

PayerMax
Connect PayerMax to PayLexer to accept cards, e-wallets and local payment methods across the Middle East, Asia, Latin America and Africa through PayerMax's hosted checkout.
PayerMax is a global payments platform headquartered in Singapore and part of SHAREit Group. It is built for fast-growing markets, above all the Middle East, Southeast Asia and Latin America, and alongside international cards, Apple Pay and Google Pay it offers hundreds of local wallets and payment methods through a single connection.
- Supported Regions (Merchant Accounts): Middle East, Asia, Latin America, Africa - view full list
- Supported Currencies: USD, EUR, GBP, SAR, AED, KWD, CLP, PEN, NGN, ZAR - view full list
Supported Features
- Hosted checkout that redirects shoppers to PayerMax's secure payment page
- Cards, Apple Pay, Google Pay, e-wallets and local payment methods
- Full and partial refunds
- Real-time webhook notifications for payments and refunds, secured with RSA signatures
- Payment result re-checked with PayerMax before the shopper reaches your thank-you page
- Separate test and live credentials for safe testing
Subscriptions and recurring billing are not available through PayerMax in PayLexer. Only one-time payments are available, so use another gateway for subscription products.
Before You Start
Make sure you have:
- PayerMax Account – Don't have one? Sign up for PayerMax →
- PayLexer Account – Required to configure the integration. Create your account →
- A website where you want to integrate
Looking for a different payment processor? View all supported gateways →
Configuring PayerMax
You need a Merchant ID (merchantNo), App ID, Merchant Private Key (PKCS8 PEM) and PayerMax Public Key (PEM) from PayerMax for this integration.
Getting API Credentials
PayerMax uses a pair of keys instead of a single API key. You create your own key pair, give PayerMax the public half, and keep the private half for PayLexer. PayerMax then gives you its own public key in return.
Log in to the PayerMax Developer Center
Sign in to the PayerMax Developer Center. Both your test and live credentials are managed here. Test and live use completely different IDs and keys, so collect them one environment at a time.
Copy your Merchant ID and App ID
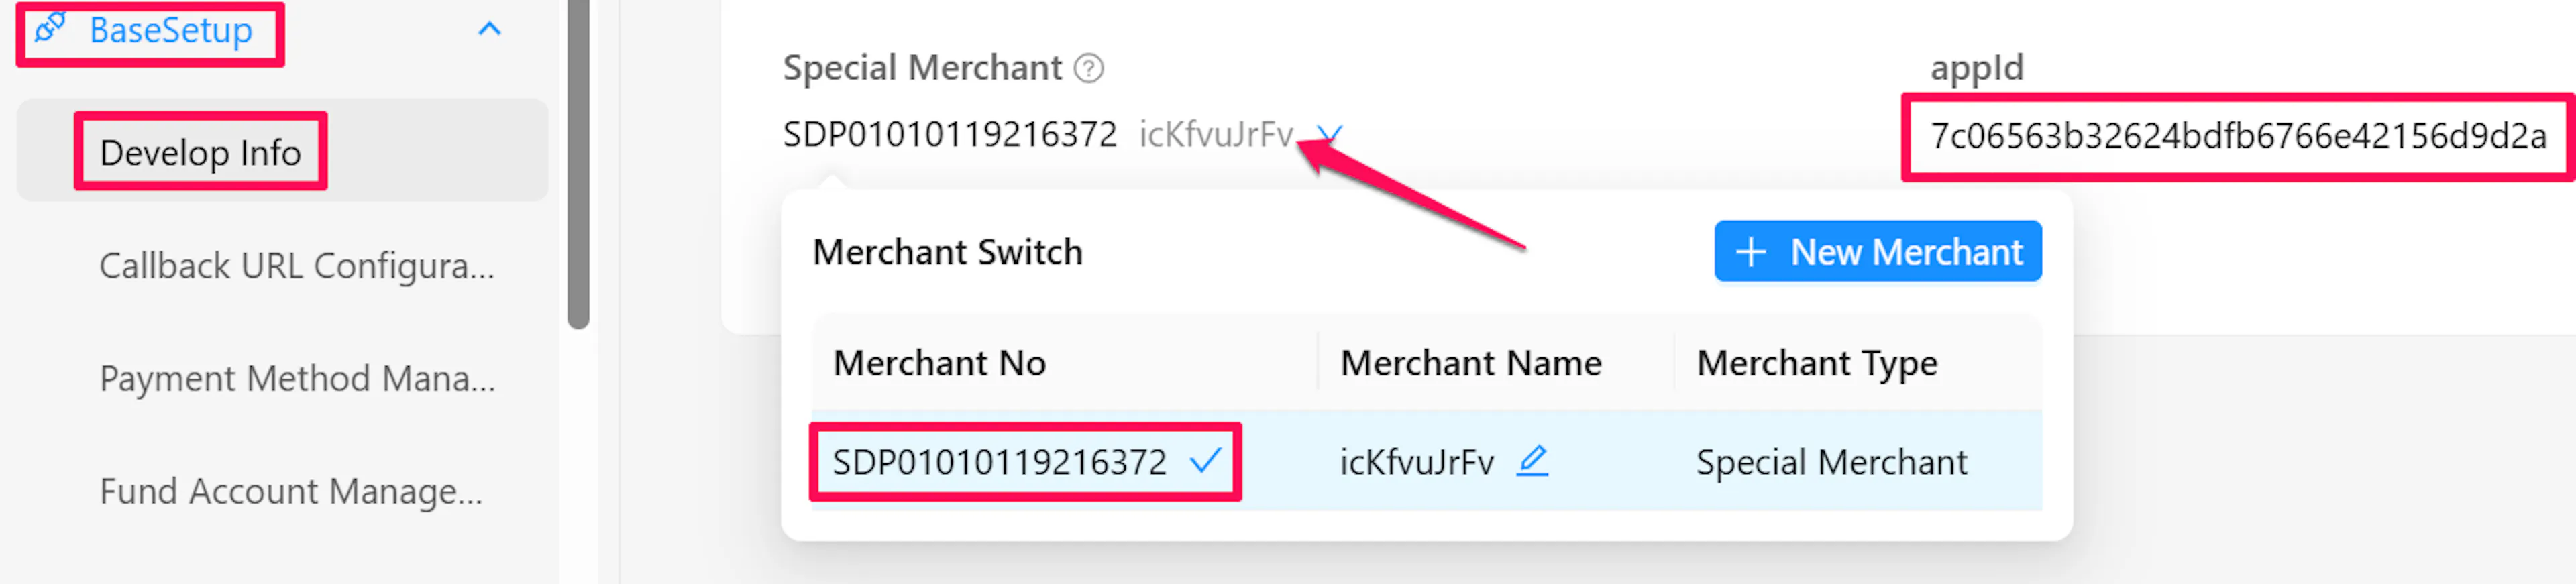
For test credentials, go to BaseSetup → Develop Info. Copy the Merchant ID (merchantNo) and the App ID.
For live credentials, first bind your production merchant ID on the Develop Info page. Once it is bound, go to Production Configuration → Key Configuration to find your live App ID.
Generate your key pair
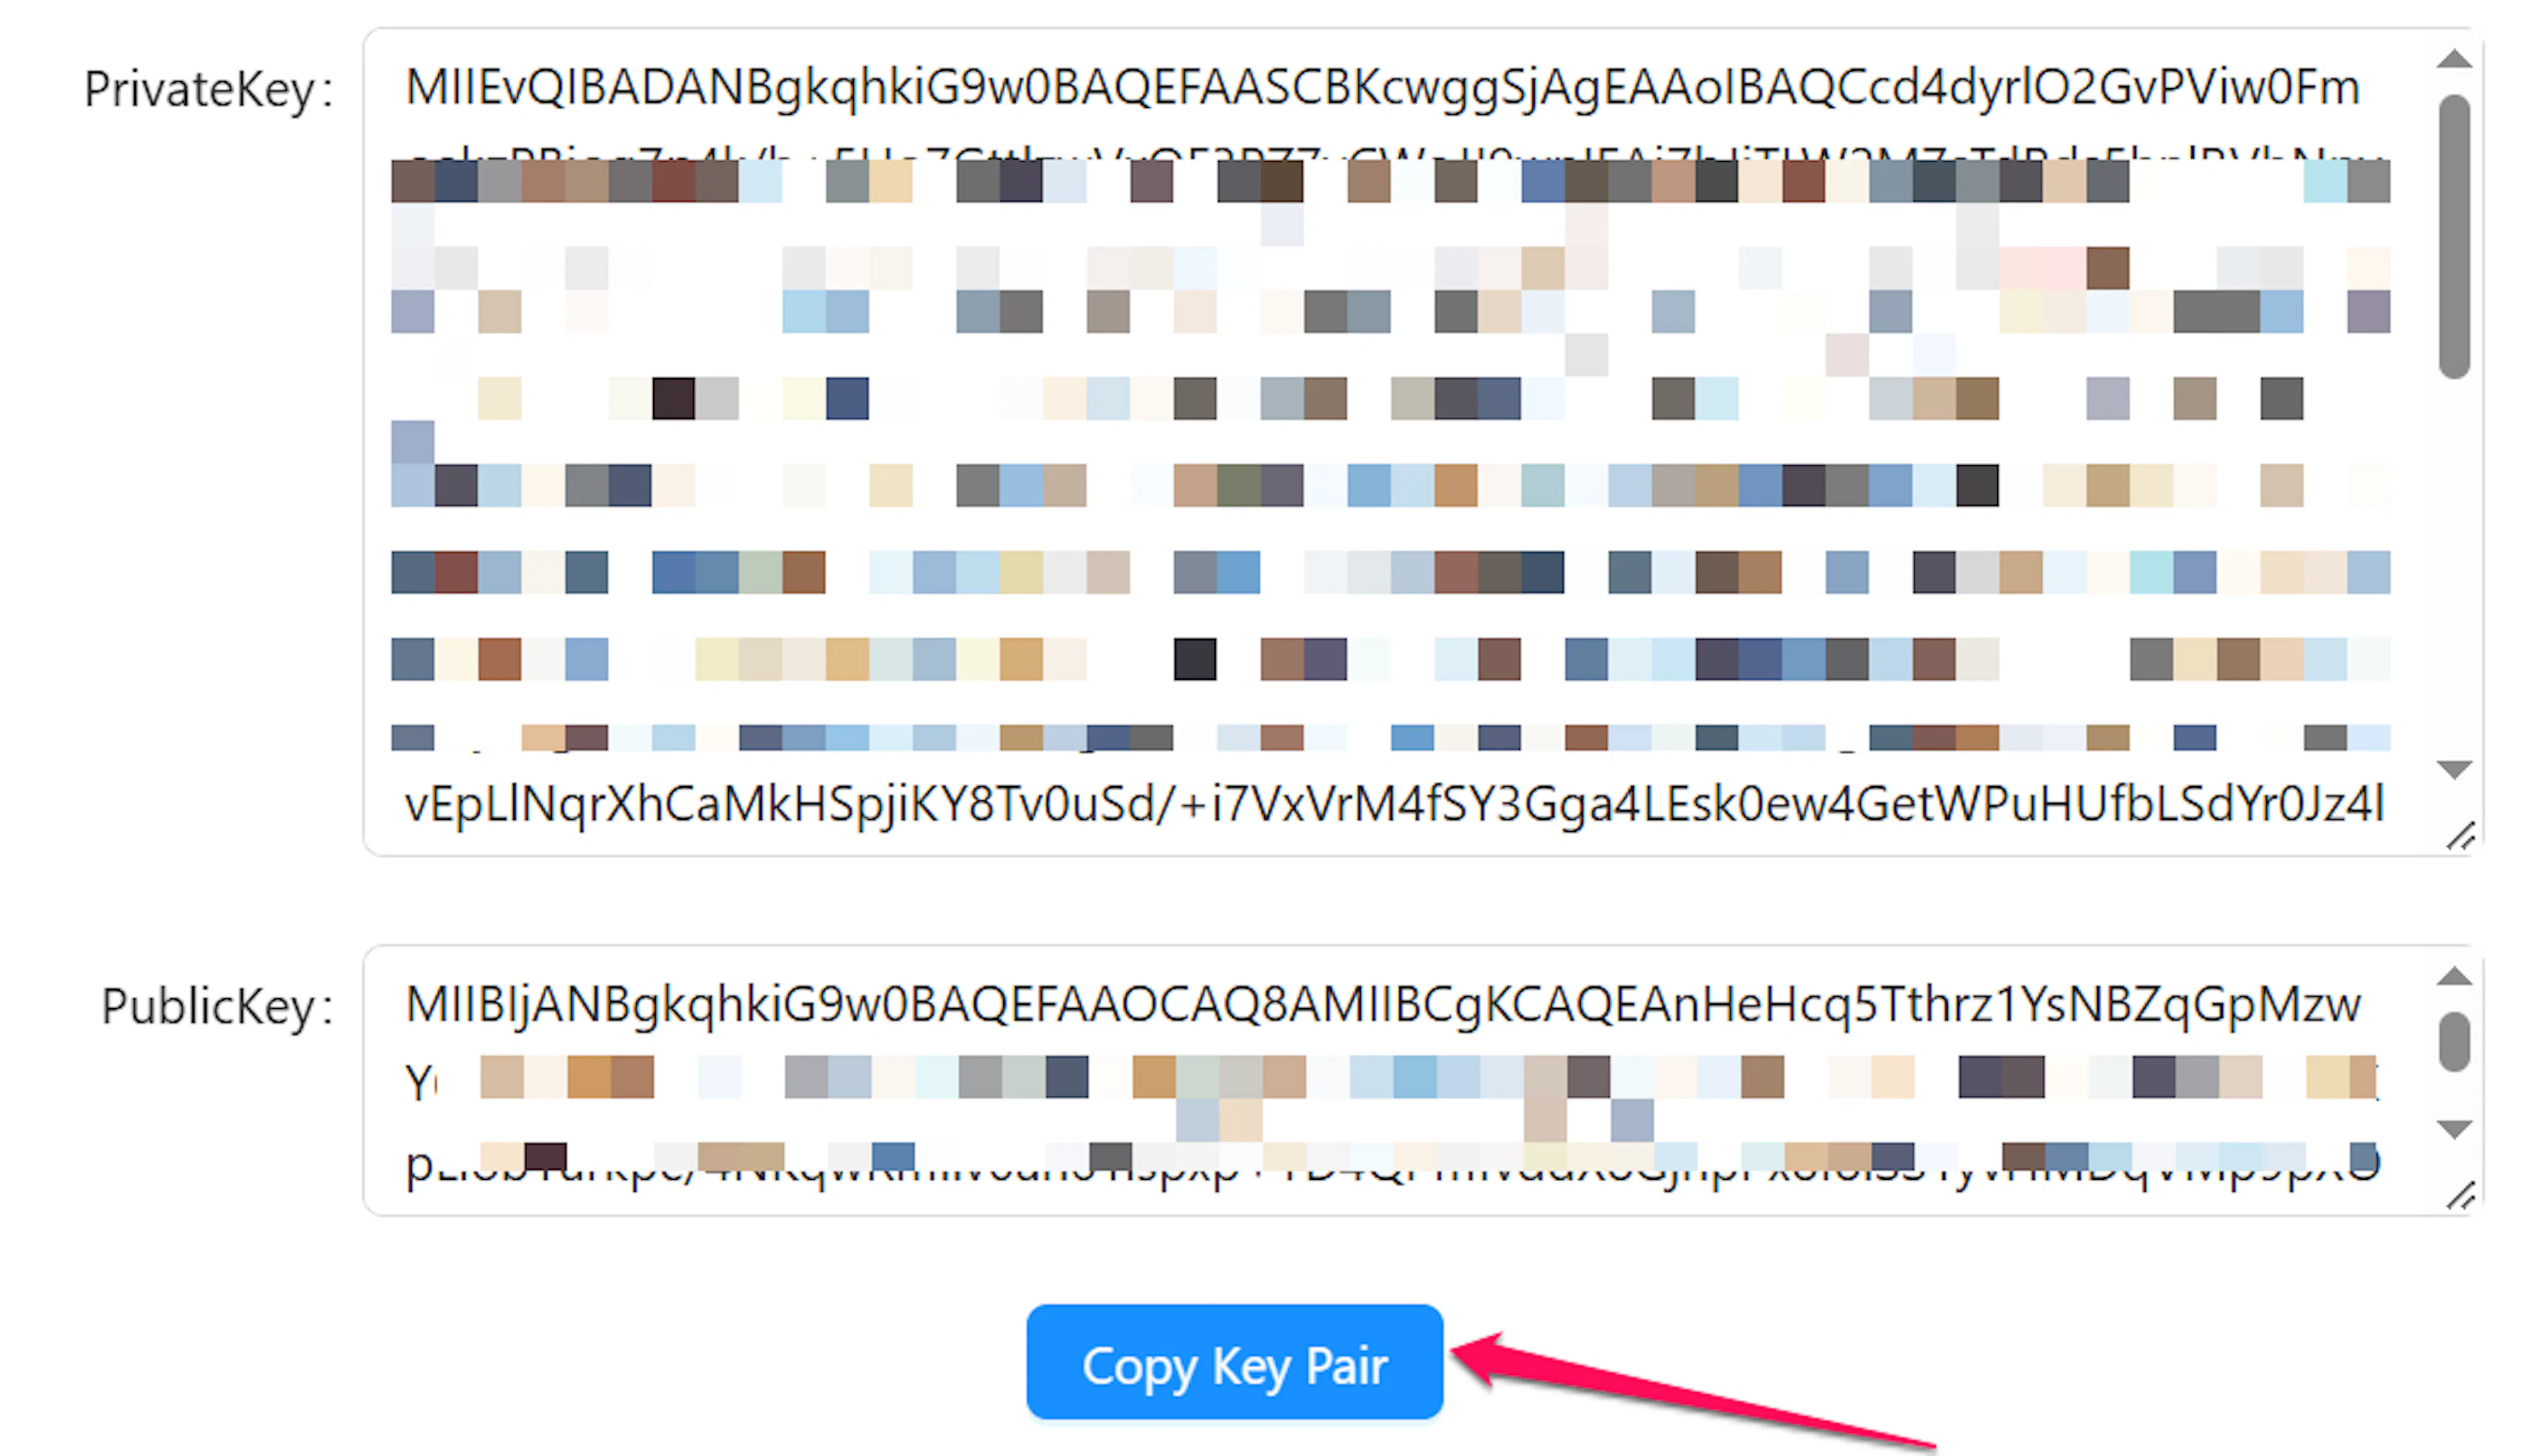
Create a 2048-bit RSA key pair in PKCS8 format. The quickest way is the Developer Center - open DevTools, choose Generate RSA, then click Generate Key Pair. If you'd rather your private key never leave your computer, use OpenSSL instead.

You end up with two keys:
- Private key: stays with you and is pasted into PayLexer. Never share it or upload it to PayerMax.
- Public key: uploaded to PayerMax in the next step.
Upload your public key to PayerMax
For test credentials, go to BaseSetup → Develop Info → Secret Info, open Upload PublicKey, paste the public key you just generated, then save. For live credentials, upload it under Production Configuration → Key Configuration instead.
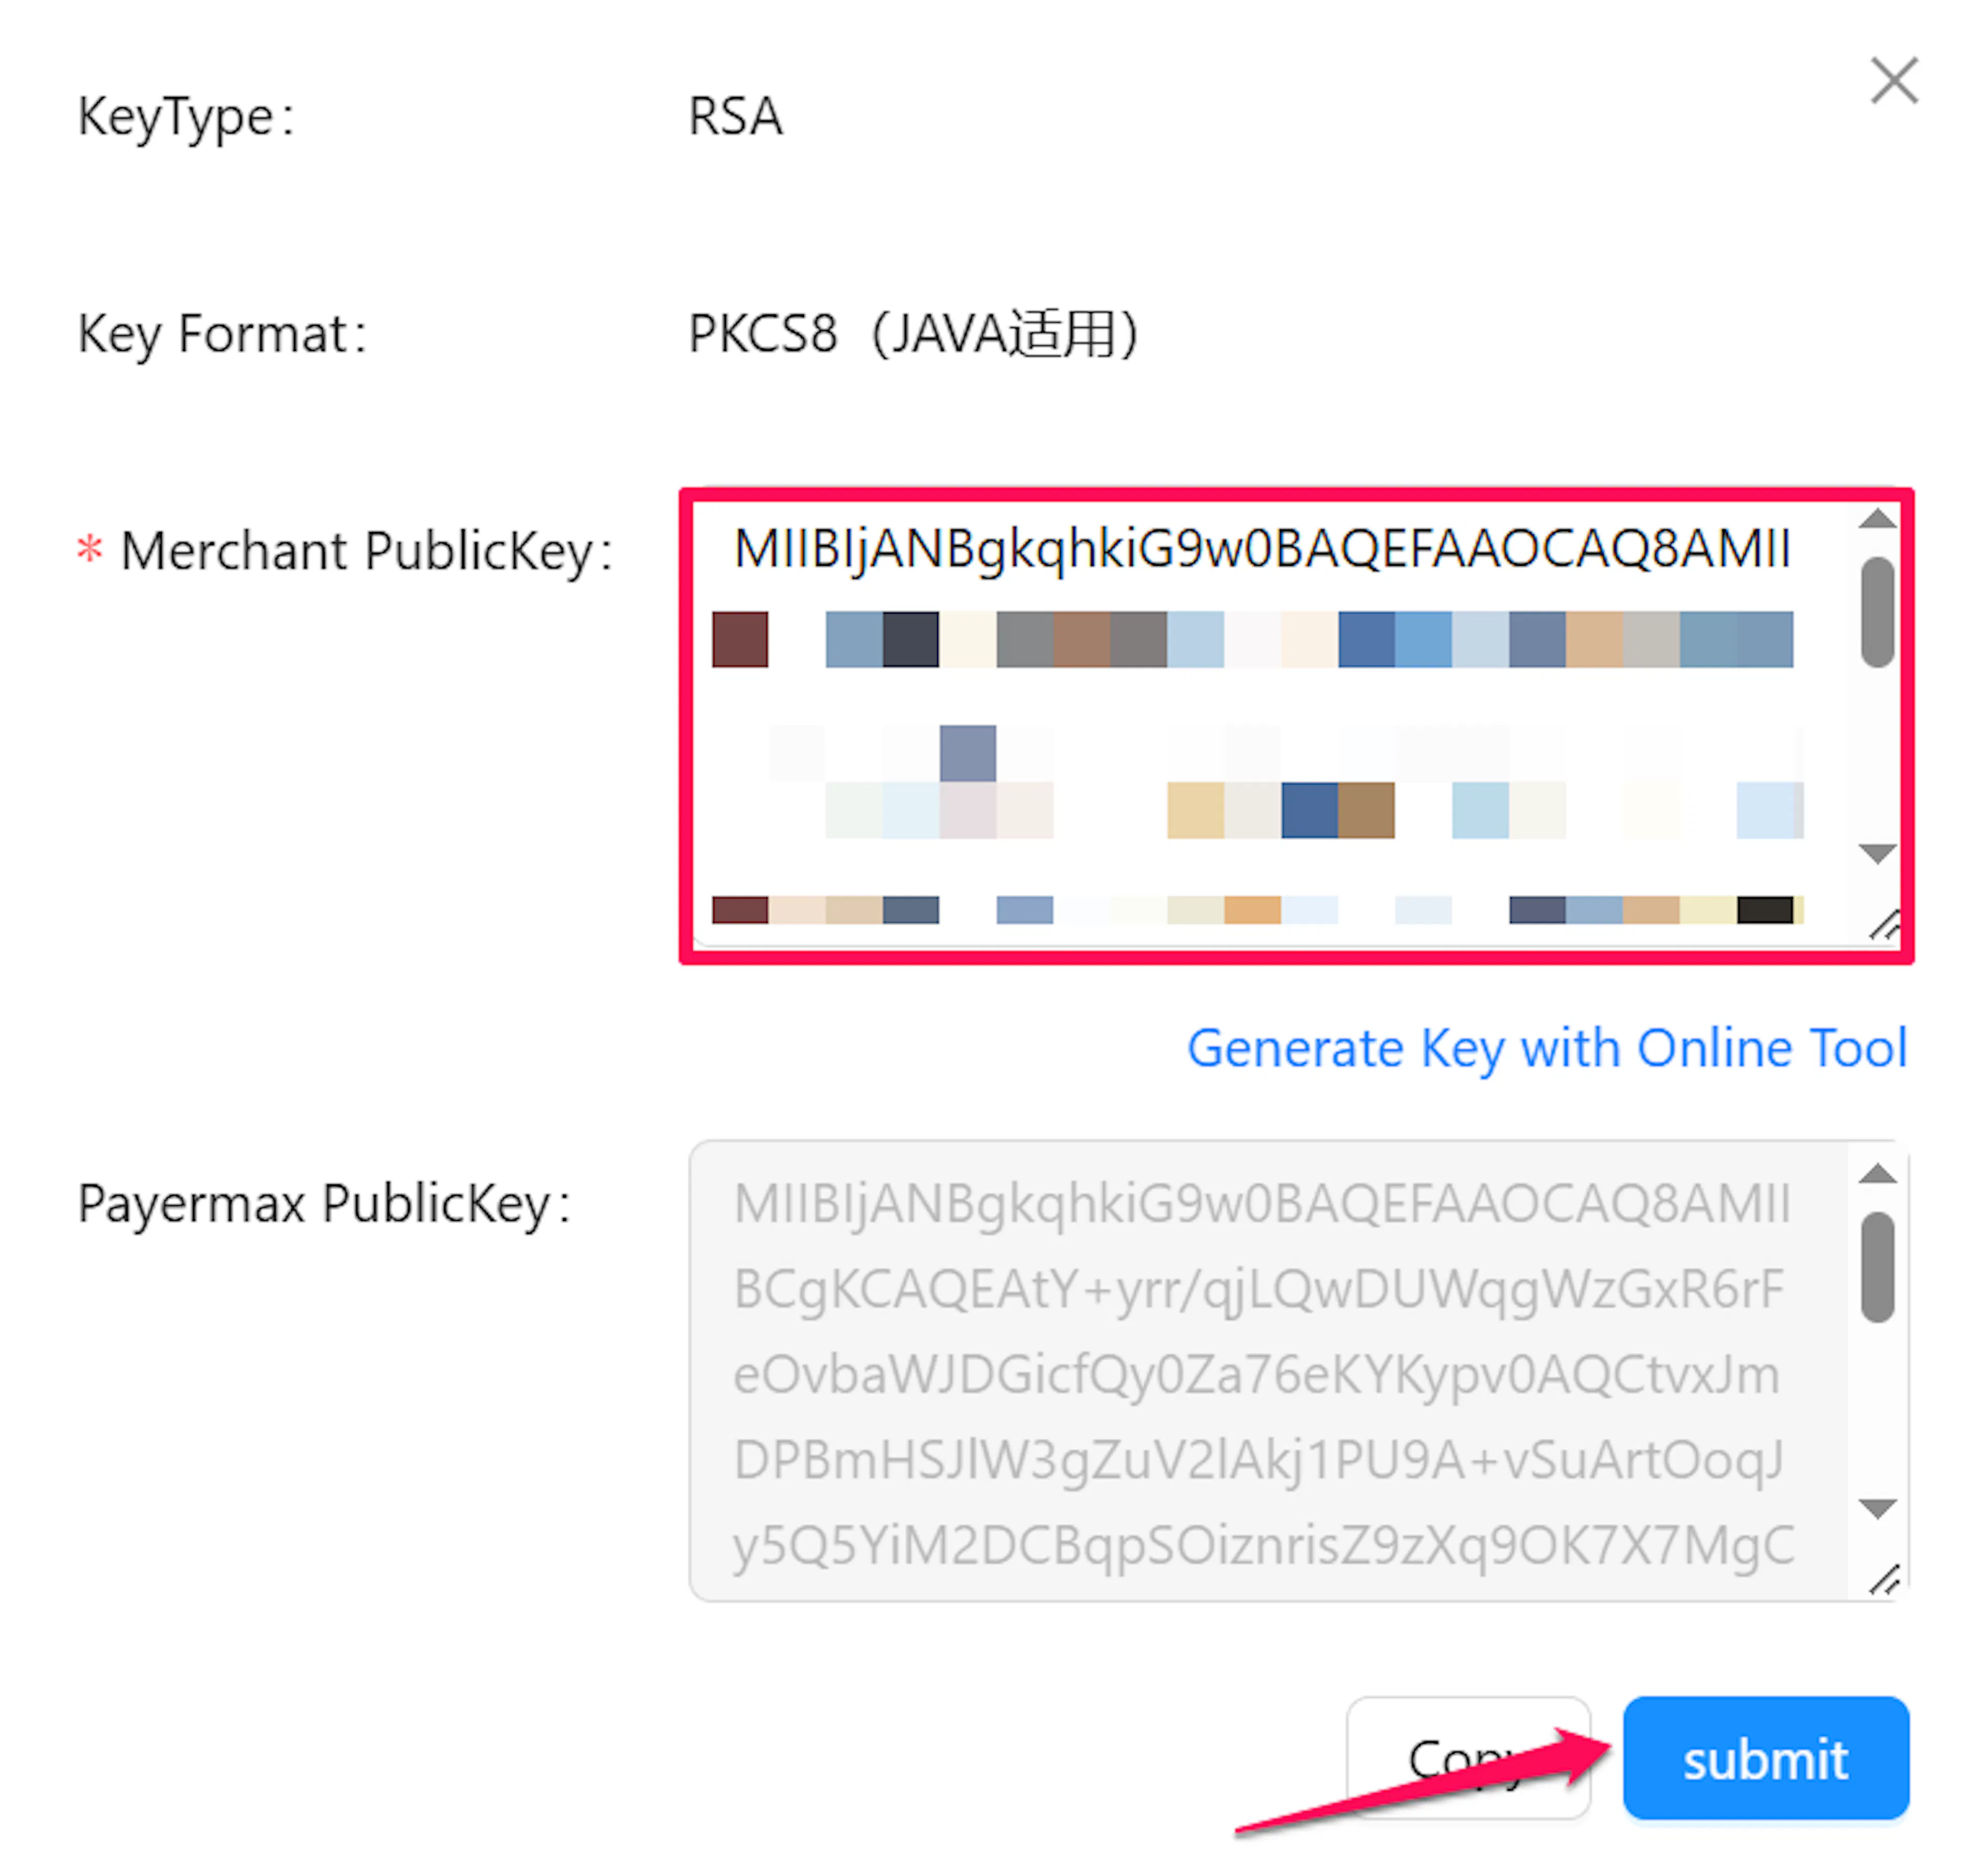
In production, a new public key must be approved by your PayerMax account administrator before it takes effect. Until it is approved, Verify Connection in PayLexer fails with a signature error.
Copy the PayerMax Public Key
On the same screen, copy the key labelled Payermax PublicKey. This is PayerMax's own public key, which PayLexer uses to confirm that replies and notifications really came from PayerMax.
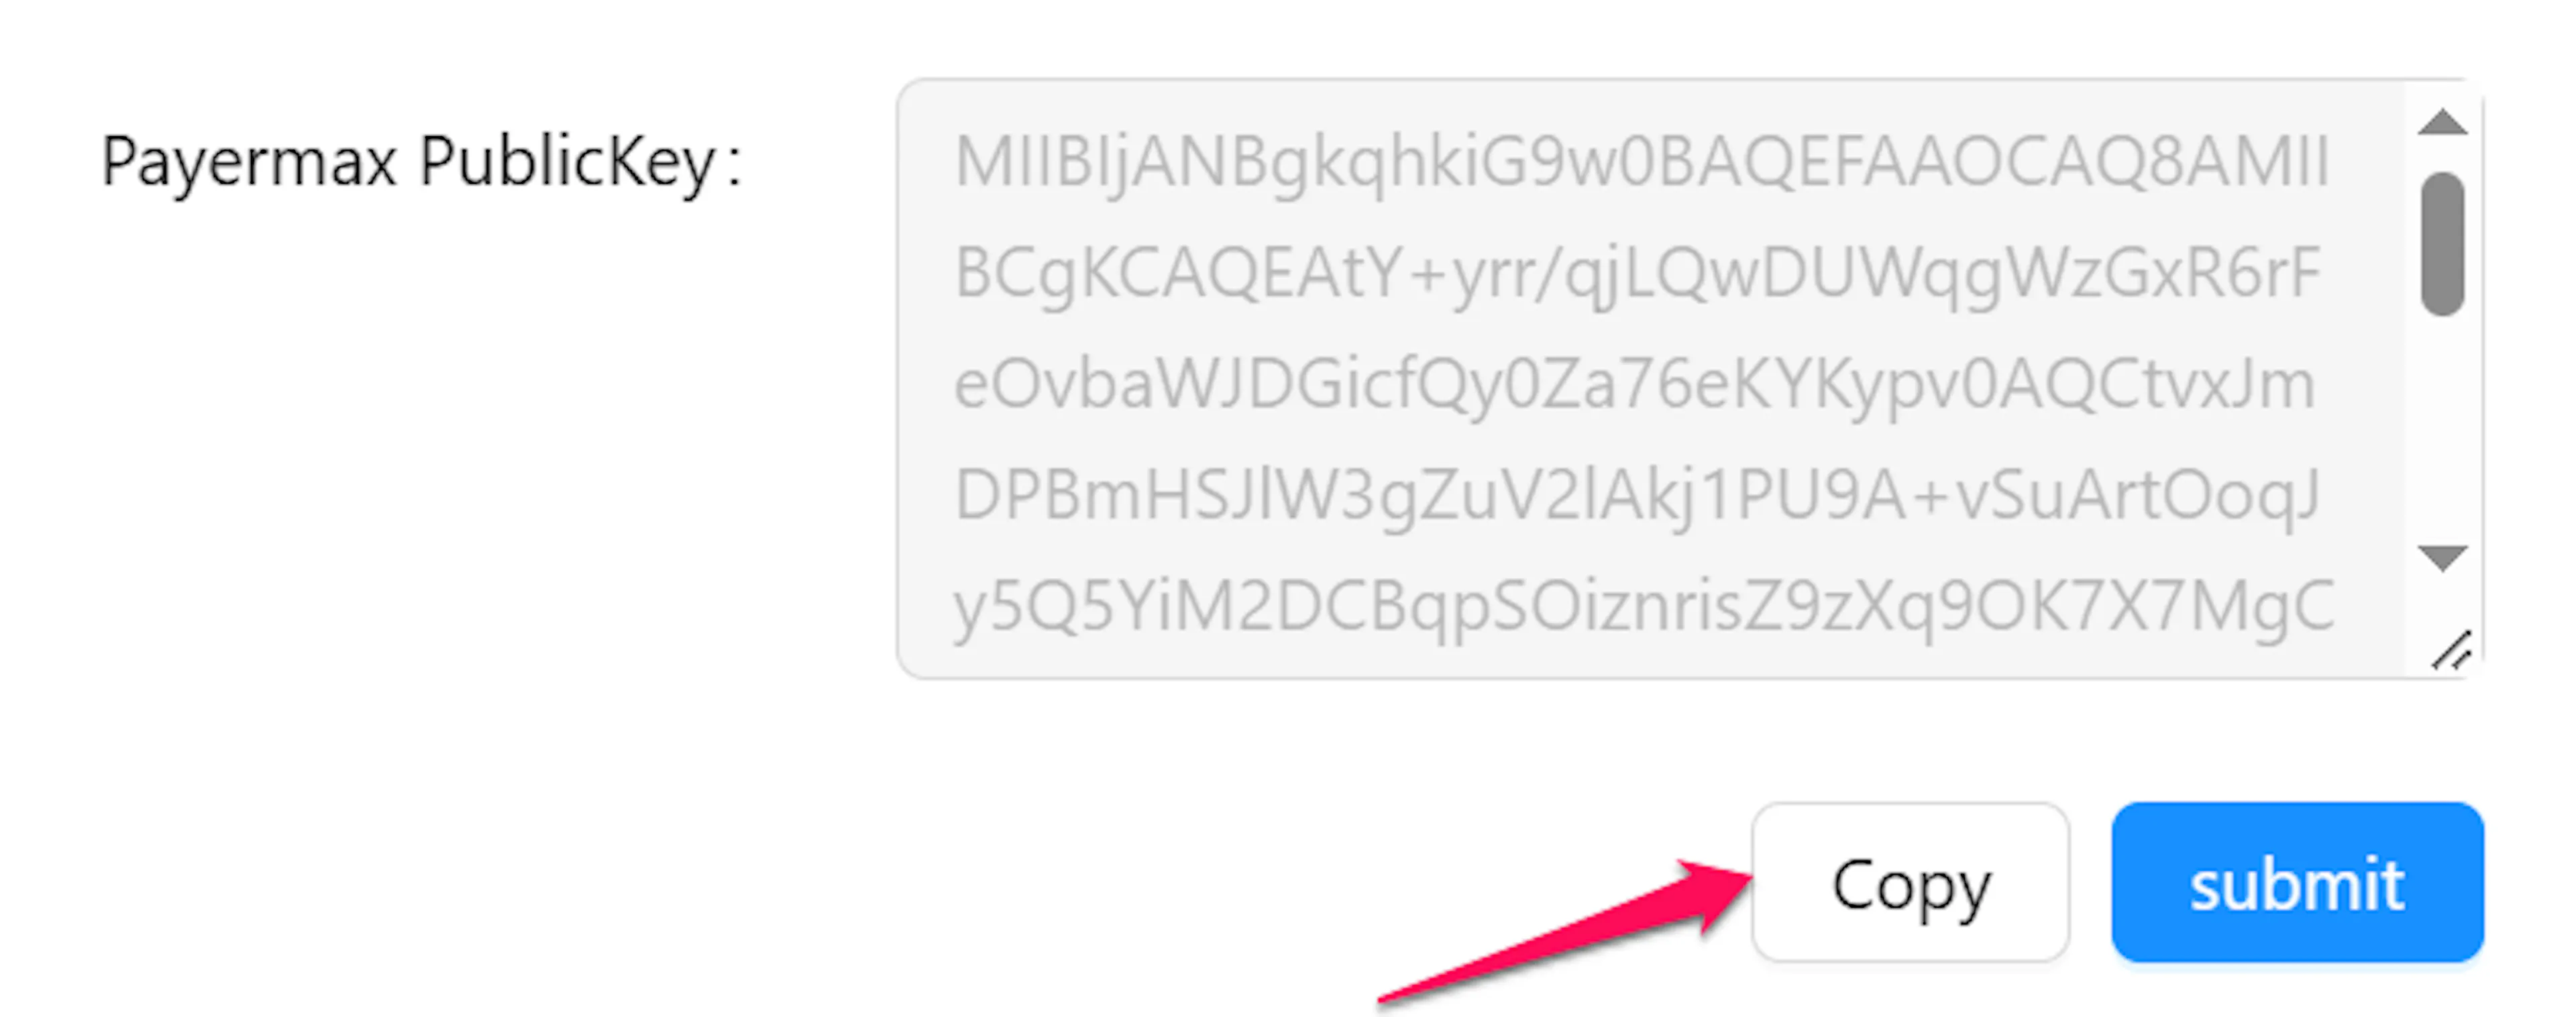
Do not paste your own public key into the PayerMax Public Key (PEM) field. This is the most common setup mistake. PayLexer detects it and shows an error when you save, but checking now saves a step.
Check your payment methods
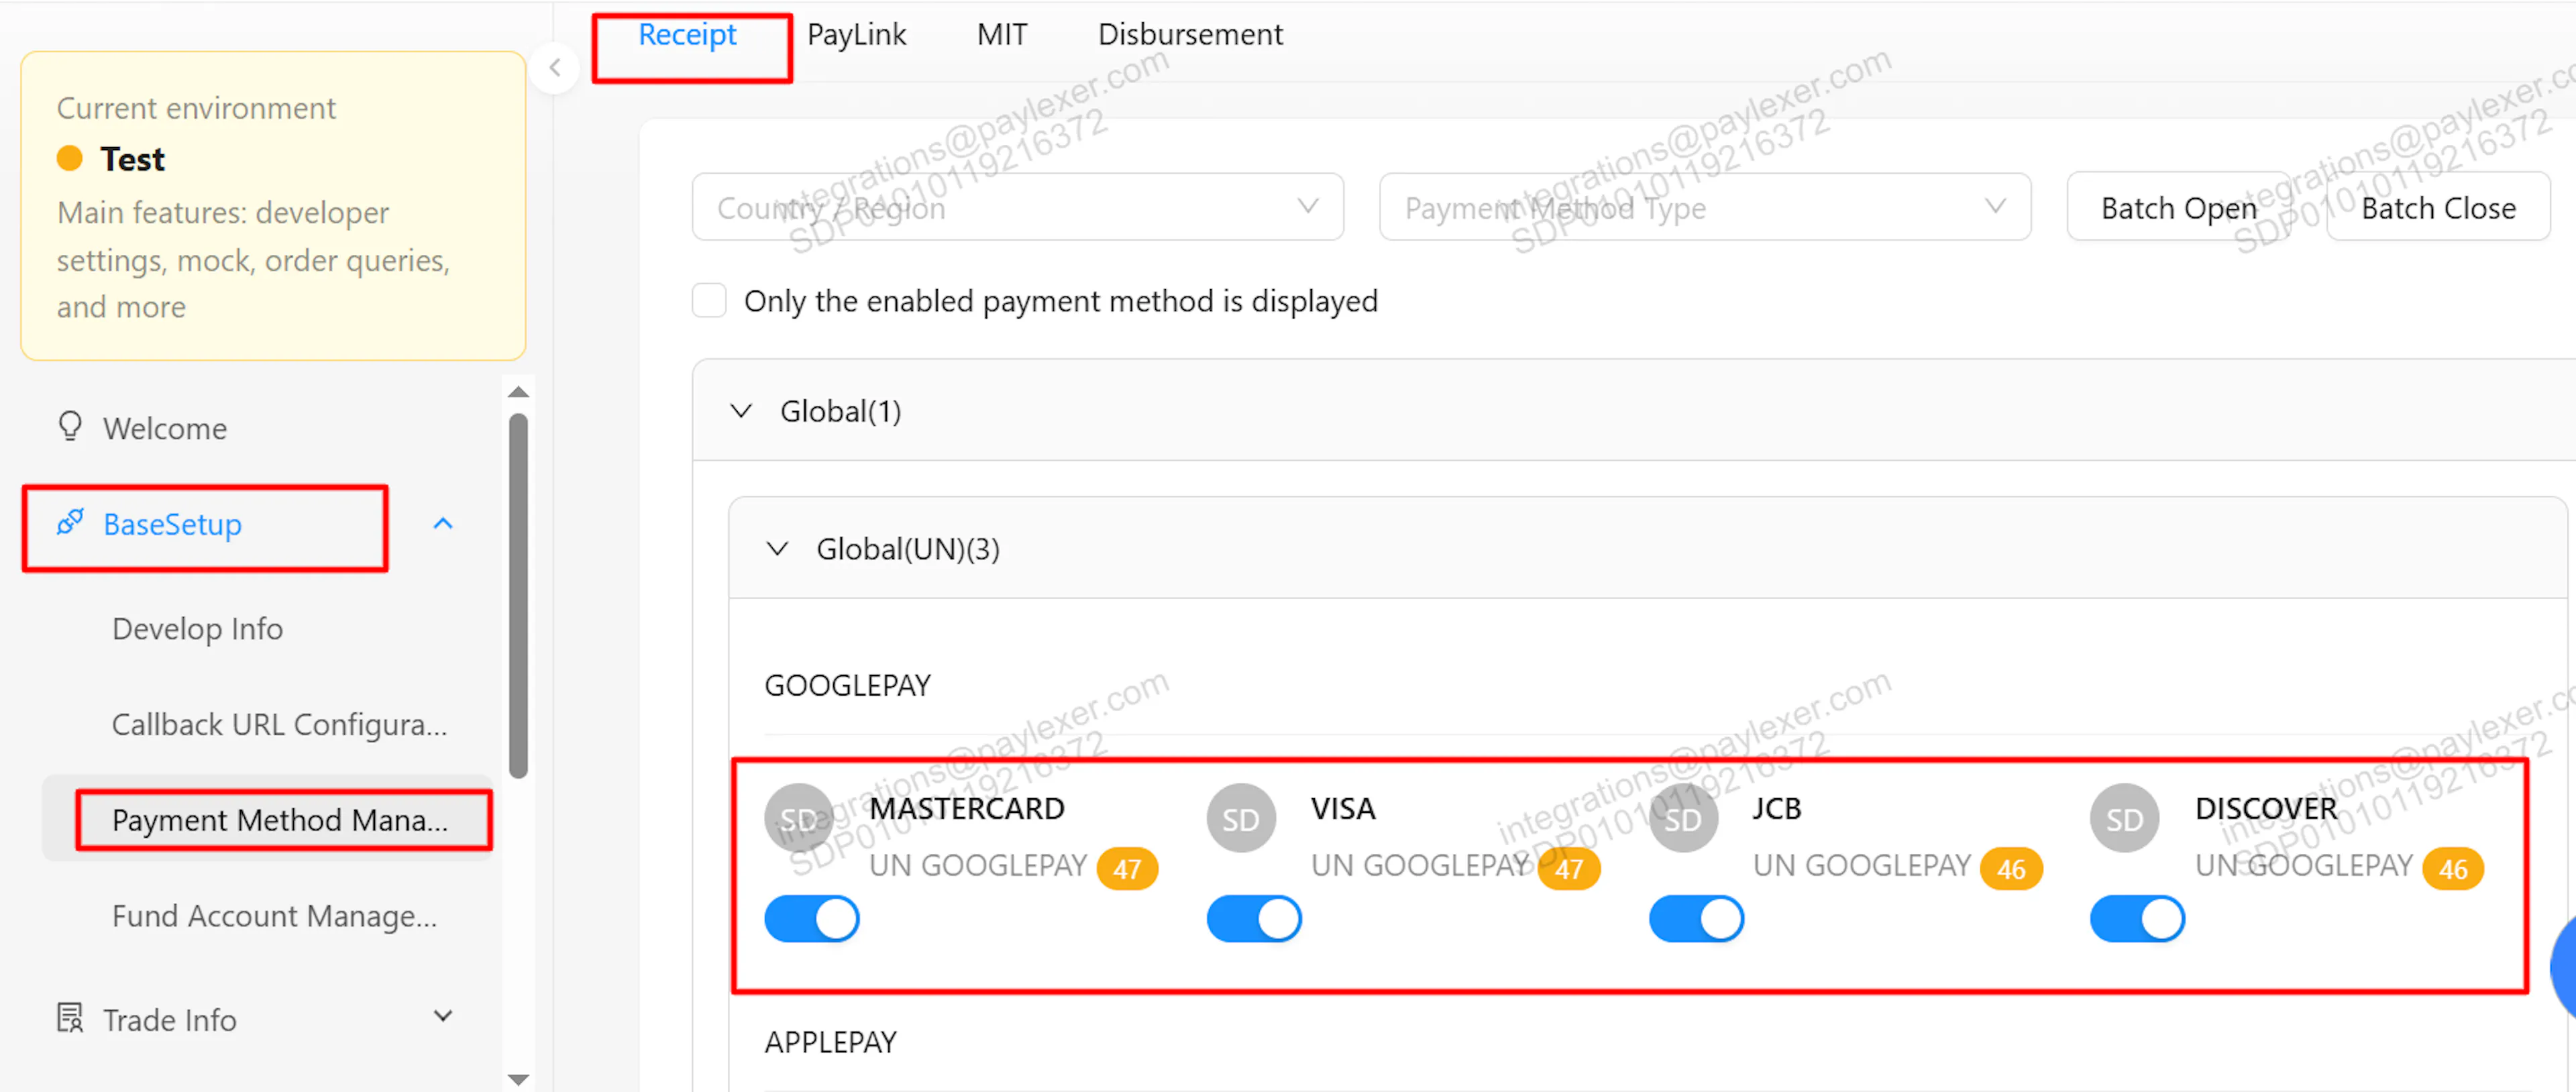
Go to BaseSetup → Payment Method Management. All payment methods are switched on by default, so check that none you want to offer have been switched off. A method that is switched off here does not appear on the PayerMax checkout page.
Adding Credentials to PayLexer
Open PayLexer Dashboard
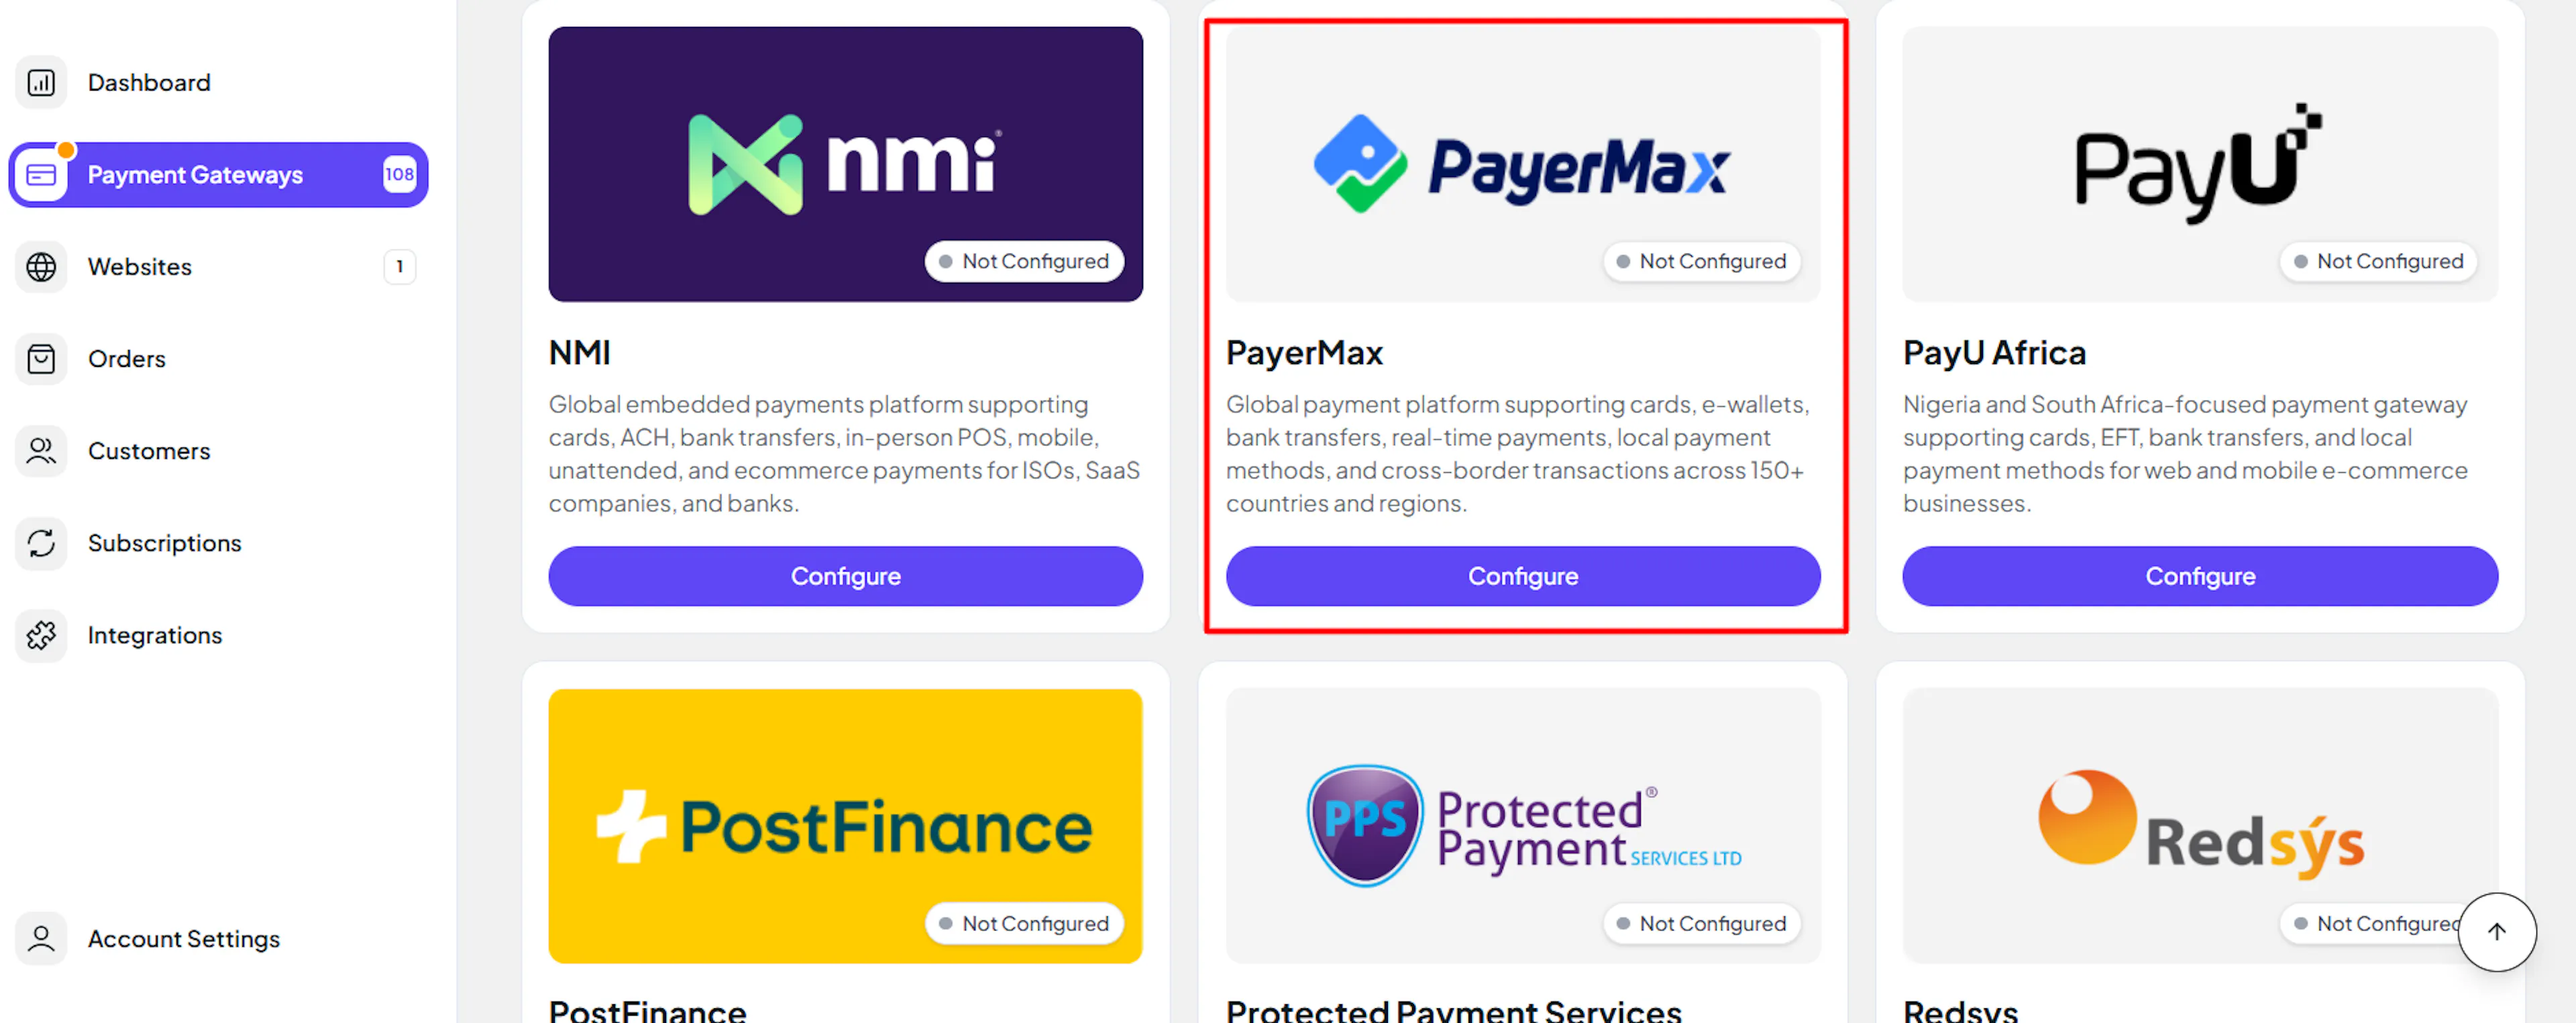
Log in to your PayLexer dashboard and navigate to Payment Gateways → PayerMax.
Enter your credentials
Paste the Merchant ID (merchantNo), App ID, Merchant Private Key (PKCS8 PEM) and PayerMax Public Key (PEM) you copied from PayerMax into the corresponding fields. Keys can be pasted with or without their -----BEGIN ... KEY----- header lines.
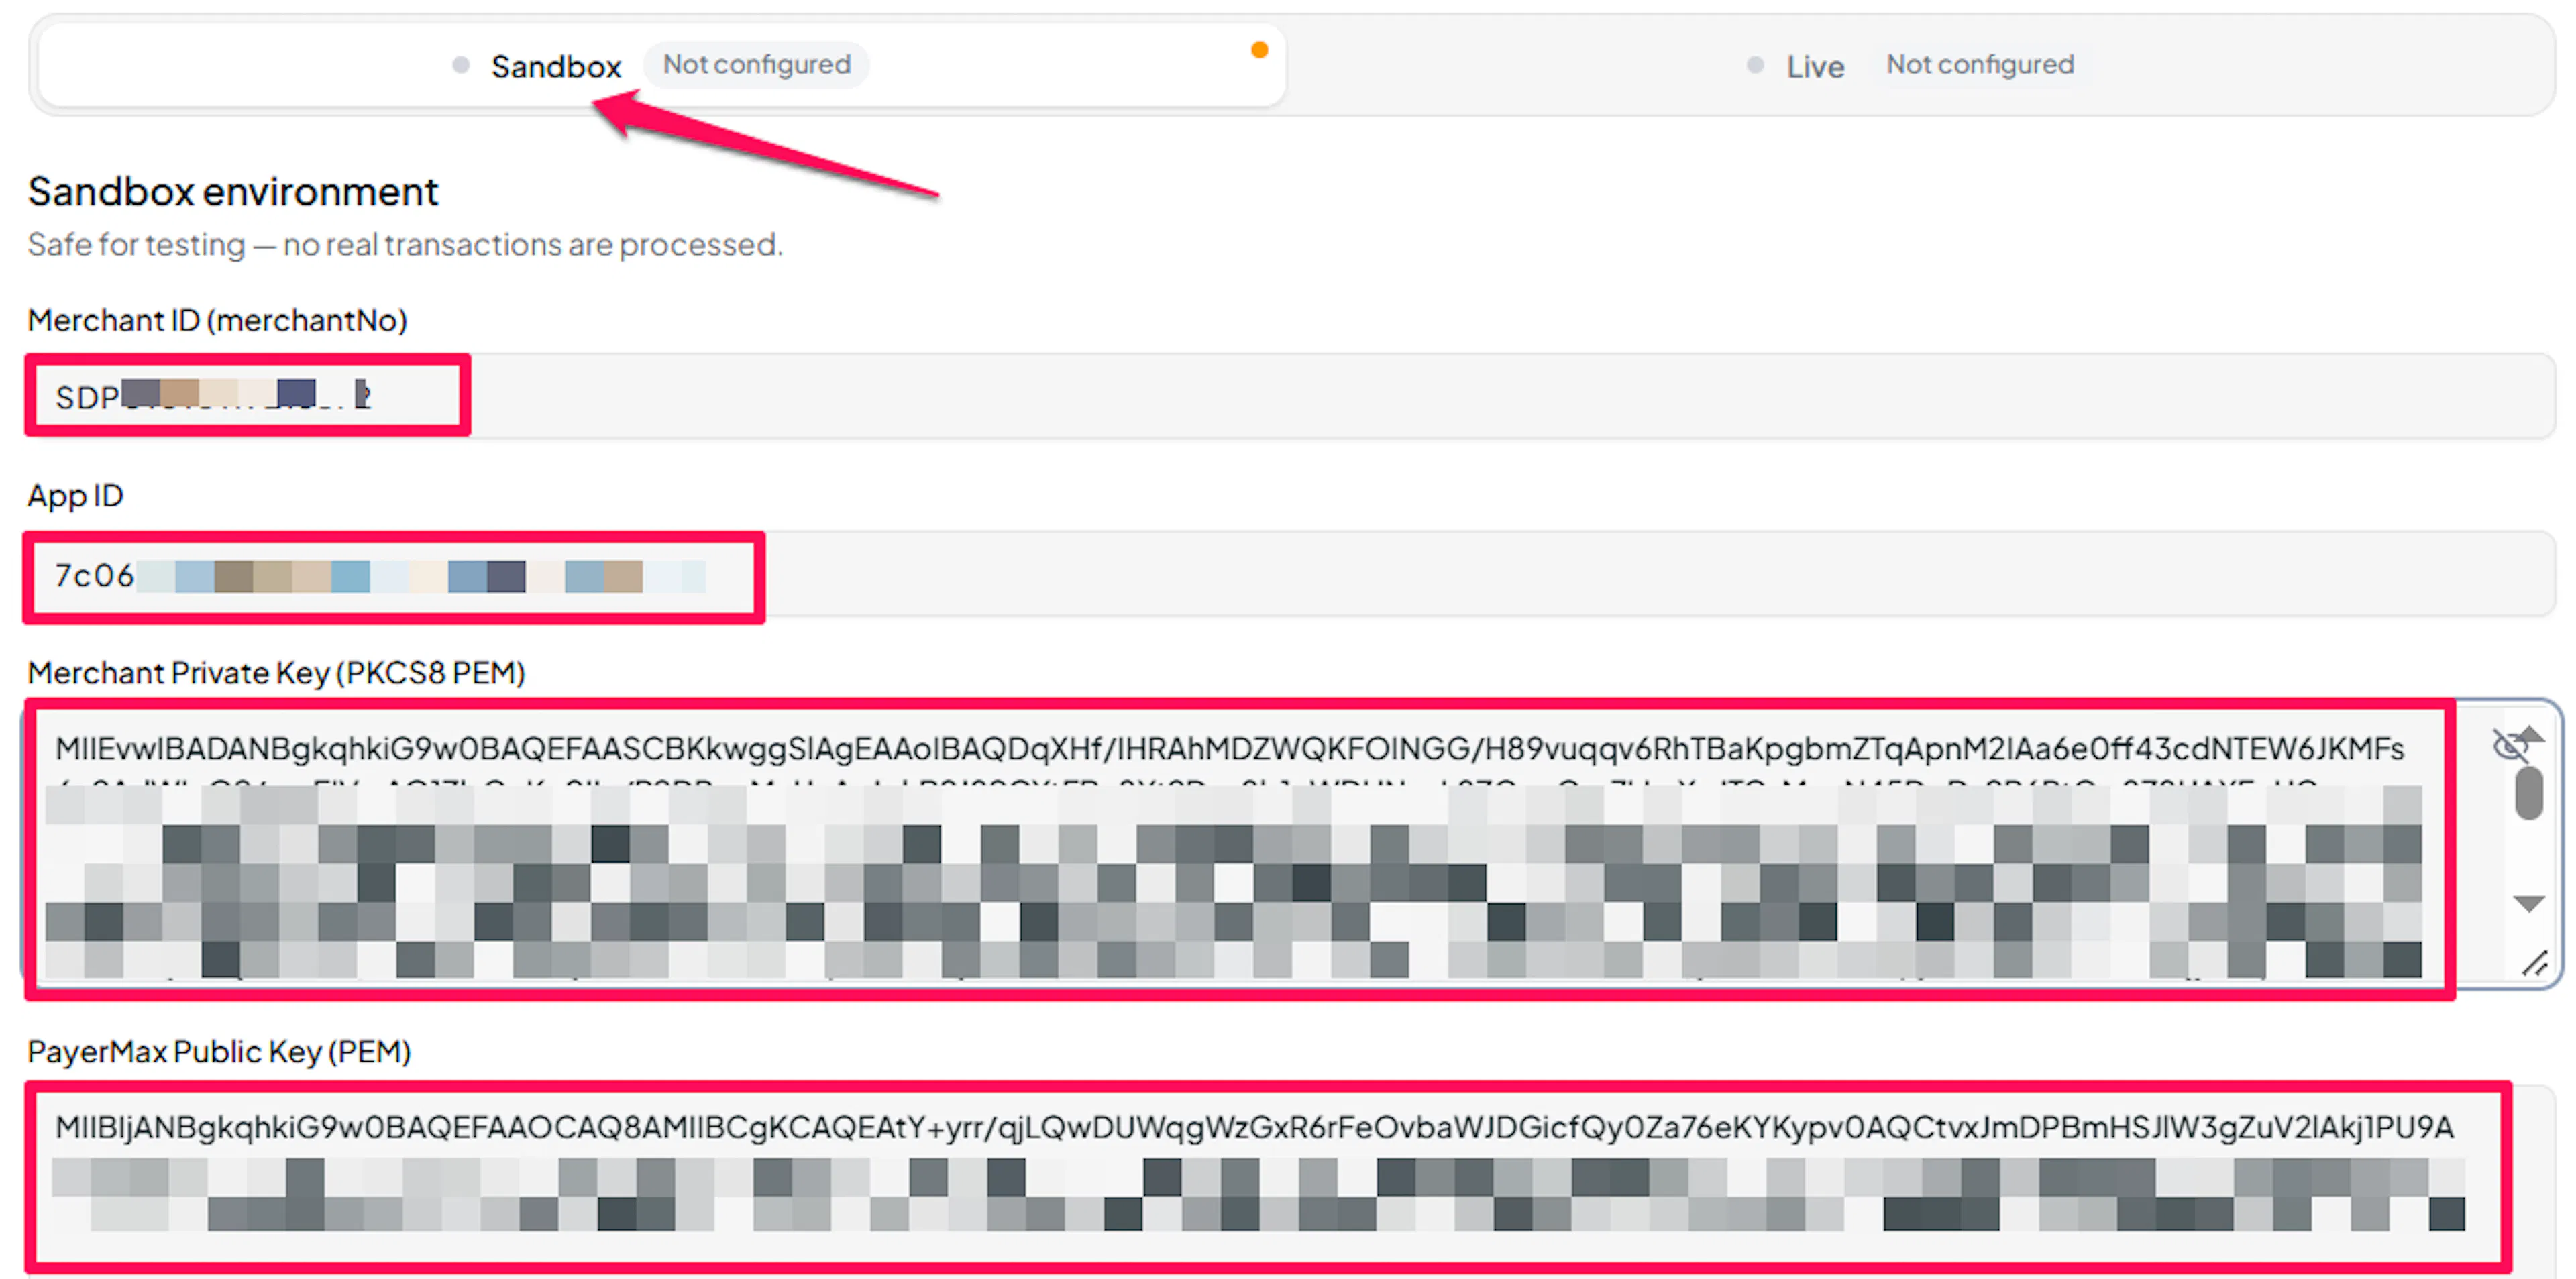
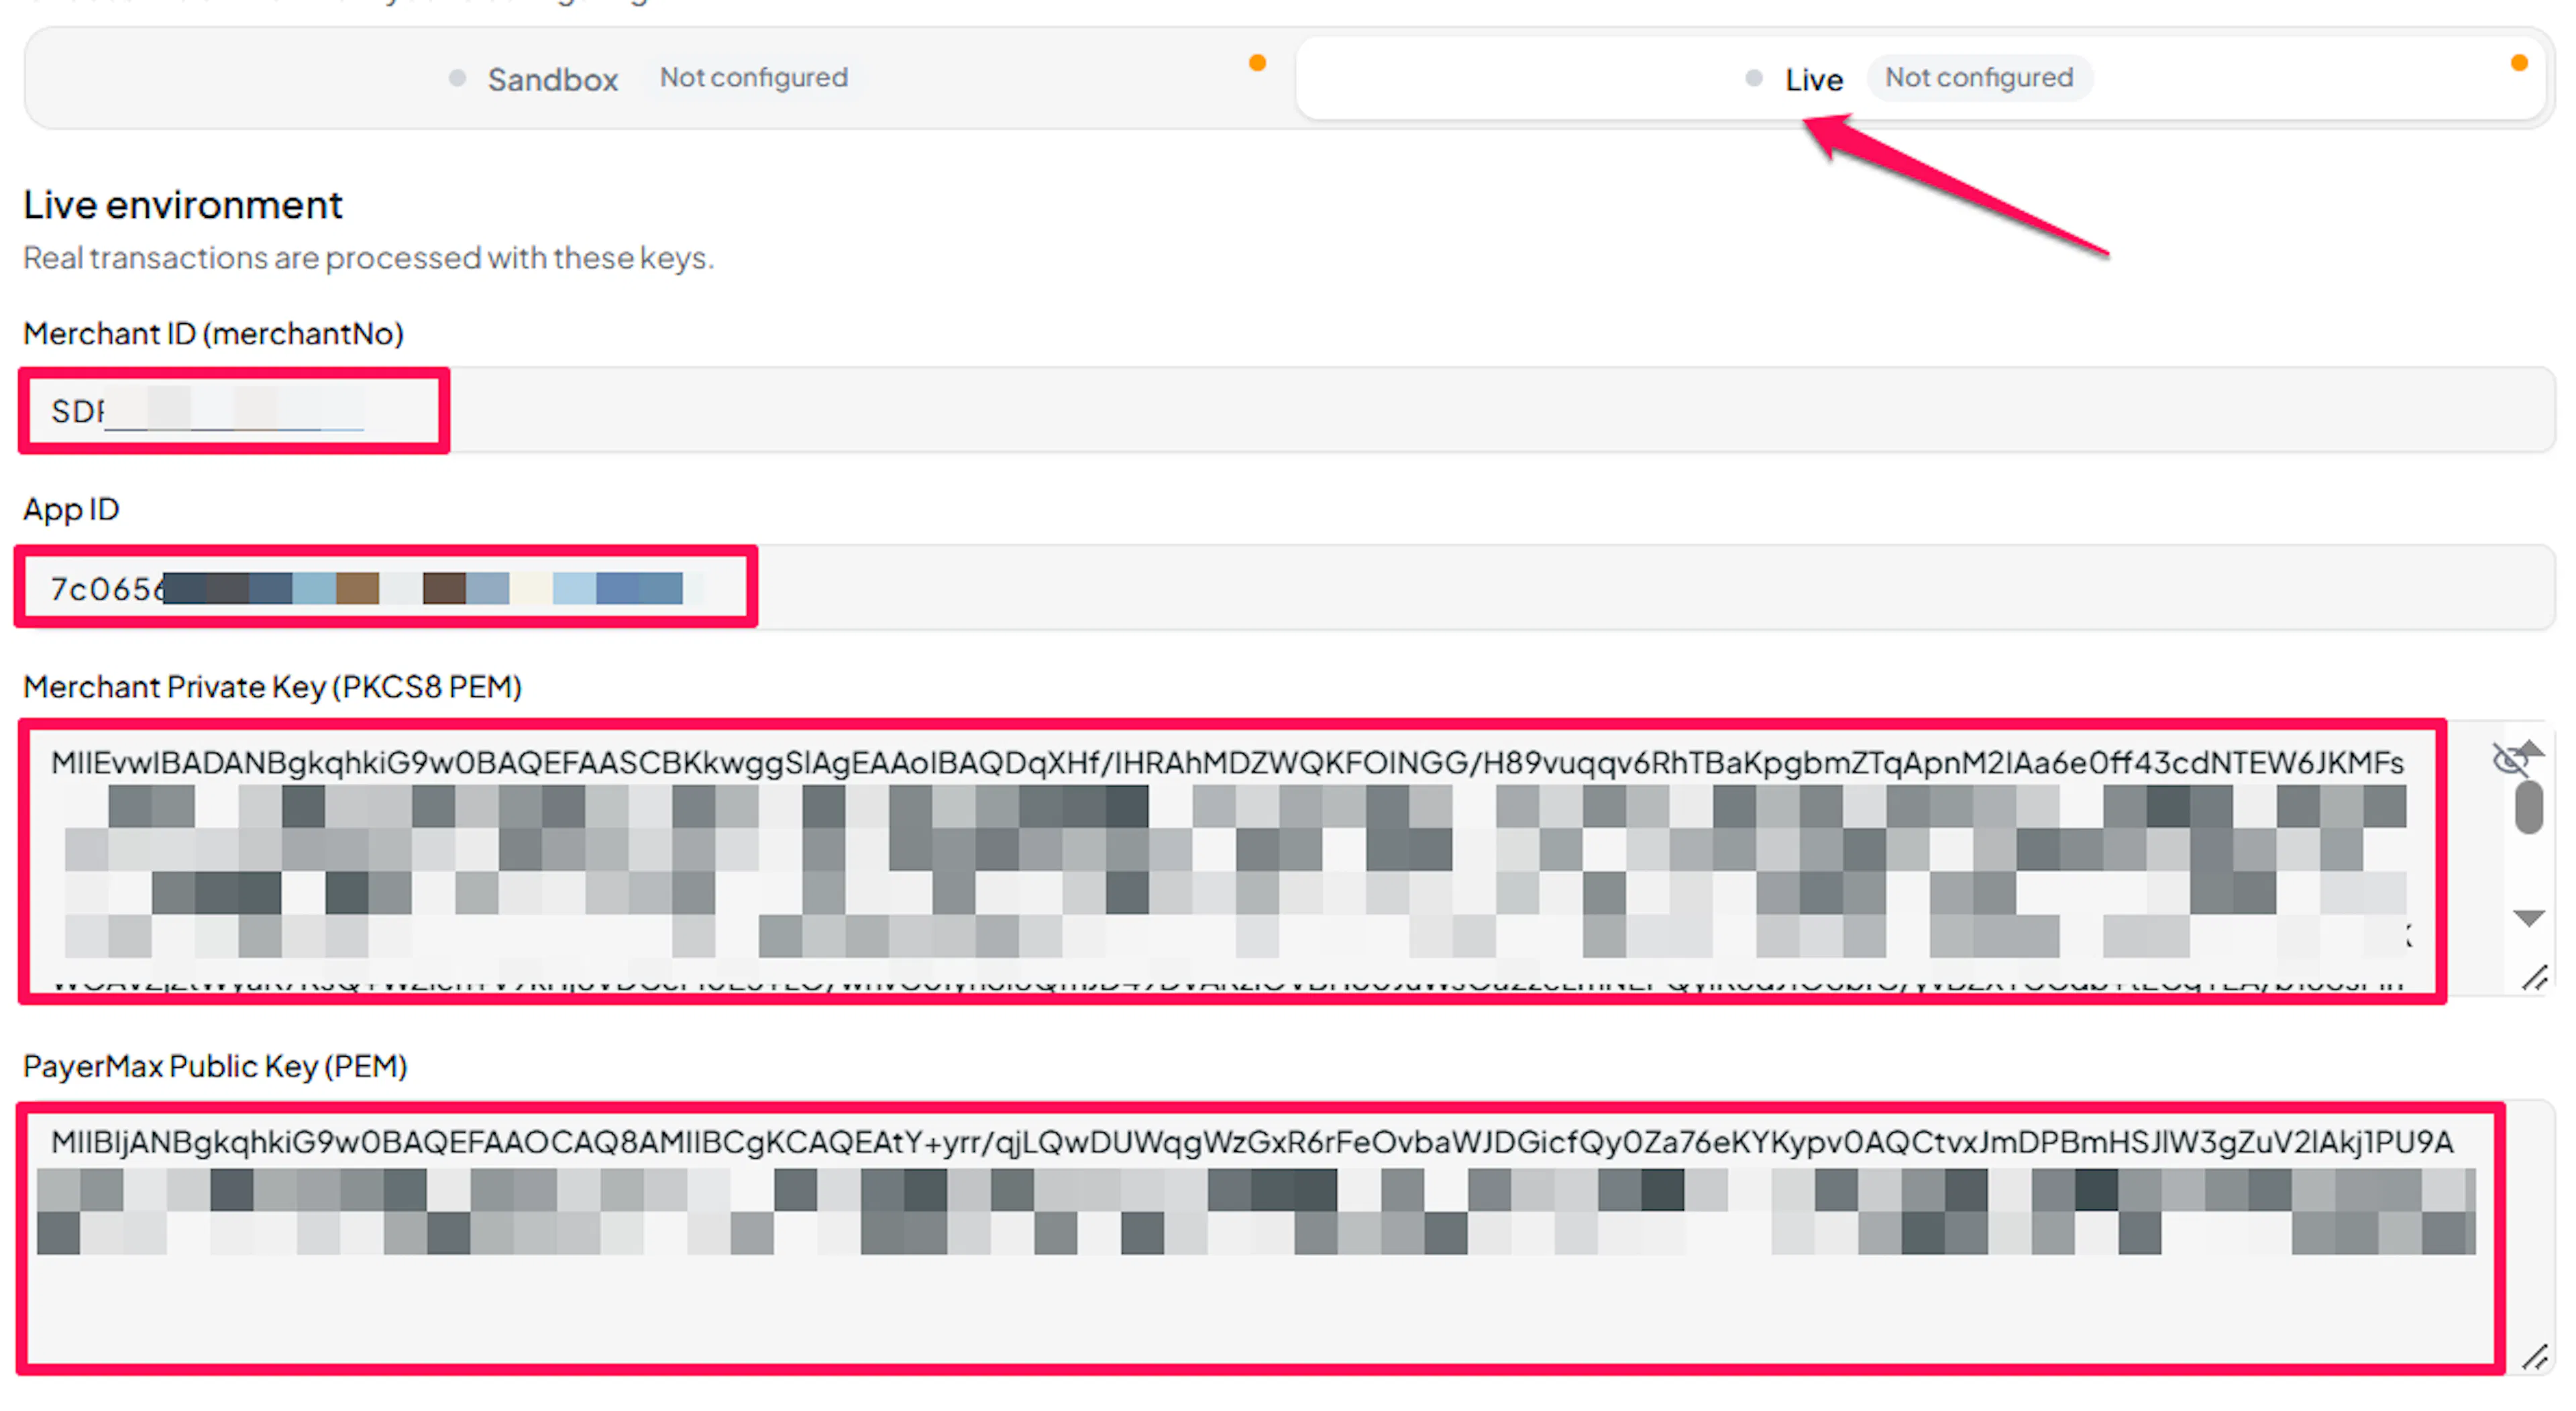
Understanding Live/Production and Sandbox Settings:
| Environment | Purpose |
|---|---|
| Live / Production | Used for real transactions. |
| Test / Sandbox | Used for testing only. No real money is processed. |
How PayLexer selects credentials:
- Debug/Test mode ON → Test credentials are used
- Debug/Test mode OFF → Live credentials are used
Test and save
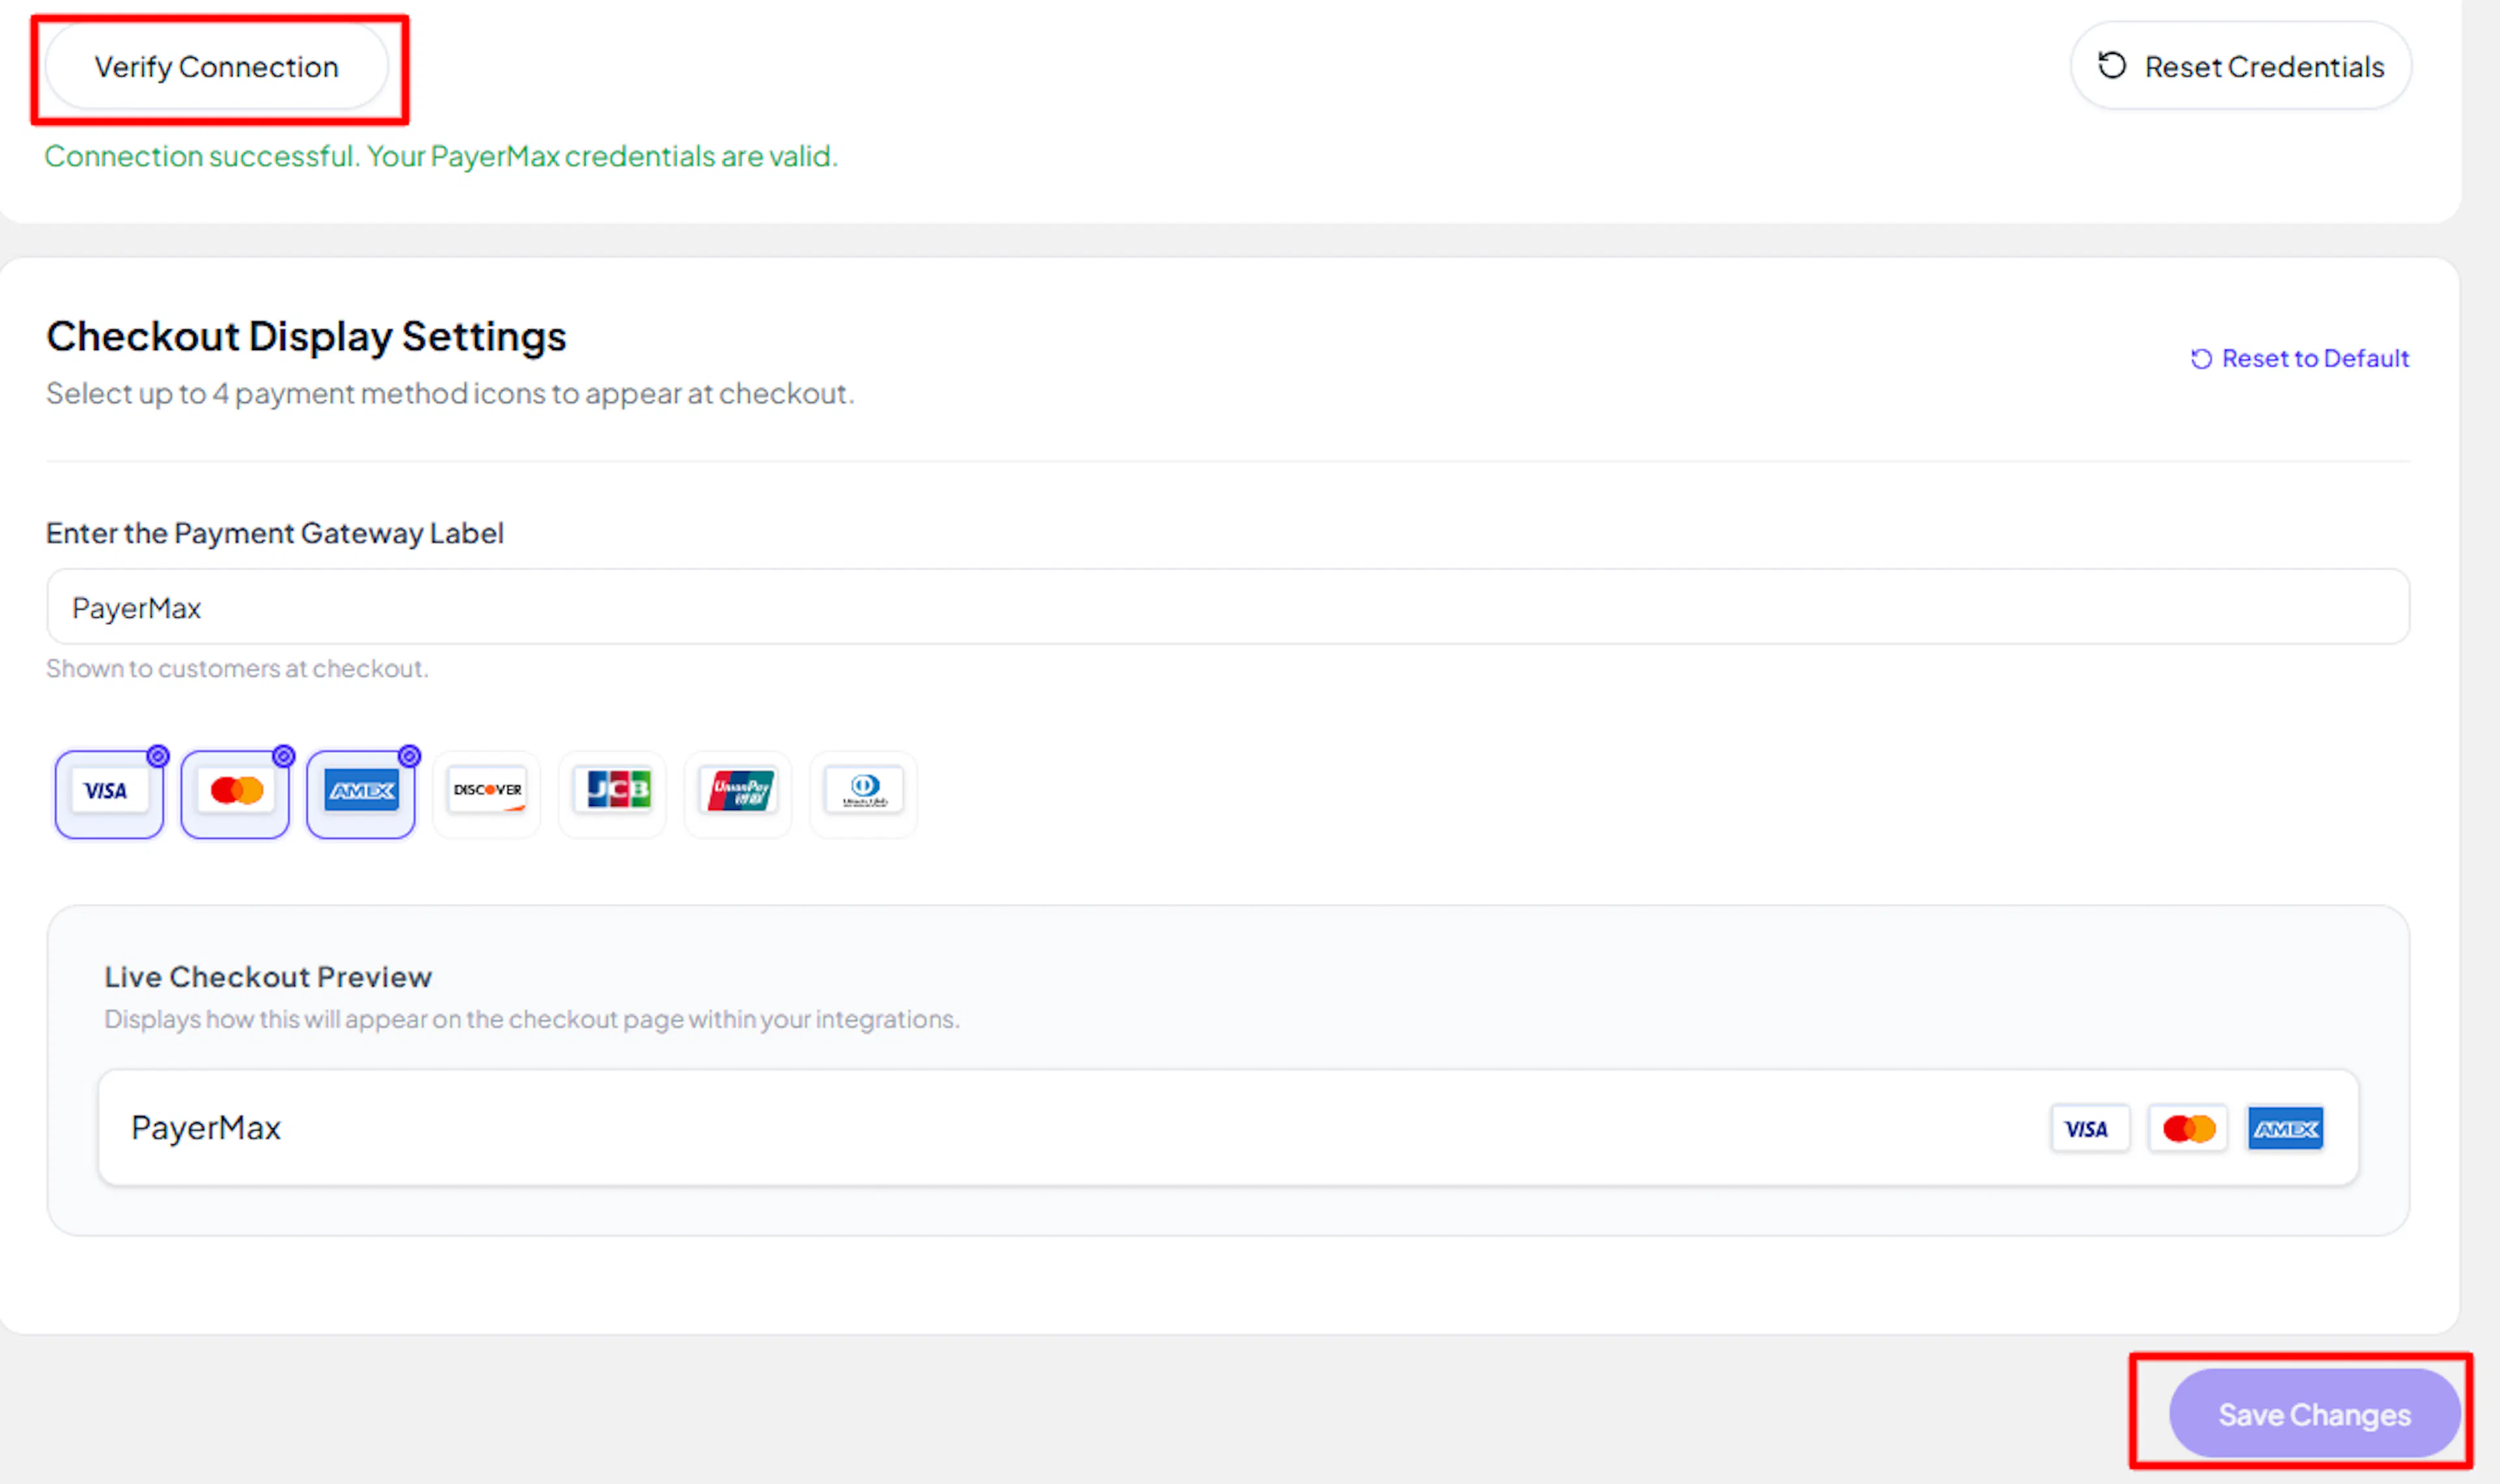
Click Save to save your configuration and verify your credentials. Click Verify Connection to test the connection.
Configuring Webhooks
Webhooks enable real-time payment updates and significantly improve reliability.
Benefits of Webhooks:
- Instant payment status updates
- Automatic refund status updates
With PayerMax, there is nothing to configure manually. PayLexer sends a secure notification URL with every payment and refund it creates, and PayerMax uses it in place of any notification URL saved in your Developer Center. PayerMax signs each notification with its own key, which PayLexer checks using the PayerMax Public Key (PEM) you saved.
Save a valid PayerMax Public Key
Confirm the PayerMax Public Key (PEM) is saved in PayLexer (see the steps above). No separate webhook secret or webhook URL is required.
Payments confirm automatically
When a payment or refund is completed, PayerMax notifies PayLexer, which verifies the signature and updates the order to paid, failed or refunded. No action is needed on your side.
Notifications are what move an order to its final status, so the correct PayerMax Public Key is what makes real-time updates and refunds work. A notification signed with any other key is rejected.
Integrate PayerMax to Your Website
If you have already added and configured your site, you can enable PayerMax in your existing setup.
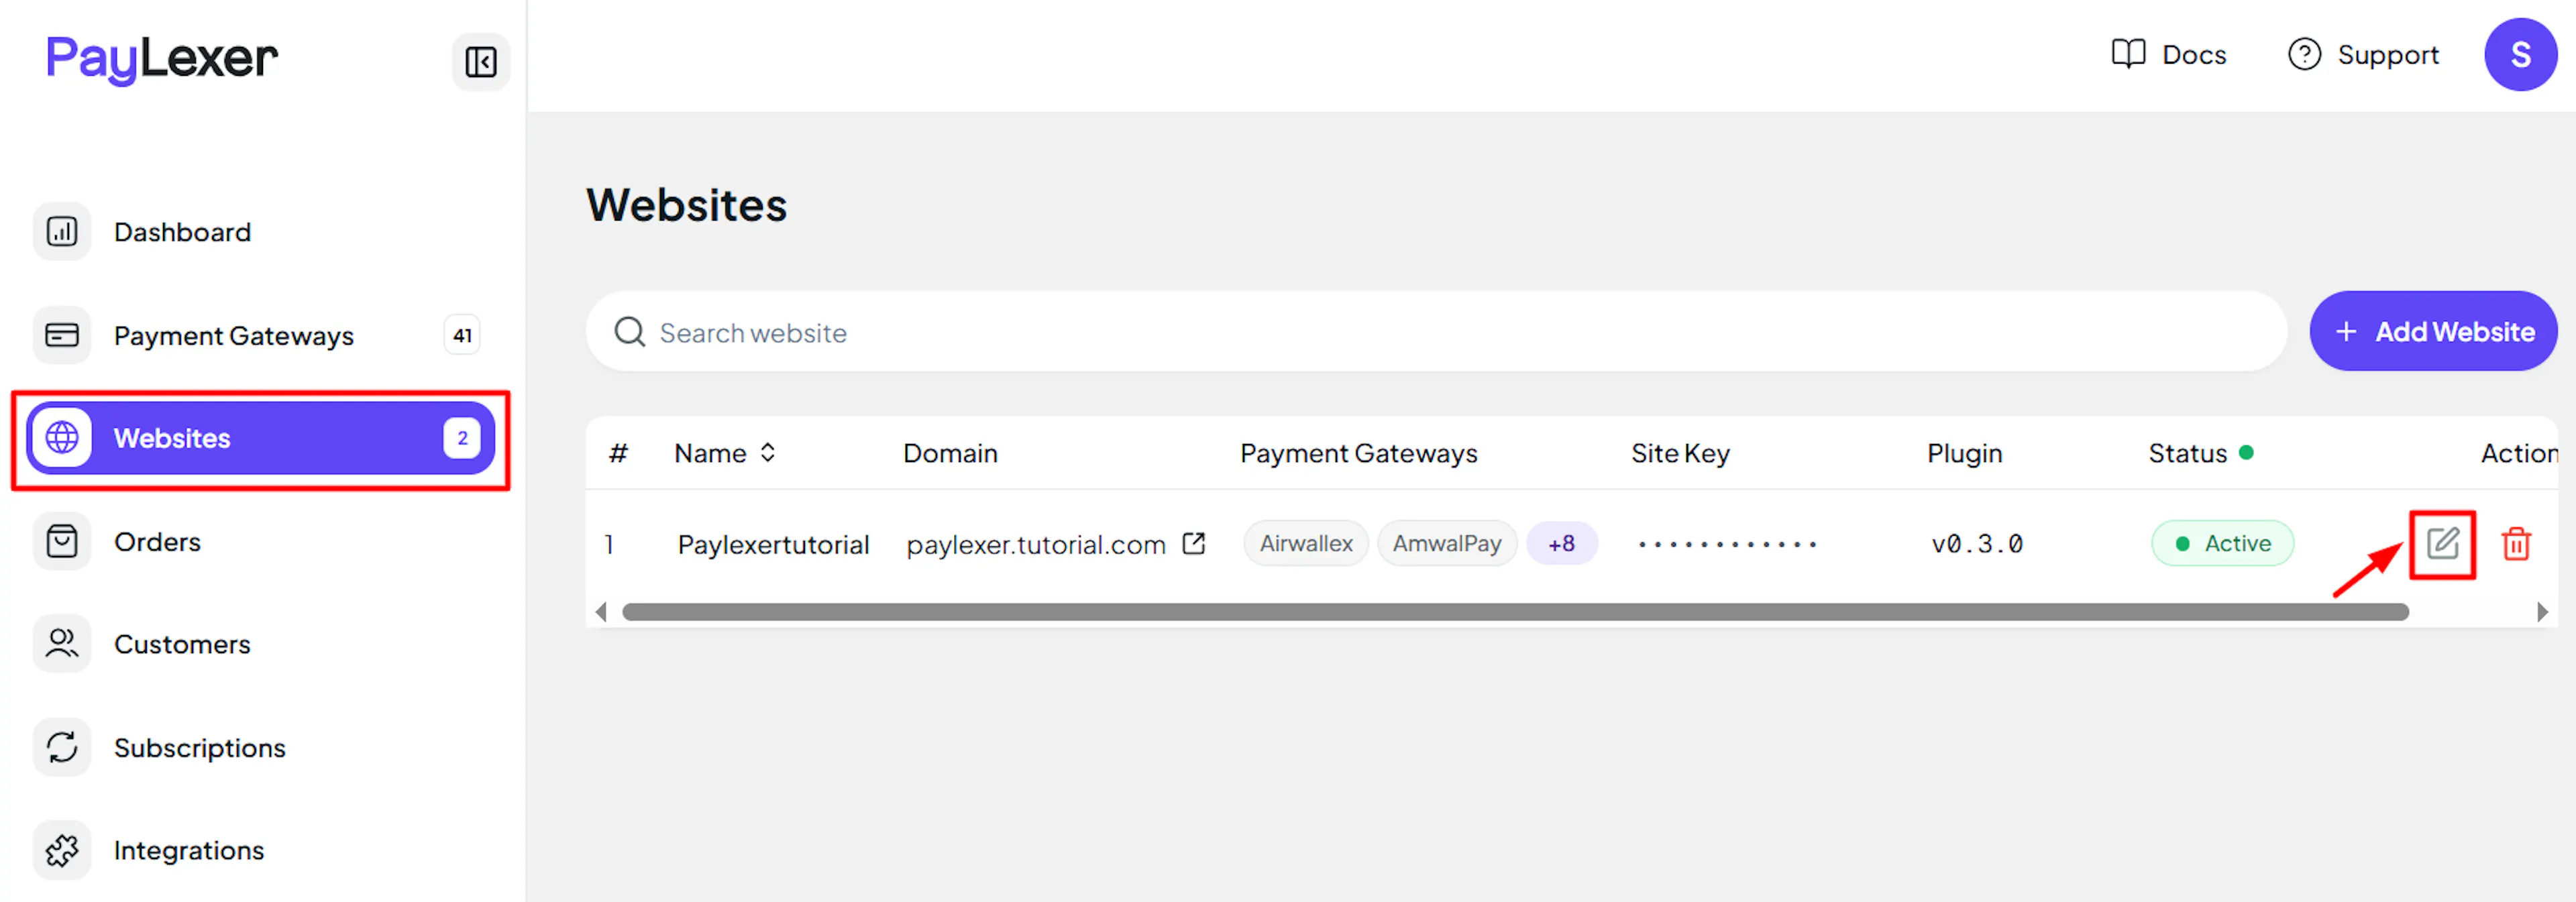
Go to Websites
Navigate to Websites in your PayLexer dashboard.
Edit your website
Click the Edit Icon of your added website.
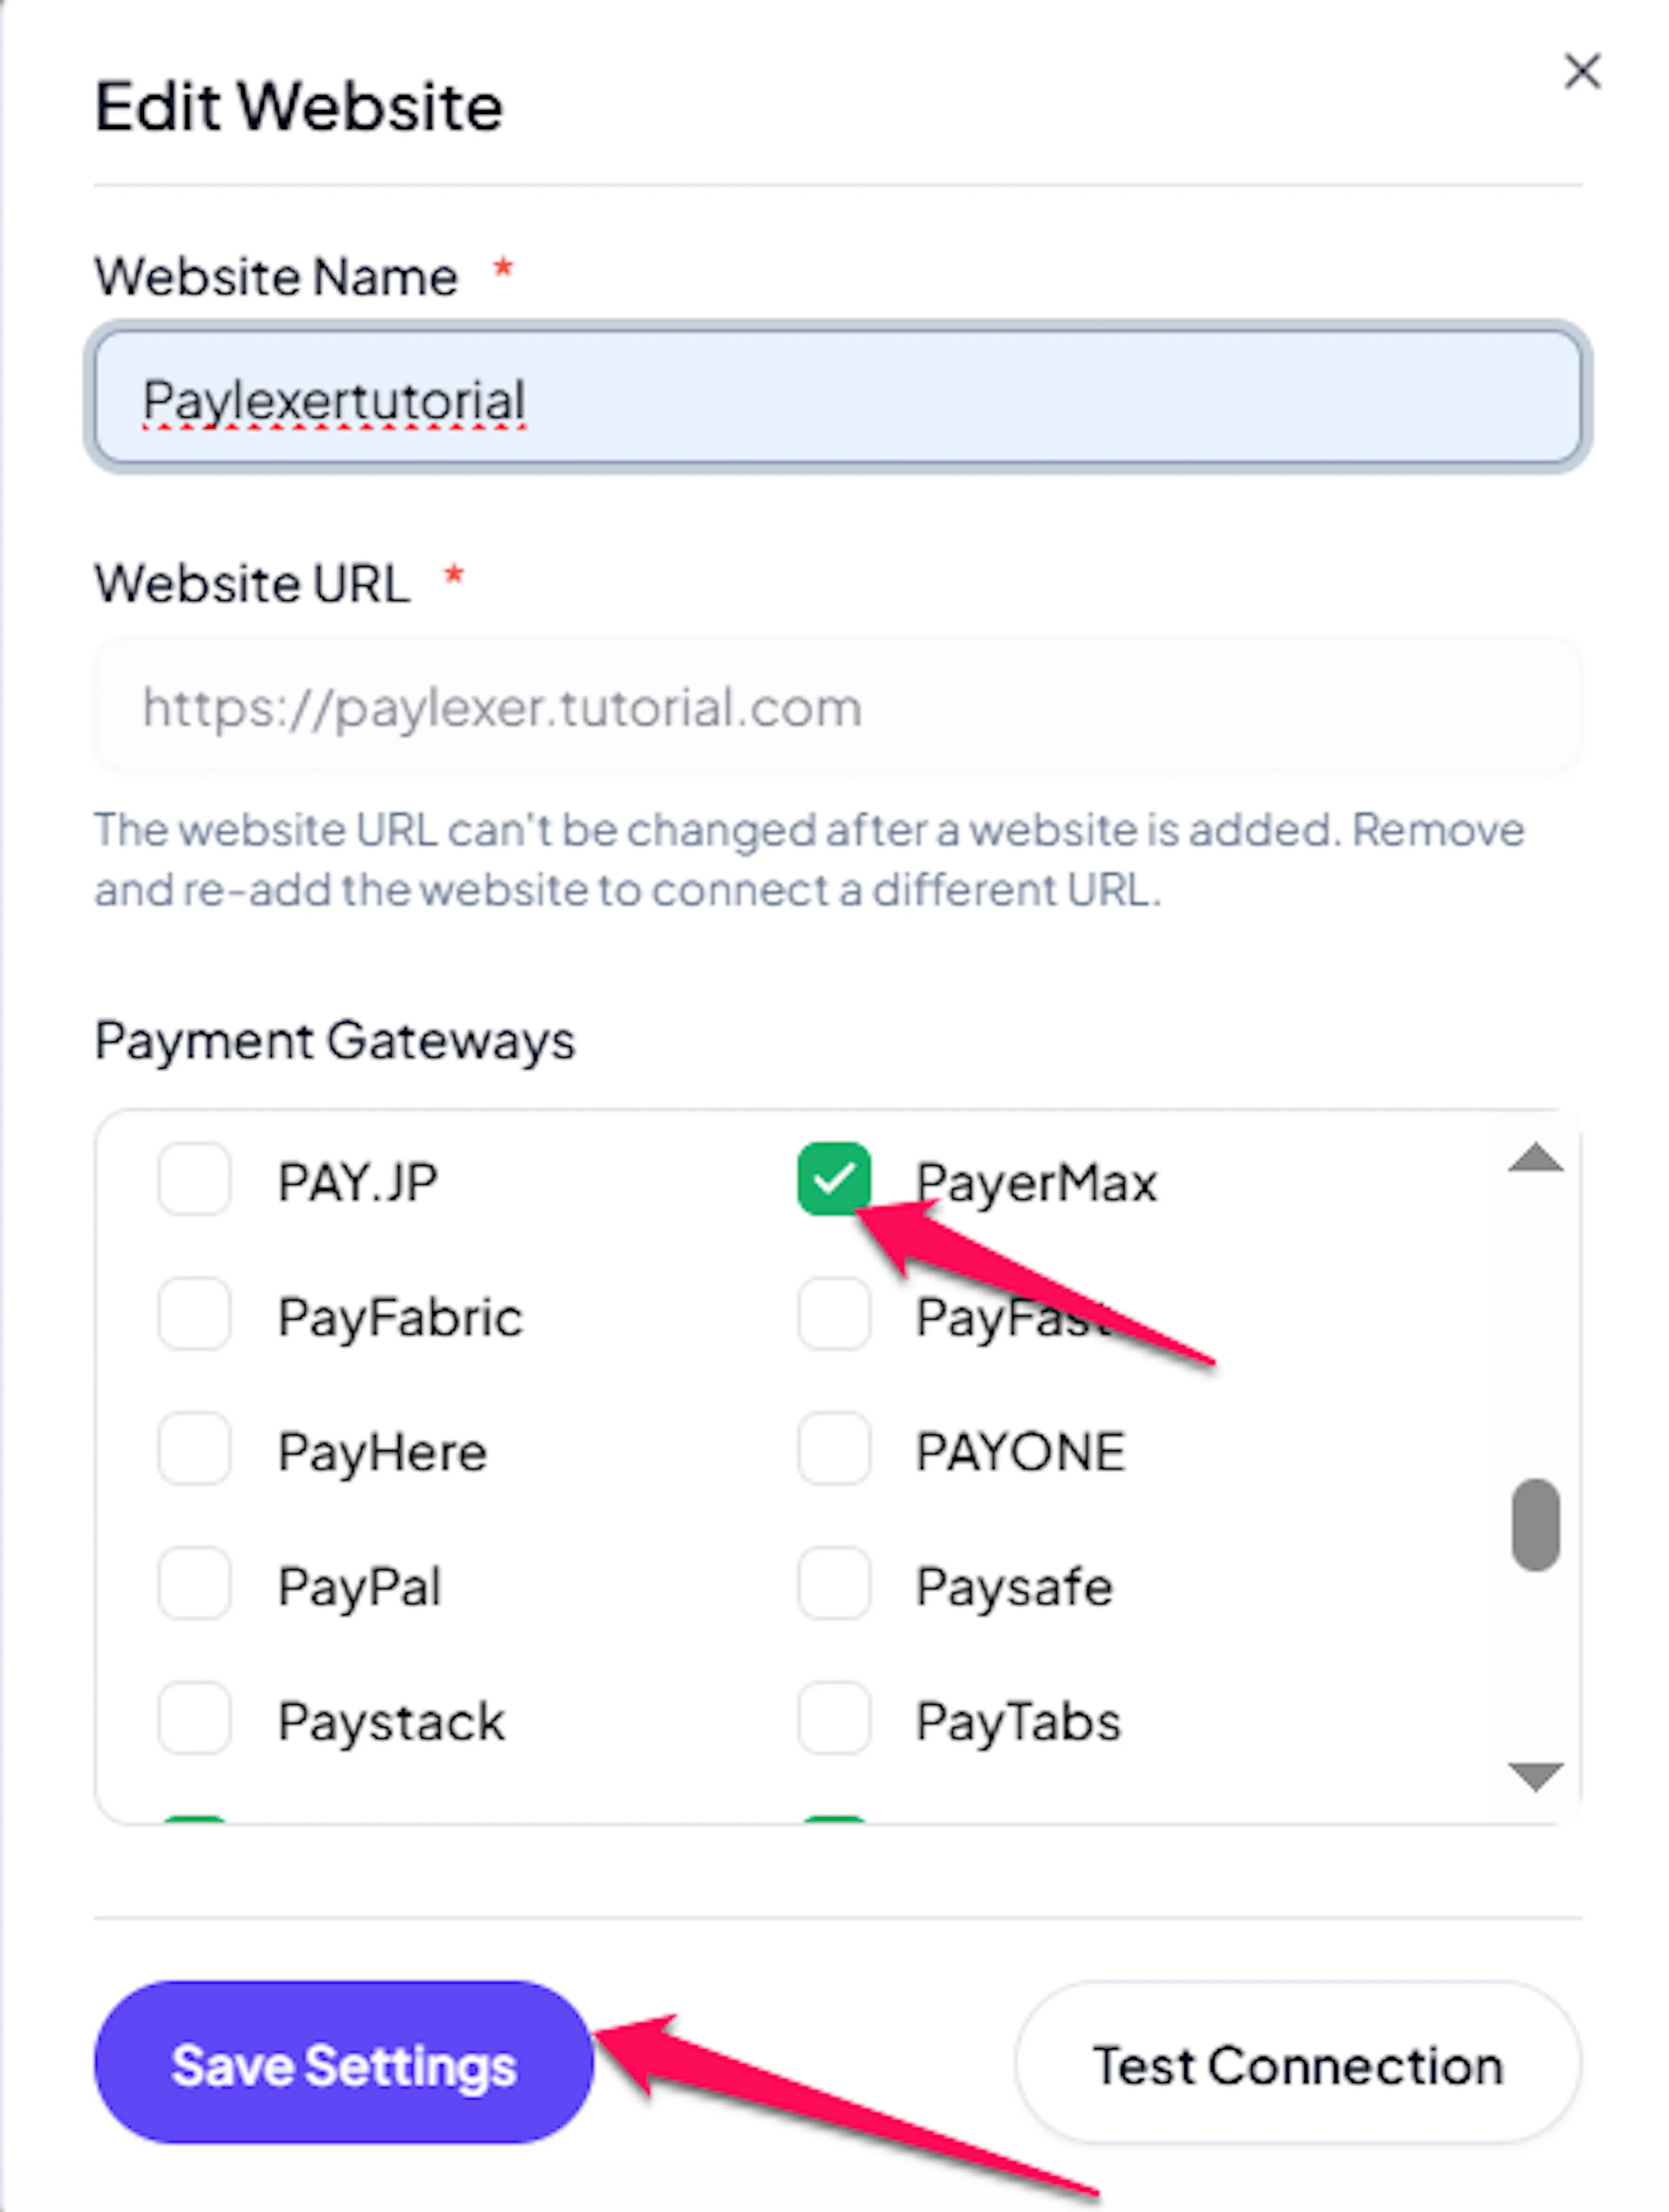
Enable PayerMax
Click the checkbox to enable PayerMax for the website.
If you haven't added a website yet, Continue to Add Your Website →
Troubleshooting
Best Practices
- Test in sandbox before enabling production, using your PayerMax test credentials with Debug/Test mode ON
- Keep your Merchant Private Key private. It is never uploaded to PayerMax, and anyone who has it can sign requests as your account
- Double-check that the PayerMax Public Key field holds PayerMax's key, not your own
- Check the payment methods you plan to offer are switched on in PayerMax before taking live payments
- Use separate key pairs for test and live
- Reconcile your PayLexer orders against your PayerMax dashboard periodically
FAQs
Still Have Questions?
- PayerMax Support:
- Contact Page: Contact PayerMax
- Support Email: customersupport@payermax.com
- PayLexer Support: Contact Support