

Pin Payments
Connect Pin Payments to PayLexer to accept card payments through a secure embedded card form with native subscription support and HMAC-signed webhooks.
Pin Payments is an Australian payment gateway that lets merchants accept card payments directly on their checkout page. Shoppers enter card details into Pin Payments' secure embedded fields; card data goes straight to Pin Payments and never passes through PayLexer. PayLexer connects to Pin Payments for one-off card charges, recurring subscriptions and refunds.
- Supported Regions (Merchant Accounts): Australia and New Zealand.
- Supported Currencies: AUD, USD, NZD, SGD, EUR, GBP, CAD, HKD, JPY, MYR - view full list
Supported Features
- Embedded card form on the checkout page and shoppers never leave your site
- Card payments with no PCI scope for the merchant (card data goes directly to Pin Payments)
- Recurring subscriptions billed automatically by Pin Payments on each due date
- Free trial periods and one-time sign-up fees on subscriptions
- Mixed cart support - combine a subscription and one-off products in a single checkout
- Full and partial refunds processed from PayLexer
- HMAC-signed webhooks for real-time payment and subscription updates
Before You Start
Make sure you have:
- Pin Payments Account - Don't have one? Sign up for Pin Payments →
- PayLexer Account - Required to configure the integration. Create your account →
- A website where you want to integrate
Looking for a different payment processor? View all supported gateways →
Configuring Pin Payments
You need a Secret Key, Publishable Key, and Webhook Signing Key from Pin Payments for this integration.
Getting API Credentials
Open the Pin Payments Dashboard
Log in to your Pin Payments Dashboard.
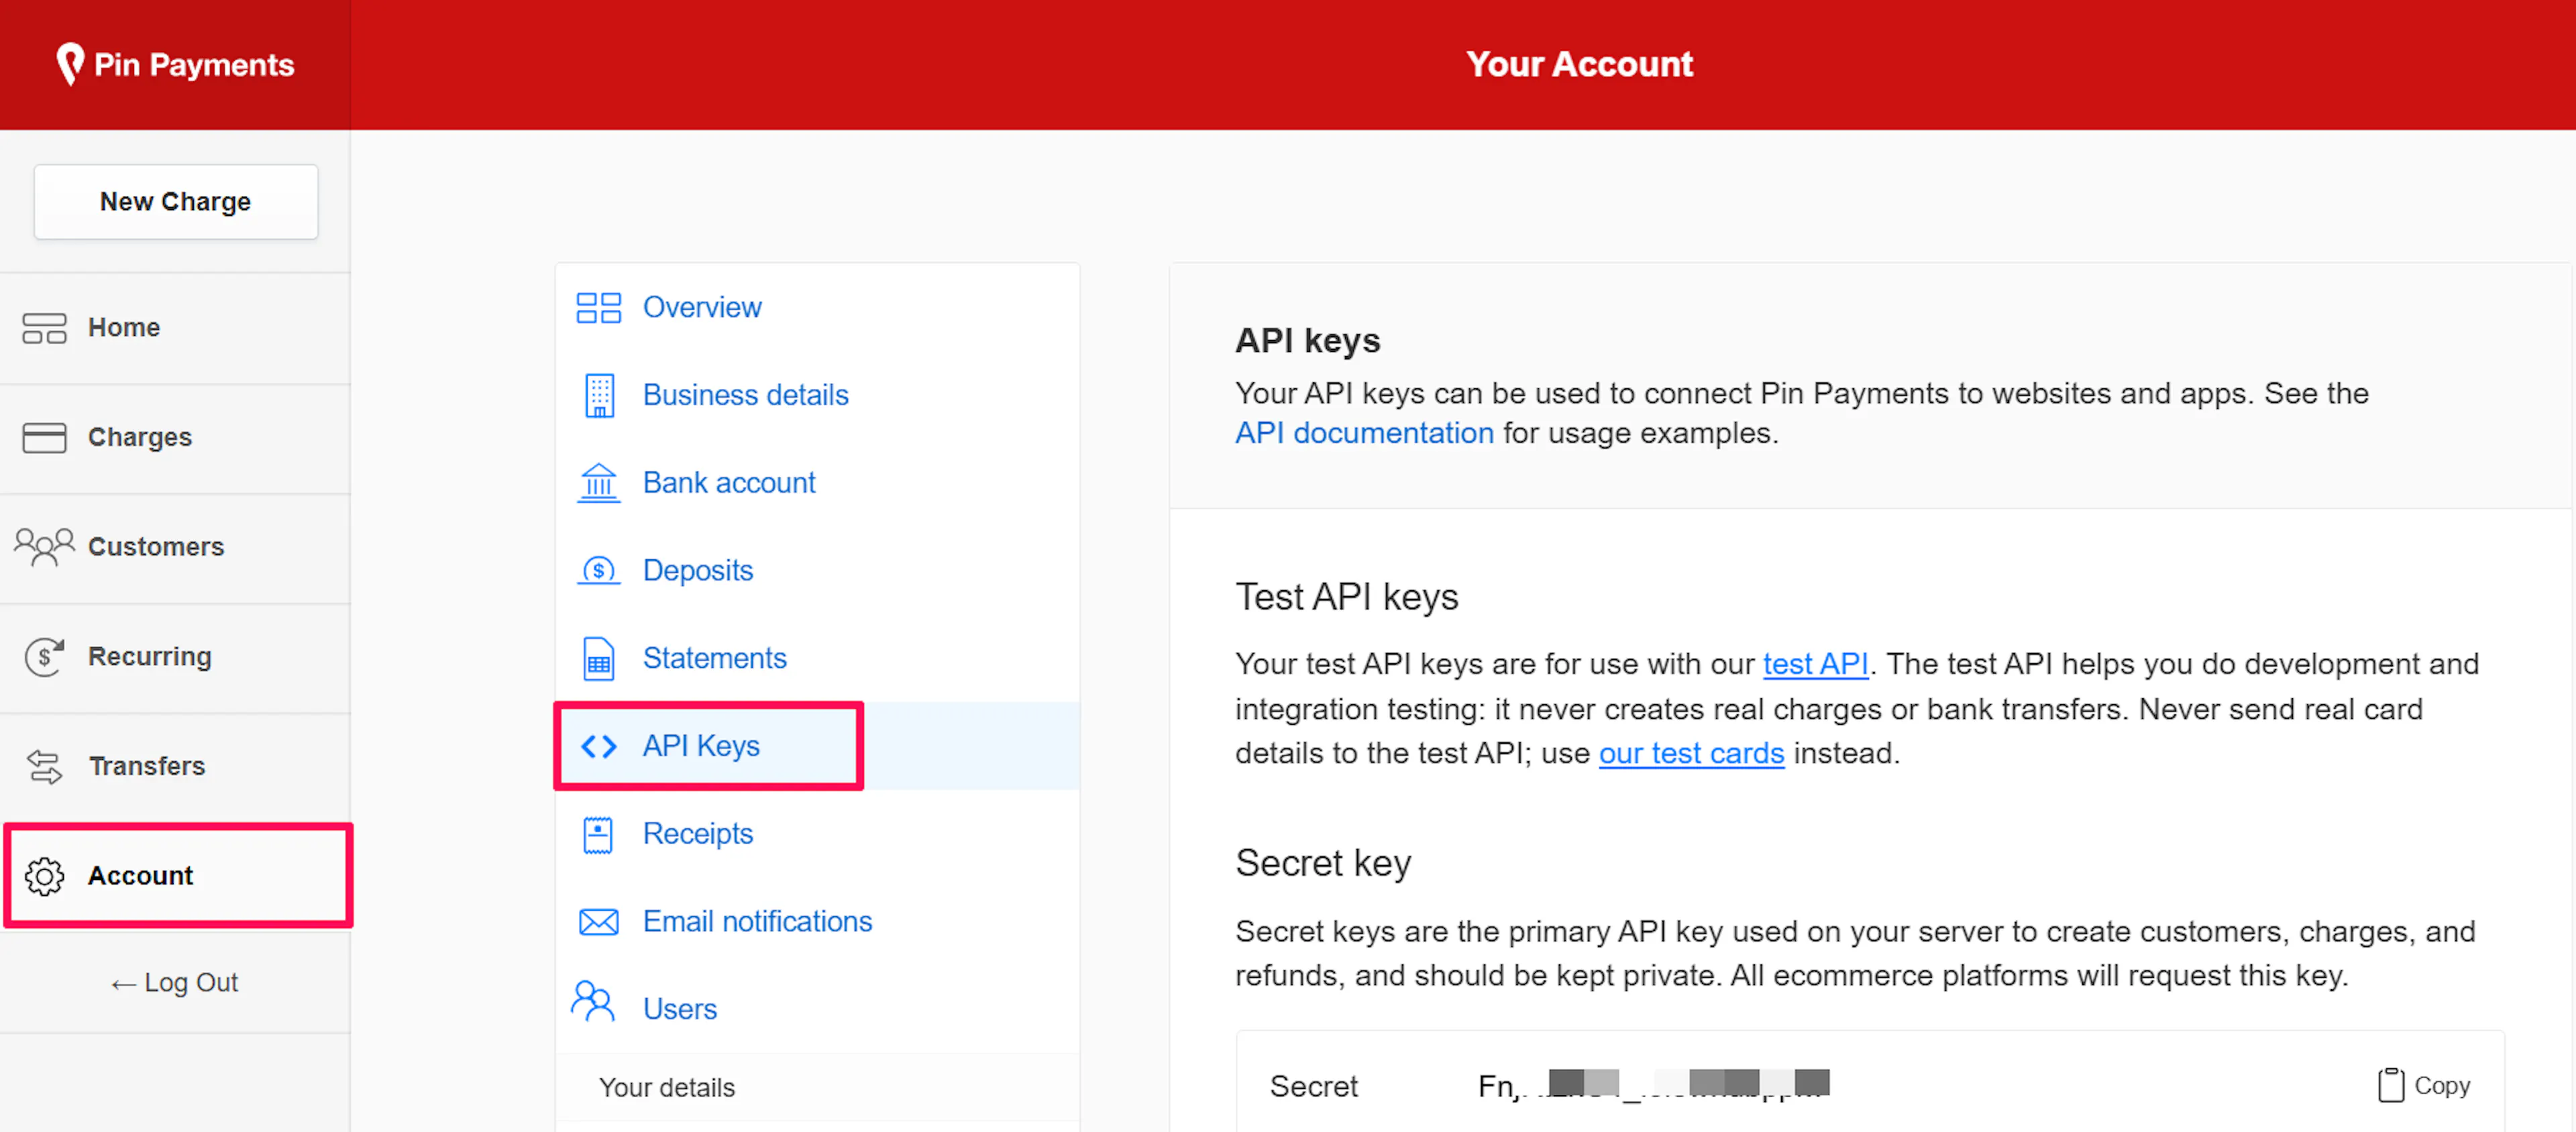
Go to API Keys
Navigate to Account → API Keys.
Copy your Secret Key and Publishable Key
The page shows separate sections for Test API keys and Live API keys. Copy the Secret key and Publishable key for the environment you are setting up.
- Test keys are used for integration testing and never create real charges.
- Live keys are available after your Pin Payments account is activated.
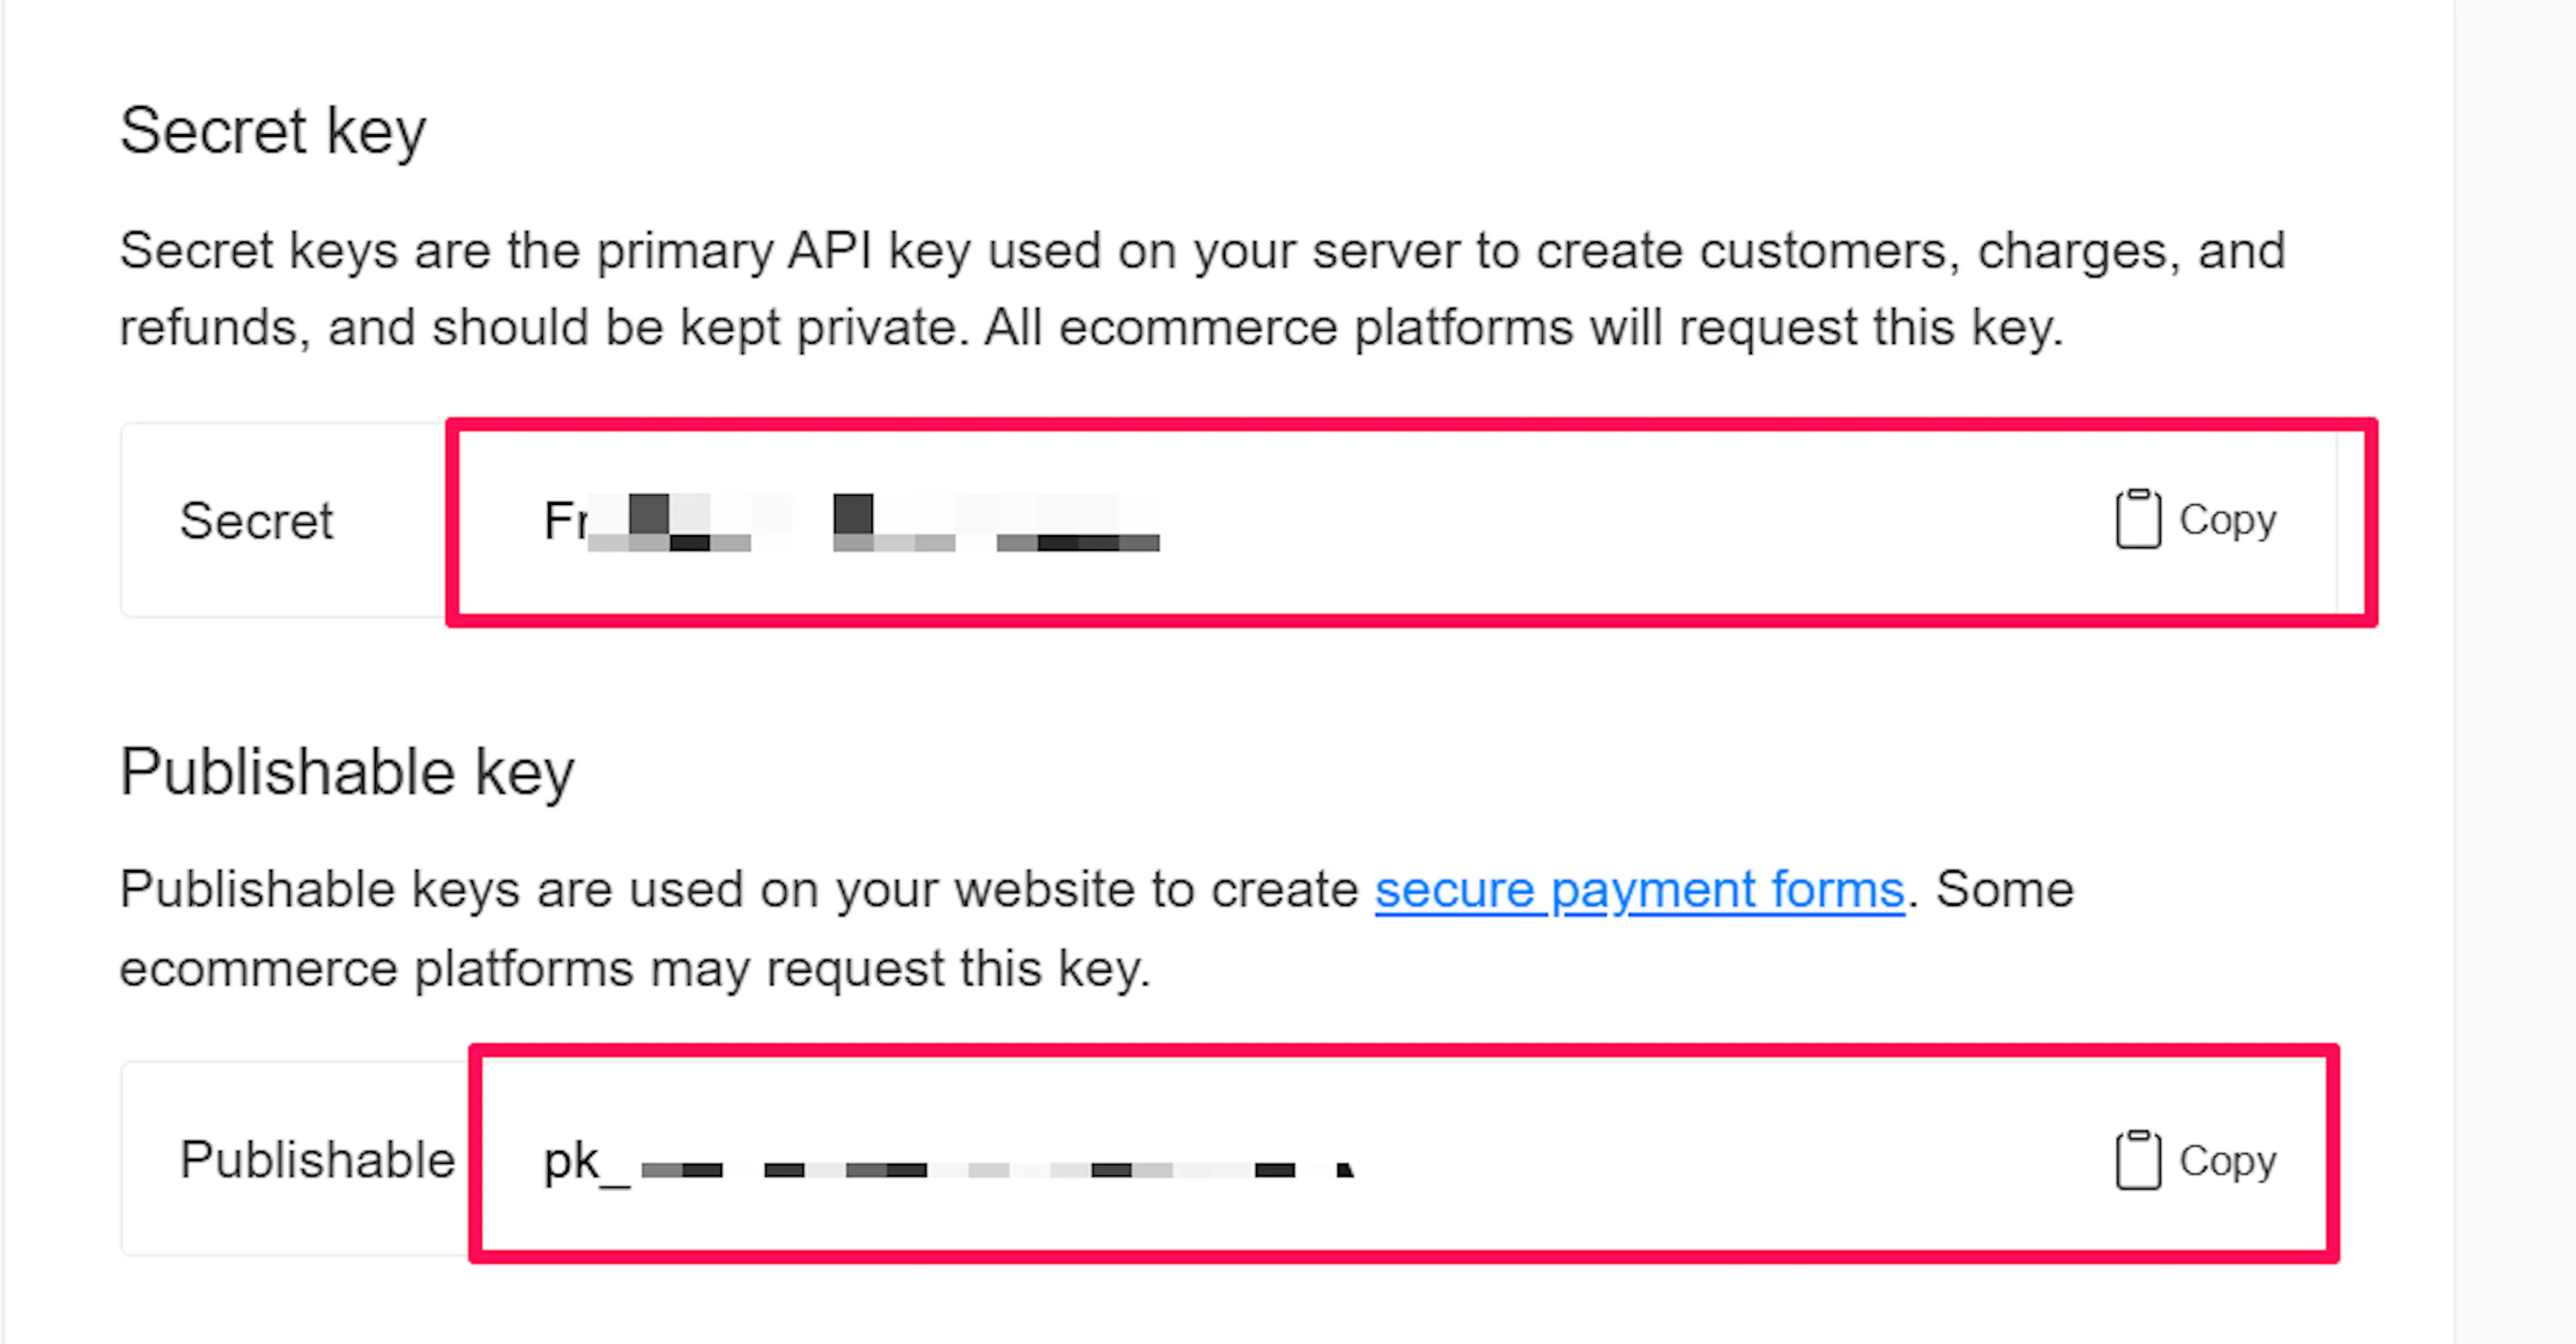
Keep your Secret key private - it grants full access to your Pin Payments account. Never expose it in client-side code or public repositories.
Adding Credentials to PayLexer
Open PayLexer Dashboard
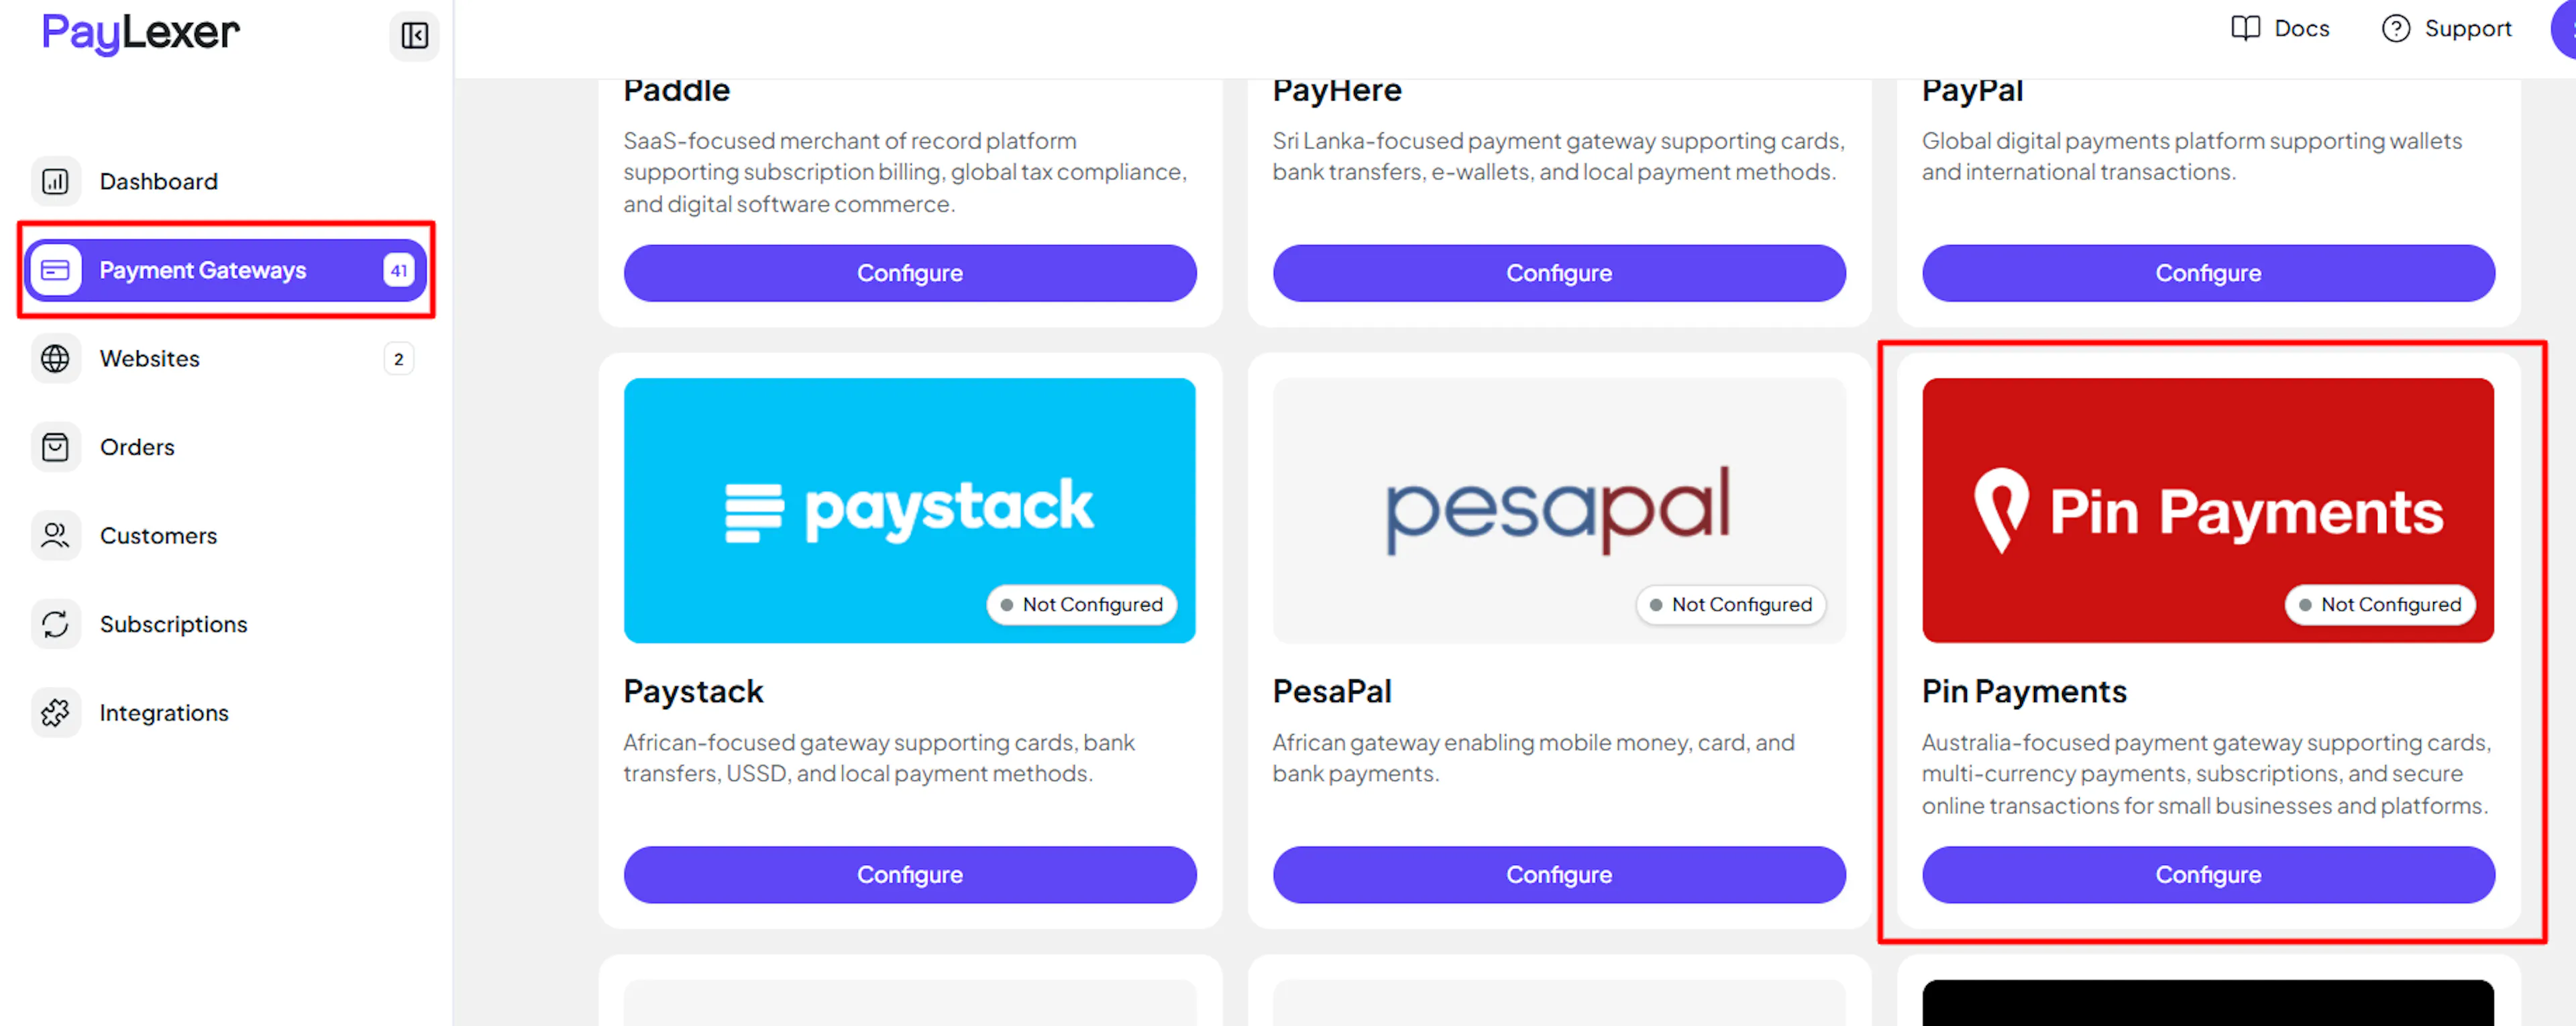
Log in to your PayLexer dashboard and navigate to Payment Gateways → Pin Payments.
Copy the Webhook URL
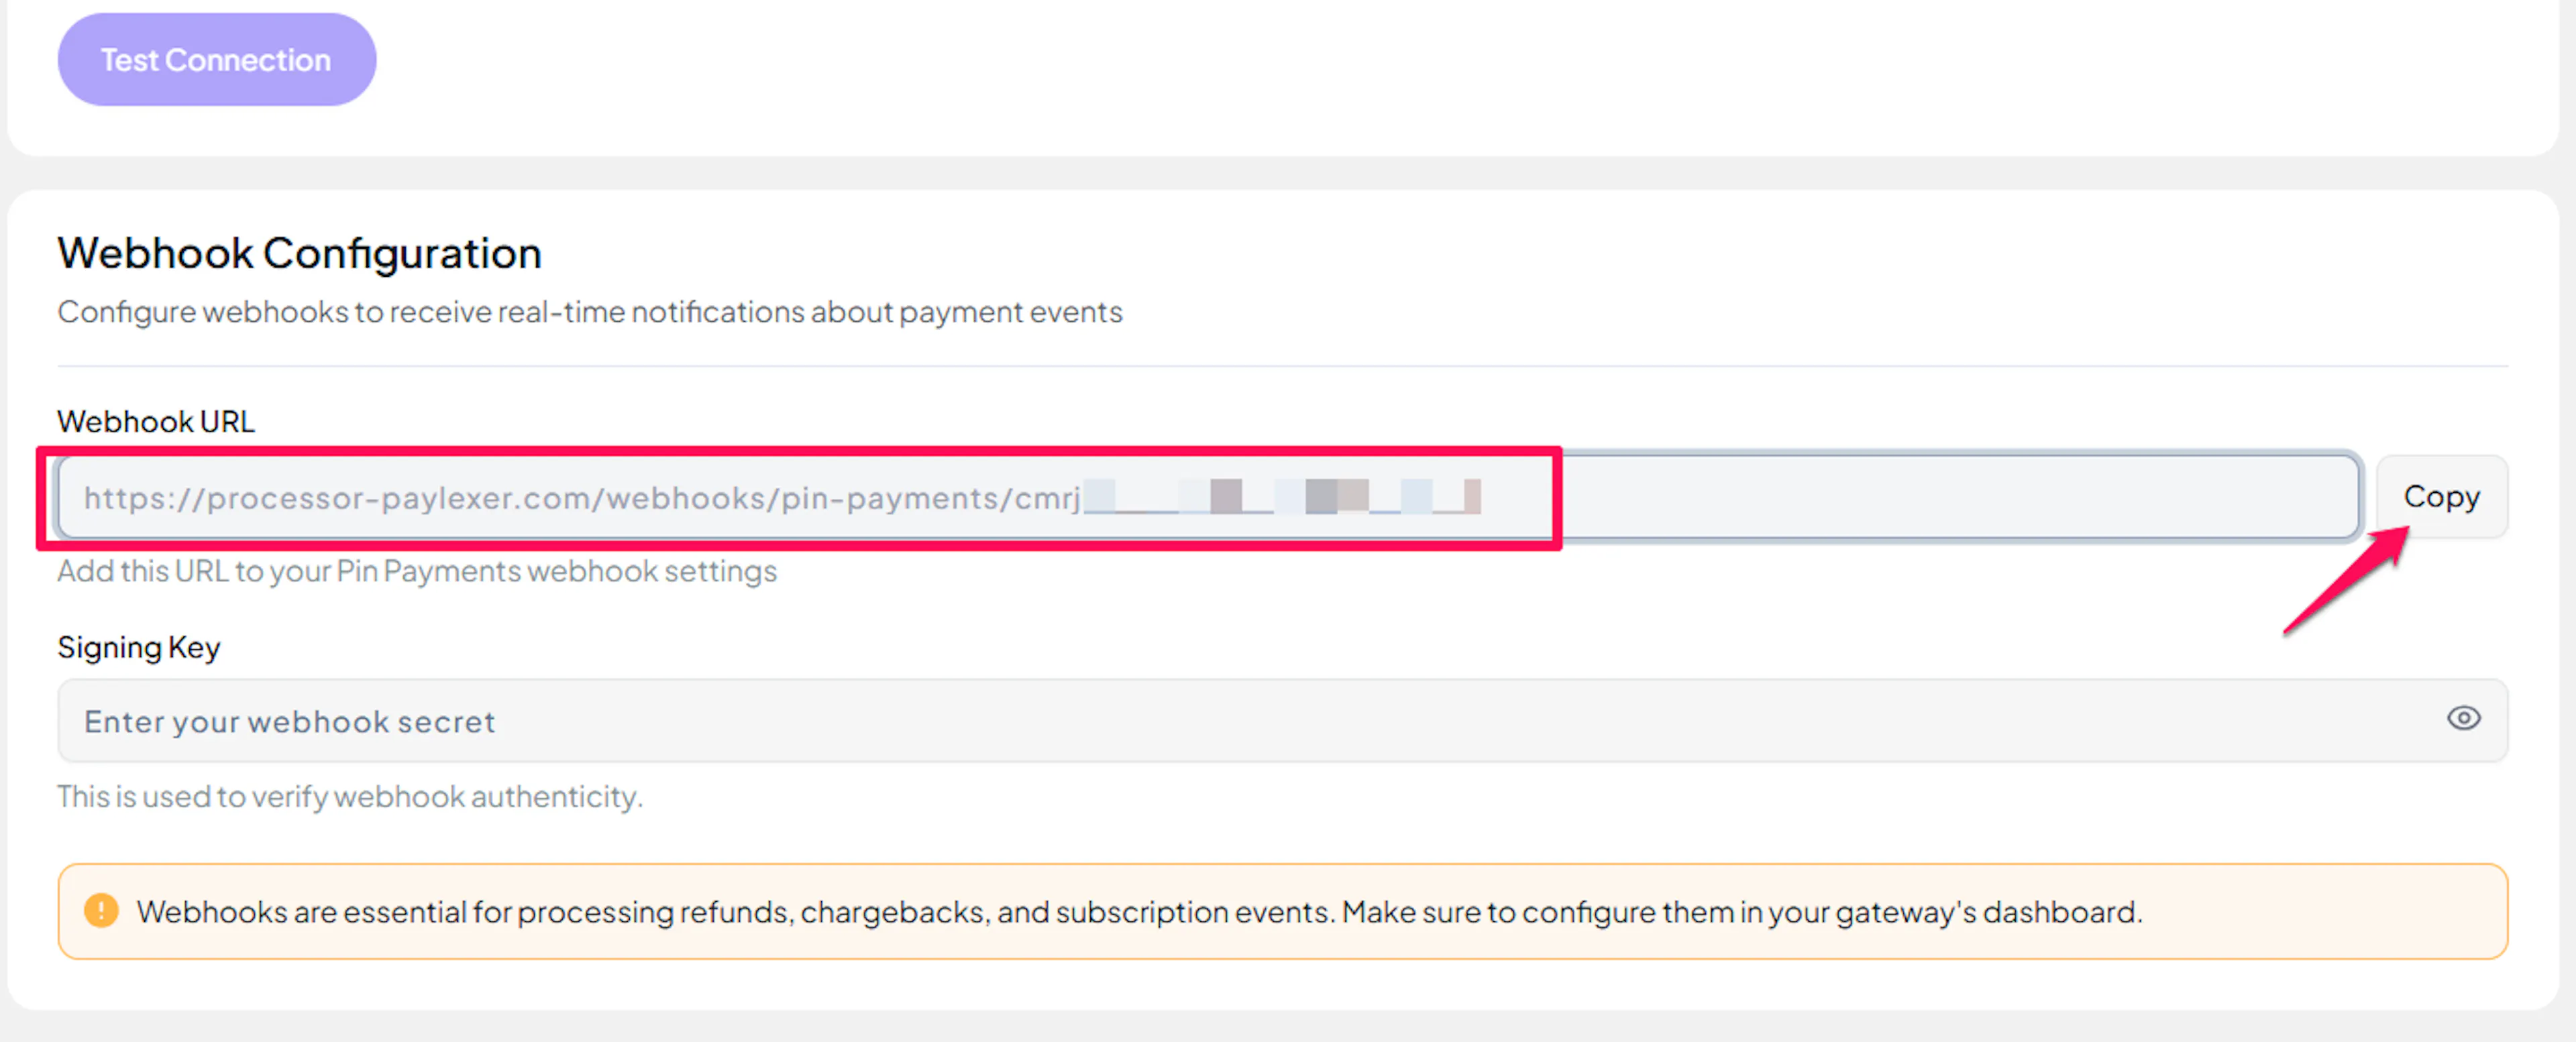
Copy the Webhook URL shown on the Pin Payments configuration page. You will need it when registering your webhook endpoint in Pin Payments in the next section.
Enter your credentials
Paste your Live and Test credentials into the respective fields:
- Secret Key - the live secret key from Pin Payments
- Publishable Key - the live publishable key from Pin Payments
- Secret Key (Test) - the test secret key from Pin Payments
- Publishable Key (Test) - the test publishable key from Pin Payments
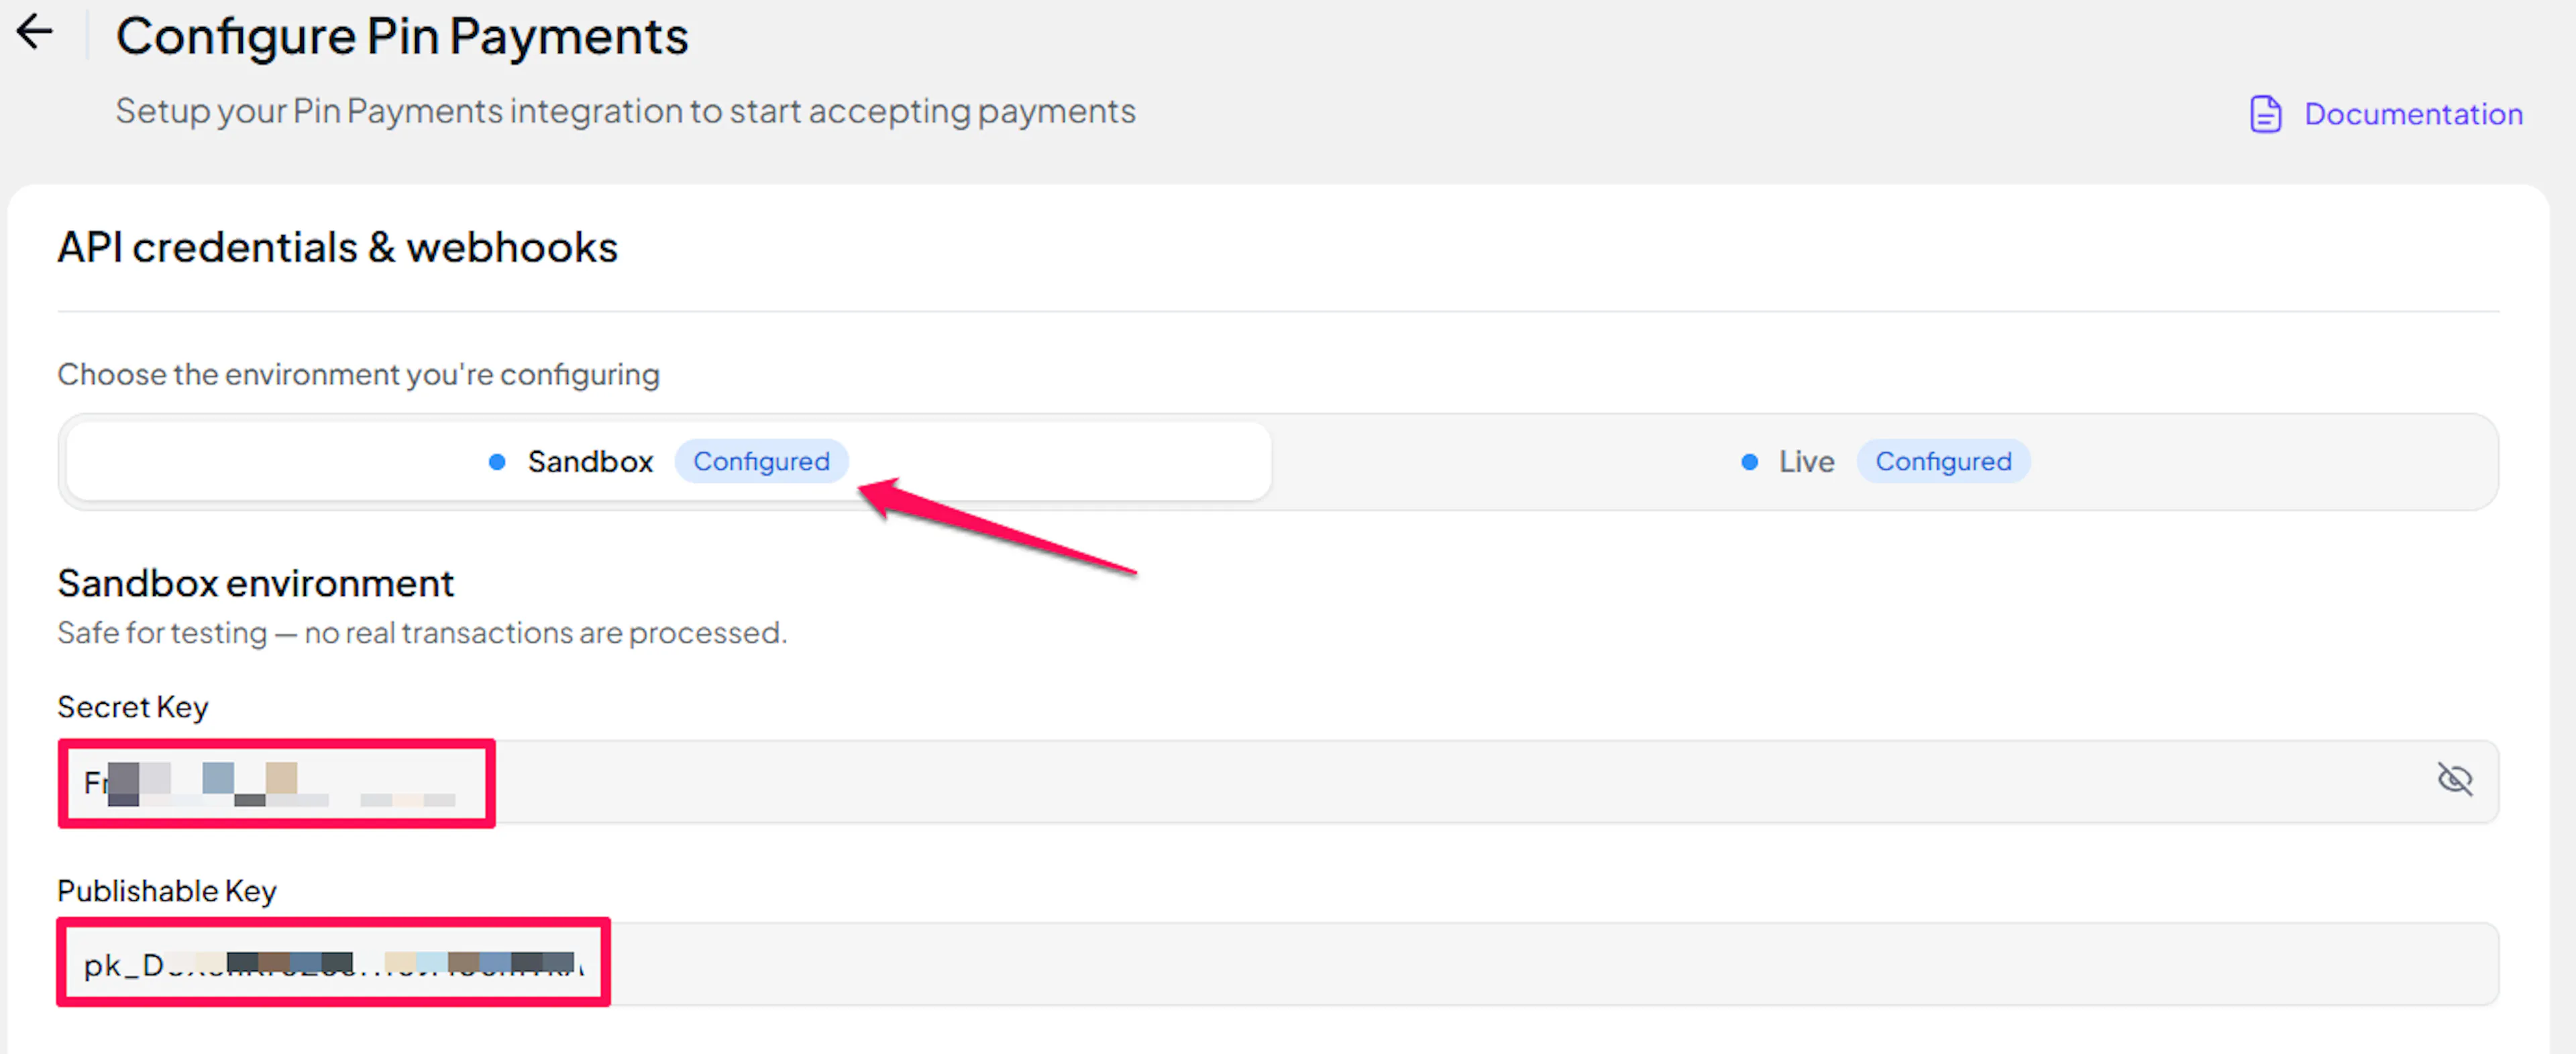
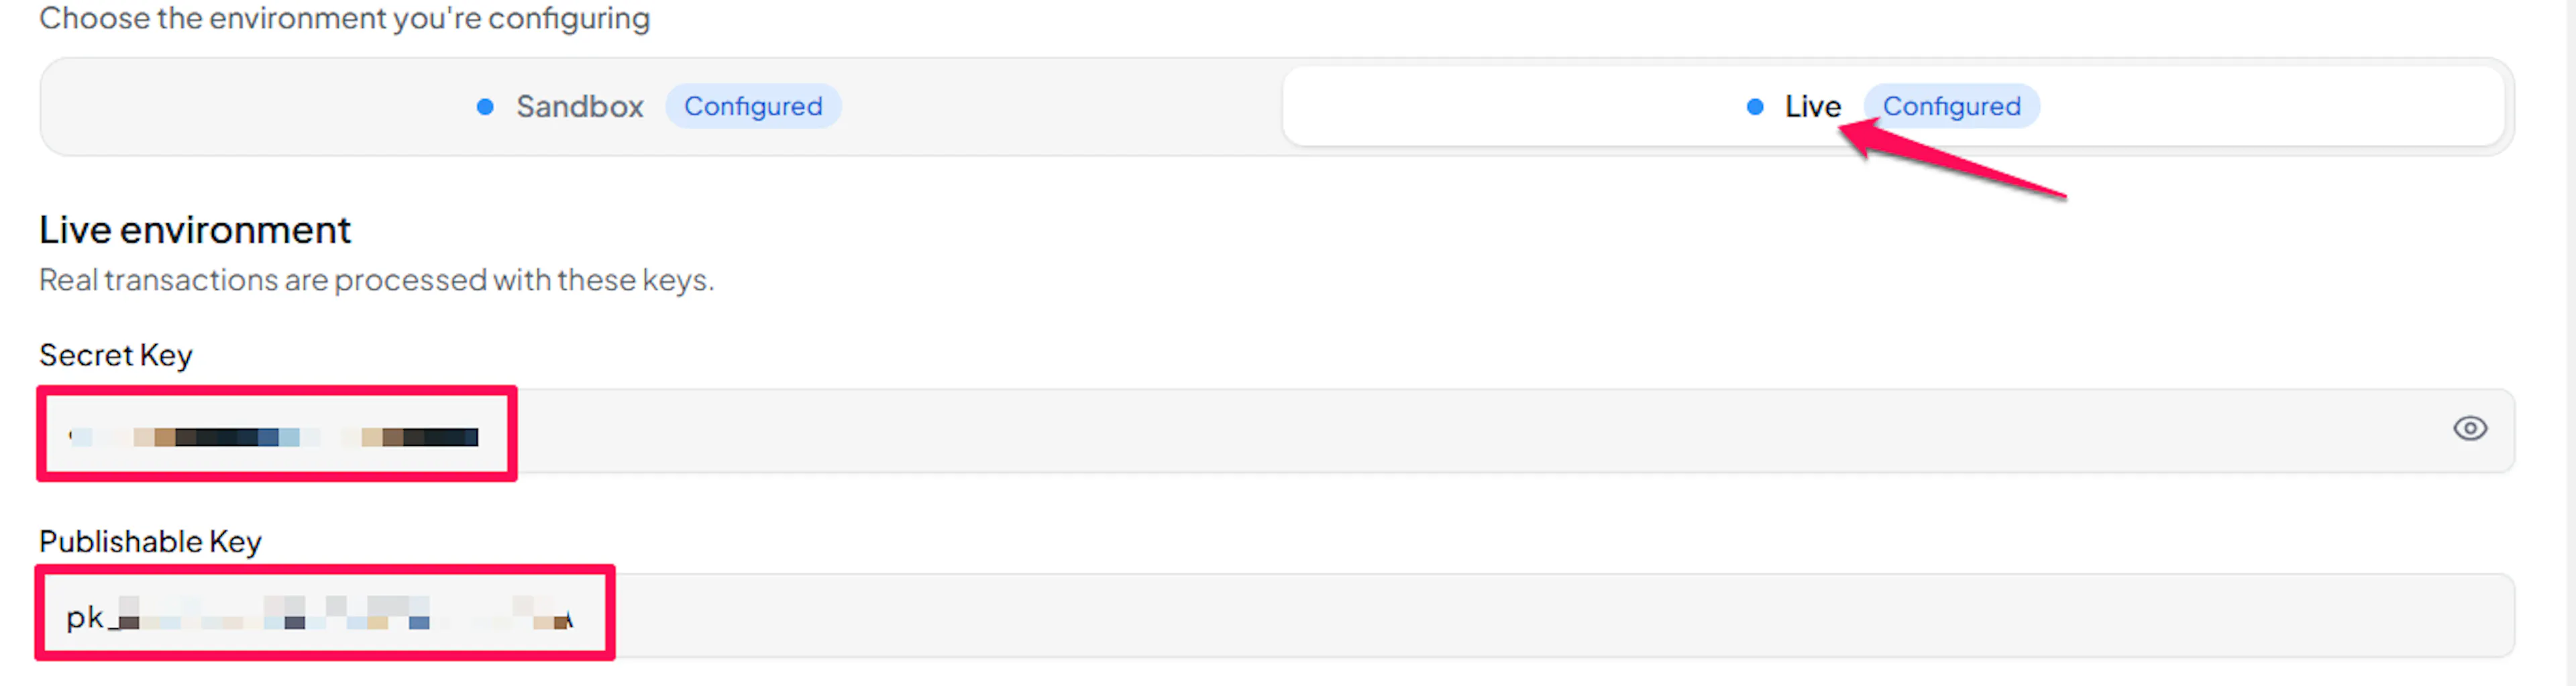
Understanding Live/Production and Sandbox Settings:
| Environment | Purpose |
|---|---|
| Live / Production (Mandatory) | Used for real transactions. Cannot be empty, even when testing. |
| Test / Sandbox (Optional) | Used for testing only. No real money is processed. |
How PayLexer selects credentials:
- Debug/Test mode ON → Test credentials are used
- Debug/Test mode OFF → Live credentials are used
Test and save
Click Save to save your configuration and verify your credentials. Click Verify Connection to test the connection.
Configuring Webhooks (Mandatory)
Webhooks enable real-time payment, subscription, and refund updates. Without them, order statuses may not update automatically.
Benefits of Webhooks:
- Instant payment status updates
- Automatic subscription lifecycle tracking (activations, renewals, cancellations)
- Refund confirmation notifications
Pin Payments signs each webhook with an HMAC-SHA256 signature in the Pin-Signature header. PayLexer verifies this signature before processing any notification.
Open Webhooks in Pin Payments
In your Pin Payments Dashboard, navigate to Account → Webhooks.
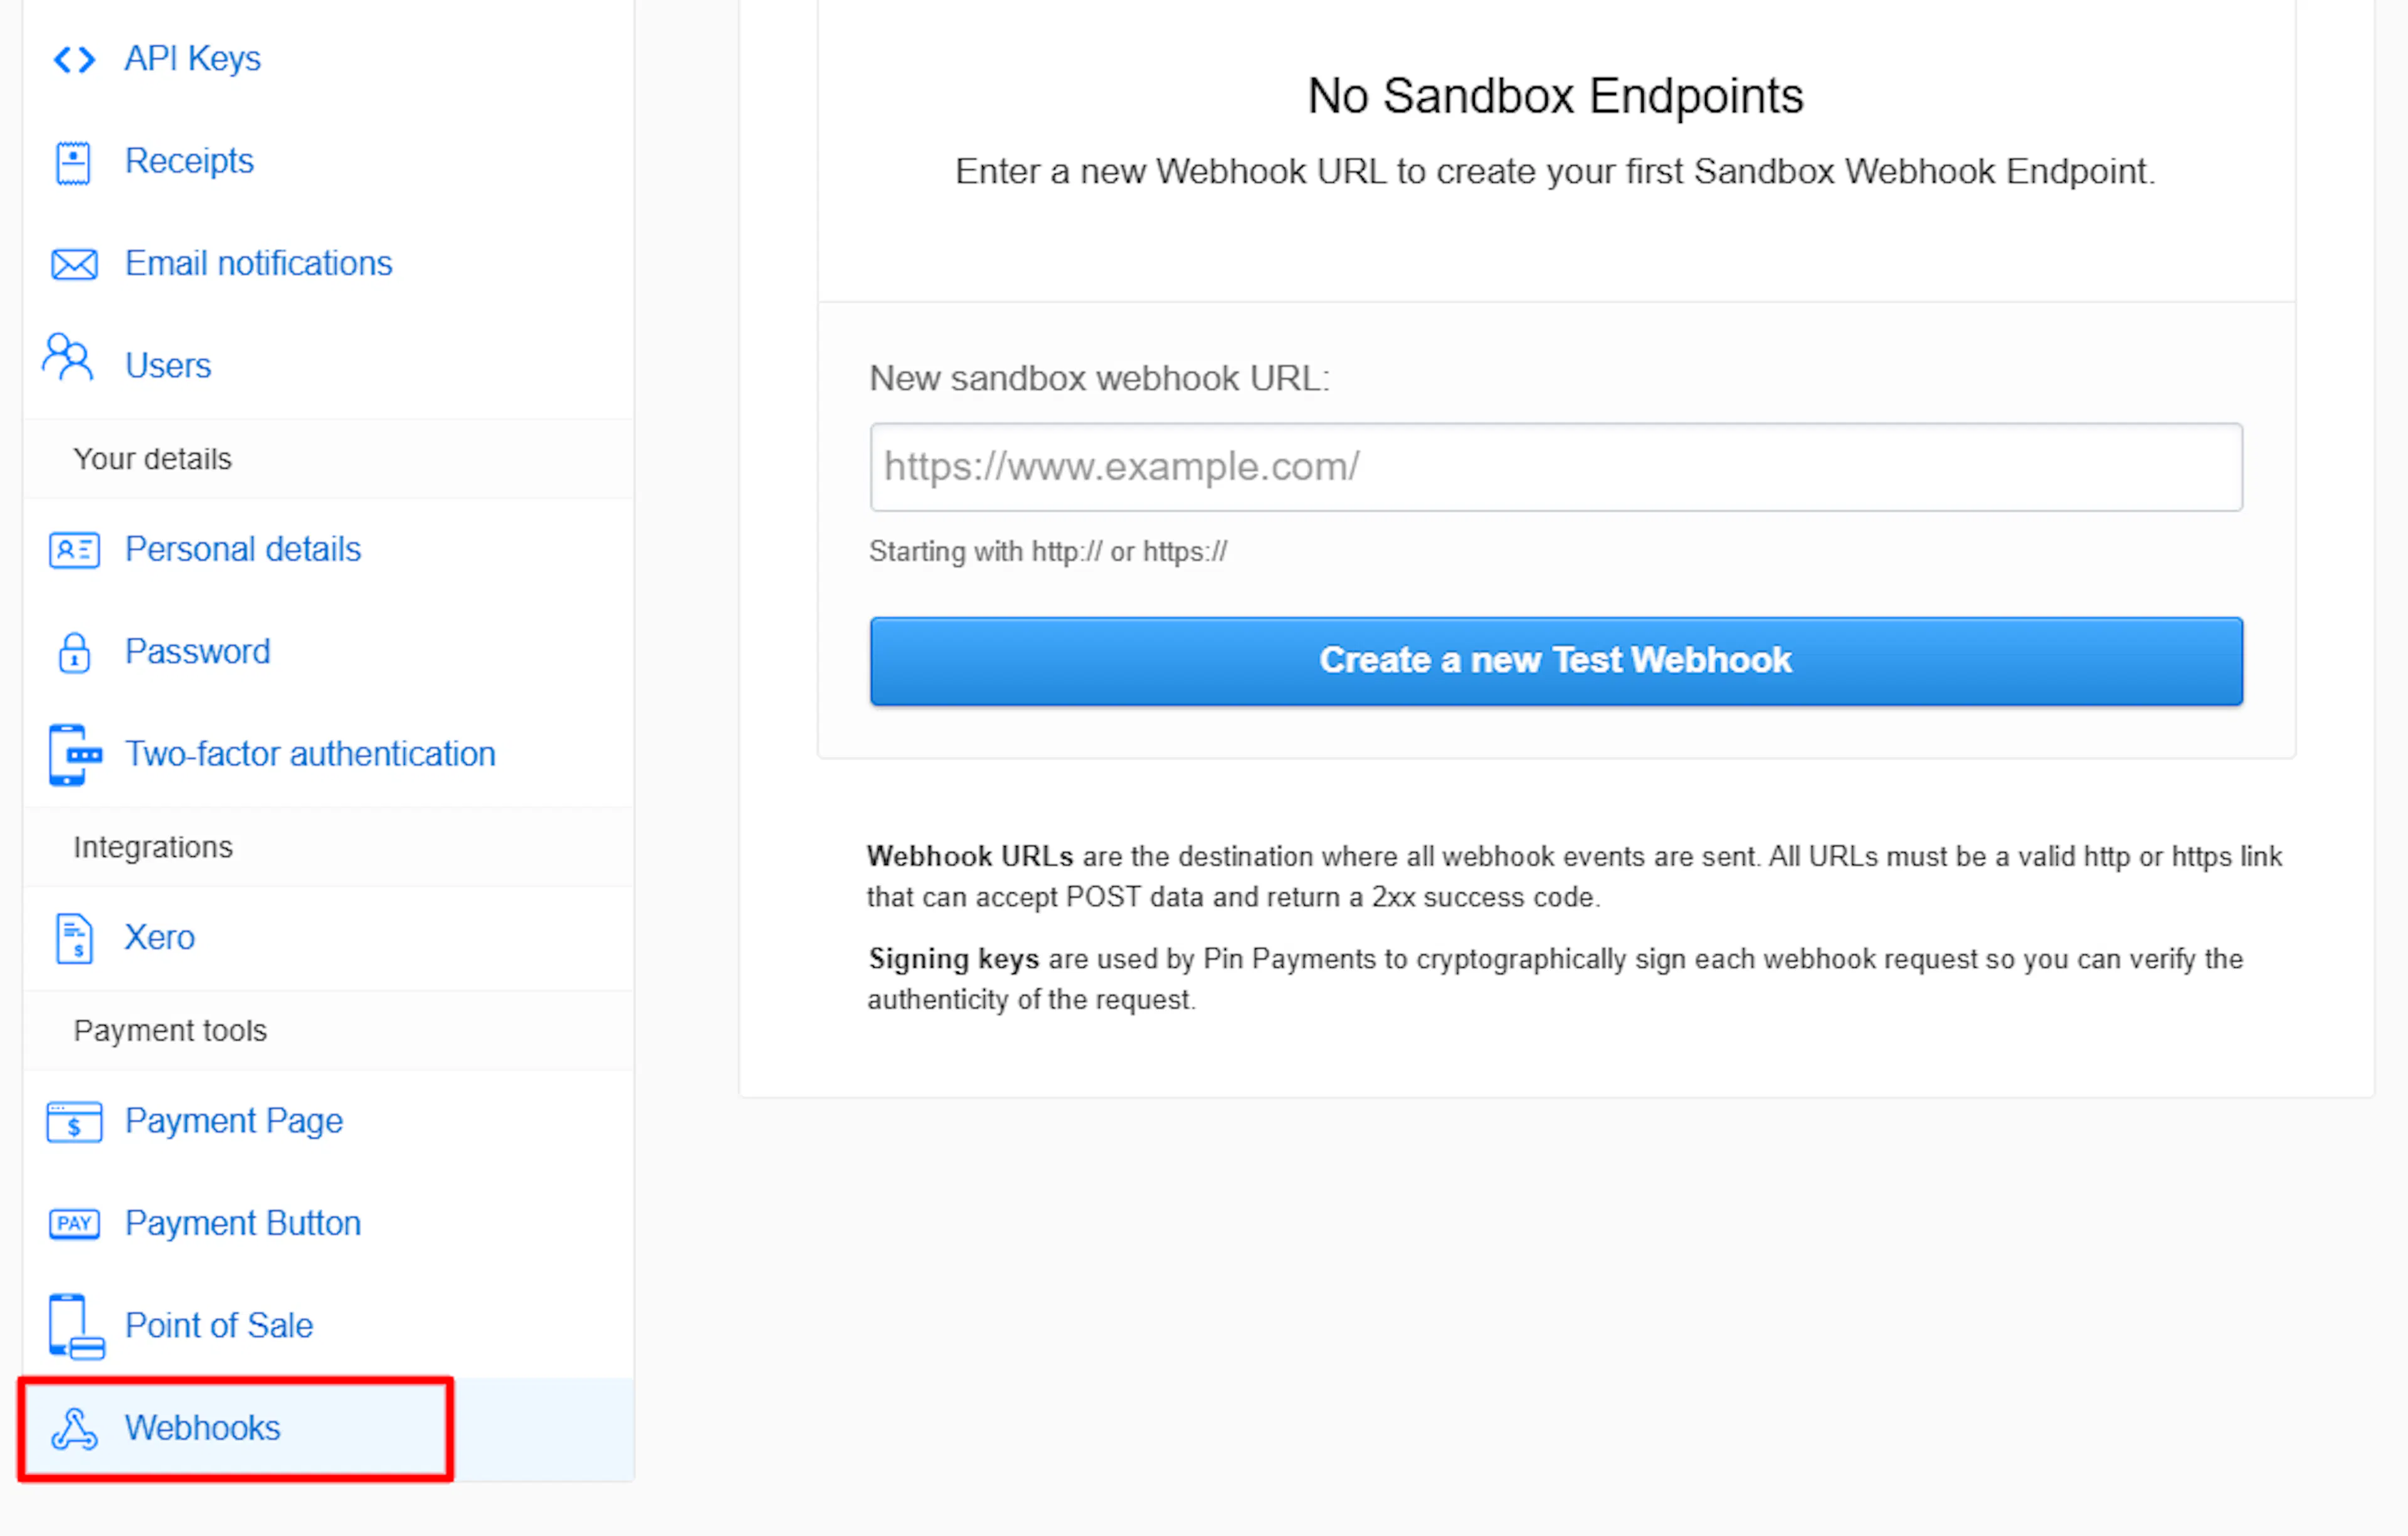
Register the PayLexer Webhook URL
Under Sandbox webhook endpoints (for test) or the live webhook section (for your live account), paste the PayLexer Webhook URL you copied earlier into the New sandbox webhook URL field and click Create a new Test Webhook.
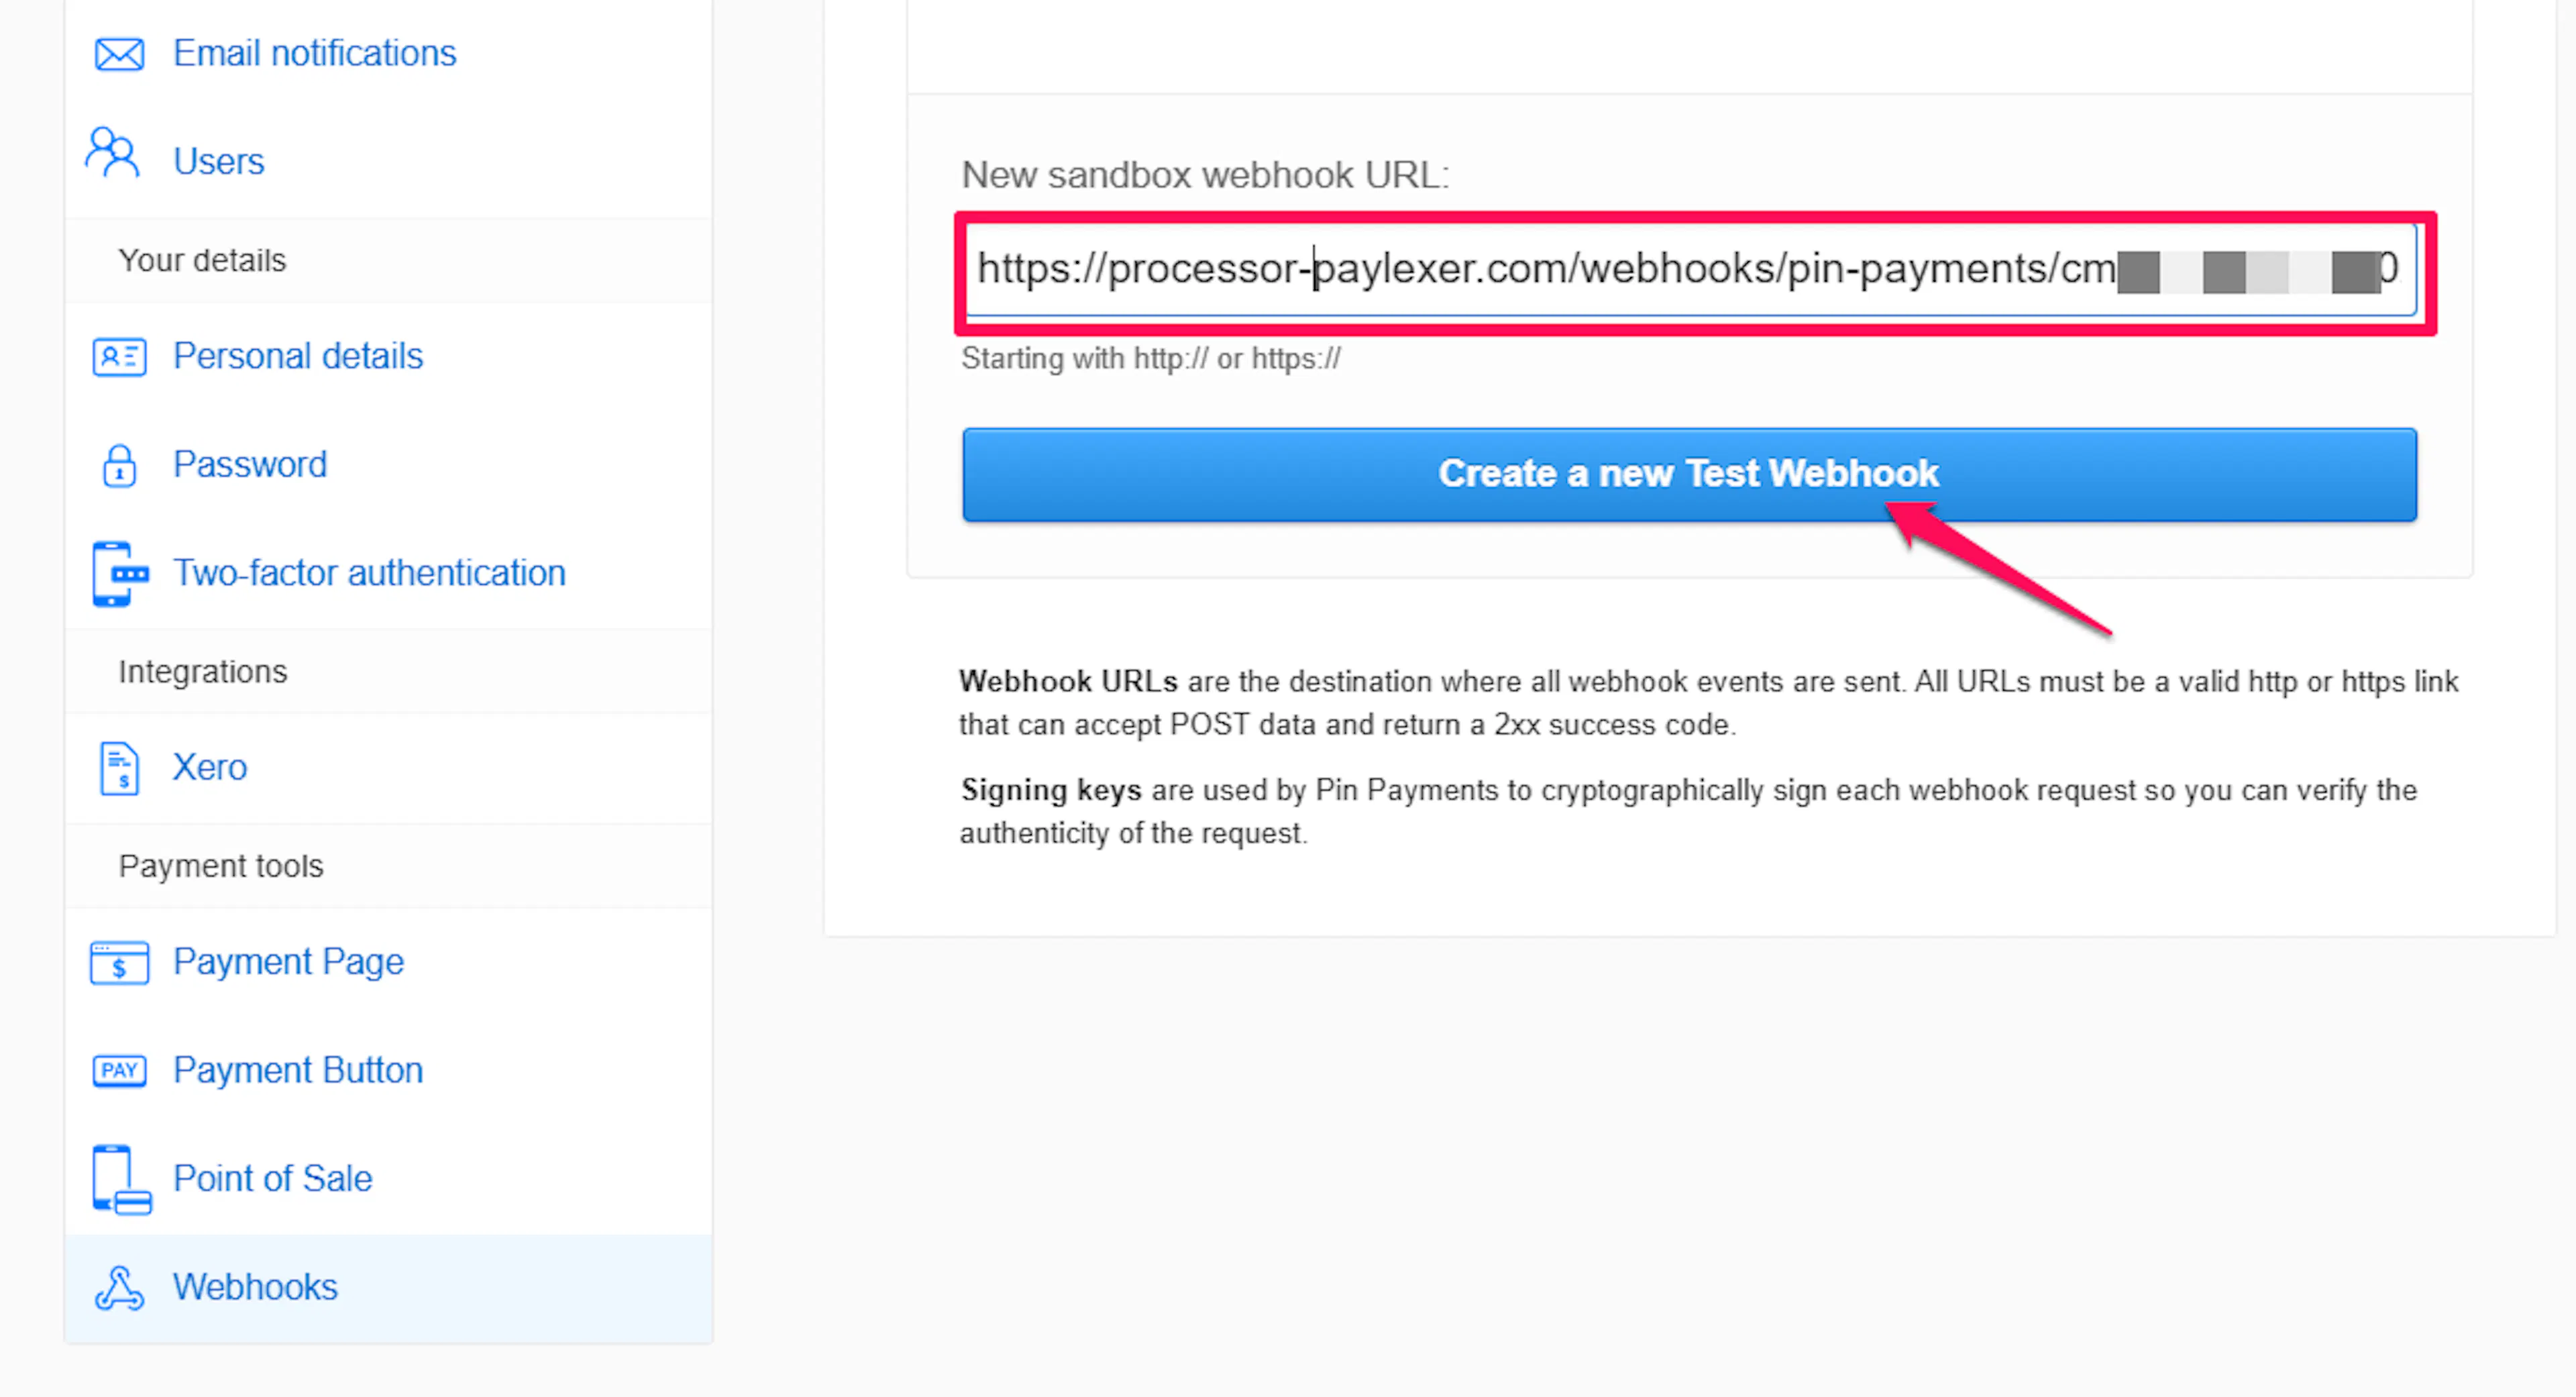
Register the webhook in whichever environment you are setting up - the sandbox section for testing, or the live section for your activated account. You can register in both sections if you want webhooks for both environments.
Copy the Signing Key
After the webhook is created, Pin Payments displays a Signing Key next to your webhook URL. Copy this key immediately.
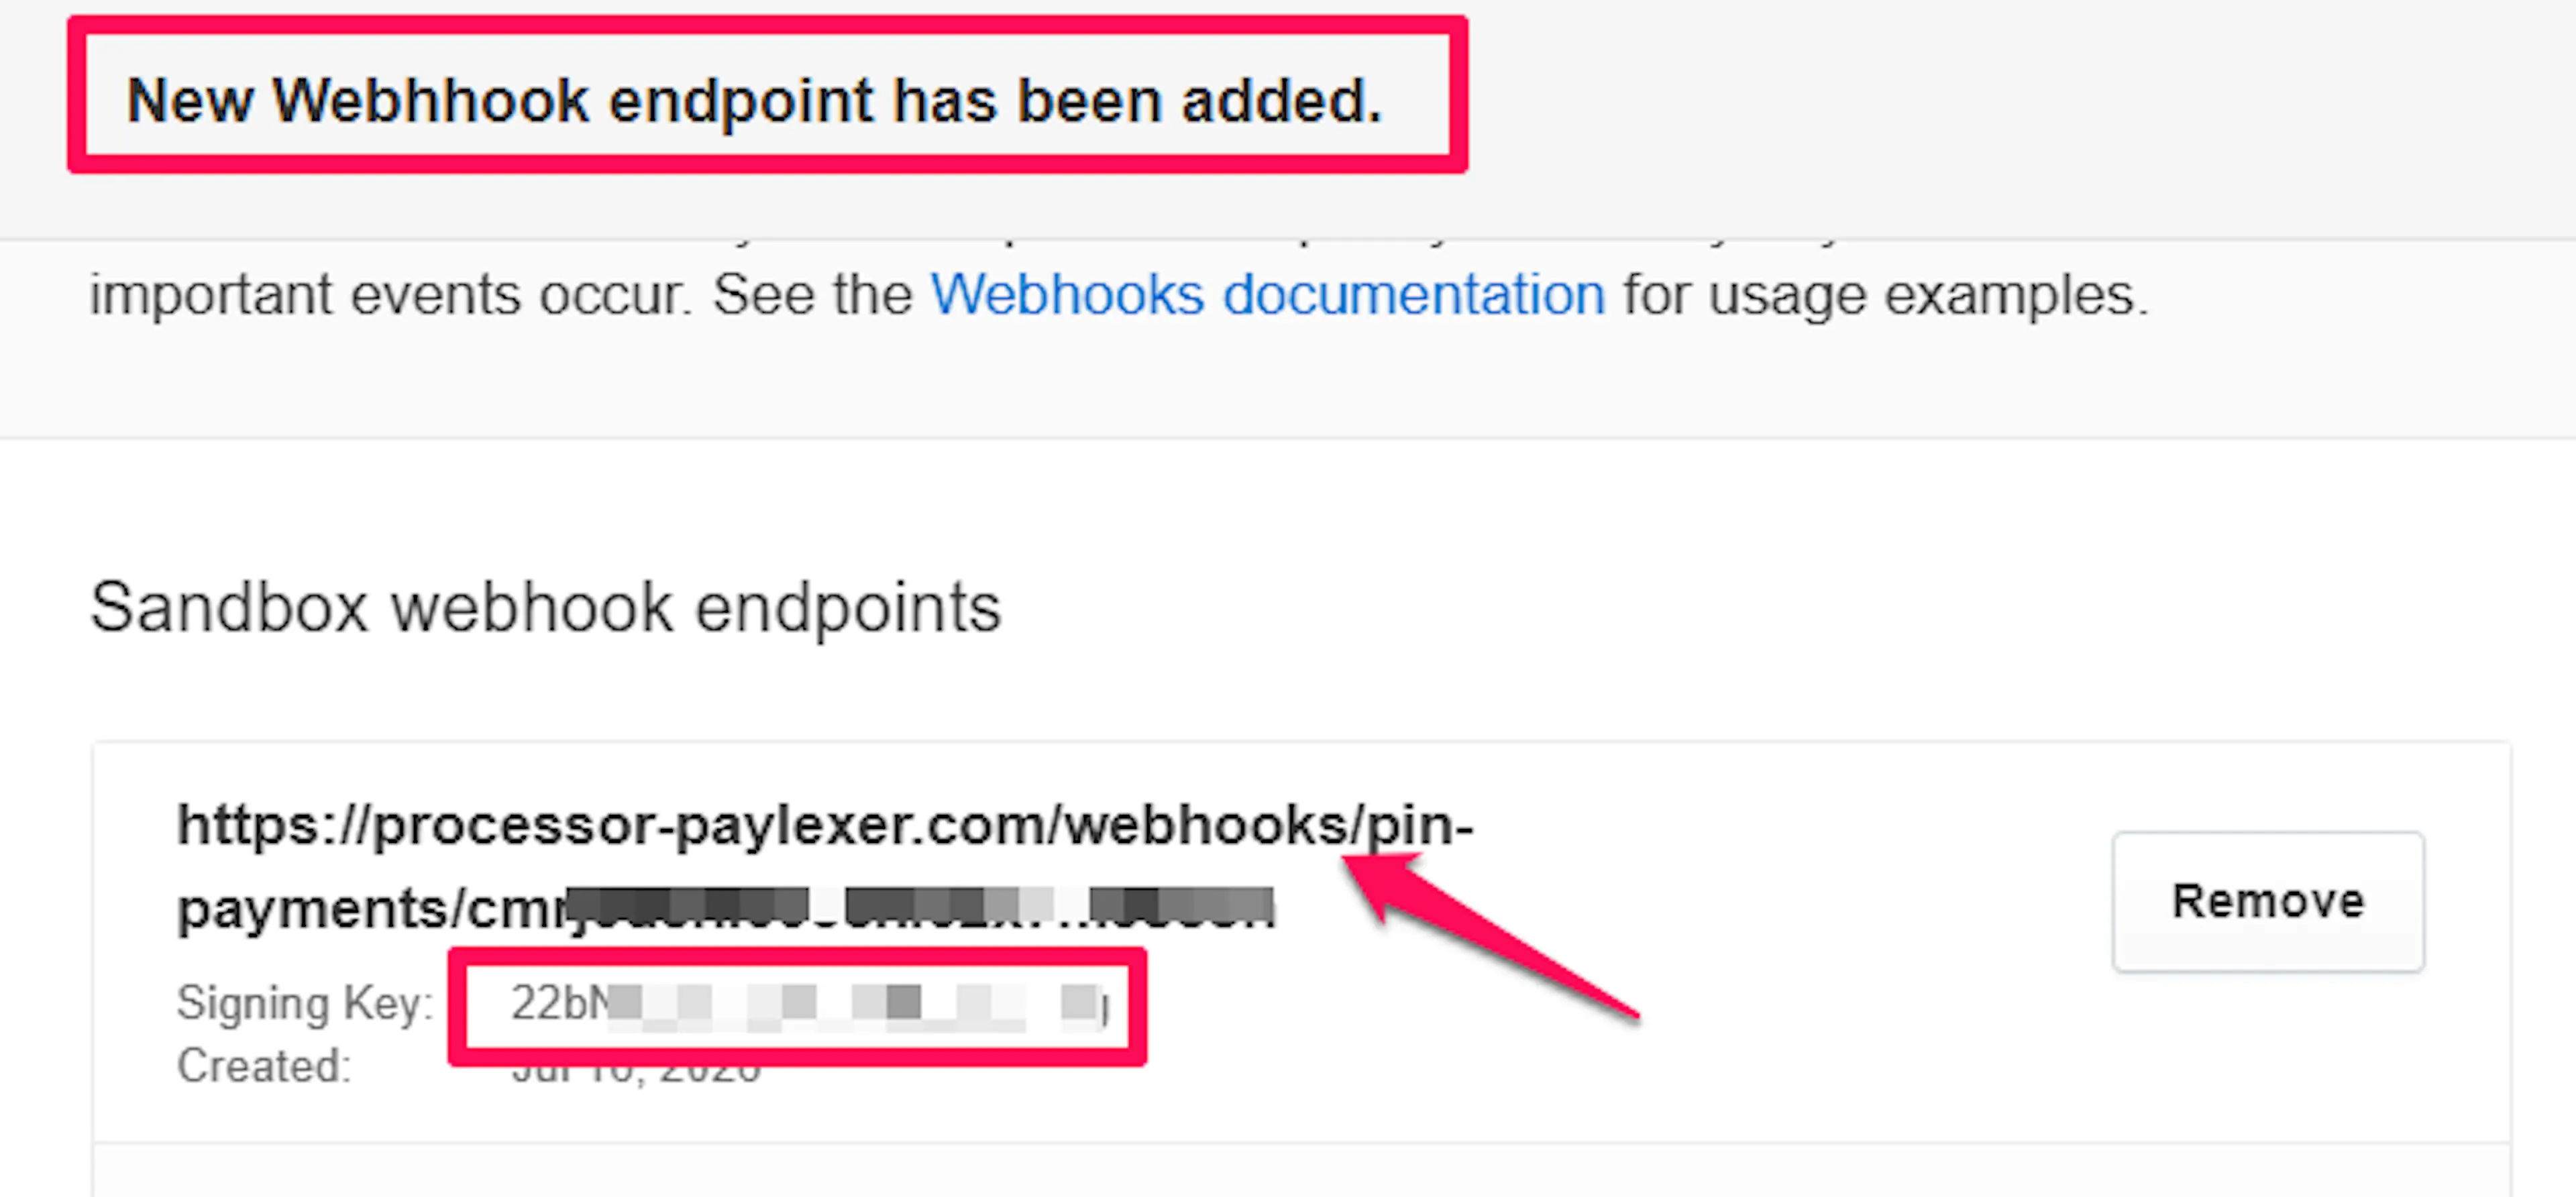
Copy the Signing Key before leaving this page. PayLexer uses it to verify webhook notifications. If you lose it, you'll need to re-register the webhook to generate a new key.
Add the Signing Key to PayLexer
Return to Payment Gateways → Pin Payments in your PayLexer dashboard. Paste the Signing Key into the Webhook Signing Secret field and click Save Configuration.
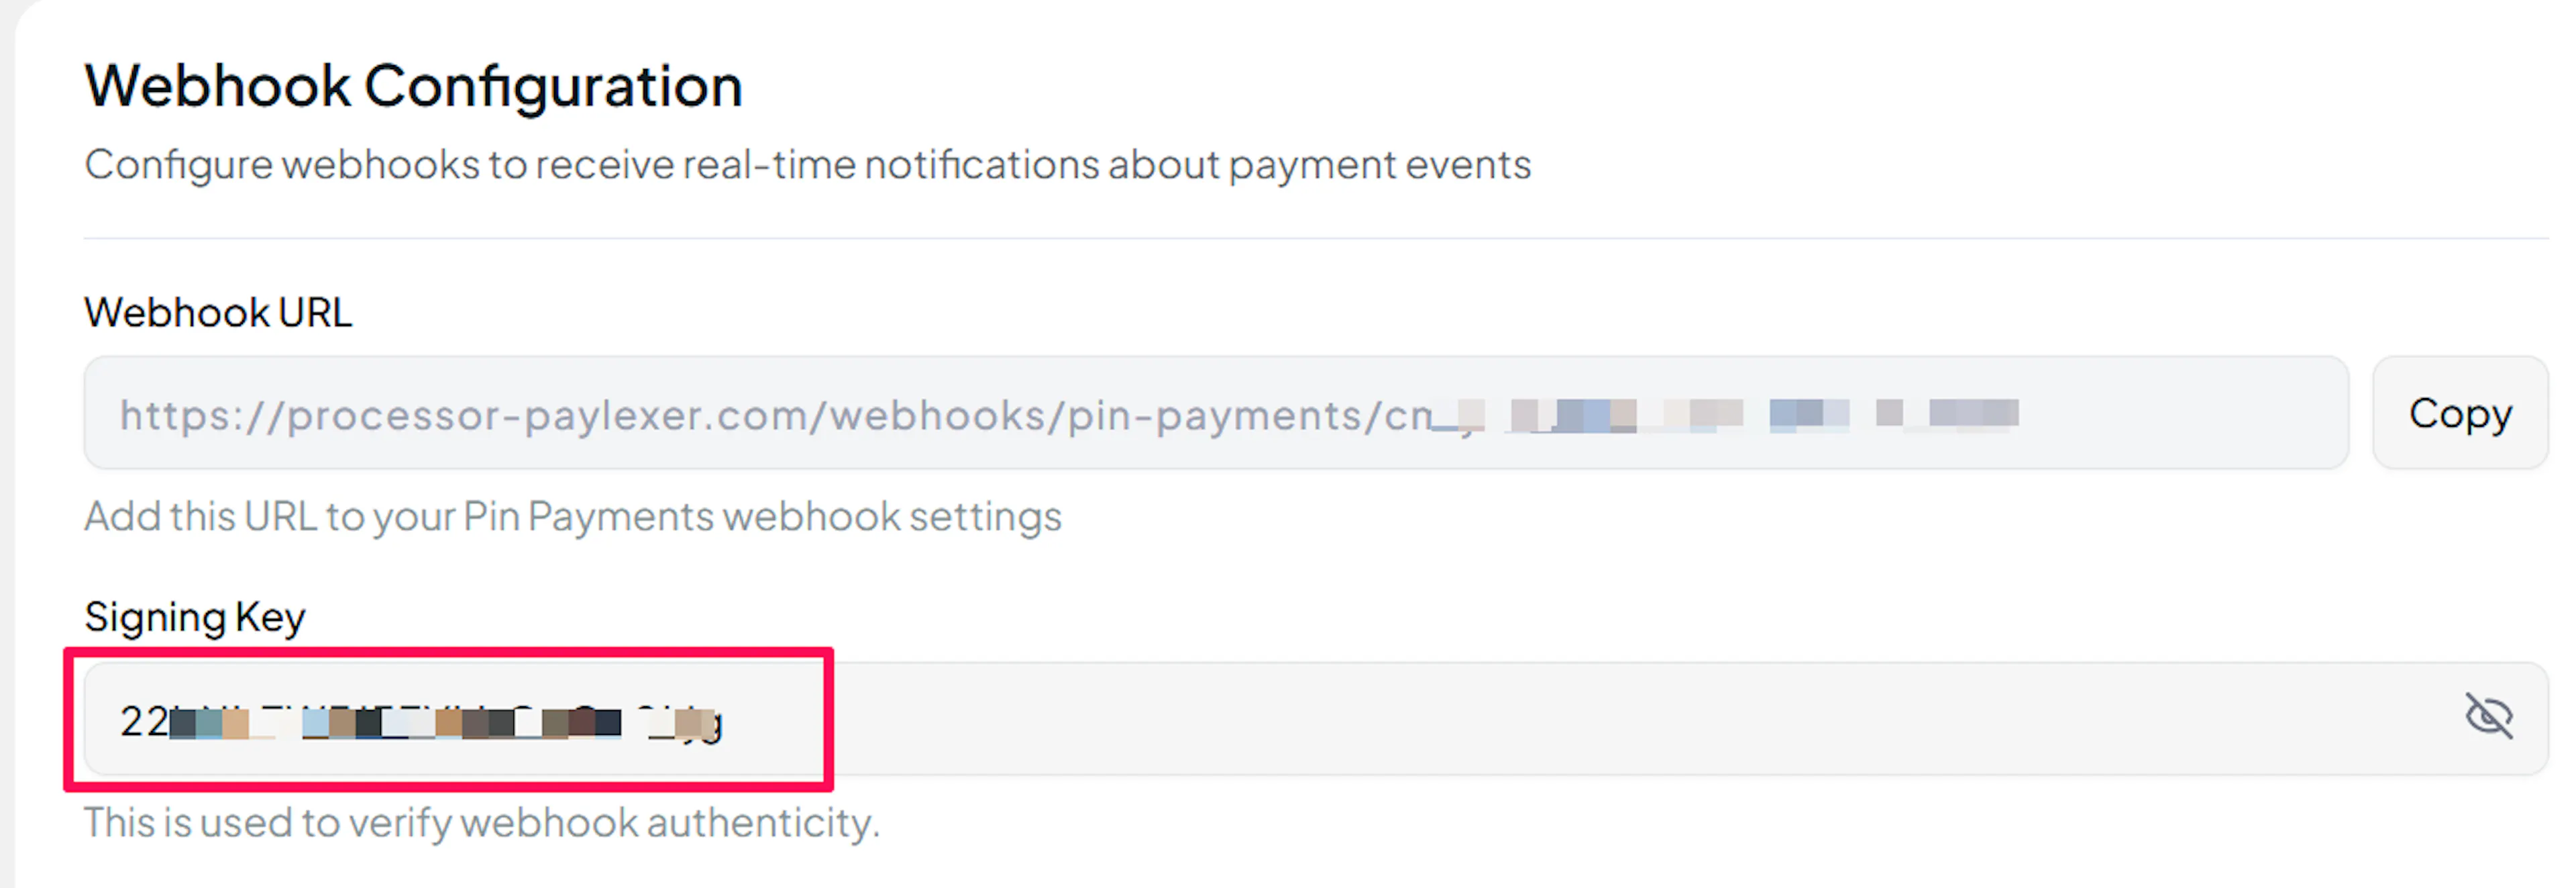
PayLexer will now verify every Pin Payments notification using HMAC-SHA256 before updating any order or subscription.
Integrate Pin Payments to Your Website
If you have already added and configured your site, you can enable Pin Payments in your existing setup.
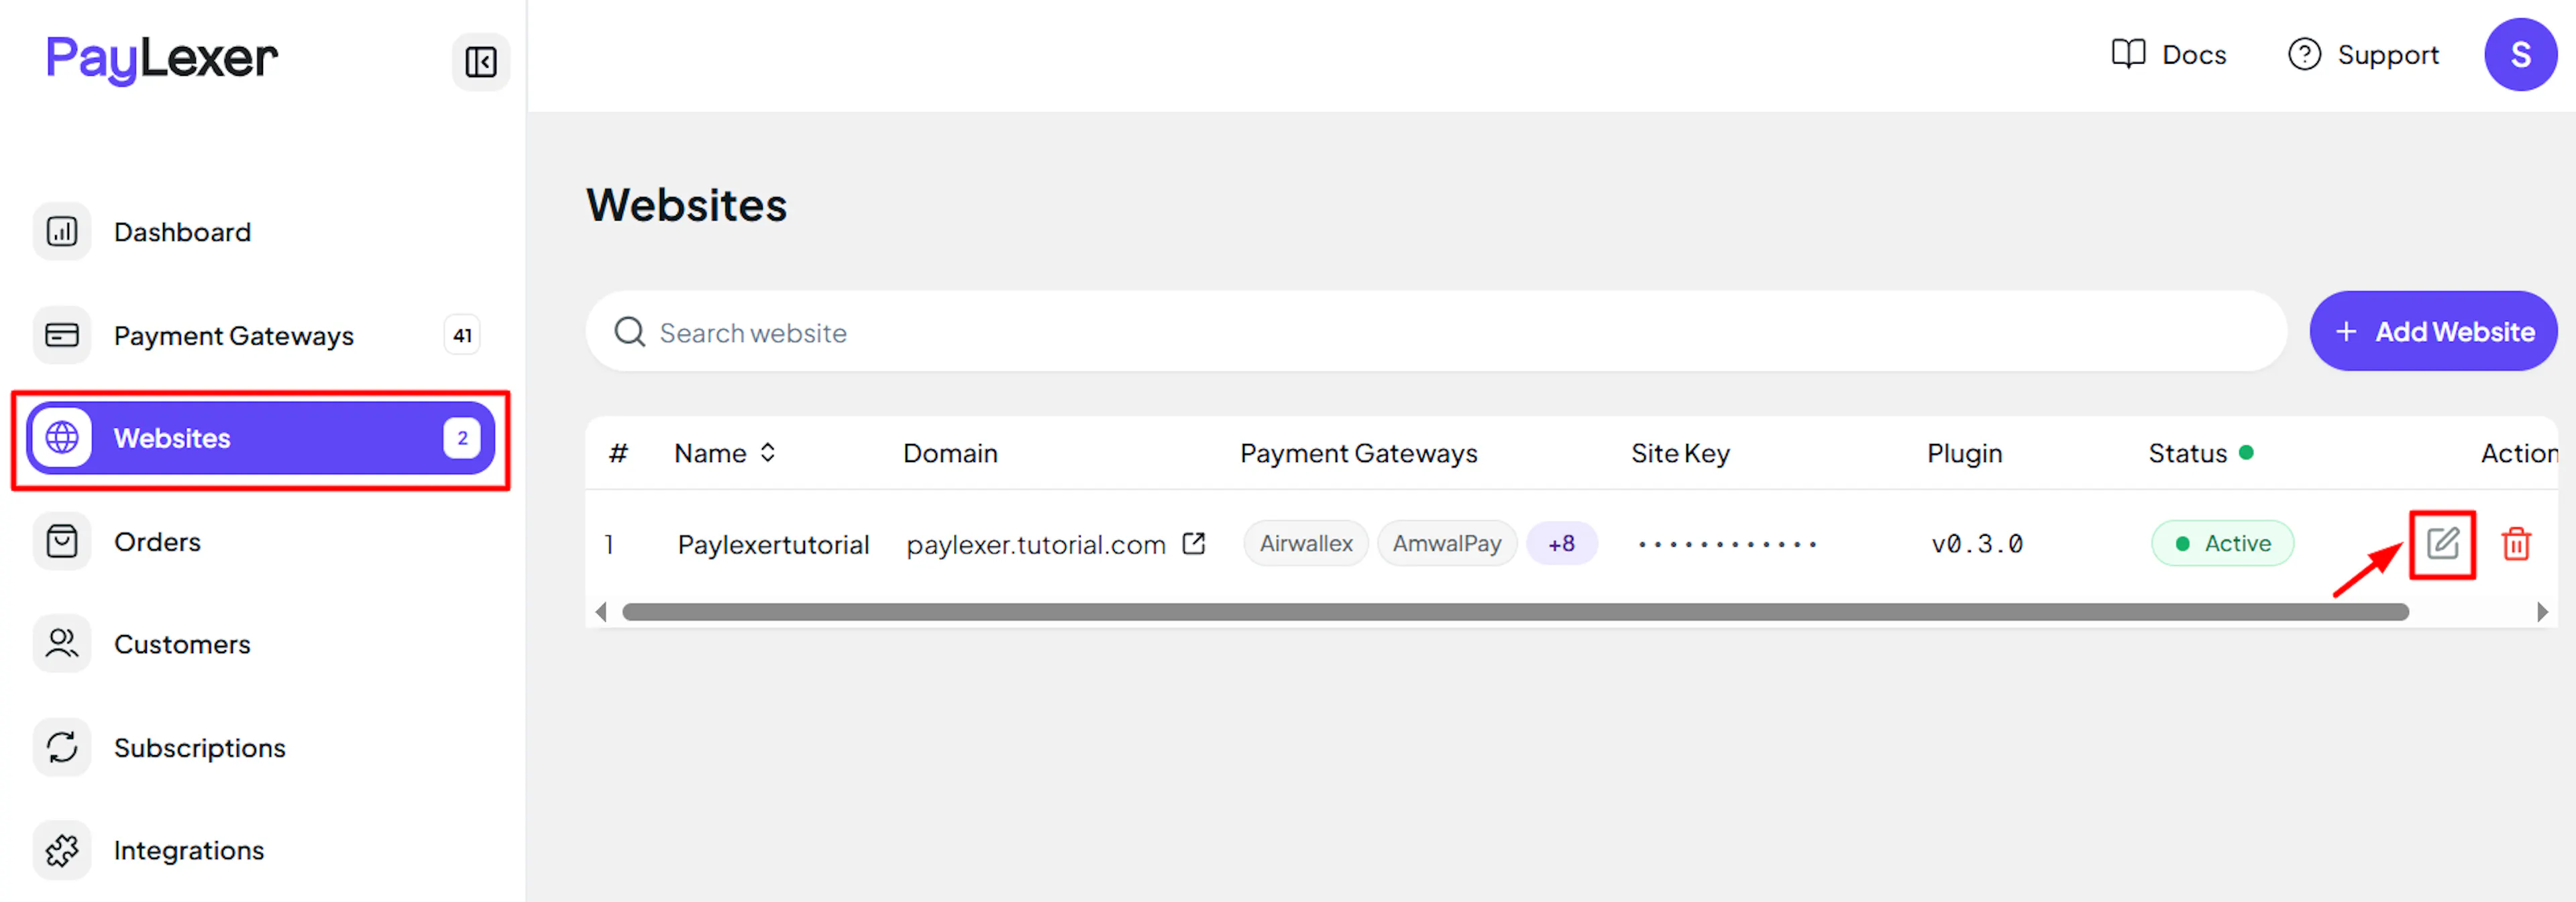
Go to Websites
Navigate to Websites in your PayLexer dashboard.
Edit your website
Click the Edit Icon of your added website.
Enable Pin Payments
Click the checkbox to enable Pin Payments for the website.
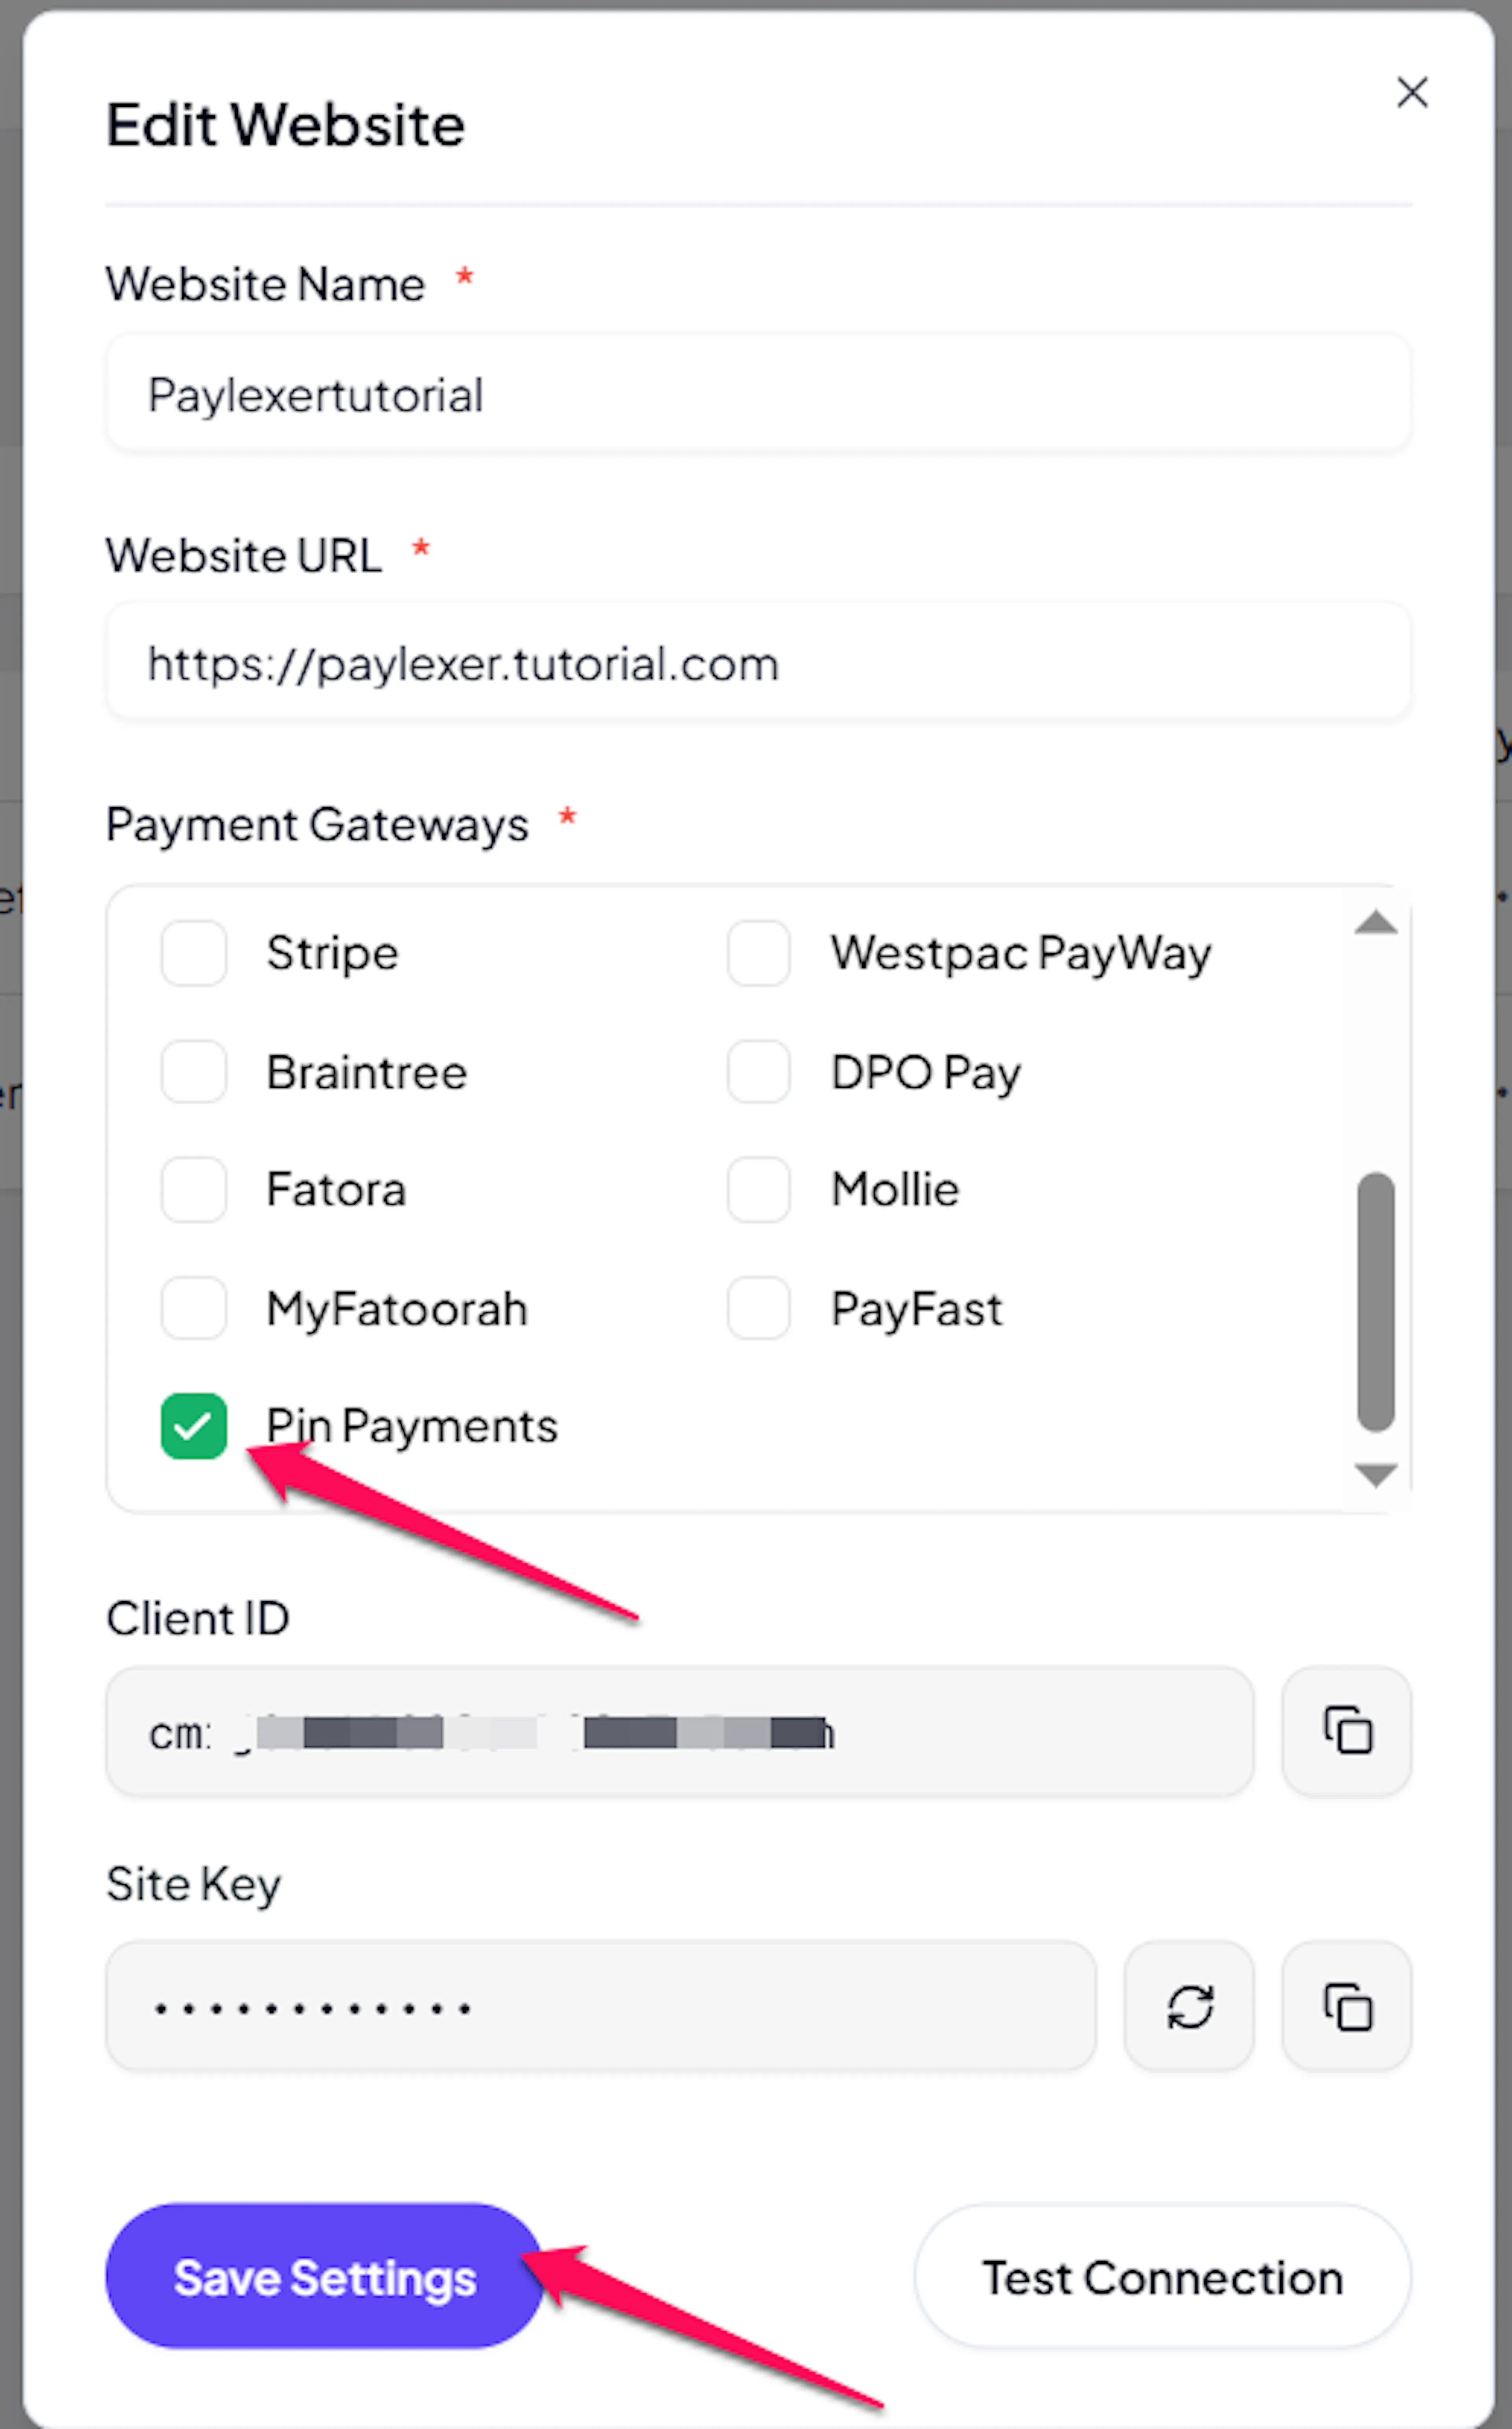
Pin Payments is now active for this website. Run a test transaction before switching off Debug/Test mode.
If you haven't added a website yet, Continue to Add Your Website →
Troubleshooting
Best Practices
- Test in sandbox before enabling production. Use your test keys and Pin Payments' test cards to complete a full payment before switching to live.
- Configure webhooks so payment, subscription, and refund events sync in real time. Without webhooks, subscription renewals and refund completions will not update automatically.
- Keep your Secret Key and Webhook Signing Secret confidential. Do not expose them in client-side code or share them publicly. Rotate them immediately if you suspect they have been compromised.
- For subscriptions with a sign-up fee and a trial period, the sign-up fee is charged immediately at subscription start while the first recurring charge is deferred until the trial ends.
- If your subscription includes one-off products alongside a recurring item, PayLexer handles the one-off charge separately on the same saved card before creating the subscription - if the one-off charge fails, the subscription is not created.
FAQs
Still Have Questions?
- Pin Payments Support: Pin Payments Support
- PayLexer Support: Contact Support
For API references and webhook integration details, see the Pin Payments developer documentation.