How to Integrate PayLexer with FluentCart
Connect PayLexer to FluentCart to handle secure payment processing across multiple gateways directly from your WordPress store.
FluentCart is a lightweight WordPress shopping cart and checkout plugin designed for creators, coaches, and digital product sellers. It enables you to sell products and services with a streamlined checkout experience directly from your WordPress site.
PayLexer integrates with FluentCart to handle secure payment processing across multiple gateways (like Stripe, Airwallex, Paystack, Square, etc).
Supported Features
-
One-time payments - Accept full payment for a product or service in a single transaction.
-
Multiple payment gateways and websites - Connect and manage several gateways and websites from one PayLexer account.
-
Test mode via FluentCart's Store Mode - Safely test payments without real charges before going live.
-
Live payments - Process real transactions securely once setup is verified.
-
Simplified checkout - Optimized checkout flow for better conversion.
Before You Start
Prerequisites
Make sure you have:
-
Configured Payment Gateway – Choose & configure a gateway →
-
PayLexer Account Required to configure the integration. Create your account →
-
Admin Access to your WordPress Site Required to install the PayLexer plugin and configure settings.
-
FluentCart Plugin Installed & Active Your site should have the plugin installed. Download FluentCart →
Setup Journey
Haven't configured PayLexer yet? Follow these steps in order:
-
Getting Started - Complete setup guide →
-
Configure Payment Gateway - Choose & configure gateway →
-
Add Your Website - Add your site →
-
Platform Integration - You're here! ✓
-
Test Transactions & Platform Integration - Verify everything works →
Integration Steps
Step 1: Choose WordPress as the Platform
In the Add Website flow inside your PayLexer dashboard:
-
Select WordPress as the platform
-
Download the PayLexer WordPress plugin (
.zipfile) -
Copy the credentials generated by PayLexer:
-
Client ID
-
Site Key
-

Keep this tab open - you will paste these credentials into WordPress in Step 3.
Step 2: Install the PayLexer WordPress Plugin
Go to WordPress Admin - Plugins - Add Plugin
-
Click Upload Plugin
-
Click Choose File and select the
.zipfile you downloaded from PayLexer -
Click Install Now

- Click Activate once installation completes
The PayLexer plugin is now active on your WordPress site.
Step 3: Connect FluentCart to PayLexer
Go to FluentCart - Settings - Payment Settings in your WordPress admin.
You will see two fields:
-
Client ID
-
Site Key

-
Copy the Client ID and Site Key from PayLexer
-
Paste them into FluentCart - Settings - Payment Settings
-
Click Save Settings
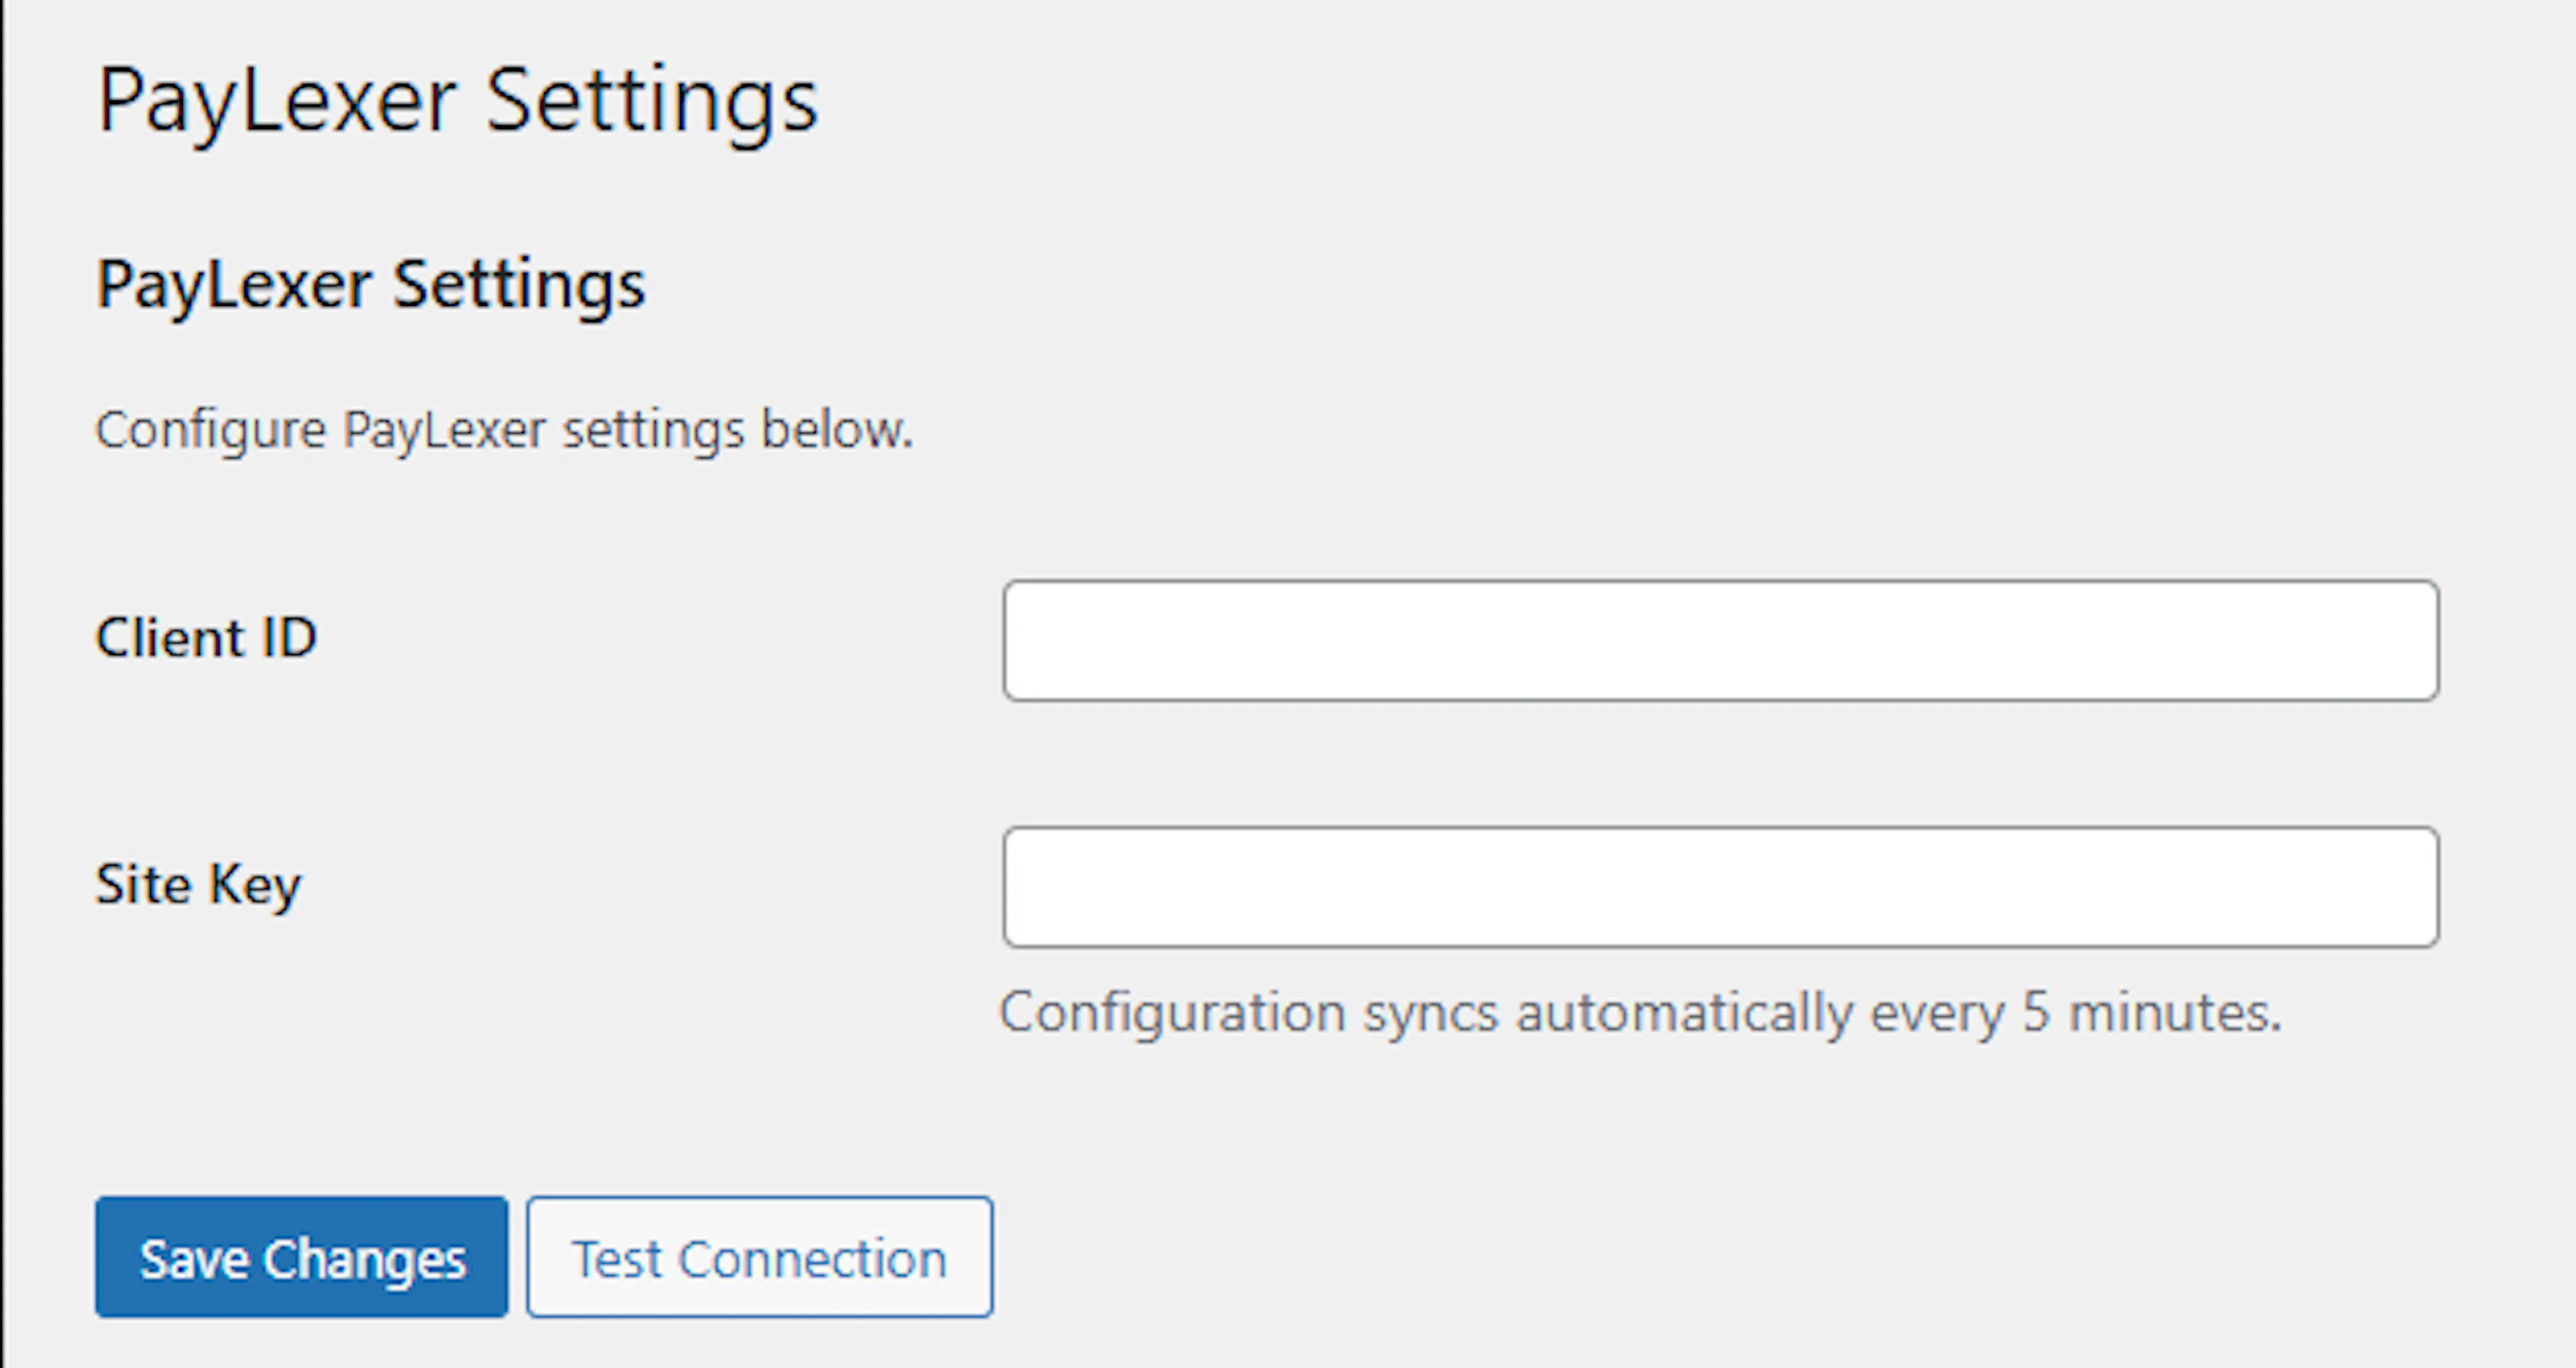
This establishes a secure connection between FluentCart and PayLexer.
Step 4: Test the Connection
Return to your PayLexer dashboard and go back to the Add Website flow.
- Click Test Connection
Success: Website shows as Connected.
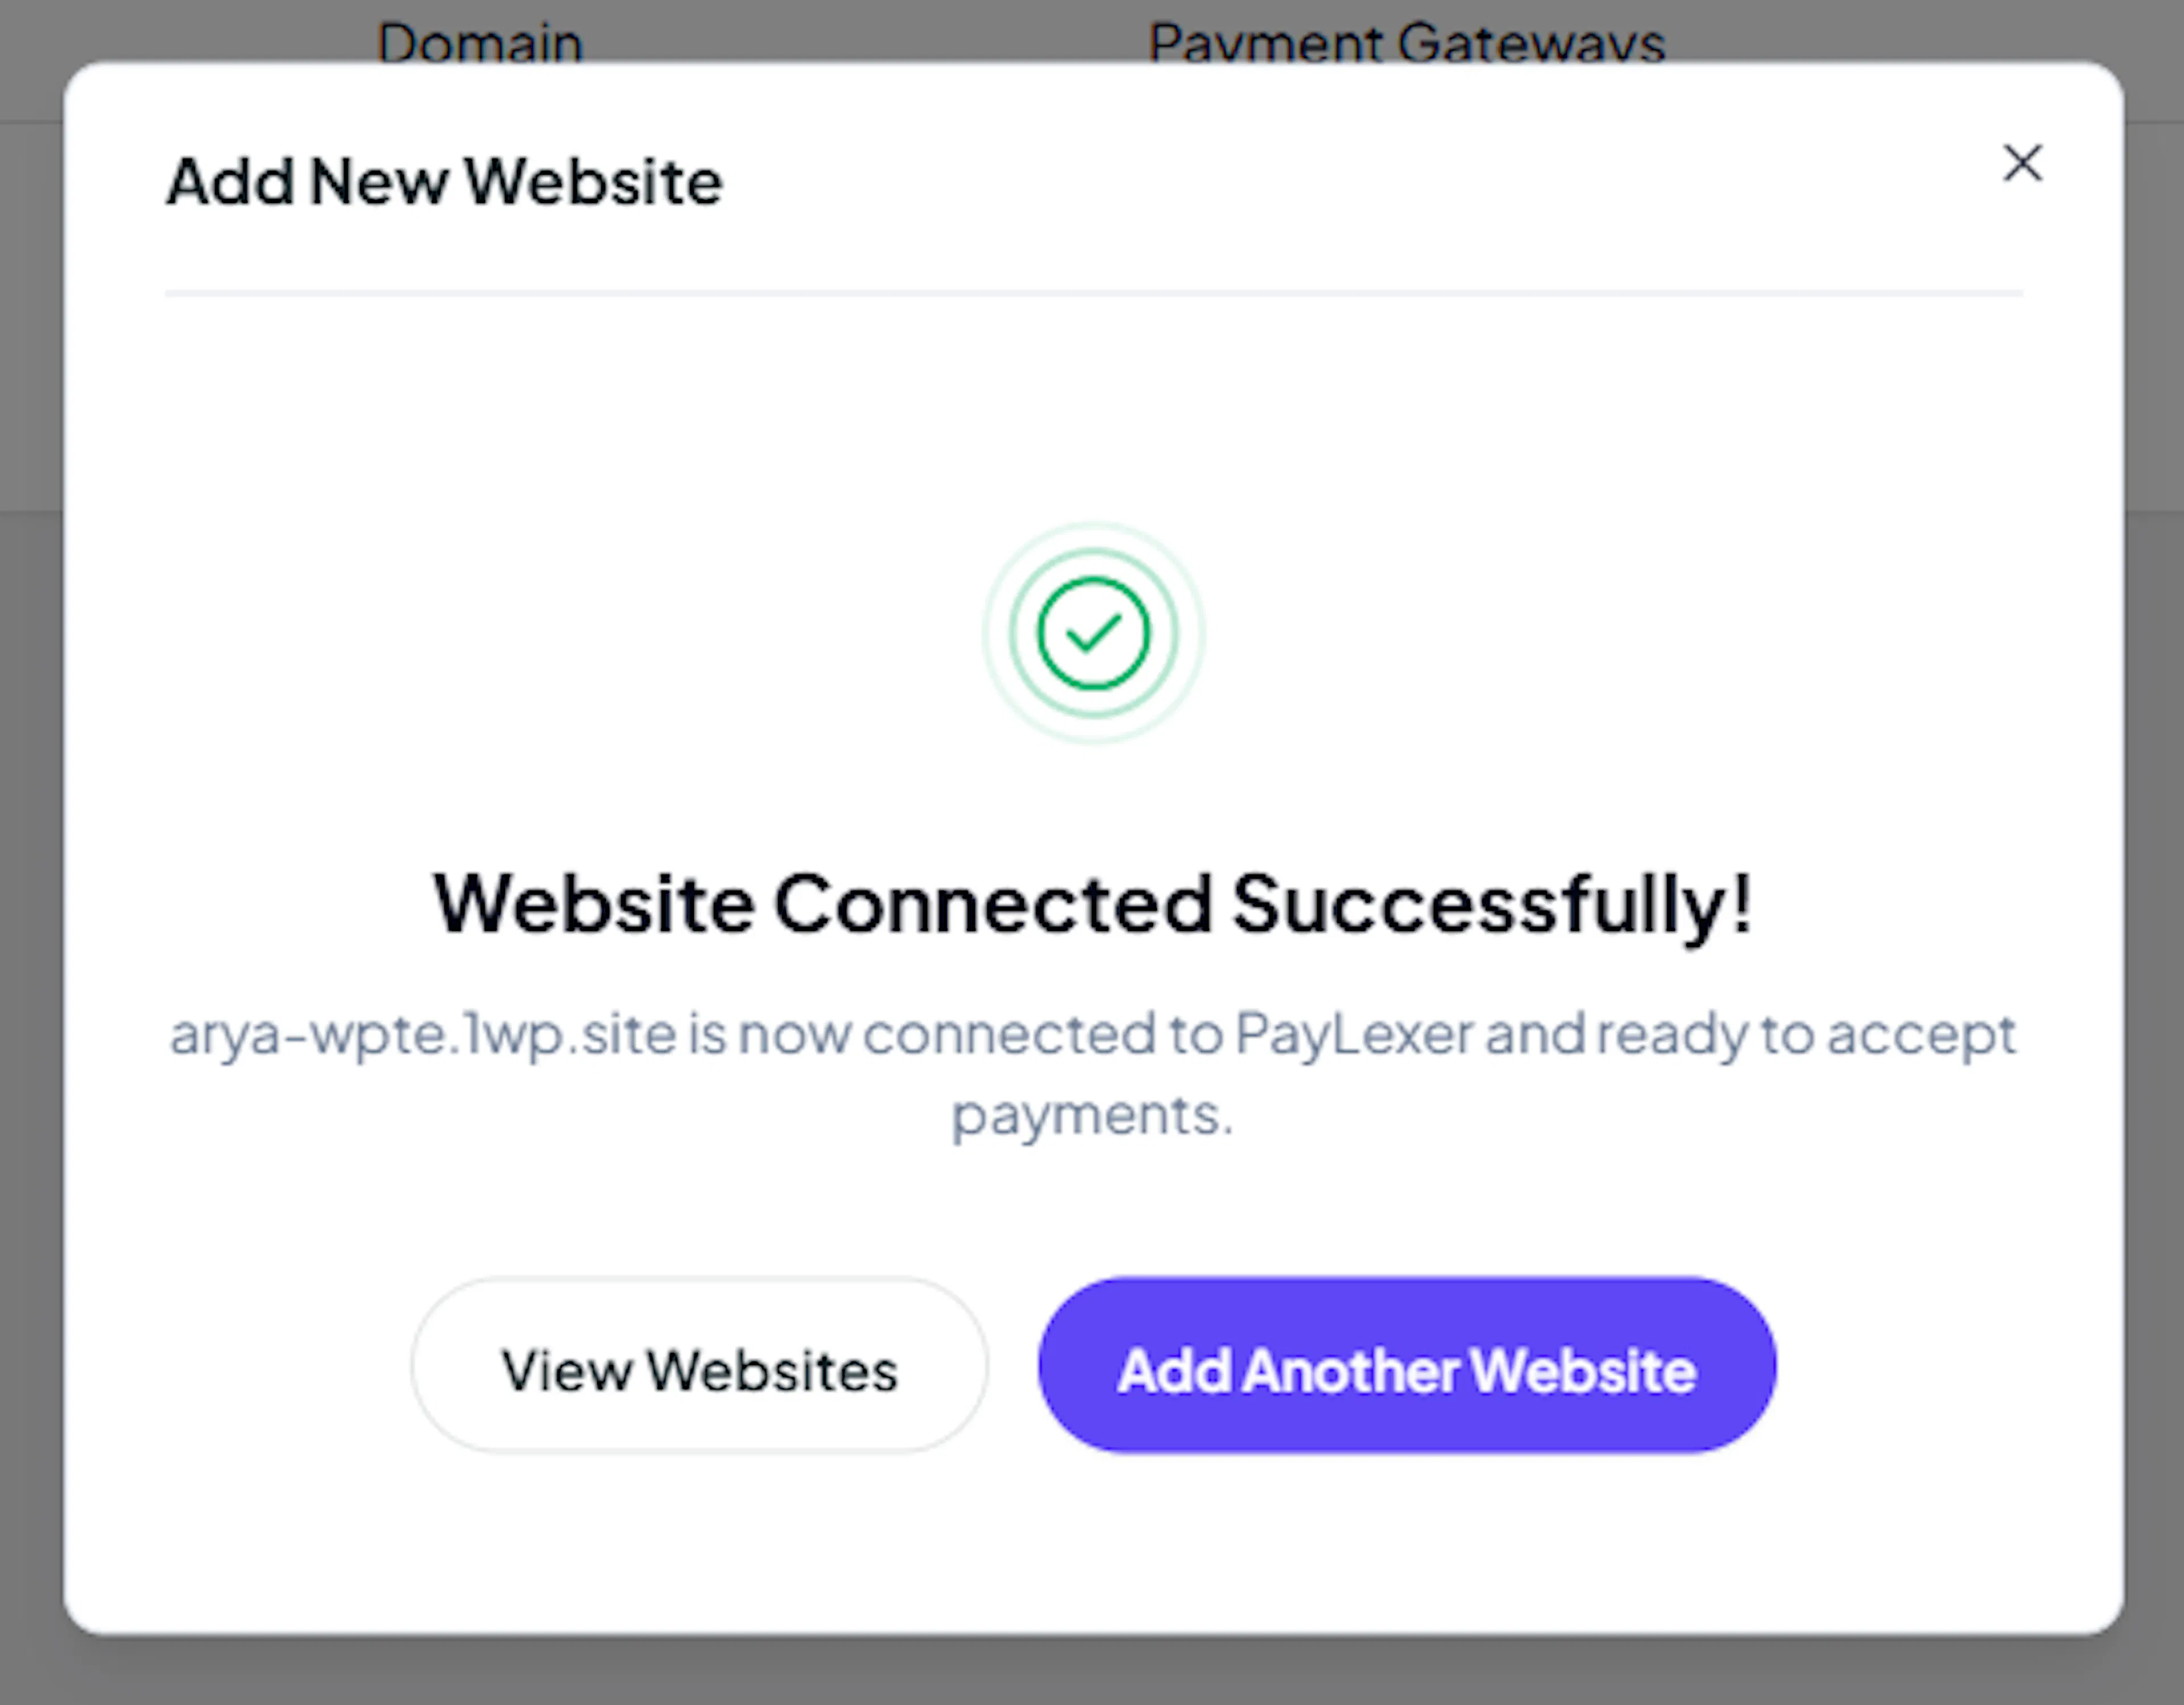
Your website is now connected. Payments can be processed once at least one gateway is active.
On failure, try checking the Website URL or the credentials you have pasted in FluentCart.
Your website must show as Connected before payments can be processed.
Step 5: Enable PayLexer Payment Gateways in FluentCart
Once the connection is successful, your PayLexer-configured gateways appear automatically in FluentCart.
Go to FluentCart - Settings:

- Click Manage next to any gateway to configure it individually
- Use the Payment Activation toggle to enable or disable a specific gateway


If a gateway does not appear, confirm it is fully configured and active in your PayLexer dashboard, then re-save your credentials in FluentCart.
PayLexer will now handle payment processing for FluentCart orders.
Customize Gateway Settings
Once a payment gateway is enabled, you can customize how it appears to your customers at checkout. This applies to all payment gateways - the steps below use Paddle as an example.
This is useful when you want to show a friendlier name to your customers. For example:
-
Show "Credit Card" instead of "Paddle" or "Stripe" - most customers do not know the gateway name
-
Translate the label for your audience - "Tarjeta de crédito" for Spanish, "Carte bancaire" for French
-
Add checkout instructions in your customer's language
-
Upload a logo that matches your store's branding
Go to FluentCart → Settings → Payment Settings, find the gateway, click Manage, then click the Edit icon.
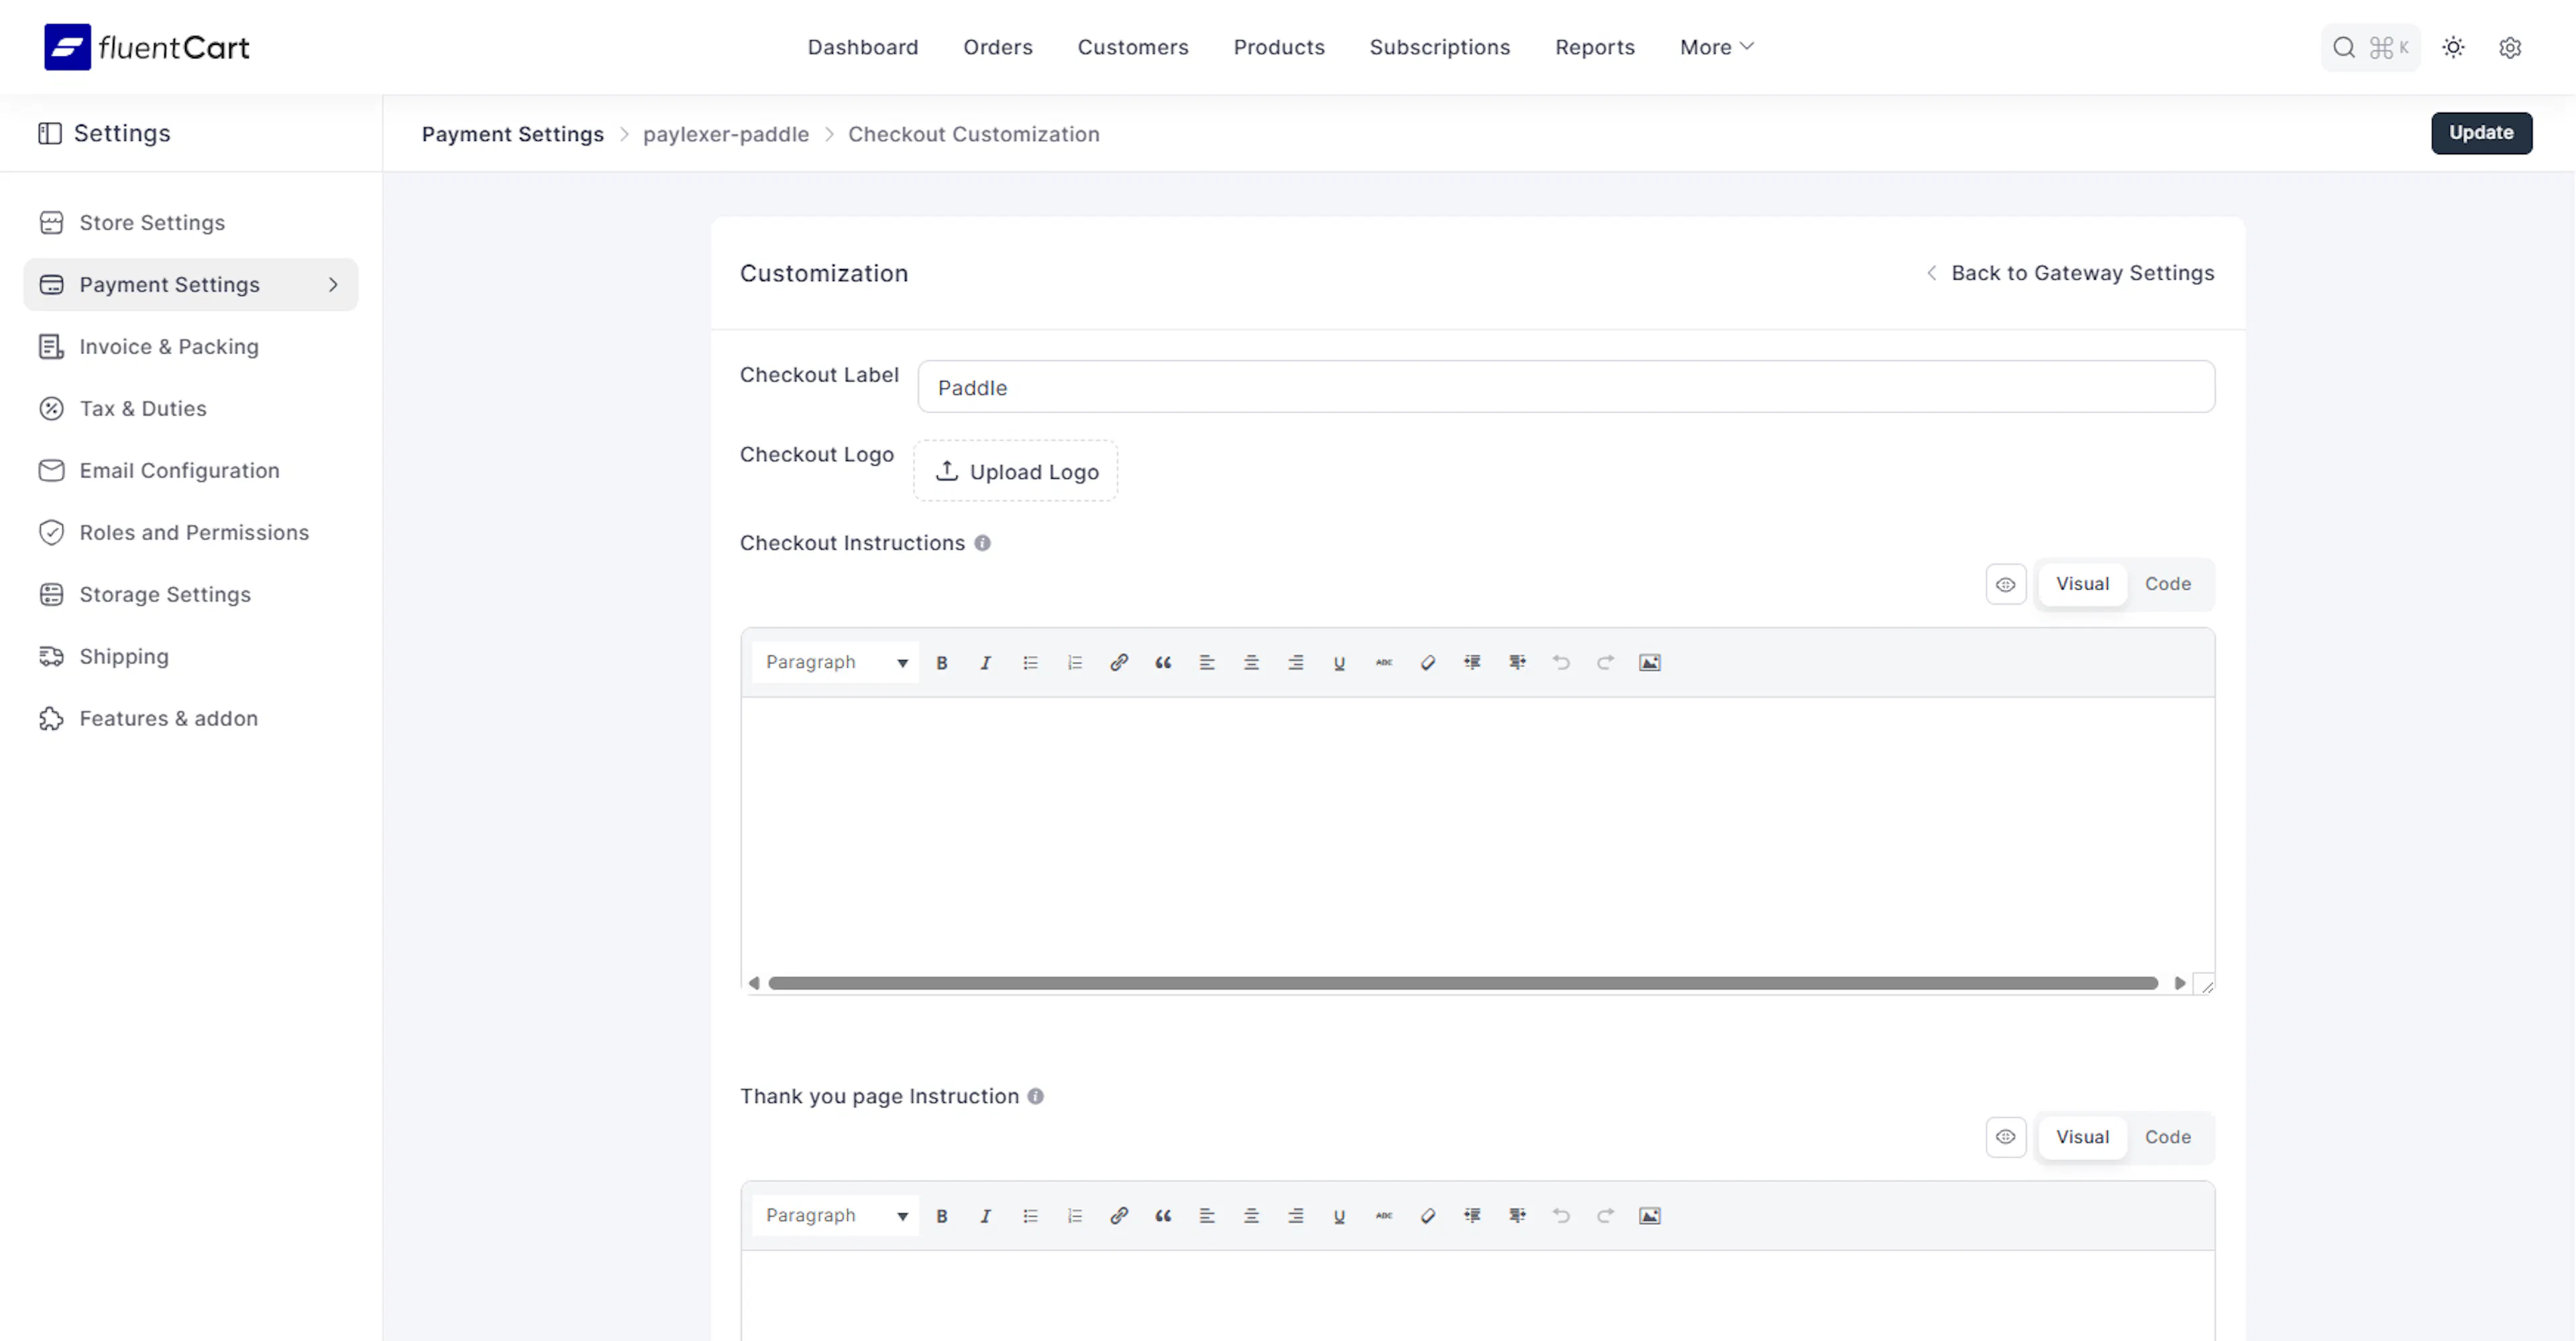
You can update the following fields:
-
Checkout Label - The name shown to customers when they choose a payment method at checkout. By default this is the gateway name (e.g., "Paddle"). Change it to something more familiar to your customers.
-
Checkout Logo - Upload a logo or icon to display next to the payment option at checkout. You can use the gateway's own logo or a generic card icon.
-
Checkout Instructions - Optional text shown to customers on the checkout page after they select this payment method. Use this to guide them - for example, "You will be redirected to complete your payment securely."
-
Thank You Page Instruction - Optional text shown on the confirmation page after a successful payment. Use this to tell customers what to expect next - for example, a delivery timeline or a download link notice.

Click Update in the top right to save.
Test Mode & Debug Mode
PayLexer supports full testing without real charges.
How Test Mode Works
Test Mode is autodetected. PayLexer reads the Store Mode setting directly from FluentCart - no manual toggle per gateway is required.
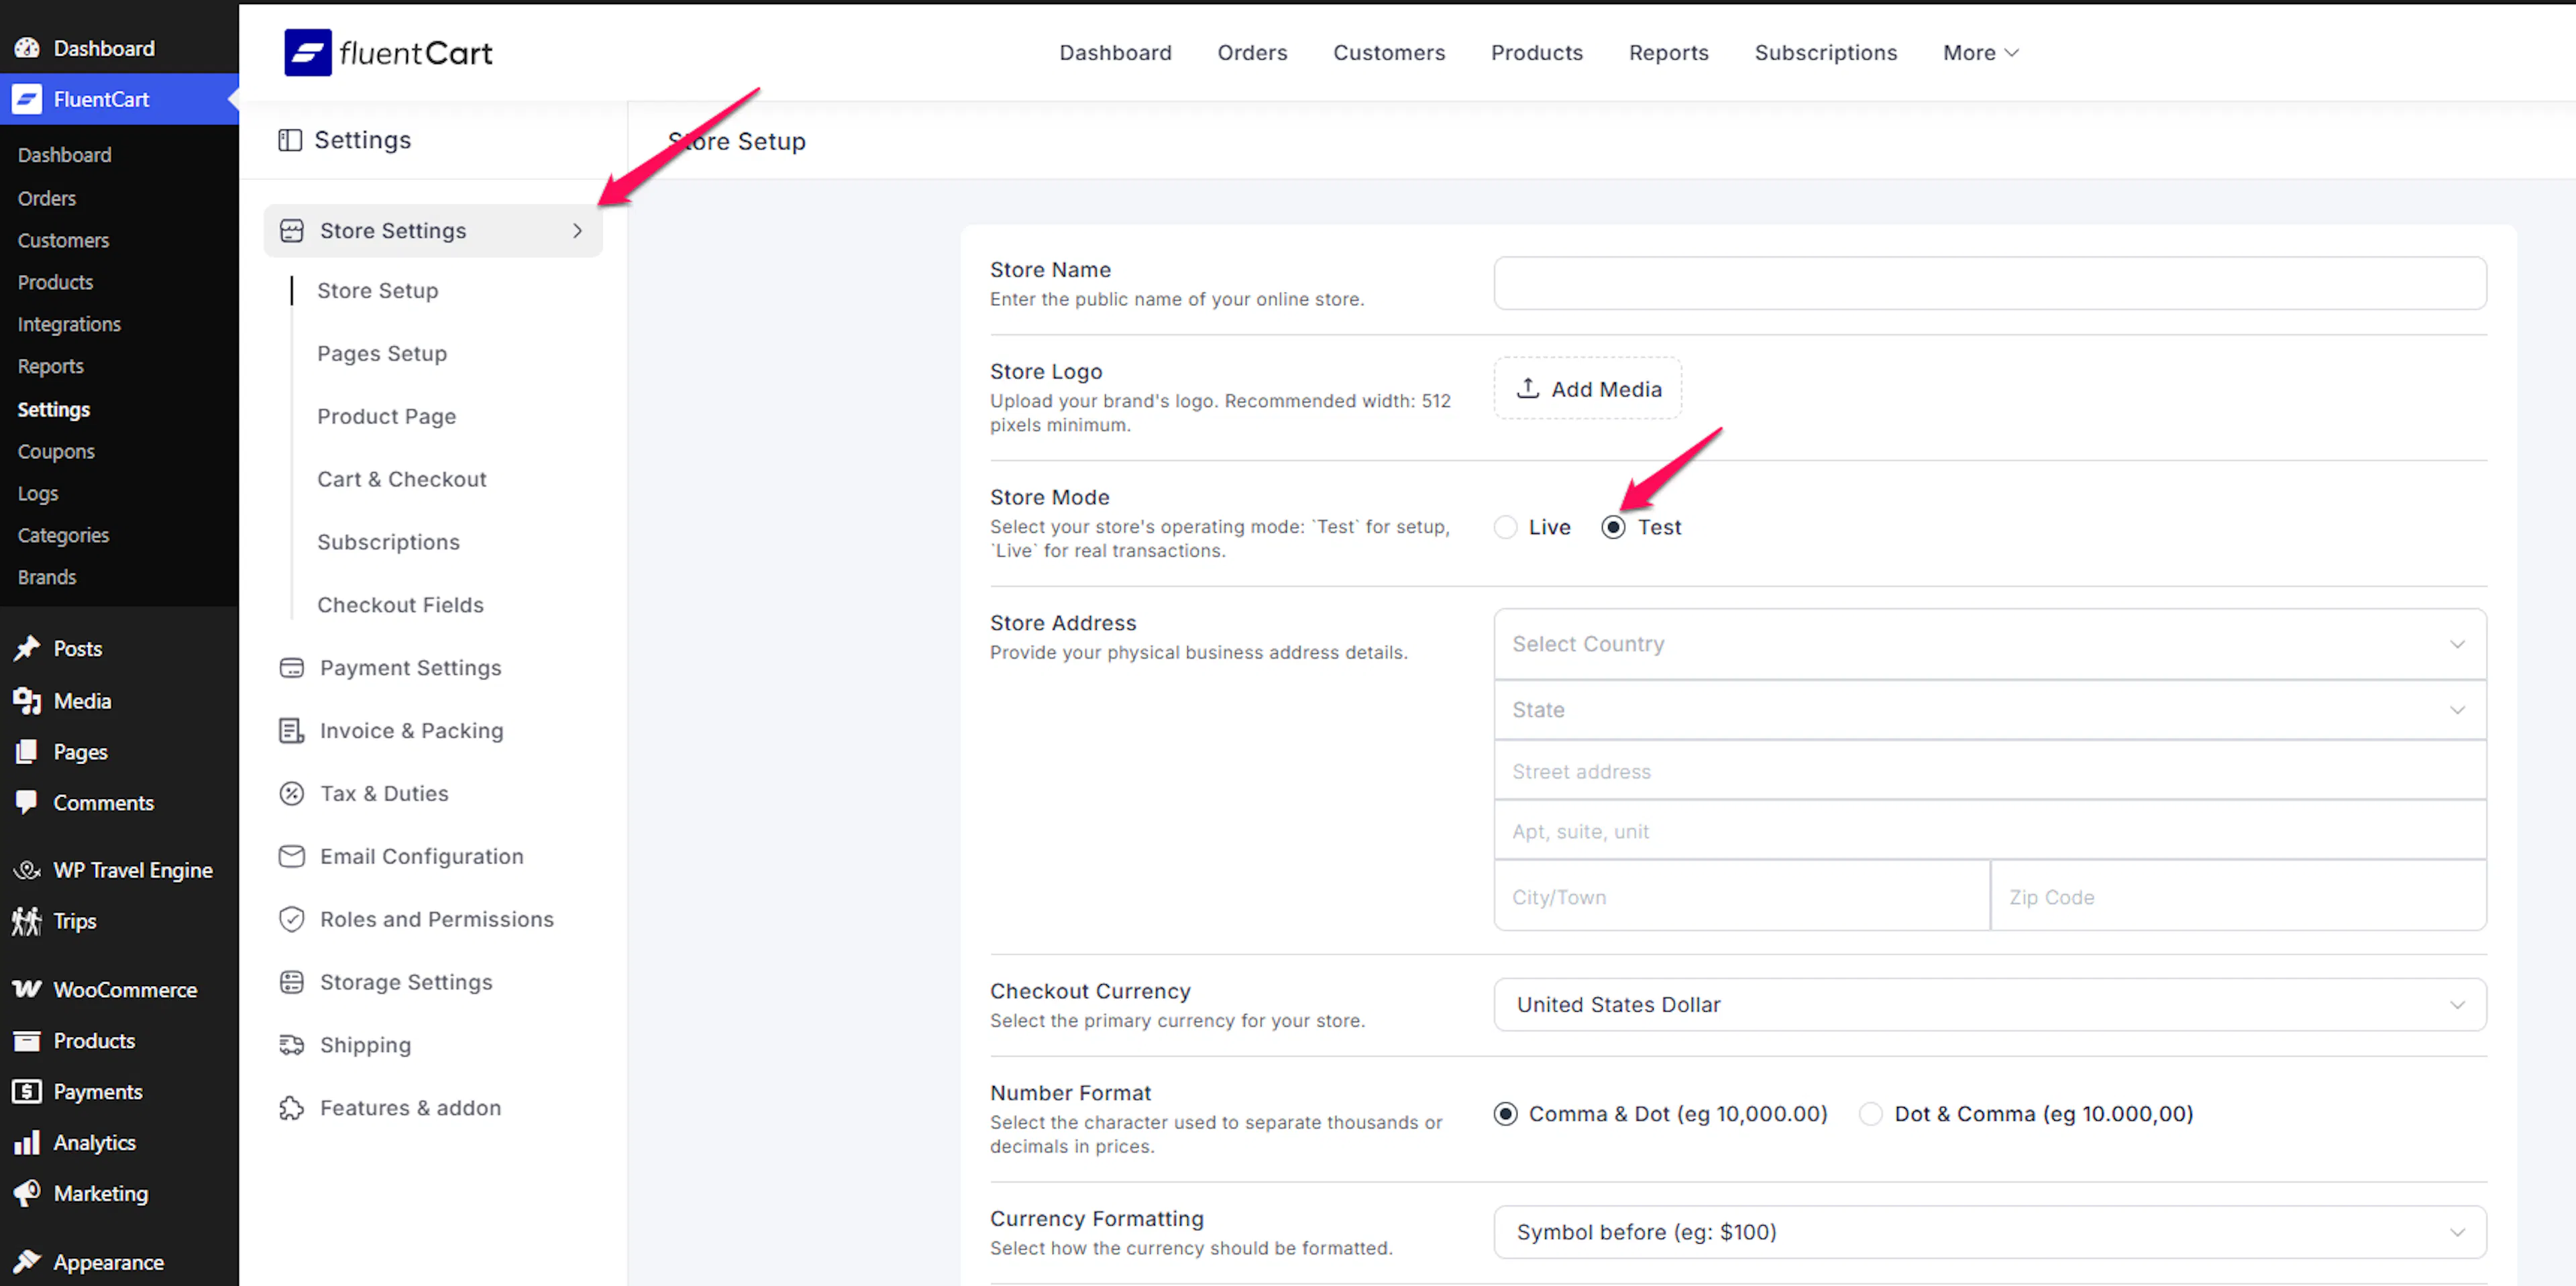
To set or verify your Store Mode:
-
Go to FluentCart - Settings - Store Settings - Store Setup
-
Locate the Store Mode field
-
Select Test for setup and testing, or Live for real transactions
When Store Mode is set to Test:
-
Uses Test credentials in PayLexer's Payment Gateway Configuration page
-
FluentCart orders will be created normally
-
Payments are processed in test mode
When Store Mode is set to Live, the Live credentials in PayLexer's Payment Gateway Configuration page are used.
Confirm** Store Mode** is set to Test in FluentCart - Settings - Store Settings - Store Setup before placing a test order.
Payment Flow Overview
-
Customer views a product or offer in FluentCart
-
Customer proceeds to checkout
-
Payment Gateway from PayLexer is selected at checkout
-
Payment is processed via the configured gateway
-
Order is confirmed based on payment result
-
Order appears in:
-
PayLexer Orders
-
FluentCart Orders
-
A new PayLexer order is created for every payment attempt.
Payment Flow Overview
A new PayLexer order is created for every payment attempt.
Next Steps: Test Transactions & Integration
After connecting FluentCart to PayLexer and enabling gateways, it's important to validate that payments are processed correctly.
-
Basic testing in FluentCart: Use the Test Mode above to create orders without real charges.
-
Advanced or platform-specific testing: For full test transactions, including refunds and multi-gateway scenarios, follow our dedicated guide:
Test Transactions & Platform Integration Guide →
This guide uses Stripe as an example to walk through real test transactions, helping you validate your full payment flow before going live.
Troubleshooting
Best Practices
-
Always test with Test credentials before switching to Live
-
Enable webhooks for better reliability
-
Run one small real payment after going live to confirm everything works
-
Test the complete checkout flow including confirmation emails
-
Monitor both PayLexer and FluentCart dashboards during testing
Final Checklist
Before going live:
-
Payment gateway tested successfully
-
At least one payment method enabled
-
Website status shows Active
-
FluentCart payment method set to PayLexer
-
Live credentials added (not just test)
-
Store Mode set to Live in FluentCart - Settings - Store Settings - Store Setup
-
Confirmation emails working properly
FAQs
Still Have Questions?
-
PayLexer Support: Contact Support
-
FluentCart Support: Visit FluentCart Support
Learn More
For settings and advanced configuration, see the FluentCart documentation.