Midtrans
Connect Midtrans to PayLexer to accept cards, bank transfers, e-wallets, and local Indonesian payment methods.
Midtrans is an Indonesia-focused payment gateway supporting a wide range of local and international payment methods including credit and debit cards, bank transfers, e-wallets (GoPay, OVO, Dana, ShopeePay), QRIS, and convenience store payments. It operates primarily in Indonesia and supports both one-time and recurring payments through its Snap and Core API products.
- Supported Regions (Merchant Accounts): Indonesia
- Supported Currencies: IDR (Indonesian Rupiah); international card payments may be accepted depending on your merchant account configuration
Supported Features
-
Credit and debit card payments (Visa, Mastercard, JCB, American Express)
-
Bank transfers (BCA, BNI, BRI, Mandiri, Permata, and others)
-
E-wallet payments (GoPay, OVO, Dana, ShopeePay, LinkAja)
-
QRIS (Quick Response Code Indonesian Standard)
-
Convenience store payments (Indomaret, Alfamart)
-
3D Secure (3DS) card authentication
-
Sandbox and production environments
-
Webhook notifications for real-time payment status updates
Before You Start
Make sure you have:
- Midtrans Account – Don't have one? Sign up for Midtrans →
- PayLexer Account – Required to configure the integration. Create your account →
- A website where you want to integrate
Looking for a different payment processor? View all supported gateways →
Configuring Midtrans
You need a Server Key and Client Key from Midtrans for this integration. Separate credentials are required for Sandbox and Production environments.
Getting API Credentials
Log in to your Midtrans dashboard
Go to the Midtrans production dashboard or the Midtrans sandbox dashboard and sign in.
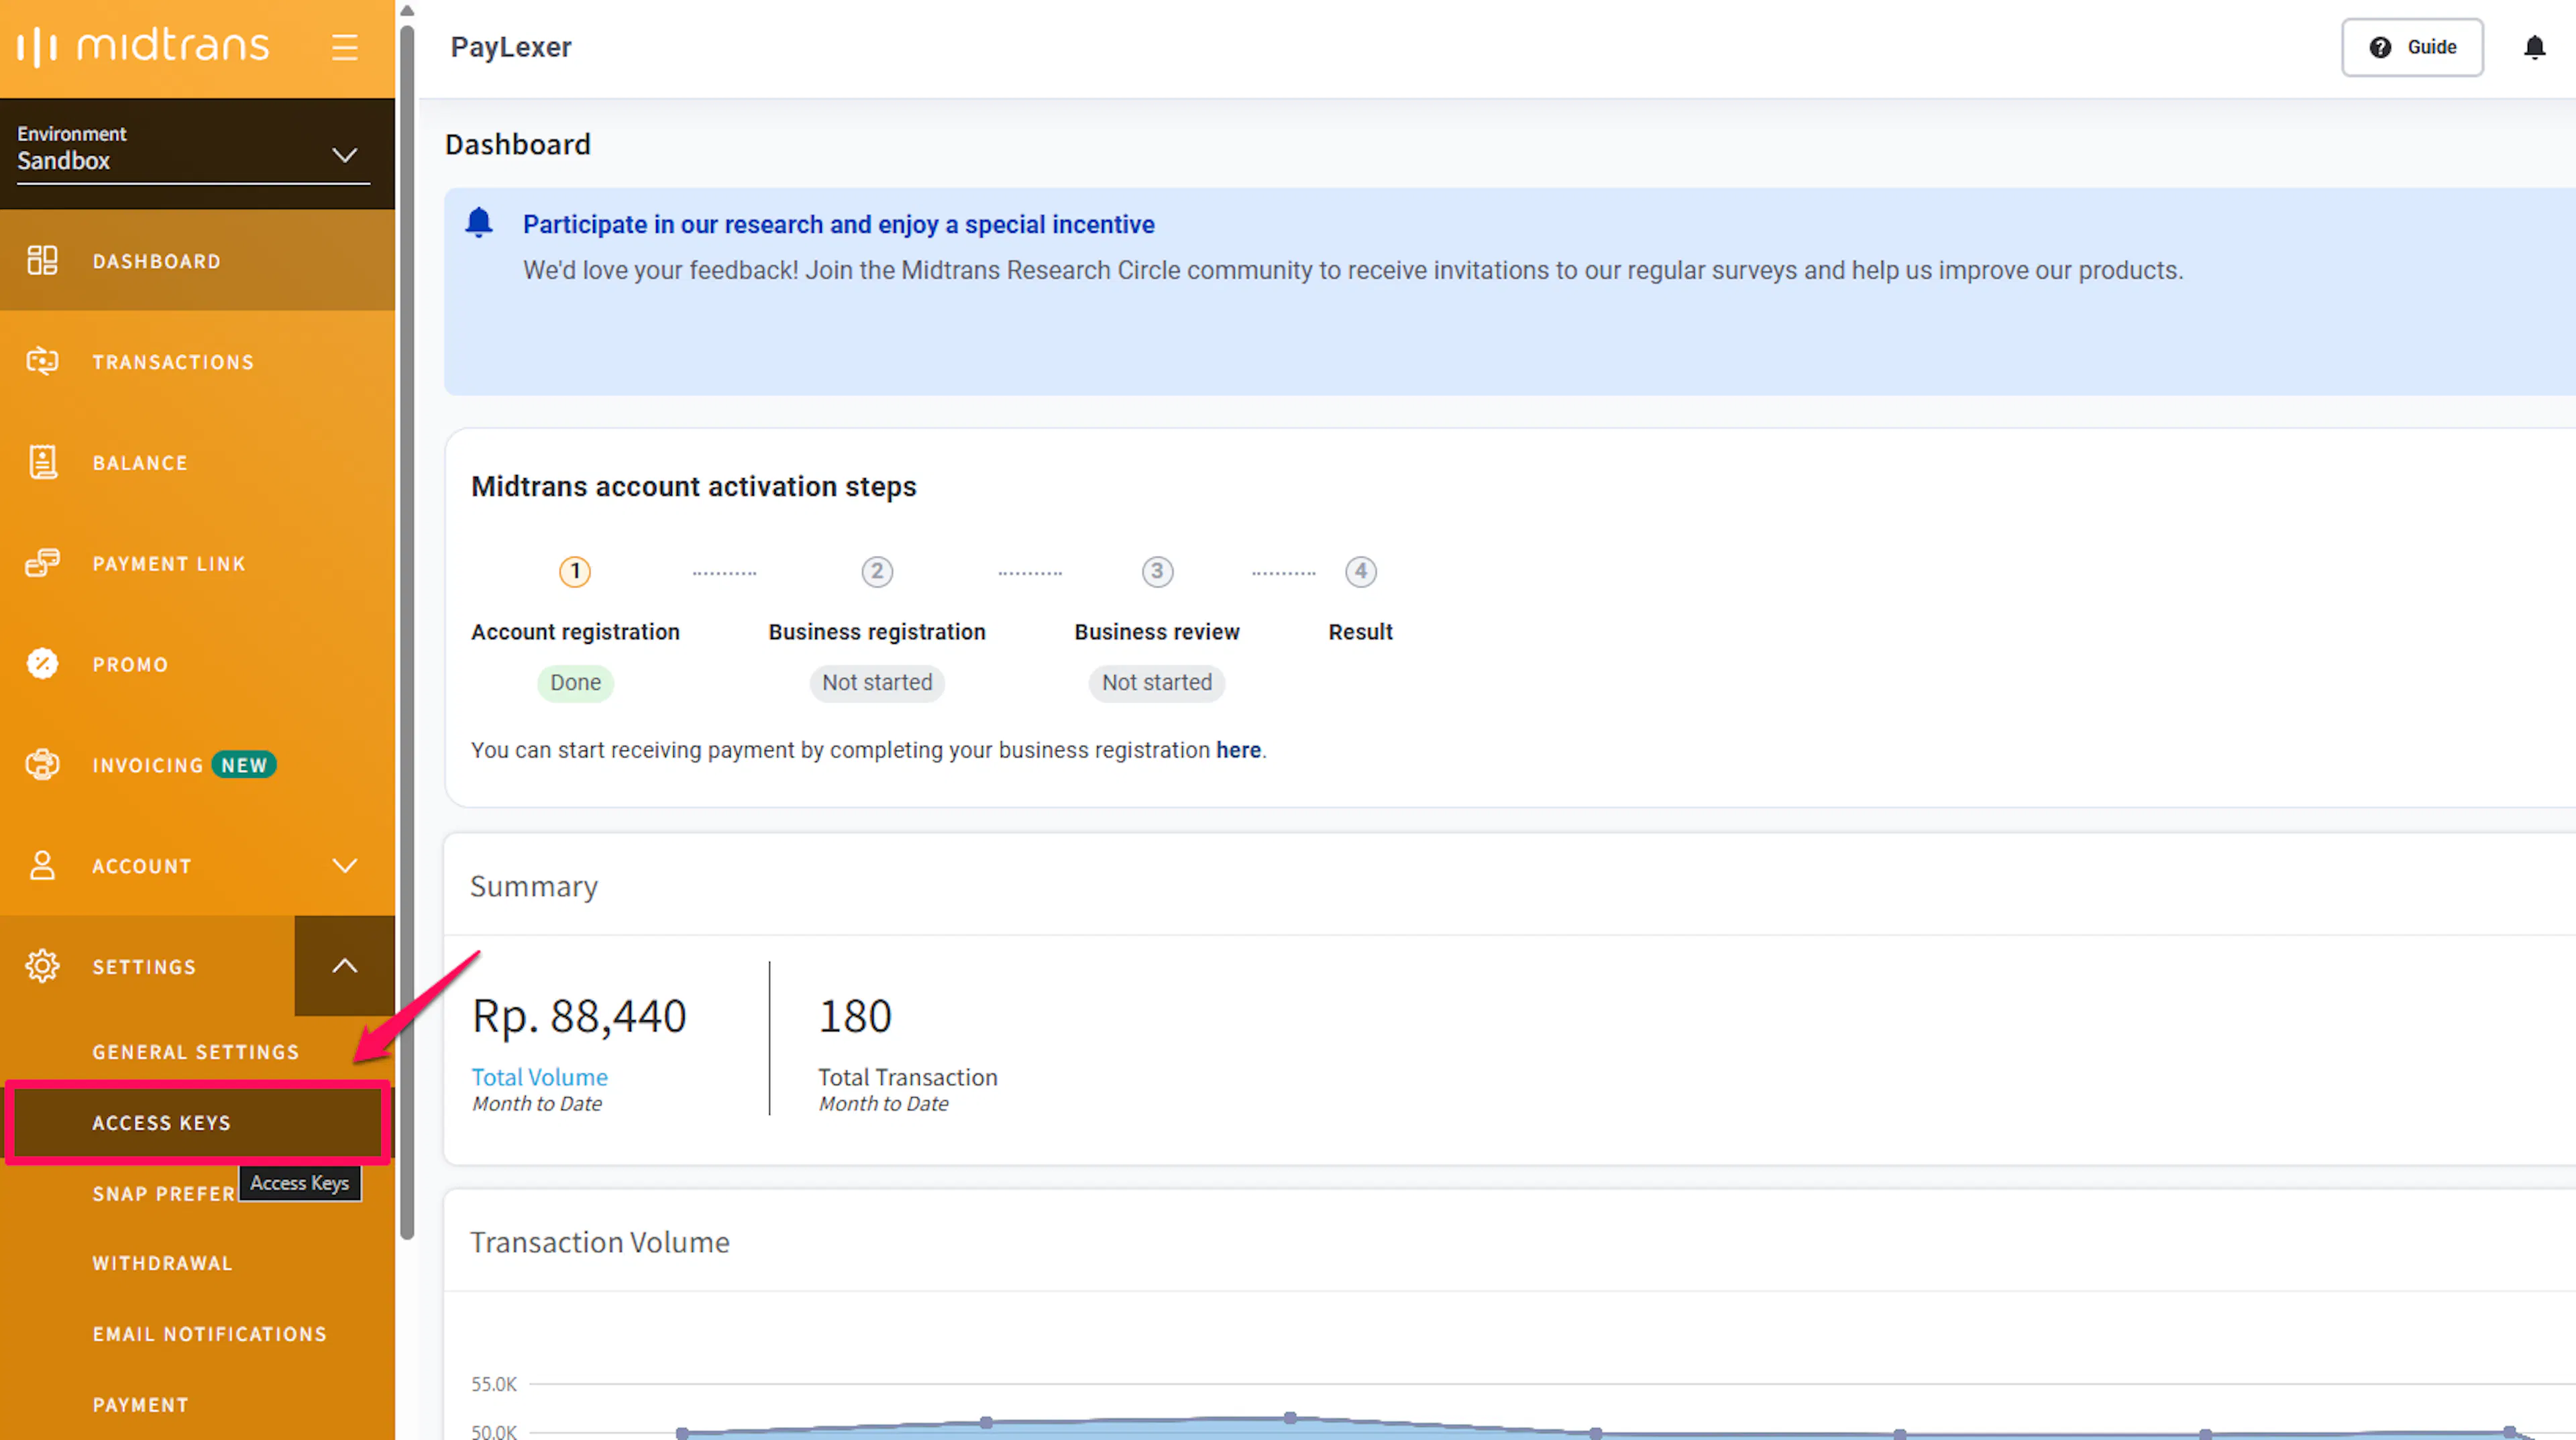
Open Access Keys
In the left sidebar, click Settings, then select Access Keys.
Copy your Server Key and Client Key
You will see two keys on this page:
-
Server Key - used by PayLexer for server-side API calls. Keep this secret.
-
Client Key - used for client-side payment forms.
Copy both keys. Repeat these steps in the other environment (sandbox and production) so you have both sets of credentials.
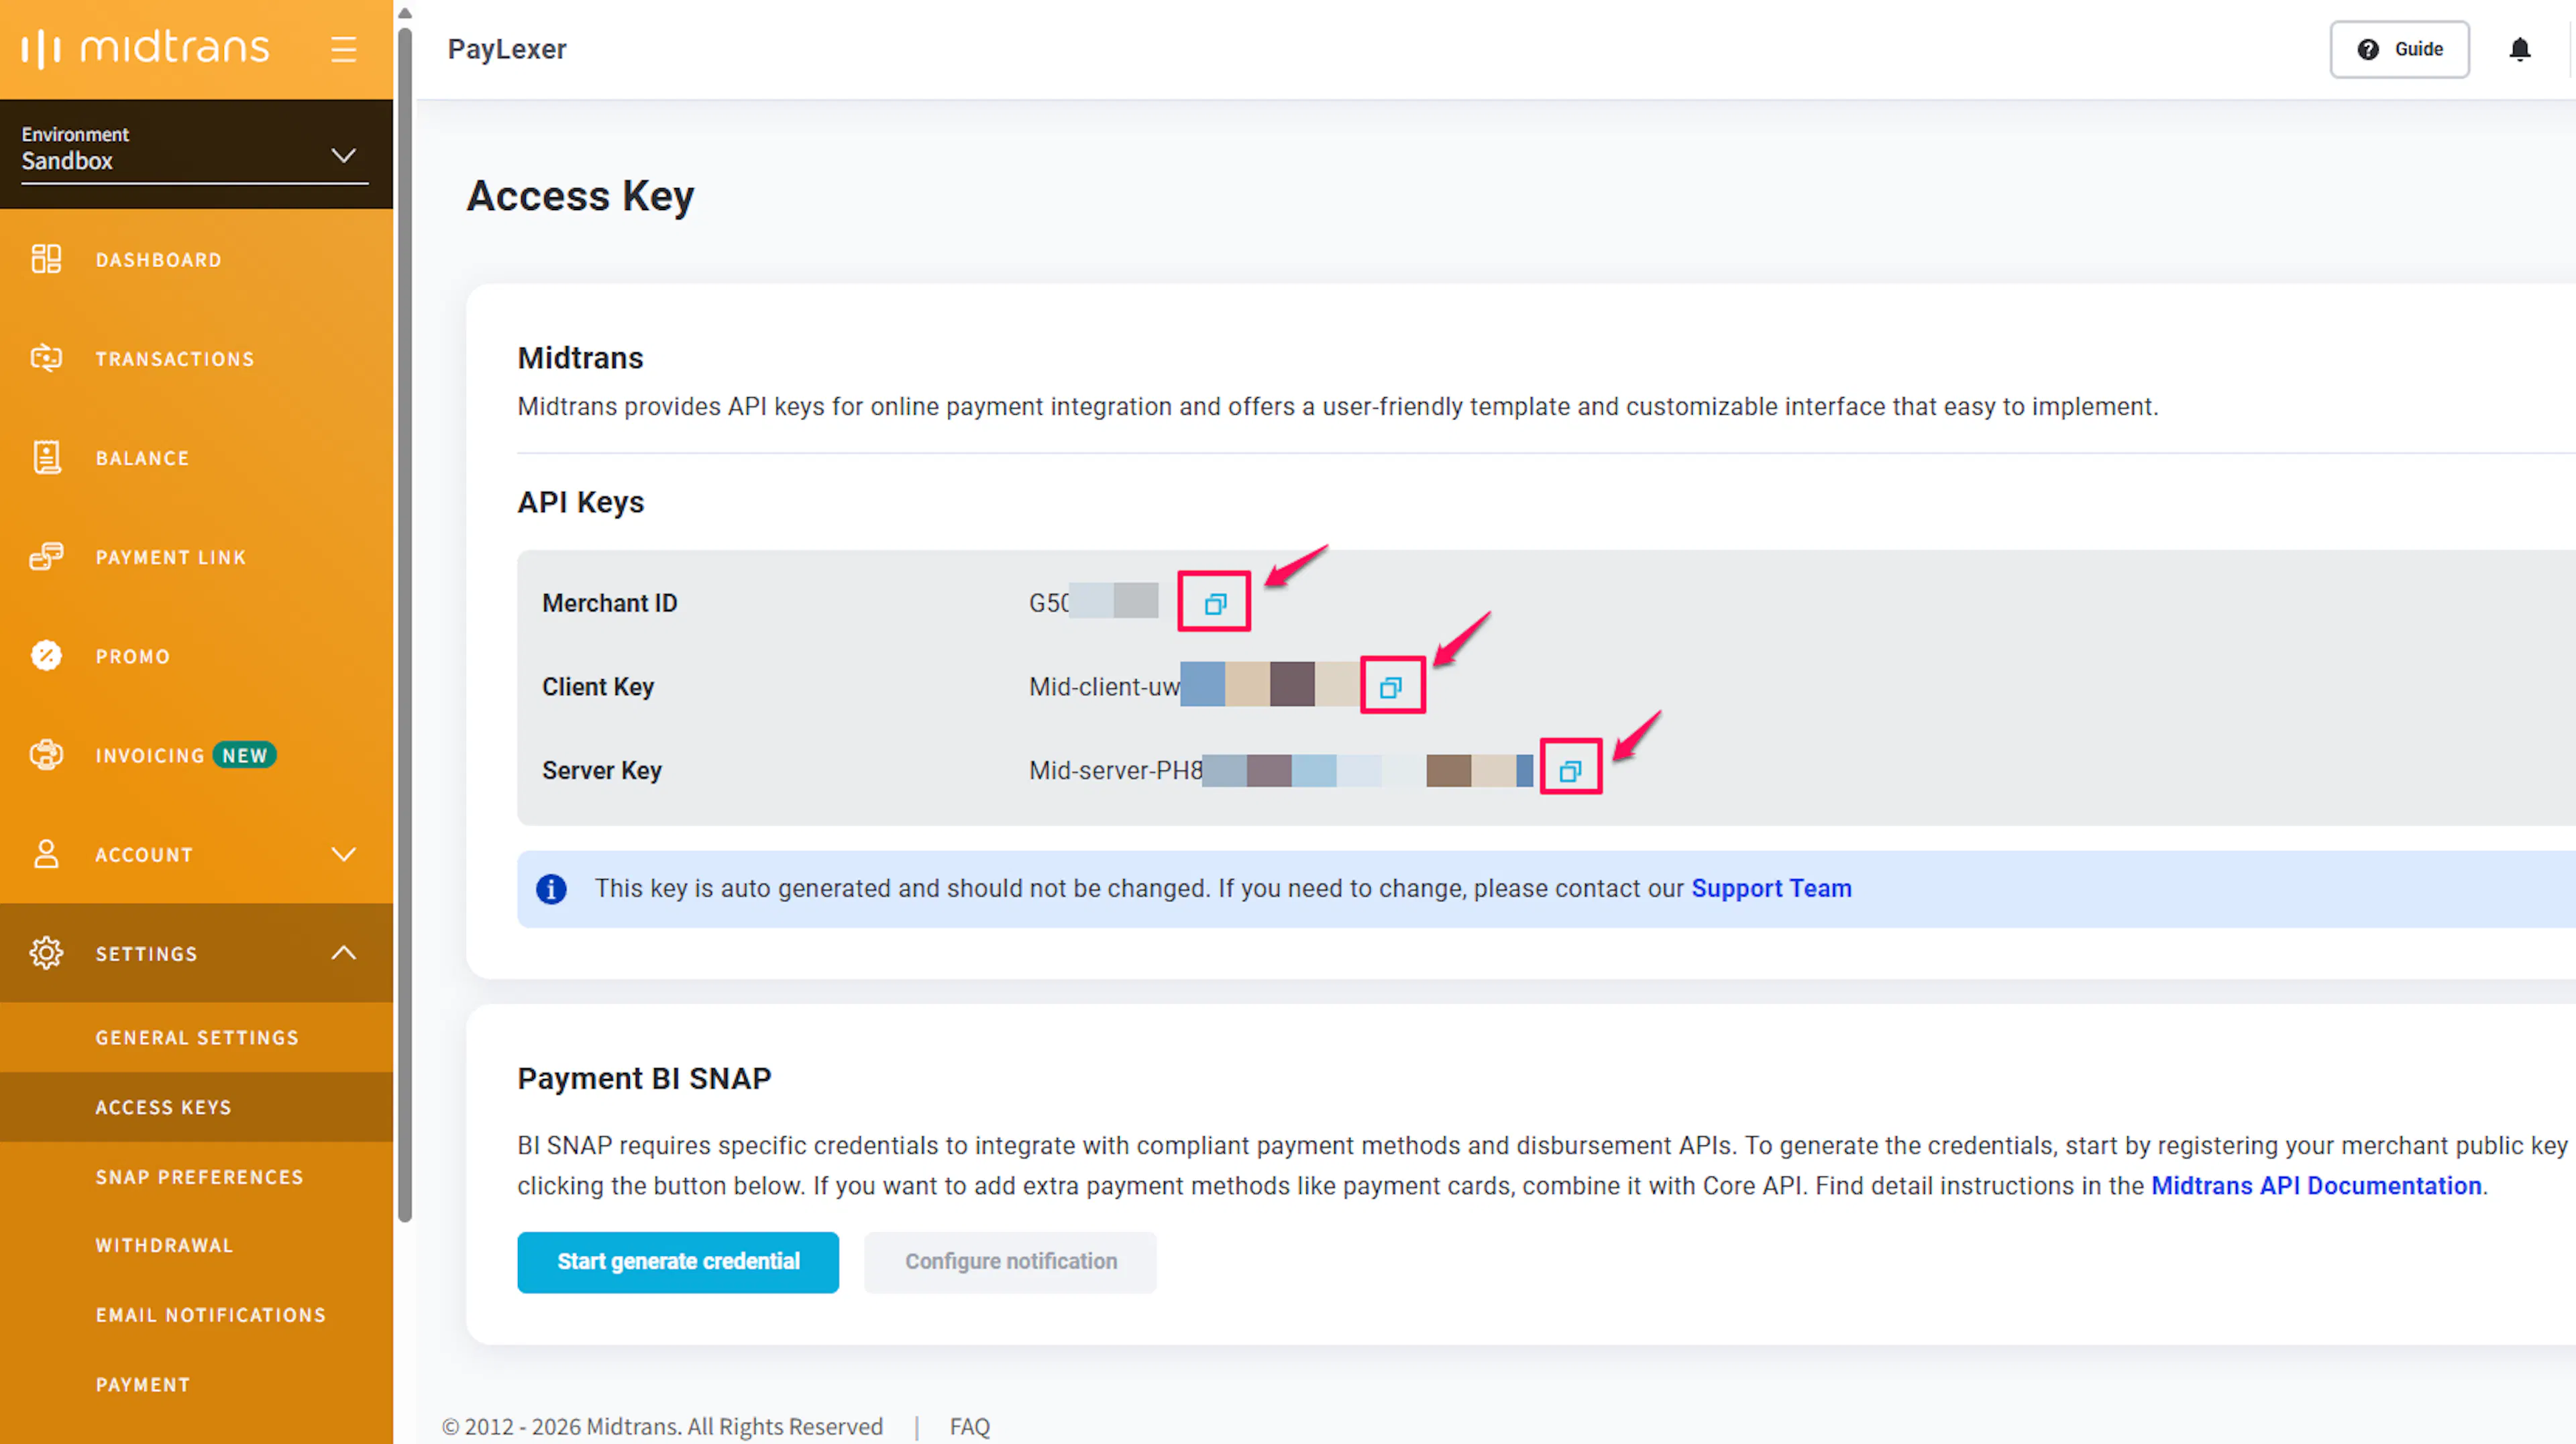
Your Server Key is sensitive. Never expose it in client-side code, public repositories, or logs.
Adding Credentials to PayLexer
Open PayLexer Dashboard
Log in to your PayLexer dashboard and navigate to Payment Gateways → Midtrans.
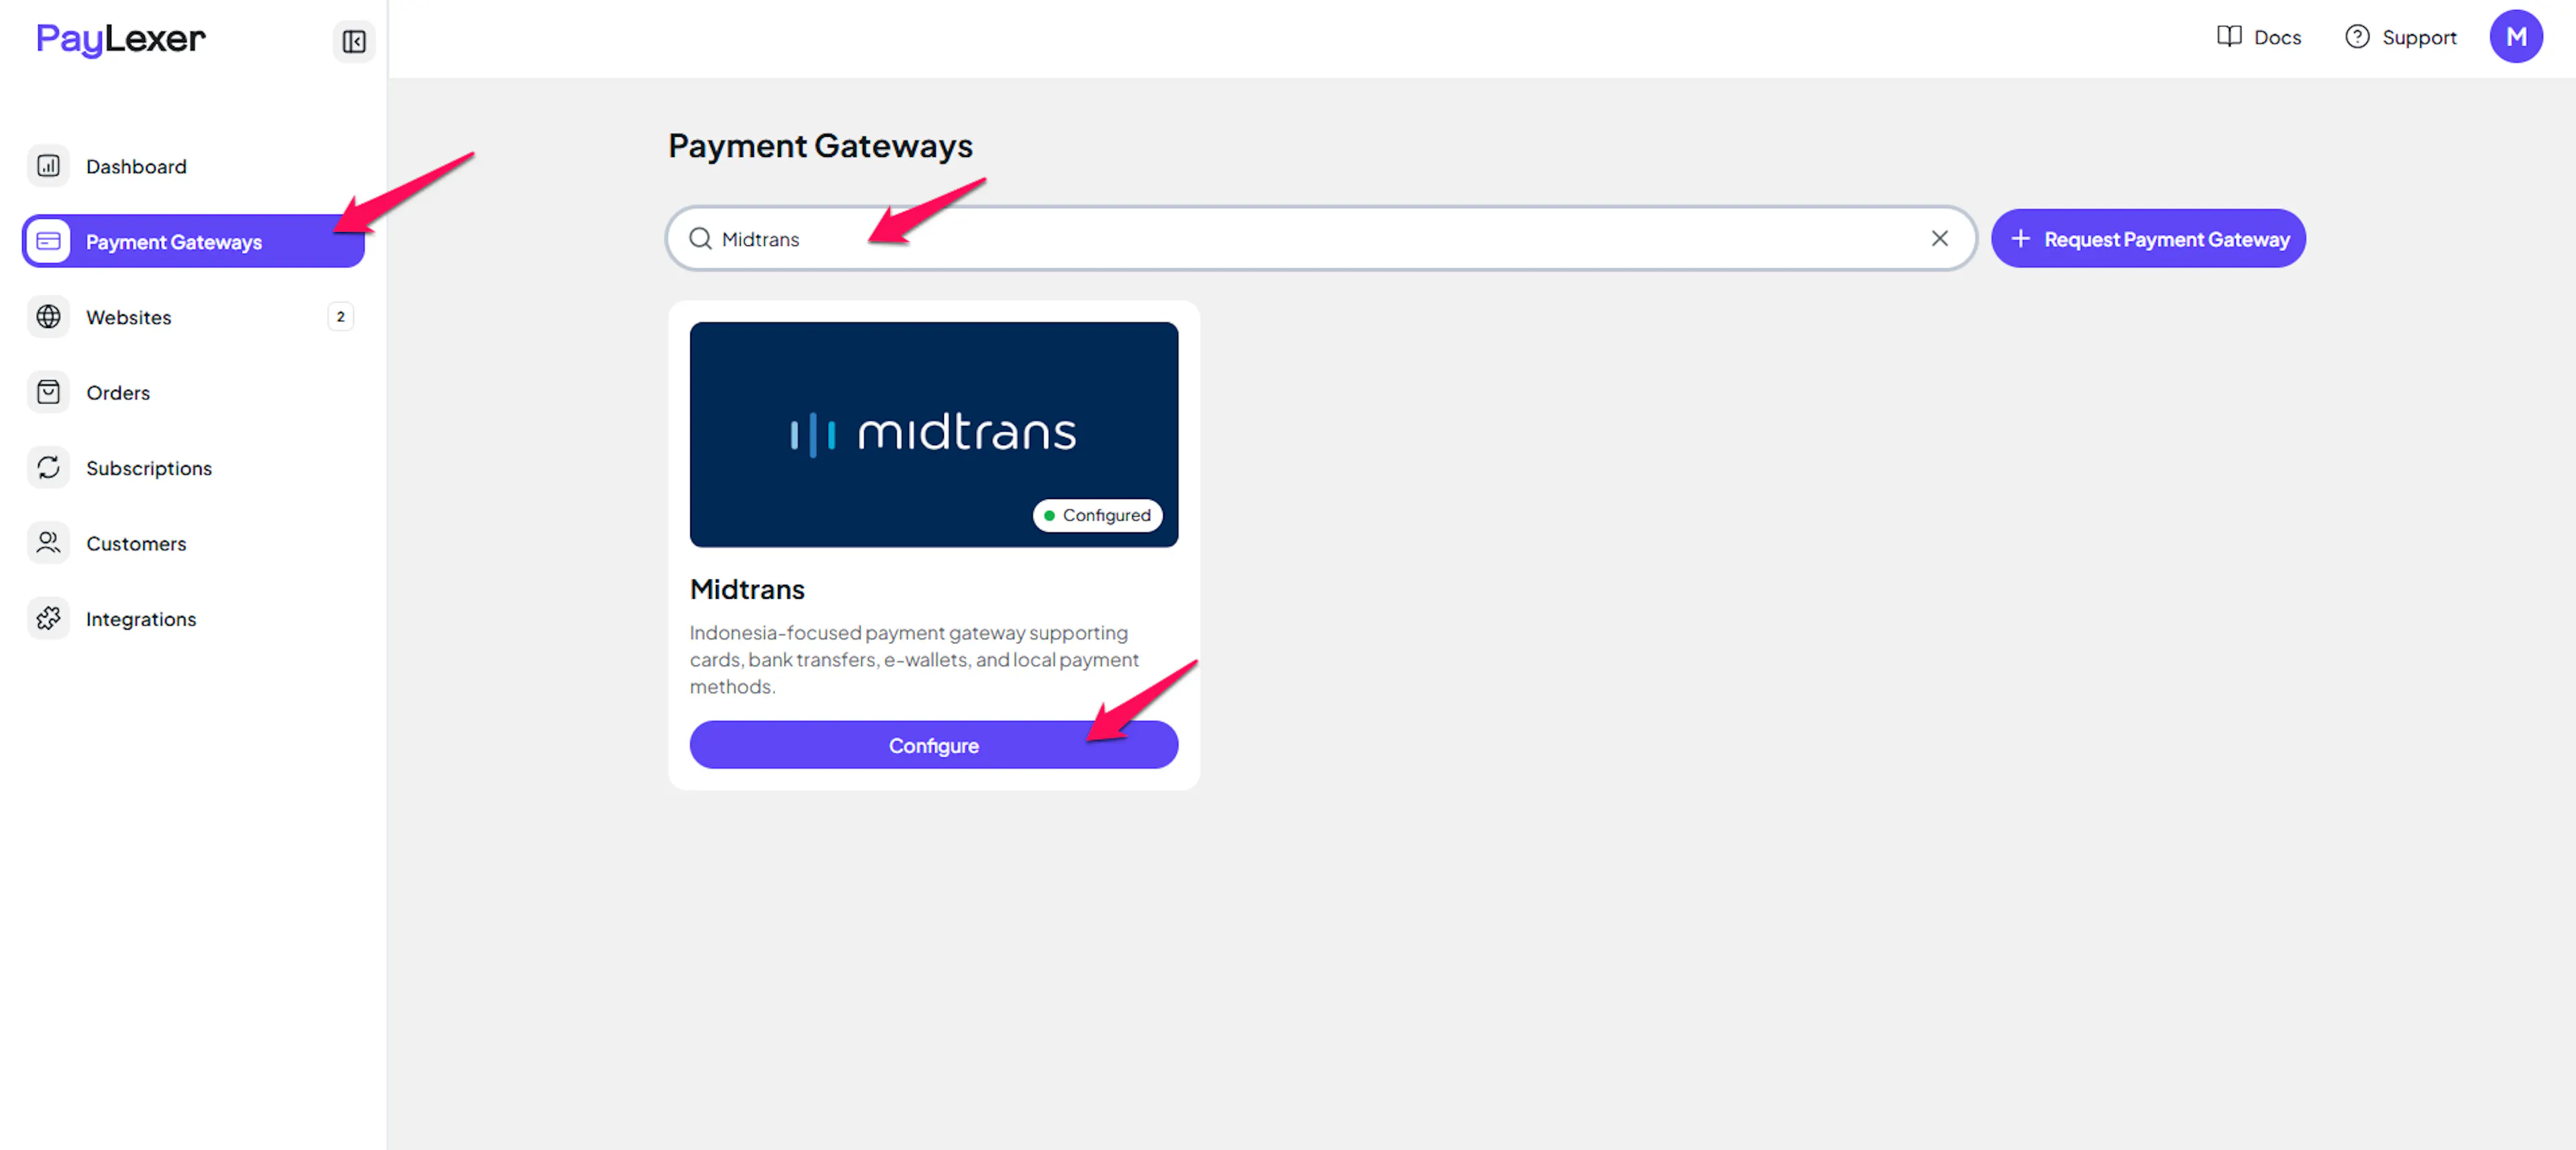
Enter your credentials
Paste the Server Keys and Client Keys you copied from Midtrans:
-
Server Key (Live) - paste your production Server Key
-
Client Key (Live) - paste your production Client Key
-
Server Key (Test) - paste your sandbox Server Key
-
Client Key (Test) - paste your sandbox Client Key

Understanding Live/Production and Sandbox Settings:
| Environment | Purpose |
|---|---|
| Live / Production (Mandatory) | Used for real transactions. Cannot be empty, even when testing. |
| Test / Sandbox (Optional) | Used for testing only. No real money is processed. |
How PayLexer selects credentials:
- Debug/Test mode ON → Test credentials are used
- Debug/Test mode OFF → Live credentials are used
Save your configuration
Click Save Configuration to store your Midtrans credentials in PayLexer.
Your Midtrans credentials are saved and ready to use.
Configuring Webhooks (Mandatory)
Webhooks enable real-time payment updates and significantly improve reliability. Midtrans calls webhooks "HTTP Notifications" in the dashboard.
Benefits of Webhooks:
-
Instant payment status updates for cards and e-wallets
-
Real-time settlement notifications for bank transfers, which can complete hours after initiation
-
Automatic handling of payment method callbacks (GoPay, OVO, QRIS, and others)
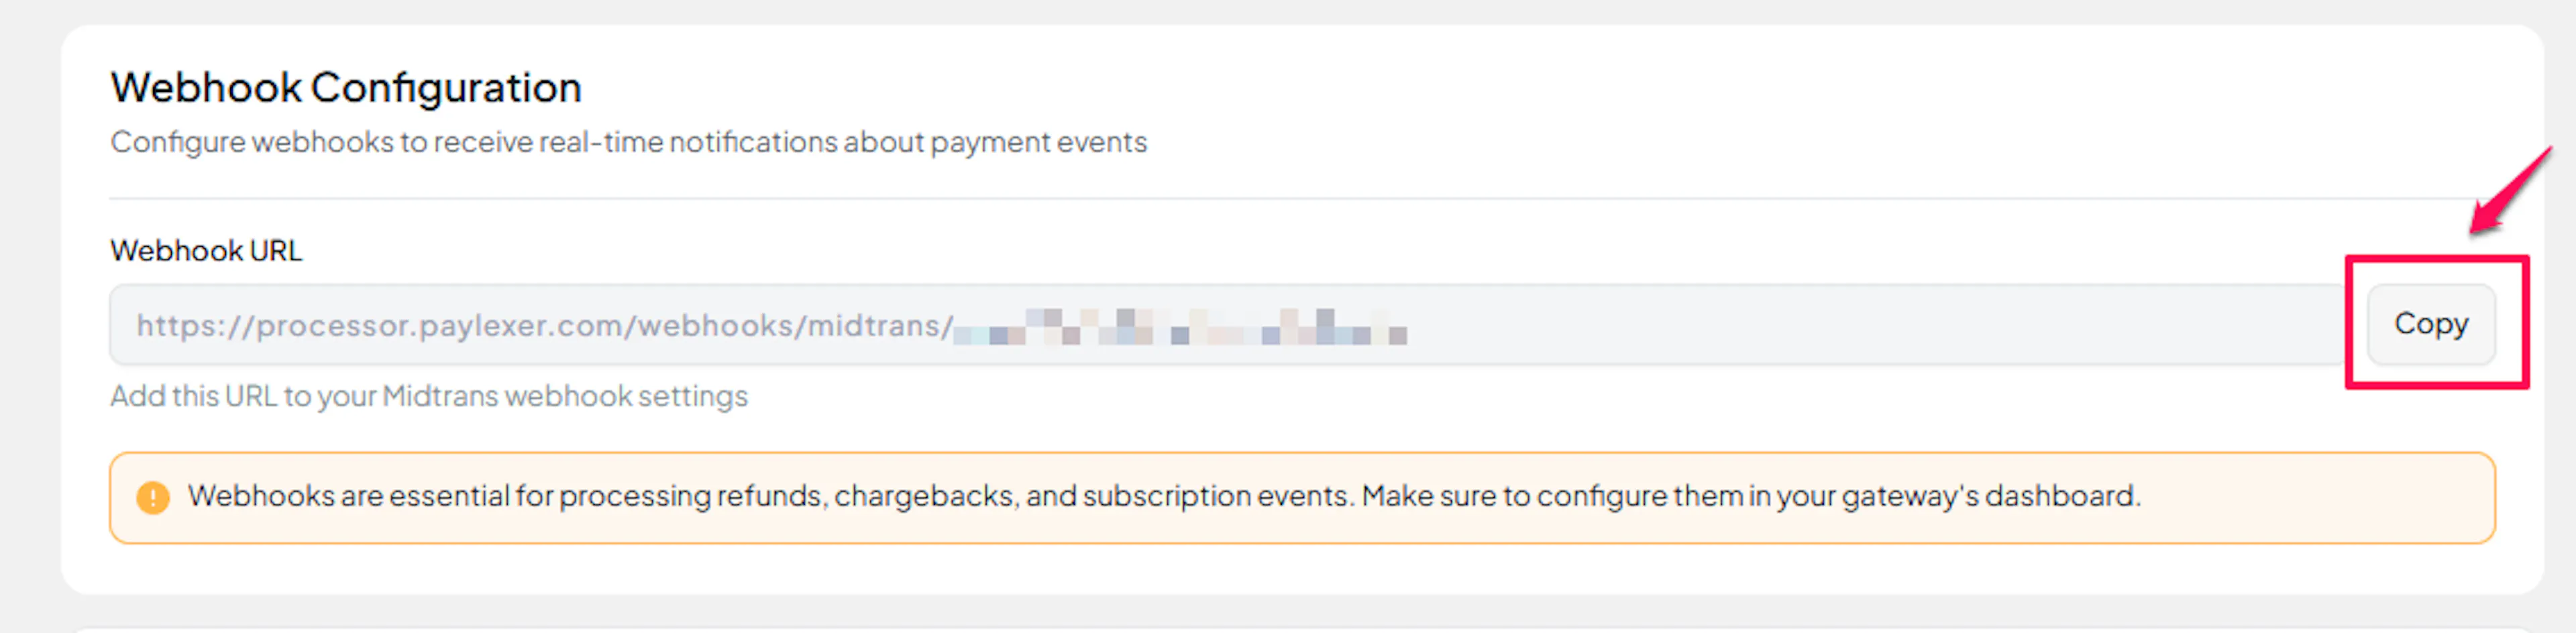
Copy your PayLexer webhook URL
In your PayLexer dashboard, go to Payment Gateways → Midtrans and copy the Webhook URL shown on the page.
This URL is generated by PayLexer for your account - copy it exactly as displayed, without editing it.
Open Notification settings in Midtrans
In your Midtrans dashboard, go to Settings → Configuration.
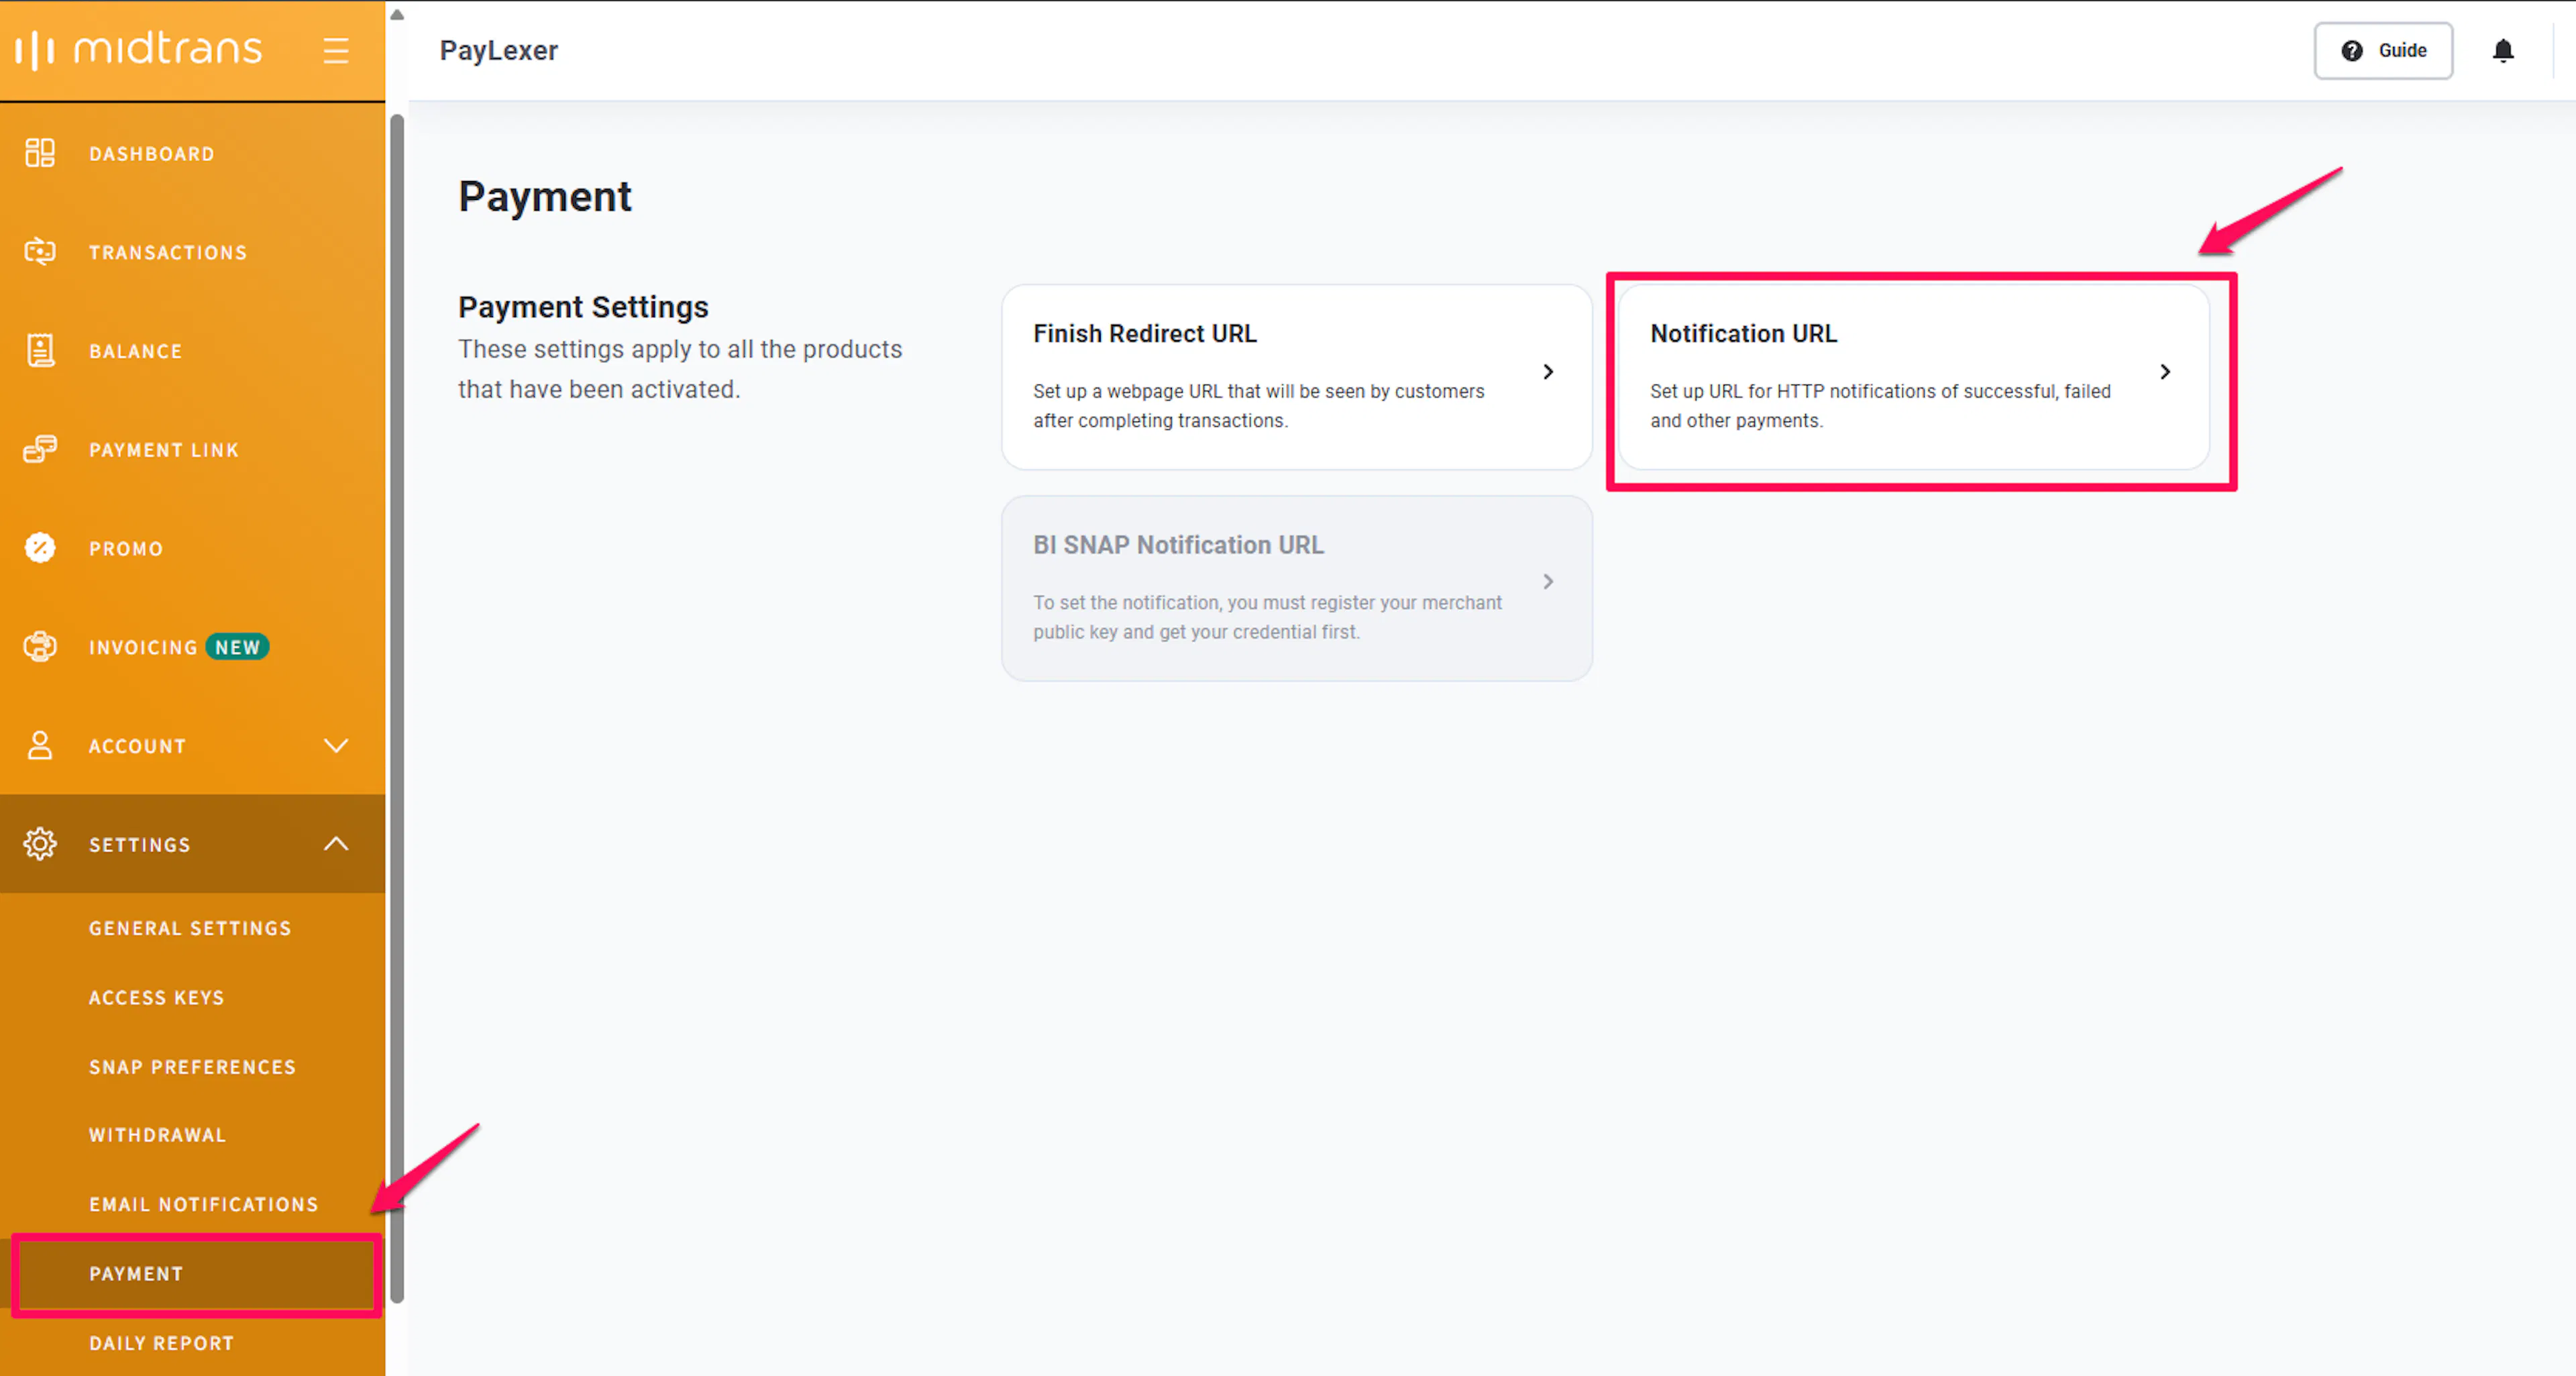
Set the Payment Notification URL
In the Payment Notification URL field, paste the PayLexer webhook URL you copied.
Optionally set the Finish Redirect URL and Unfinish Redirect URL to your checkout result pages.
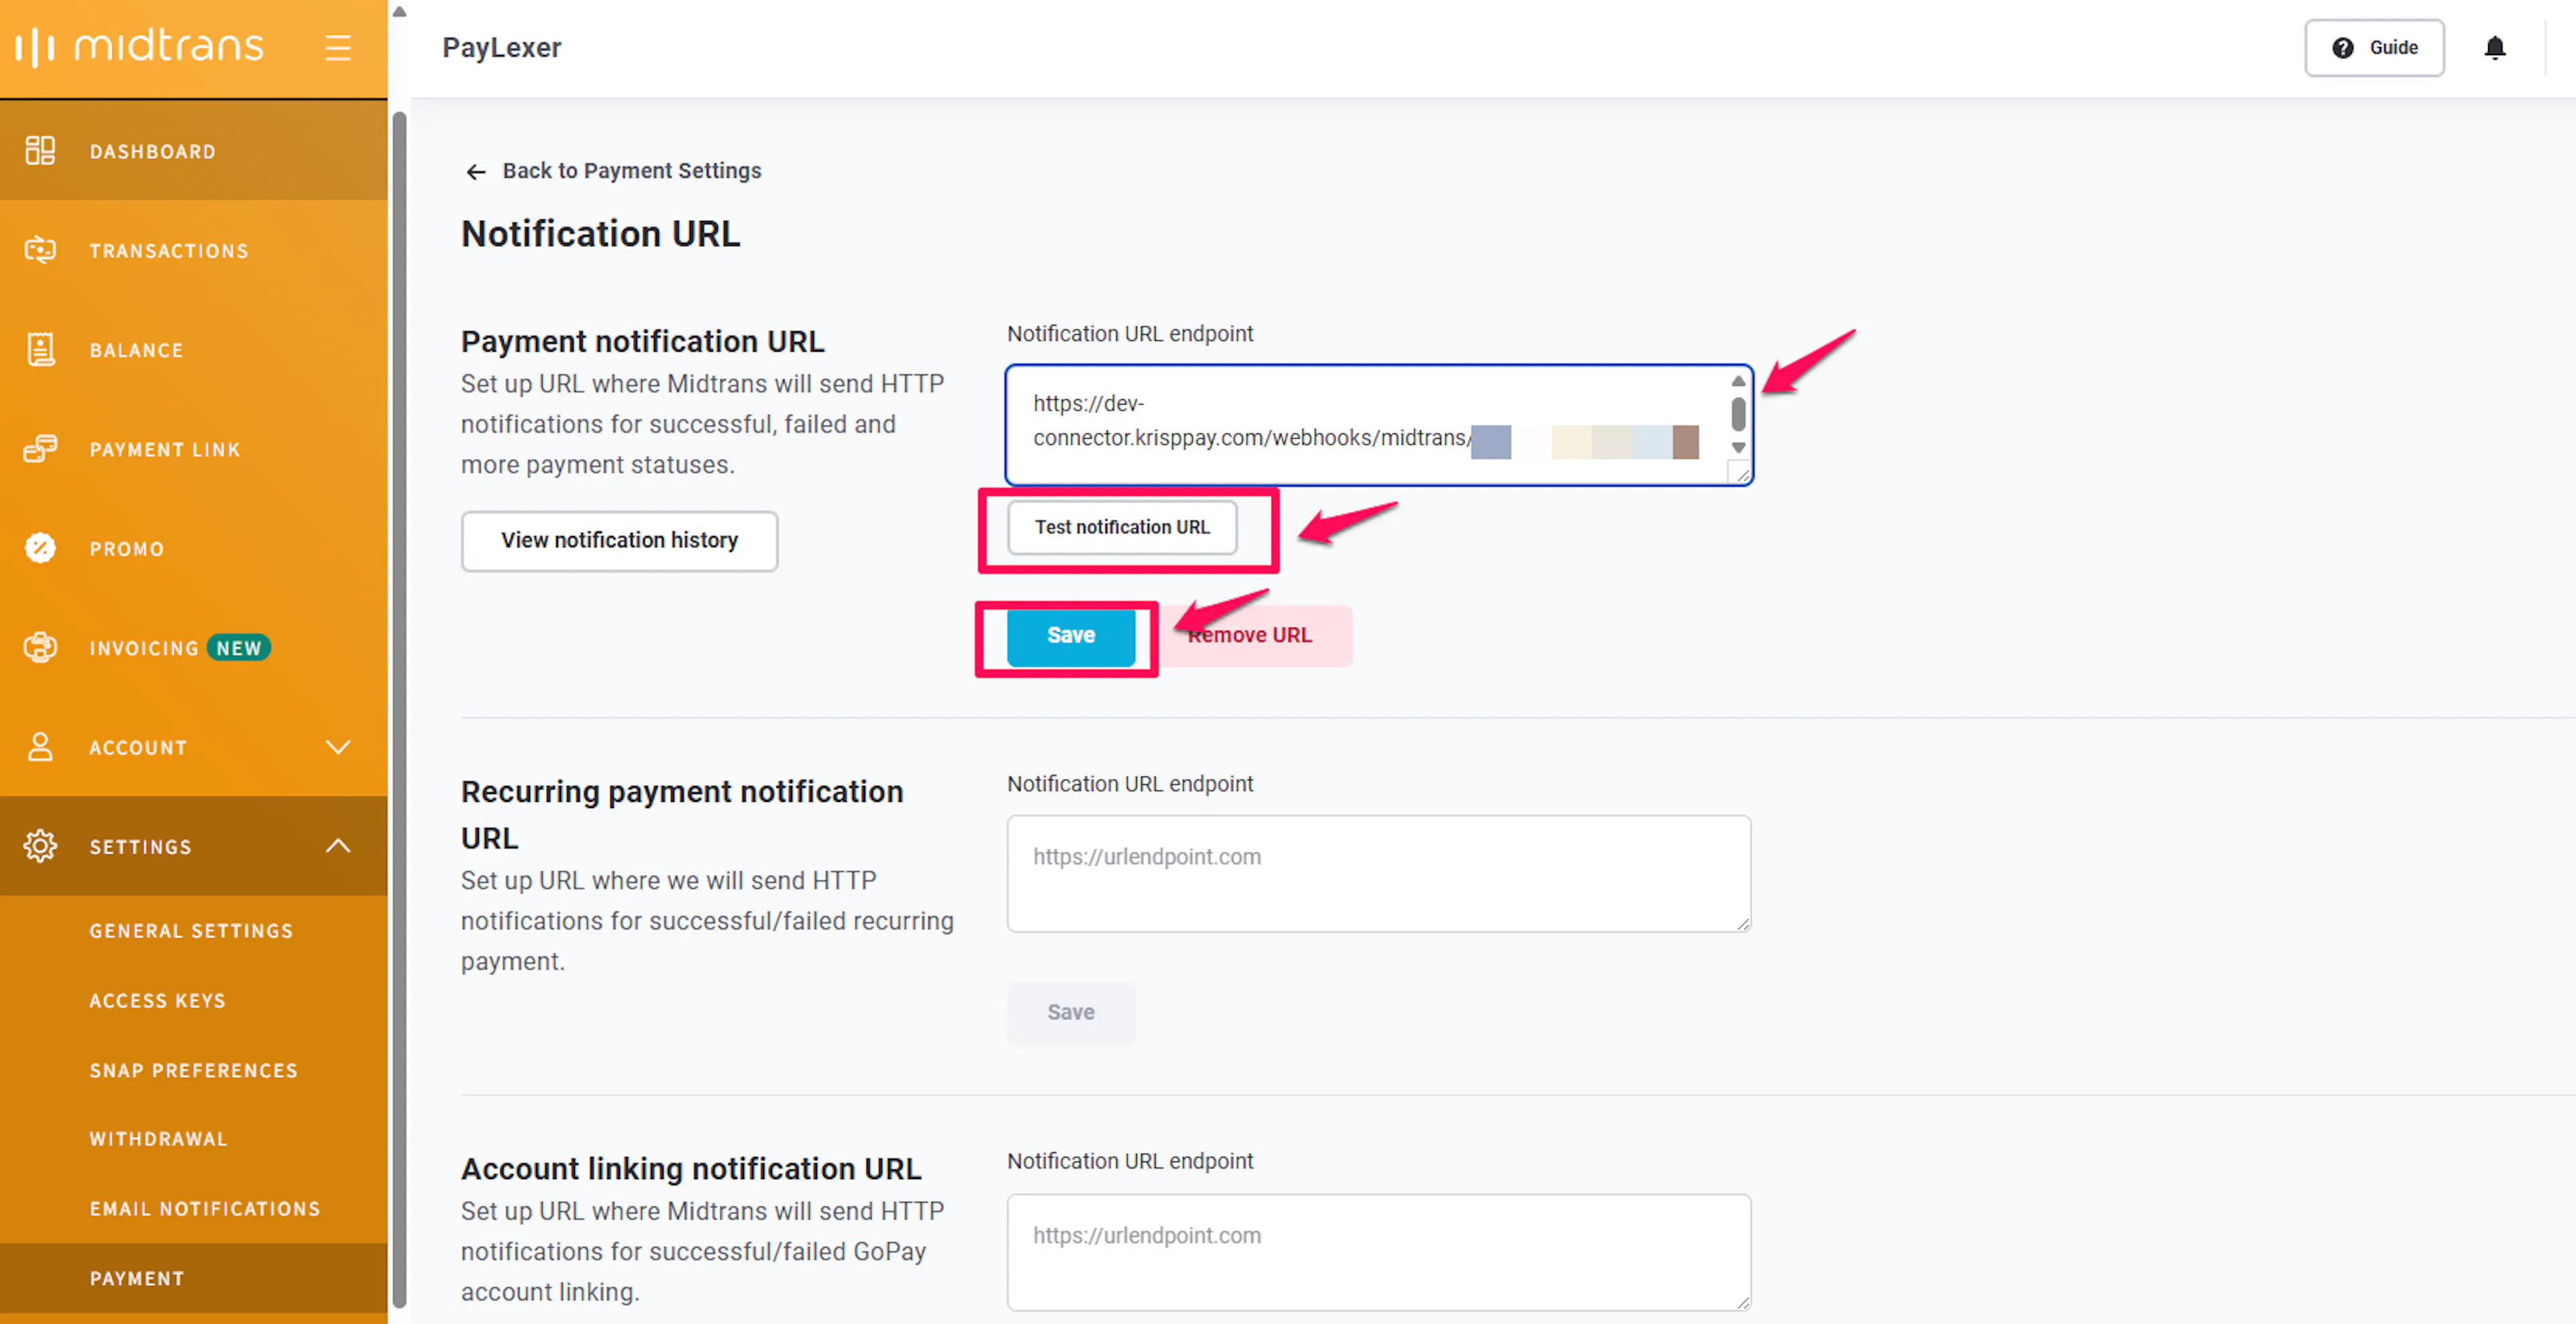
Save the configuration
Click Update to save the notification URL.
Midtrans will now send payment status notifications to PayLexer automatically.
Save your Server Key as the Webhook Secret
Midtrans signs notifications using your Server Key. PayLexer uses this to verify that incoming webhook events are genuine.
In your PayLexer dashboard, go to Payment Gateways → Midtrans and paste your Midtrans Server Key into the Webhook Secret field, then click Save Configuration.
Integrate Midtrans to Your Website
If you have already added and configured your site, you can enable Midtrans in your existing setup.
Go to Websites
Navigate to Websites in your PayLexer dashboard.
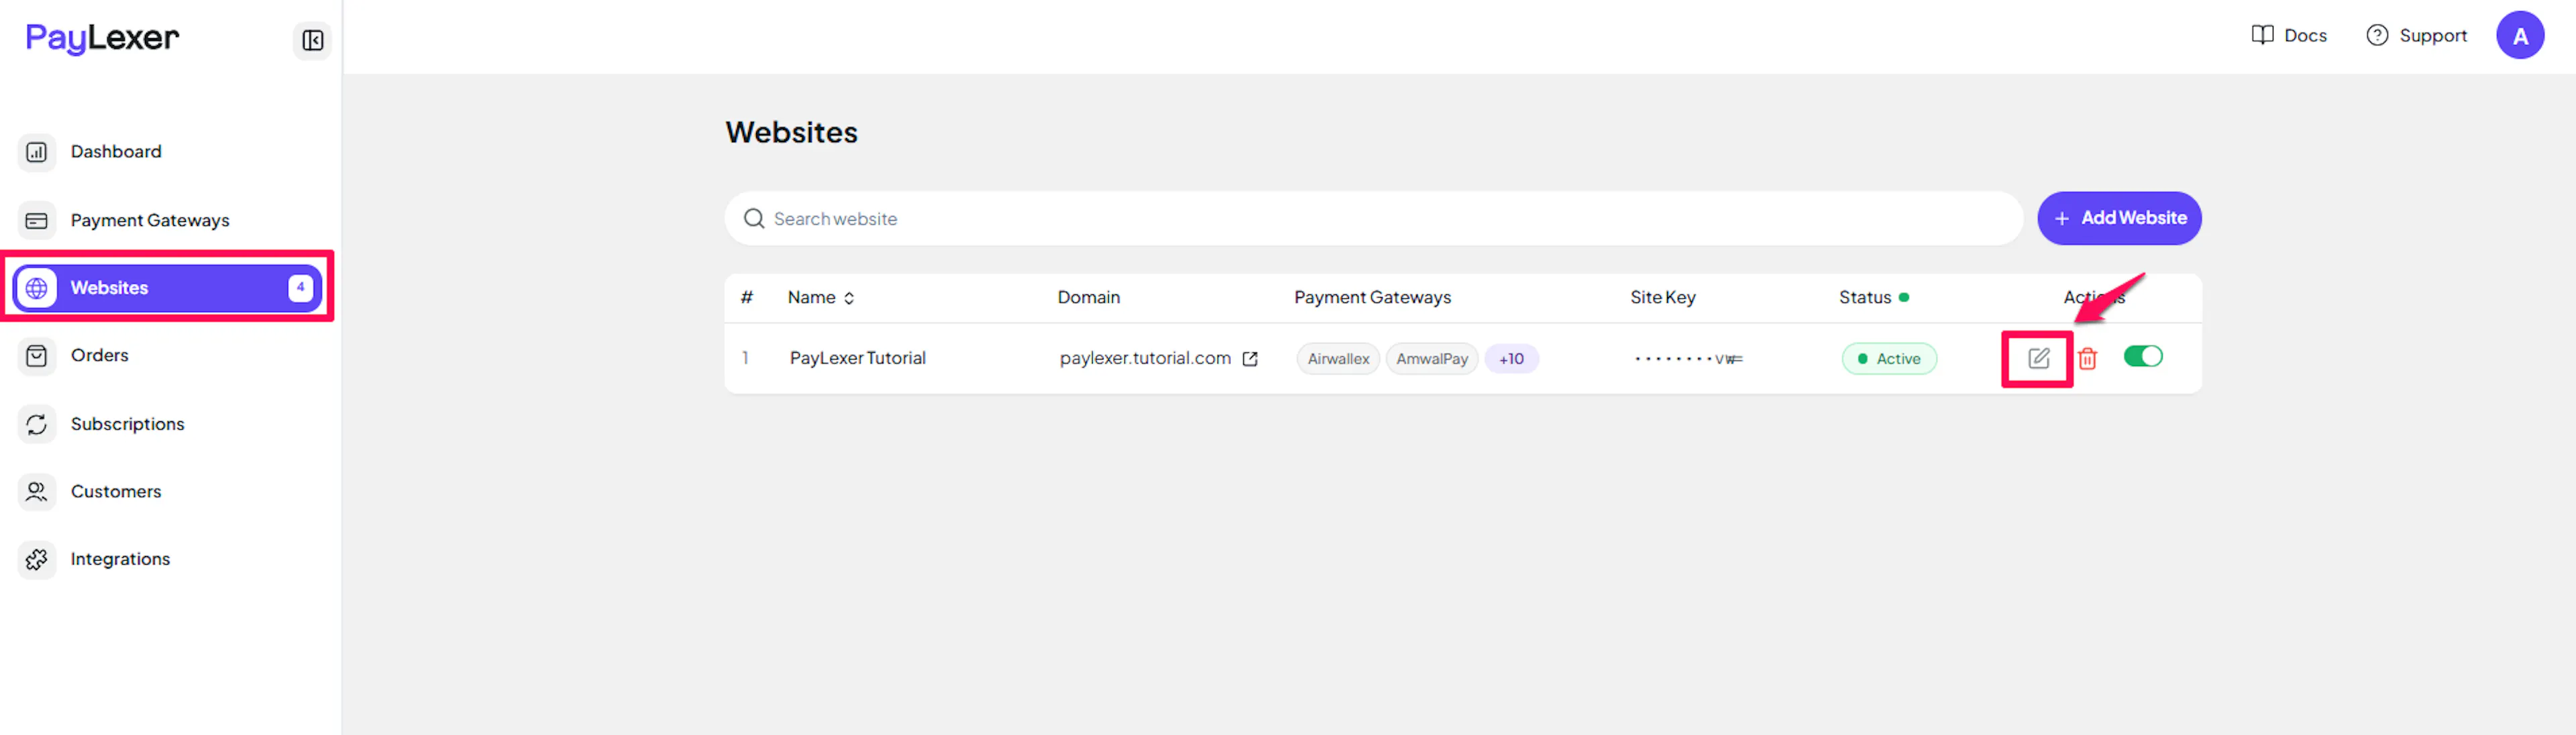
Edit your website
Click the Edit Icon of your added website.
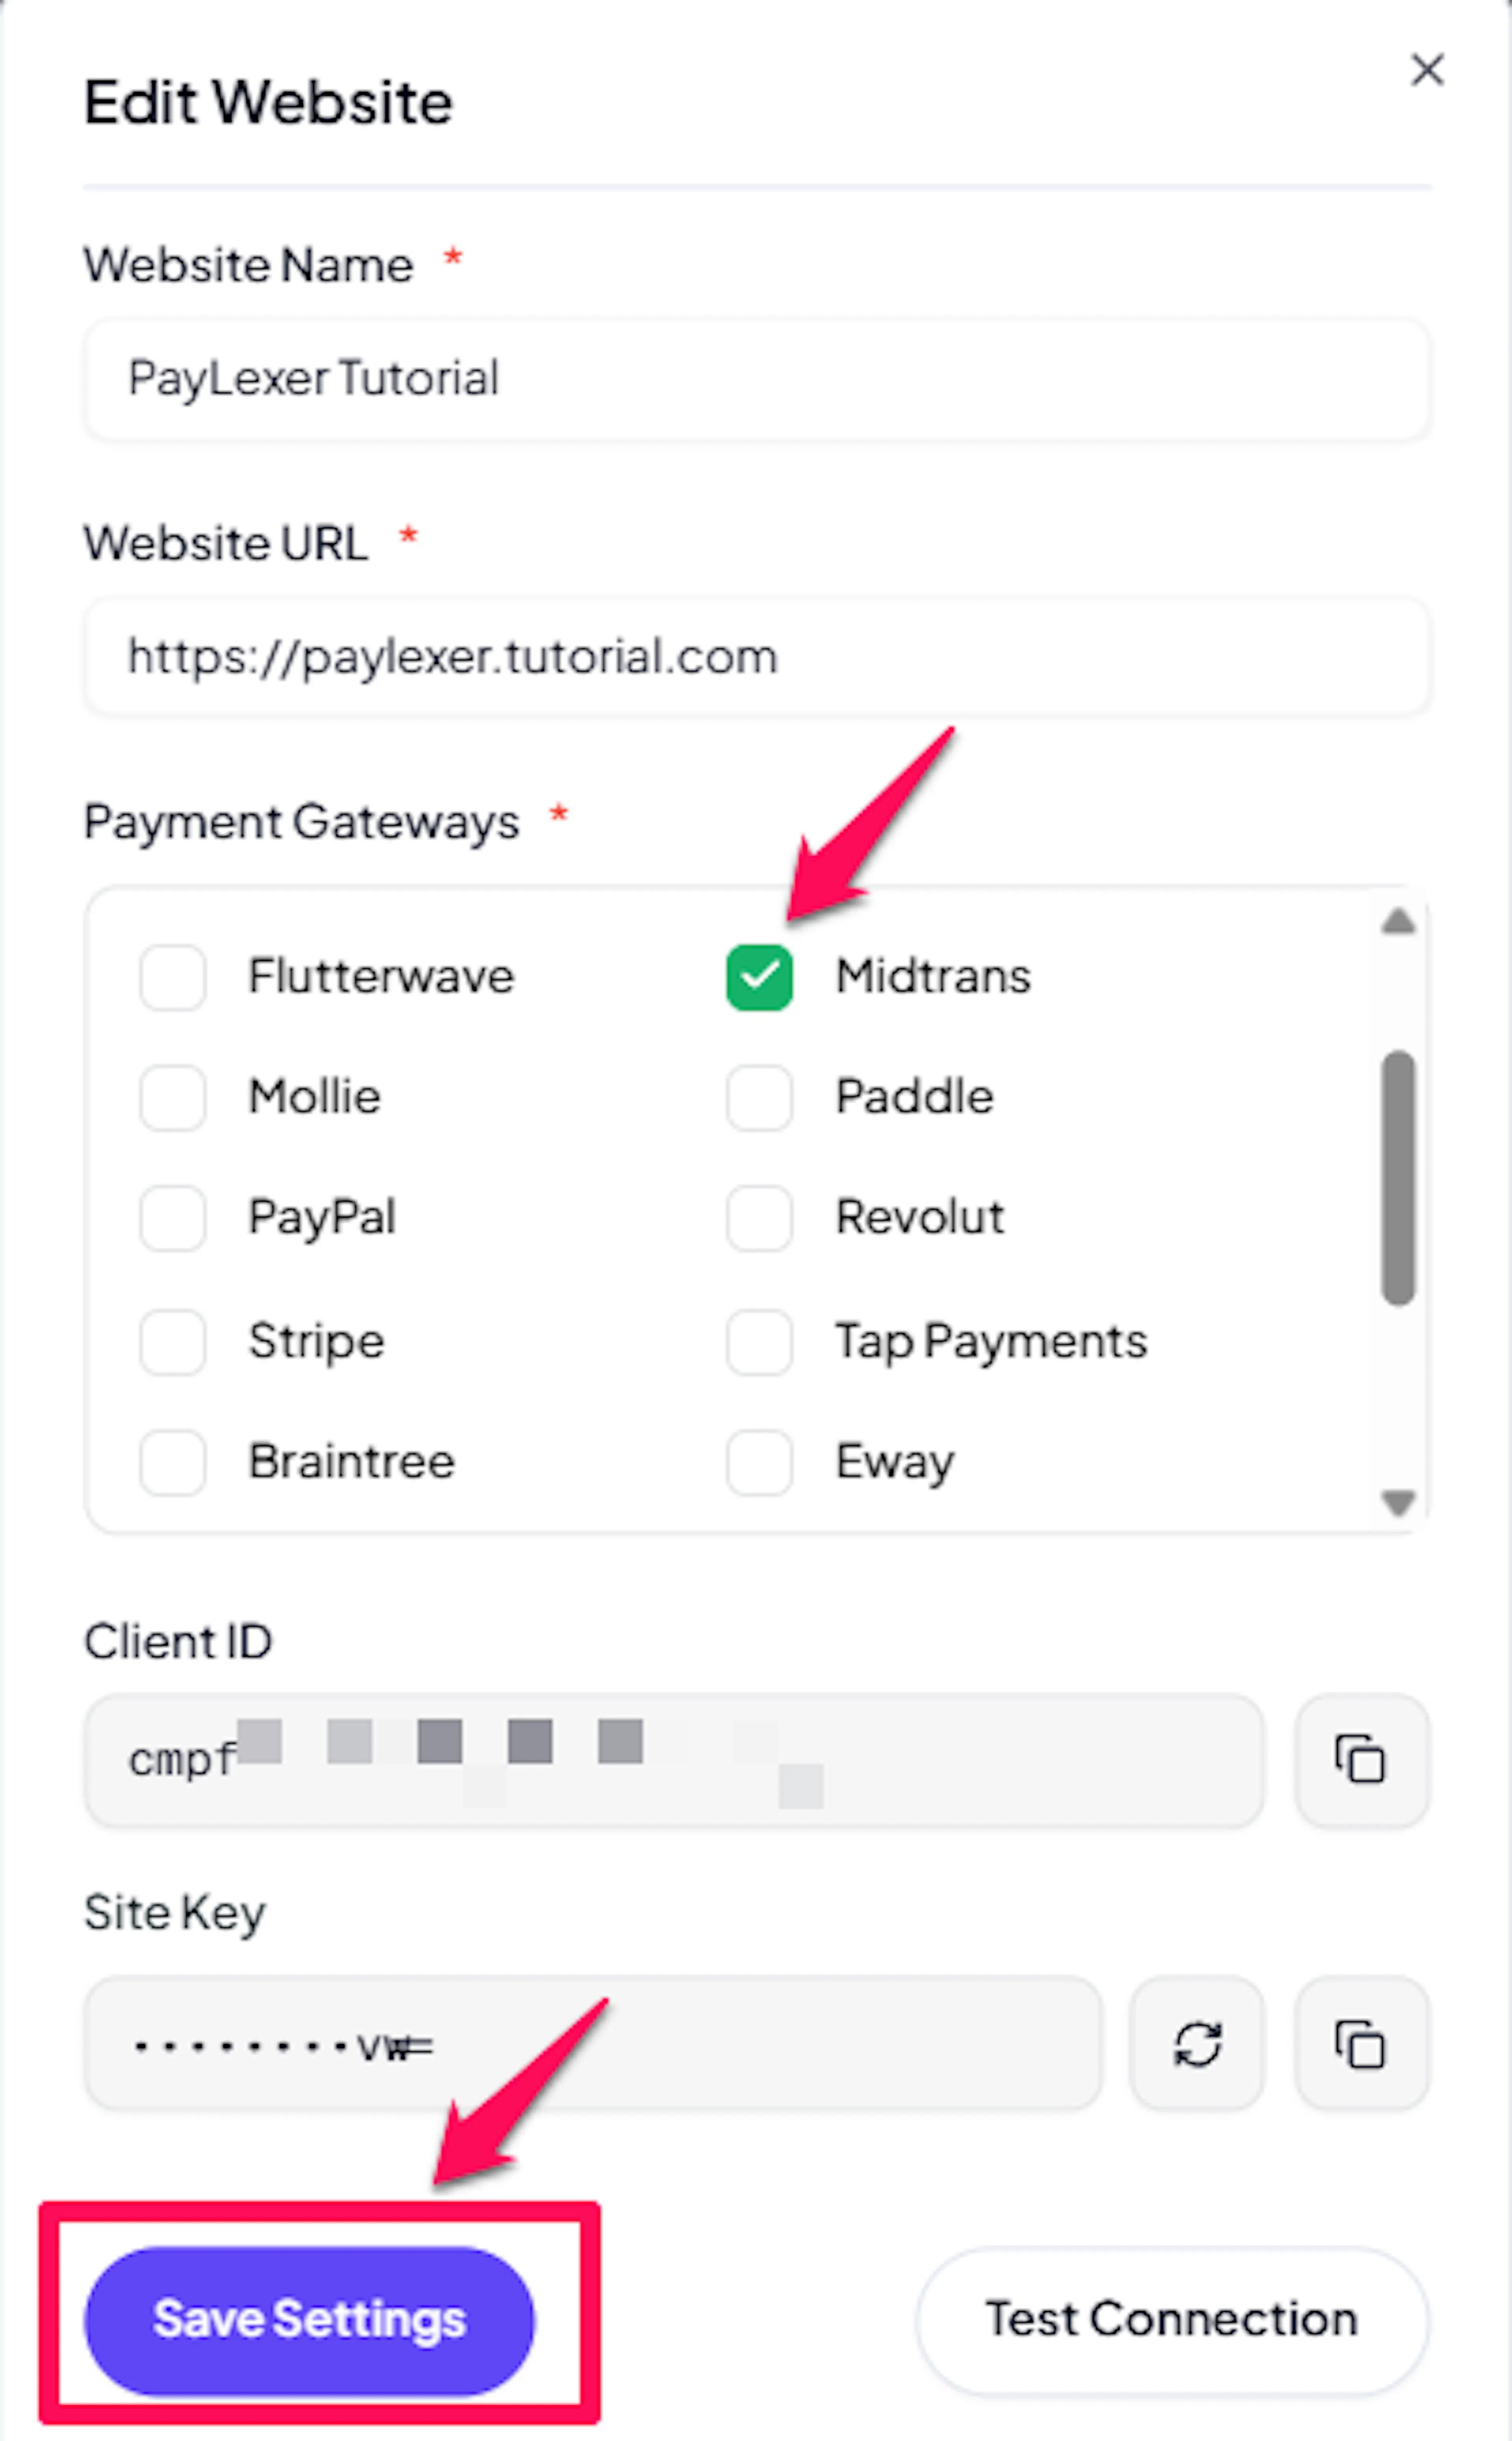
Enable Midtrans
Click the checkbox to enable Midtrans for the website.
You can enable multiple gateways on a single website and let customers choose at checkout.
If you haven't added a website yet, Continue to Add Your Website →
Troubleshooting
Best Practices
-
Always test with sandbox credentials before going live to confirm the full payment flow works end-to-end.
-
Configure webhooks - they are the most reliable way to receive payment status updates, especially for bank transfers and e-wallets that may complete minutes or hours after initiation.
-
Store only the minimum data you need from payment responses; never log or store your Server Key.
-
Use distinct sandbox and production Midtrans accounts when possible to avoid accidental live charges during testing.
-
Monitor the Midtrans transaction dashboard alongside PayLexer to cross-reference payment statuses during initial rollout.
FAQs
Still Have Questions?
- Midtrans Support: Midtrans Help Center
- PayLexer Support: Contact Support
For full API reference and advanced configuration, see the Midtrans developer documentation.