ToyyibPay
Connect ToyyibPay to PayLexer to accept FPX bank transfers and card payments in Malaysia through a secure hosted checkout.
ToyyibPay is a Malaysia-focused payment gateway that processes payments through a secure, hosted checkout page. Through PayLexer, ToyyibPay supports FPX bank transfers and card payments in Malaysian Ringgit, making it well-suited for businesses and individuals collecting payments from Malaysian customers.
-
Supported Regions (Merchant Accounts): Malaysia
-
Supported Currencies: MYR
Supported Features
-
FPX bank transfers and card payments via ToyyibPay's hosted checkout
-
Test and Live environments via separate portals
-
One-time payments only - subscriptions and refunds are not supported through PayLexer for ToyyibPay
Before You Start
Make sure you have:
-
ToyyibPay Account - Don't have one? Sign up for ToyyibPay →
-
PayLexer Account - Required to configure the integration. Create your account →
-
A payment category set up in your ToyyibPay account - you will need the Category Code during configuration
-
A website where you want to integrate
Looking for a different payment processor? View all supported gateways →
Configuring ToyyibPay
You need a Secret Key and Category Code from ToyyibPay for this integration. ToyyibPay uses separate portals for sandbox and live environments - follow the steps below in your sandbox portal, then repeat using your live portal.
Getting API Credentials
Copy your Secret Key
Log in to your ToyyibPay portal and scroll down on the dashboard page to the Settings section. Your Secret Key is listed there with a copy option.
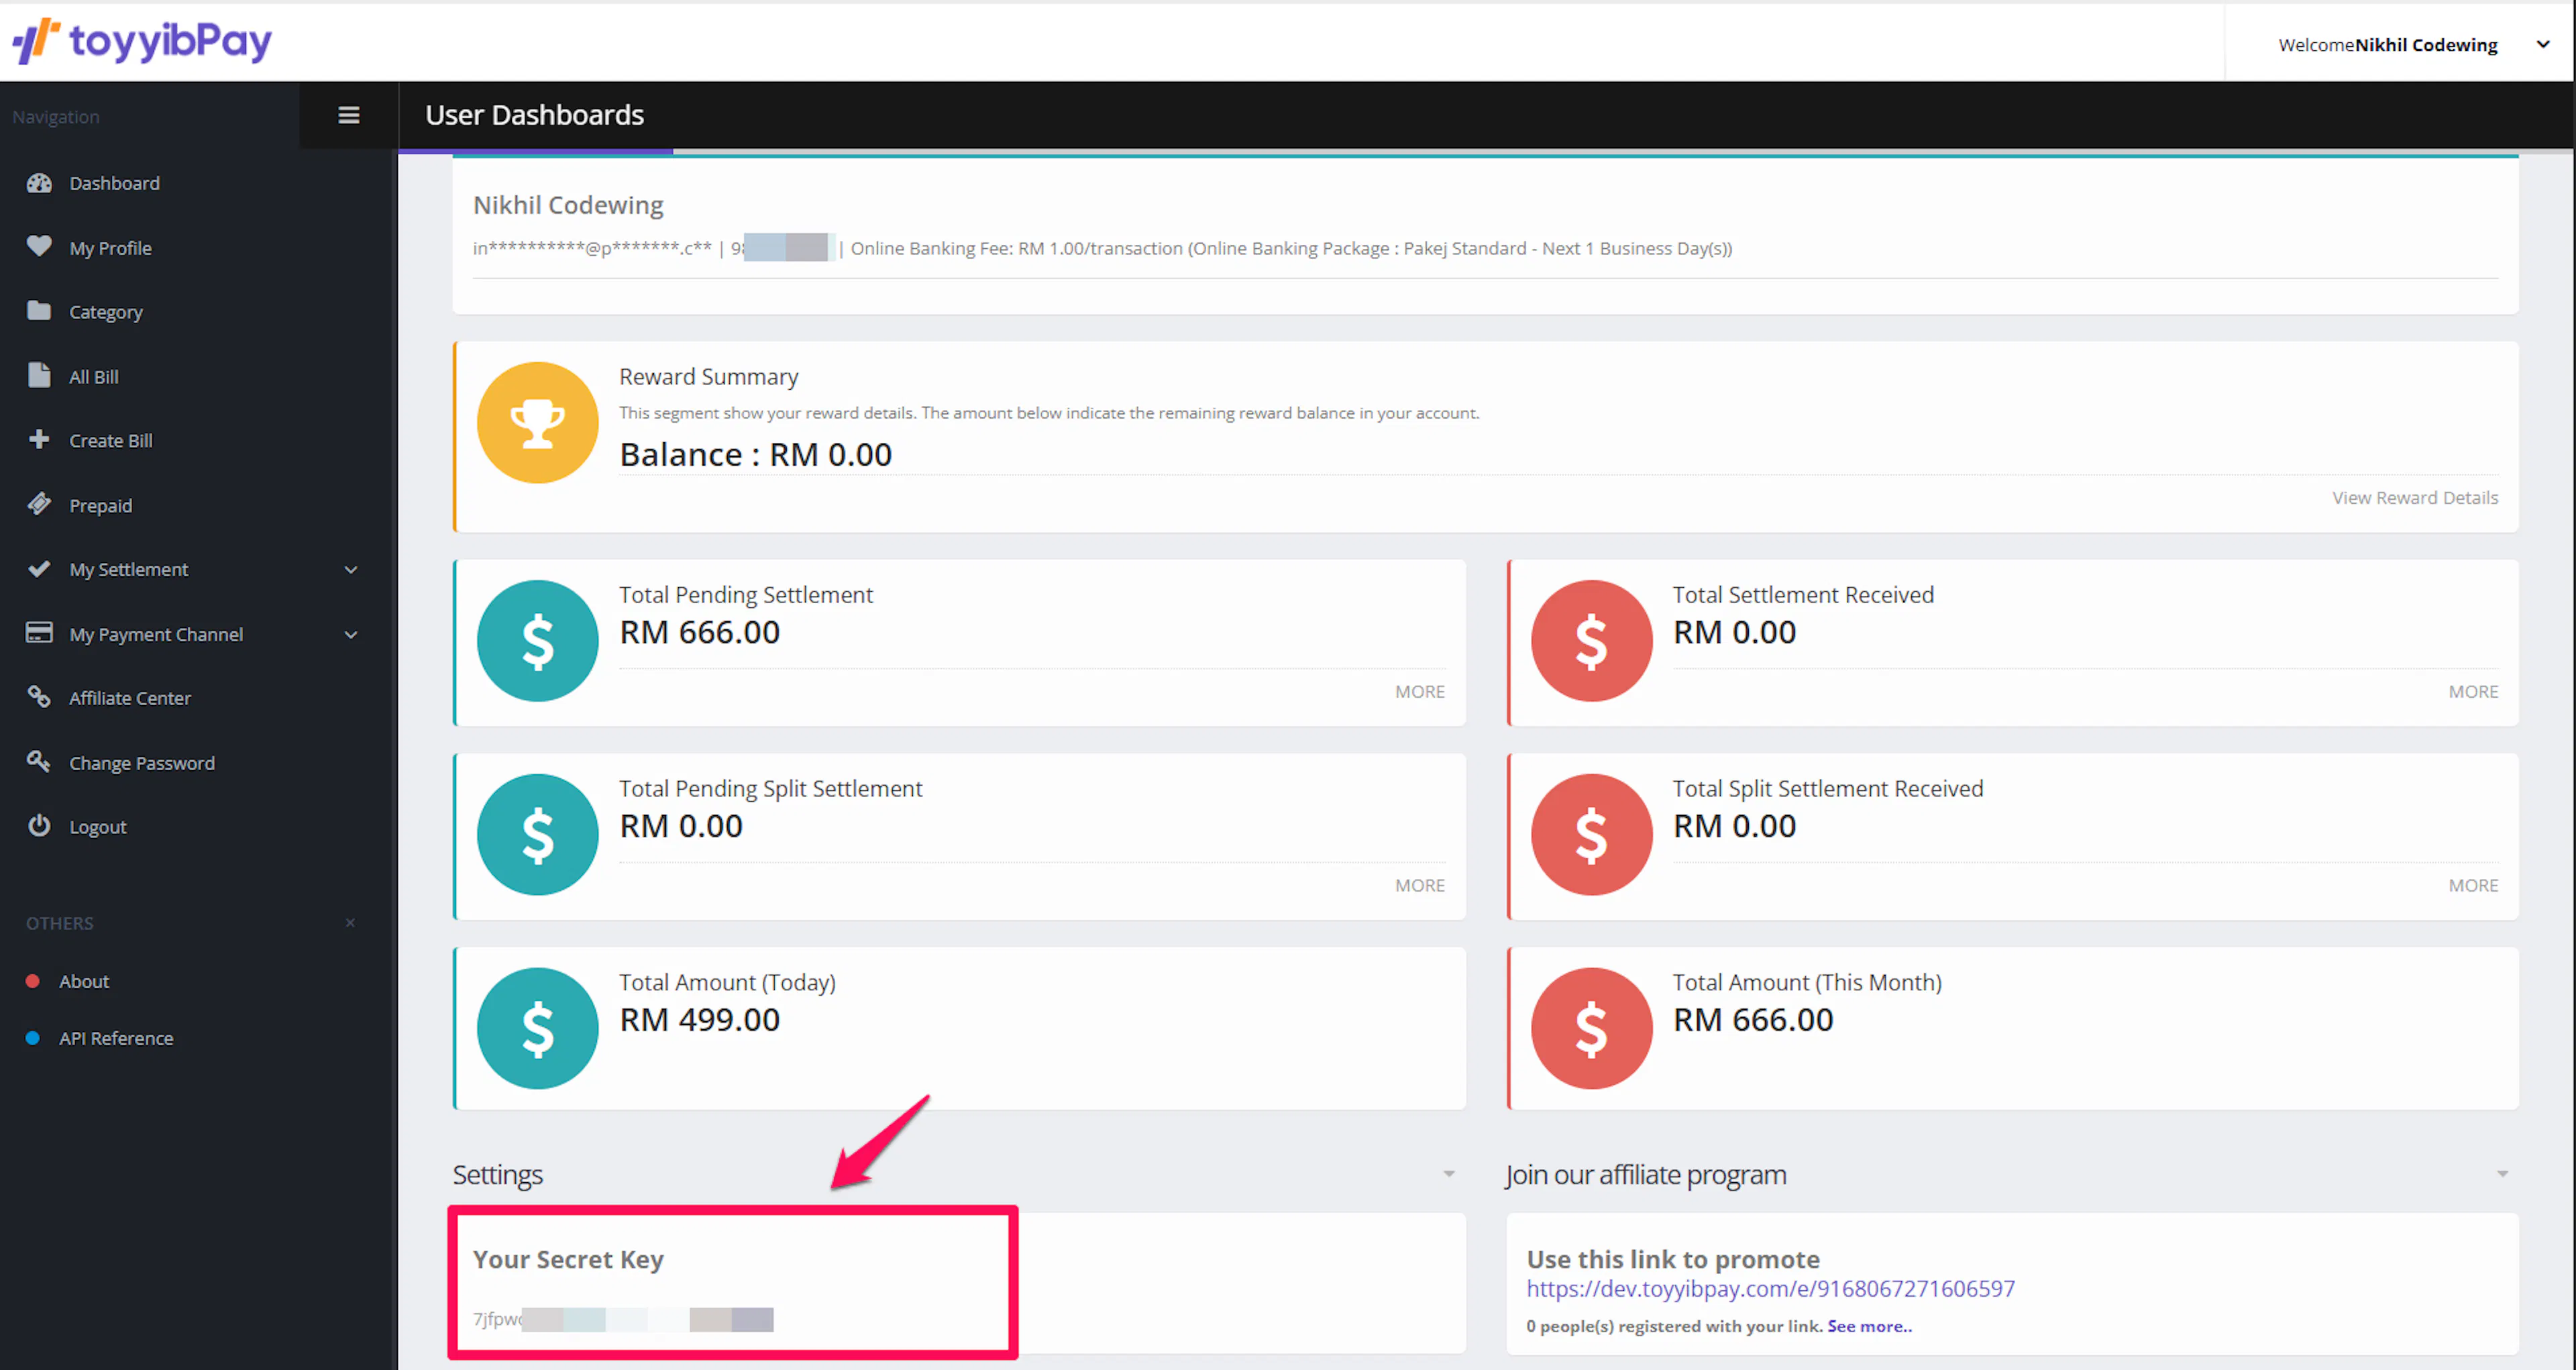
ToyyibPay does not provide an option to regenerate your Secret Key. Keep it secure - if you believe it has been compromised, contact ToyyibPay support to have it reset.
Get your Category Code
Go to the Categories tab from the dashboard menu. You can use an existing category or create a new one by clicking Add New Category. Each category has a unique Category Code that identifies it.
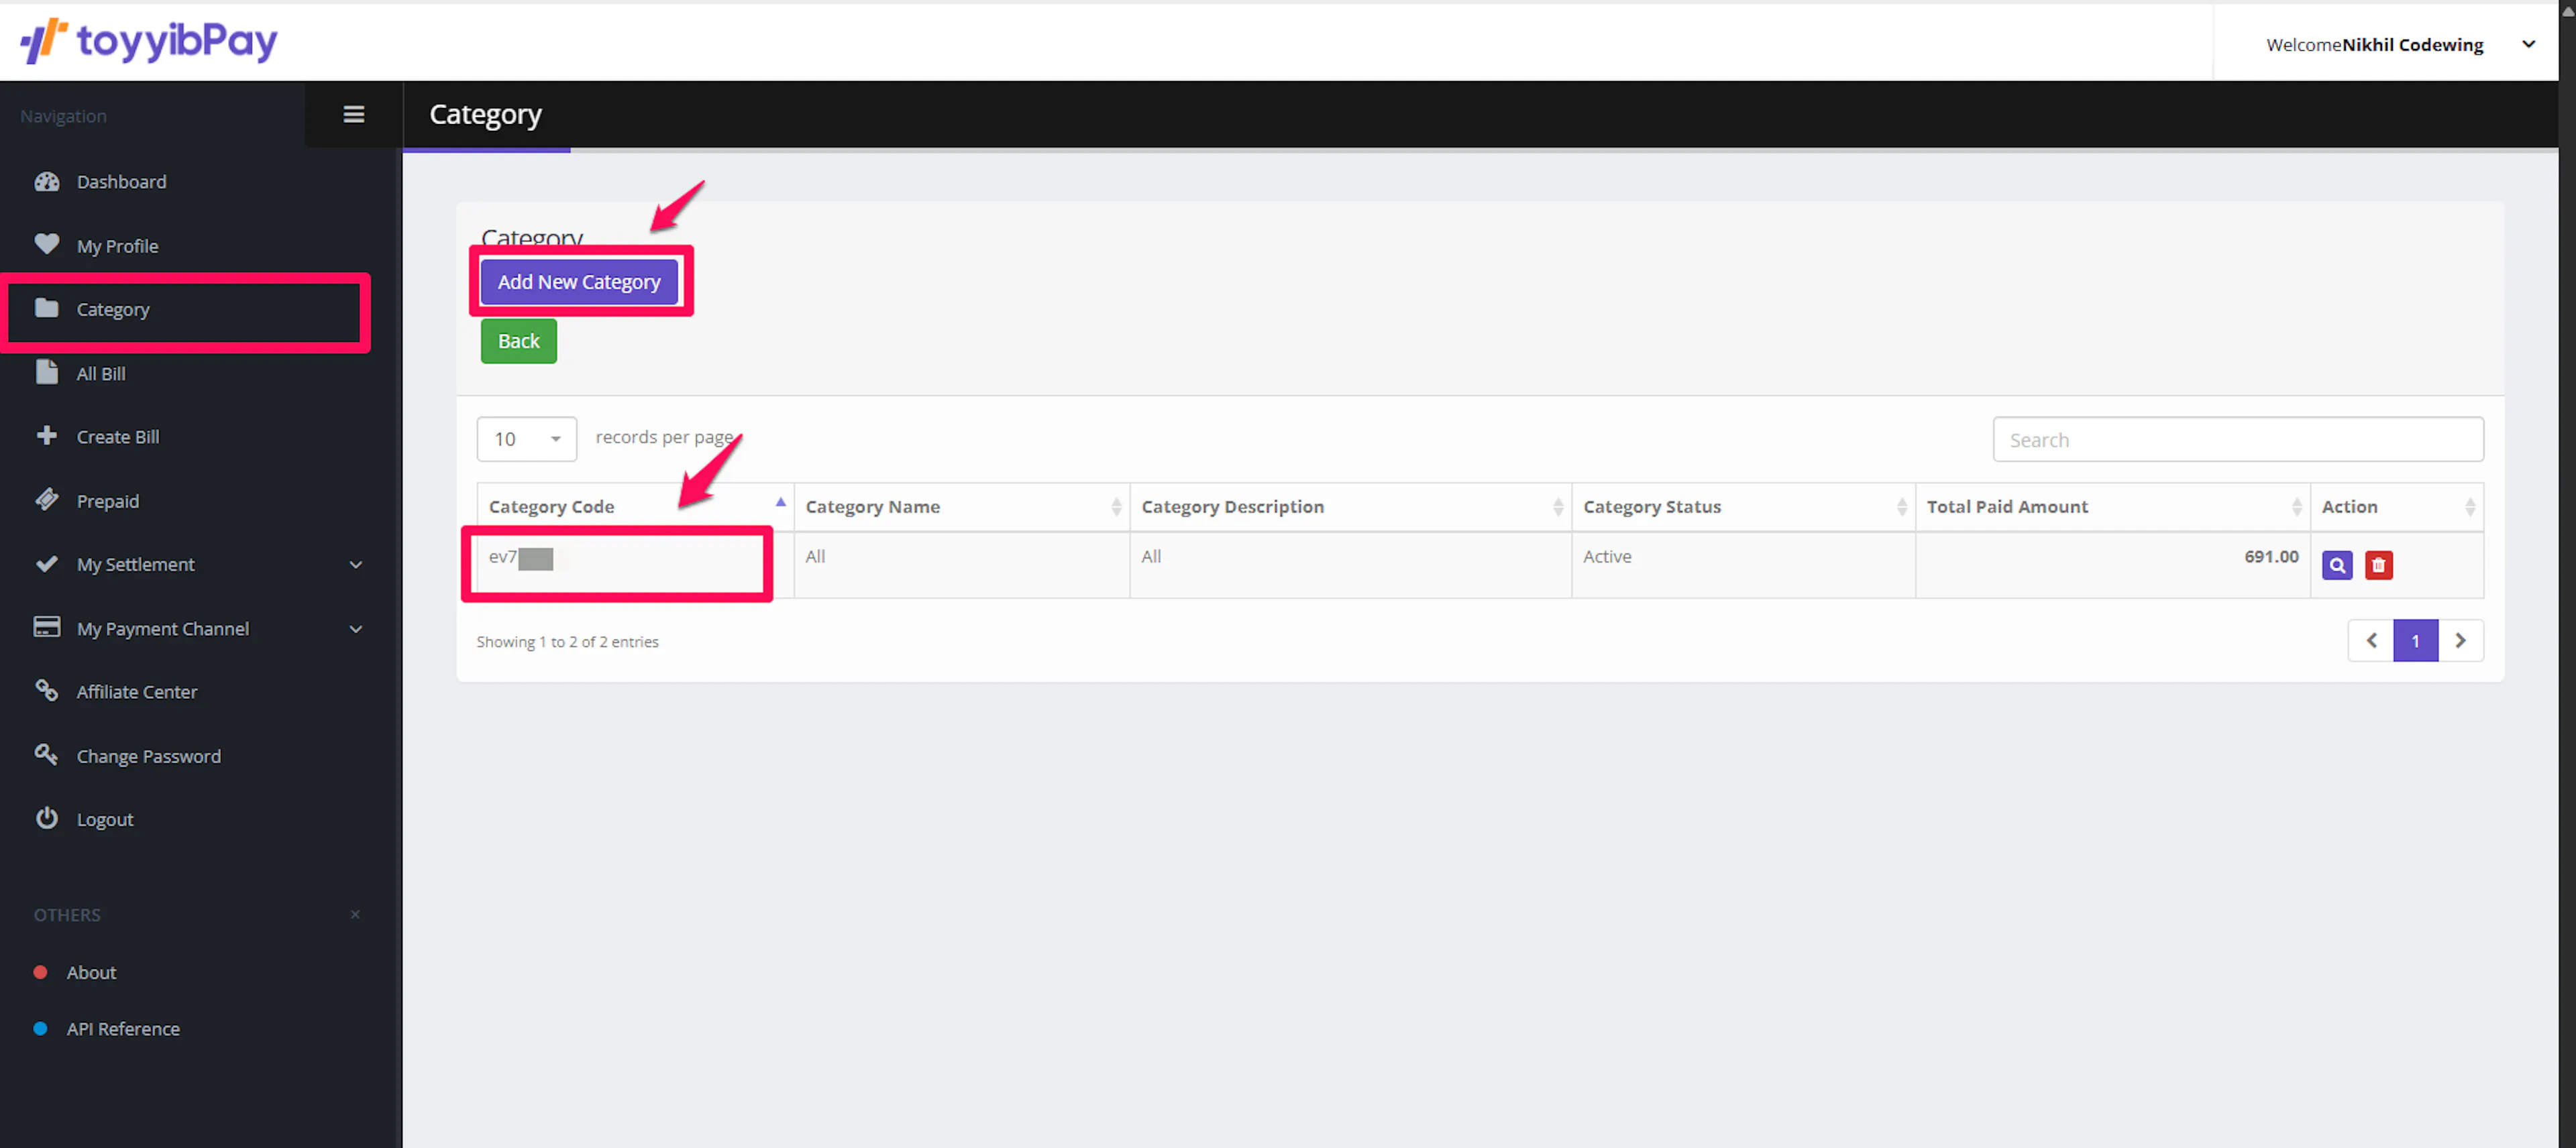
Copy the Category Code for the category you want to use for PayLexer payments.
Create a dedicated category named "PayLexer" or similar so transactions are easy to identify in your ToyyibPay dashboard.
Adding Credentials to PayLexer
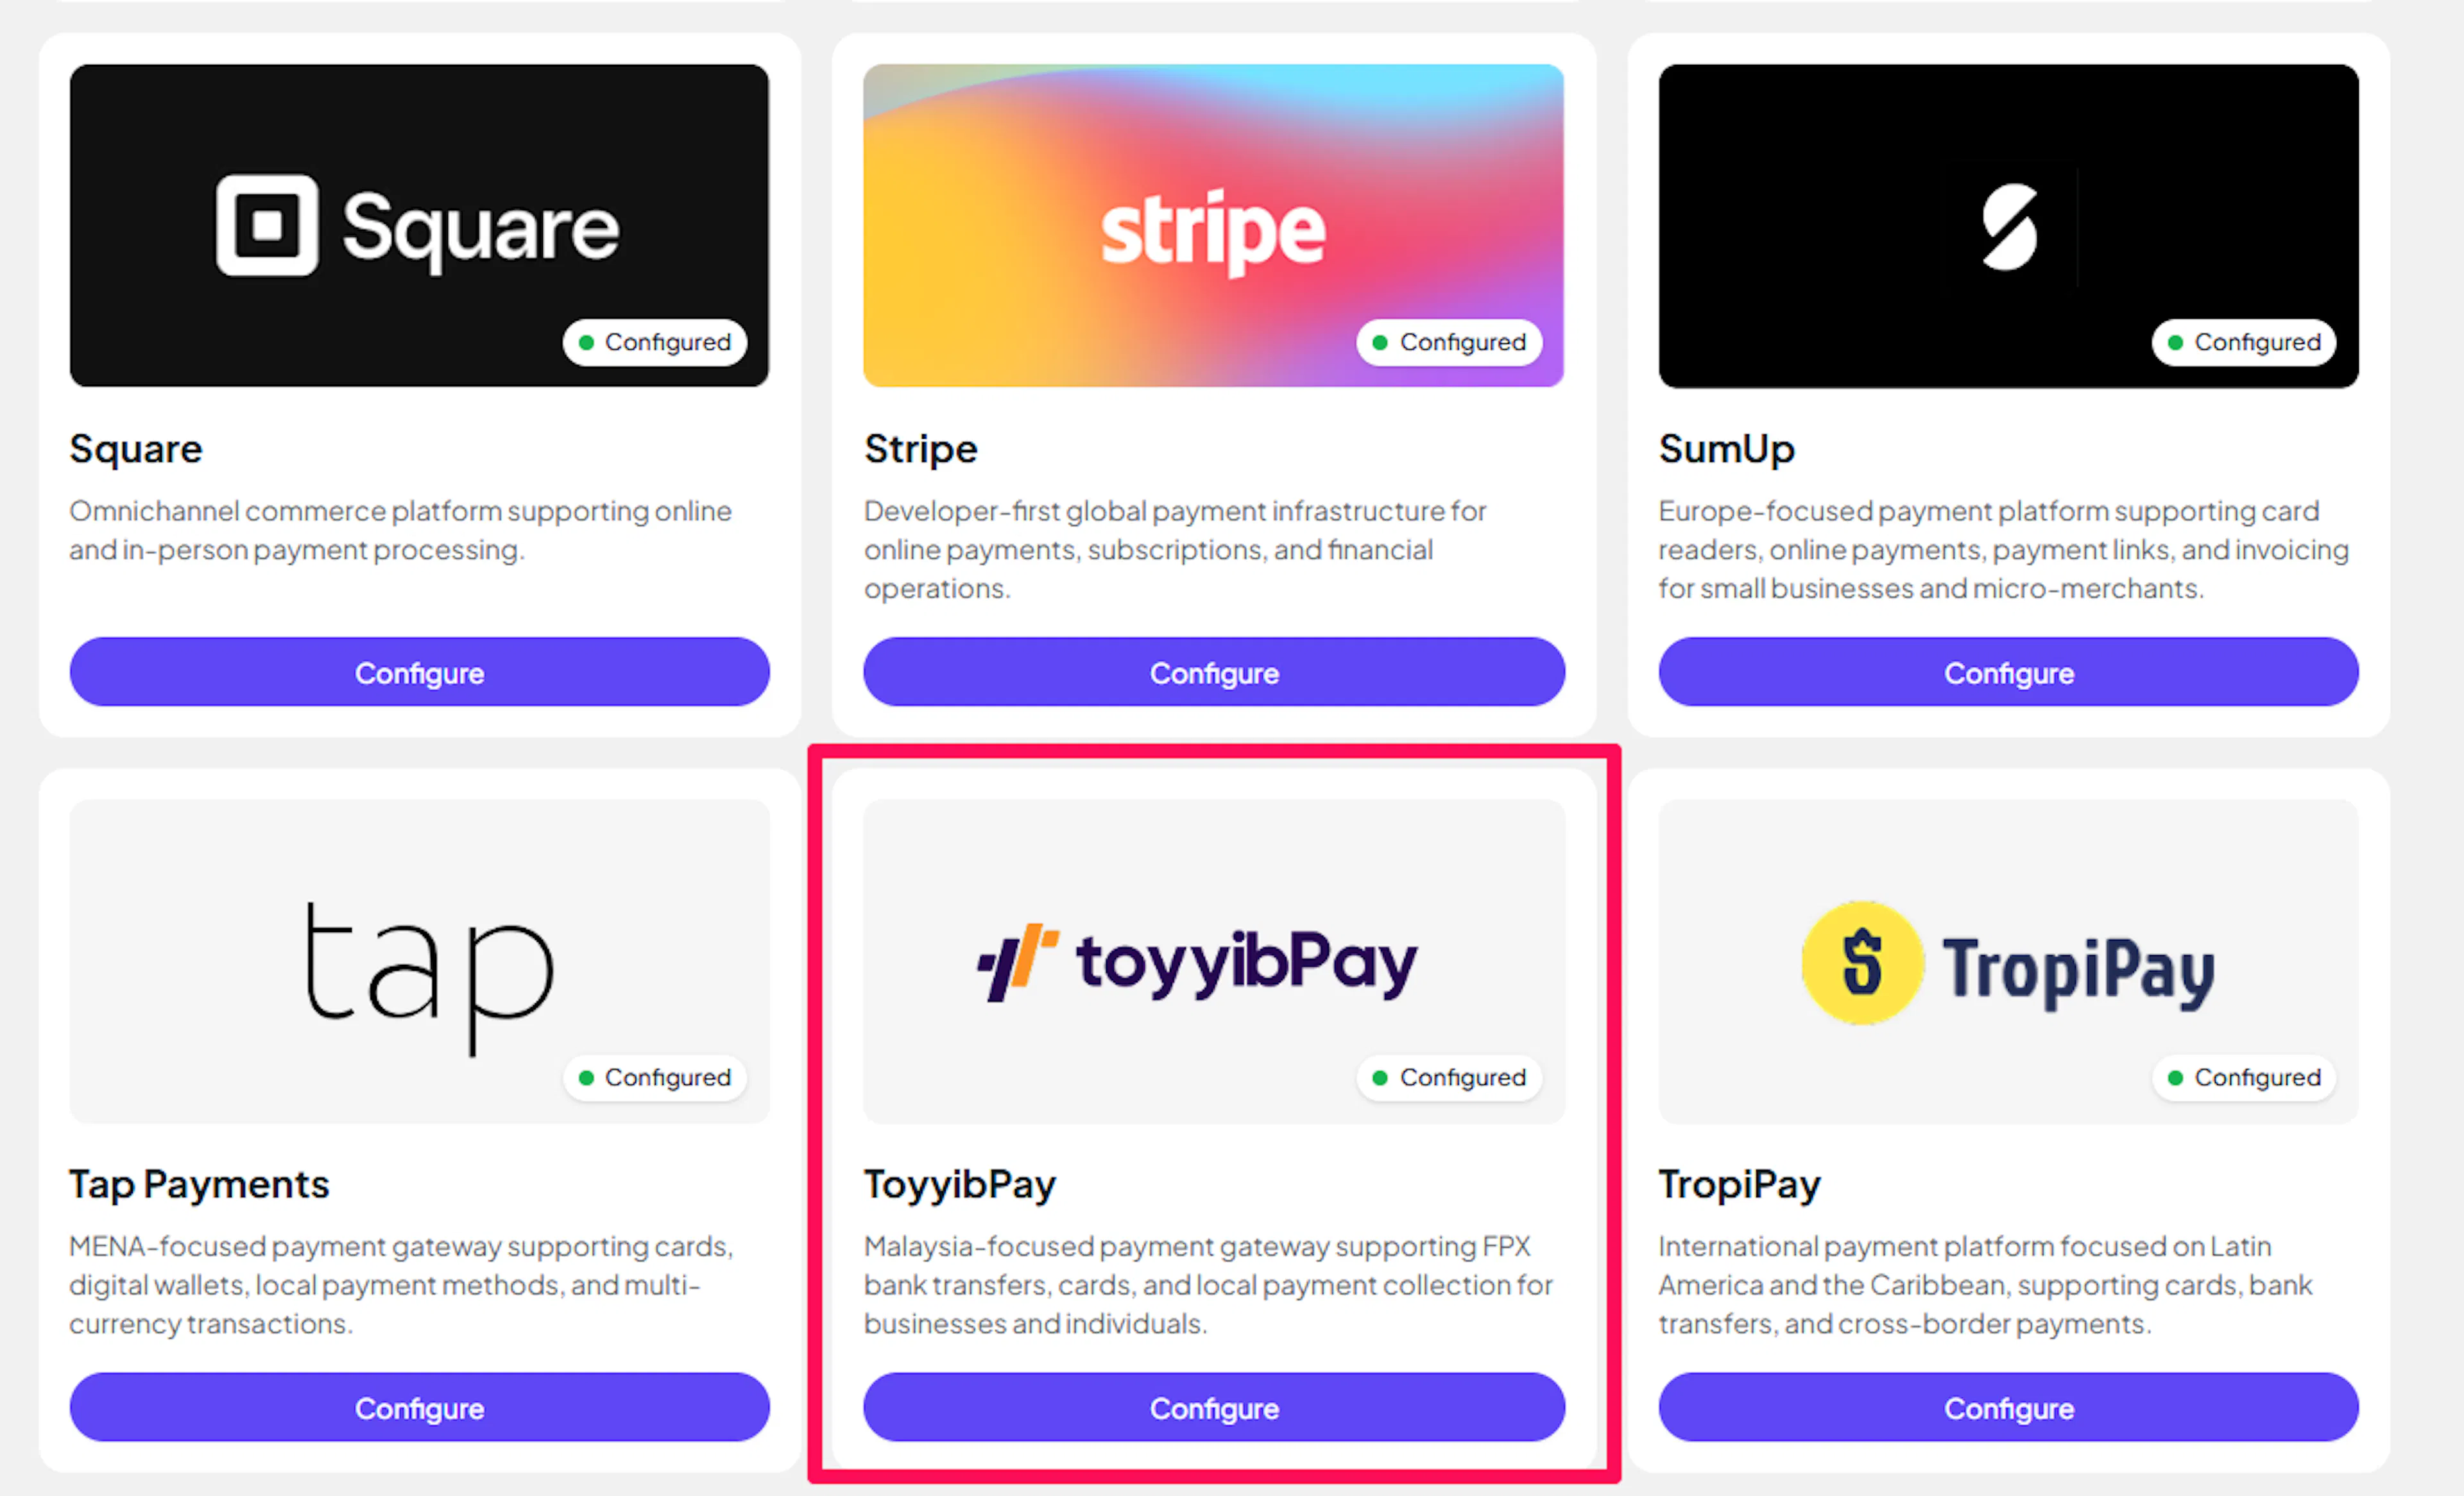
Open PayLexer Dashboard
Log in to your PayLexer dashboard and navigate to Payment Gateways → ToyyibPay.
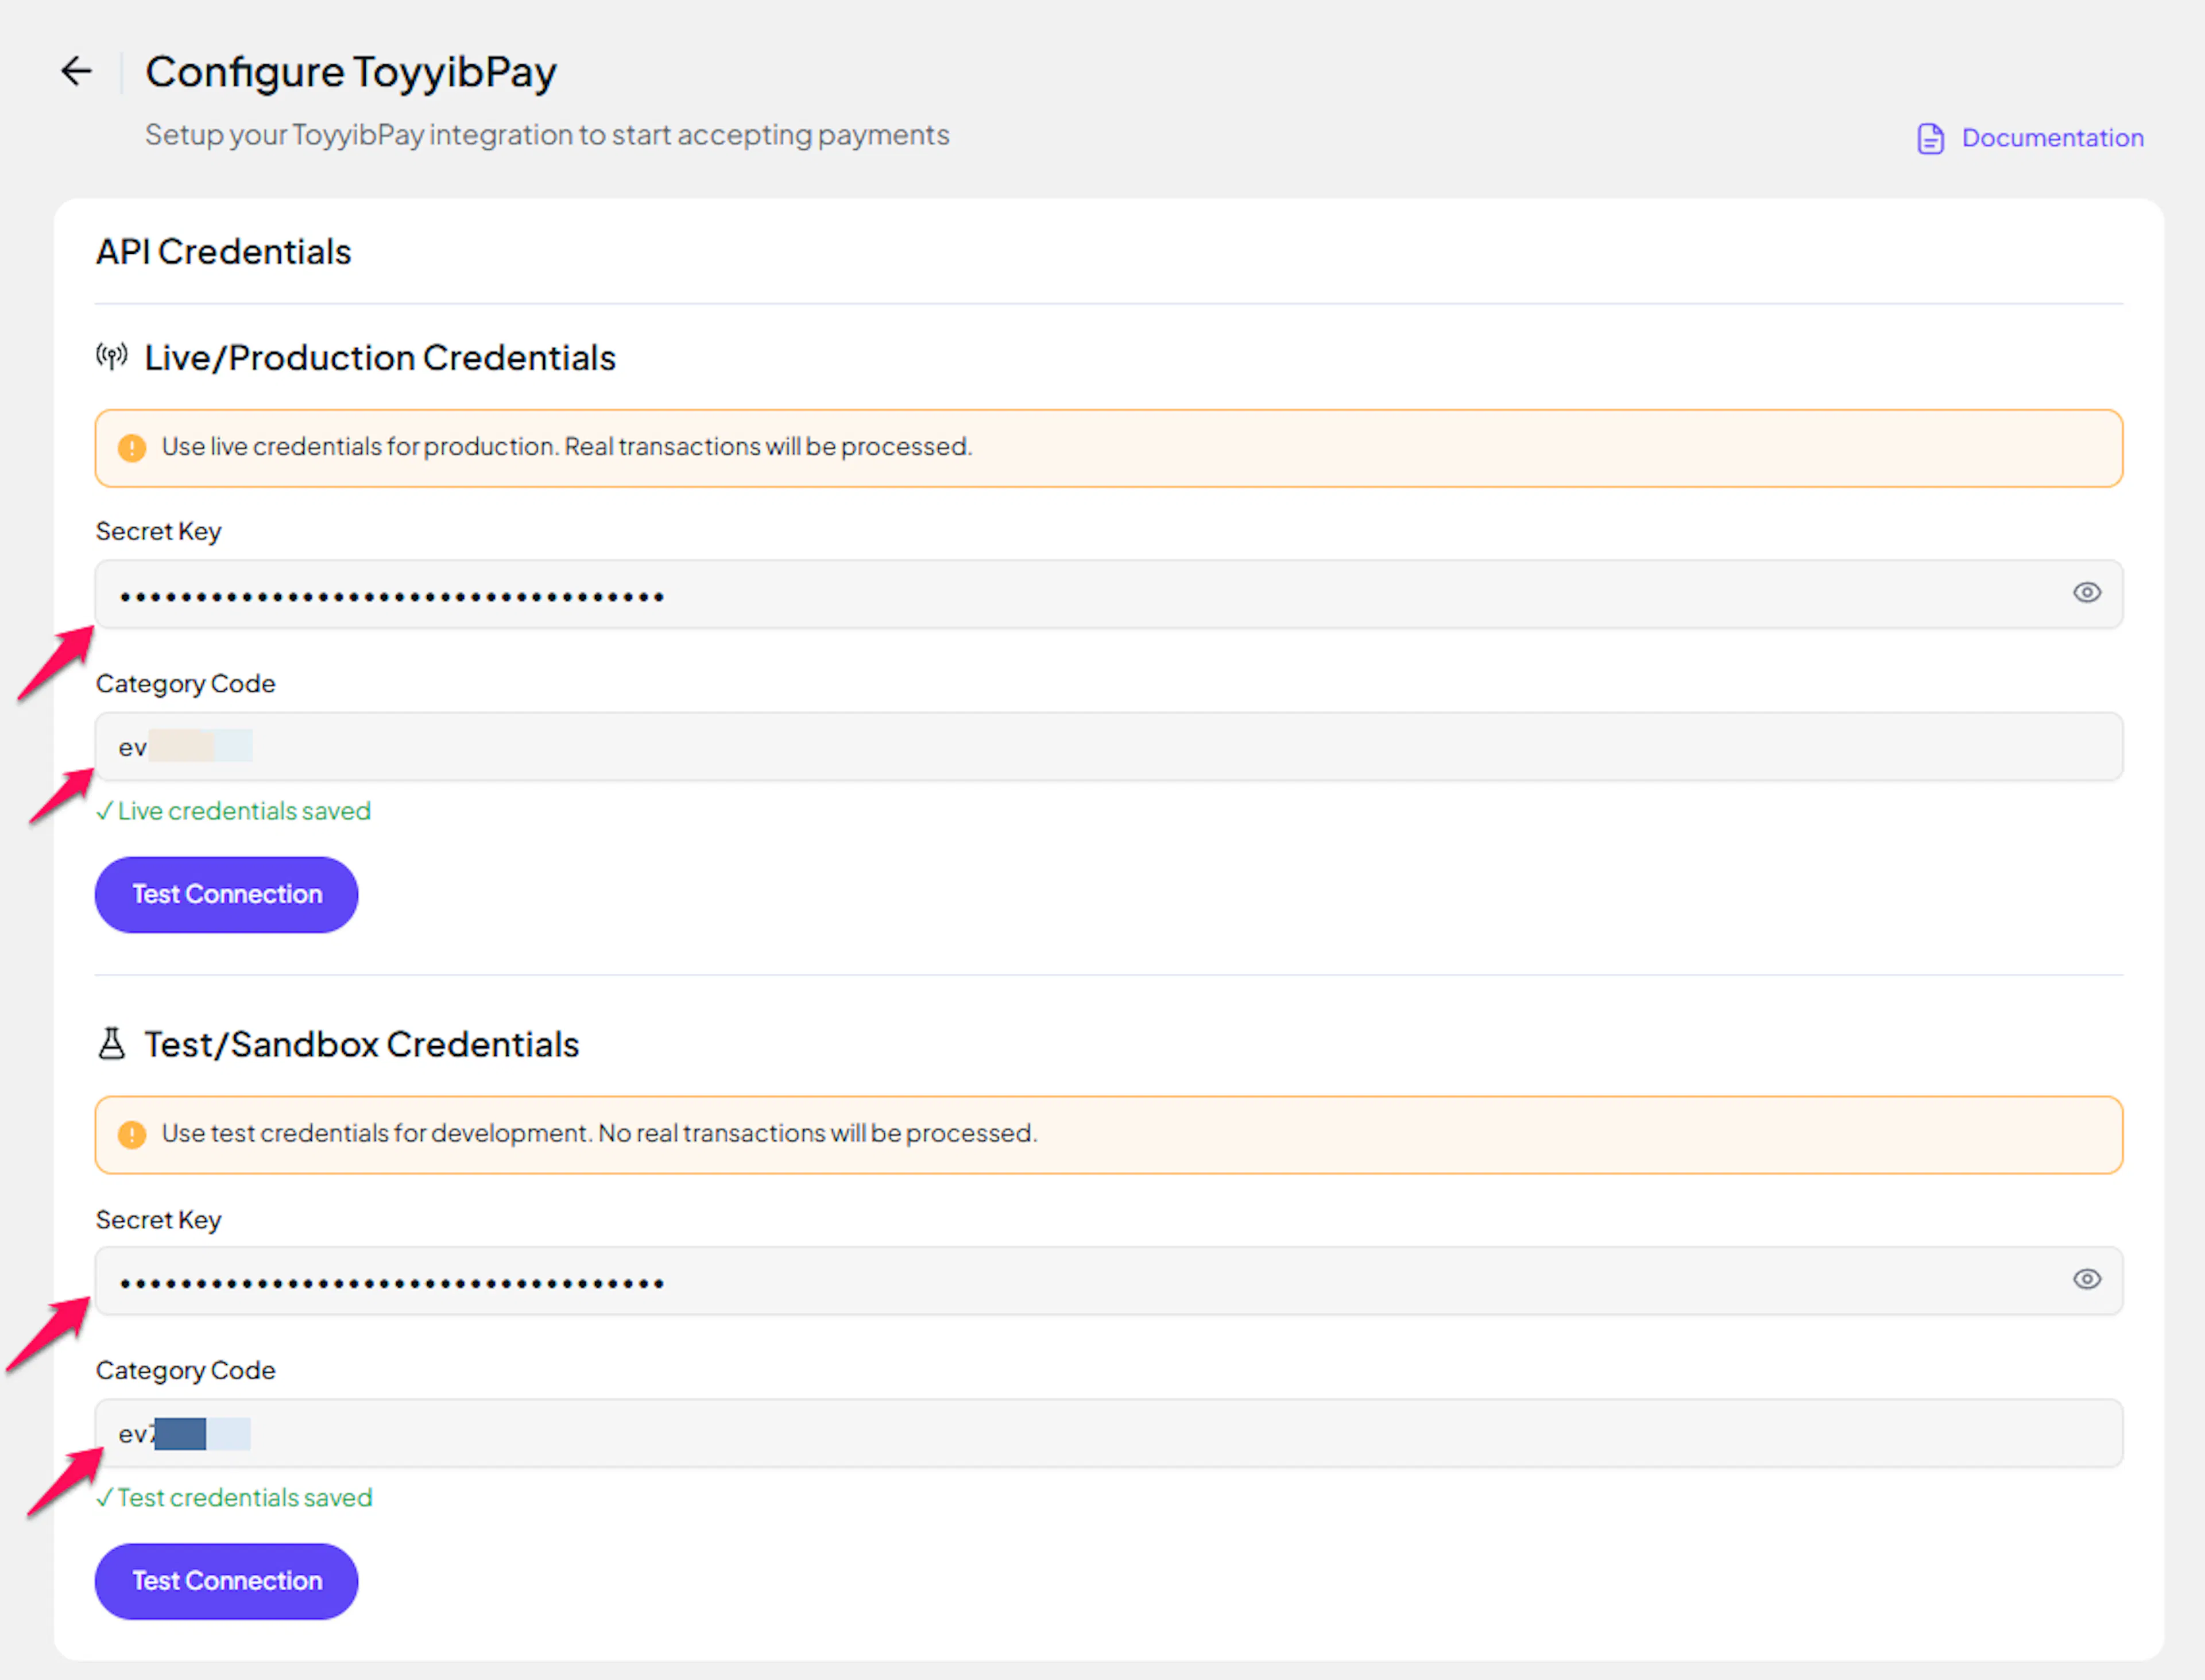
Enter your credentials
Paste your Live and Test credentials into the respective fields:
-
Secret Key - the Secret Key from your ToyyibPay live account
-
Category Code - the Category Code from your ToyyibPay live account
-
Secret Key (Test) - the Secret Key from your ToyyibPay sandbox account
-
Category Code (Test) - the Category Code from your ToyyibPay sandbox account
Understanding Live/Production and Sandbox Settings:
| Environment | Purpose |
|---|---|
| Live / Production (Mandatory) | Used for real transactions. Cannot be empty, even when testing. |
| Test / Sandbox (Optional) | Used for testing only. No real money is processed. |
How PayLexer selects credentials:
-
Debug/Test mode ON → Test credentials are used
-
Debug/Test mode OFF → Live credentials are used
Save your configuration
Click Save. PayLexer validates the credentials against ToyyibPay's API and shows Connected if both environments authenticate successfully.
Credentials saved. You can now enable ToyyibPay on any of your websites.
Webhooks
Payment status notifications are handled automatically by PayLexer - there is no webhook URL to register in the ToyyibPay dashboard.
-
PayLexer includes a per-bill callback URL when creating each payment, so status updates (paid, failed, pending) are delivered automatically
-
A scheduled polling job reconciles any payments where the callback was not delivered (for example, if the customer closed the browser before completing checkout)
-
ToyyibPay callbacks are fired once with no automatic retry - the polling fallback ensures no payments are left permanently pending
Integrate ToyyibPay to Your Website
If you have already added and configured your site, you can enable ToyyibPay in your existing setup.
Go to Websites
Navigate to Websites in your PayLexer dashboard.
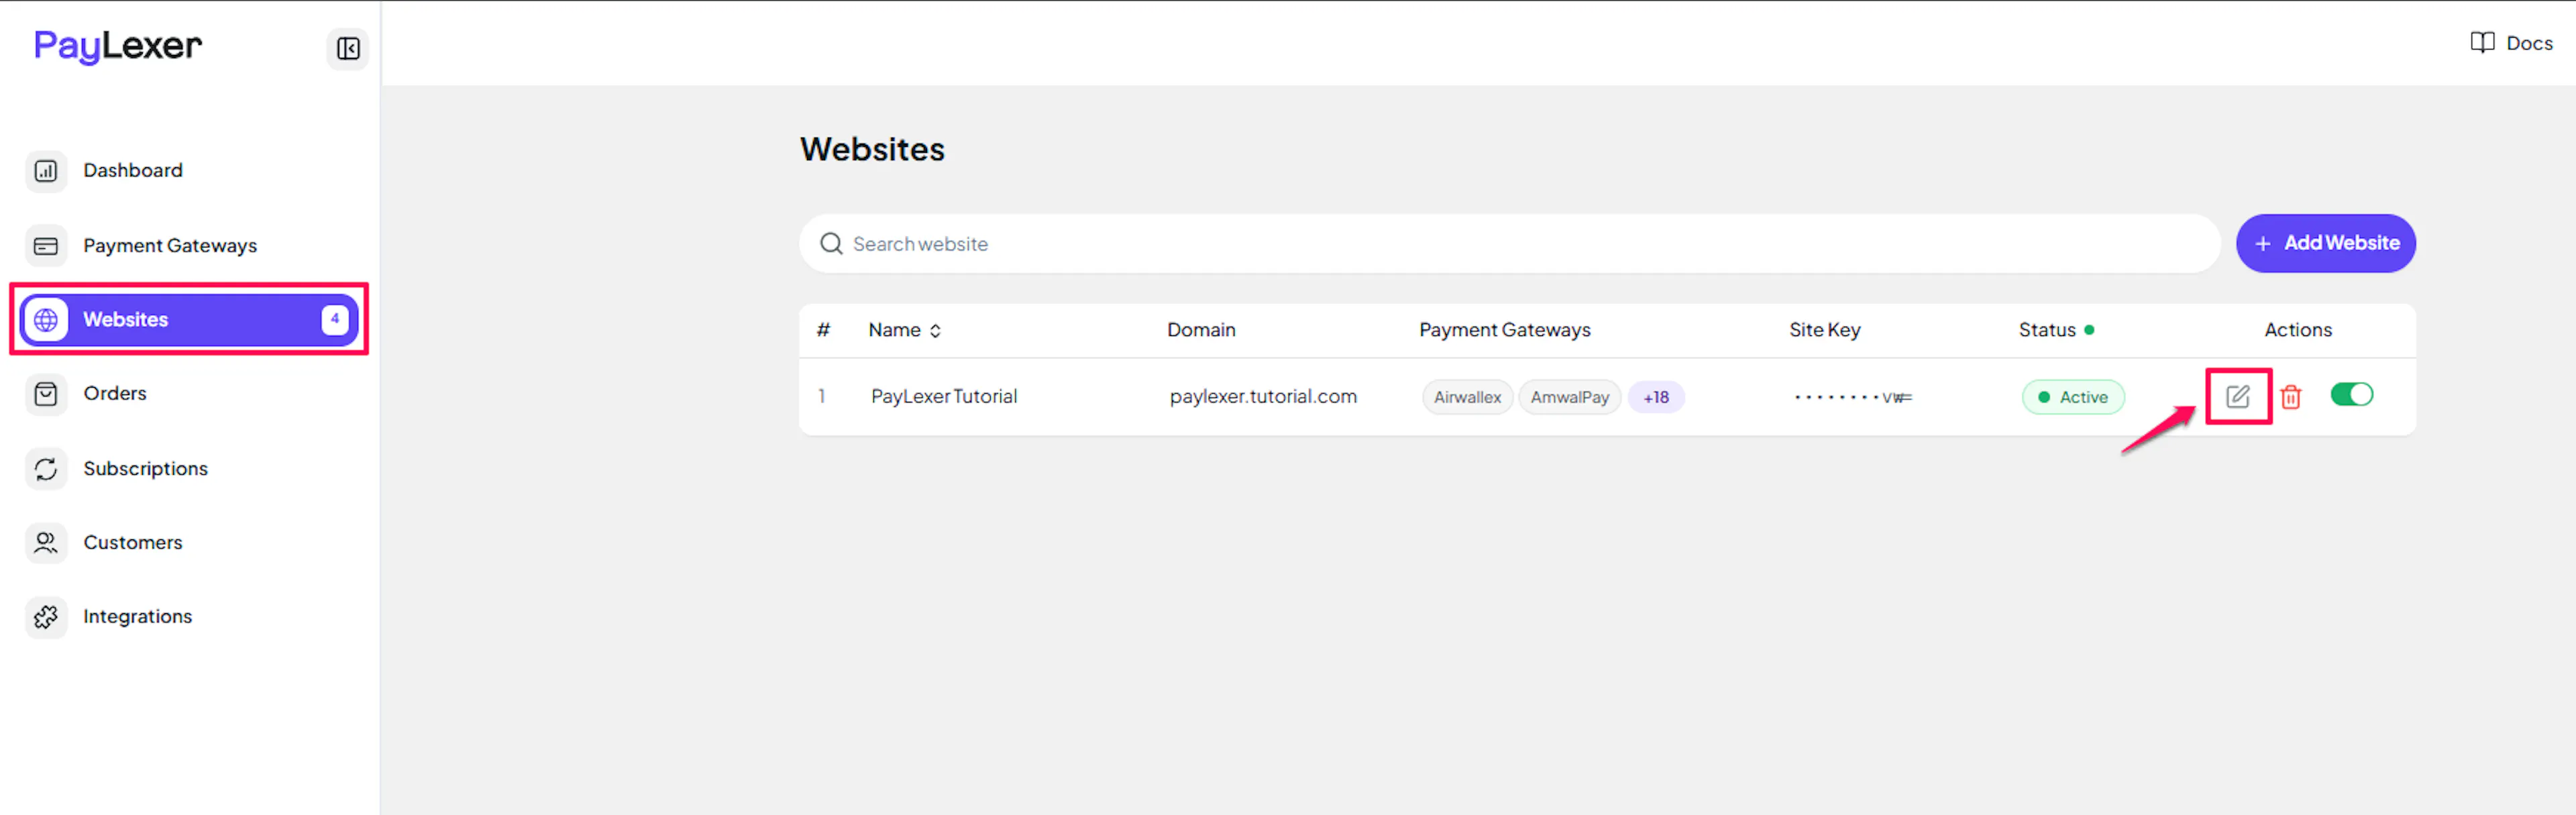
Edit your website
Click the Edit Icon of your added website.
Enable ToyyibPay
Click the checkbox to enable ToyyibPay for the website.
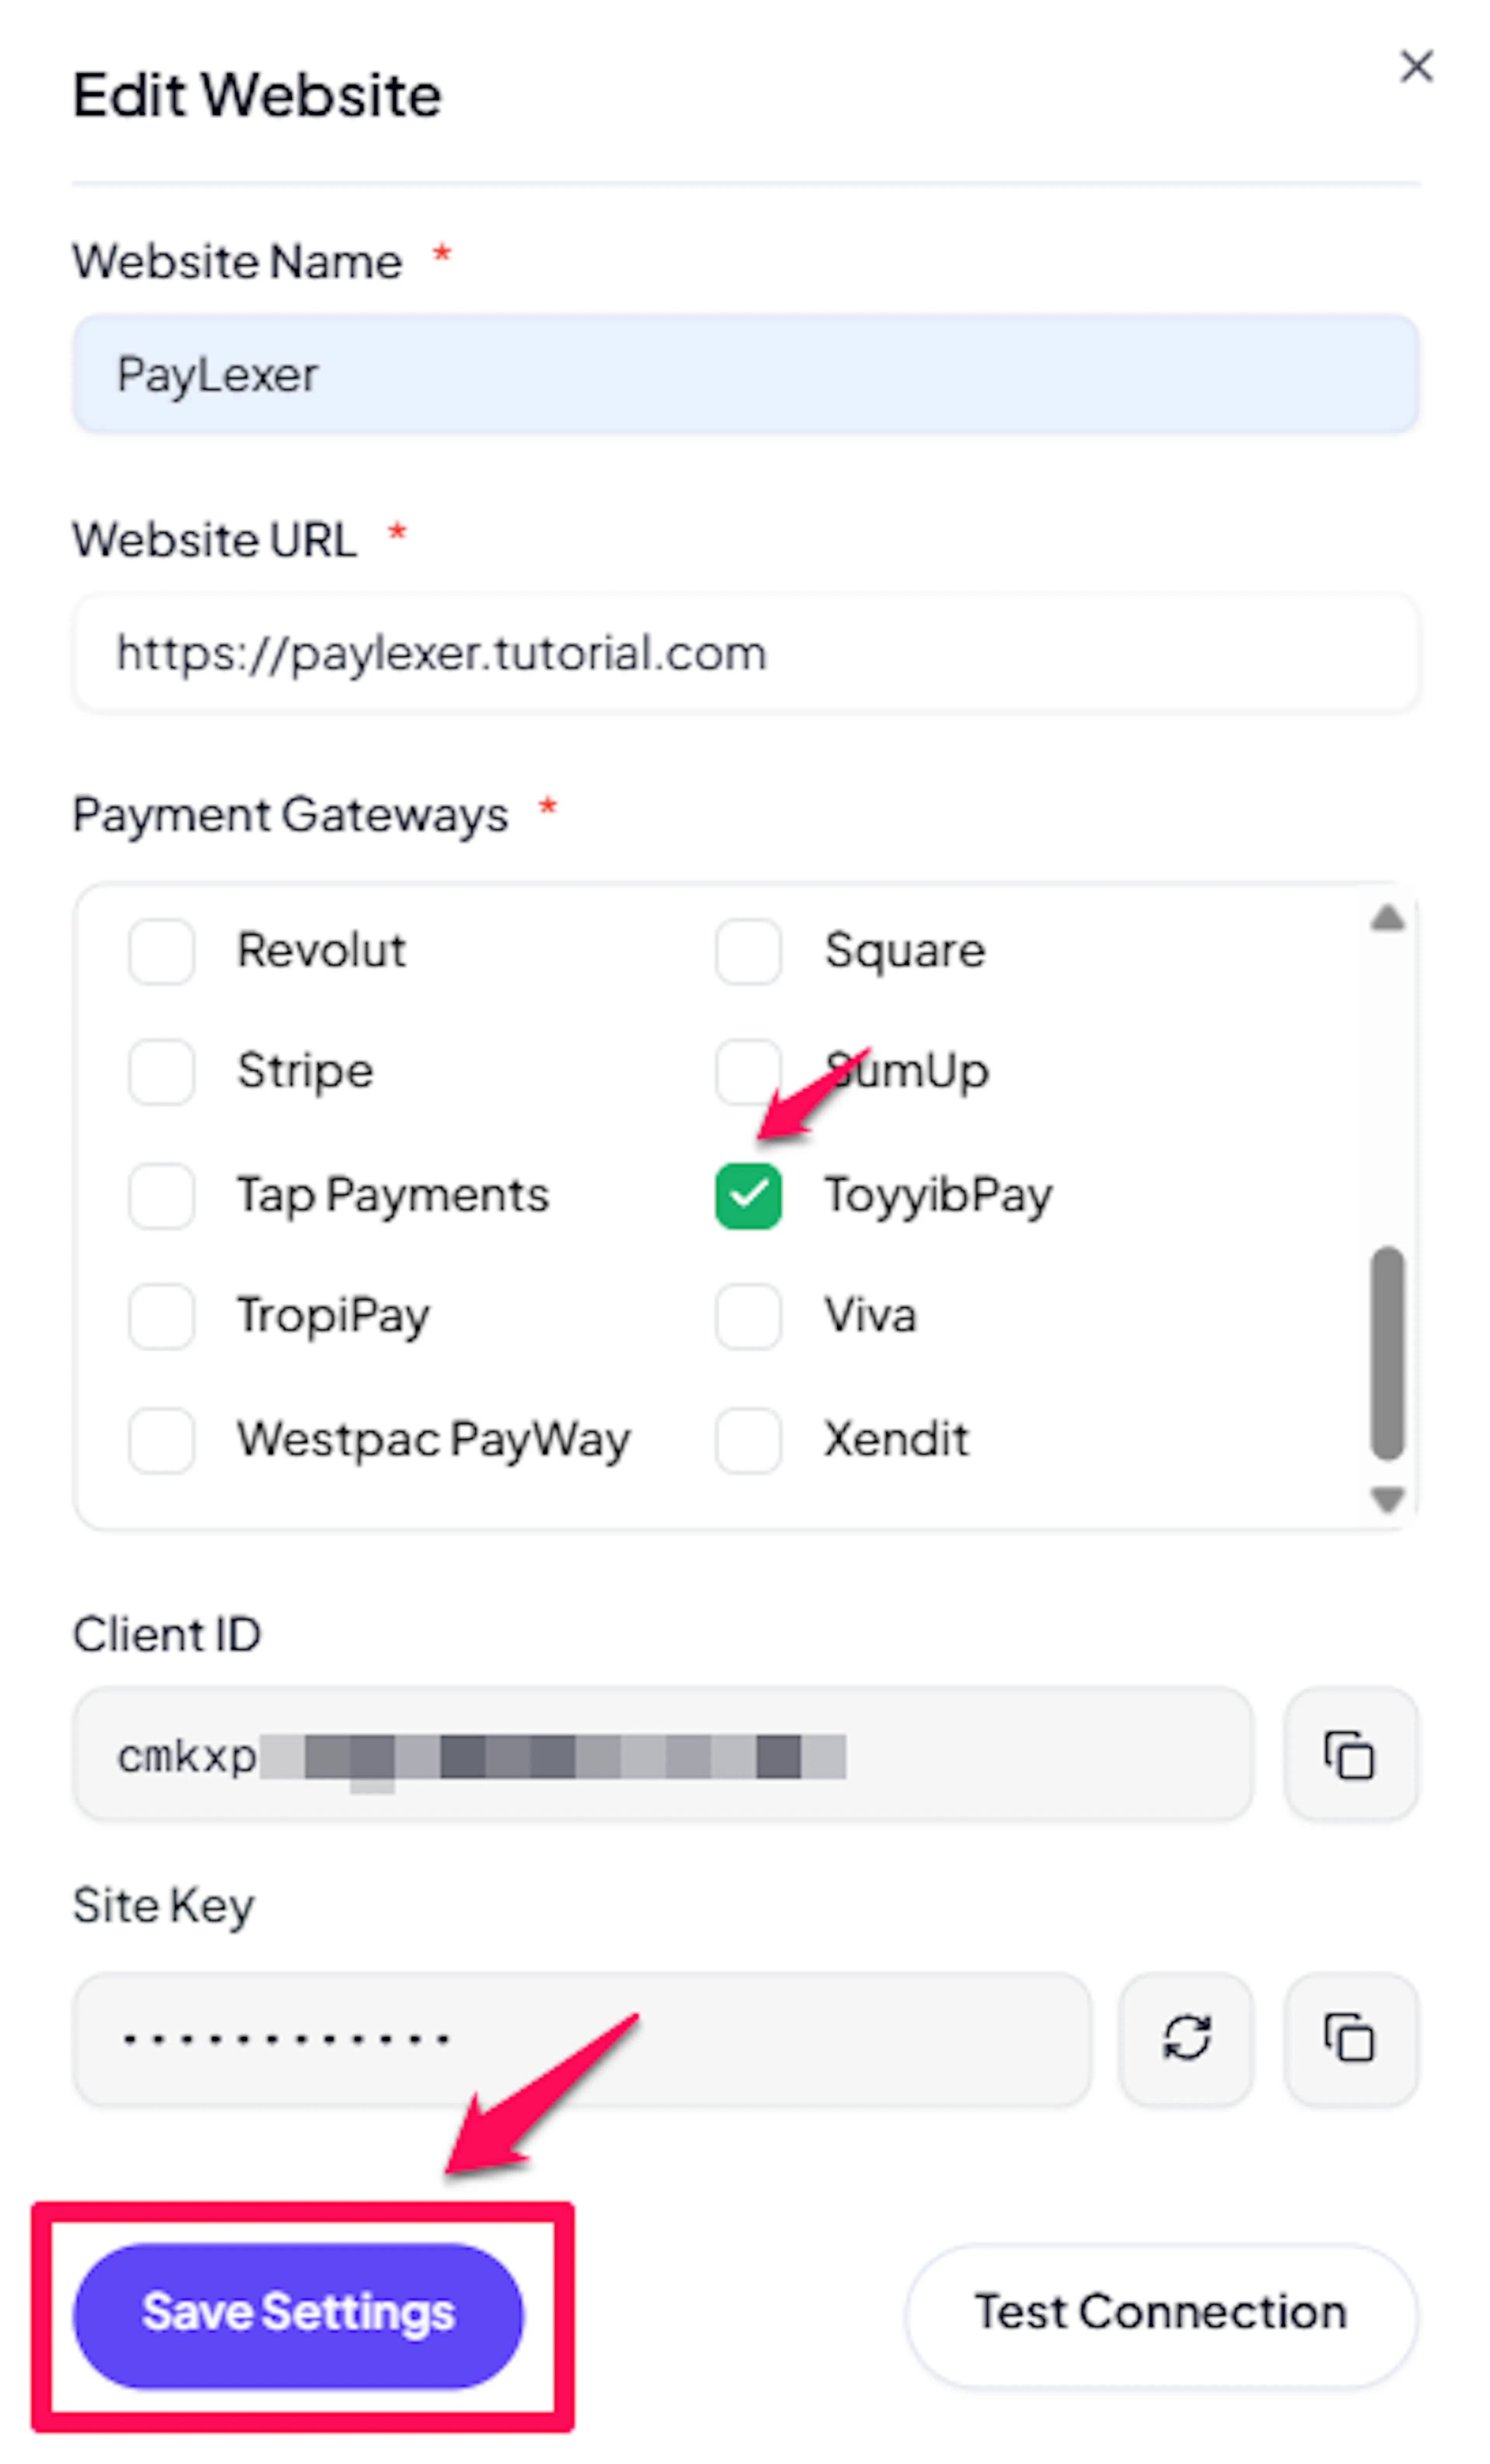
ToyyibPay is now active for this website. Run a test transaction before switching off Debug/Test mode.
If you haven't added a website yet, Continue to Add Your Website →
Troubleshooting
-
Confirm the Secret Key was copied from the correct portal. Sandbox credentials only work with dev.toyyibpay.com; live credentials only work with toyyibpay.com.
-
Verify the Category Code exists and is active in your ToyyibPay account. An inactive or deleted category will cause credential validation to fail.
-
Make sure there are no leading or trailing spaces in any pasted values.
-
Live credentials must be filled in even when you are only testing. PayLexer requires both environments to be configured.
-
ToyyibPay uses a hosted checkout page. When the customer completes payment, ToyyibPay fires a callback to PayLexer and the customer is redirected back to your site.
-
If the callback was not delivered (for example, the customer closed the browser), PayLexer's scheduled polling reconciles the order automatically within a few minutes.
-
If a payment is still Pending after 30 minutes, check the transaction status directly in your ToyyibPay dashboard using the bill code or external reference.
-
This is handled automatically. The ToyyibPay callback is the primary status source, and PayLexer's polling fallback covers cases where the callback was not delivered.
-
Final payment status appears on the order detail page in PayLexer once polling reconciles it (typically within a few minutes).
- Refunds are not supported by ToyyibPay and are therefore not available through PayLexer. If you need to return funds to a customer, arrange it outside the payment platform directly with the customer.
-
Confirm ToyyibPay is Enabled under Websites → Edit → Payment Gateways for the site in question.
-
ToyyibPay only supports MYR. If the checkout currency is anything other than MYR, ToyyibPay will not appear.
-
Clear any platform-level cache (WooCommerce, EDD, FluentCart, WP Travel Engine) after enabling the gateway.
-
FPX bank transfers require the customer to complete the payment within the session window. An expired or timed-out session will result in a failed status.
-
Card payments on ToyyibPay are subject to the card issuer's authorization. The customer should retry with a different card or bank if the payment fails.
-
Check the bill status in your ToyyibPay dashboard for the specific reason code.
Best Practices
-
Run at least one full test transaction using your sandbox credentials and Debug/Test mode before going live. The sandbox portal (dev.toyyibpay.com) and live portal (toyyibpay.com) are isolated - test transactions do not affect live data.
-
Keep your Secret Key confidential. ToyyibPay does not offer a self-service key reset - contact ToyyibPay support immediately if you suspect the key has been exposed.
-
Create a dedicated ToyyibPay category for PayLexer payments (for example, named "PayLexer") so you can identify and reconcile transactions easily in the ToyyibPay dashboard.
-
ToyyibPay bills expire automatically after 7 days if unpaid. Ensure your customers complete checkout promptly, and advise them to check their bank's FPX daily transfer limit if they encounter issues.
-
Confirm your ToyyibPay category is active before going live. An inactive category will cause all payment creation to fail.
FAQs
Live credentials are mandatory to save the configuration. Test credentials are optional but strongly recommended so you can safely test payments before going live.
Check the Debug Mode setting in your platform. When Debug Mode is ON, PayLexer uses your Test credentials and routes payments through dev.toyyibpay.com. When OFF, it uses Live credentials and routes through toyyibpay.com.
No. Refunds are not supported through PayLexer for ToyyibPay. To issue a refund, process it directly in the ToyyibPay dashboard and update the order status in your platform manually.
No. PayLexer's ToyyibPay integration covers one-time payments only. If you need recurring billing, see the Supported Payment Gateways page for gateways that support subscriptions.
No. PayLexer automatically includes a callback URL when creating each payment. There is no separate webhook setup required in the ToyyibPay dashboard.
Log in to your ToyyibPay portal and scroll down on the dashboard page to the Settings section. Your Secret Key is listed there. If you need it reset, contact ToyyibPay support - there is no self-service regeneration option.
A Category Code identifies the payment collection category you created in ToyyibPay. Navigate to your categories from the dashboard menu and copy the code for the category you want to use. If you have not created a category yet, do so before configuring PayLexer.
ToyyibPay only supports MYR (Malaysian Ringgit). It is designed for merchants collecting payments from Malaysian customers.
ToyyibPay fires its payment callback once with no automatic retry. If the callback was missed, PayLexer's polling job reconciles the payment automatically within a few minutes. If it is still Pending after 30 minutes, check the bill status in your ToyyibPay dashboard using the external reference number.
Transactions appear in three places: your platform's order or booking pages, PayLexer Dashboard → Orders, and the ToyyibPay dashboard under your category. All three reflect the same transactions with different identifiers.
Still Have Questions?
-
ToyyibPay Support: ToyyibPay Help Center
-
PayLexer Support: Contact Support
For ToyyibPay API references and advanced configuration, see the ToyyibPay API documentation.