

M-PESA Kenya
Connect M-PESA (Safaricom Daraja) to PayLexer to accept phone-prompt mobile money payments in Kenyan Shillings, with automatic reconciliation and refund detection.
M-PESA is Safaricom's mobile money network, the primary way everyday shoppers pay in Kenya - no card or bank account required. PayLexer connects to Safaricom's Daraja STK Push ("Lipa Na M-PESA Online") API, so a shopper pays by typing their phone number into your own checkout and approving a PIN prompt that arrives directly on their phone - they are never redirected to a hosted payment page.
- Supported Regions (Merchant Accounts): Kenya
- Supported Currencies: KES
This gateway appears in checkout only when the selected currency is KES.
Supported Features
- Push-to-phone STK Push checkout - the shopper enters their phone number on your site and approves a PIN prompt on their own device
- Automatic reconciliation - any payment left unresolved is independently re-checked with Safaricom on a recurring schedule, since Safaricom's own confirmation message has been observed to not always arrive
- Automatic refund detection - a merchant reverses a payment directly from their own M-PESA account, and PayLexer detects the reversal on a recurring check and marks the order refunded
- Whole-shilling rounding - amounts are automatically rounded to the nearest whole Kenyan Shilling before the payment prompt is sent, since M-PESA has no concept of cents
- Sandbox test defaults - Safaricom's own published shared test settings are used automatically for any test-mode field you haven't set up yet
Recurring subscriptions are not supported for M-PESA. This integration handles one-time payments only. There is also no way to cancel a phone prompt once it has been sent - the shopper must approve, decline, or let it expire on their own device.
Before You Start
Make sure you have:
- Safaricom Daraja Account – Don't have one? Sign up for Safaricom Daraja →
- PayLexer Account – Required to configure the integration. Create your account →
- A website where you want to integrate
Looking for a different payment processor? View all supported gateways →
Configuring M-PESA
You need a Consumer Key, Consumer Secret, ShortCode, and Passkey from Safaricom Daraja for this integration.
Getting API Credentials
Log in or sign up
Go to the Safaricom Daraja portal. If you don't have an account yet, sign up first, then log in.
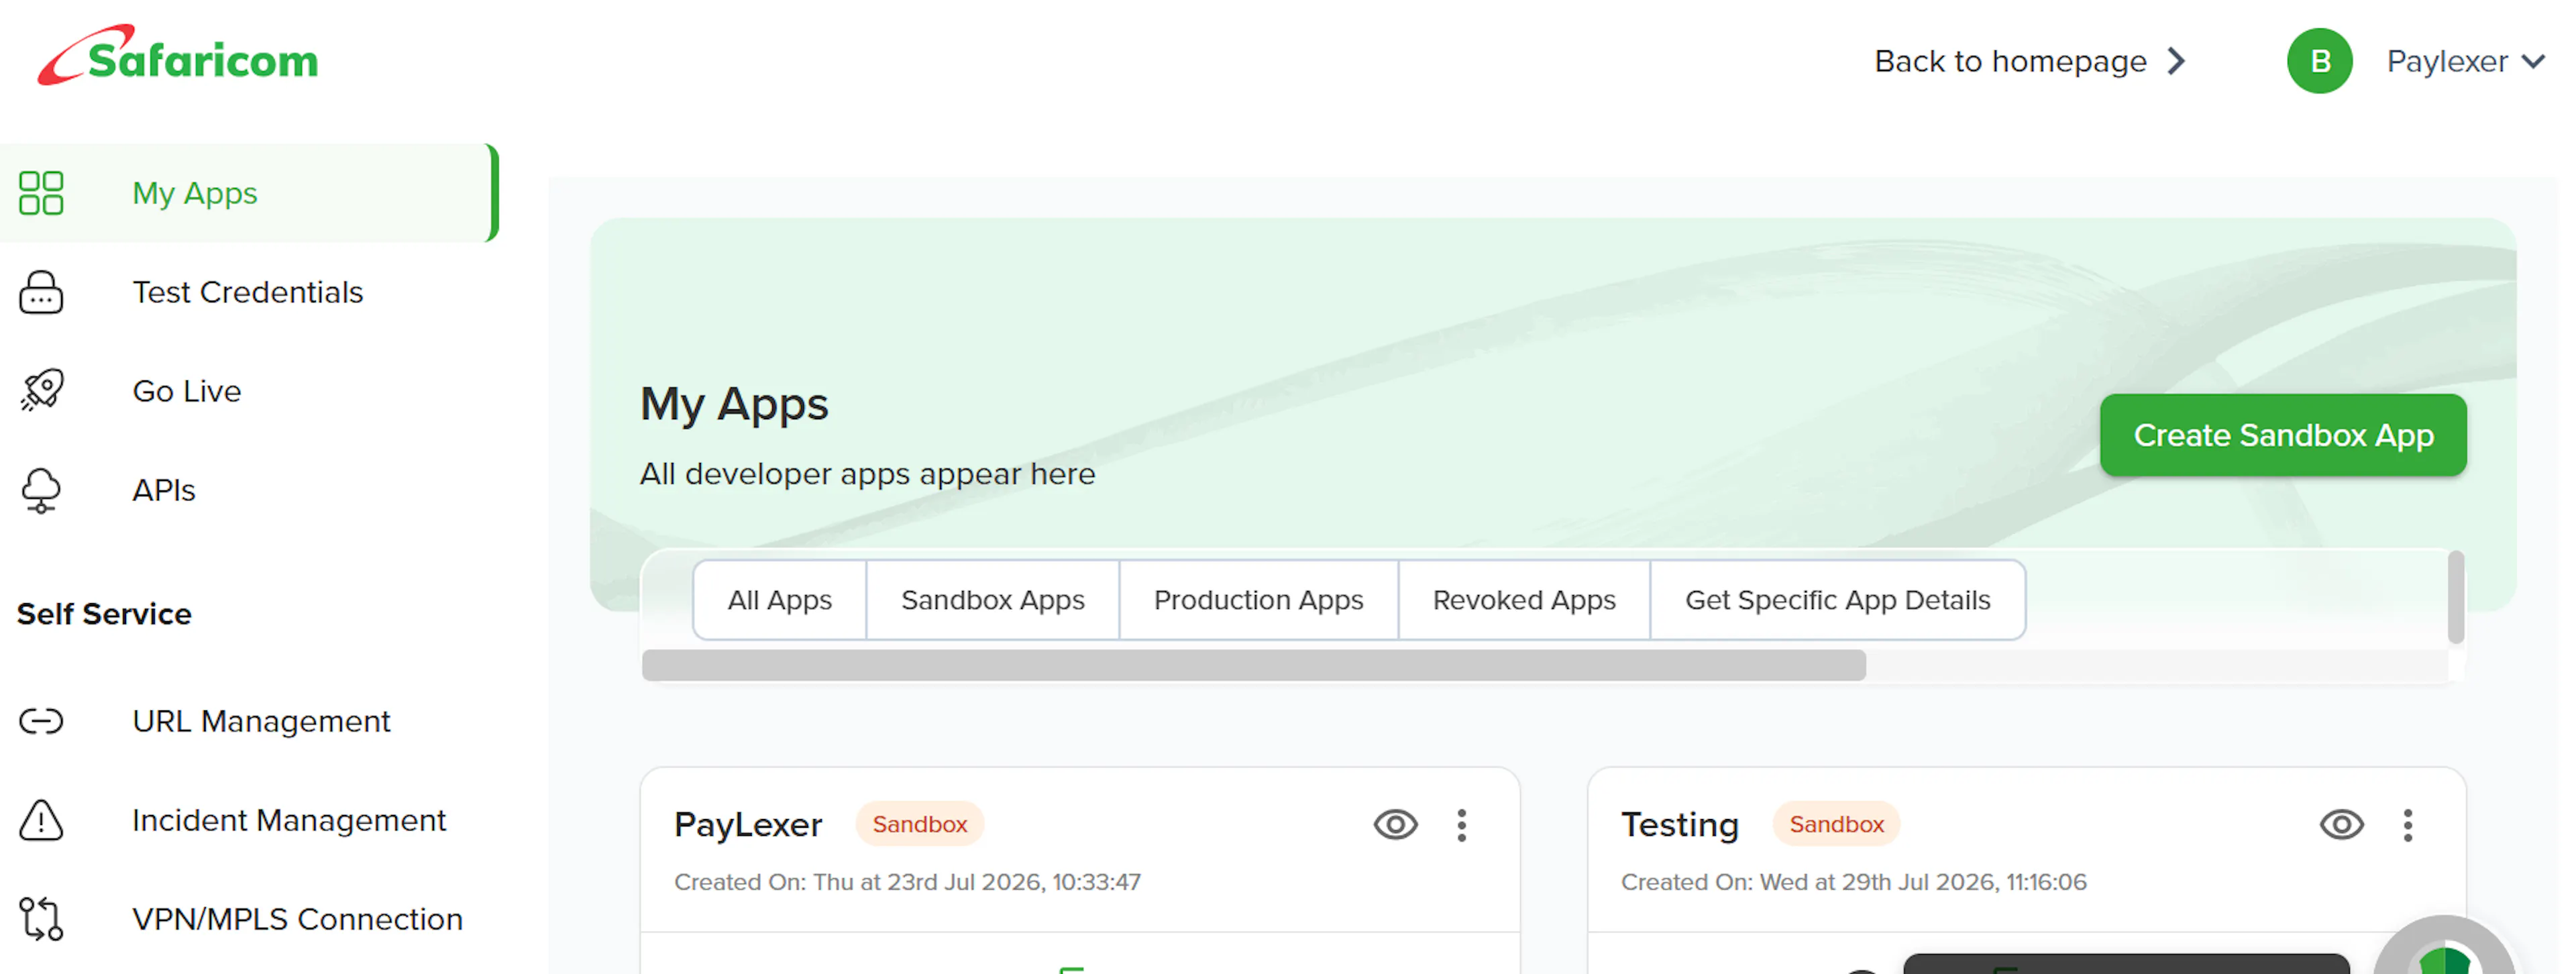
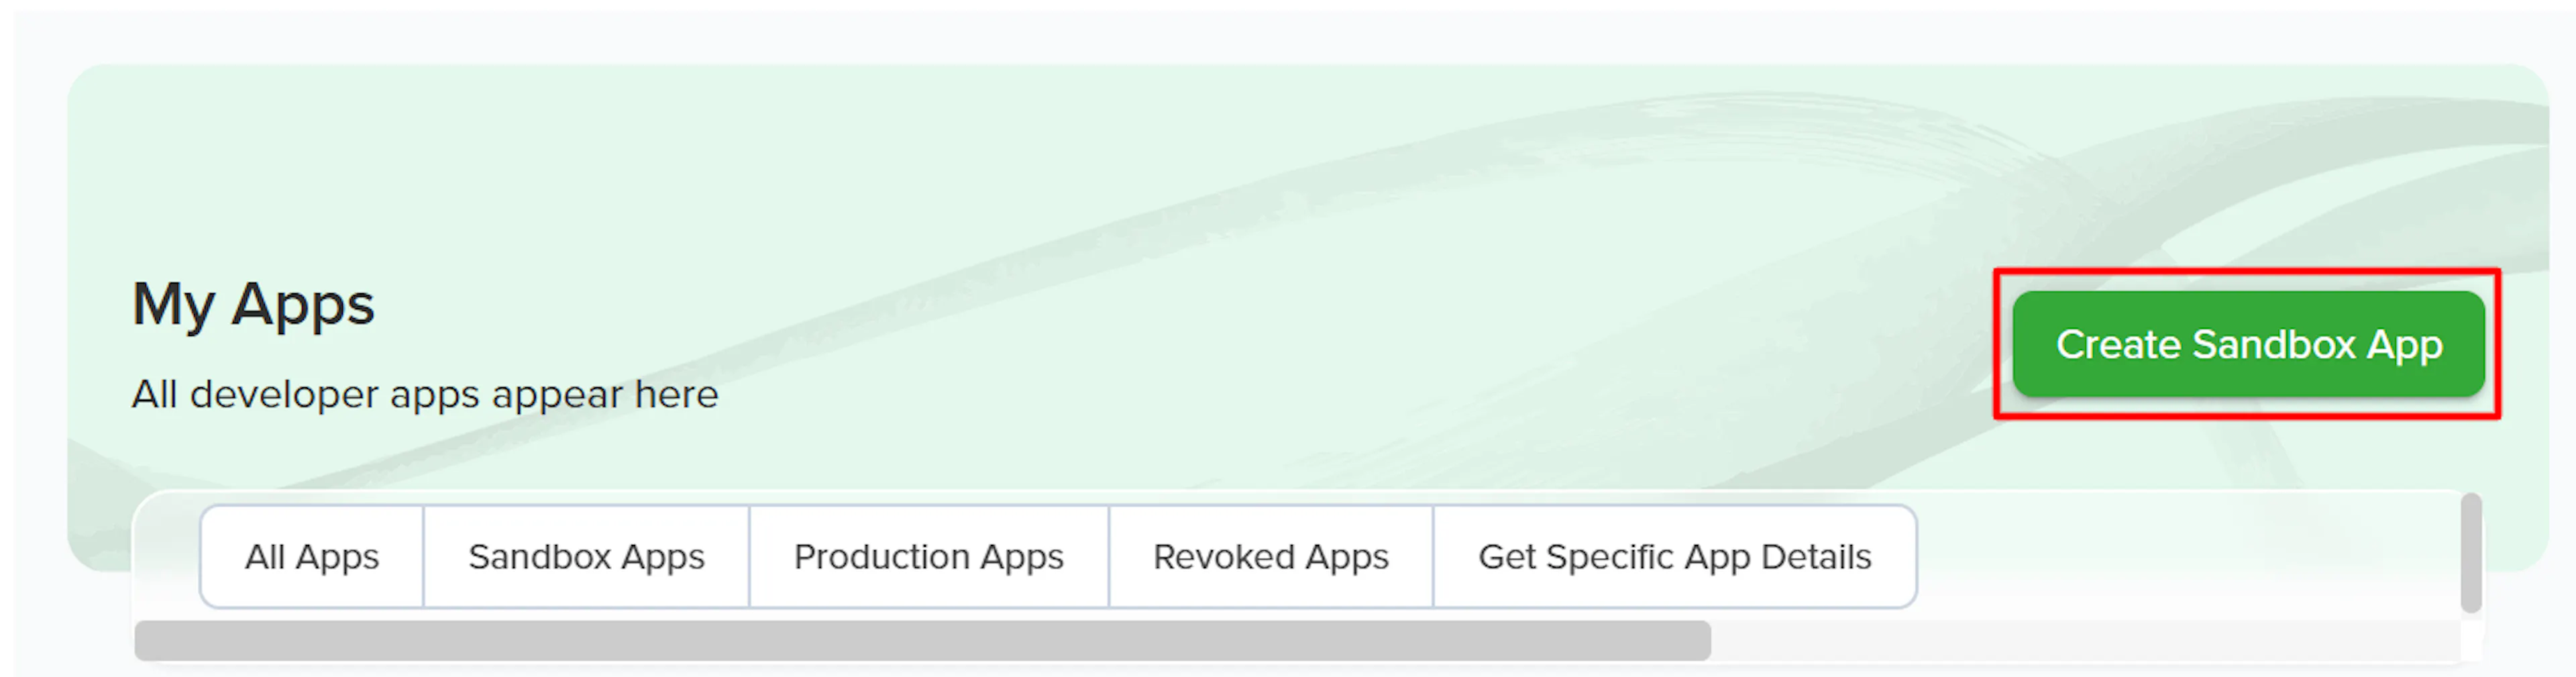
Create a Sandbox App
On your dashboard, click the Create Sandbox App button. Sandbox apps are what generate the test credentials you need before going live.
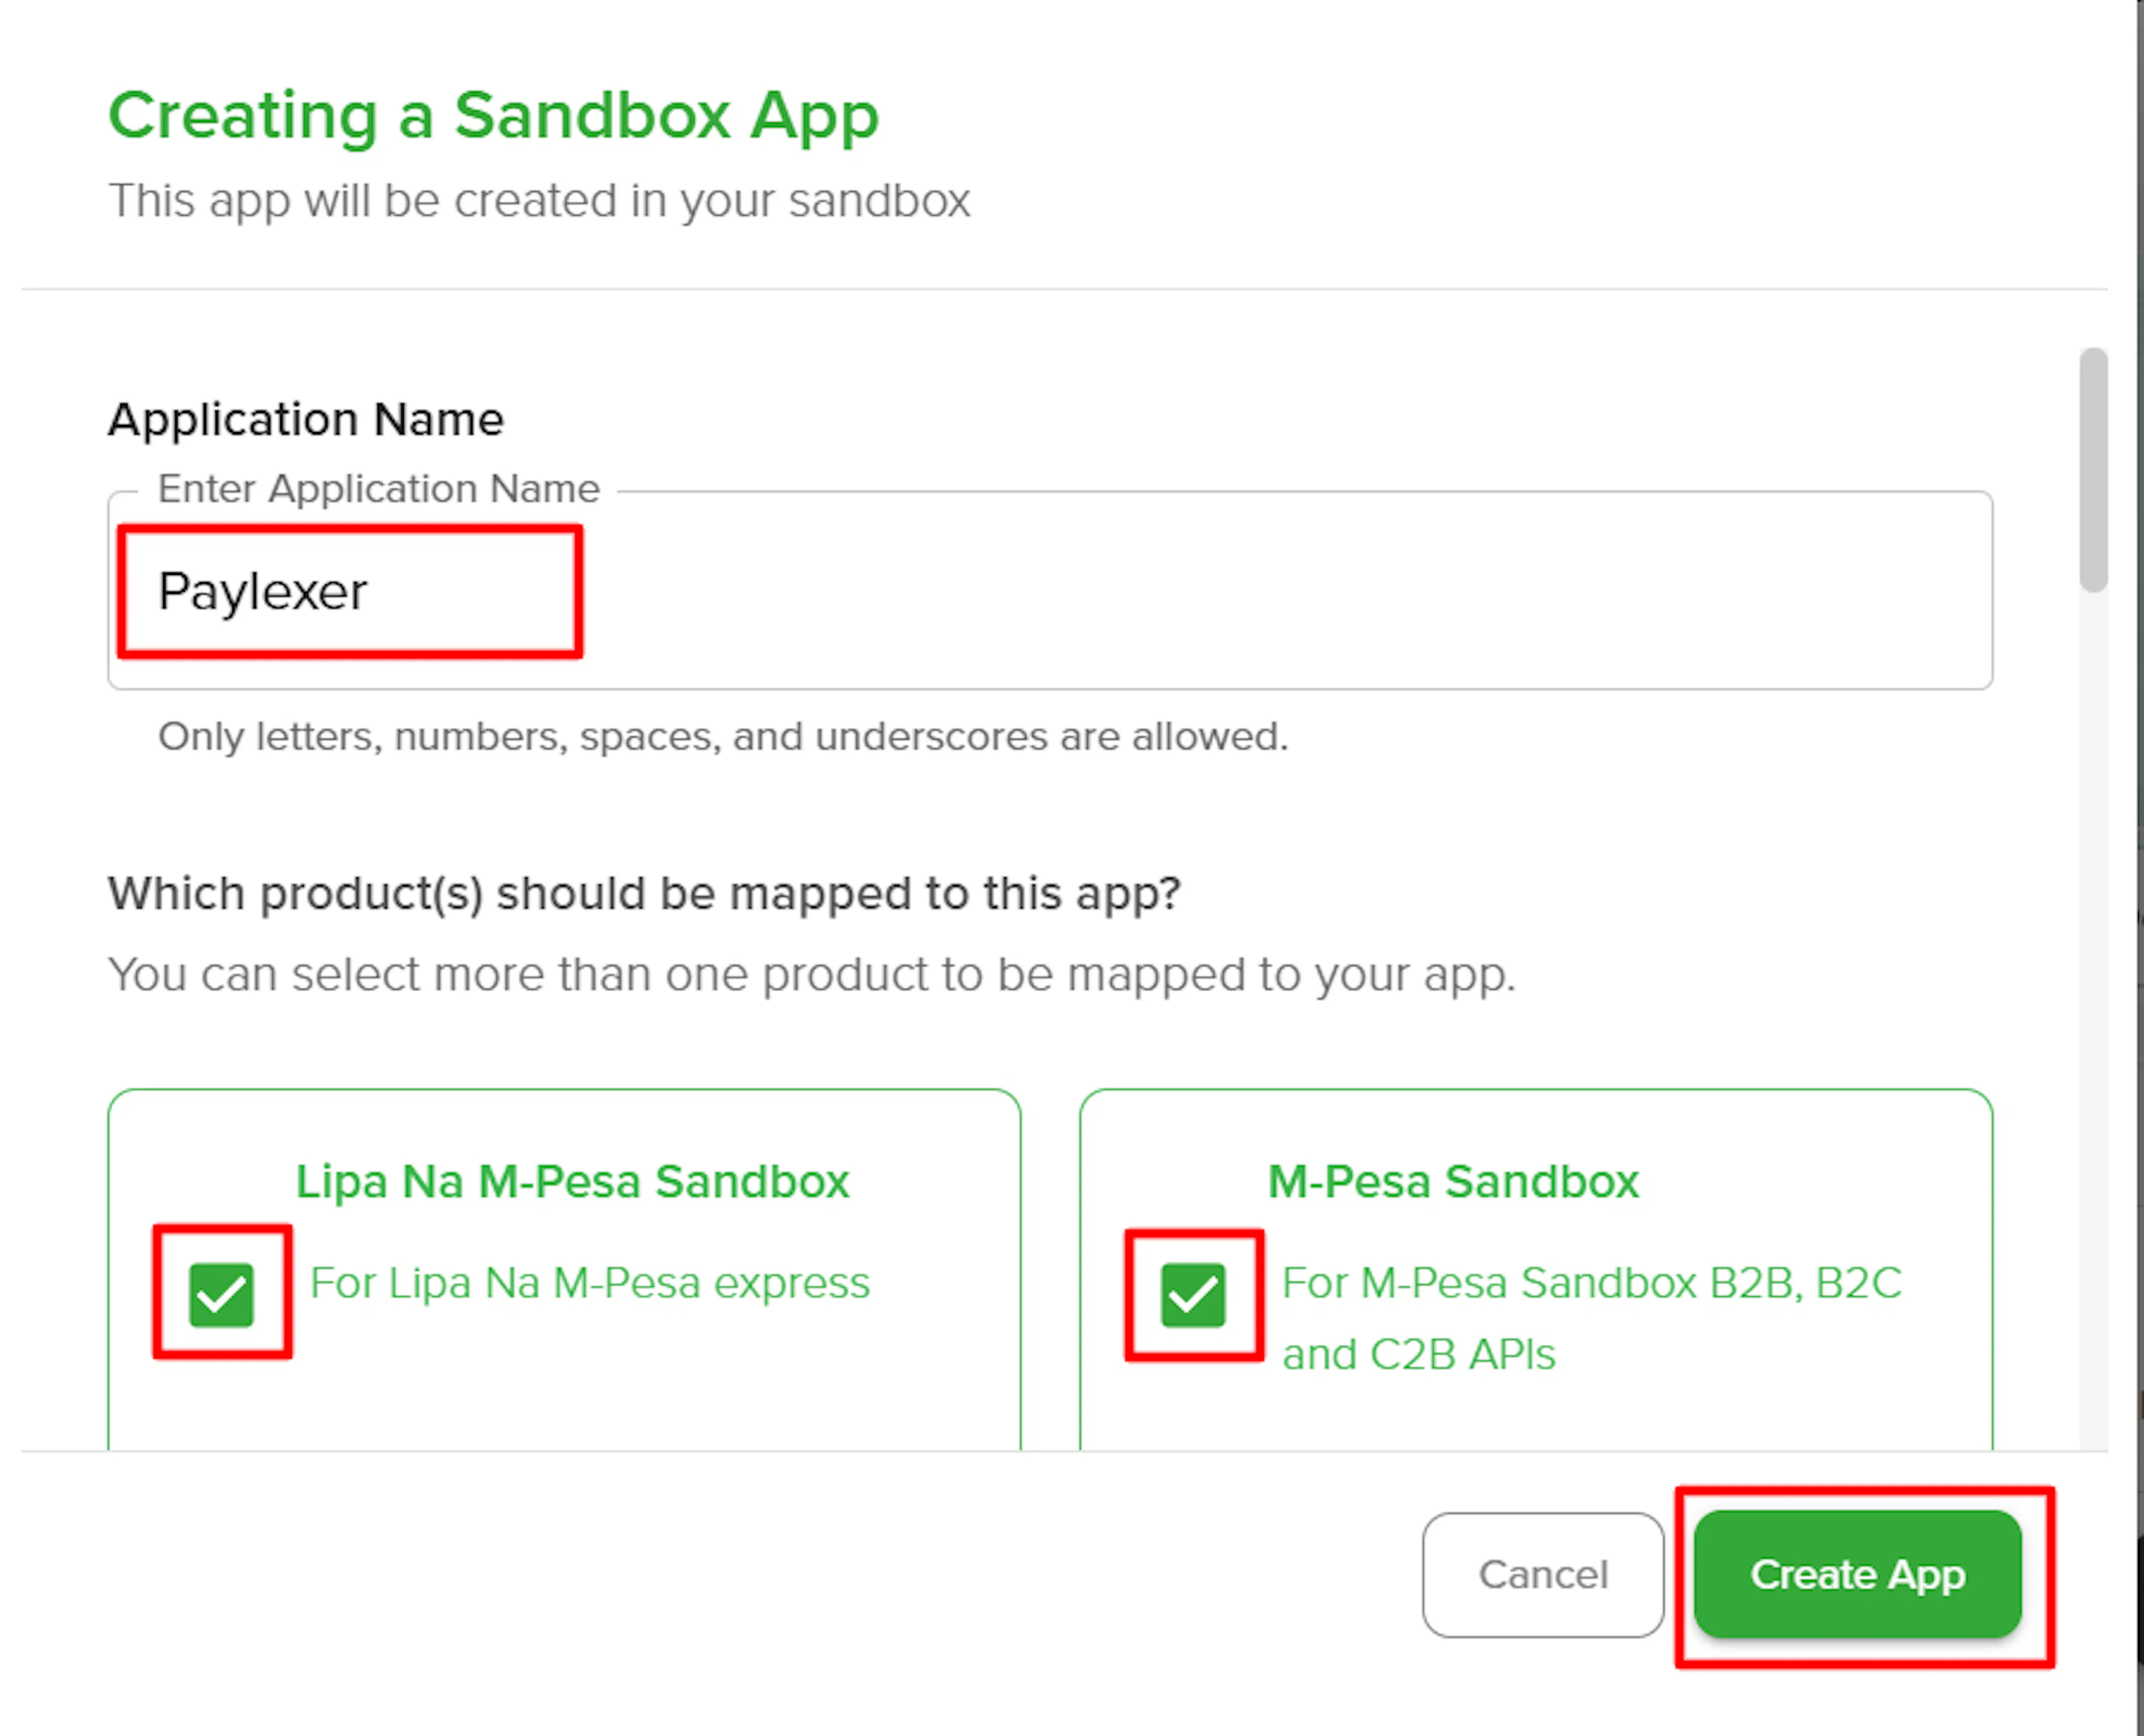
Configure and create the app
Enter an Application Name, then select both the Lipa Na M-PESA Sandbox and M-PESA Sandbox products. Click Create App to finish.
Copy your Consumer Key and Consumer Secret
Open your new app. The Consumer Key and Consumer Secret are generated automatically - copy both.
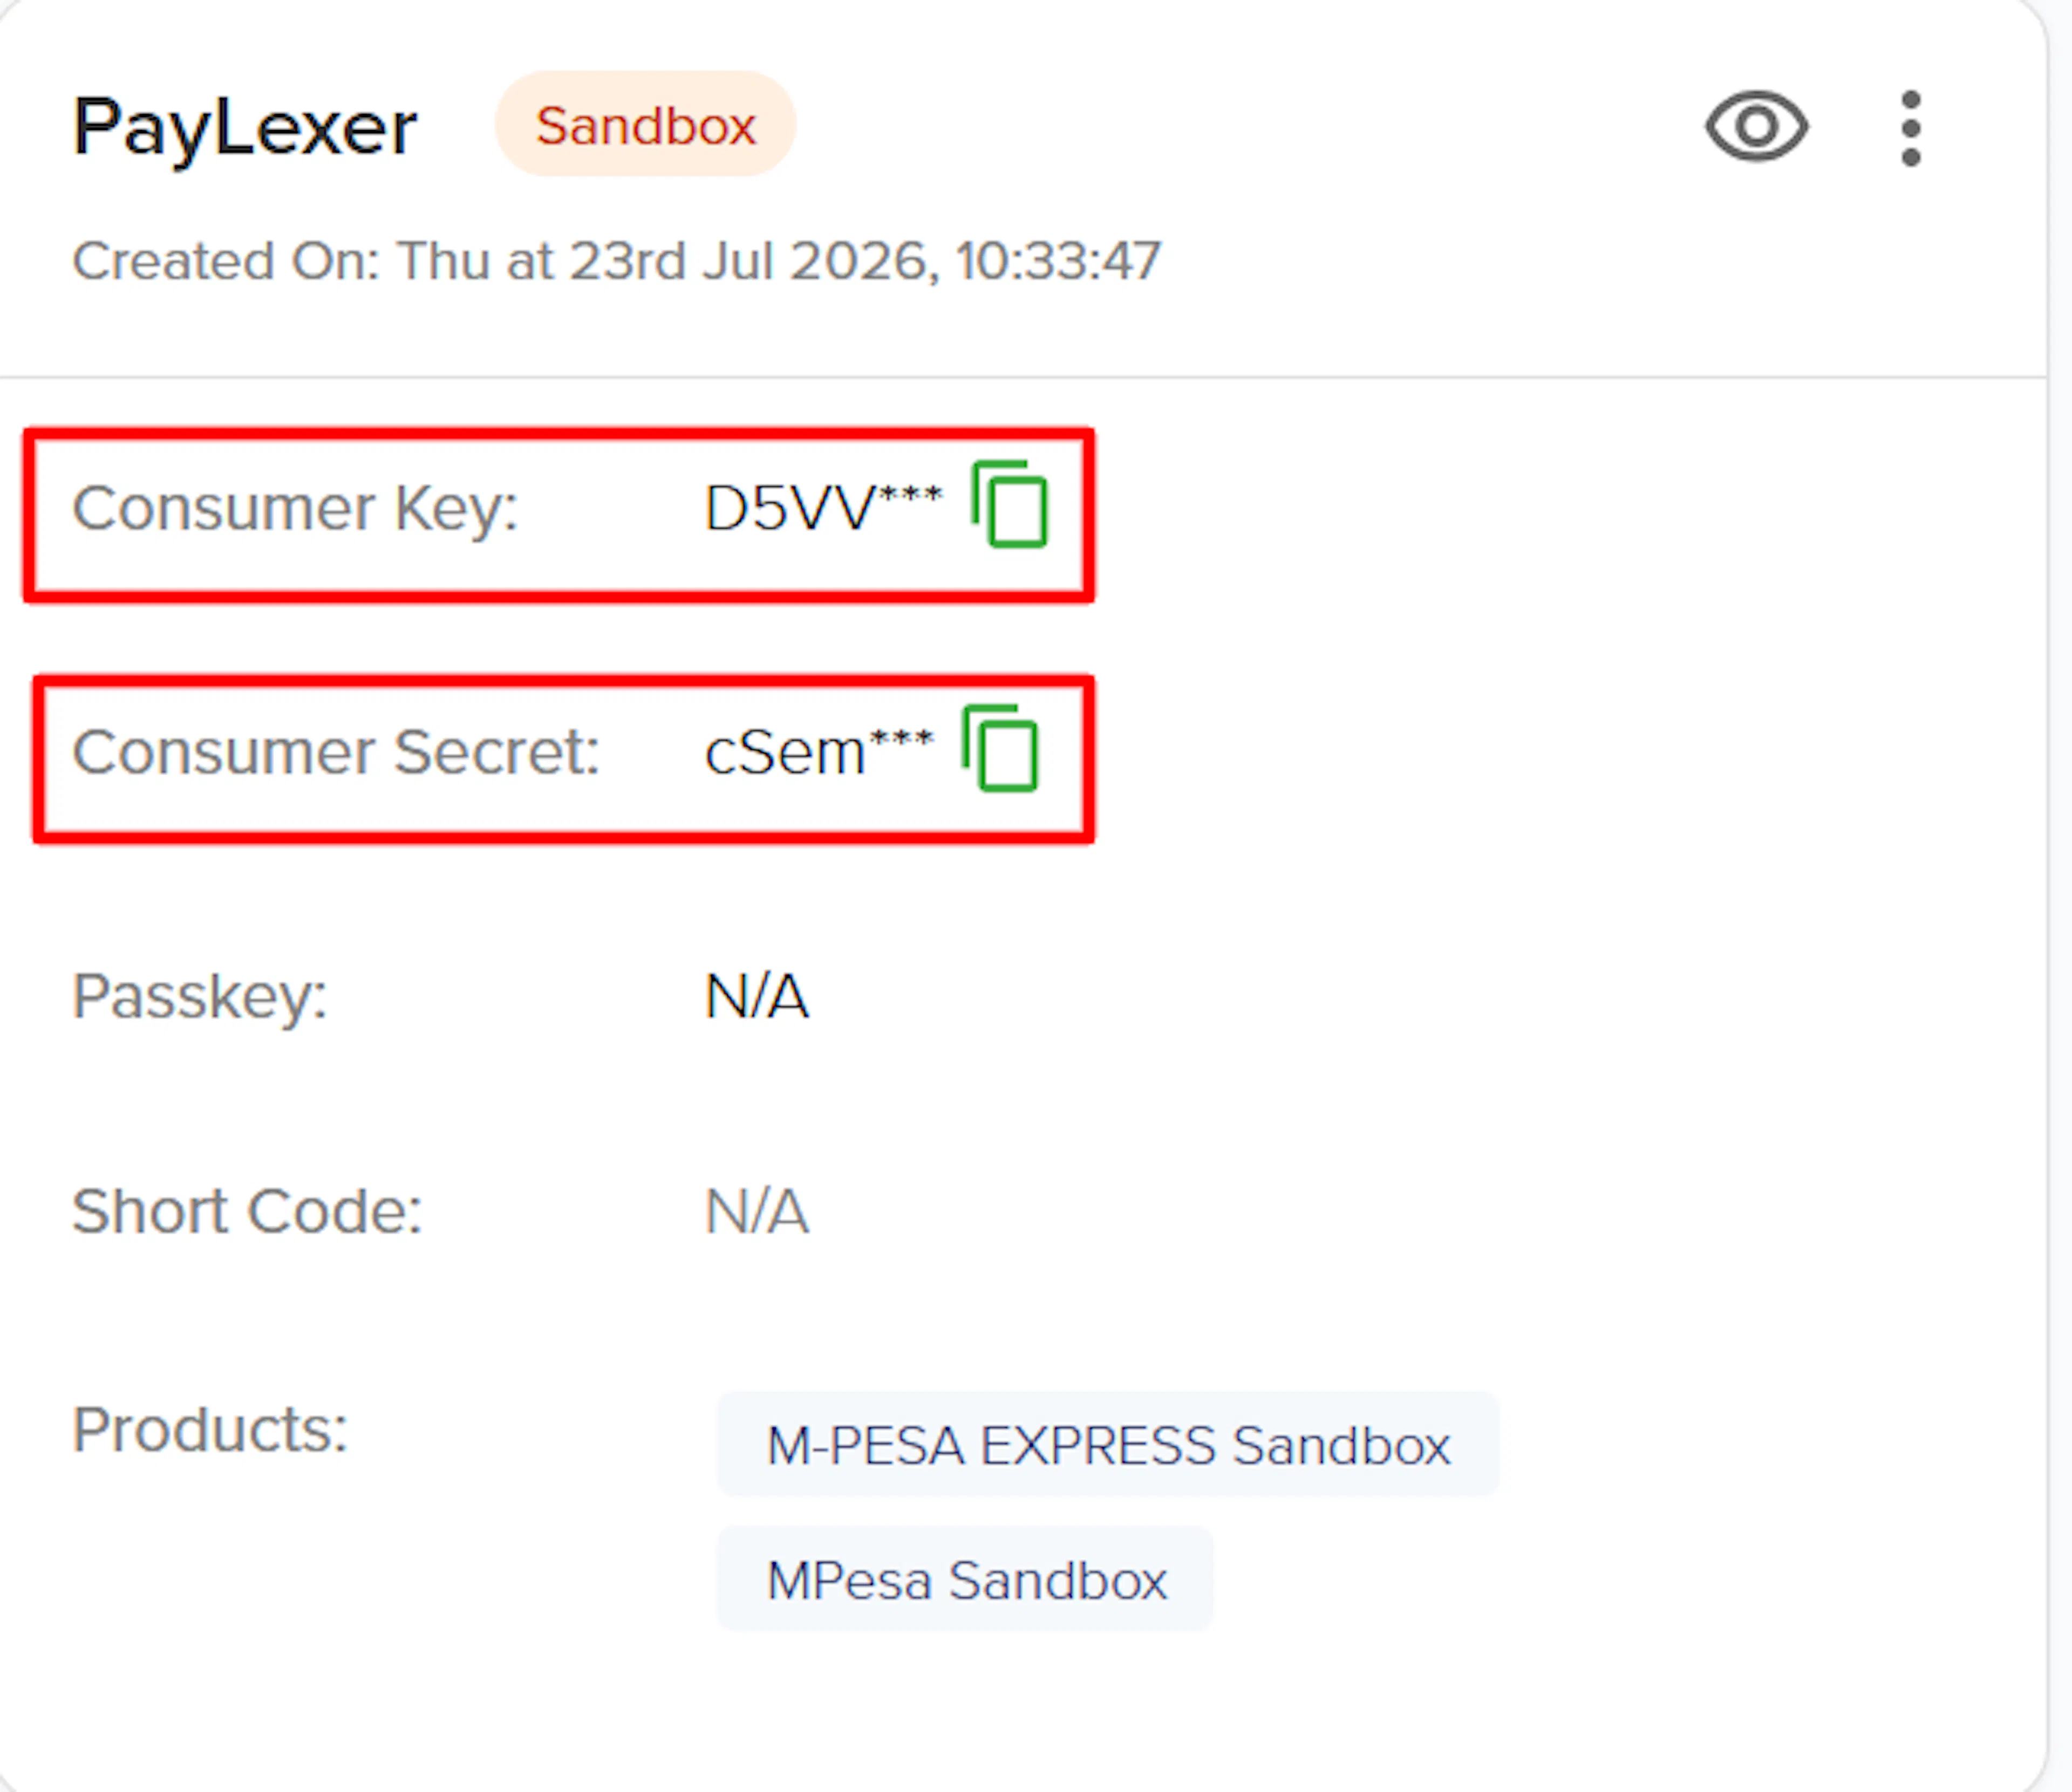
Treat the Consumer Secret like a password. Anyone with it, combined with your ShortCode and Passkey, can initiate payment prompts against your account.
Use the official test ShortCode and Passkey
For sandbox testing, use Safaricom's own officially published test values instead of generating your own:
- ShortCode:
174379 - Passkey:
bfb279f9aa9bdbcf158e97dd71a467cd2e0c893059b10f78e6b72ada1ed2c919
Go live for production credentials
When you're ready to accept real payments, go to the Go Live section of the Daraja portal and fill in the required form. Safaricom reviews this and issues your production ShortCode (your own paybill or till number) and Passkey once approved.
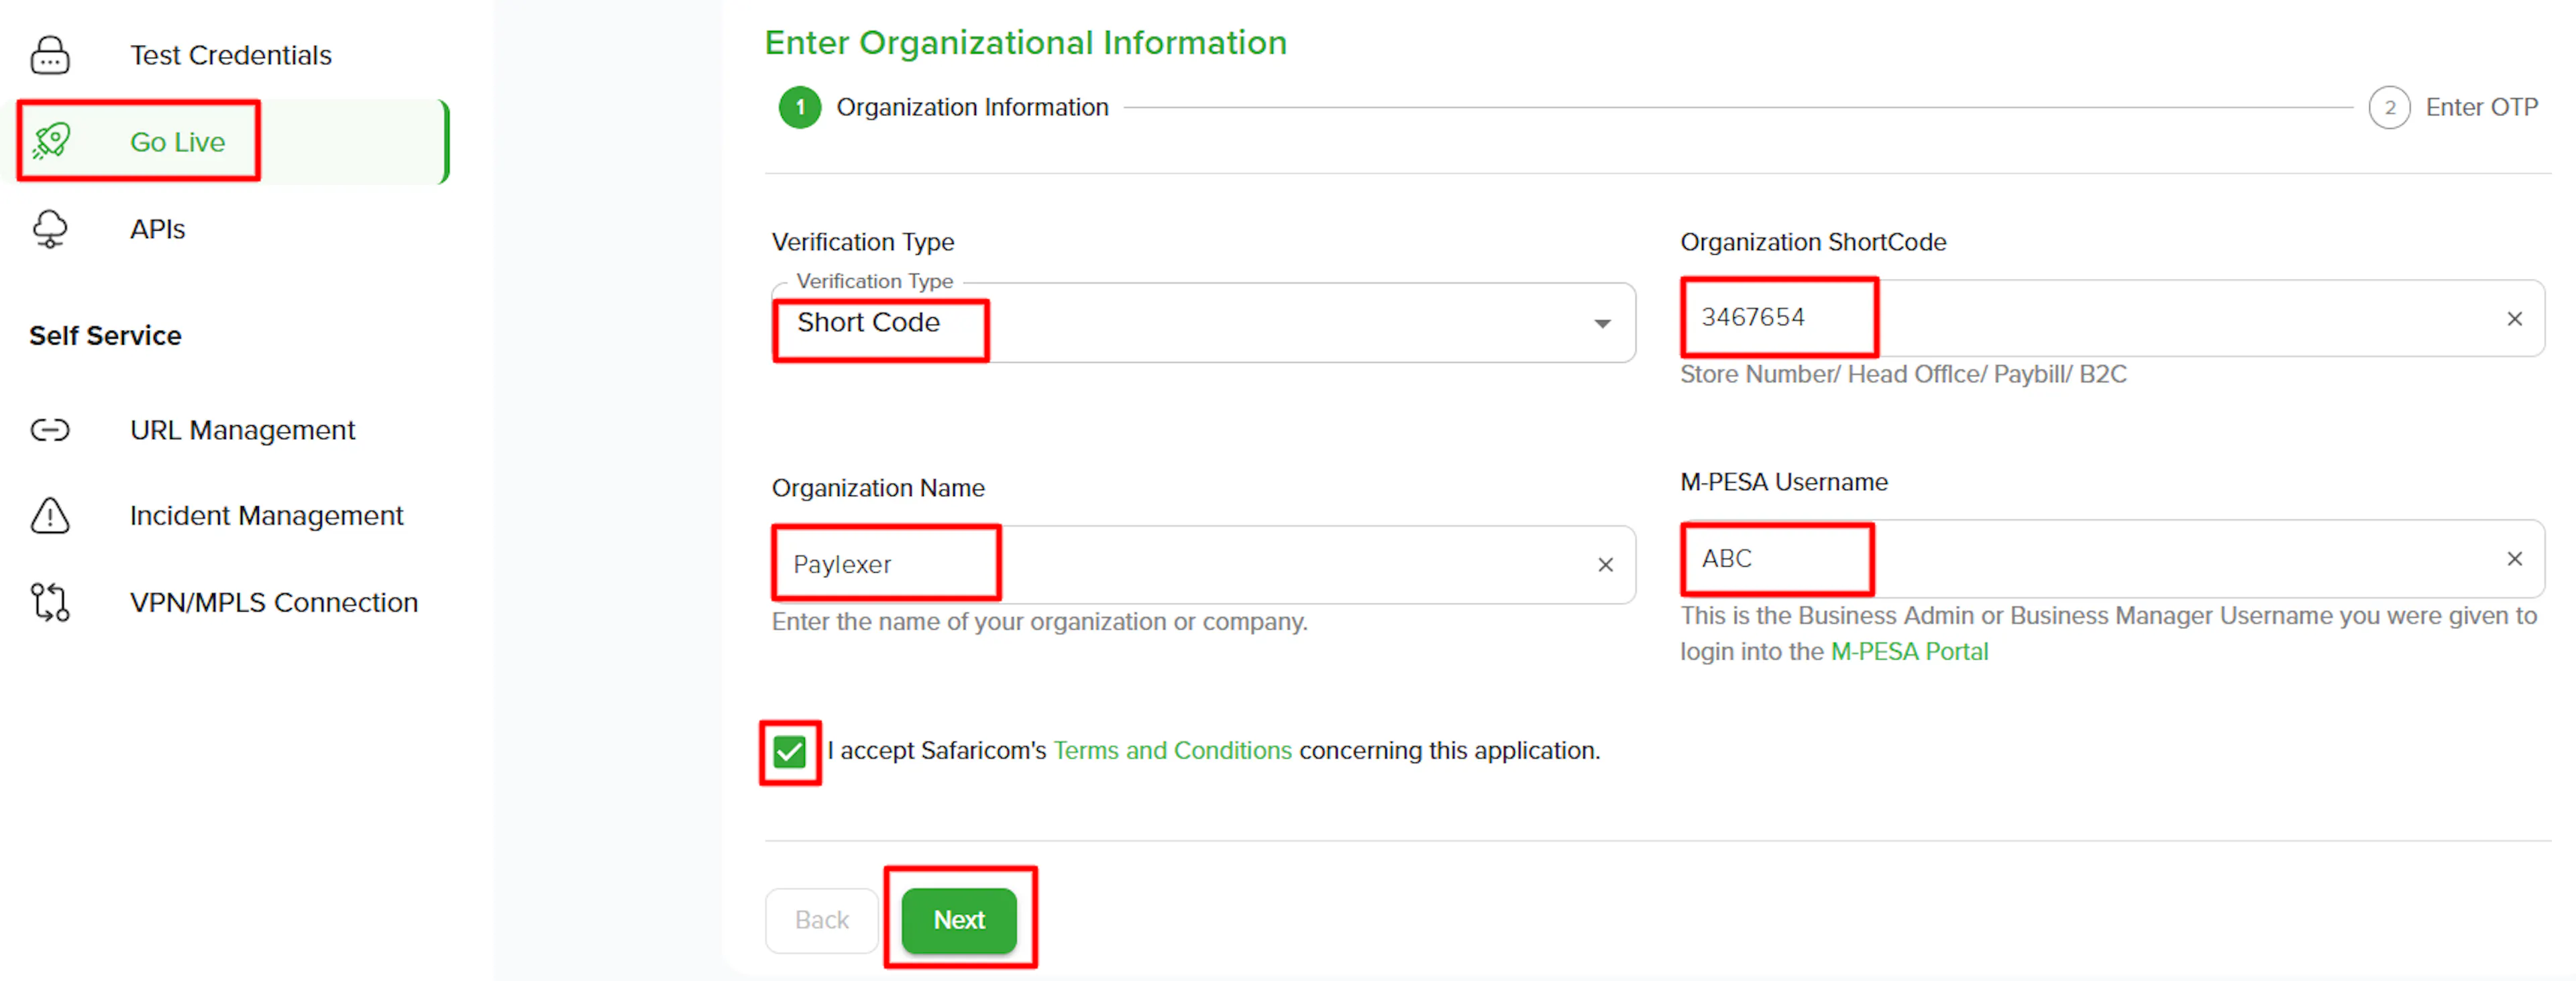
If you also want automatic refund detection, you'll need the optional Initiator Name and Security Credential fields. PayLexer only accepts these on your Live/Production credentials - there is no Test/Sandbox equivalent.
First, log in to the M-PESA Org Portal for your paybill/till and create an API operator - a user restricted to API calls only. That operator's username is your Initiator Name.
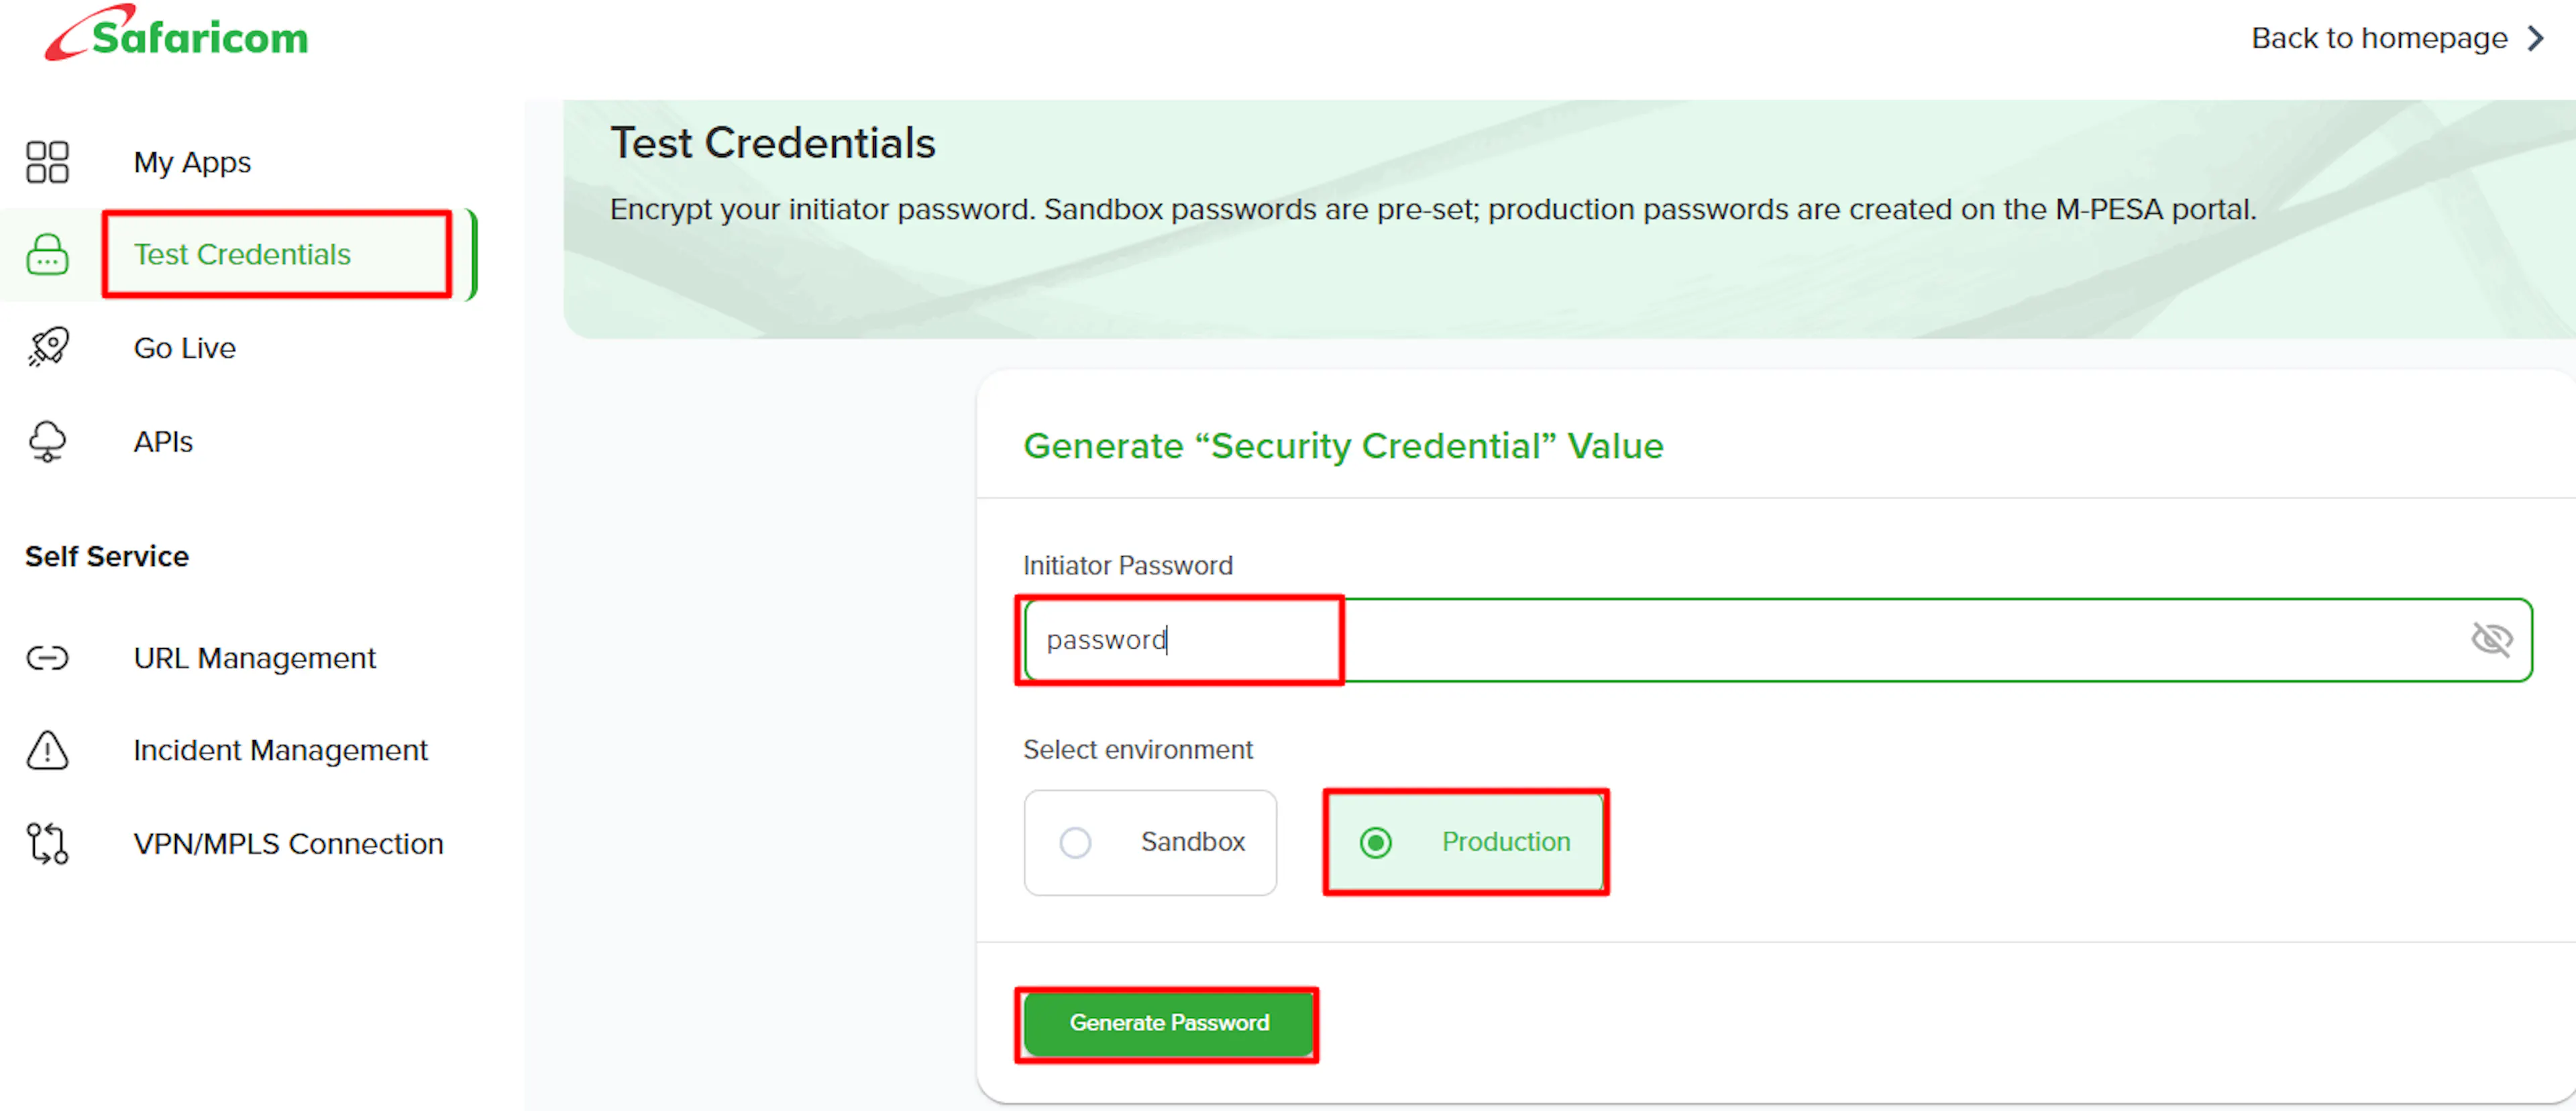
Then, on the Daraja portal's Test Credentials page, enter that operator's password into the Security Credential field, select Production as the environment, and Safaricom encrypts it for you. Copy the resulting encrypted value into PayLexer - never enter the operator's plain password here.
Adding Credentials to PayLexer
Open PayLexer Dashboard
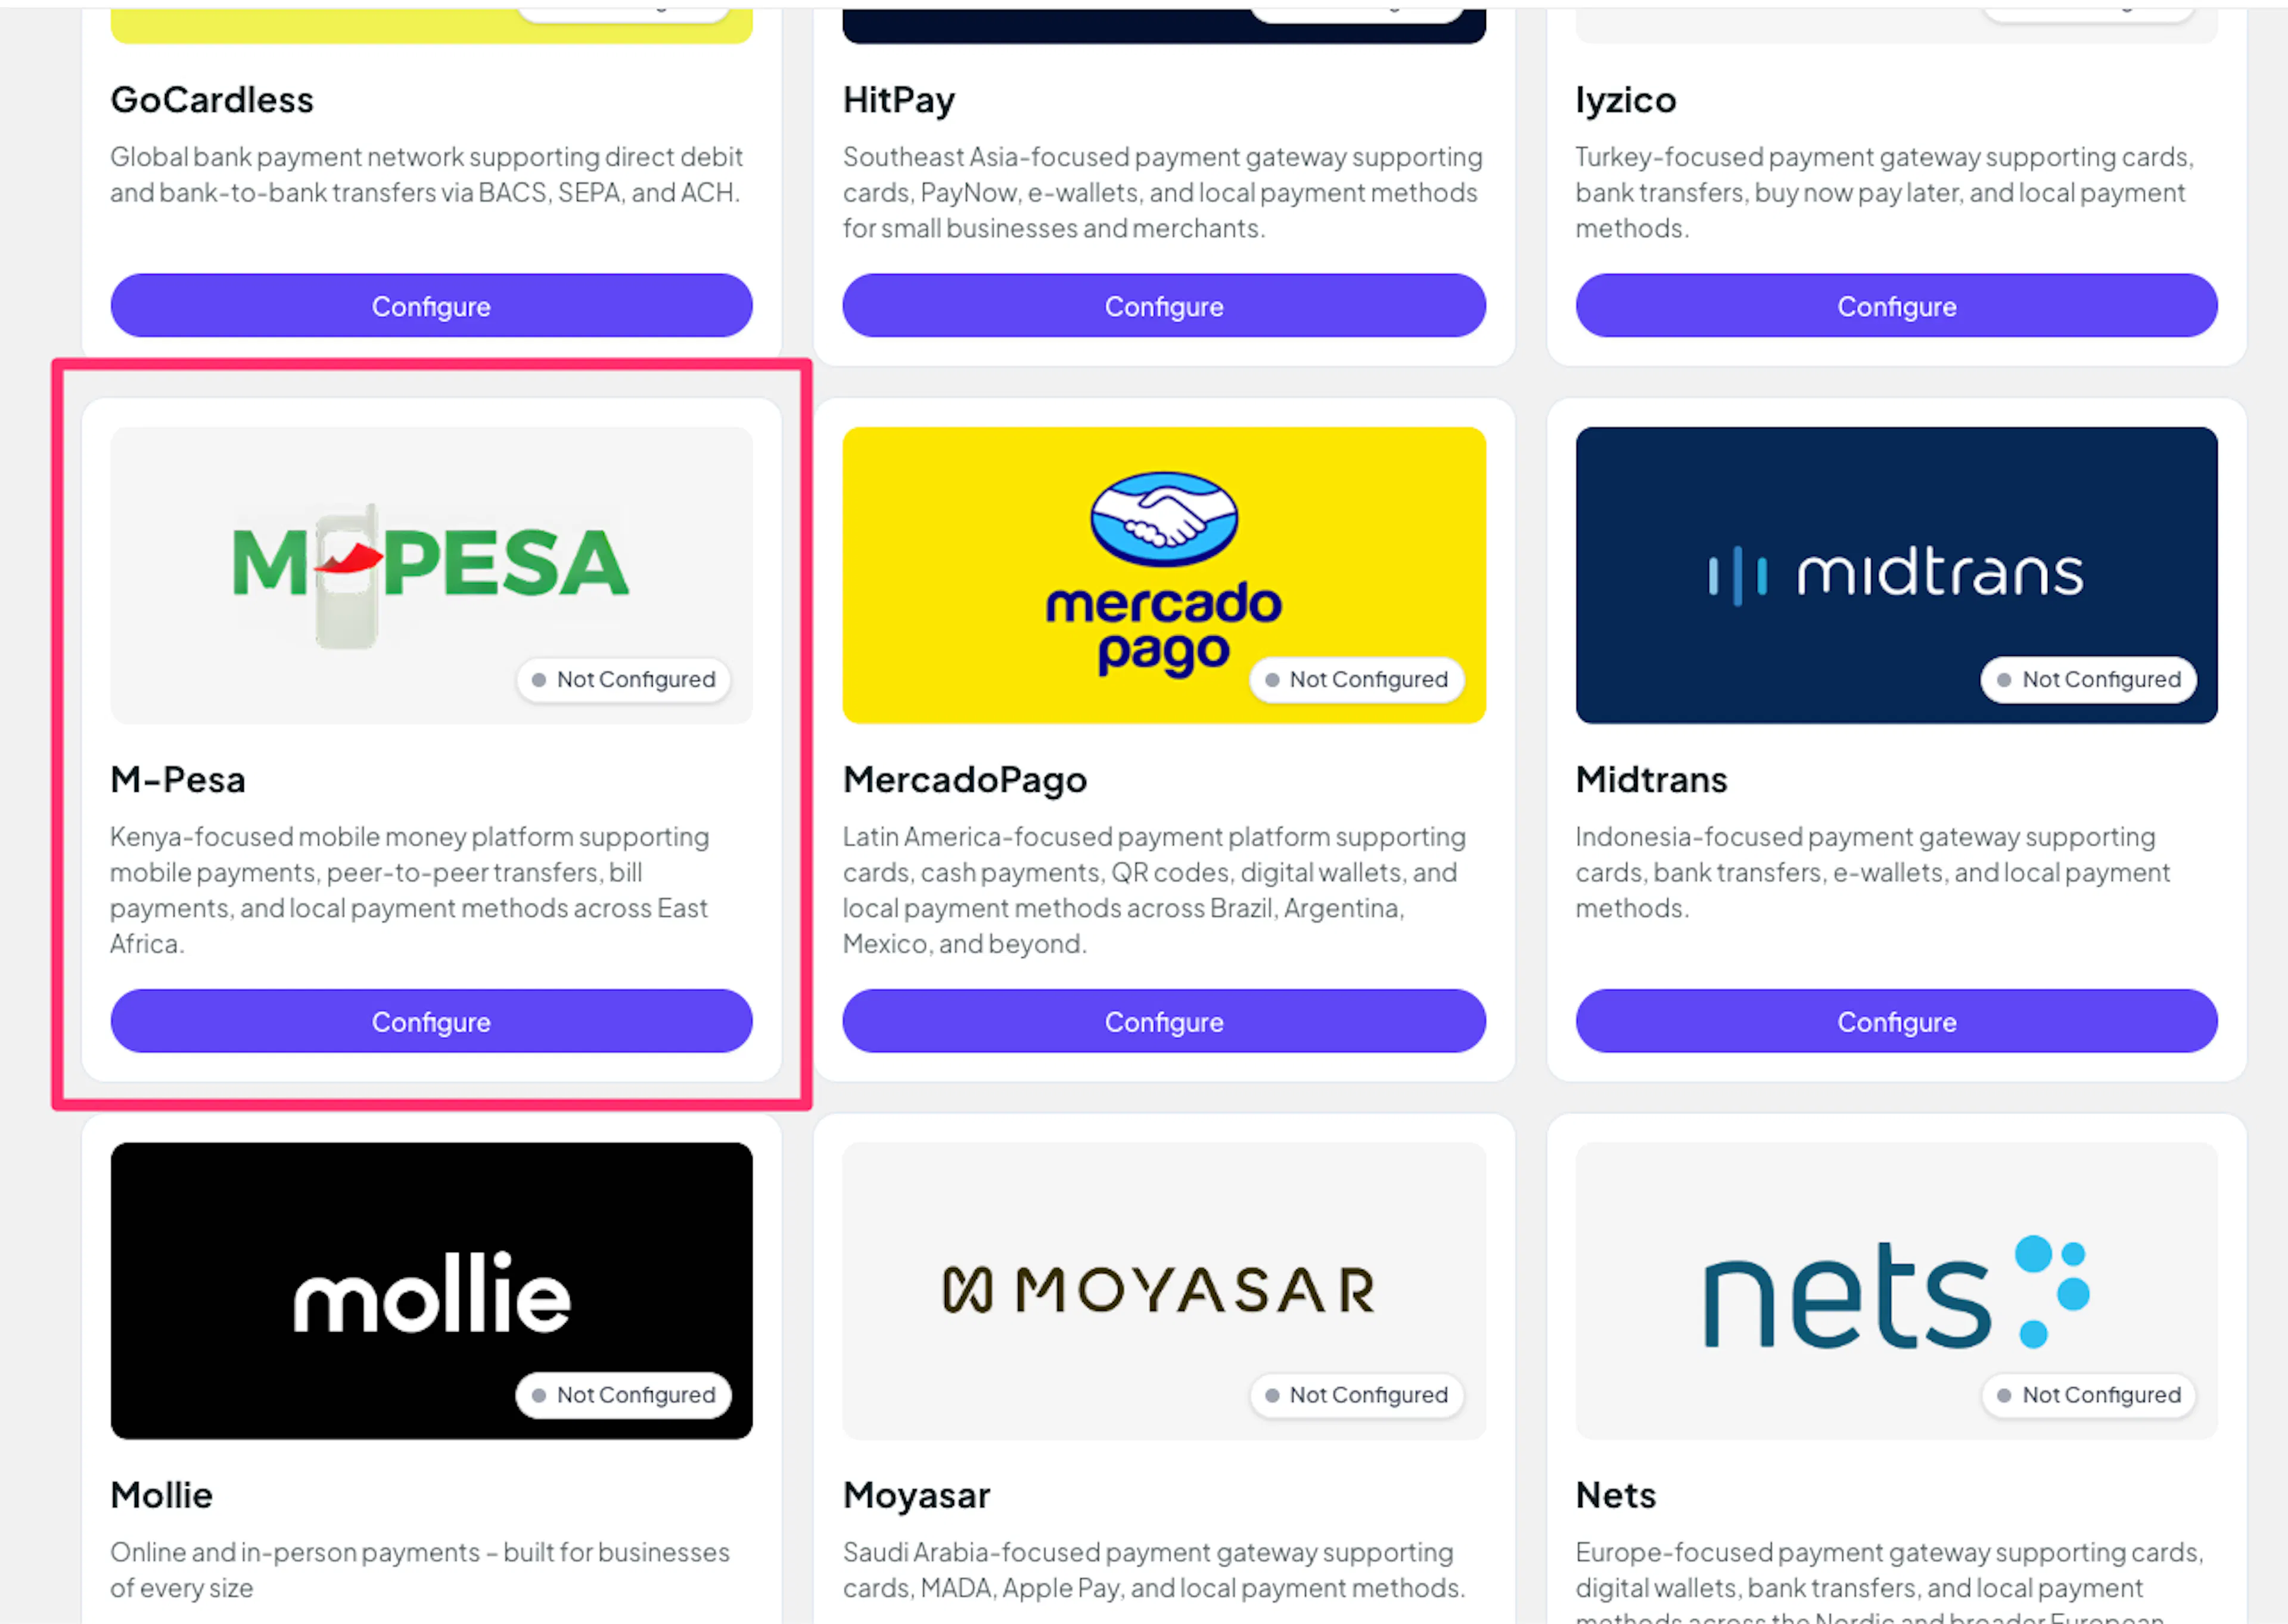
Log in to your PayLexer dashboard and navigate to Payment Gateways -> M-PESA.
Enter your credentials
Paste the Consumer Key, Consumer Secret, ShortCode, and Passkey you copied from Safaricom Daraja.
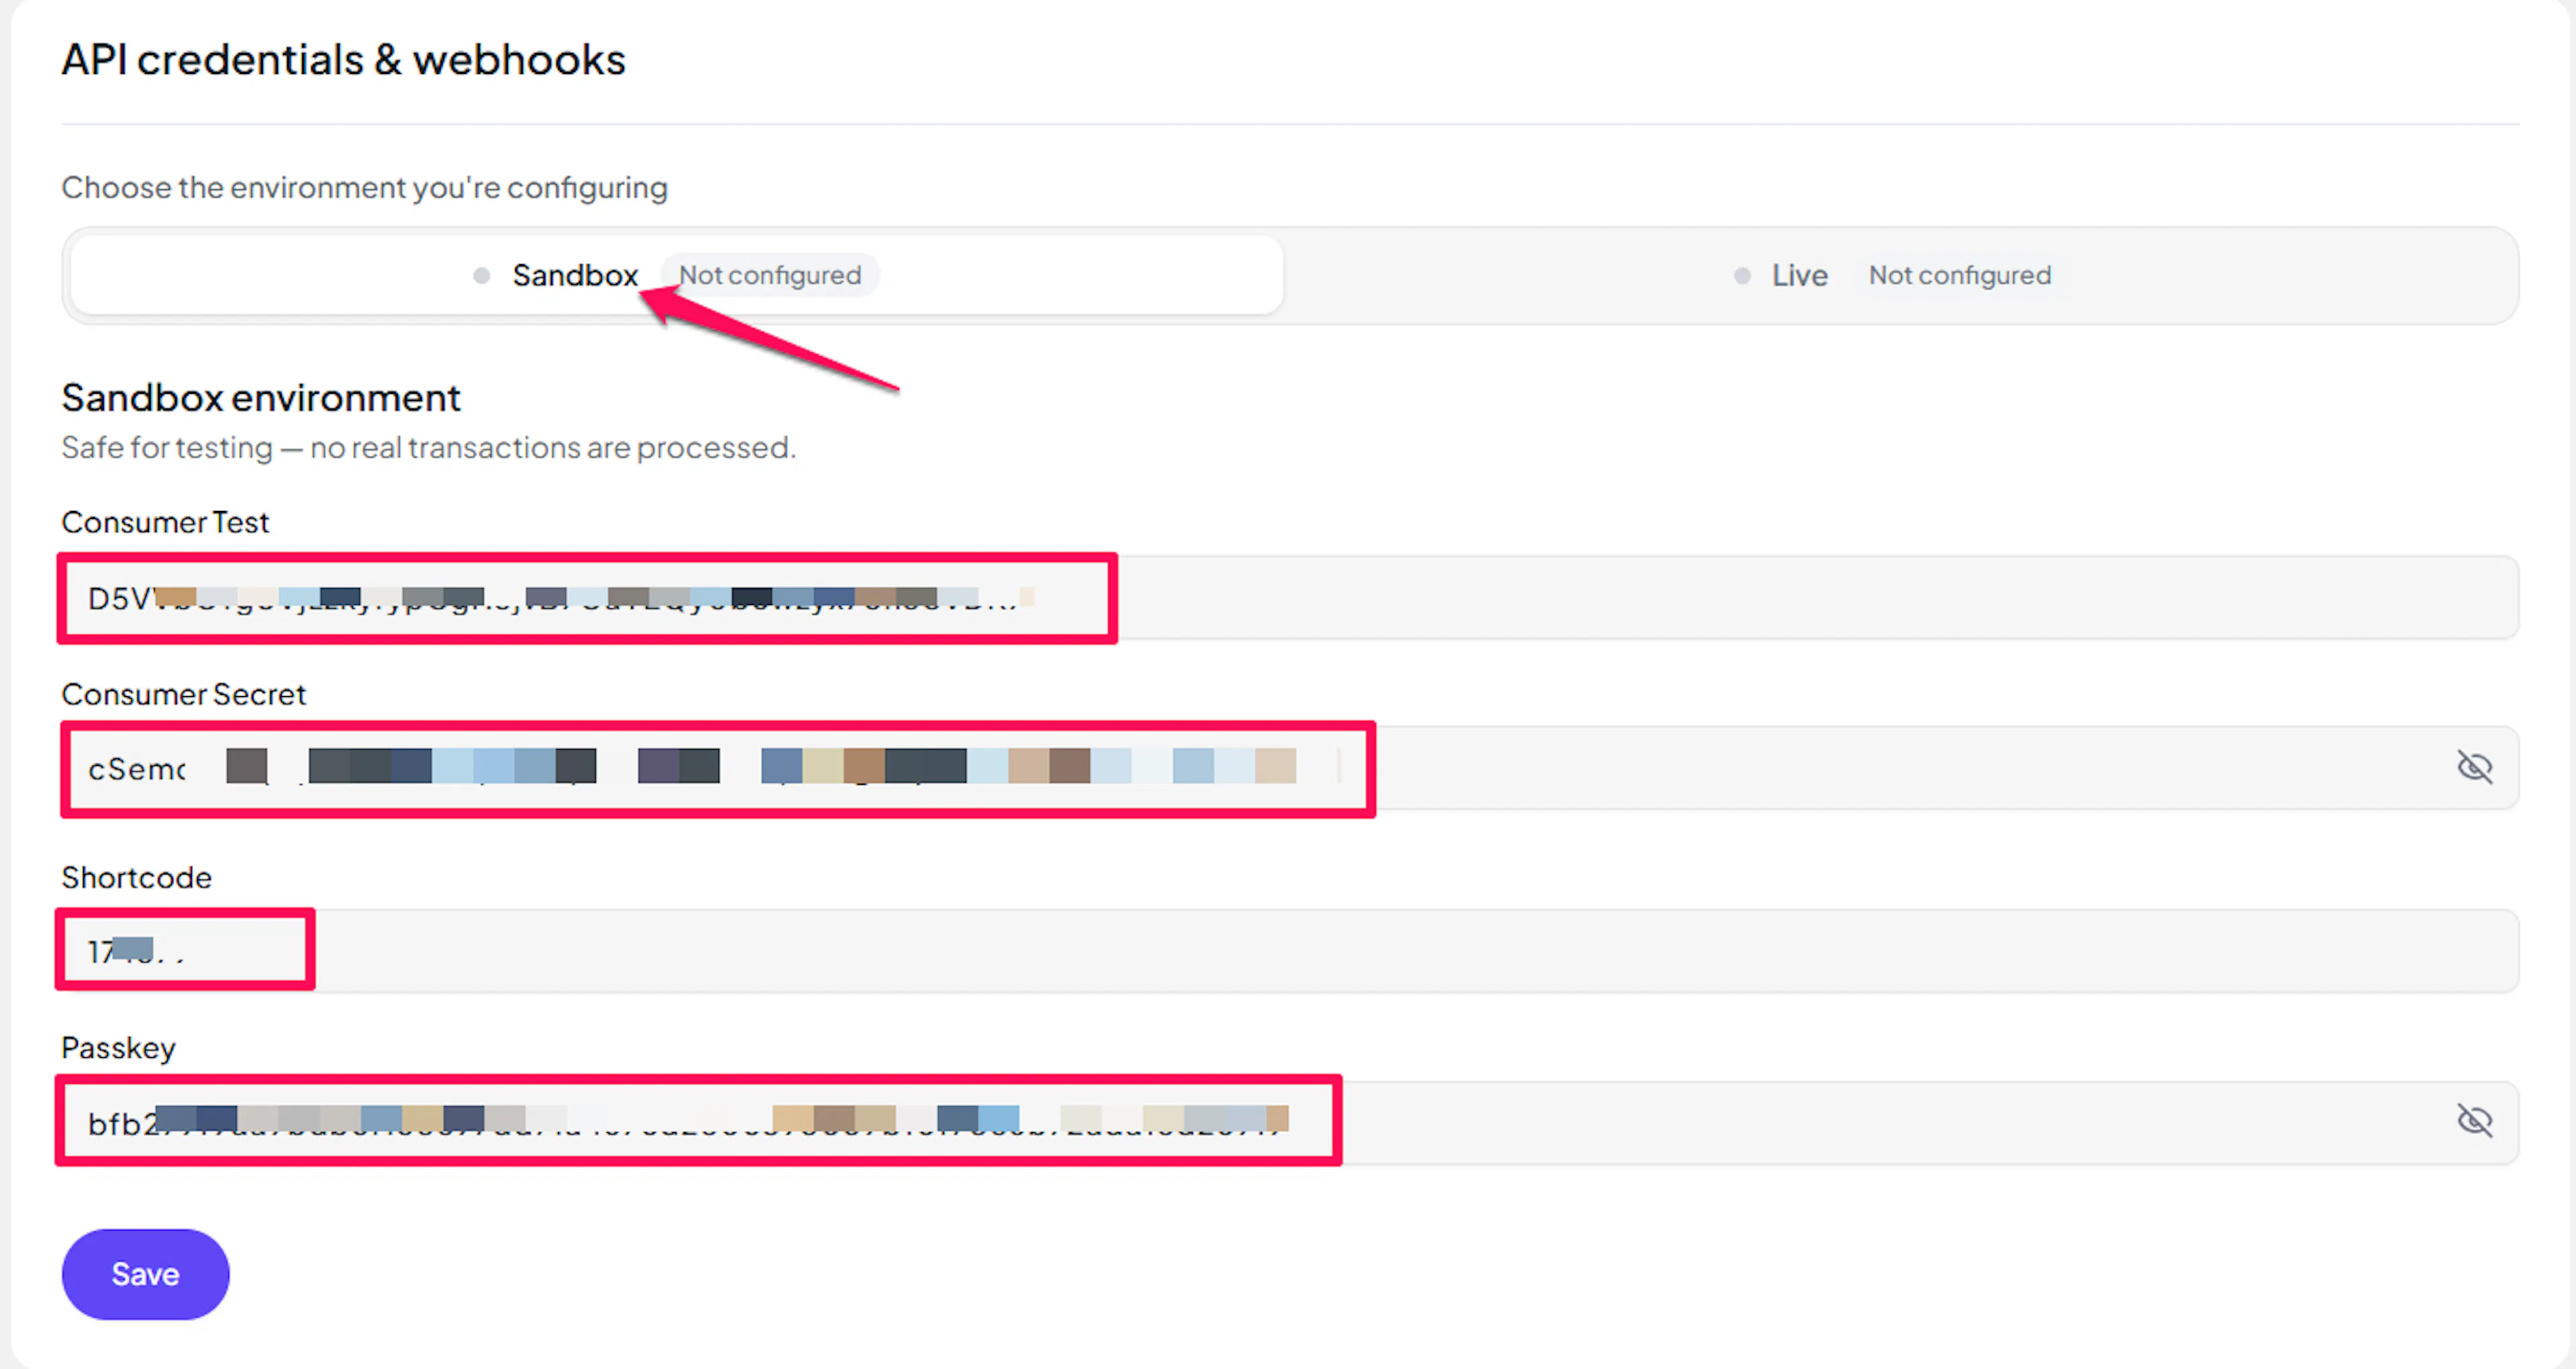
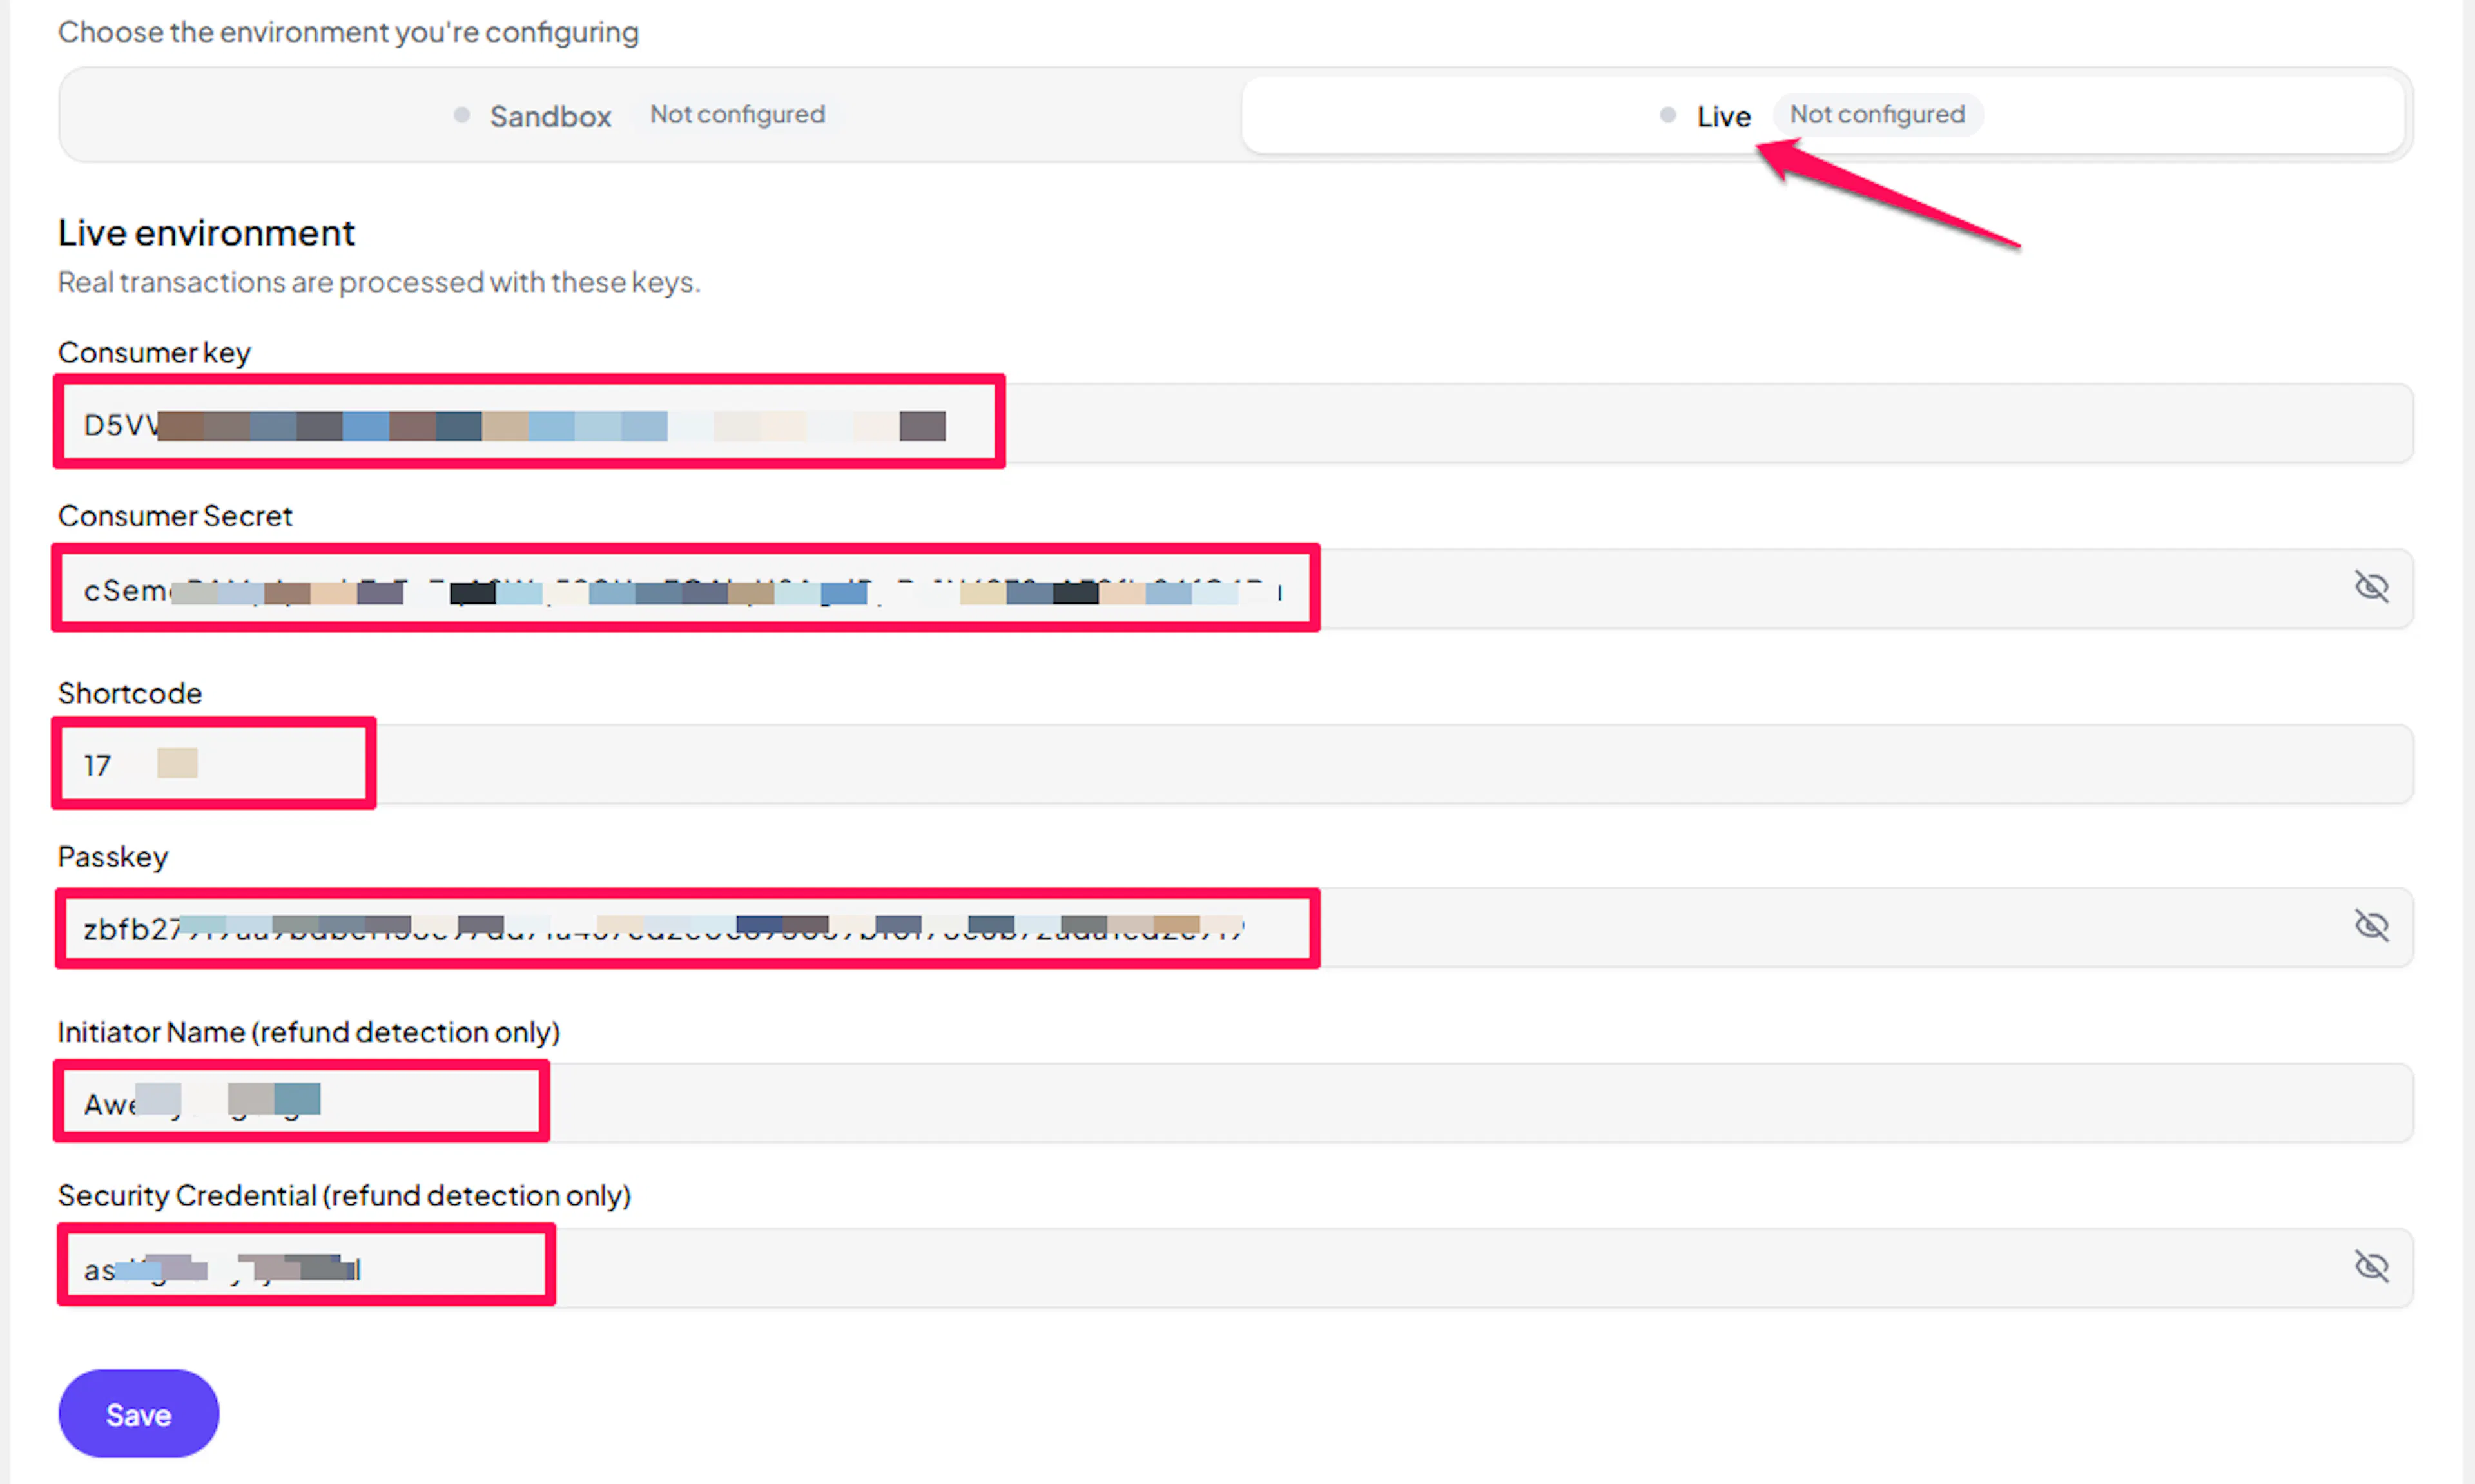
Understanding Live/Production and Sandbox Settings:
| Environment | Purpose |
|---|---|
| Live / Production (Mandatory) | Used for real transactions. Cannot be empty, even when testing. |
| Test / Sandbox (Optional) | Used for testing only. No real money is processed. ShortCode and Passkey fall back to Safaricom's own published shared test settings if left blank. |
How PayLexer selects credentials:
- Debug/Test mode ON → Test credentials are used
- Debug/Test mode OFF → Live credentials are used
Two additional optional fields, Initiator Name and Security Credential, appear alongside your Live credentials. These are only needed for automatic refund detection, described below in the Webhooks section. Payments work normally without them.
Test and save
Click **Save ** to save your configuration and verify your credentials. Click Verify Connection to test the connection.
Webhooks (Automatic - No Setup Required)
M-PESA payment confirmations are automatic - there is no webhook URL to copy, no signing secret to configure, and no dashboard step in Safaricom Daraja for this. PayLexer generates a unique callback URL for your account and passes it directly to Safaricom with every payment request, so Safaricom already knows where to send the result.
- Safaricom does not sign or authenticate its callback in any way, so PayLexer never fully relies on it alone
- Every payment left unresolved is automatically re-checked directly with Safaricom on a recurring schedule (by default every 2 minutes) as a safety net
- The order is marked paid, failed, or canceled based on whichever signal - the callback or the recurring check - arrives first
Refund Detection (Optional): M-PESA has no "click to refund" option in PayLexer. Instead, you reverse a payment directly from your own M-PESA account, the same way you would for a walk-in customer. If you add the optional Initiator Name and Security Credential fields to your Live credentials, PayLexer automatically checks your completed orders on a recurring schedule (by default every 30 minutes, looking back 30 days) and marks any reversed order as refunded on its own. Without these fields, payments still work normally, but reversed orders are not automatically detected.
Integrate M-PESA to Your Website
If you have already added and configured your site, you can enable M-PESA in your existing setup.
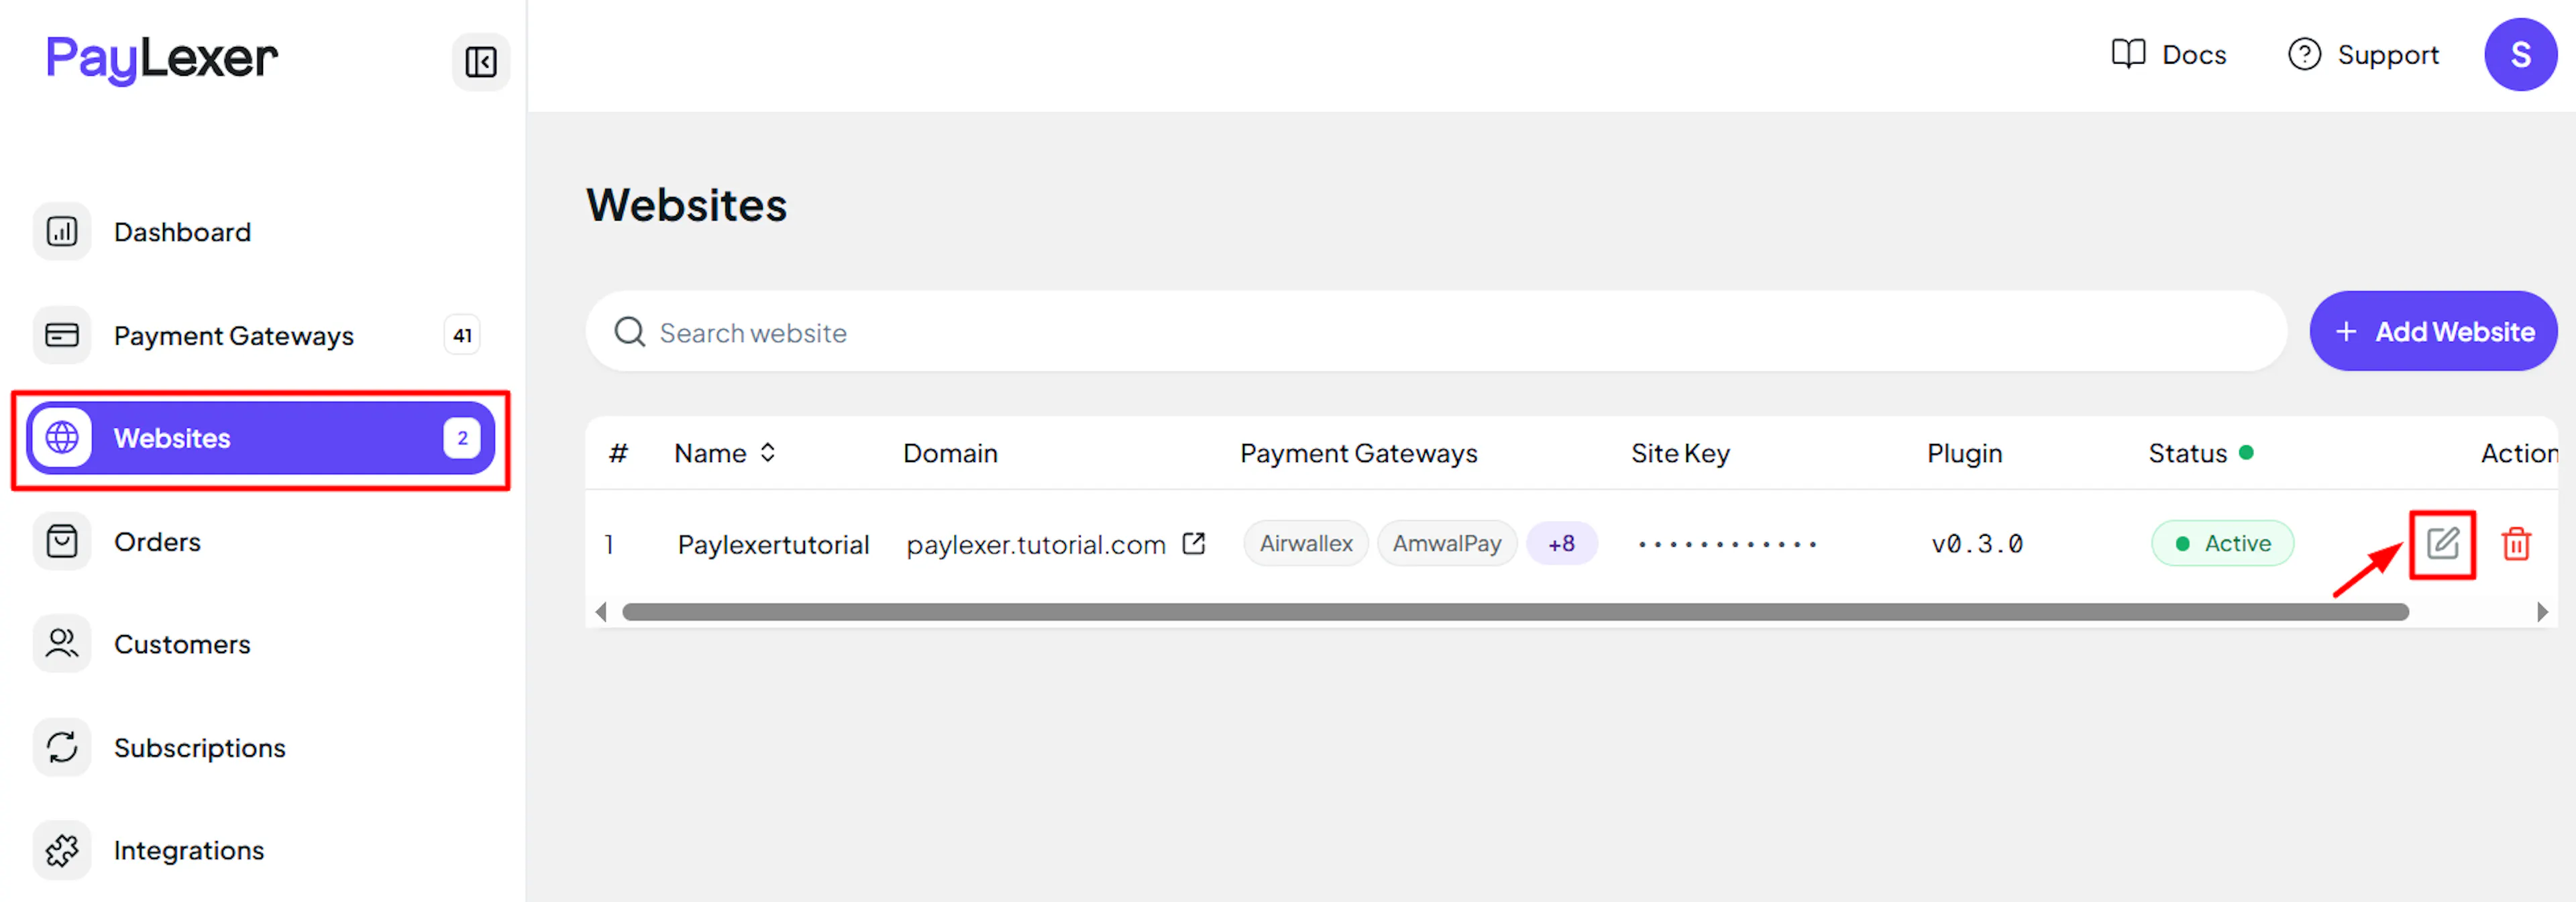
Go to Websites
Navigate to Websites in your PayLexer dashboard.
Edit your website
Click the Edit Icon of your added website.
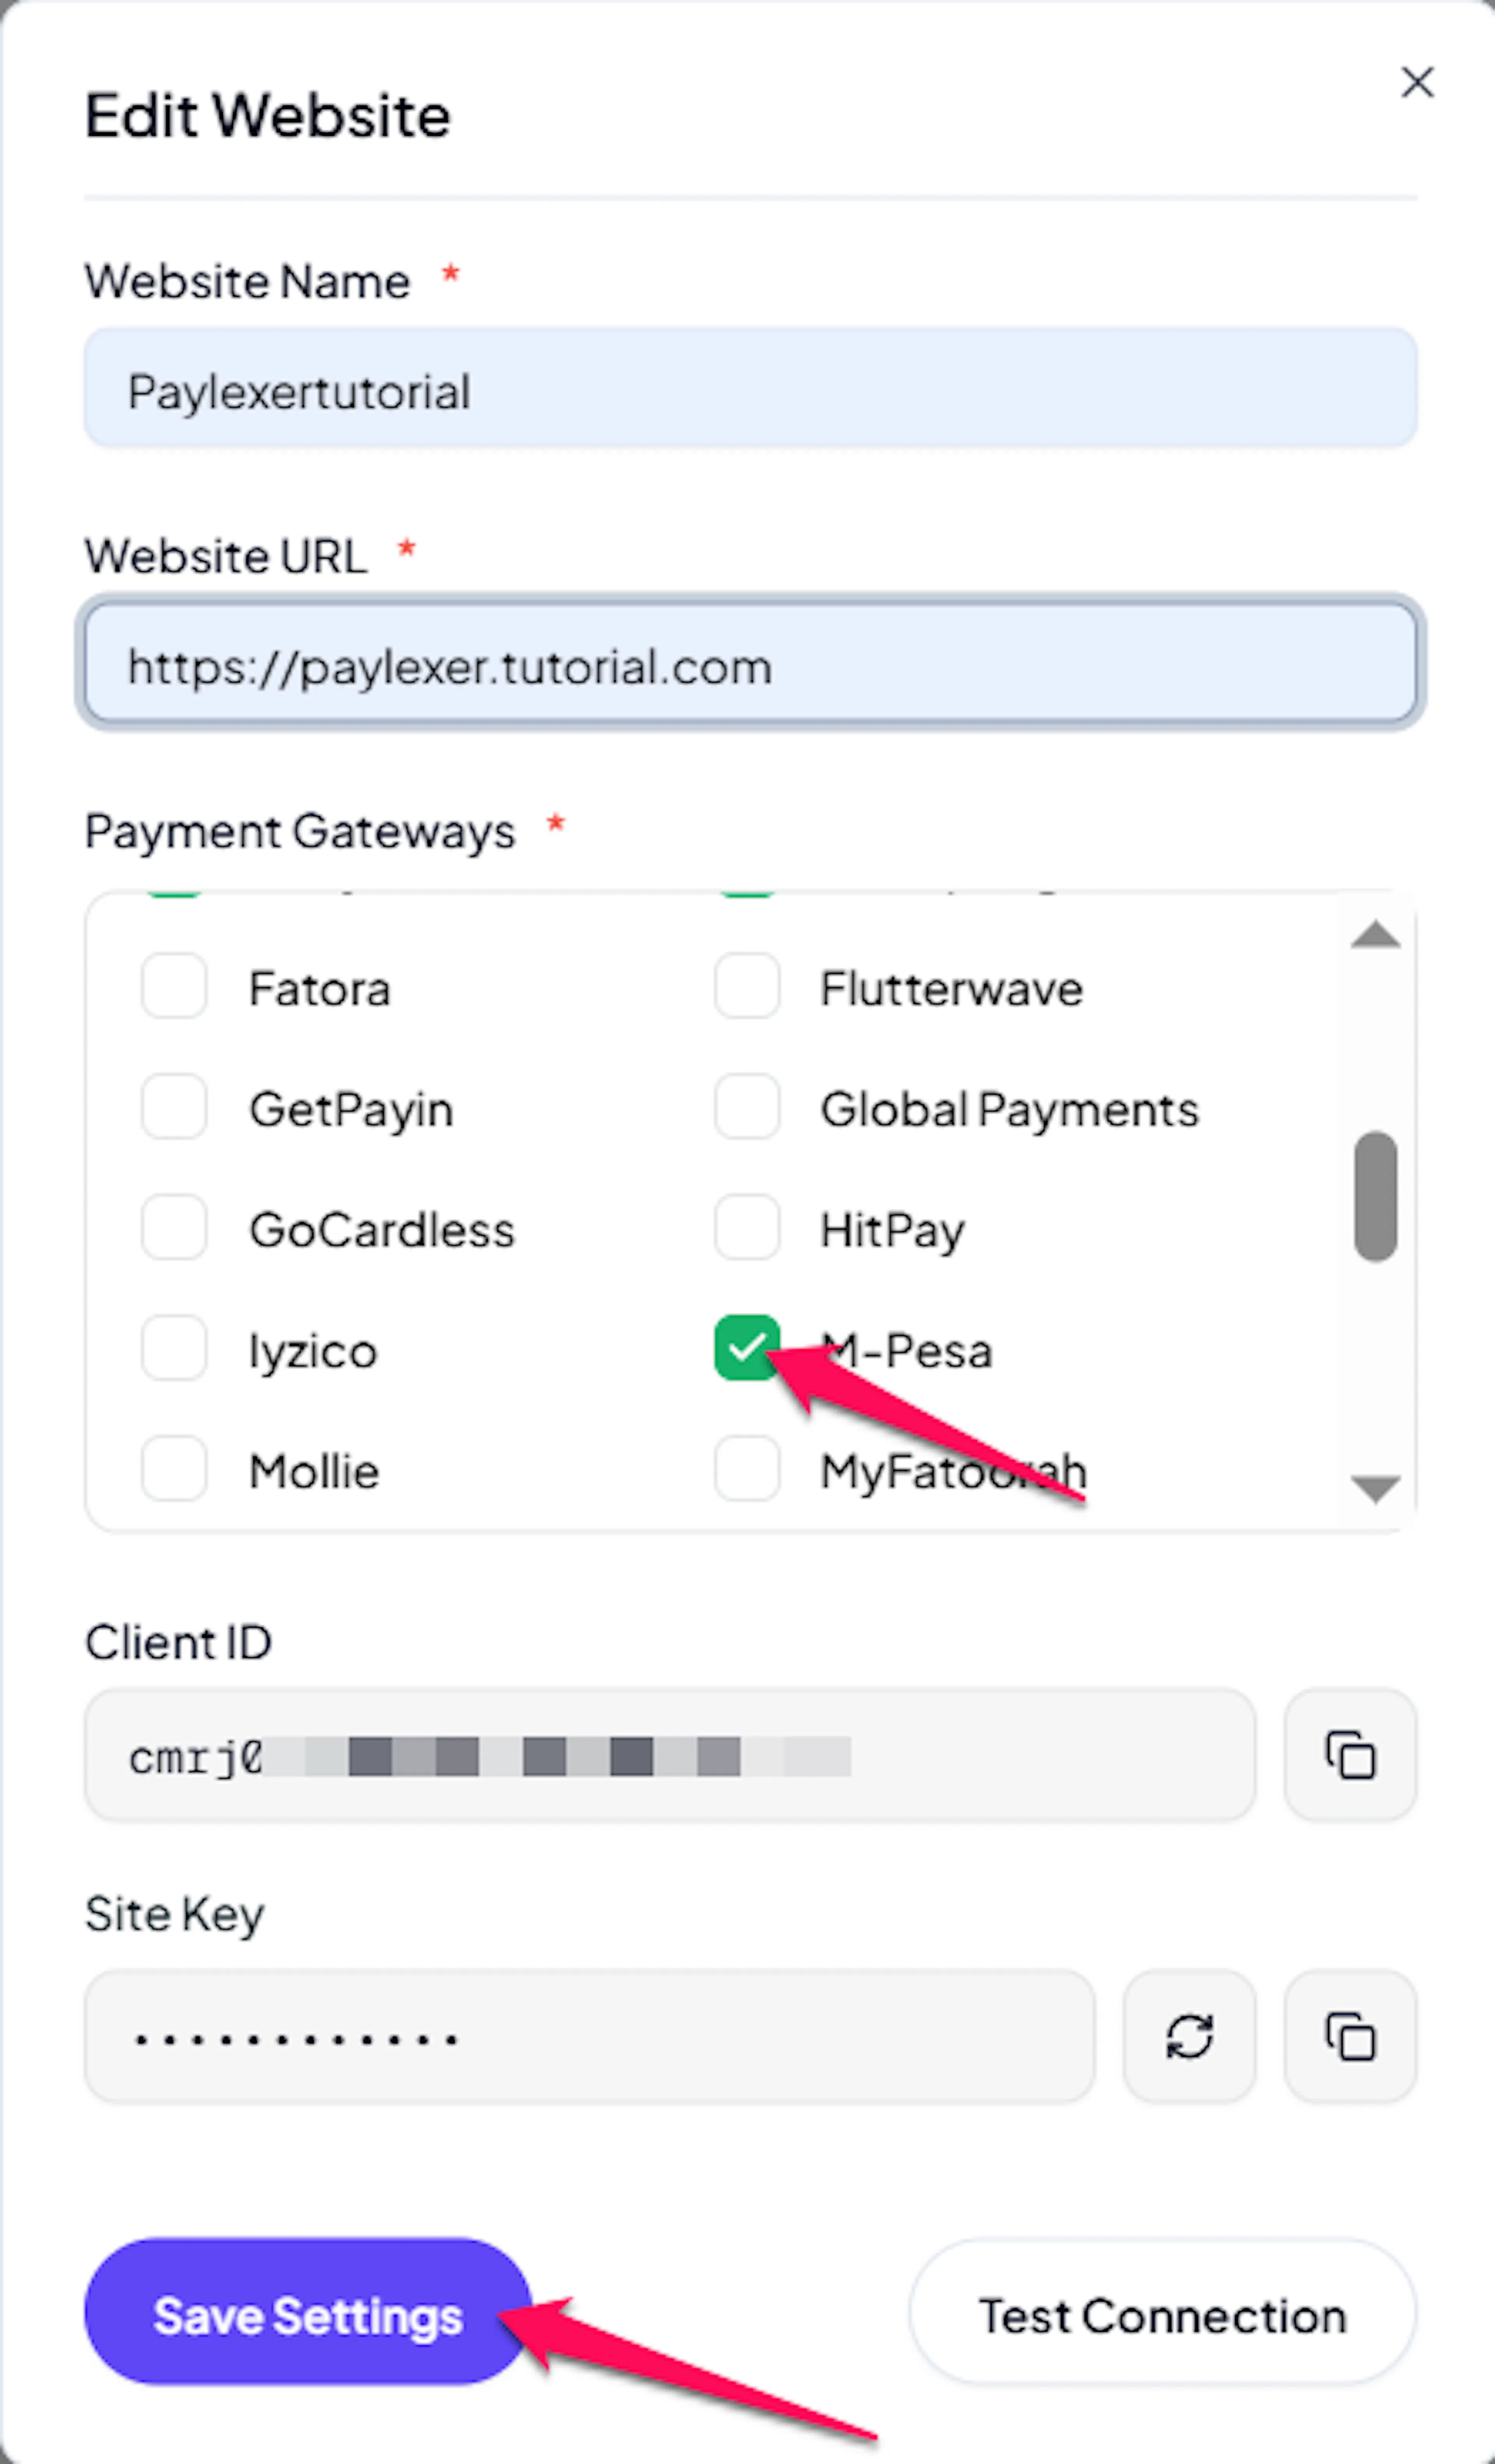
Enable M-PESA
Click the checkbox to enable M-PESA for the website.
If you haven't added a website yet, Continue to Add Your Website →
Troubleshooting
Best Practices
- Test in sandbox before enabling production. Use Safaricom's shared test settings and test phone number to complete a full payment before switching to live.
- Add the optional Initiator Name and Security Credential fields if you plan to reverse payments from your M-PESA account and want PayLexer to detect those refunds automatically.
- Keep your Consumer Secret, Passkey, and Security Credential confidential, and regenerate or rotate them if you suspect exposure.
- Remember that a payment prompt cannot be cancelled once sent - communicate this to your support team so they don't expect a "cancel" action mid-flow.
- Only charge in Kenyan Shillings - a checkout in any other currency is rejected before M-PESA is ever contacted.
FAQs
Still Have Questions?
- M-PESA Support: Safaricom Daraja Developer Support
- PayLexer Support: Contact Support