

How to Integrate PayLexer with Easy Digital Downloads
Connect PayLexer to Easy Digital Downloads to accept payments for digital products across multiple payment gateways.
Overview
Easy Digital Downloads (EDD) is a WordPress plugin for selling digital products like software, eBooks, music, graphics and courses. PayLexer integrates with EDD to handle secure payment processing across multiple gateways, such as Stripe, Airwallex, Paystack, Square and more.
Supported Features
- One-time payments - Accept full payment for a digital product in a single transaction.
- Multiple payment gateways and websites - Connect and manage several gateways and websites from one PayLexer account.
- Test mode - Test payments safely without real charges before going live.
- Live payments - Process real transactions securely once setup is verified.
- Downloadable products - Download links are generated automatically after a successful payment.
Before You Start
Make sure you have the following before starting:
- Admin access to your WordPress site.
- Easy Digital Downloads installed and active. Download Easy Digital Downloads →
- The email address you want to use for PayLexer. If you don't have a PayLexer account yet, one is created for you while you connect.
- A payment gateway account, such as Stripe or Paystack. If you're new to PayLexer, you configure it after connecting your website. Choose and configure a gateway →
Setup Journey
If you haven't configured PayLexer yet, follow these steps in order before continuing:
Getting Started
Complete the PayLexer setup. Setup guide →
Connect Your Website
Install the PayLexer plugin and select Connect Account. Connect your site →
Configure Payment Gateway
Choose and configure your gateway. Gateway docs →
Platform Integration
You're here! Continue below.
Test Transactions
Verify everything works. Test guide →
Integration Steps
You no longer add your website in PayLexer first or copy a Client ID and Site Key. The Connect Account button in the PayLexer plugin creates or signs in to your PayLexer account and adds your website automatically.
Install the PayLexer WordPress Plugin
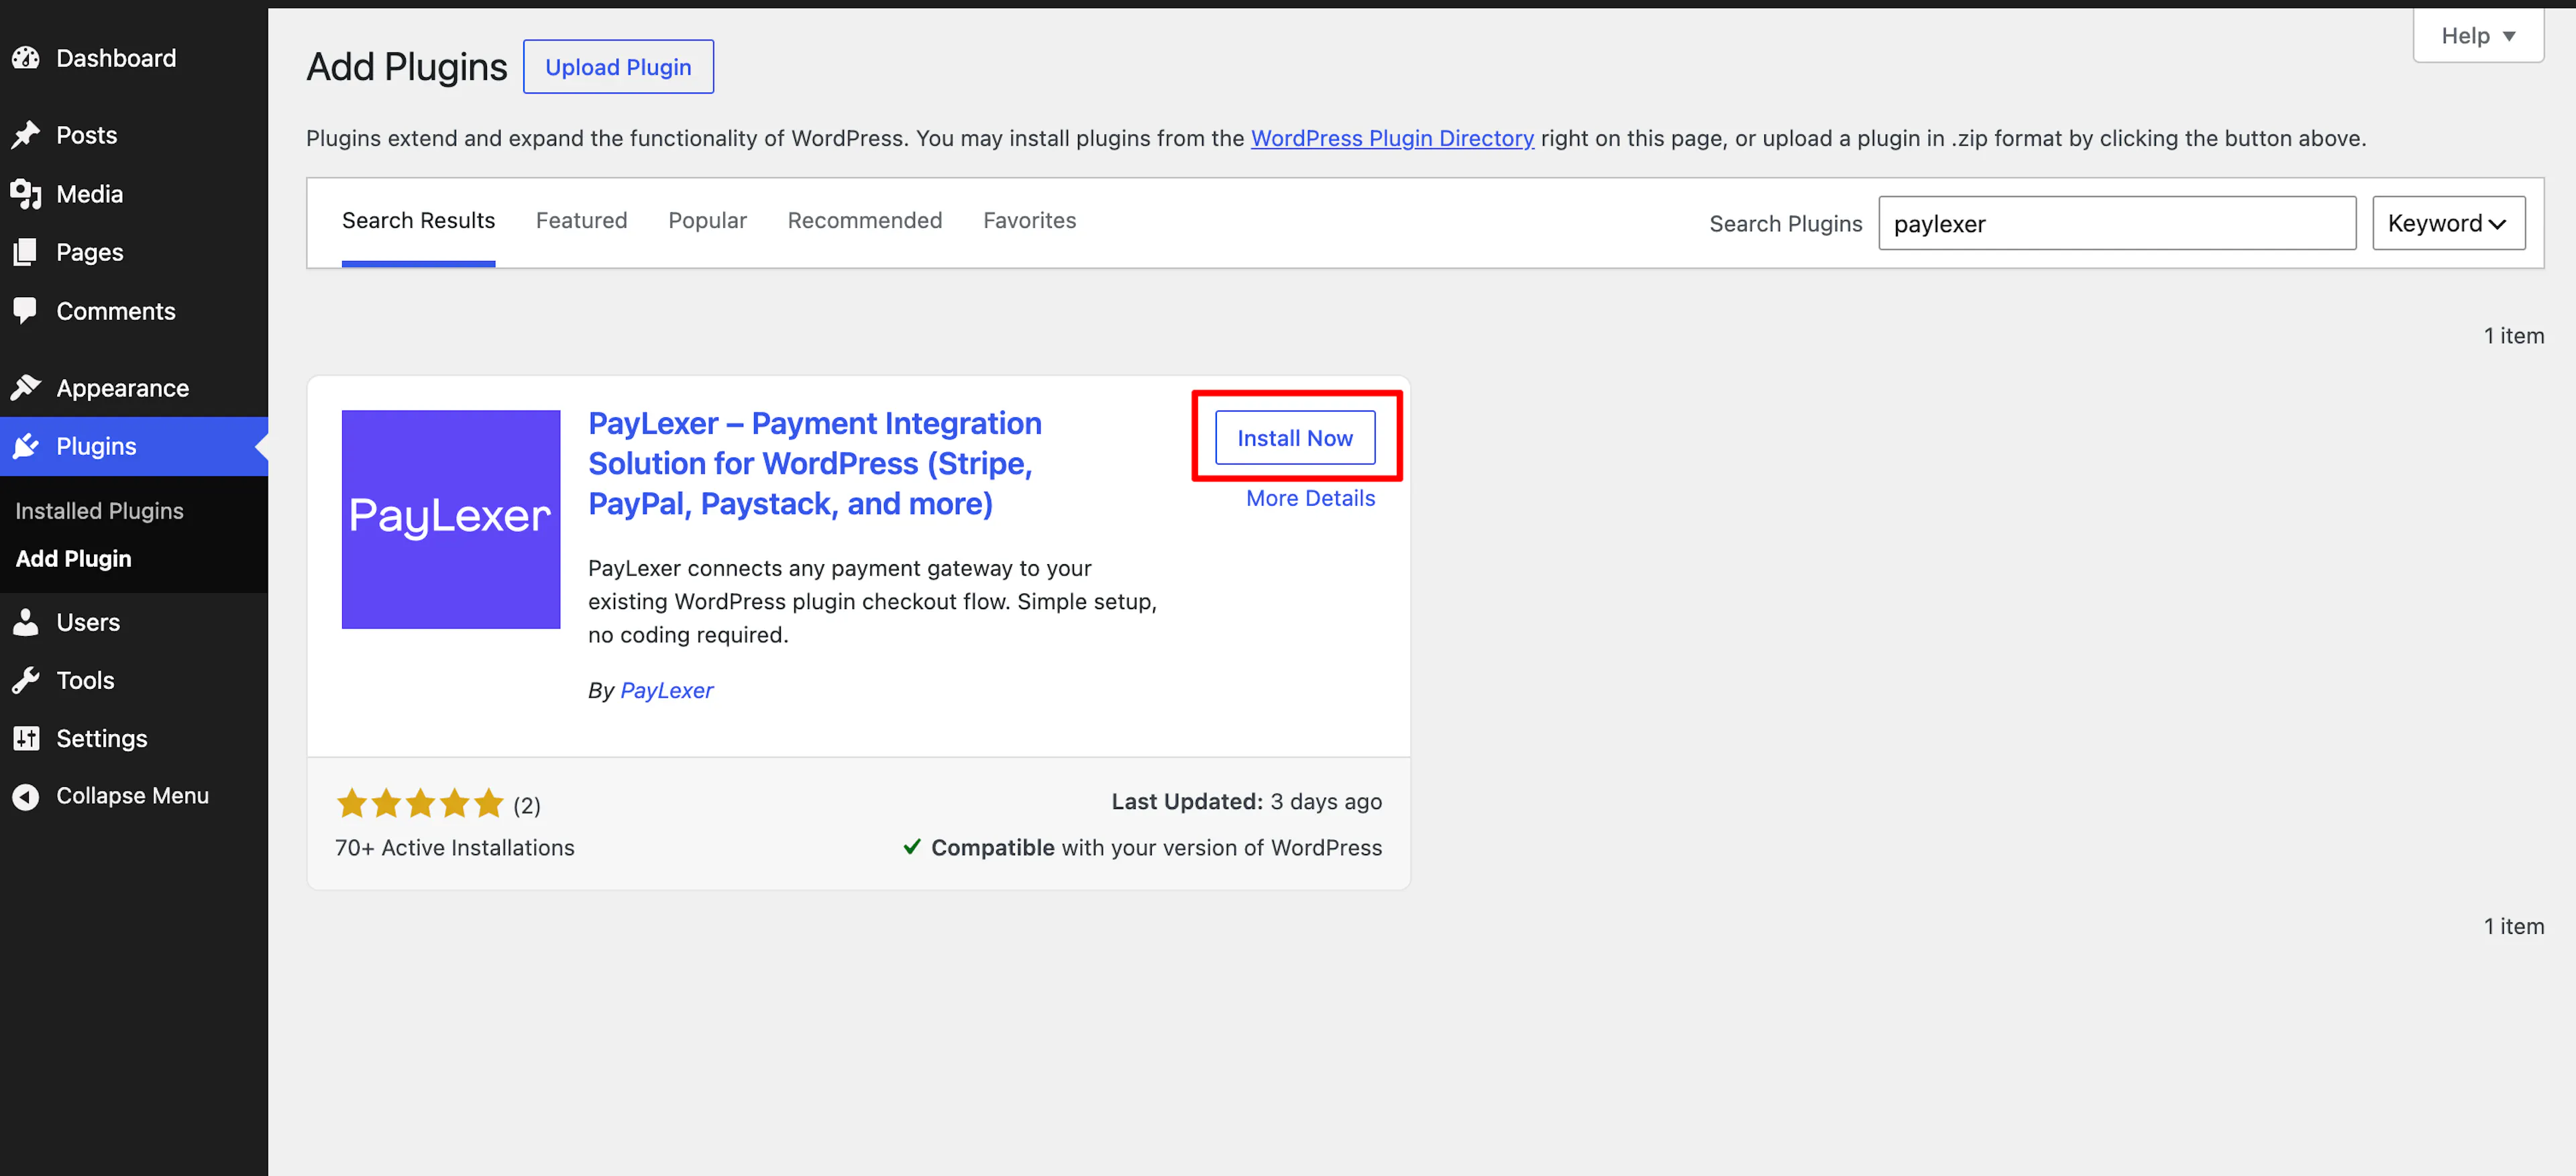
- Go to WordPress Admin → Plugins → Add New Plugin.
- Search for PayLexer, then click Install Now.
- Click Activate to enable the plugin on your site.
Connect Your PayLexer Account
- In the WordPress sidebar, go to PayLexer. The General page opens with the Connect to PayLexer card.
- Click Connect Account and enter your email address. What happens next depends on your account:
- New to PayLexer: your account is created and your website is connected.
- Existing account: enter your password to sign in and connect.
- Already signed in on this browser: you skip the password and go to the authorization page. Check the account and website, then click Connect Account and Authorize.
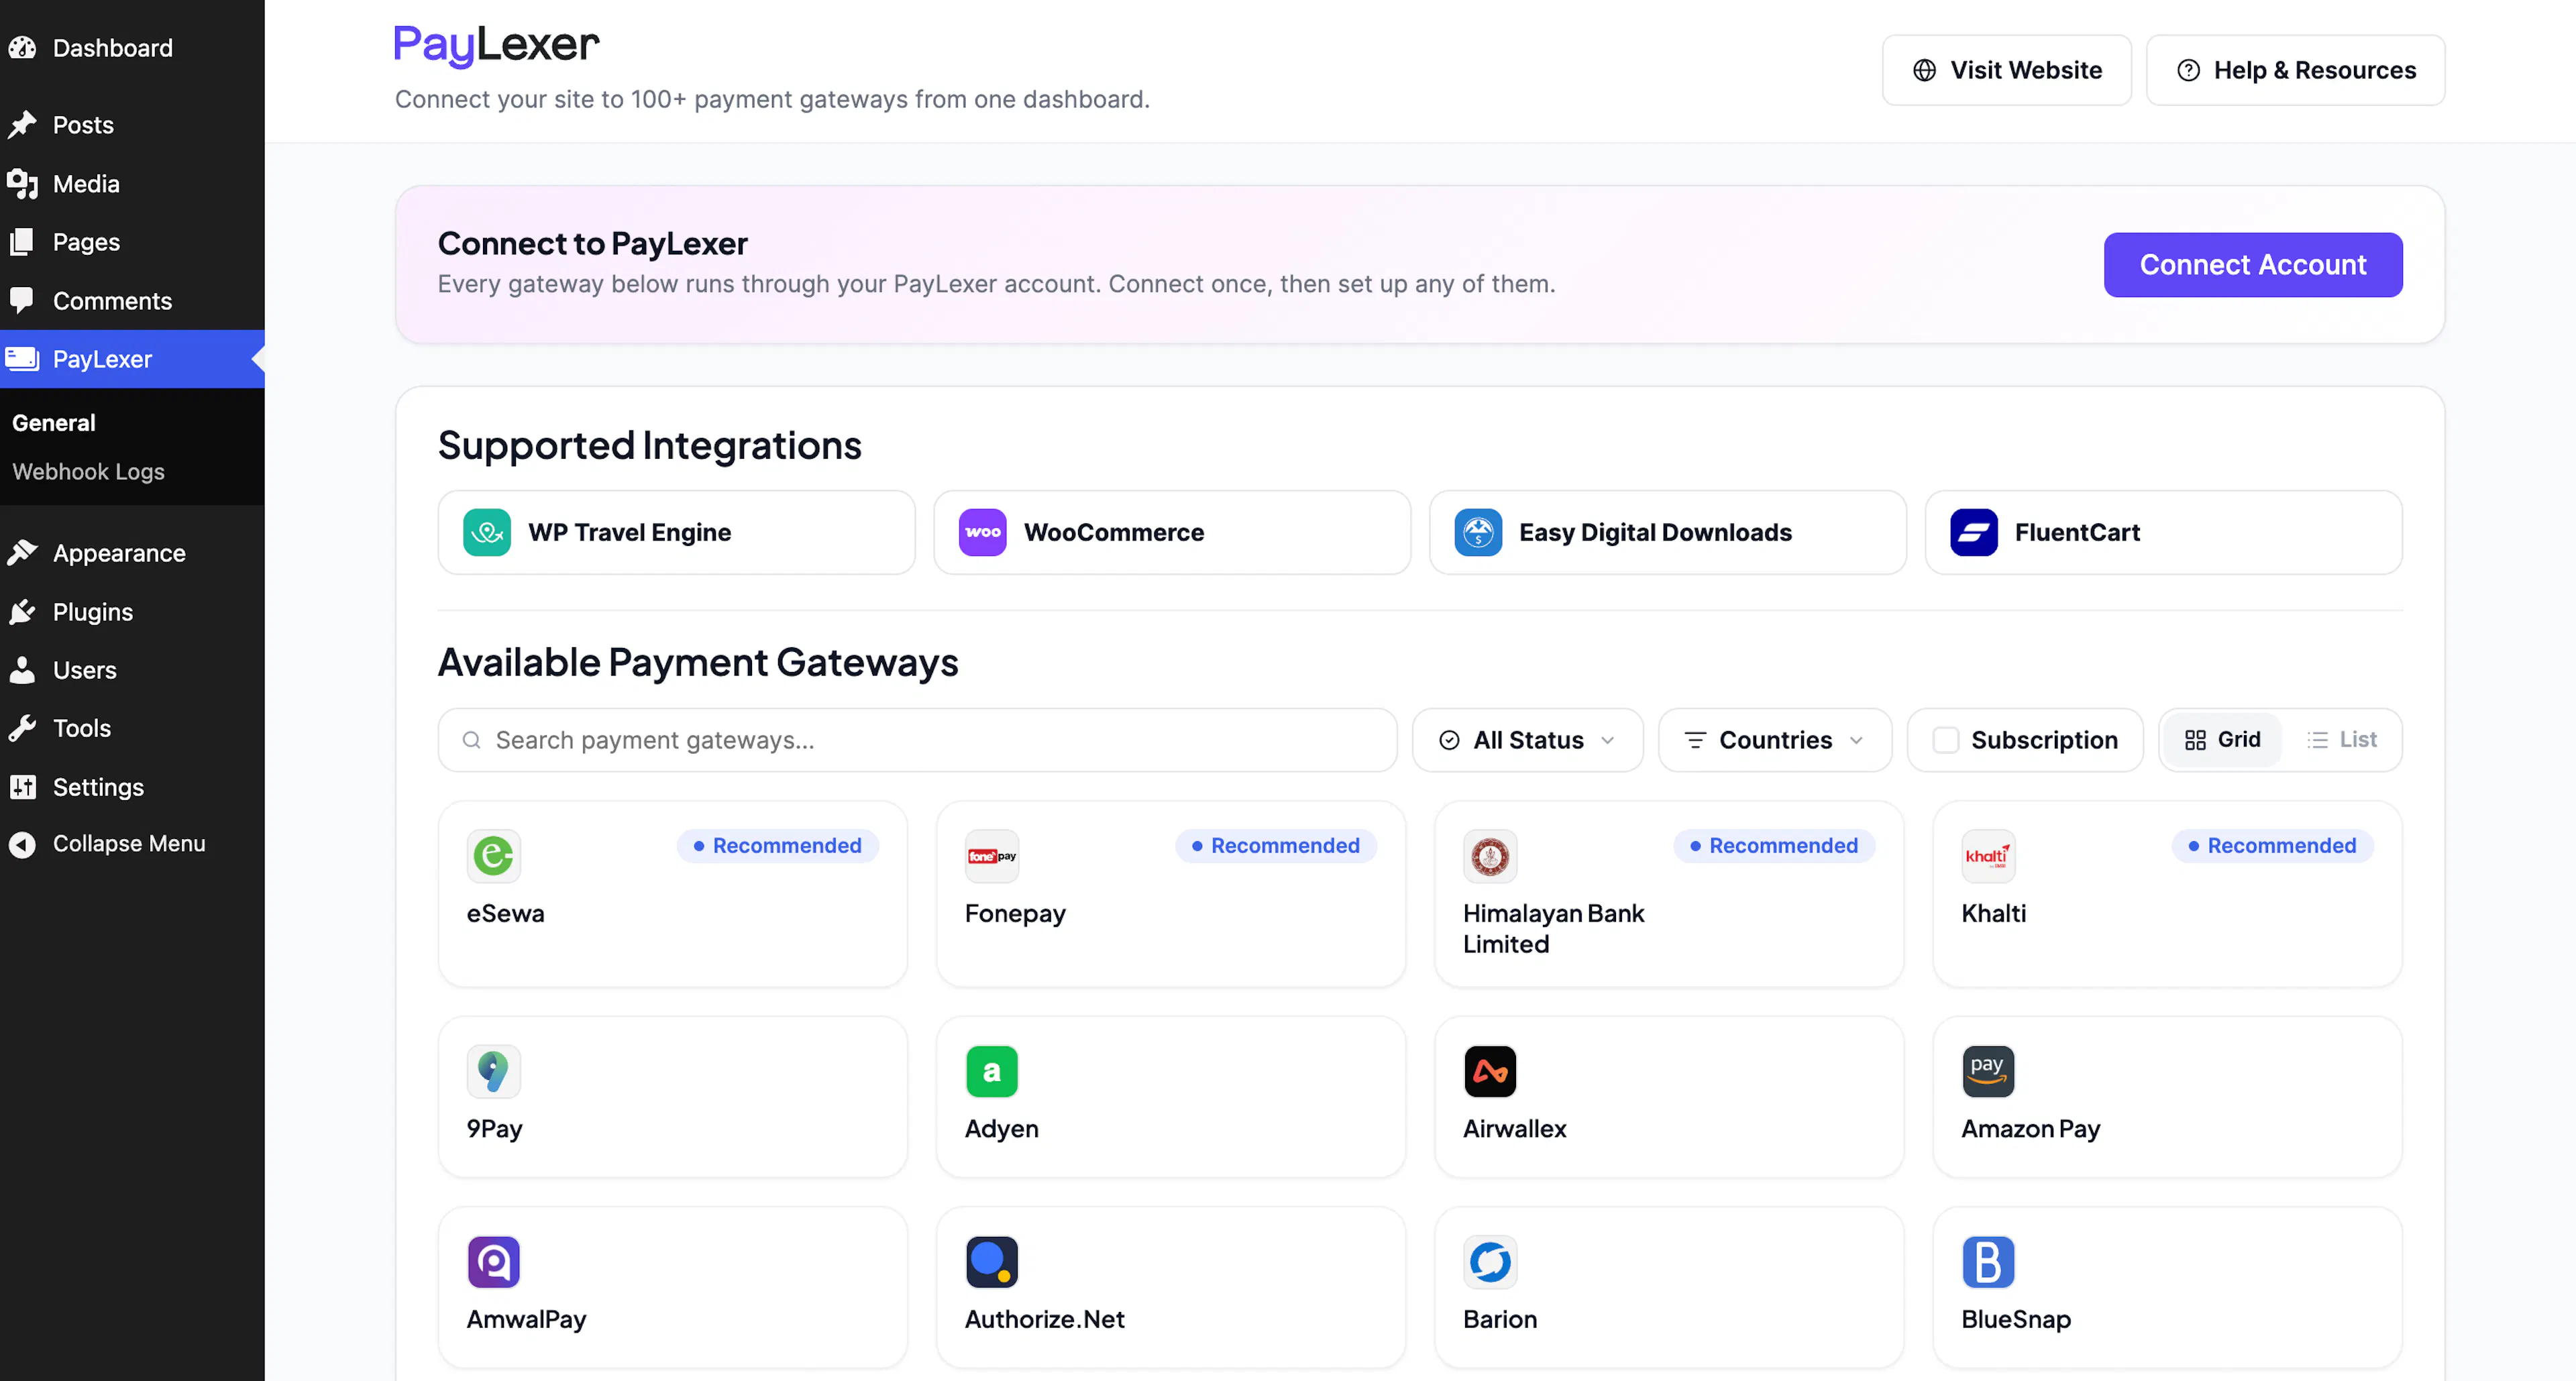
You only connect once. Every gateway you configure in PayLexer runs through this connection.
Prefer to start from PayLexer? Add your website from Websites → Add Website, then finish with Connect Account in the plugin. See both ways to connect →
Check the Connection
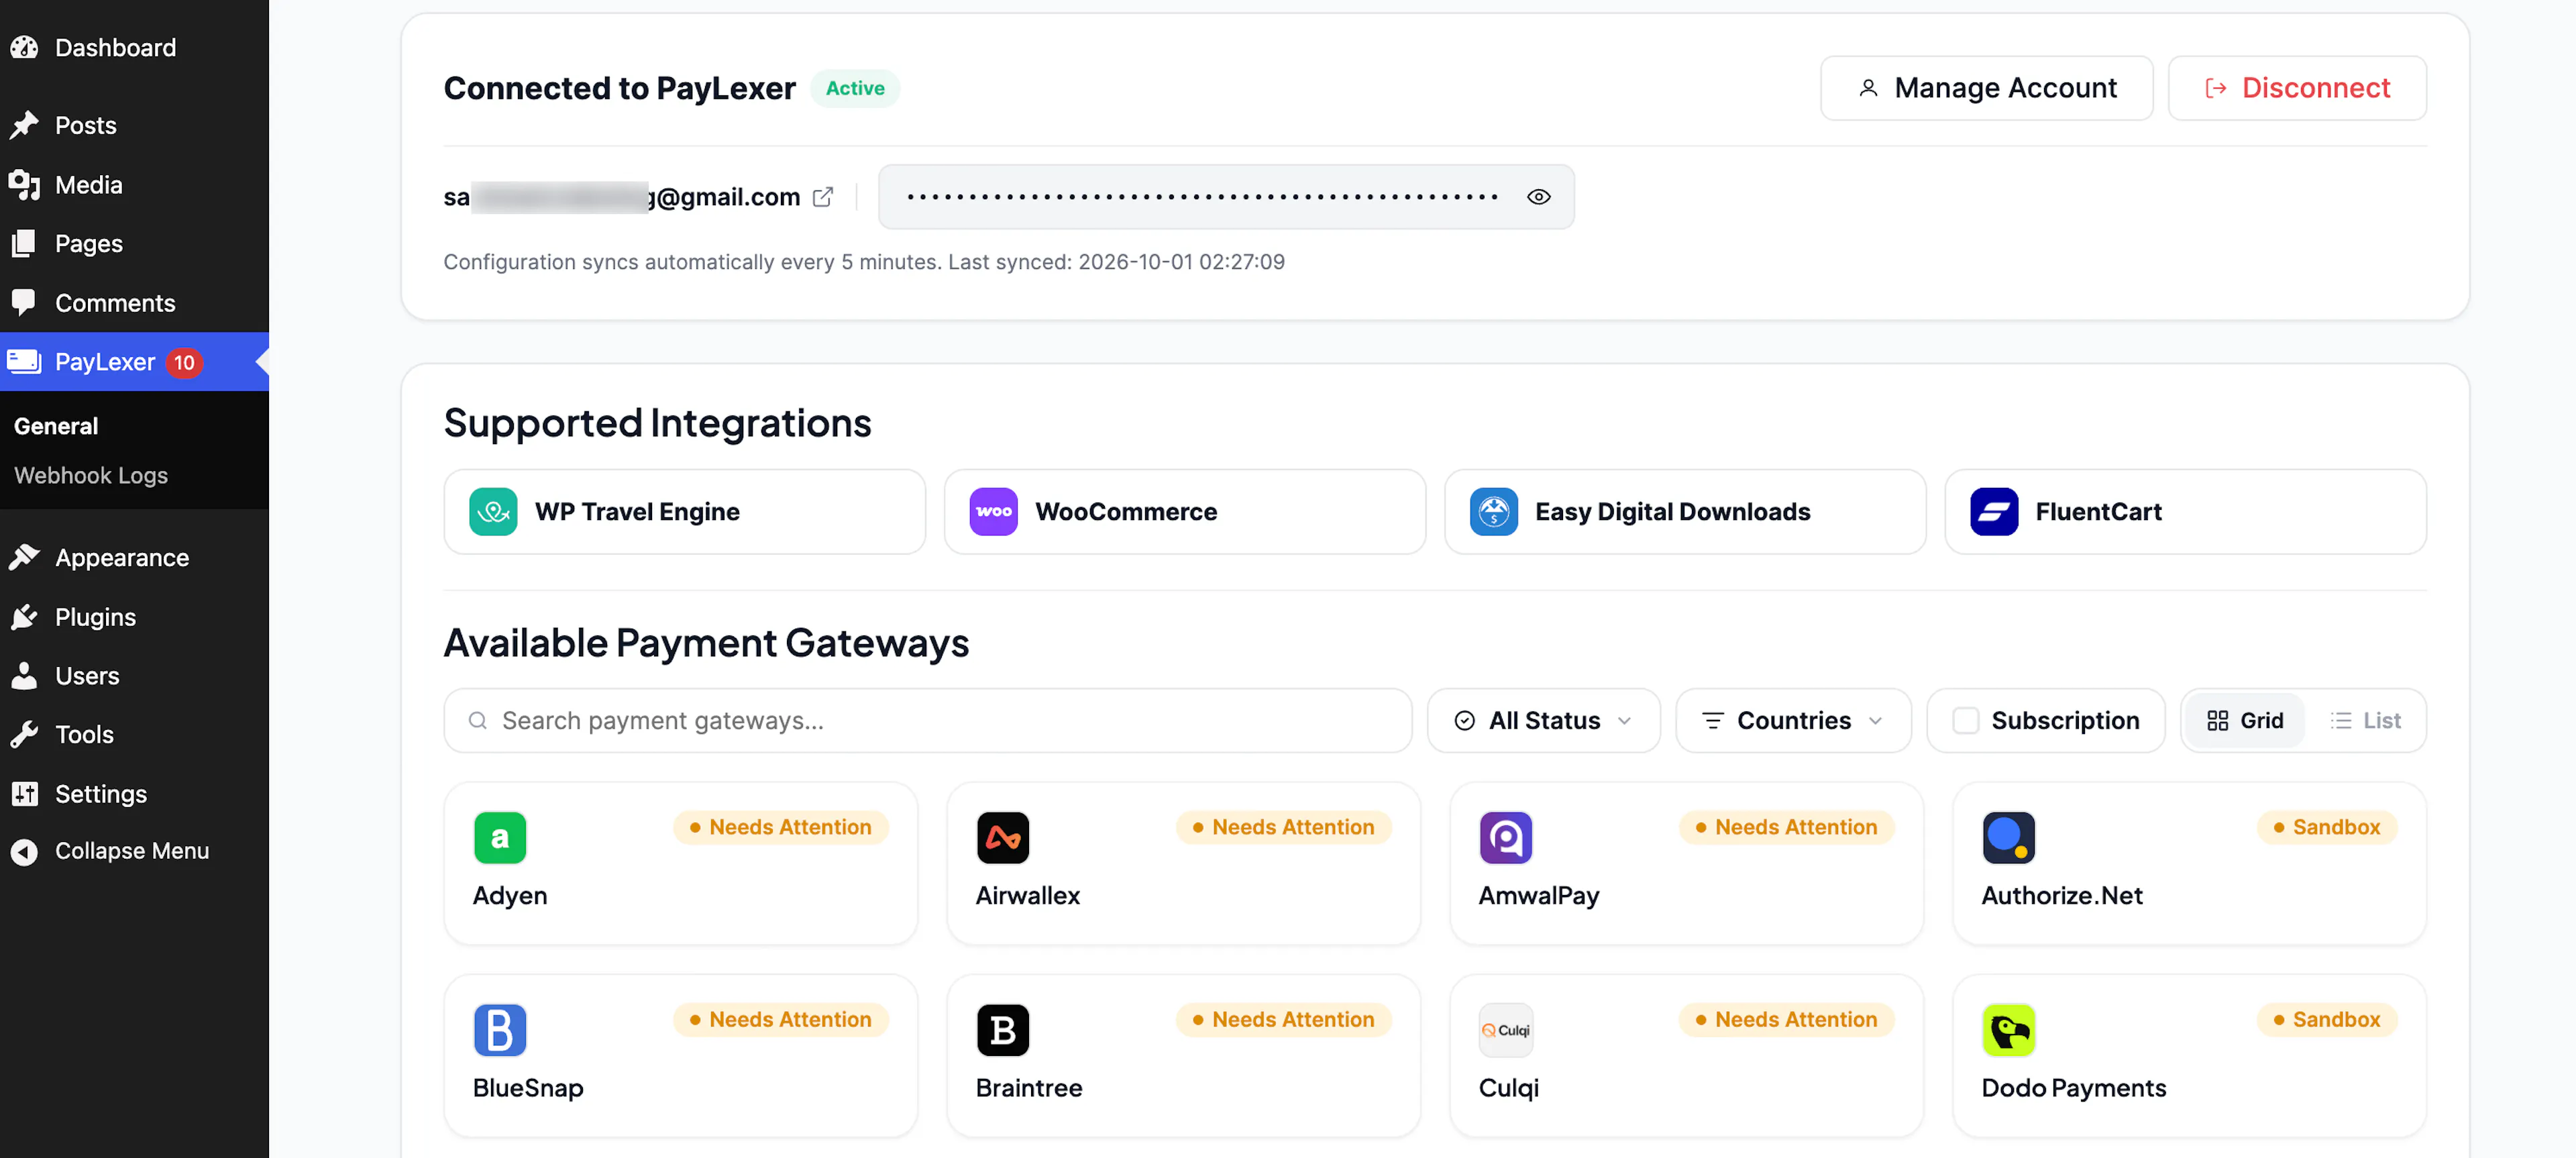
- In WordPress, the card on the PayLexer General page changes to Connected to PayLexer with the status Active, and shows the email of your PayLexer account.
- On the same page, Easy Digital Downloads shows as Activated under Supported Integrations.
- In the PayLexer dashboard, go to Websites. Your website appears in the table with the status Connected.
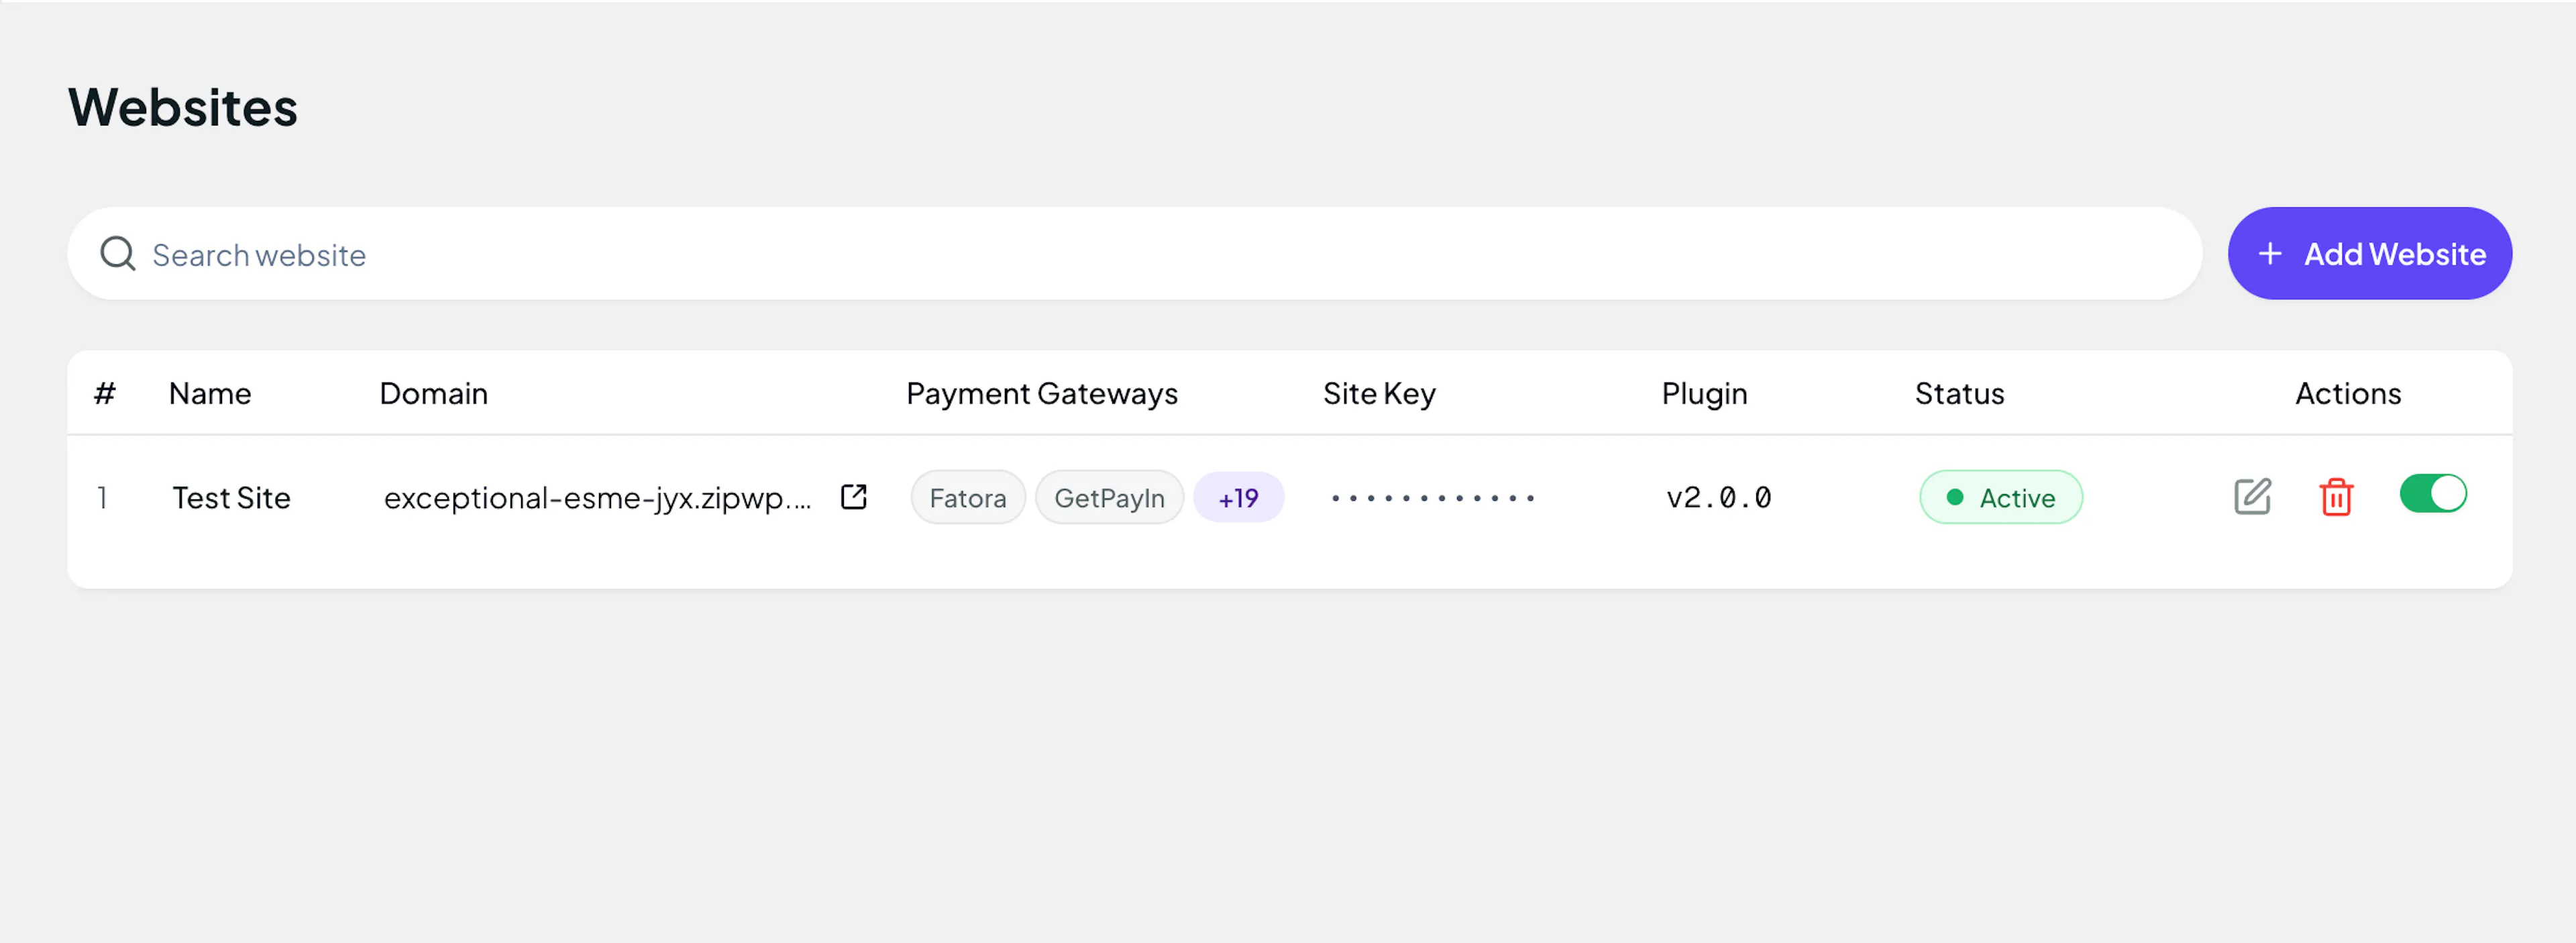
On failure: Click Connect Account again and check the email and password you entered. Your website must show as Connected before payments can be processed.
Enable PayLexer Gateways in Easy Digital Downloads
- Go to Downloads → Settings → Payments → General.
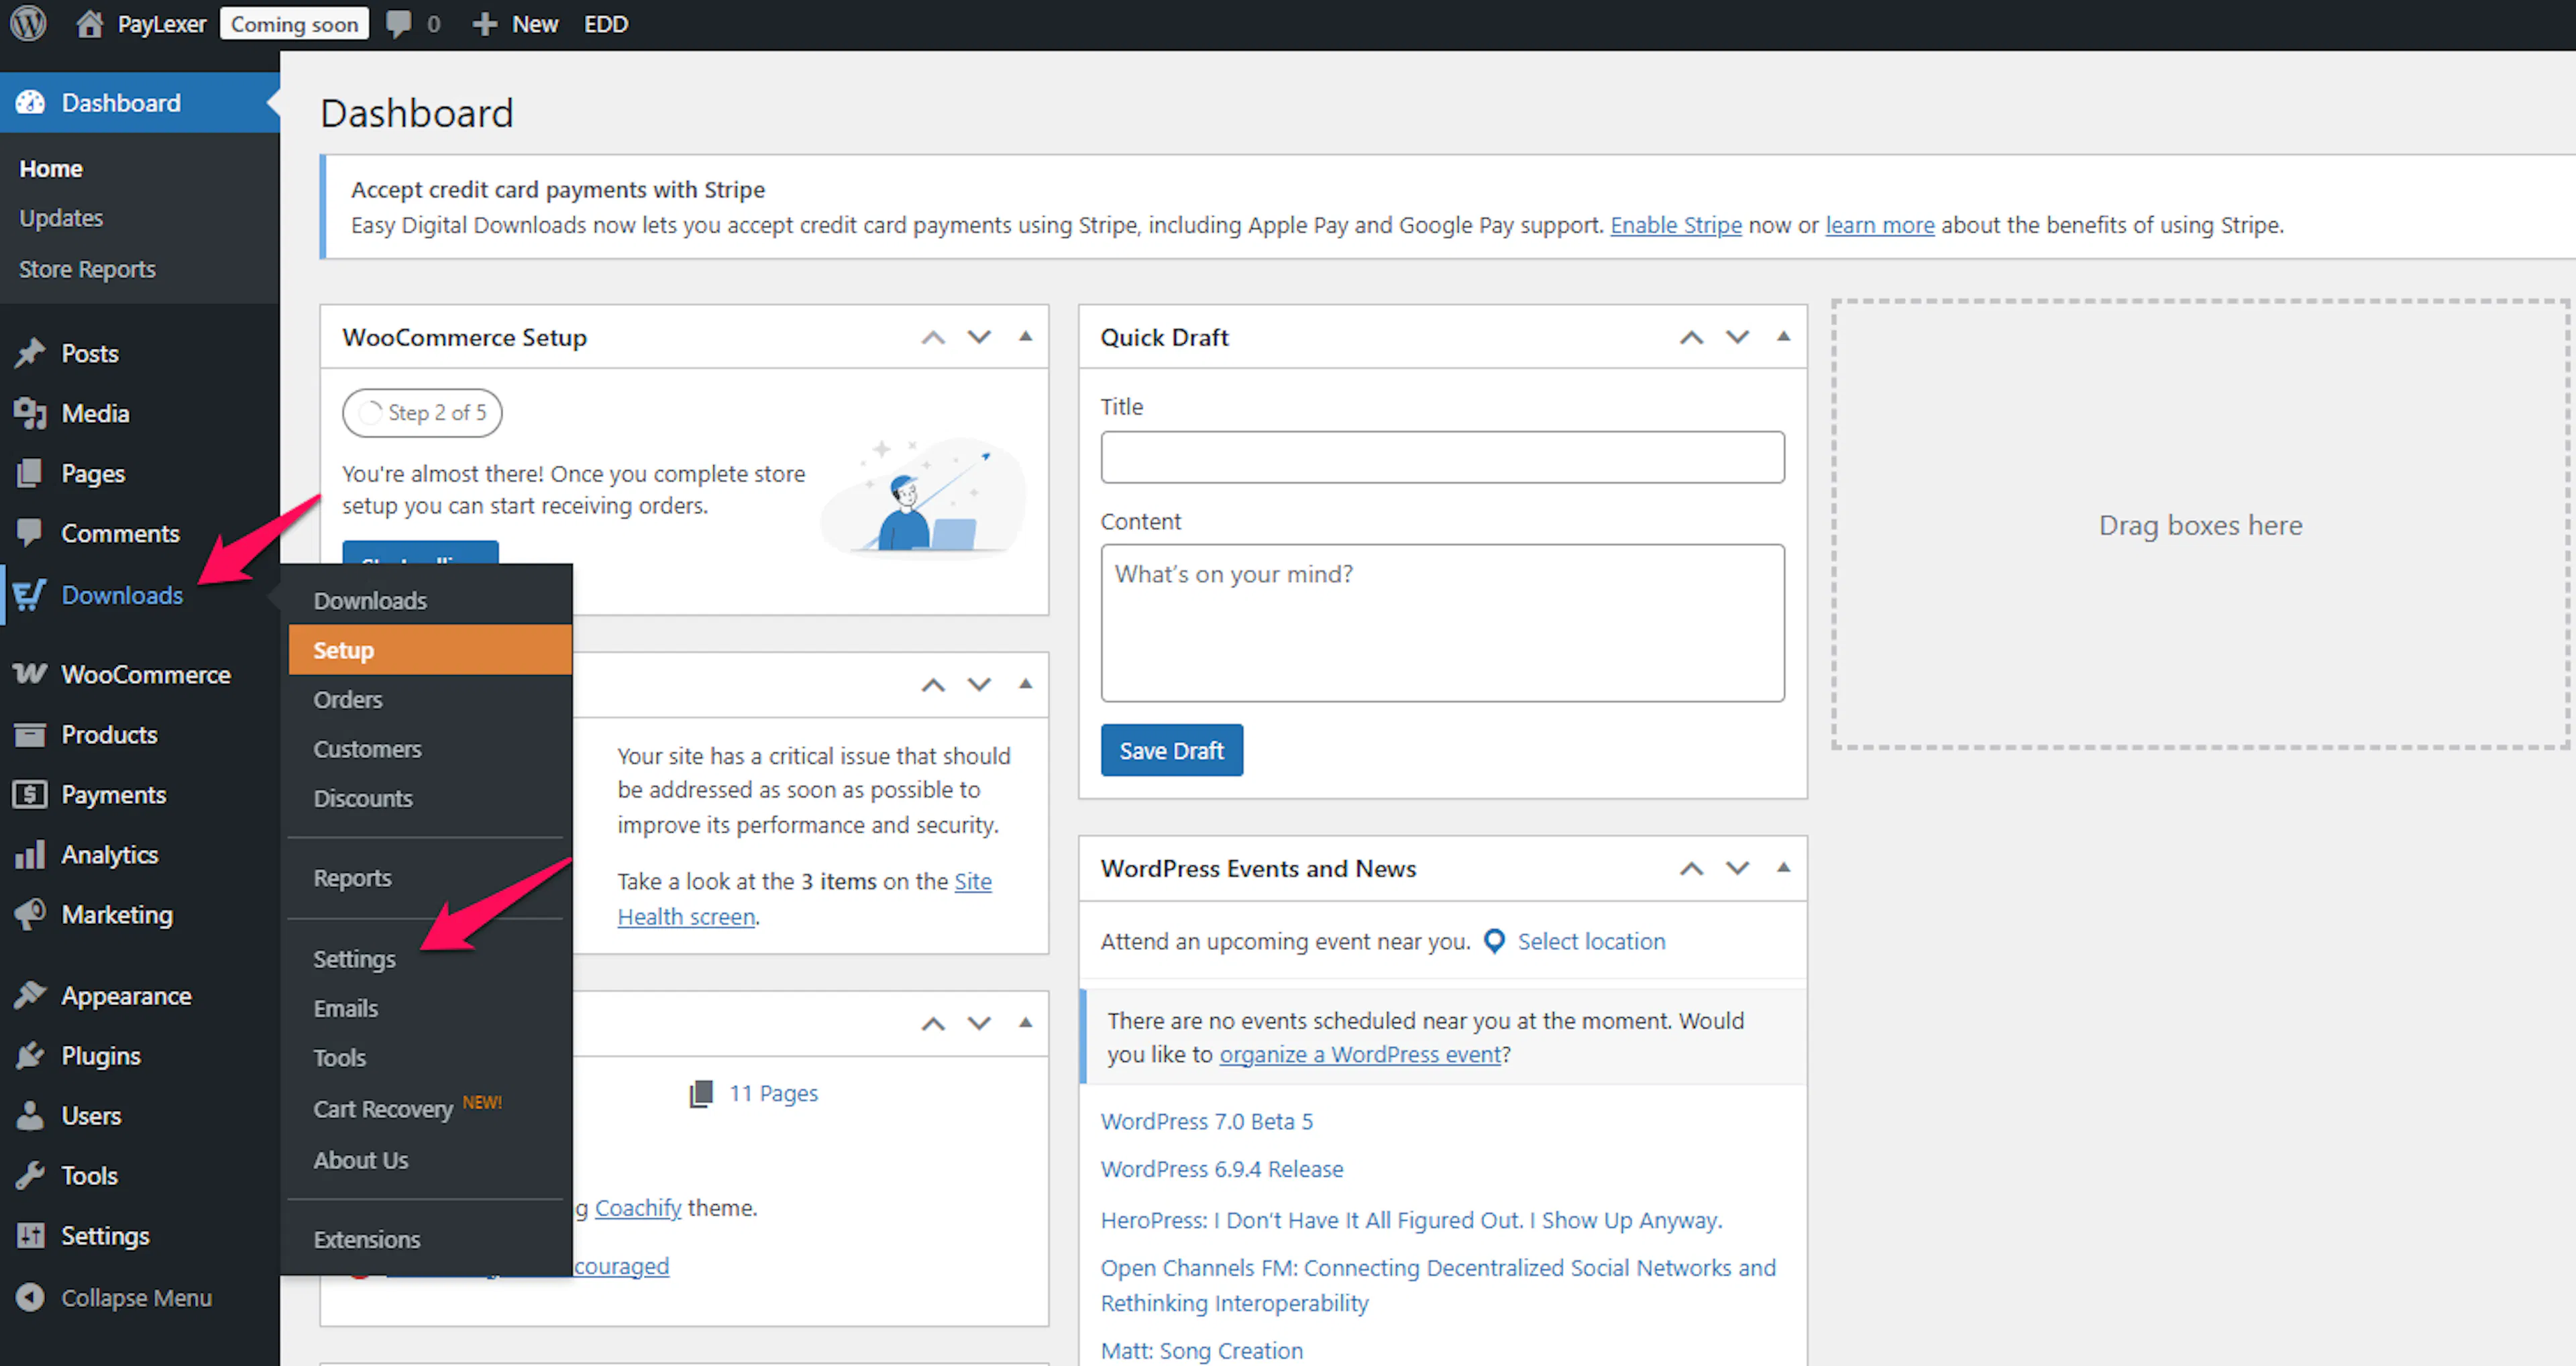
- Turn on Test Mode for initial testing.
- Enable the payment gateways you want under Active Gateways.
- Click Save Changes.
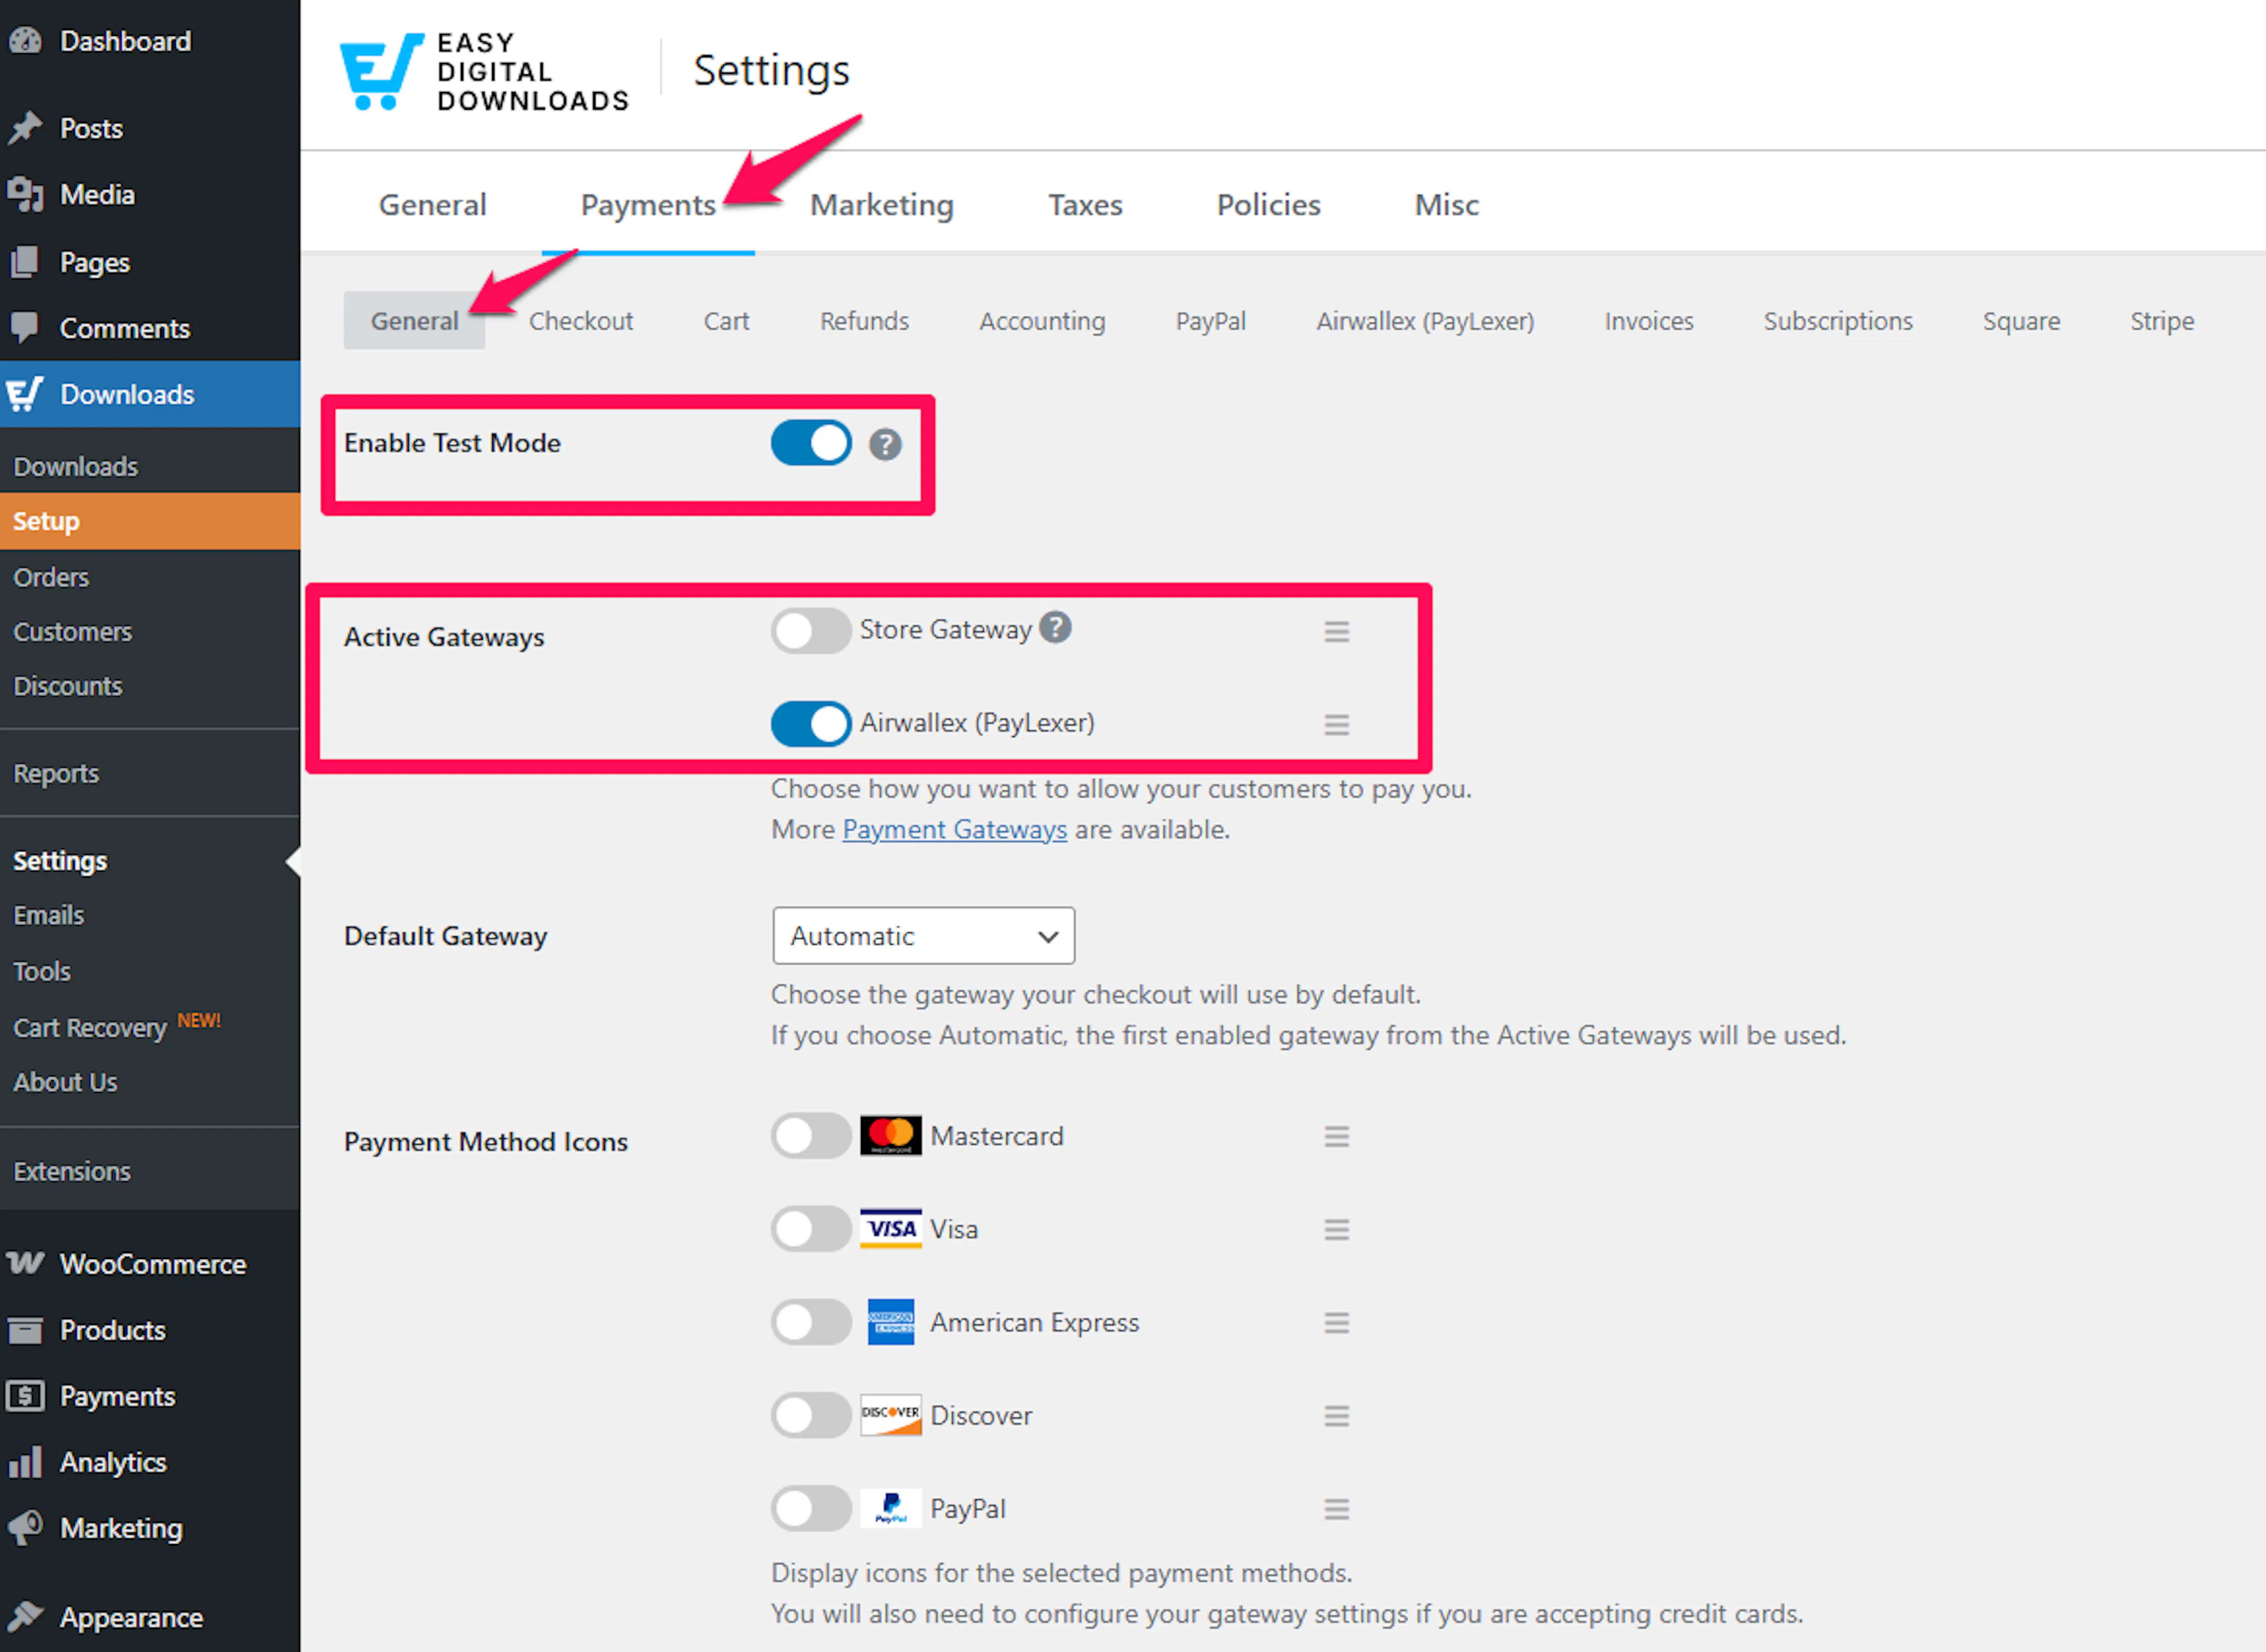
PayLexer now handles payment processing for your Easy Digital Downloads purchases.
Customize Gateway Settings
Once a payment gateway is enabled, you can change how it appears to your customers at checkout. This works for every payment gateway. The steps below use Paddle as an example.
This is useful when you want to show a friendlier name to your customers. For example:
- Show "Credit Card" instead of "Paddle" or "Stripe", since most customers don't know the gateway name.
- Translate the label for your audience, such as "Tarjeta de crédito" for Spanish or "Carte bancaire" for French.
- Add a description to guide customers during checkout.
Go to Downloads → Settings → Payments and click the tab for the gateway you want to update, for example Paddle (PayLexer). Each connected gateway has its own tab.
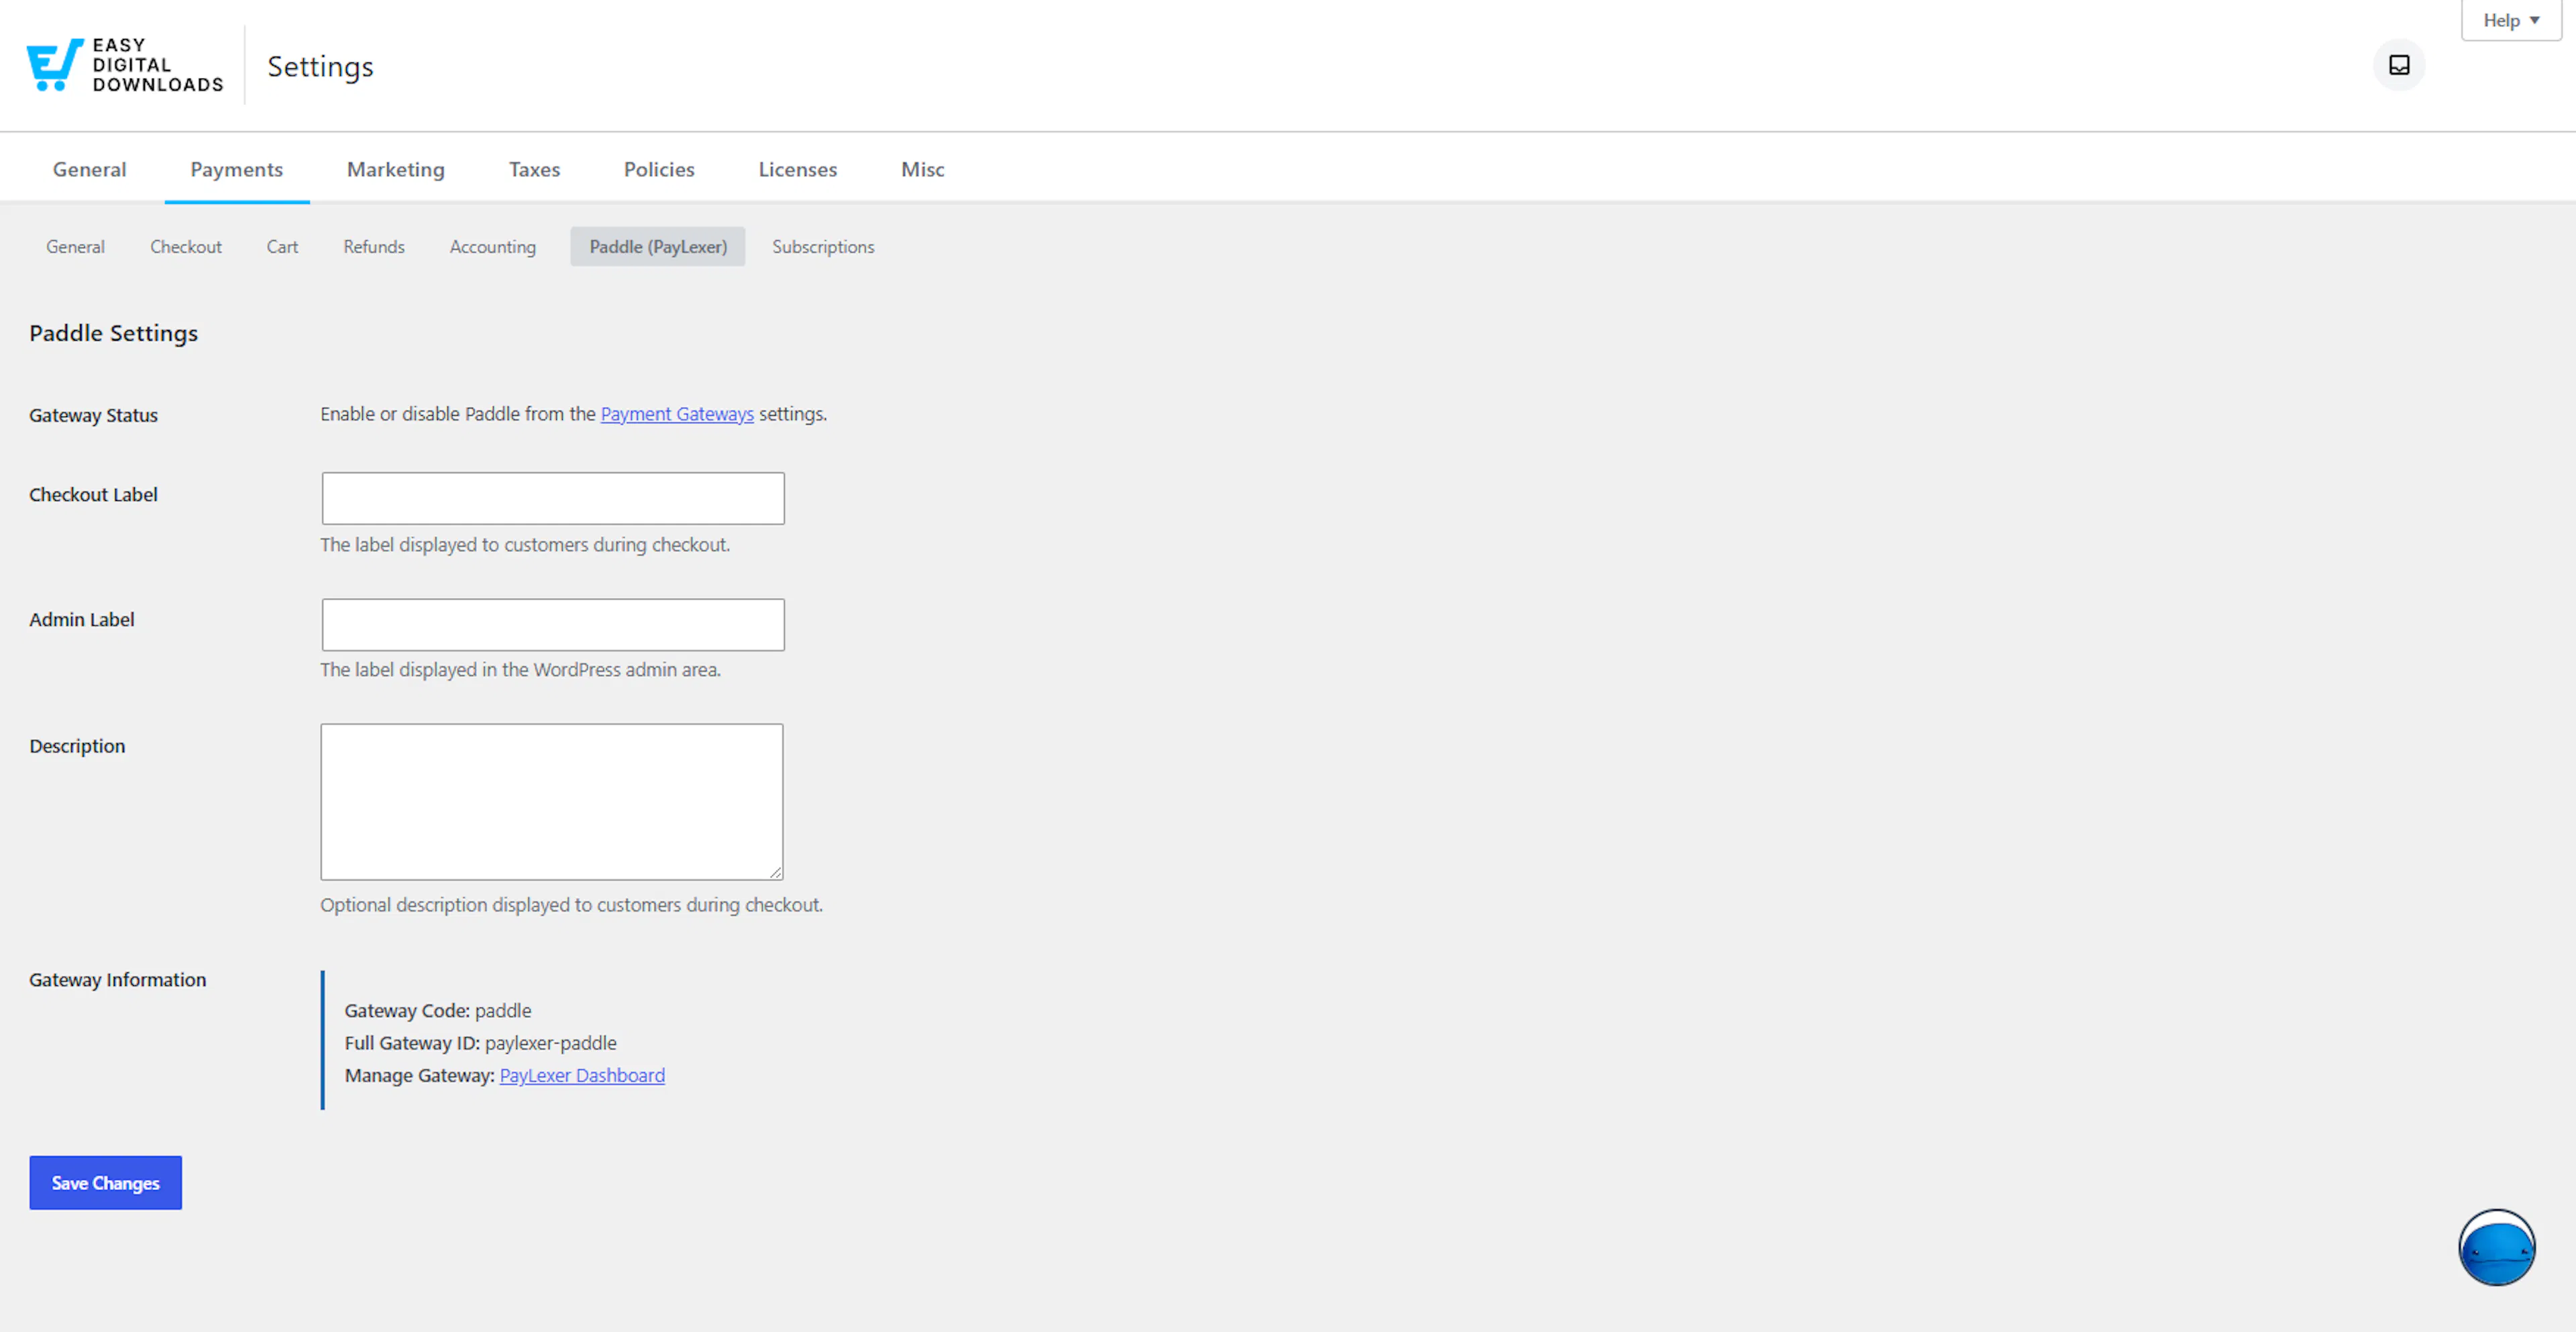
You can update the following fields:
- Checkout Label - The name customers see when they choose a payment method at checkout. By default this is the gateway name, for example "Paddle". Change it to something your customers will recognize.
- Admin Label - The label shown only in your WordPress admin. Customers never see it. Use it to tell gateways apart internally, for example when you have more than one gateway configured.
- Description - Optional text shown below the payment option on the checkout page. Use it to add helpful context, for example "Pay securely with your card. You will be redirected to complete your payment."
Click Save Changes to apply.
Test Mode
PayLexer supports full testing without real charges through EDD's built-in Test Mode.
How Test Mode Works
- Go to Downloads → Settings → Payments → General.
- Turn on Test Mode.
- Click Save Changes.
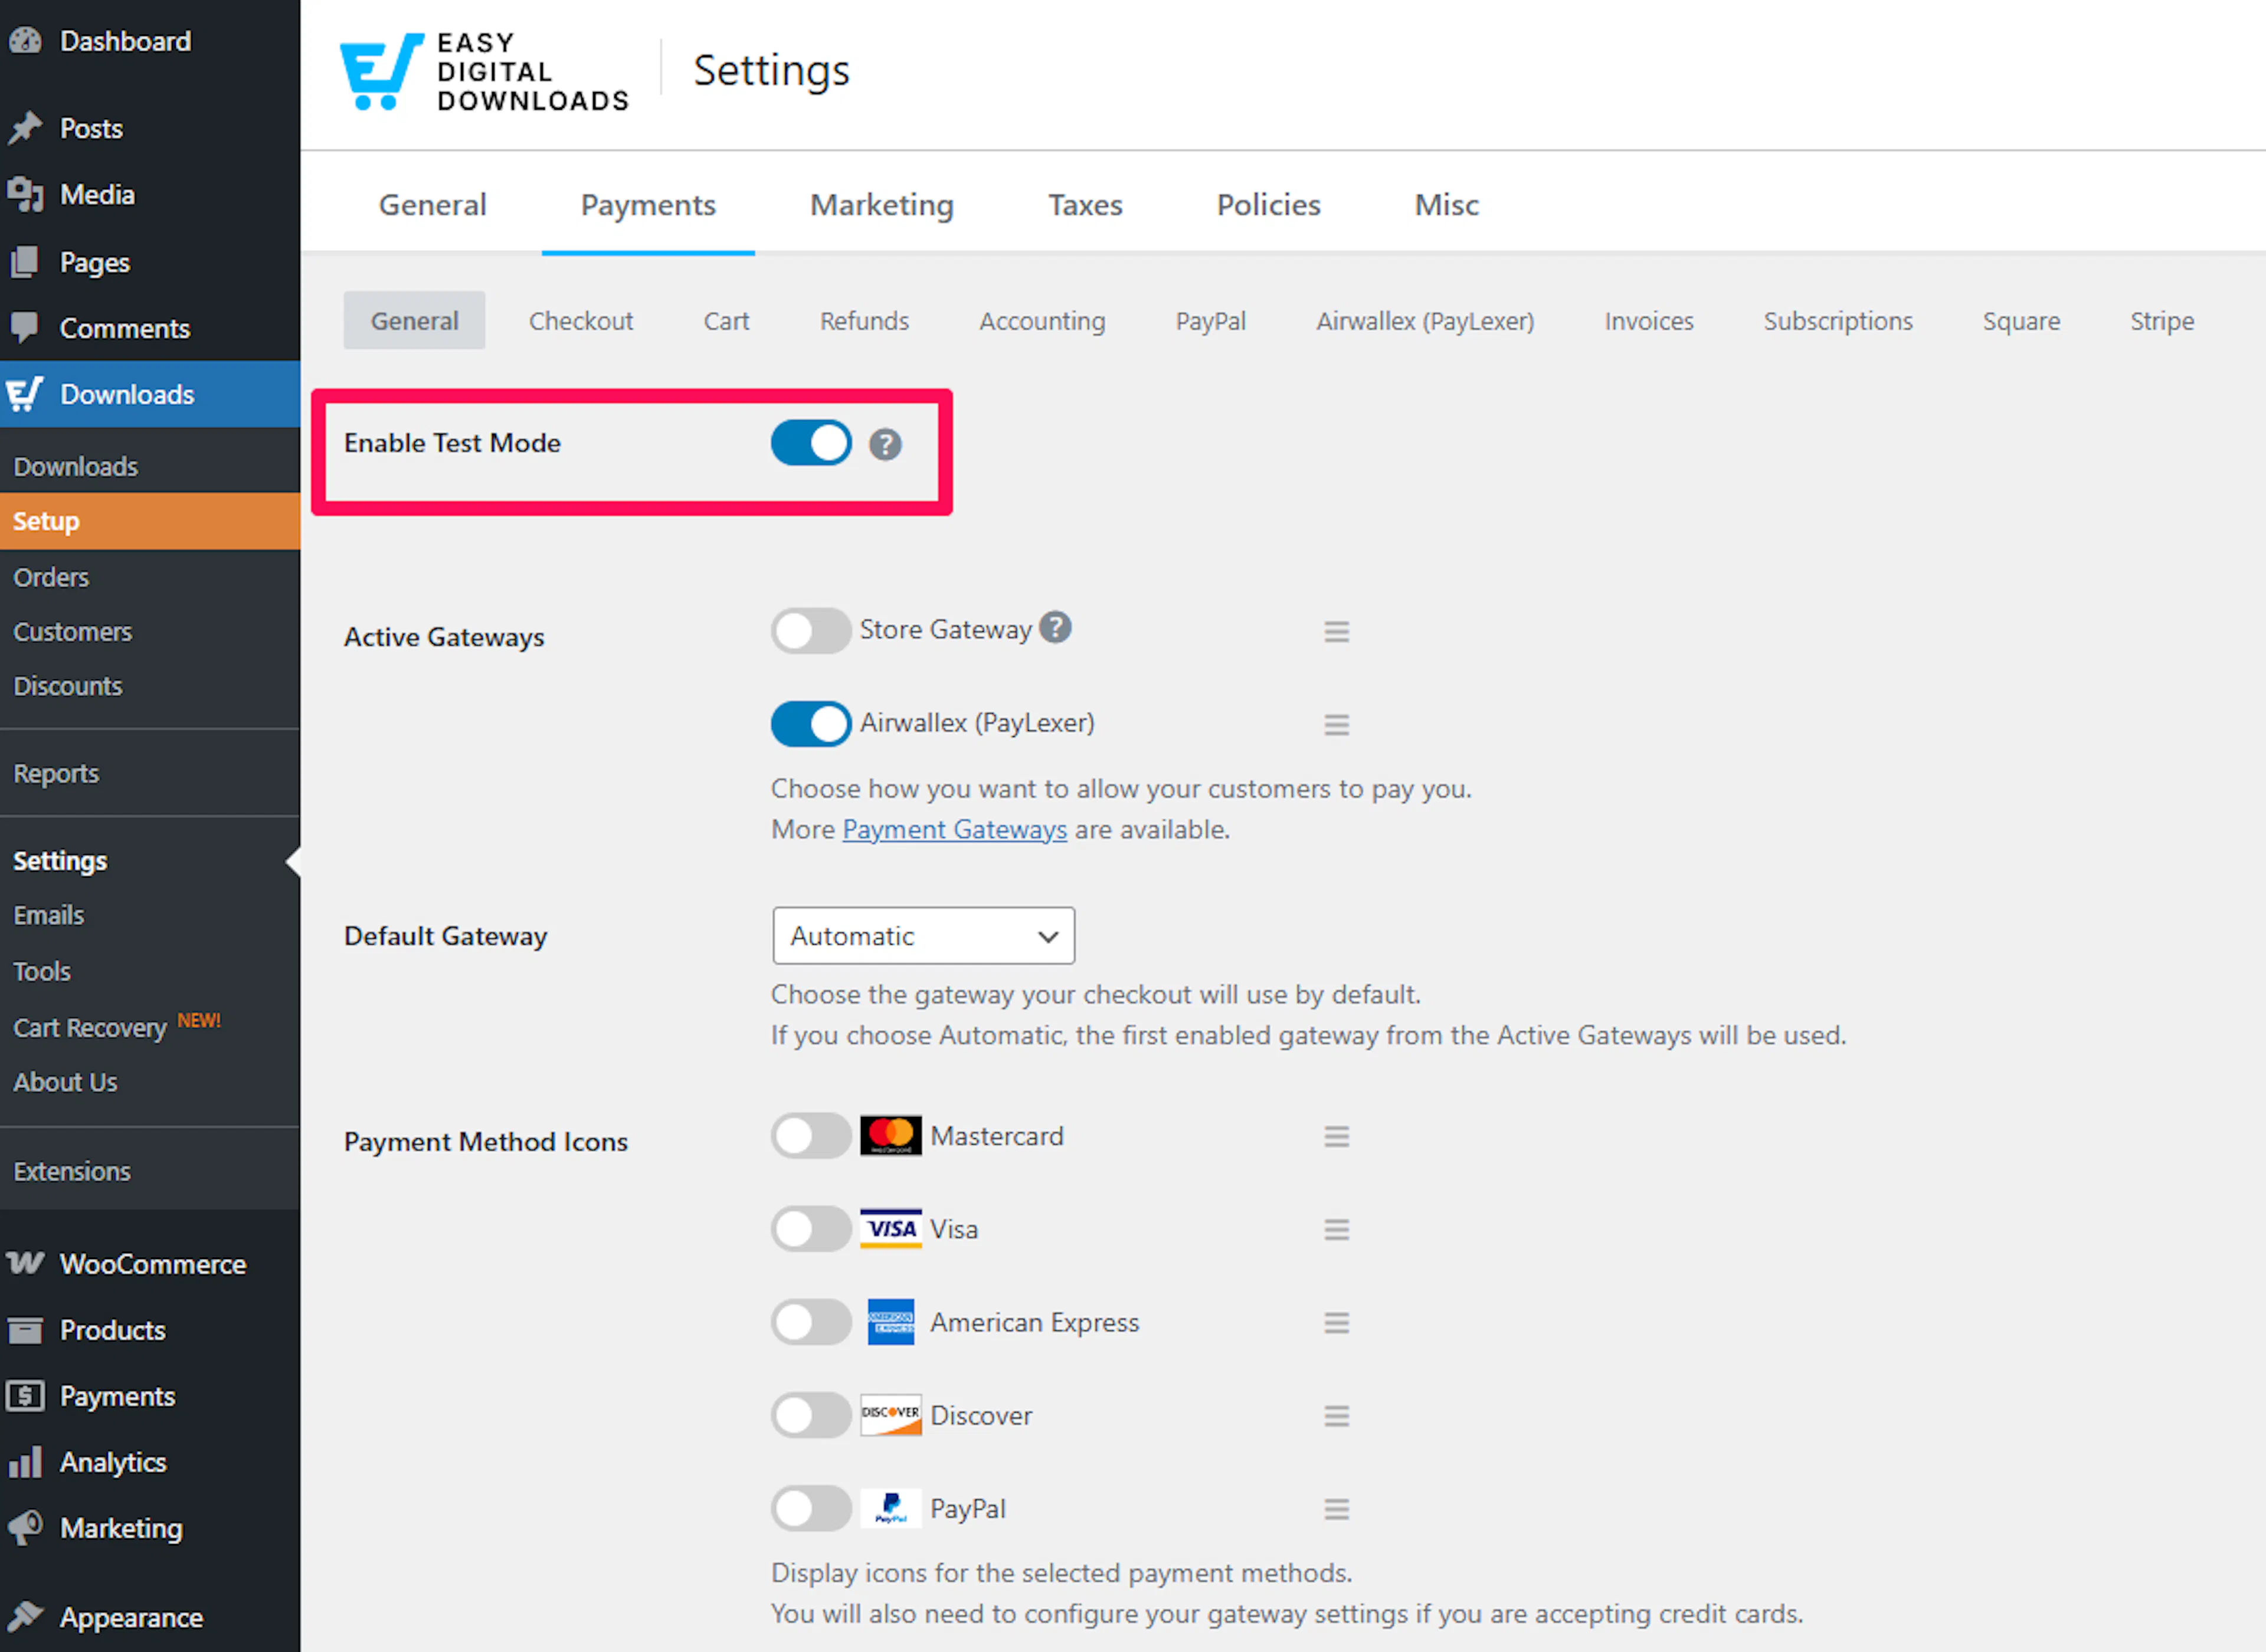
When Test Mode is ON:
- PayLexer uses your Test credentials from the Payment Gateway Configuration page.
- EDD purchases are created normally.
- Payments are processed in test mode.
- Download links are generated so you can check the full customer experience.
When Test Mode is OFF, PayLexer uses your Live credentials instead.
Payment Flow Overview
A new PayLexer order is created for every payment attempt.
Next Steps: Test Transactions
After enabling gateways, check the full payment flow before going live.
- Basic testing: Use EDD's Test Mode above to create purchases without real charges.
- Advanced testing: Follow the dedicated guide. Test Transactions & Platform Integration →
Troubleshooting
Best Practices
- Always test with Test credentials before switching to Live.
- Enable webhooks for better reliability and real-time payment event syncing.
- Run one small real payment after going live to confirm everything works end to end.
- Test download links in Test Mode to check the complete customer experience.
- Monitor both the PayLexer and EDD dashboards during the initial testing period.
Final Checklist
Before going live, confirm all of the following:
- The Connected to PayLexer card shows Active in WordPress
- Your website shows as Connected in the PayLexer Websites table
- Easy Digital Downloads shows as Activated under Supported Integrations
- At least one gateway is added to your website
- At least one PayLexer gateway is enabled under Active Gateways in EDD
- Payment gateway tested successfully in Test Mode
- Download links tested and working
- Live credentials added (not just test)
- Test Mode disabled in Easy Digital Downloads
FAQs
Still Have Questions?
Check the FAQs above first. If your question isn't covered there, choose the option that fits:
PayLexer Support
Site won't connect, gateways not showing at checkout, or duplicate payments? Open a ticket with the PayLexer team.
Easy Digital Downloads Support
Questions about products, file downloads, licensing or EDD settings? Contact the Easy Digital Downloads team.
For settings and advanced configuration, see the Easy Digital Downloads documentation.