

PG Multi-Payment Service
Connect GMO Payment Gateway's PG Multi-Payment Service to PayLexer to accept cards, QR wallets, carrier billing, convenience store, and bank payments in Japanese Yen, with subscriptions and refunds.
PG Multi-Payment Service is the online payment service of GMO Payment Gateway, one of Japan's largest payment processors, headquartered in Tokyo. It brings cards, QR and carrier wallets, convenience store payments, Pay-easy, and bank transfers together on one hosted payment page, so shoppers choose their preferred Japanese payment method and your store never handles card details.
- Supported Regions (Merchant Accounts): Japan
- Supported Currencies: Japanese Yen (JPY)
This gateway appears in checkout only when the selected currency is JPY.
Supported Features
- Hosted payment page where shoppers choose from every payment method your GMO contract enables
- Full and partial refunds, depending on the payment method
- Recurring billing and subscriptions (cards only)
Before You Start
Make sure you have:
- PG Multi-Payment Service Account – Don't have one? Contact GMO Payment Gateway →. For a free test shop, apply for a test environment →
- PayLexer Account – Required to configure the integration. Create your account →
- A website where you want to integrate
Looking for a different payment processor? View all supported gateways →
Configuring PG Multi-Payment Service
You need a Shop ID, Shop Password, and LinkType Plus Config ID from PG Multi-Payment Service for this integration.
Getting API Credentials
GMO Payment Gateway gives you a separate test shop and live shop, each with its own shop console, Shop ID, and Shop Password. Repeat these steps in both shops.
The GMO shop console is in Japanese. The menu names below include the Japanese label so you can find them; your browser's translate feature also works.
Log in to your GMO shop console
Sign in to the shop console (ショップ管理画面) with the login details GMO Payment Gateway sent you. The test shop console address starts with kt01.mul-pay.jp; the live shop console address starts with k01.mul-pay.jp.
Copy your Shop ID and Shop Password
Your Shop ID (for example tshop00012345) is shown at the top of every console page. To see your Shop Password, open Shop Management (ショップ管理) → Shop Password (ショップパスワード) and click Show (表示).

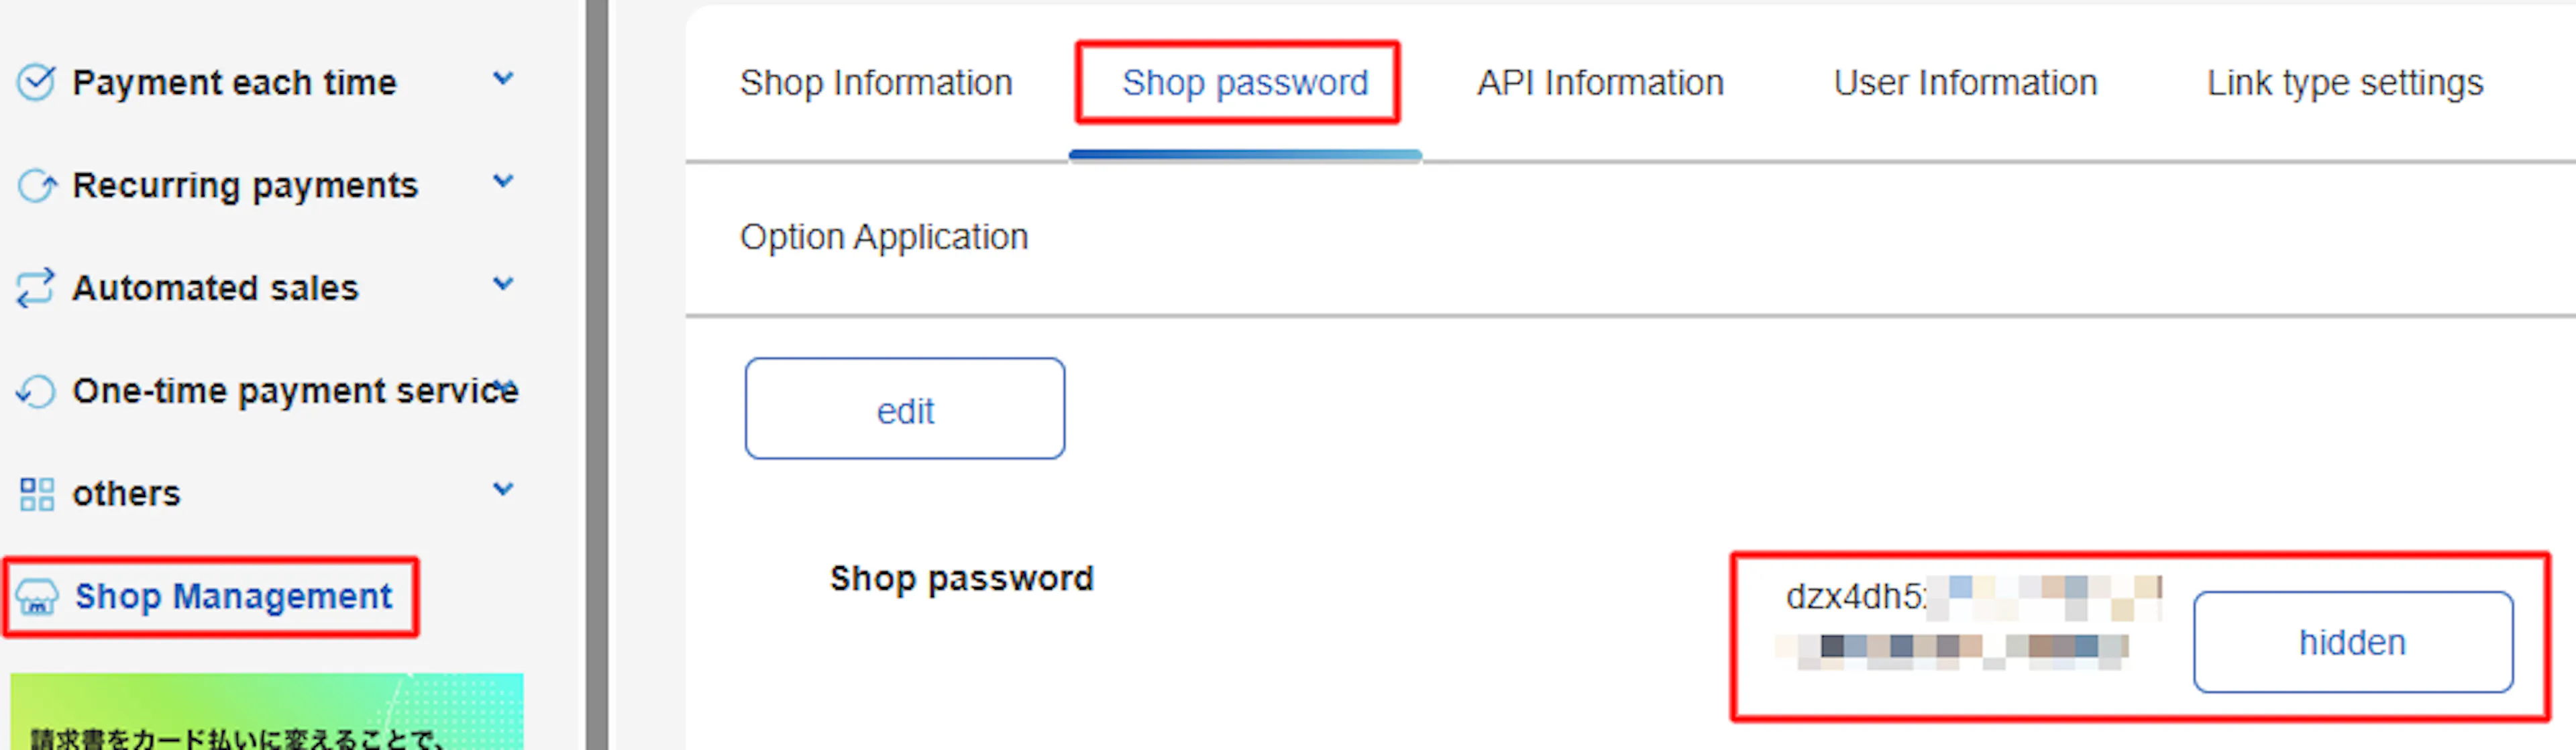
The Shop Password is the API password for your shop. It is not the password you use to log in to the console.
Create a LinkType Plus Config ID
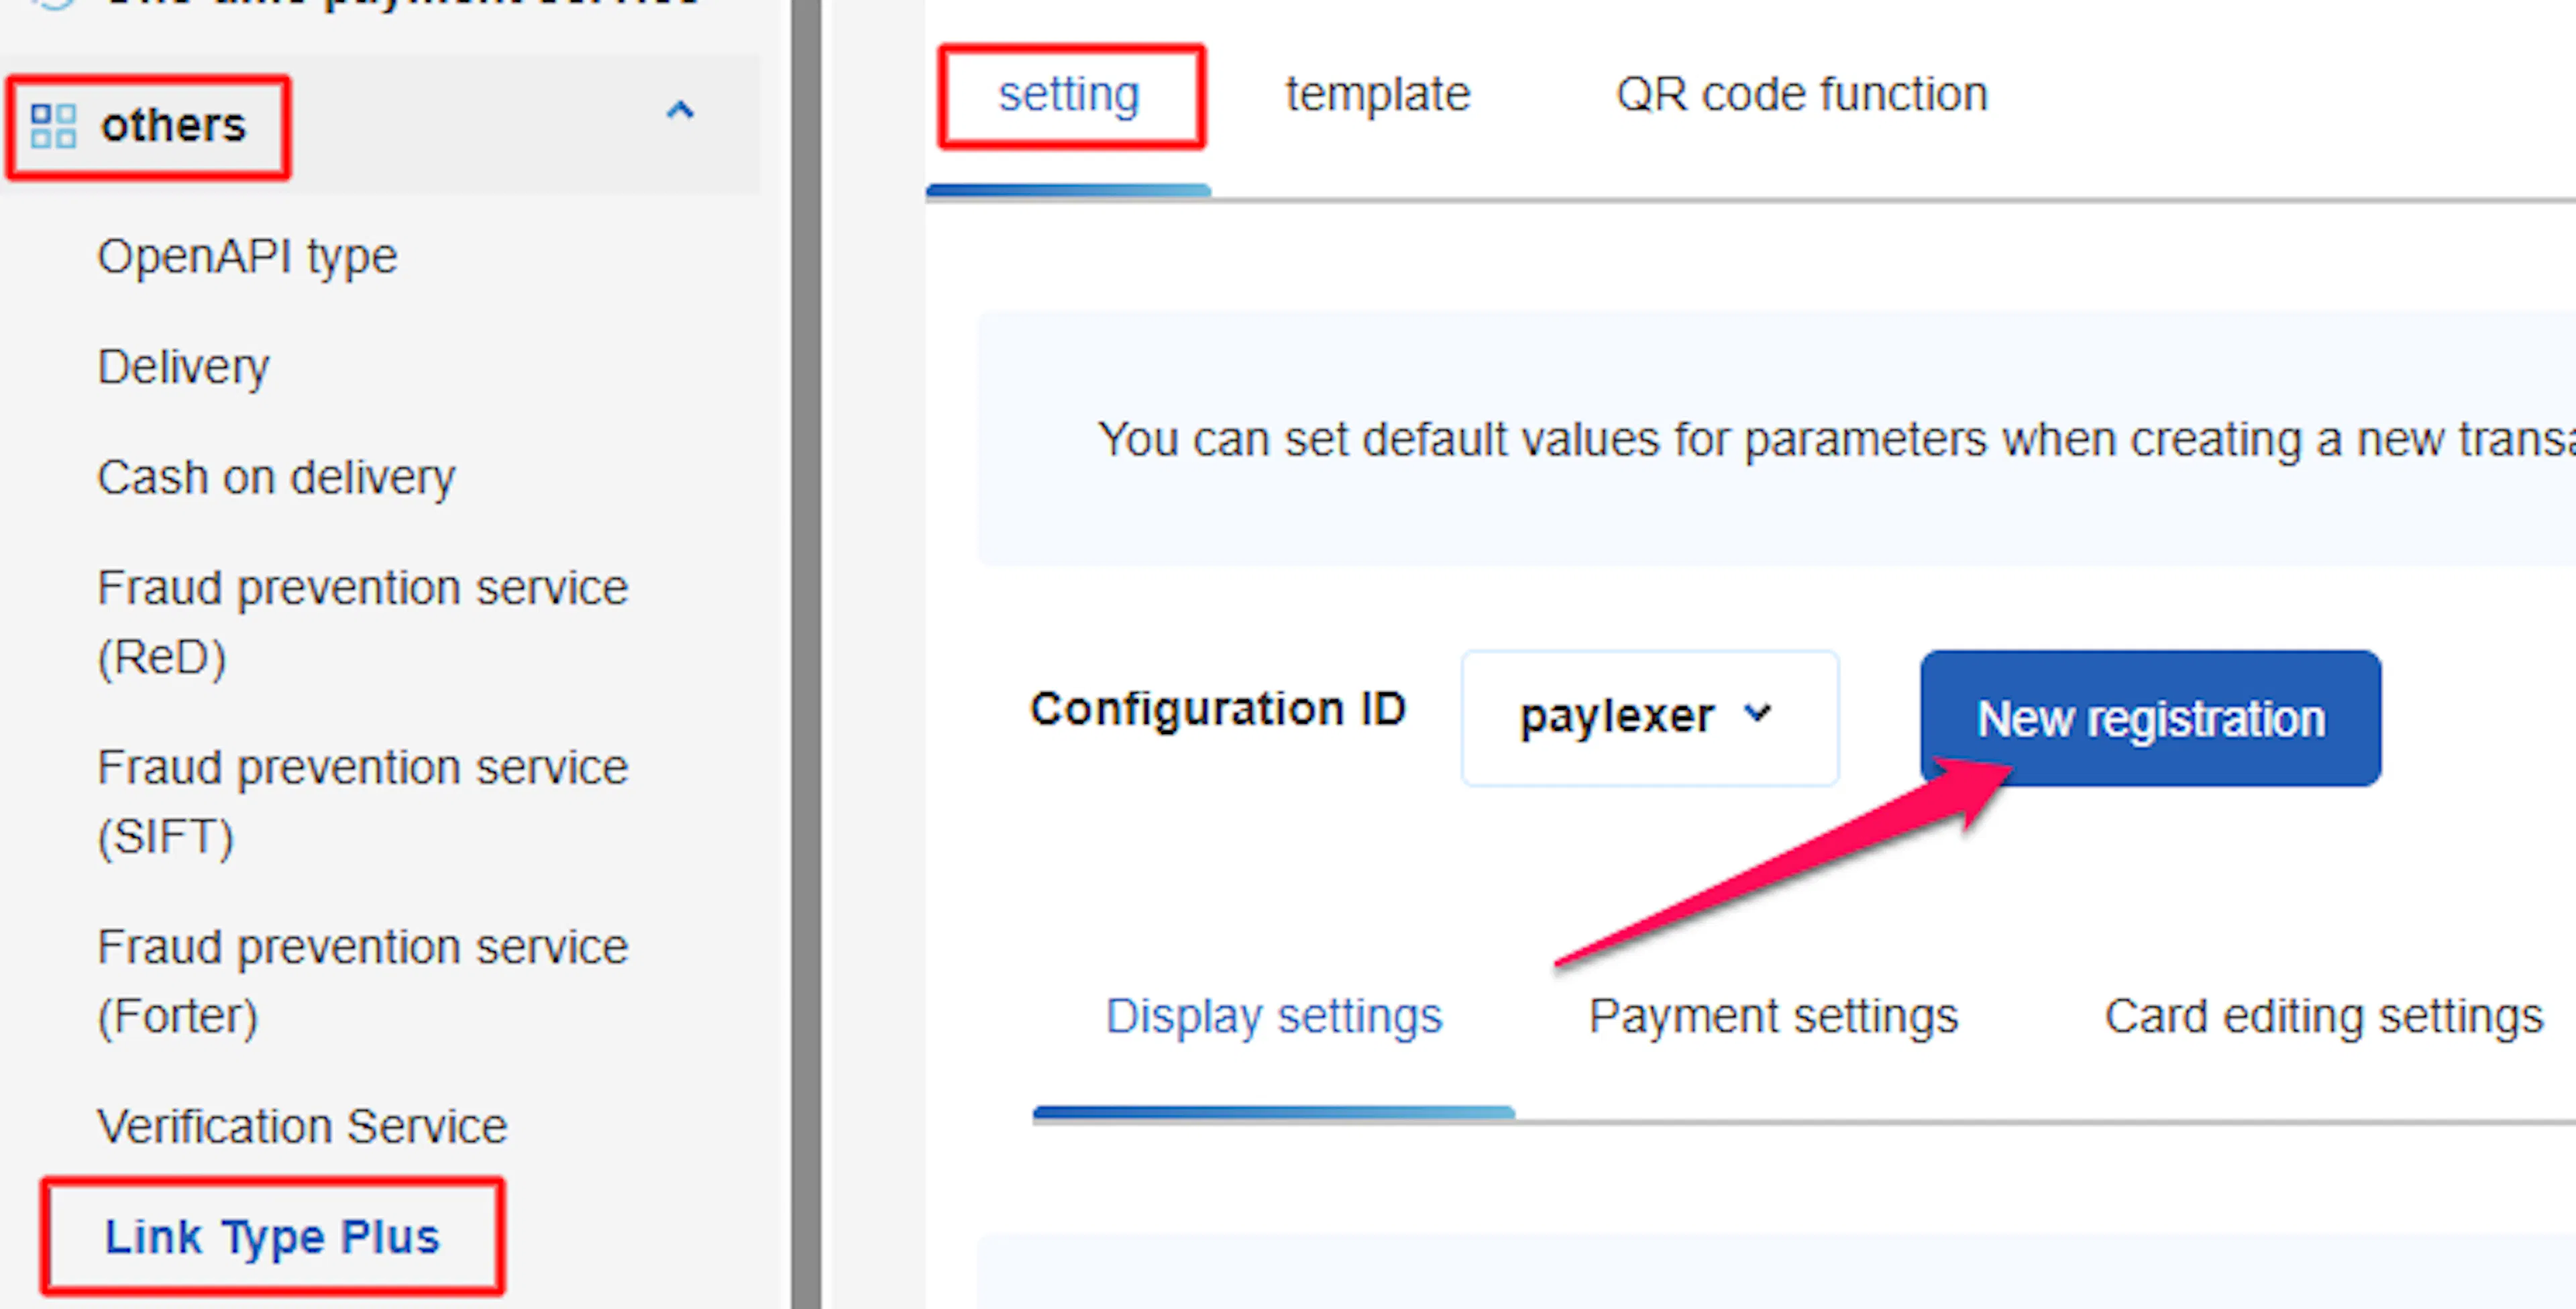
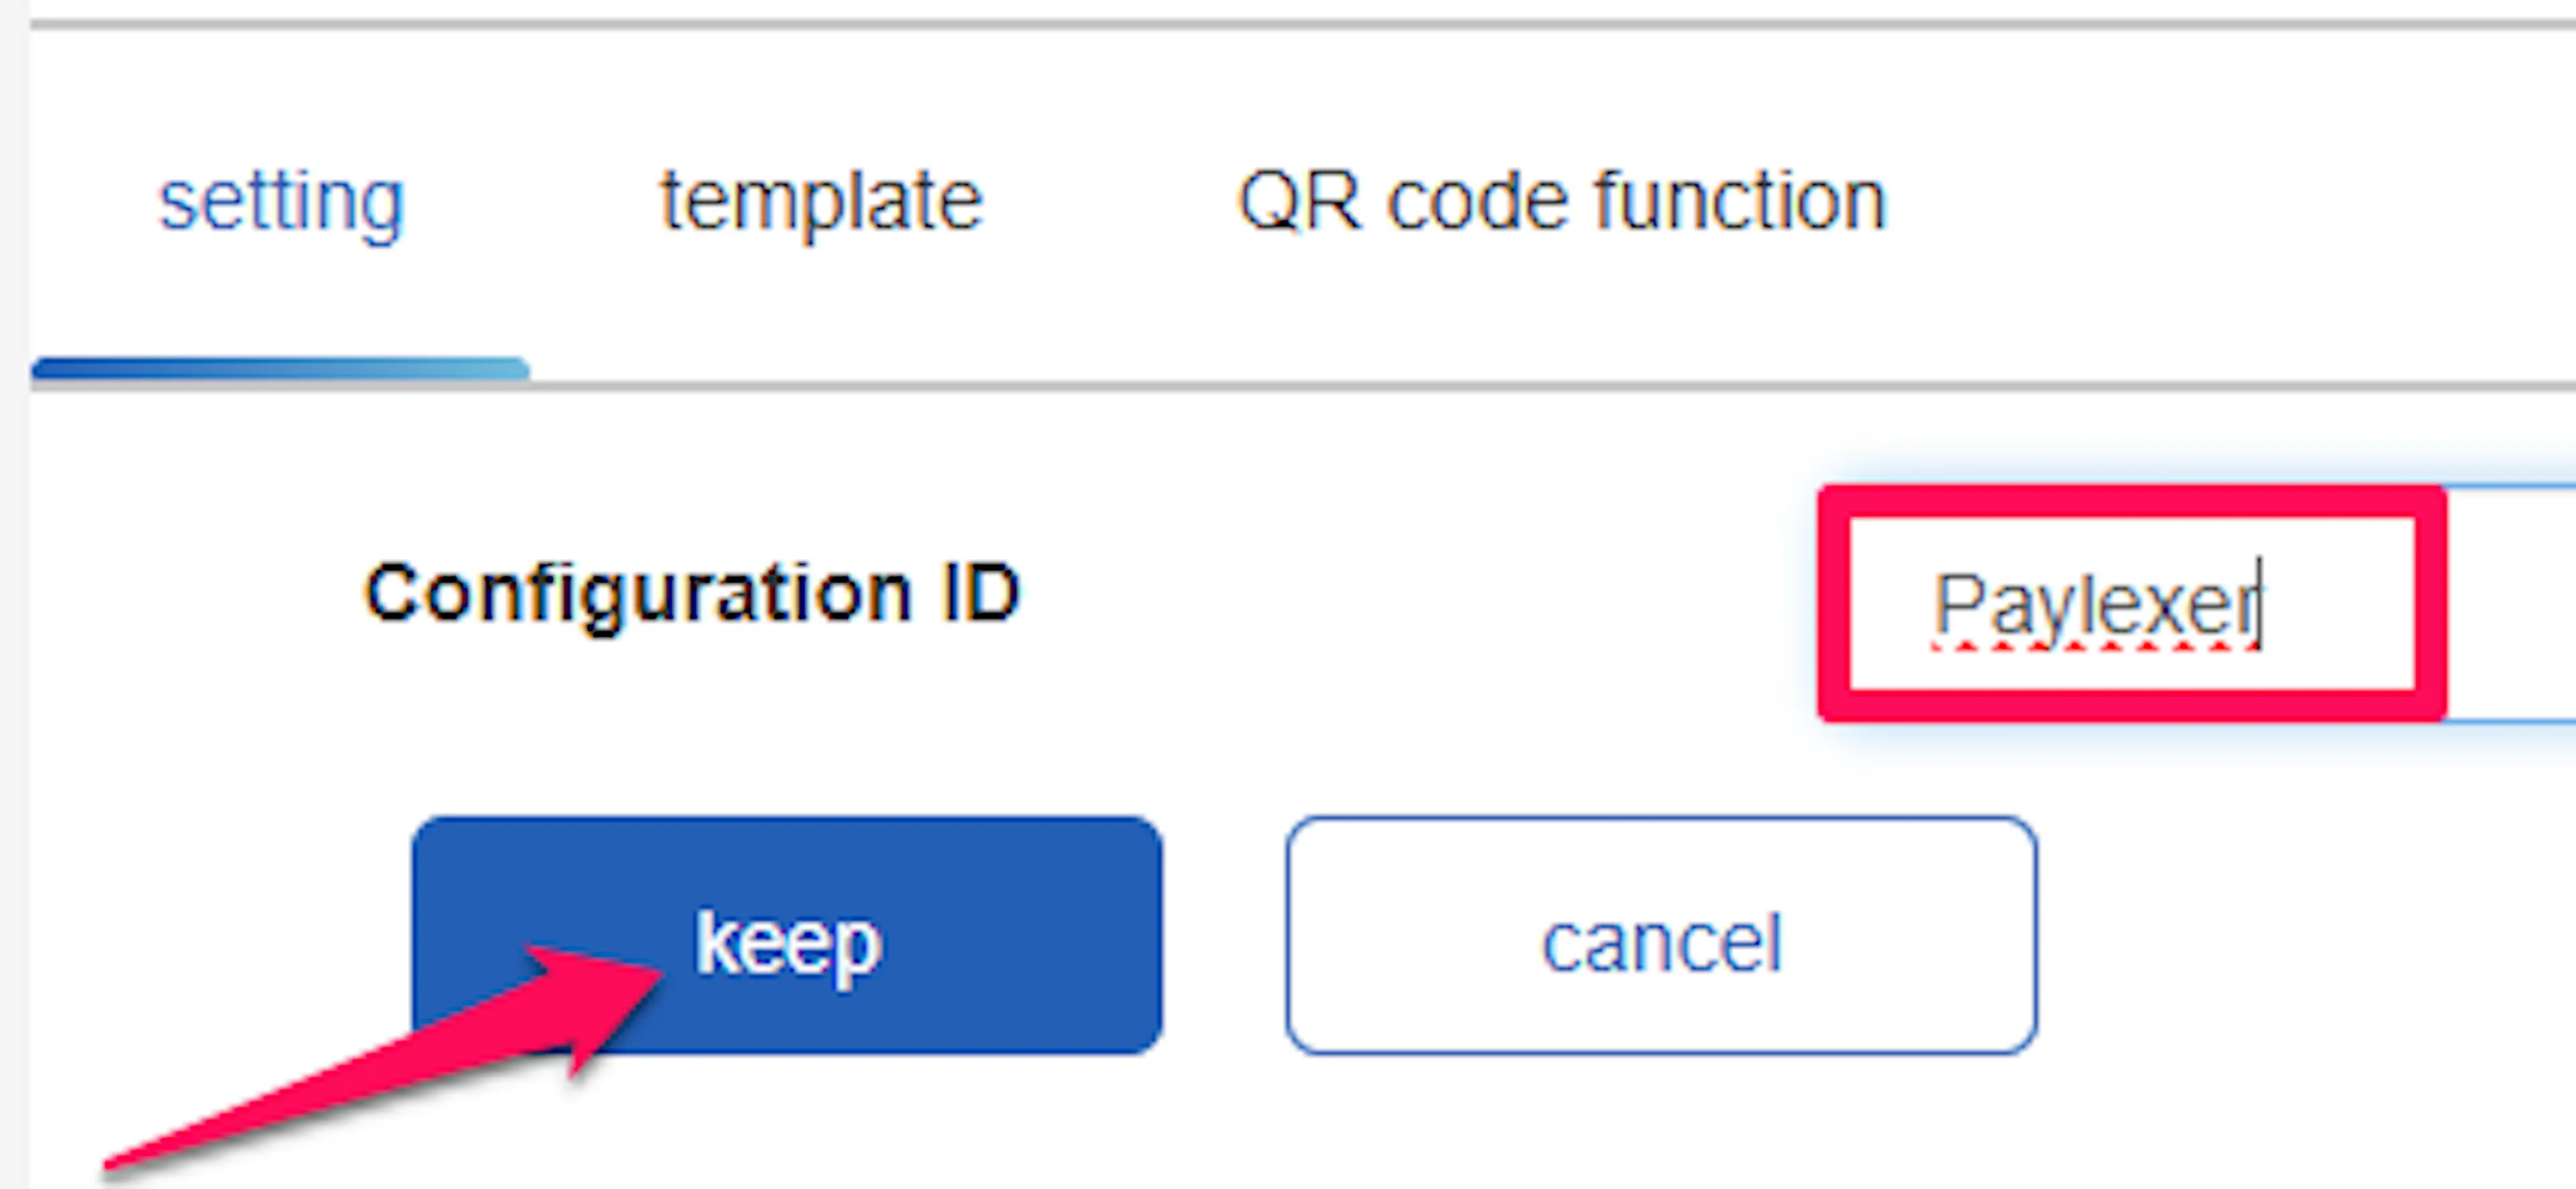
Open Other (その他) → LinkType Plus (リンクタイプ Plus) → Settings (設定) and click New Registration (新規登録). Enter a Config ID (設定ID), for example paylexer, and save. This is the value you enter as the LinkType Plus Config ID in PayLexer.
Fill in the payment settings for pay-later and wallet methods
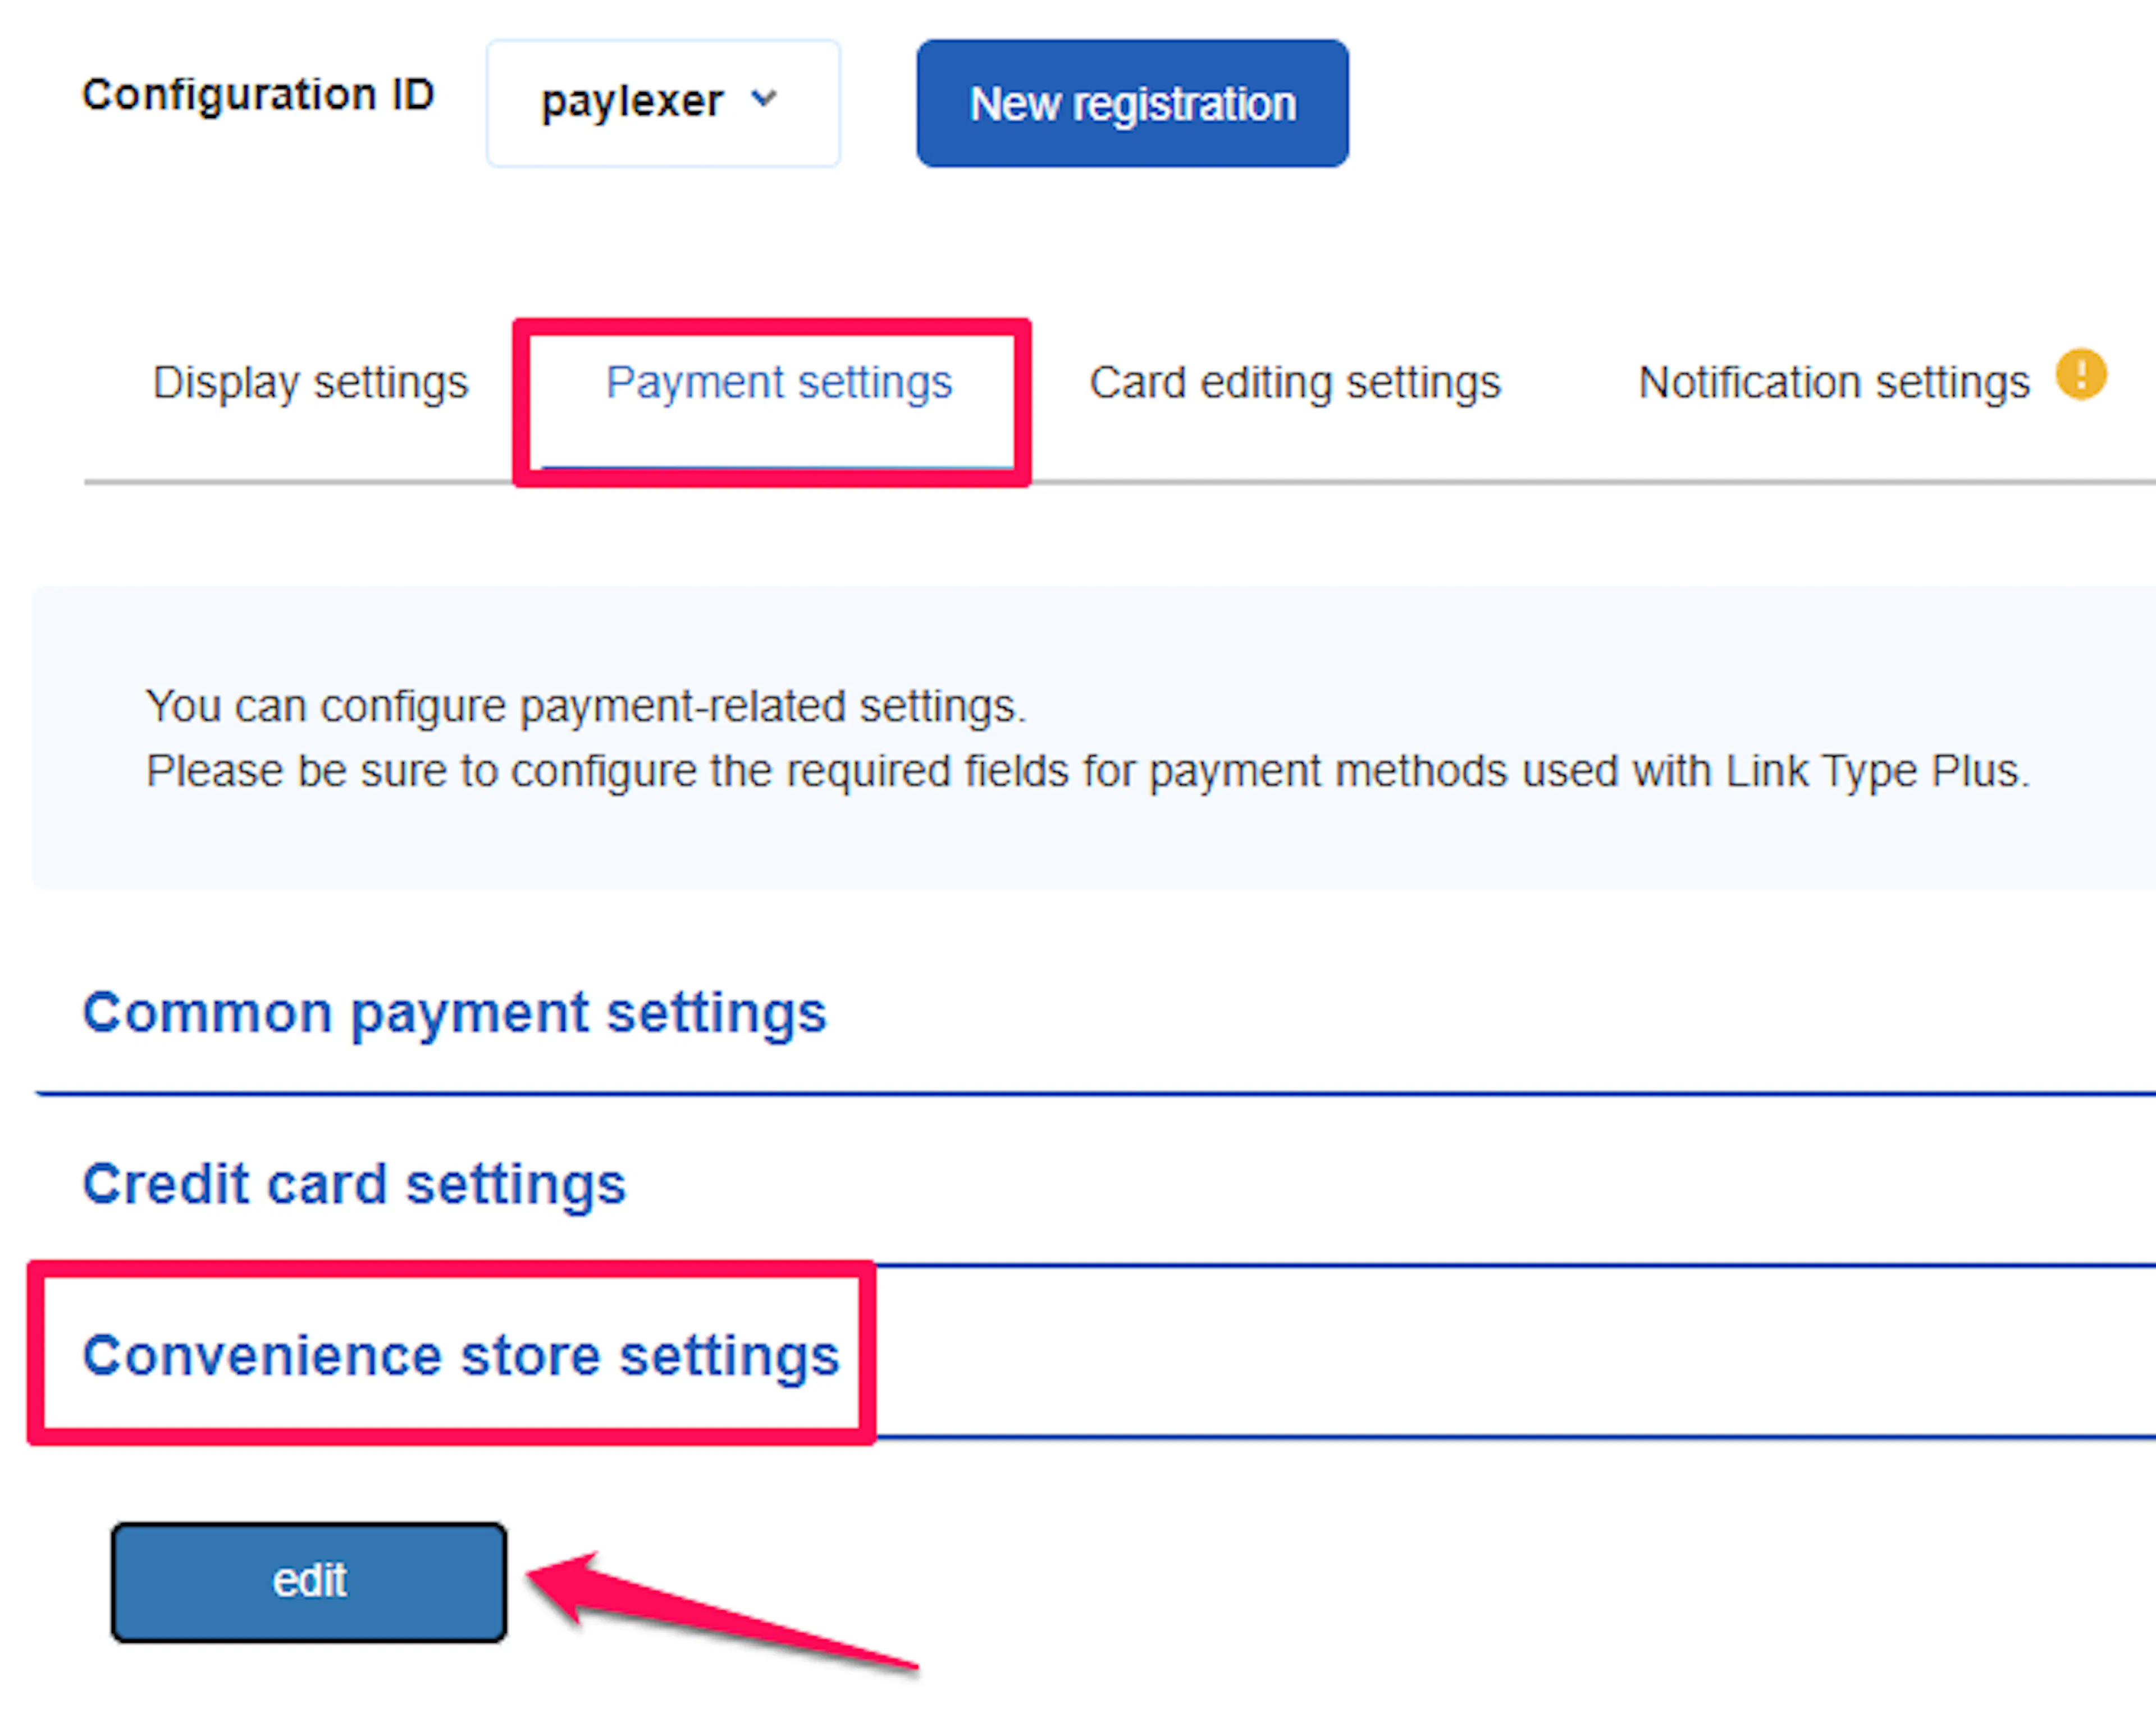
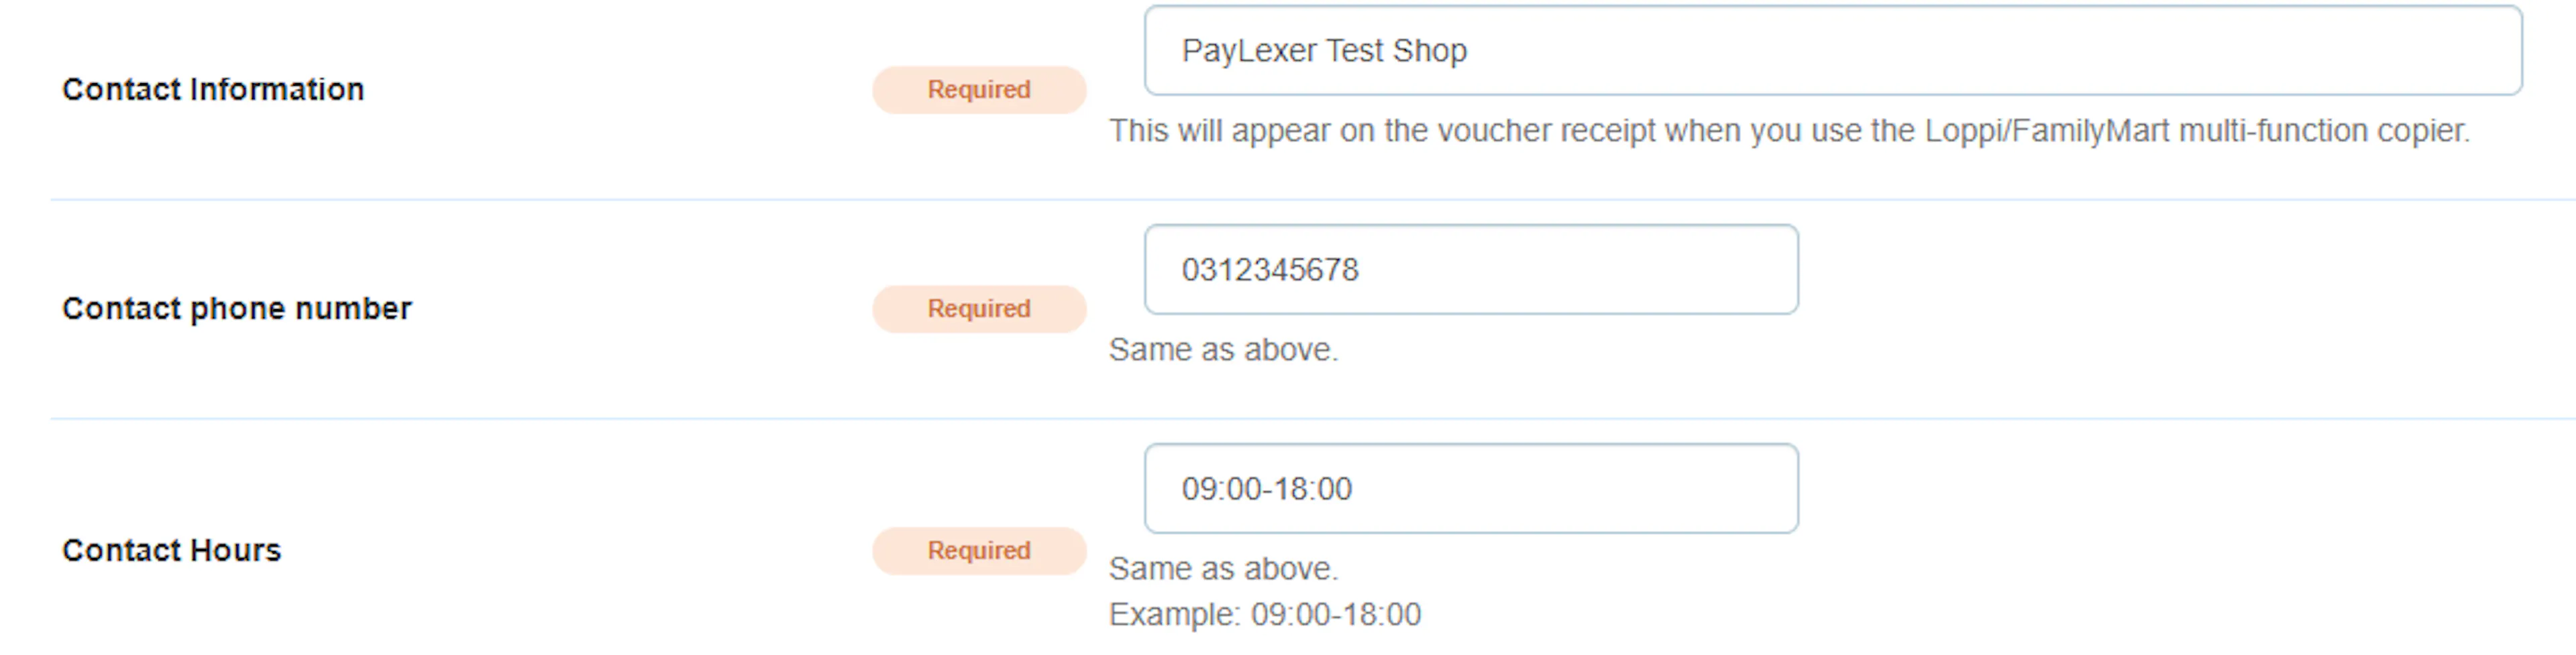
If your contract includes convenience store, Pay-easy, myPayment, Alipay, or au Easy Payment, open Payment Settings (決済設定) on the same Config ID and fill in the section for each of those methods (shop contact, merchant name, and description). A method whose section is left empty is hidden on the payment page.
Adding Credentials to PayLexer
Open PayLexer Dashboard
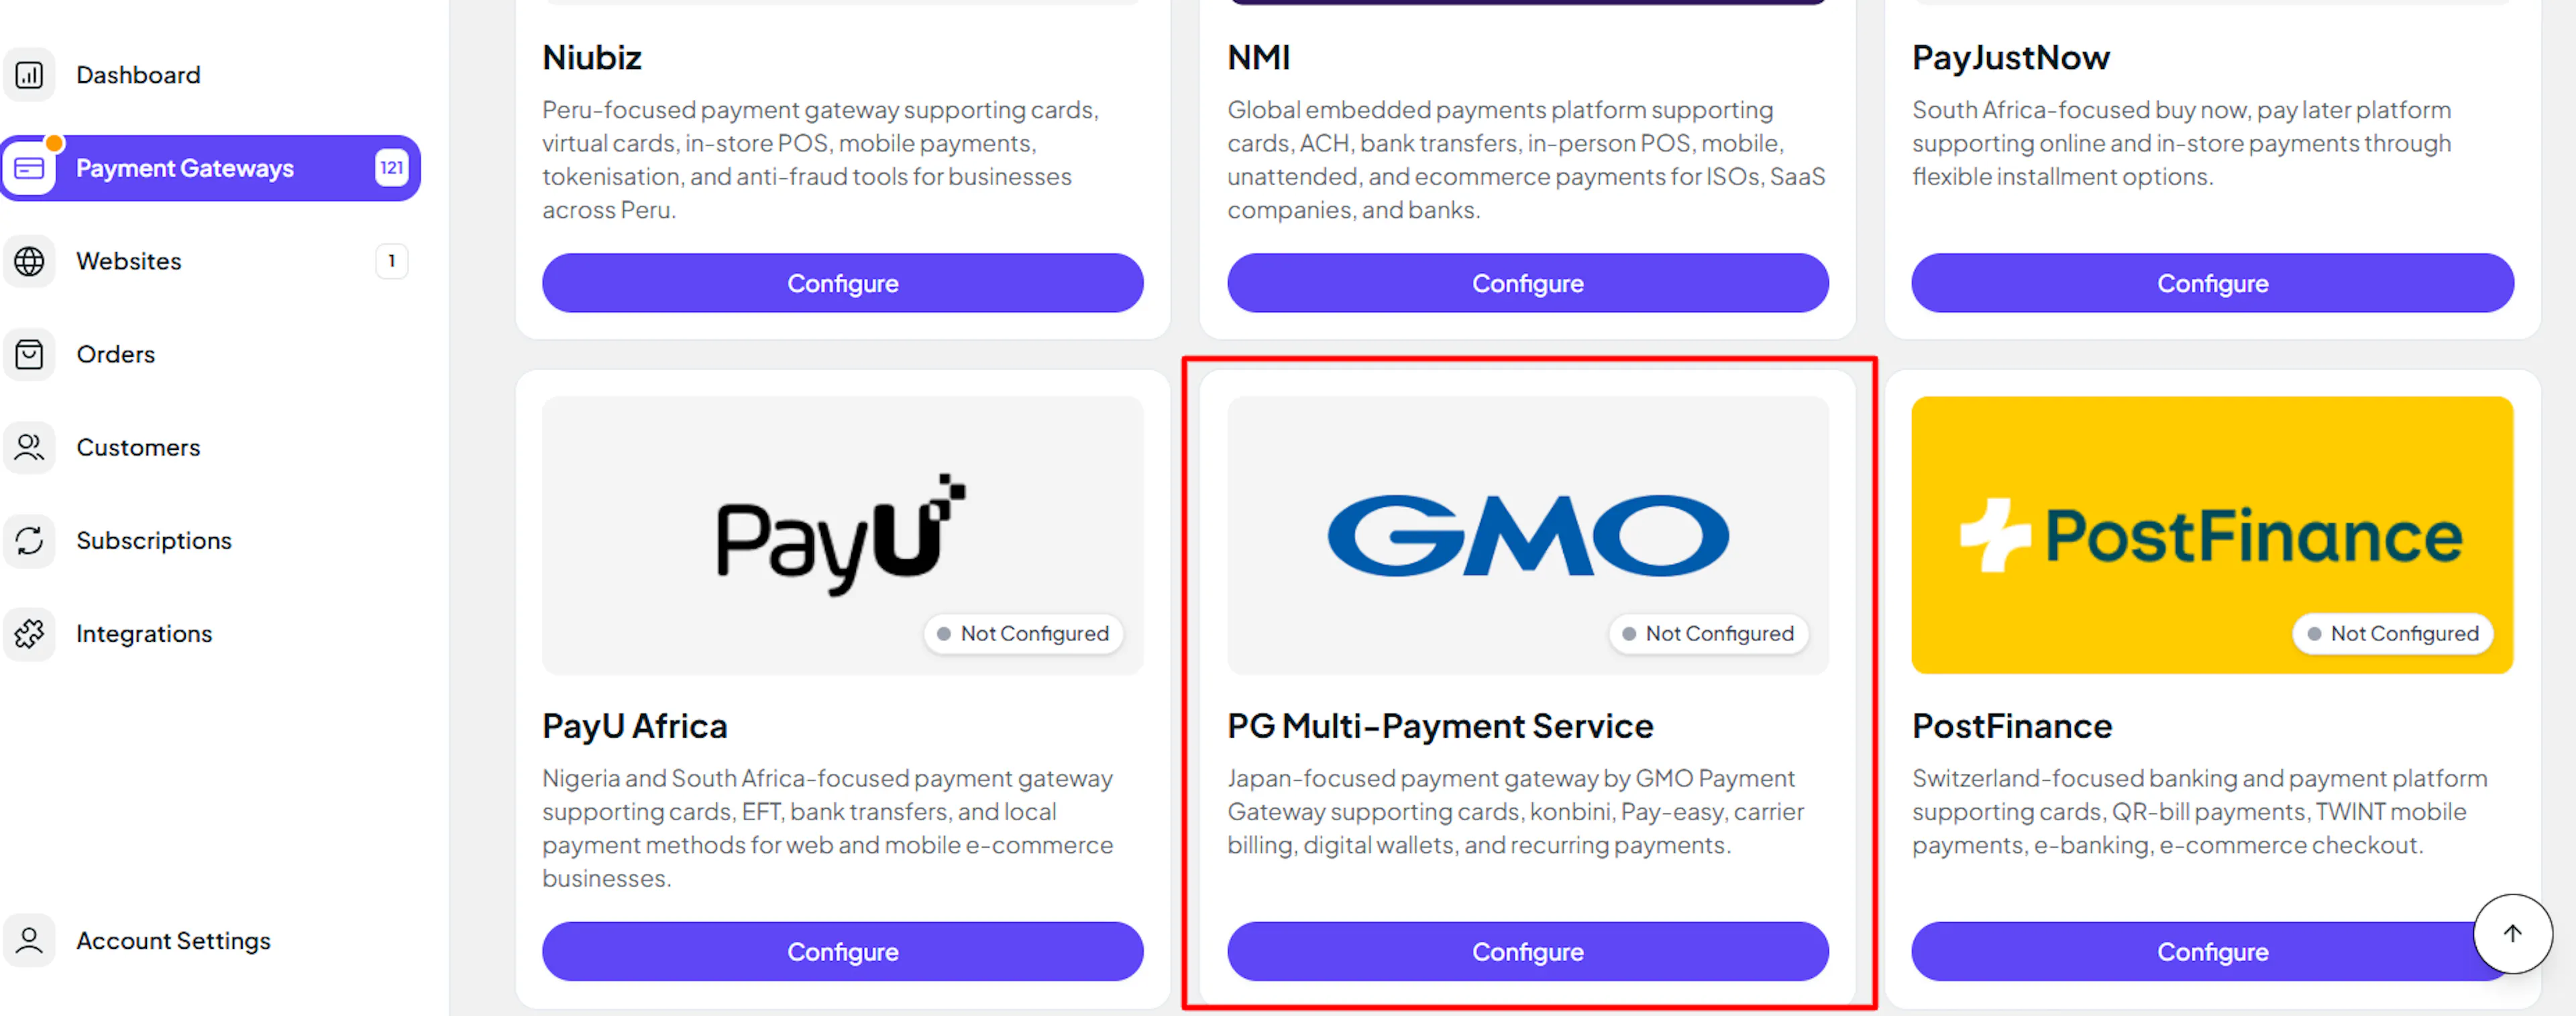
Log in to your PayLexer dashboard and navigate to Payment Gateways → PG Multi-Payment Service.
Enter your credentials
Paste the Shop ID, Shop Password, and LinkType Plus Config ID you copied from PG Multi-Payment Service into the corresponding fields. Use your live shop's values under Live and your test shop's values under Test.
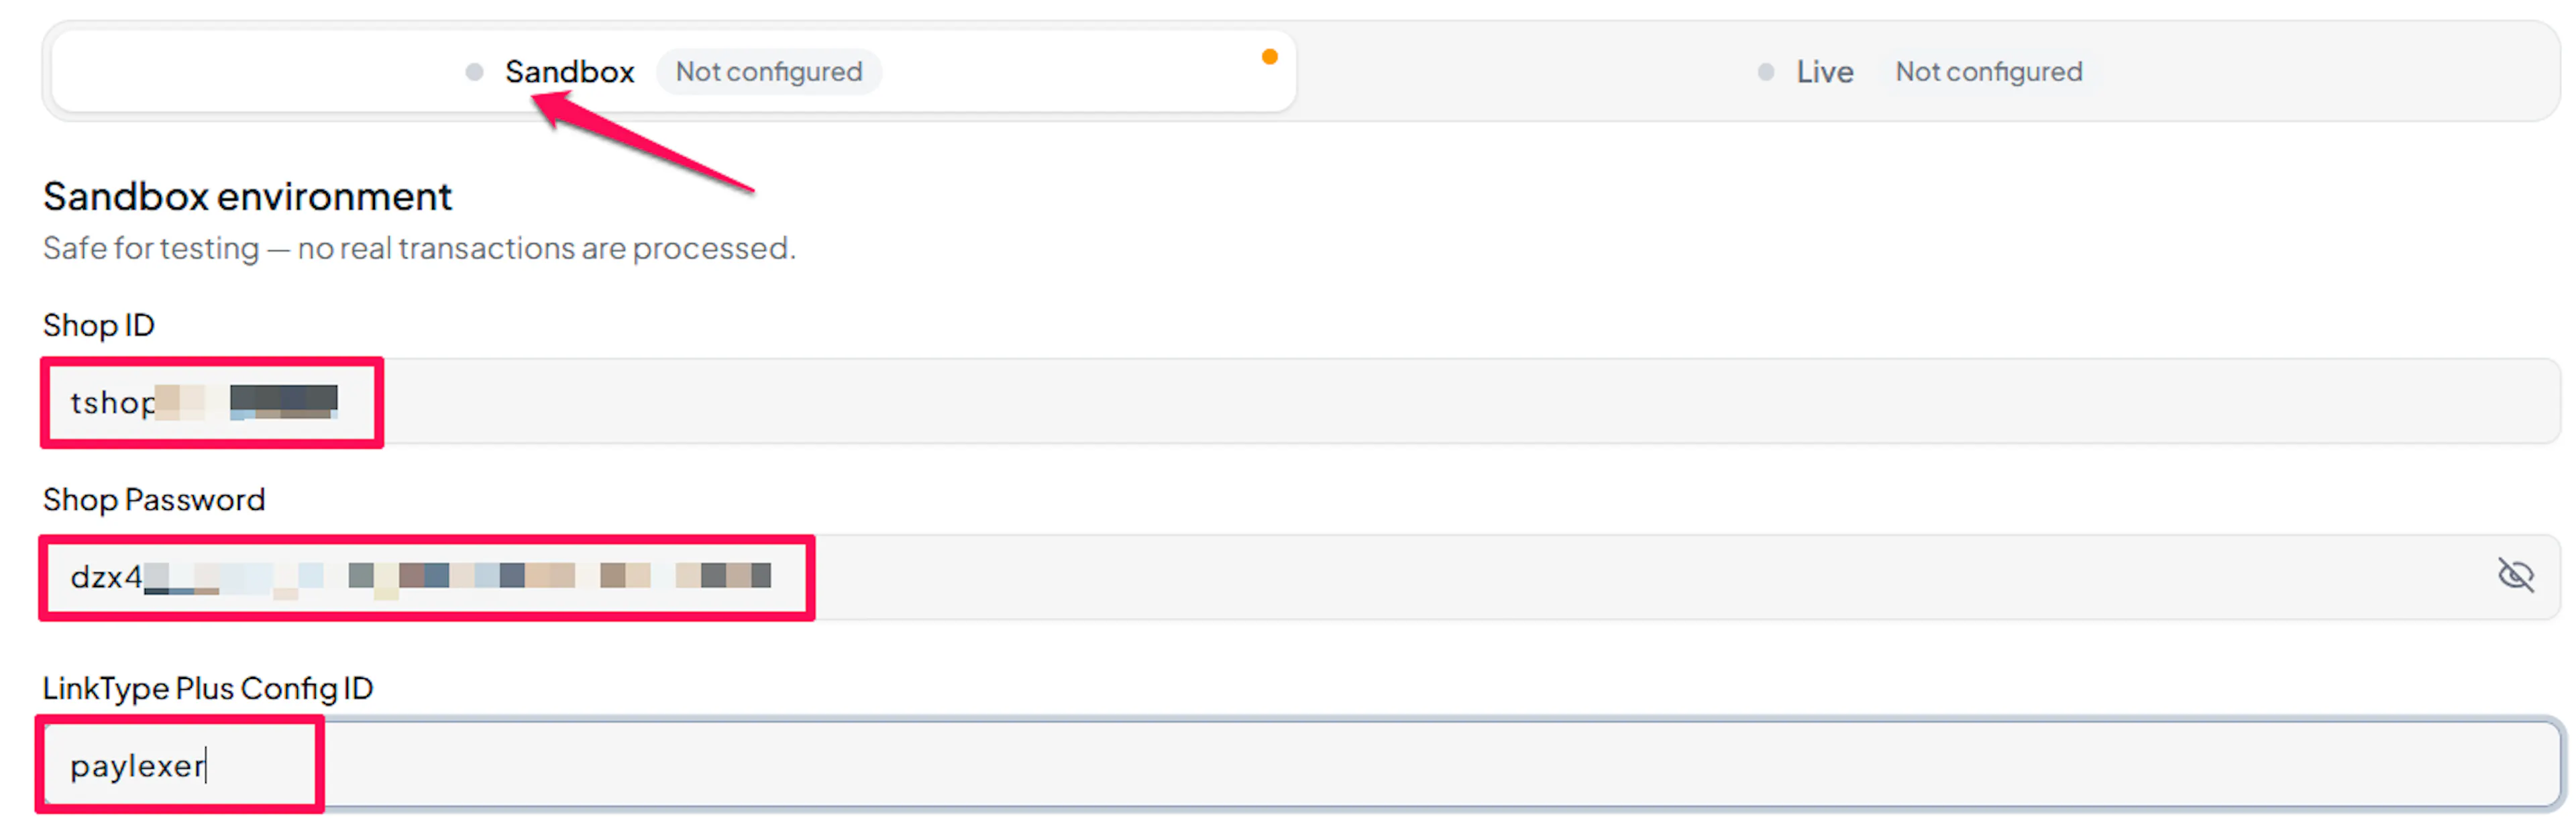
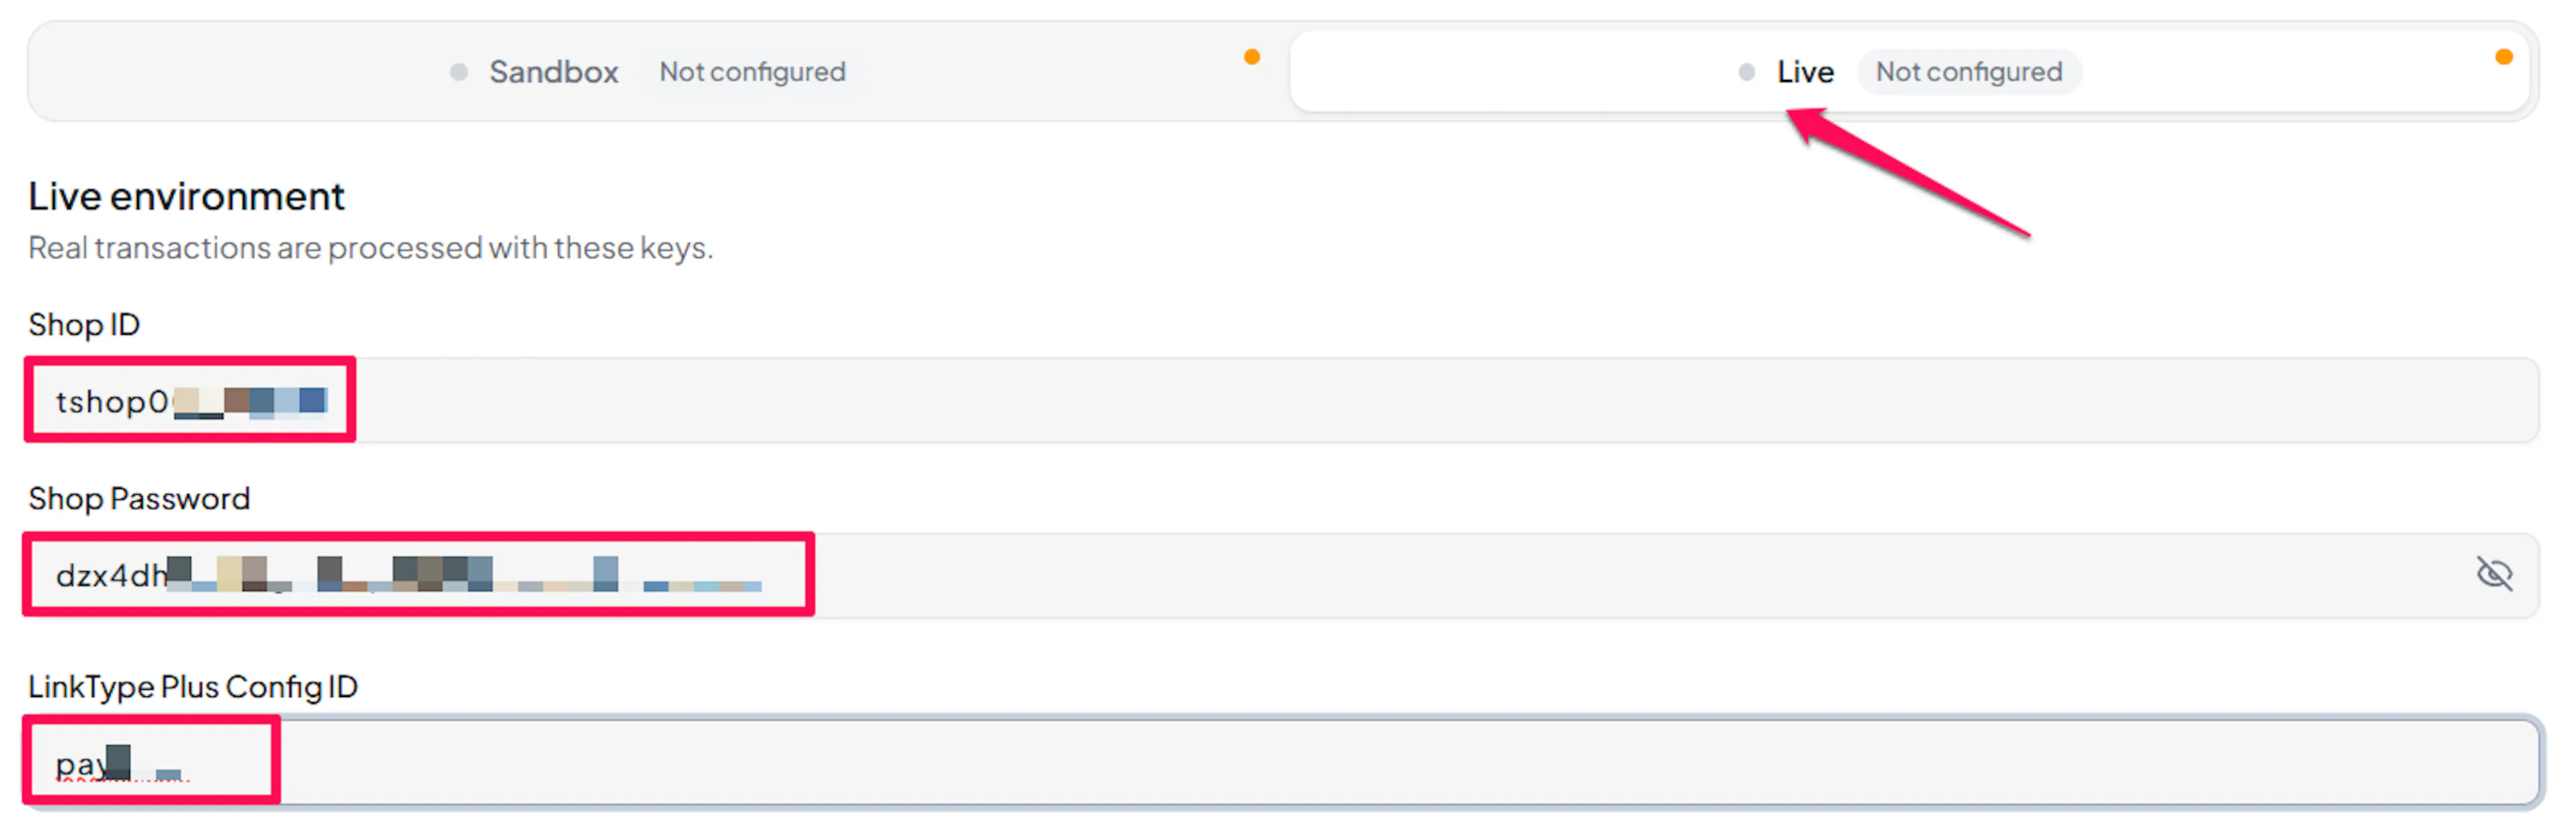
Understanding Live/Production and Sandbox Settings:
| Environment | Purpose |
|---|---|
| Live / Production (Mandatory) | Used for real transactions. Cannot be empty, even when testing. |
| Test / Sandbox (Optional) | Used for testing only. No real money is processed. |
How PayLexer selects credentials:
- Debug/Test mode ON → Test credentials are used
- Debug/Test mode OFF → Live credentials are used
Test and save
Click Save to save your configuration and verify your credentials. Click Verify Connection to test the connection.

Configuring Webhooks (Mandatory)
Webhooks enable real-time payment updates and significantly improve reliability.
Benefits of Webhooks:
- Instant payment status updates
- Automatic refund processing
- Convenience store, Pay-easy, and bank transfer payments are confirmed as soon as the shopper pays
PG Multi-Payment Service calls these webhooks result notifications. They are not signed, so PayLexer checks every notification against GMO Payment Gateway's own record before updating an order. There is no webhook secret to copy.
Copy your PayLexer webhook URL
On the PG Multi-Payment Service configuration page in your PayLexer dashboard, copy the Webhook URL.

Open the result notification settings
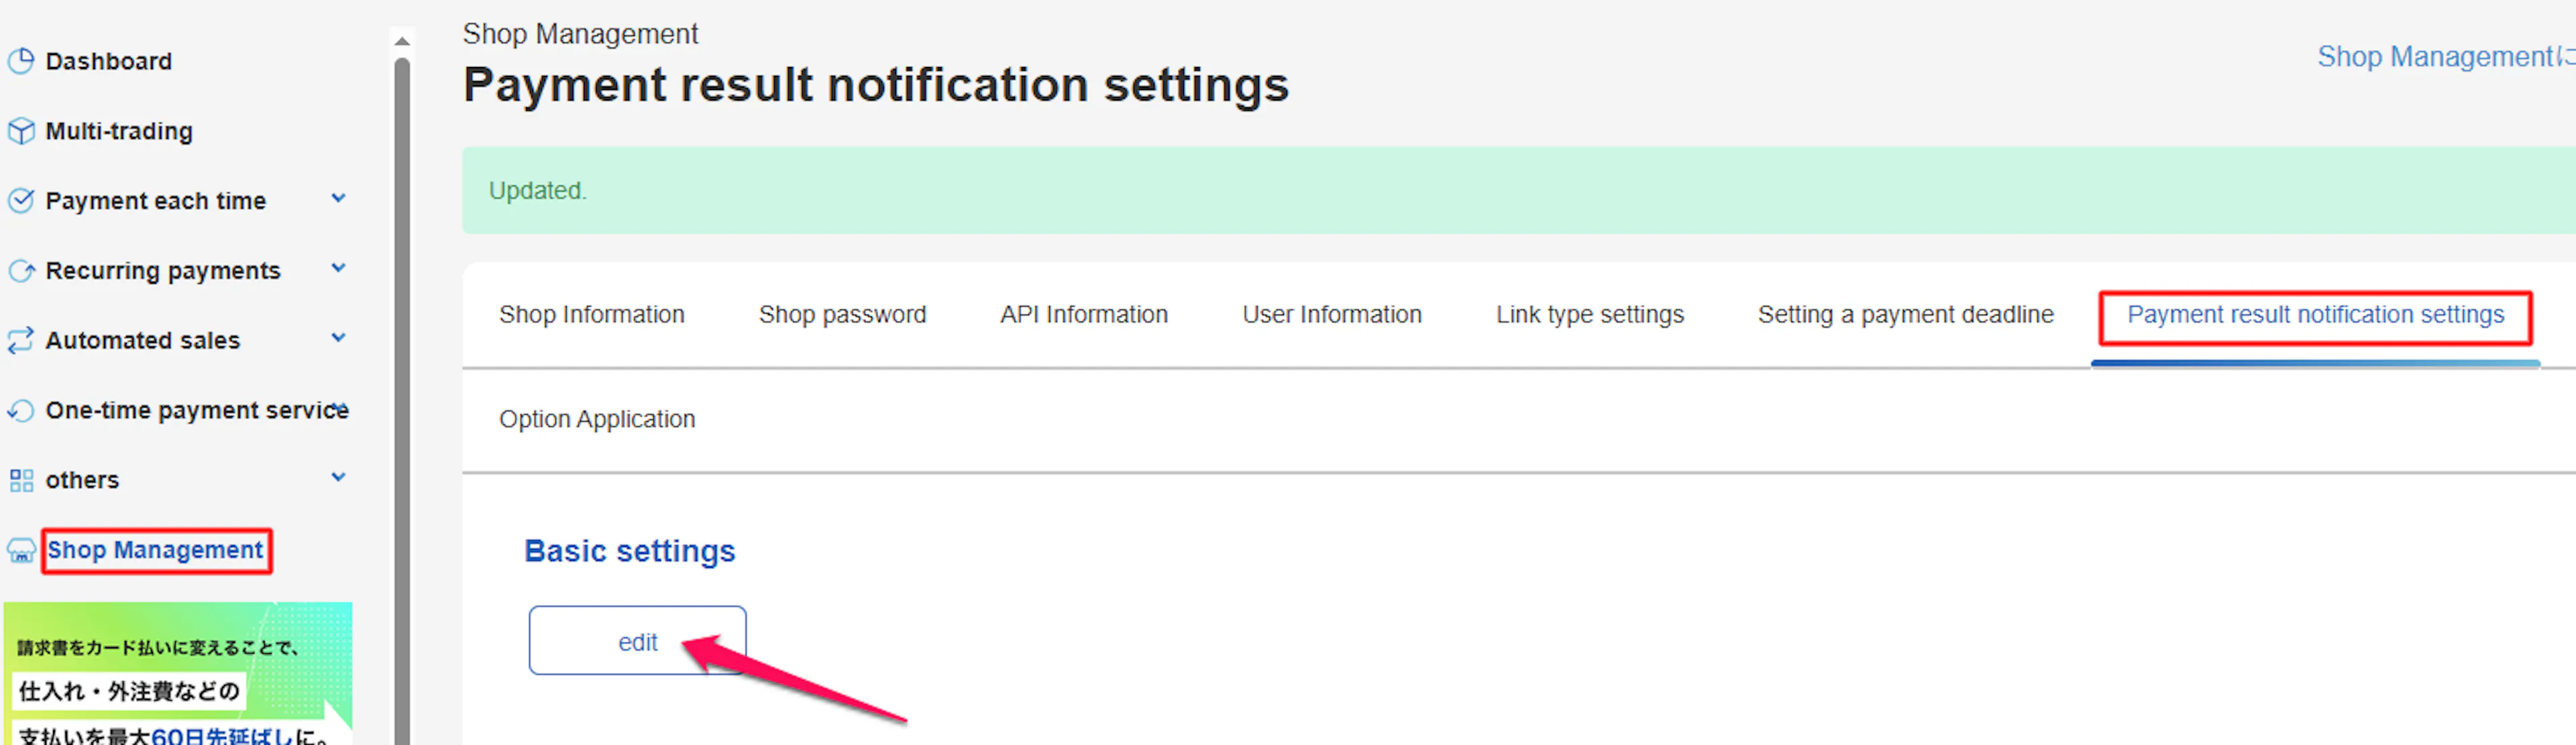
In your GMO shop console, open Shop Management (ショップ管理) → Payment Result Notification Settings (決済結果通知設定), then click Edit (編集) under Basic Settings (基本設定).
Turn on notifications and paste the URL
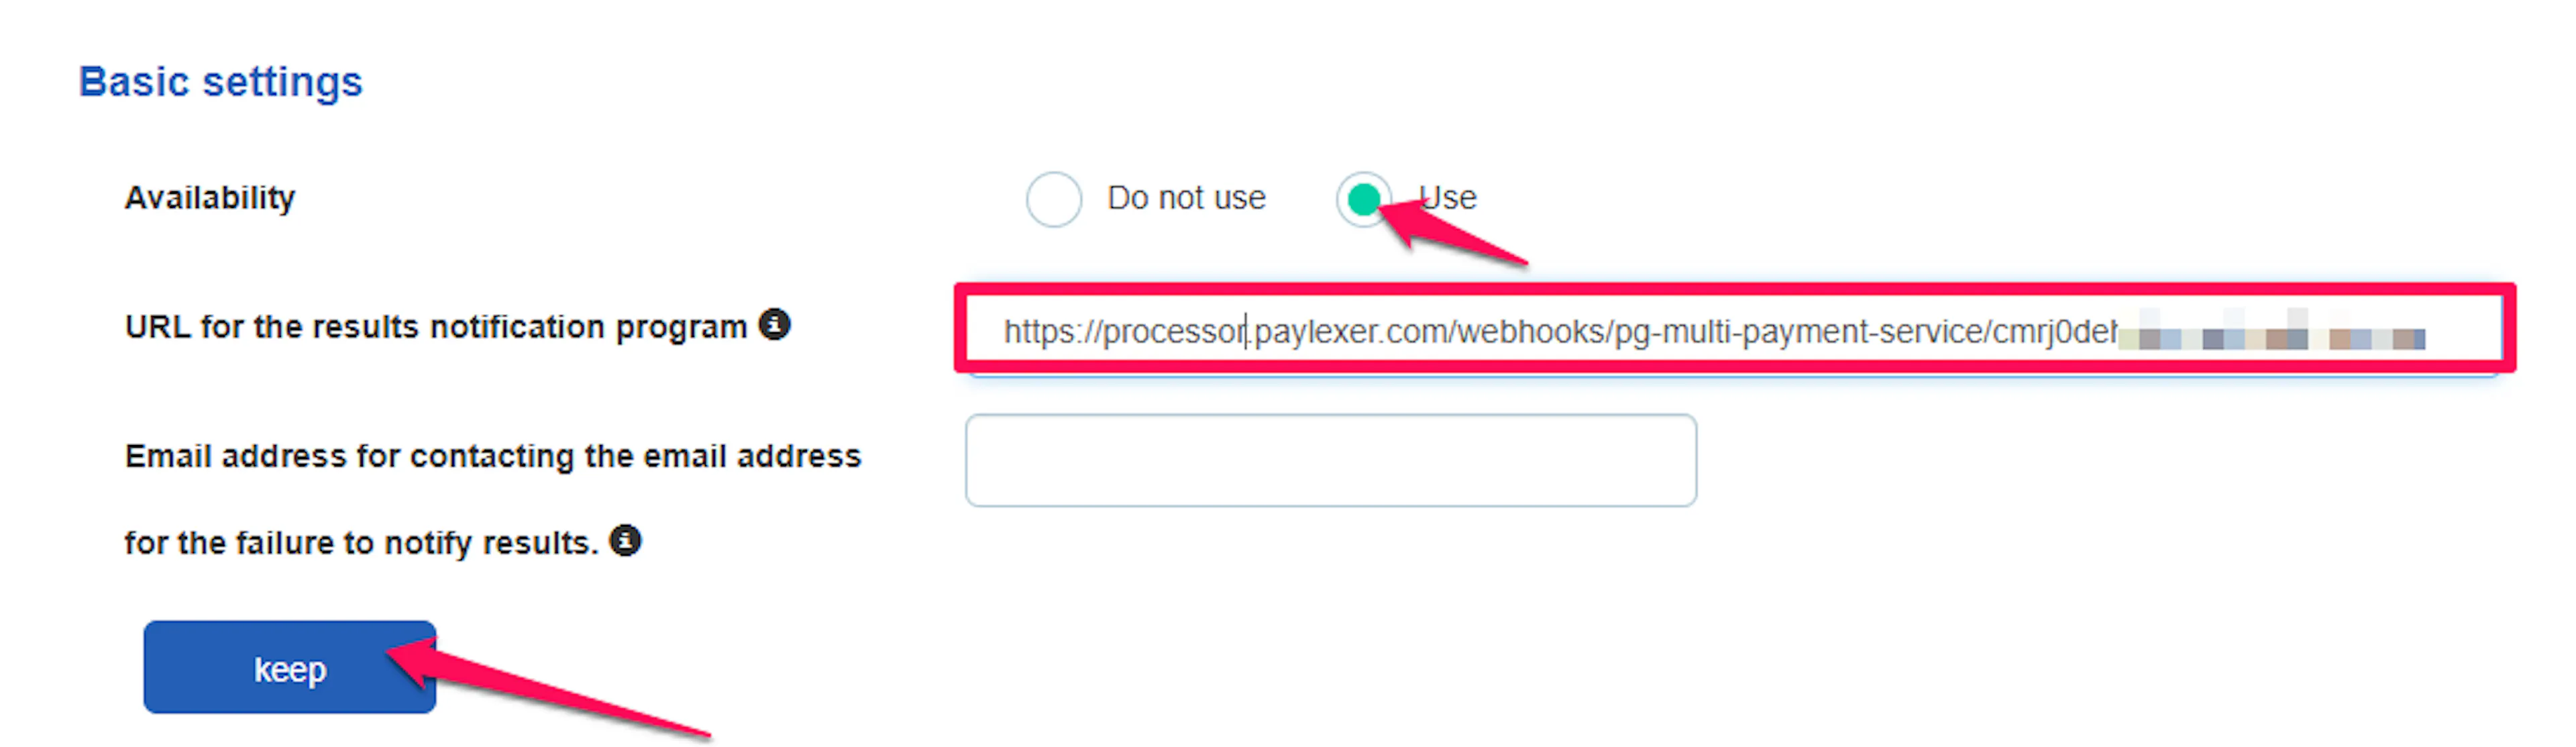
Set Availability (利用有無) to Use (利用する), paste the PayLexer webhook URL into Result Notification Program URL (結果通知プログラムURL), and save.
Keep Result Notification Sending Status (結果通知送信ステータス設定) set to Send all result notifications (全ての結果通知を送信).
Repeat in your other shop
Each shop has its own notification setting. Add the same webhook URL in both your test shop and your live shop.
Integrate PG Multi-Payment Service to Your Website
If you have already added and configured your site, you can enable PG Multi-Payment Service in your existing setup.
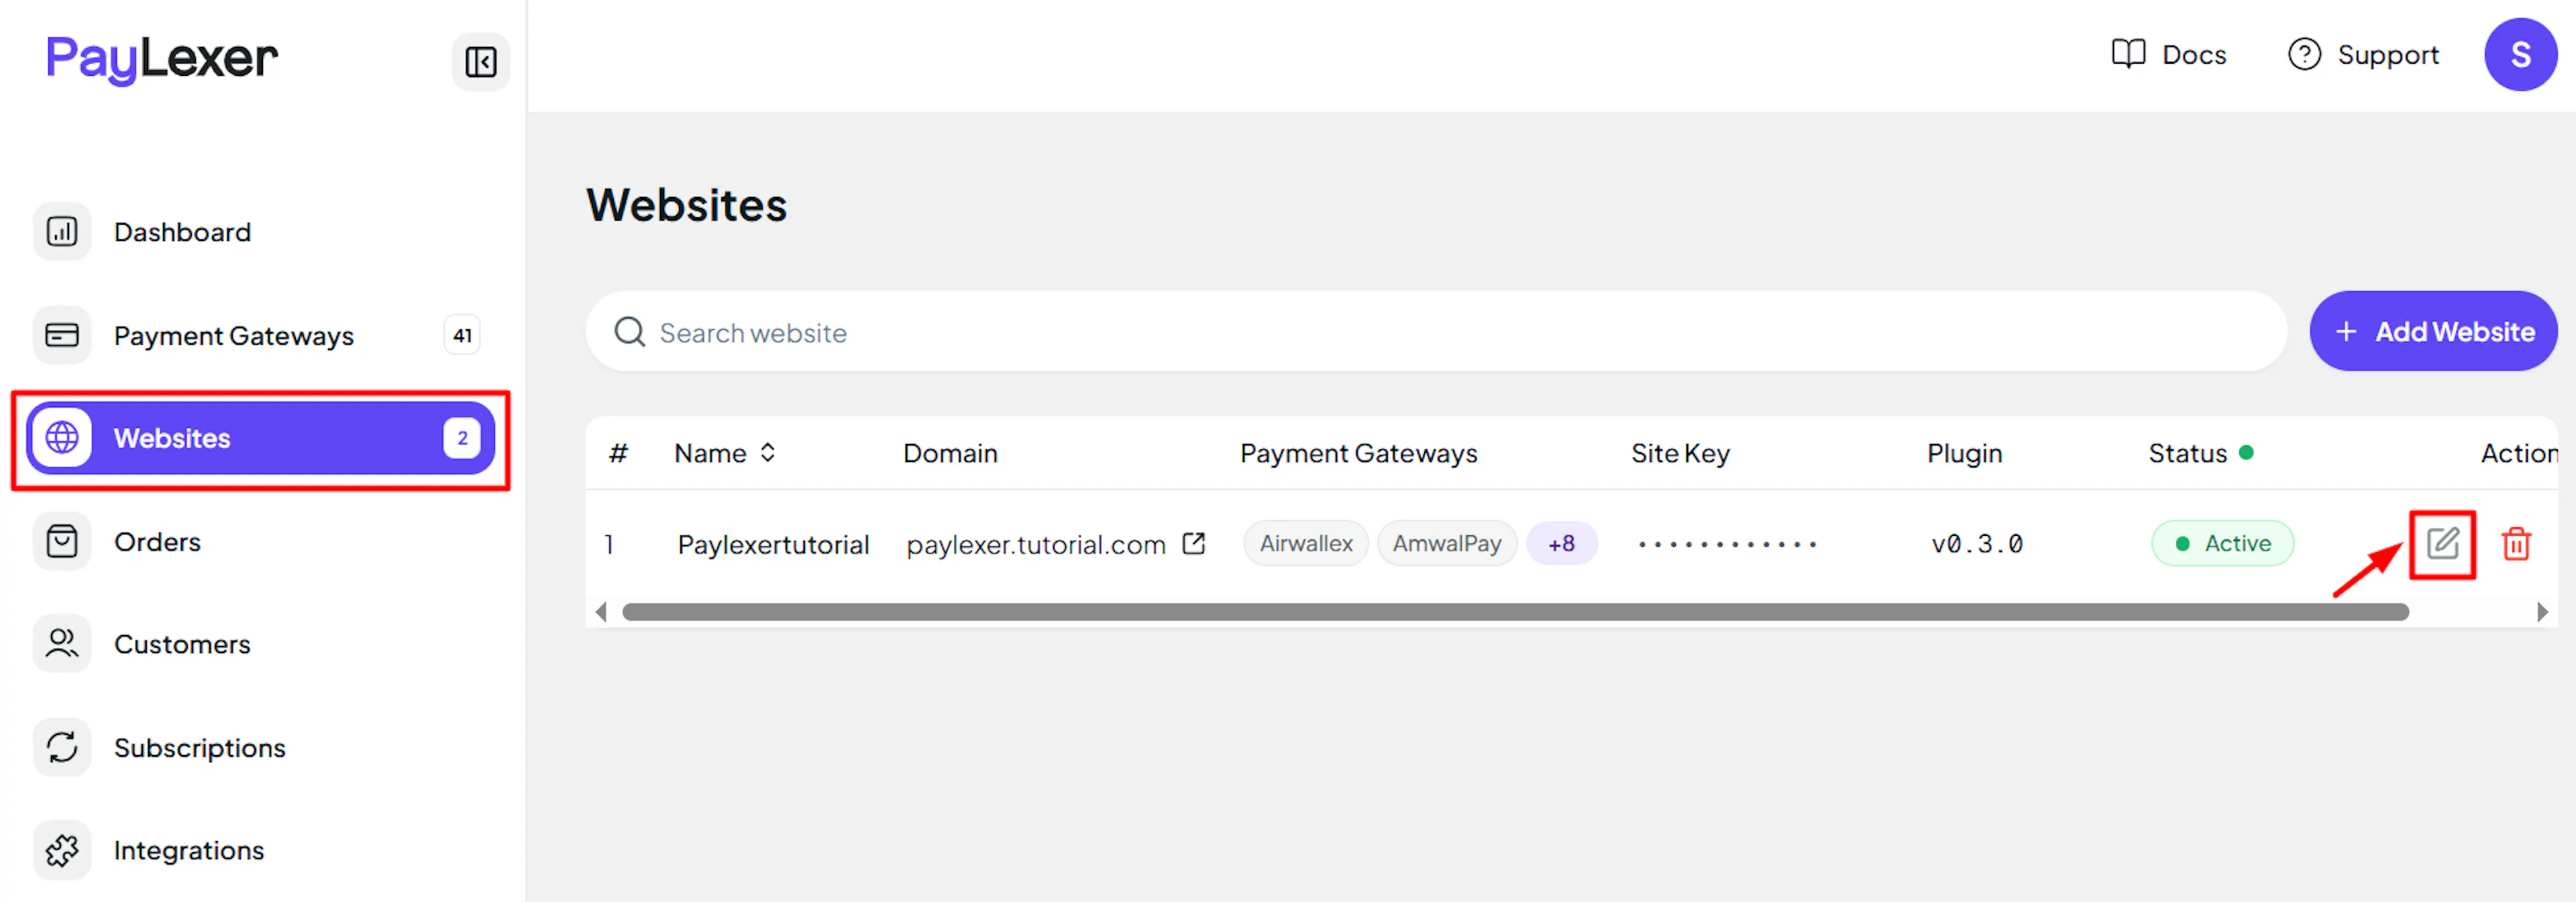
Go to Websites
Navigate to Websites in your PayLexer dashboard.
Edit your website
Click the Edit Icon of your added website.
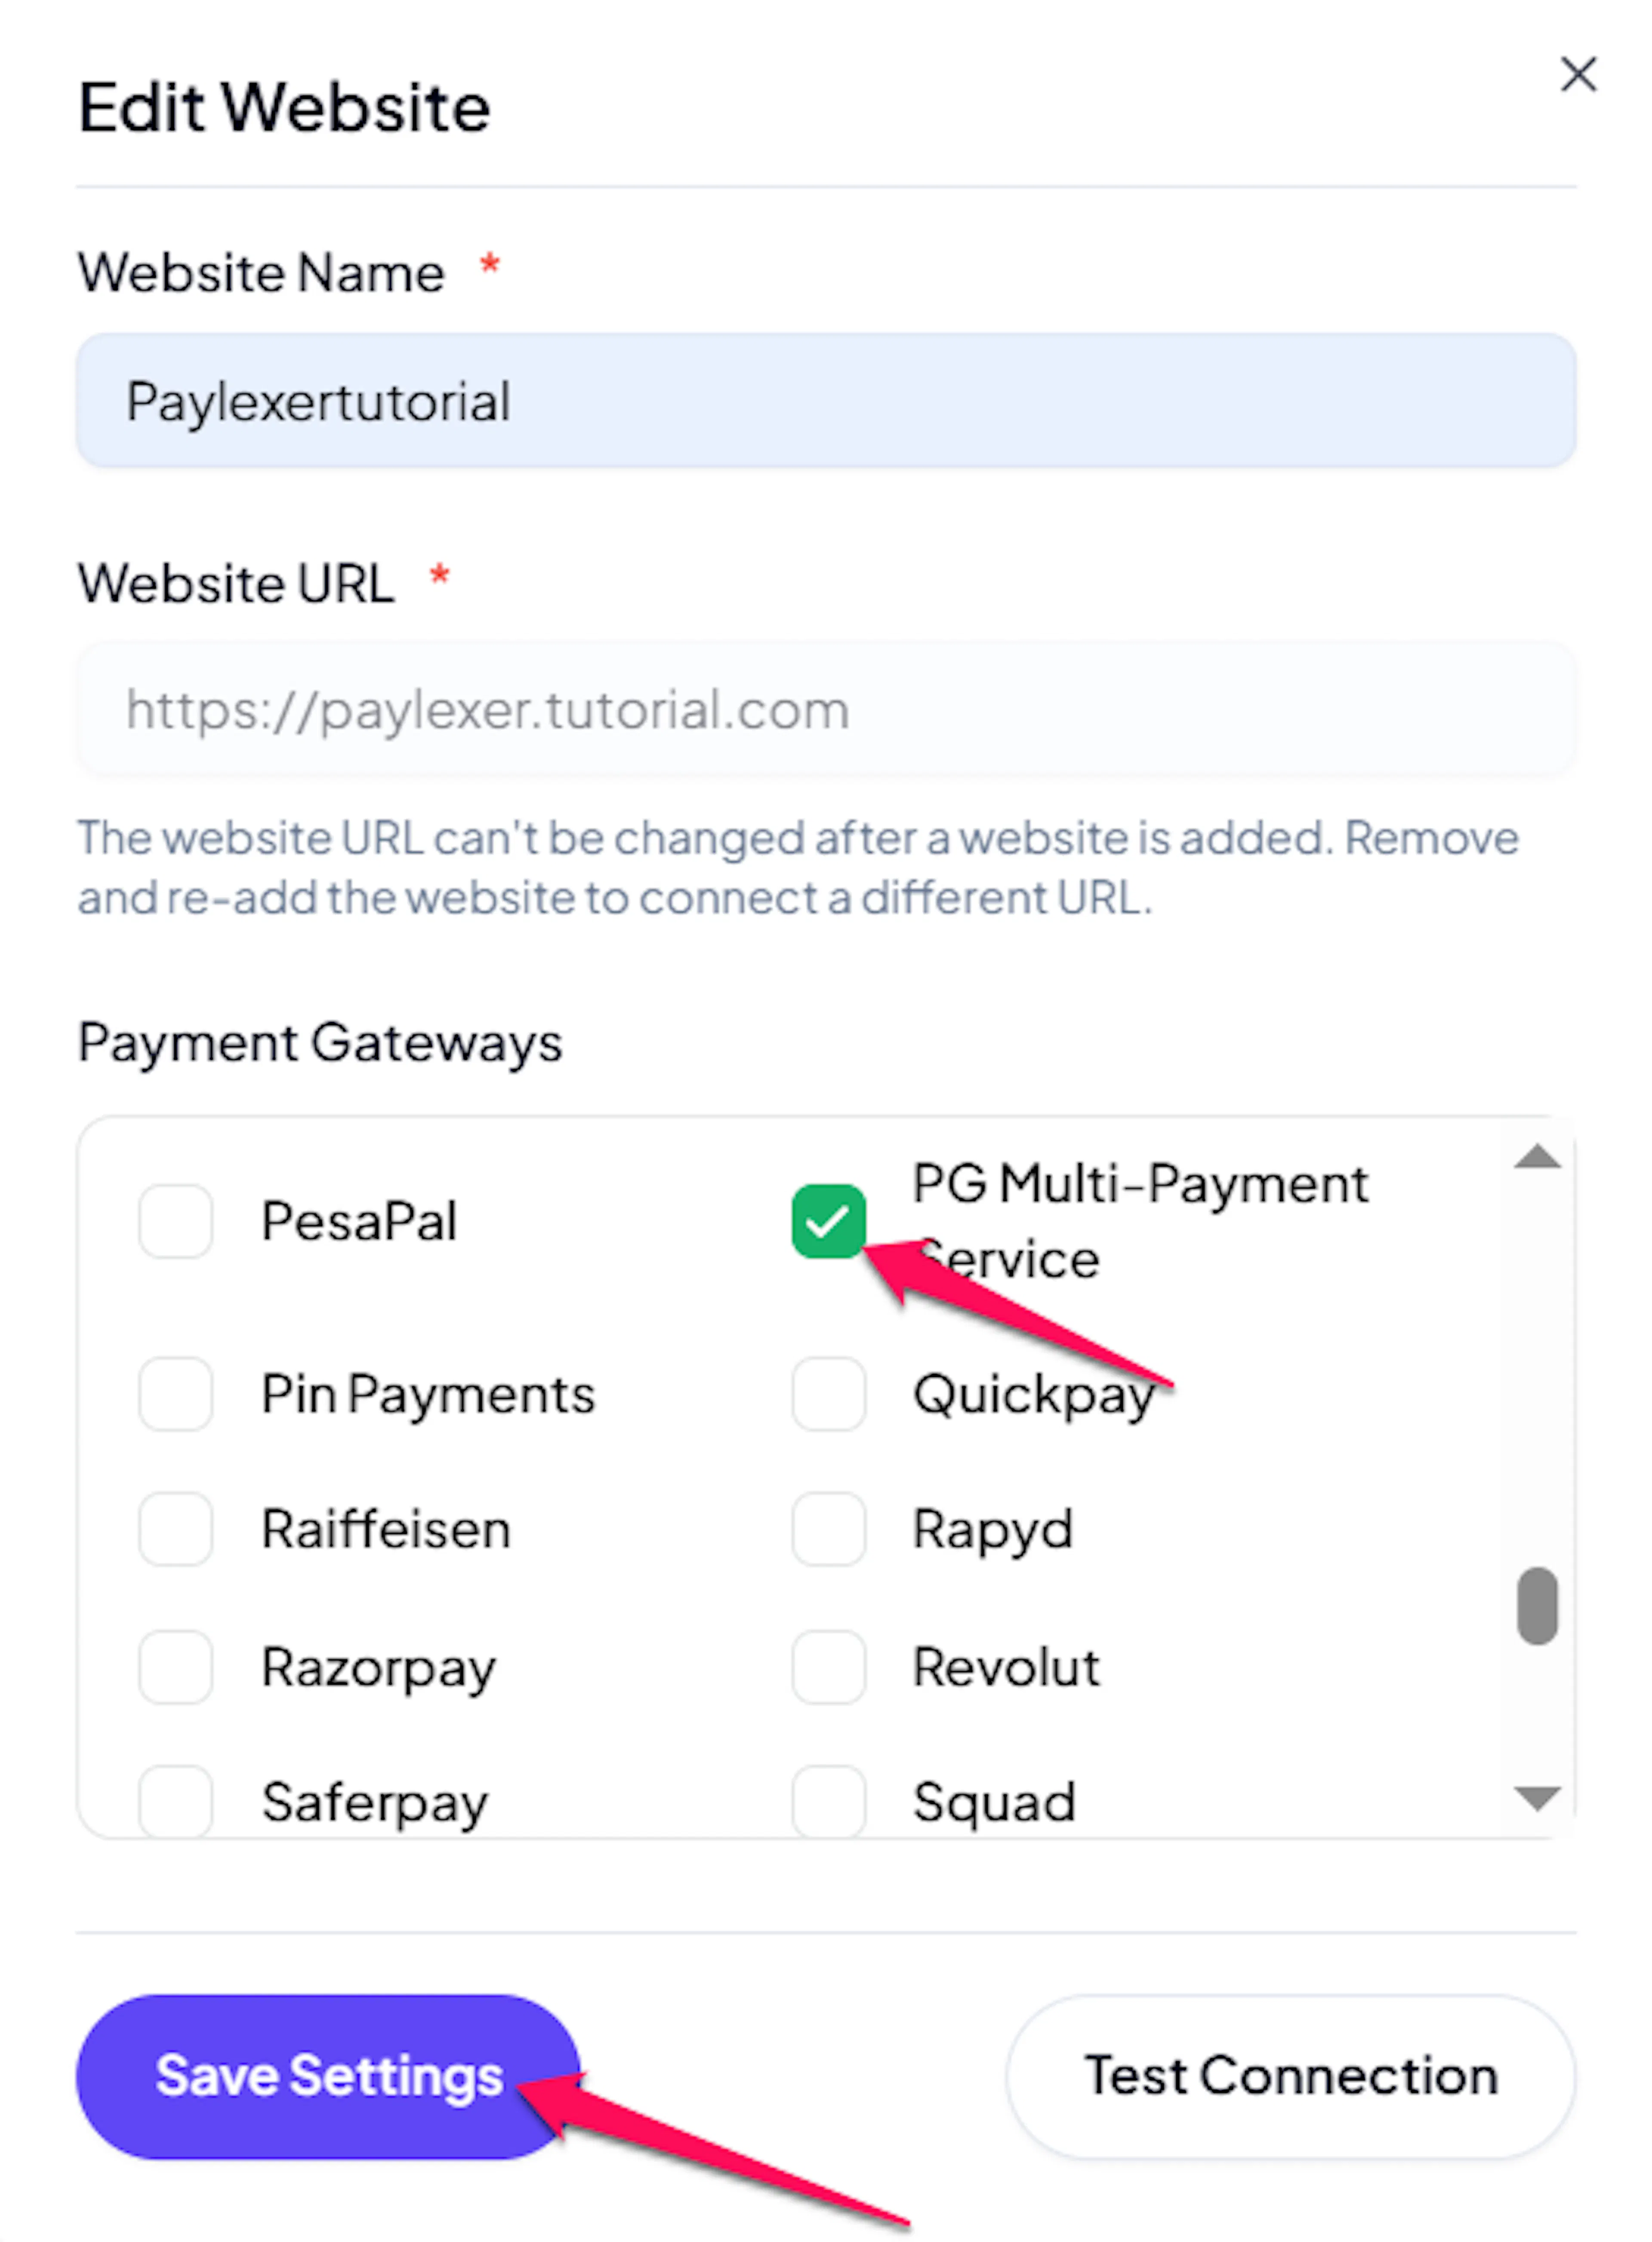
Enable PG Multi-Payment Service
Click the checkbox to enable PG Multi-Payment Service for the website.
If you haven't added a website yet, Continue to Add Your Website →
Troubleshooting
Best Practices
- Test in sandbox before enabling production, using your test shop's credentials under Test
- Add the webhook URL in both your test and live shops so payment, refund, and pay-later updates arrive instantly
- Keep your order currency set to Japanese Yen - PG Multi-Payment Service does not appear at checkout for any other currency
- Use the same Config ID name in your test and live shops to keep both environments consistent
FAQs
Still Have Questions?
- PG Multi-Payment Service Support: PG Multi-Payment Service FAQ
- PayLexer Support: Contact Support