Mollie
Connect your Mollie account to PayLexer.
Mollie is a European payment service provider headquartered in the Netherlands, trusted by over 250,000 businesses. It supports a wide range of local and global payment methods including iDEAL, Bancontact, SOFORT, SEPA Direct Debit, credit and debit cards, Apple Pay, Google Pay, PayPal, and Klarna, making it a strong choice for businesses targeting European customers.
-
Supported Regions (Merchant Accounts): Most European countries including Netherlands, Belgium, Germany, France, United Kingdom, Spain, Italy, Austria, Switzerland, and more - view full list
-
Supported Currencies: EUR, GBP, USD, CHF, DKK, NOK, SEK, PLN, and more
Supported Features
-
One-time card payments via Visa, Mastercard, and American Express
-
Webhook notifications for real-time payment status updates
-
Test mode for safe sandbox testing without real transactions
-
Multi-currency support across EUR, GBP, USD, and more
Before You Start
Make sure you have:
-
Mollie Account – Don't have one? Sign up for Mollie →
-
PayLexer Account – Required to configure the integration. Create your account →
-
A website where you want to integrate
Looking for a different payment processor? View all supported gateways →
Configuring Mollie
You need a Live API Key and Test API Key from Mollie for this integration.
Getting API Credentials
Log in to your Mollie Dashboard
Go to my.mollie.com/dashboard and sign in to your account.
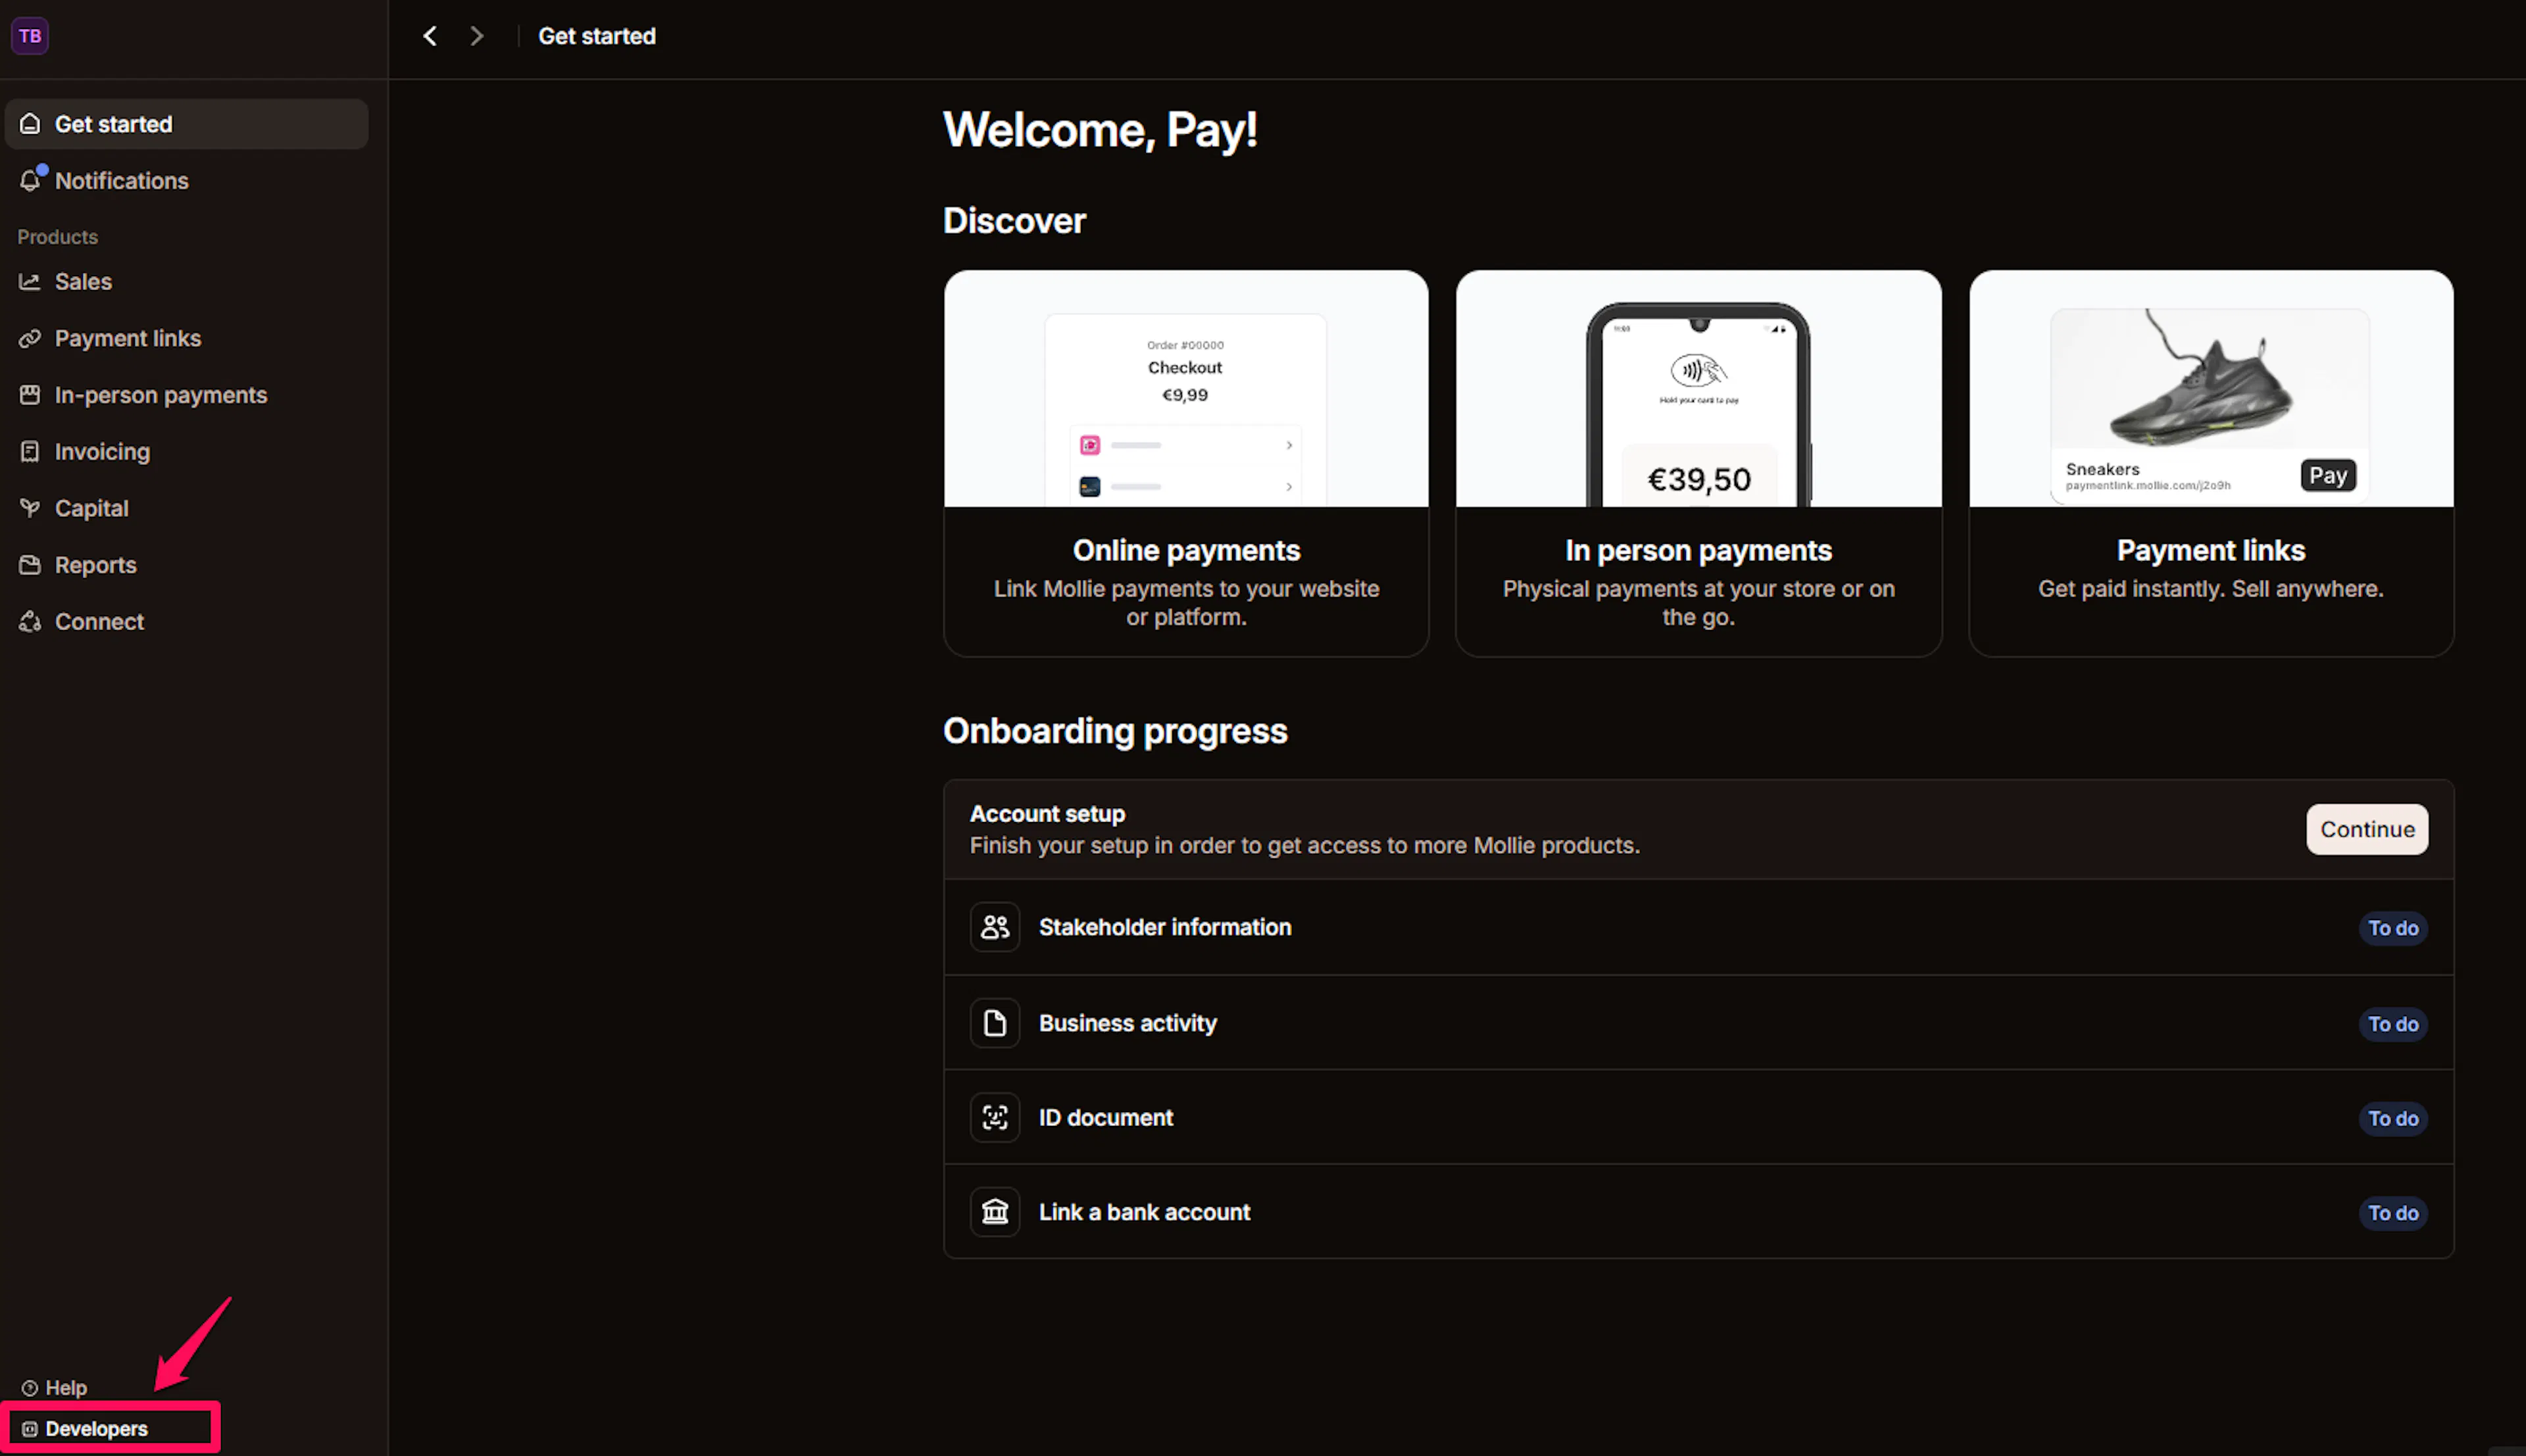
Open the Developers section
At the bottom of the left sidebar, click Developers, then click API access tokens.
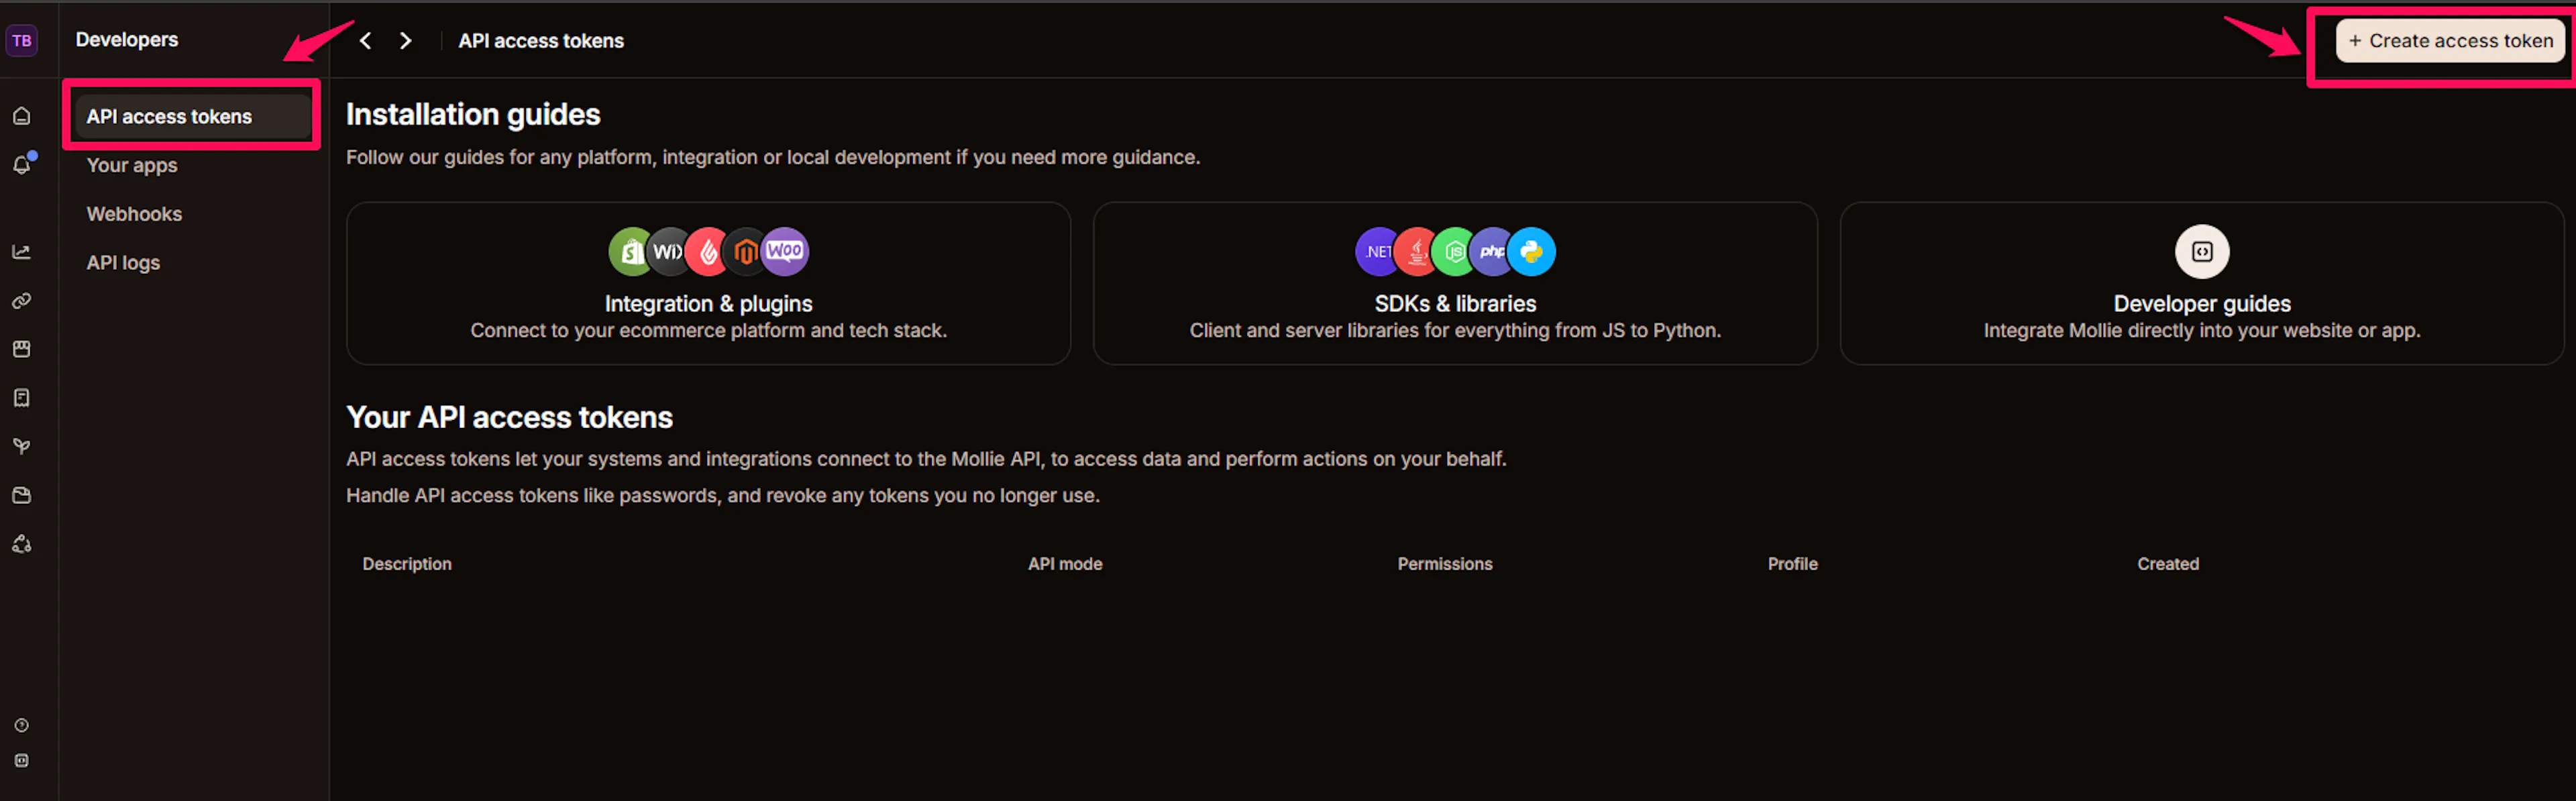
Create an access token
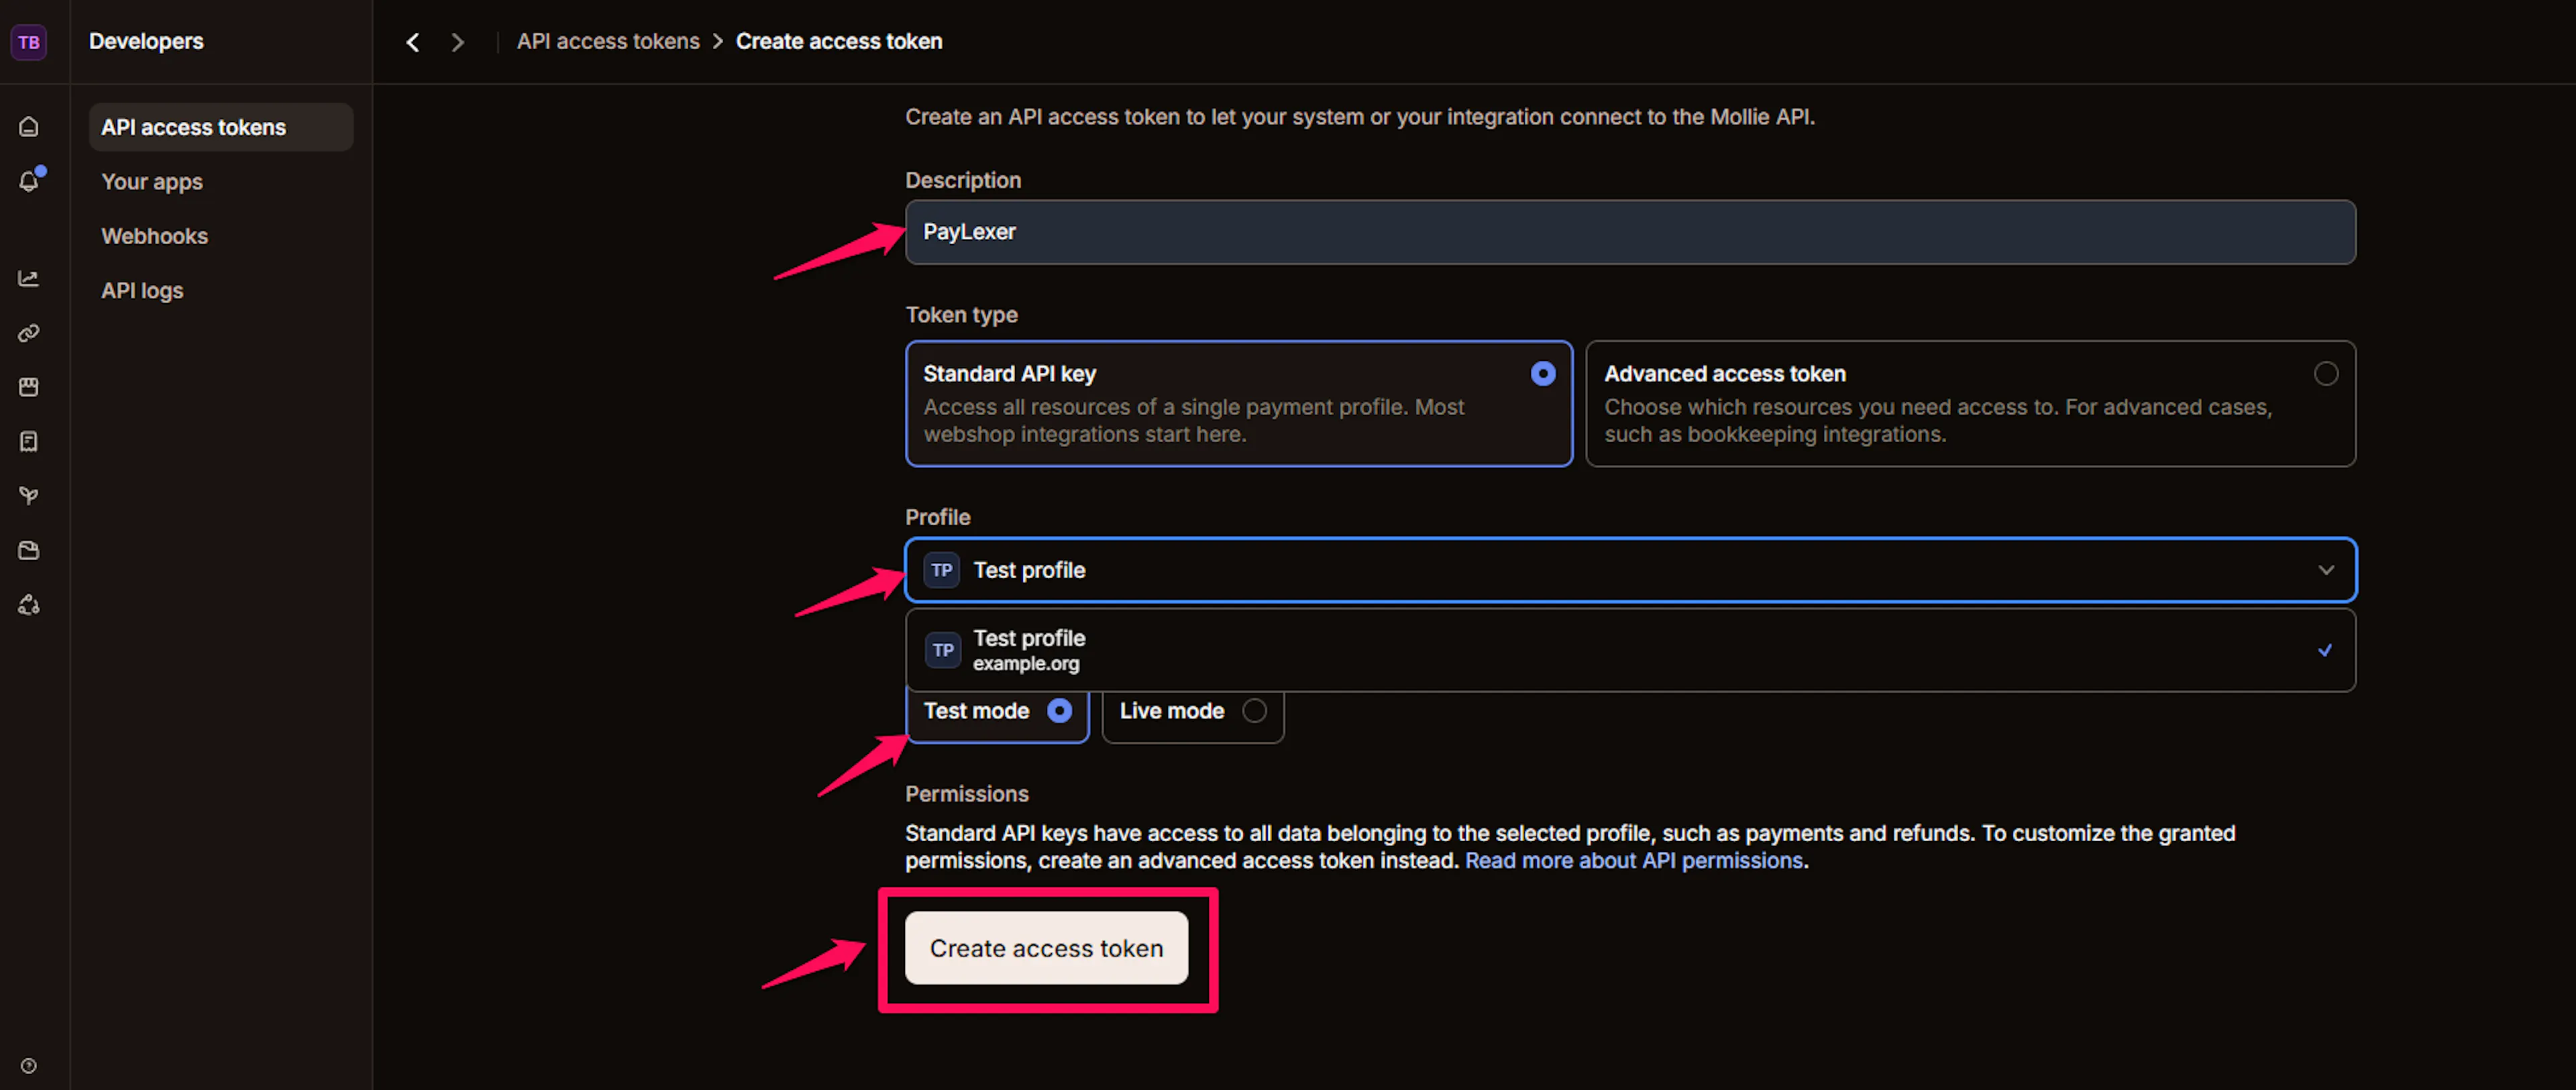
In the top right corner, click Create access token. Enter a Description (such as "PayLexer"), select Standard API key as the token type, choose your Profile, and select Live mode or Test mode. Click Create access token.
You need to create two separate access tokens - one with Live mode selected and one with Test mode selected. Repeat this step for each mode.
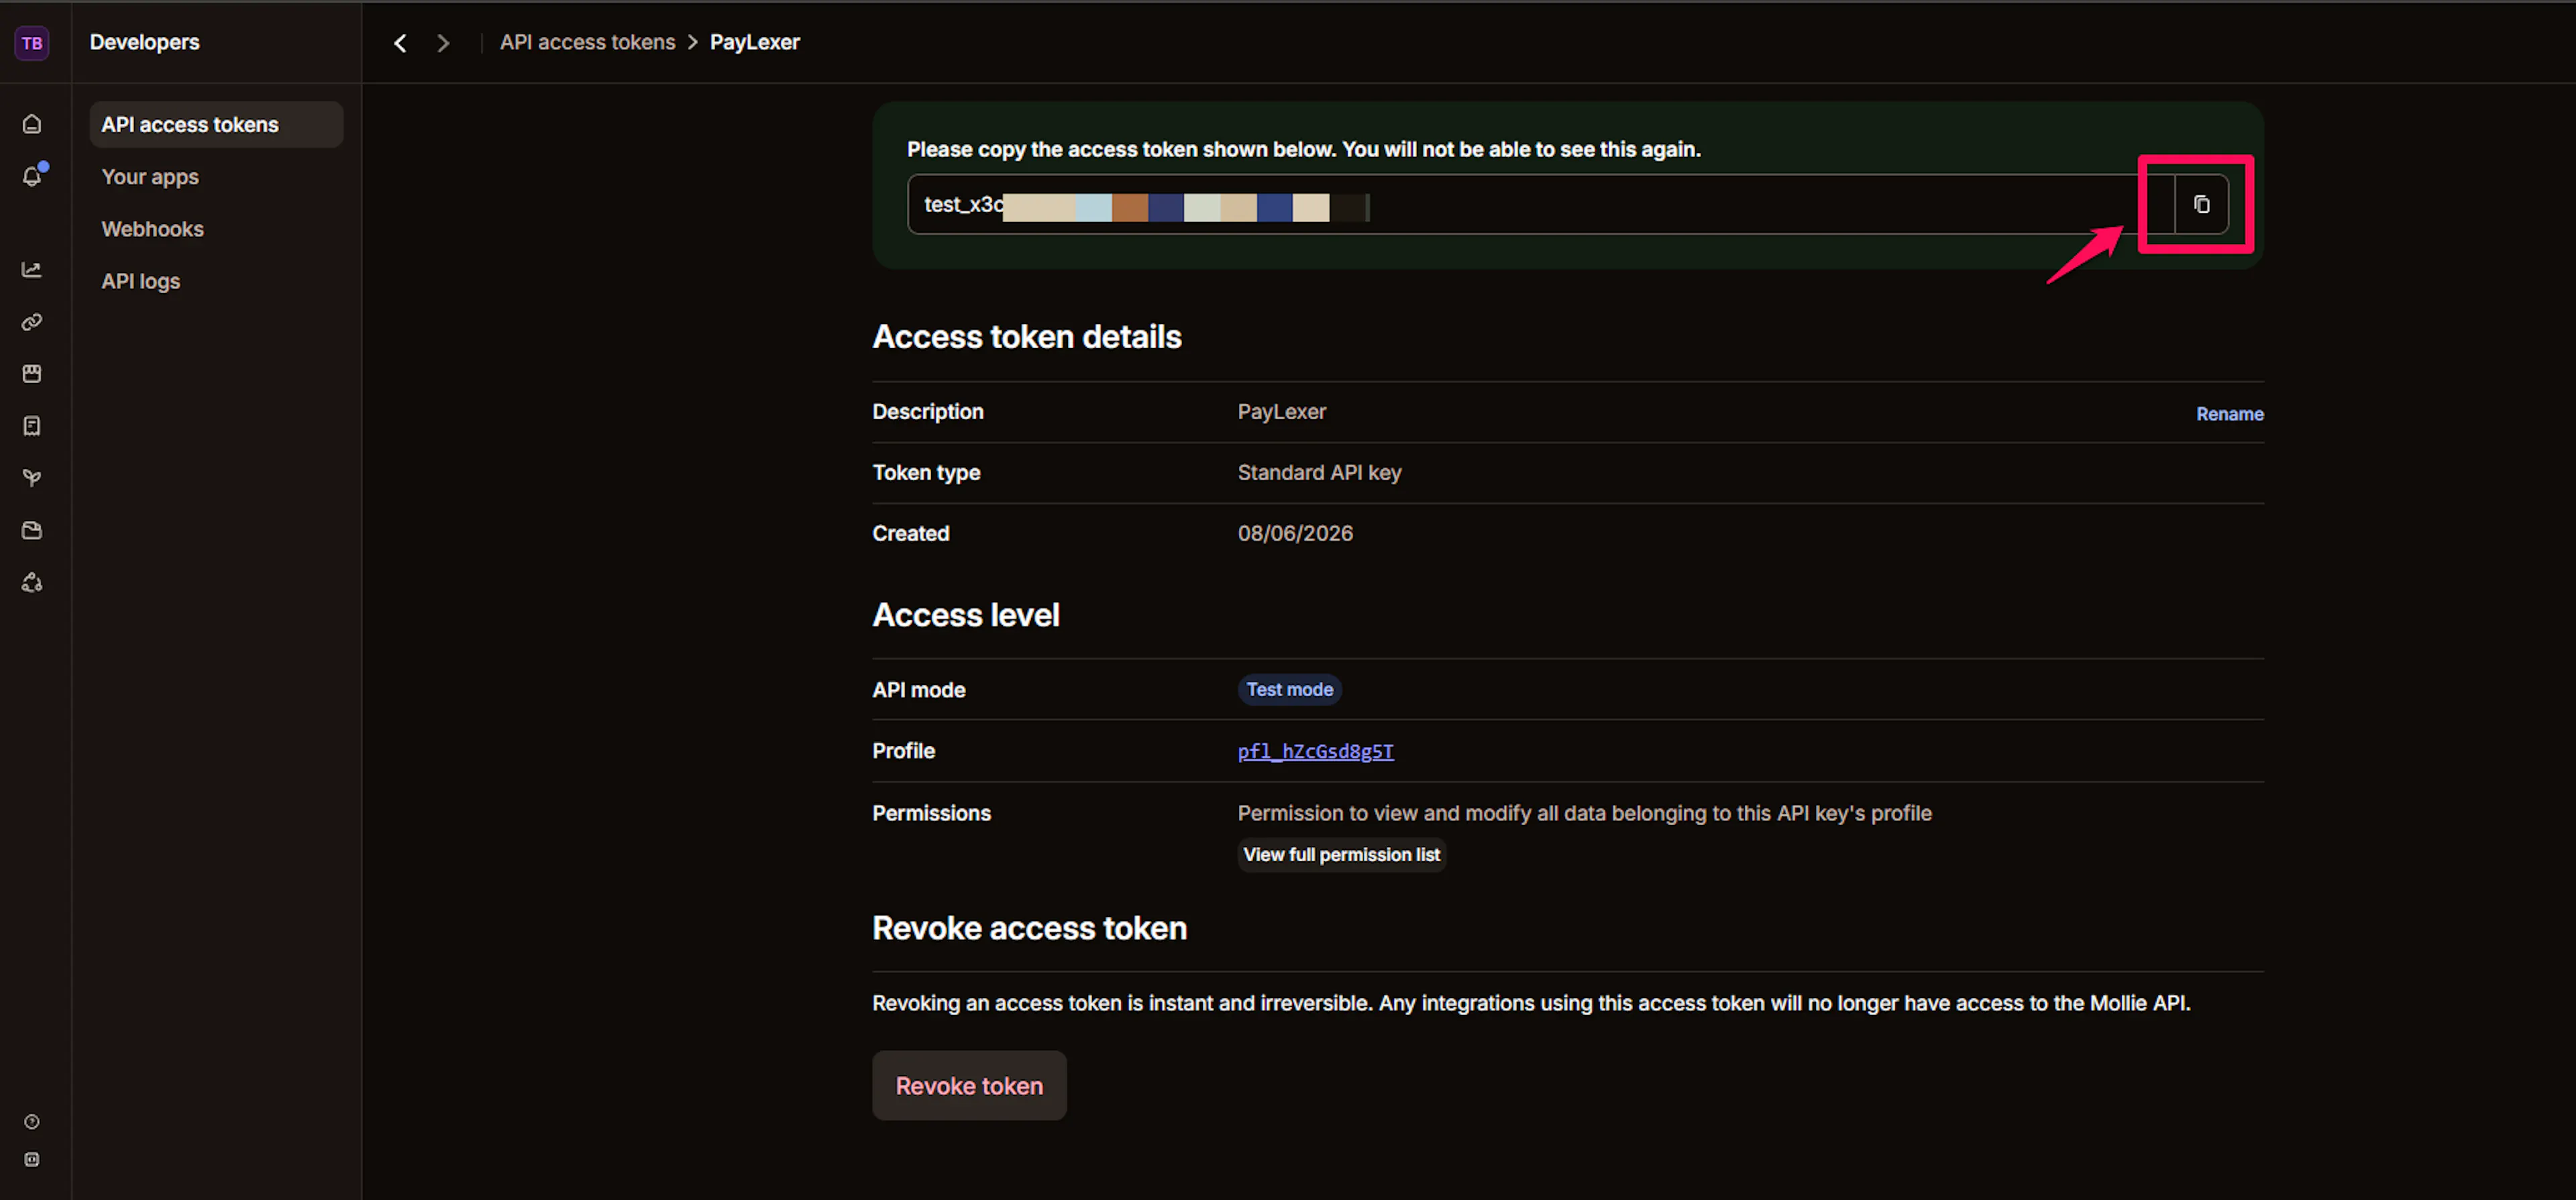
Copy your API key
After the token is created, your API key is displayed once - you will not be able to see it again. Click the copy icon to save it before navigating away.
Repeat steps 3 and 4 twice: once with Live mode selected (your Live API key) and once with Test mode selected (your Test API key).
Your Live API key starts with live_ and your Test API key starts with test_.
Adding Credentials to PayLexer
Open PayLexer Dashboard
Log in to your PayLexer dashboard and navigate to Payment Gateways → Mollie.

Enter your credentials
In the Live/Production Credentials section, paste your Mollie Live API key into the API Key field. In the Test/Sandbox Credentials section, paste your Mollie Test API key into the API Key field.

Understanding Live/Production and Sandbox Settings:
| Environment | Purpose |
|---|---|
| Live / Production (Mandatory) | Used for real transactions. Cannot be empty, even when testing. |
| Test / Sandbox (Optional) | Used for testing only. No real money is processed. |
How PayLexer selects credentials:
-
Debug/Test mode ON → Test credentials are used
-
Debug/Test mode OFF → Live credentials are used
Save your configuration
Click Test Connection to verify each set of credentials, then click Save to store your configuration.
Your Mollie credentials are now saved in PayLexer.
Configuring Webhooks (Mandatory)
Webhooks enable real-time payment updates and significantly improve reliability.
Benefits of Webhooks:
-
Instant payment status updates when payments succeed or fail
-
Real-time notifications for refunds and chargebacks
-
Reliable order synchronization without depending on the customer returning through the redirect
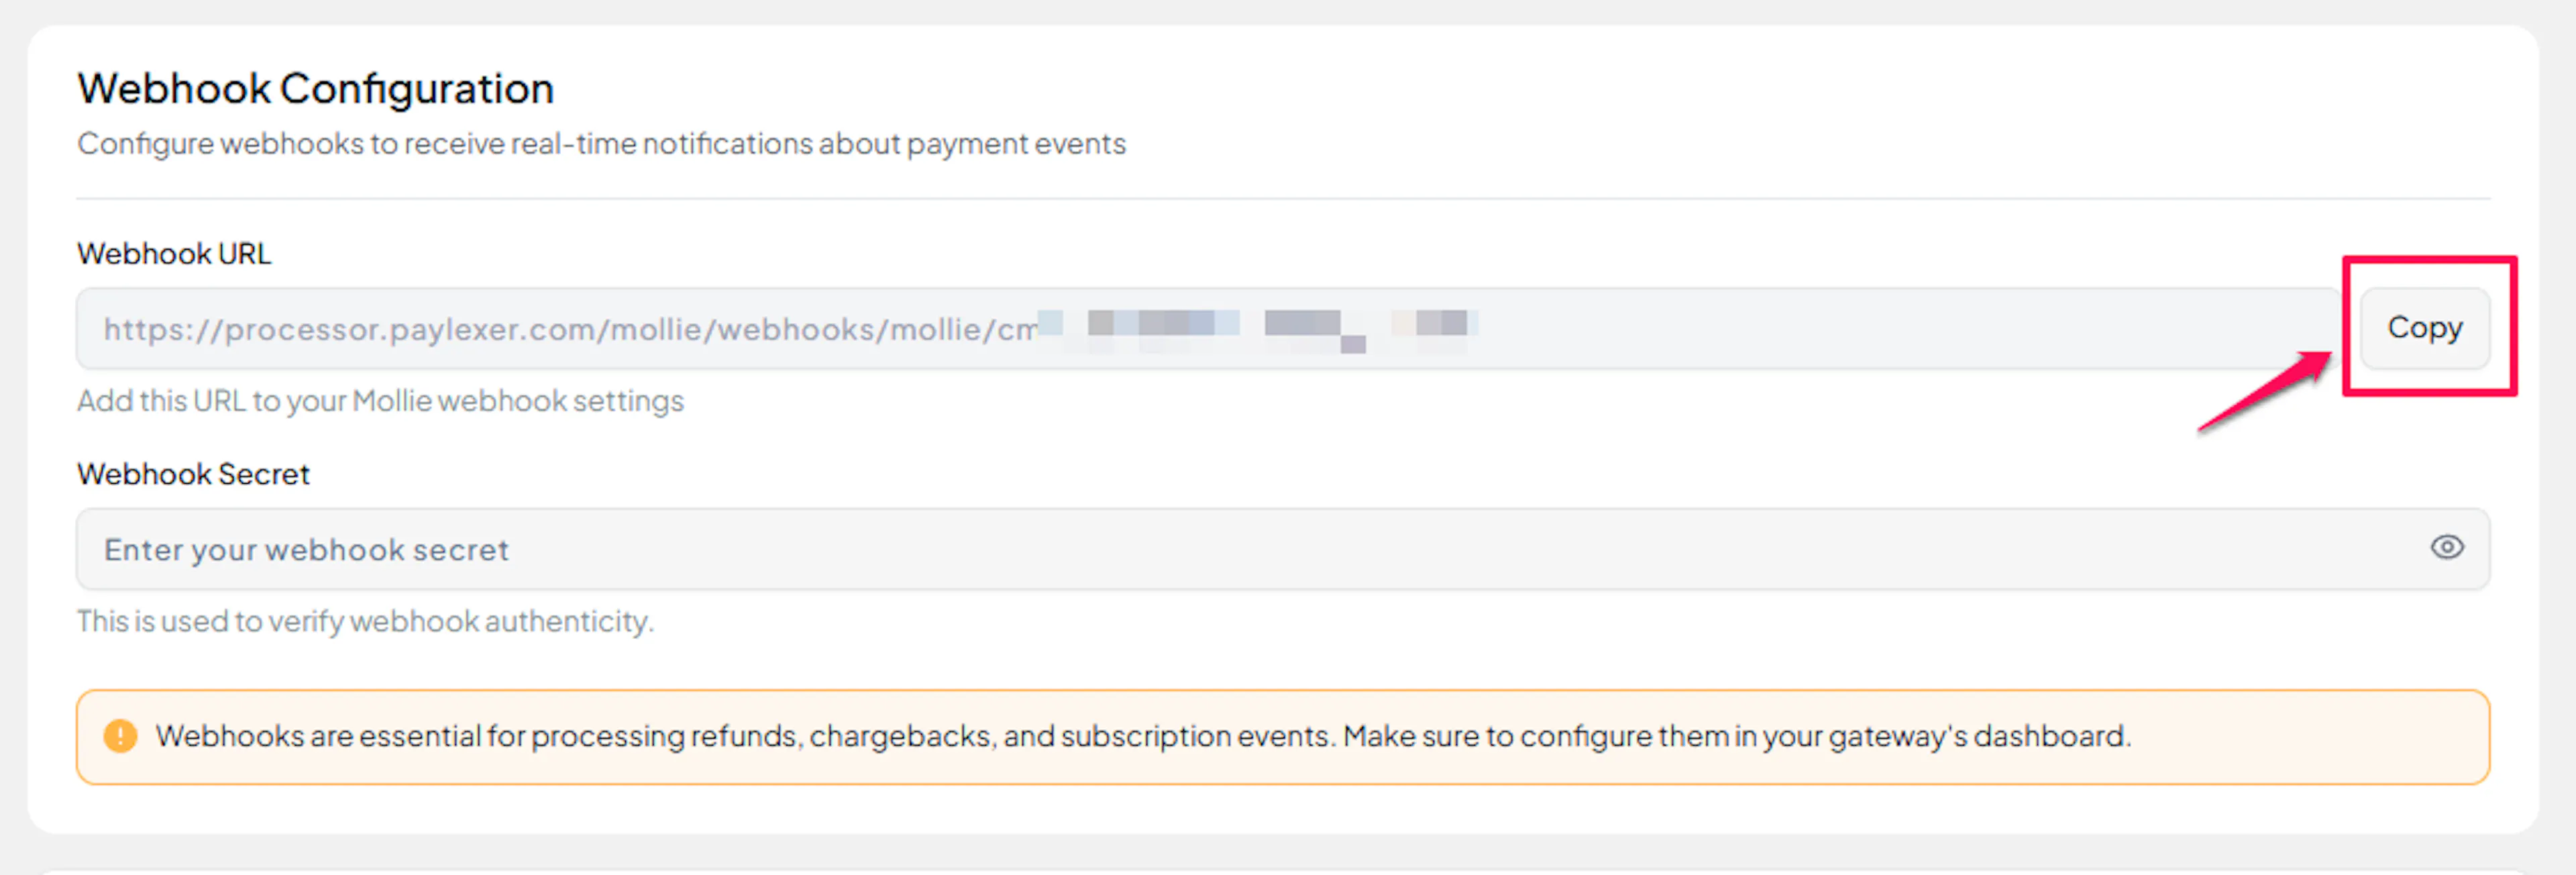
Copy your PayLexer Webhook URL
In your PayLexer dashboard, go to Payment Gateways → Mollie and click Copy next to the Webhook URL shown in the Webhook Configuration section.
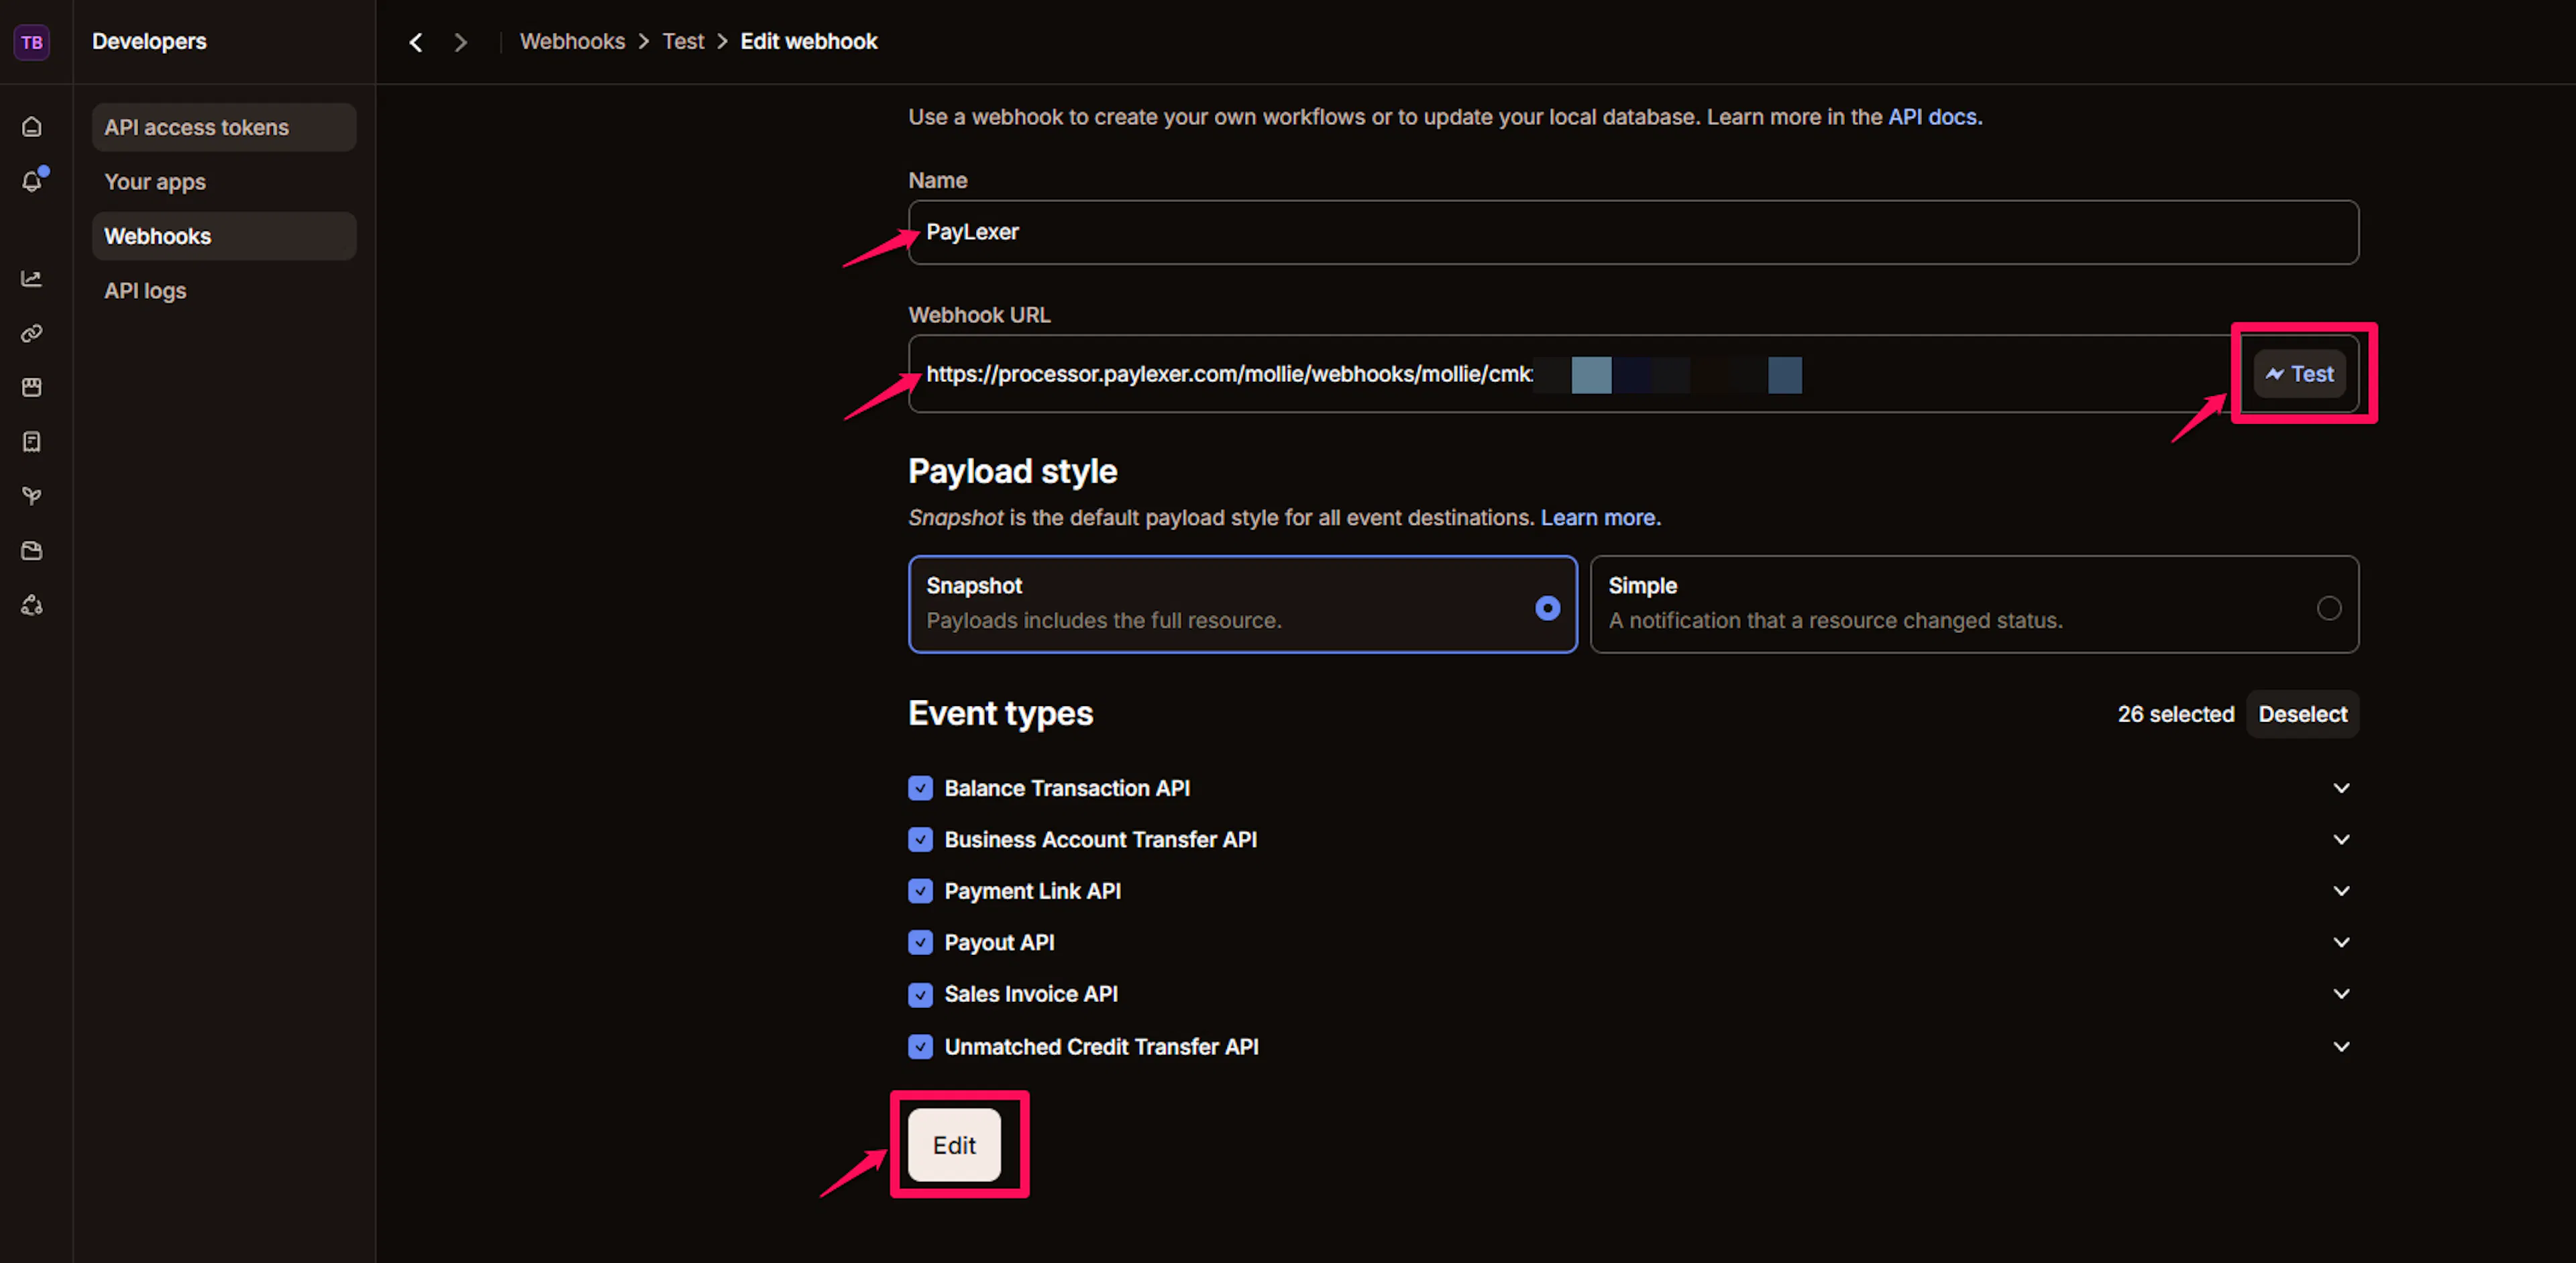
Add the Webhook URL in Mollie
Go to Developers → Webhooks and click Create webhook. Enter a Name, paste the Webhook URL you copied into the Webhook URL field, and select the payment events to listen to. Click Create to save.
If you use the Mollie Dashboard to inspect individual payments, you will see the webhook URL listed under each payment's details. This is expected behavior.
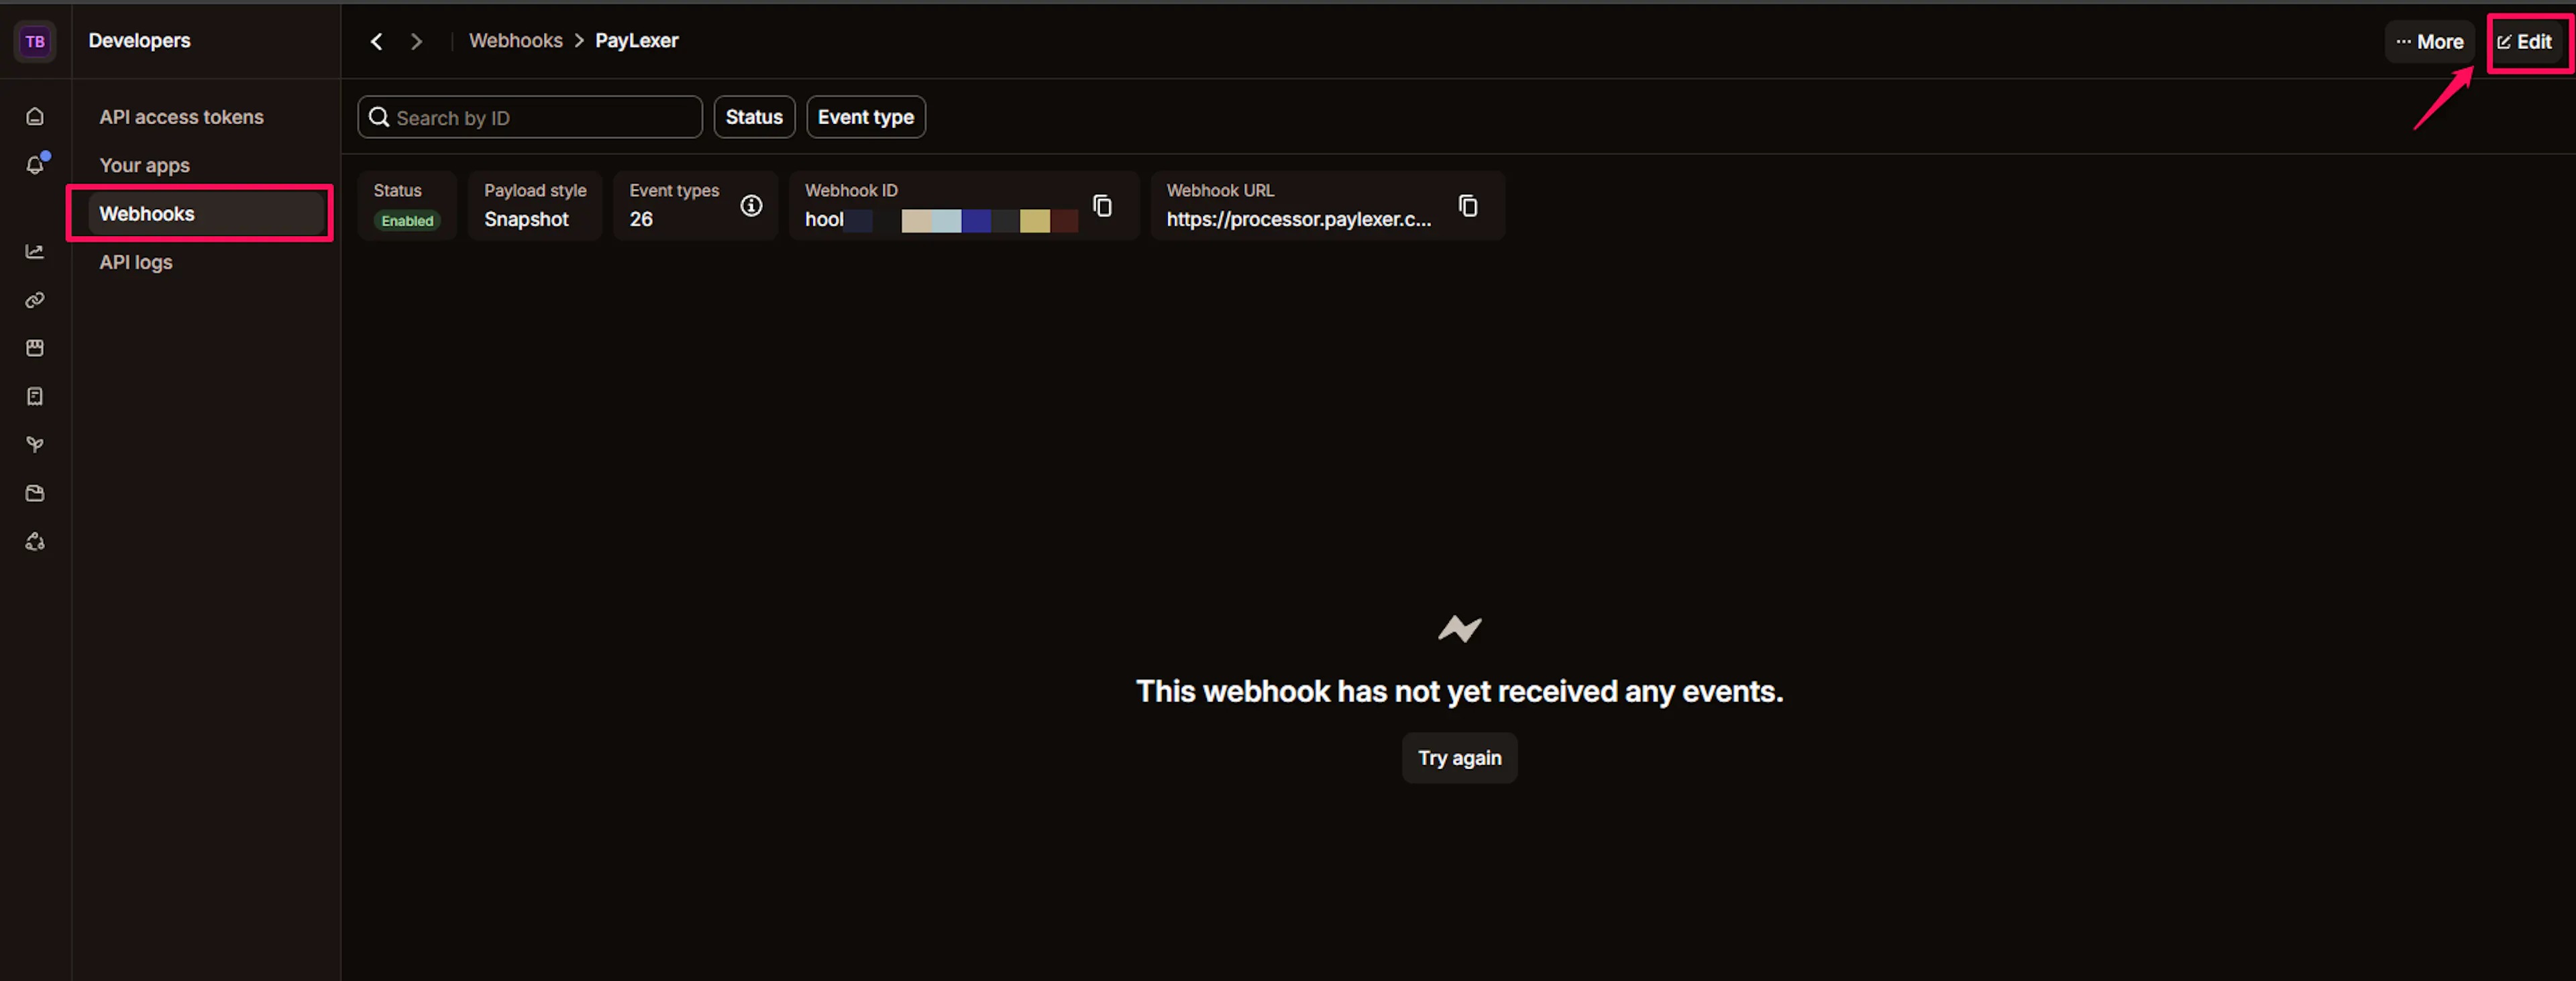
Copy the Webhook ID and save to PayLexer
From Developers → Webhooks, click on the webhook you just created to view its details. Click the copy icon next to the Webhook ID to copy it.
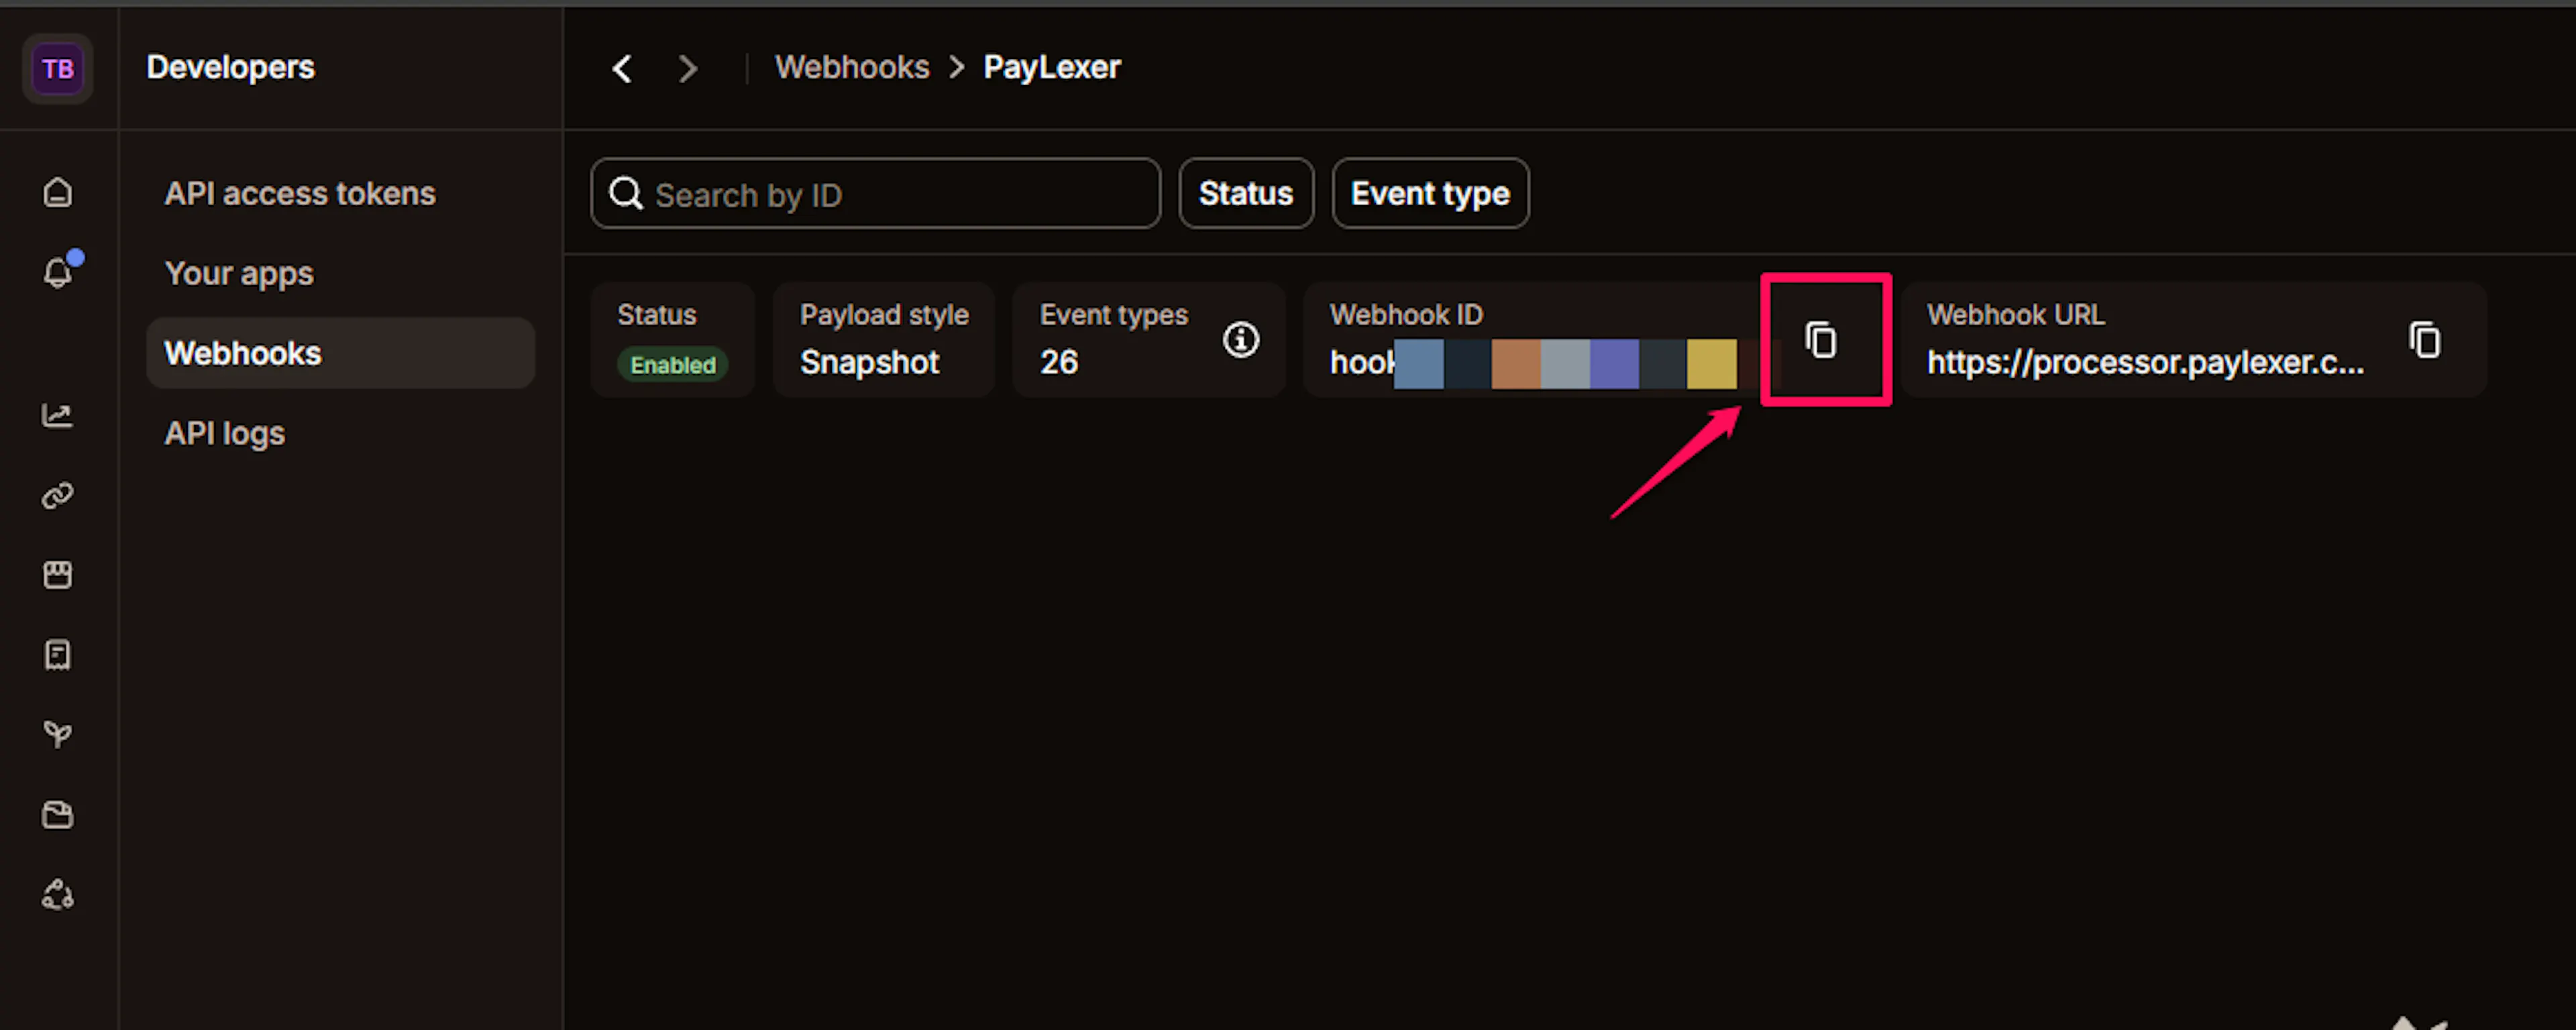
Then go back to Payment Gateways → Mollie in your PayLexer dashboard and paste the Webhook ID into the Webhook Secret field.
Integrate Mollie to Your Website
If you have already added and configured your site, you can enable Mollie in your existing setup.
Go to Websites
Navigate to Websites in your PayLexer dashboard.
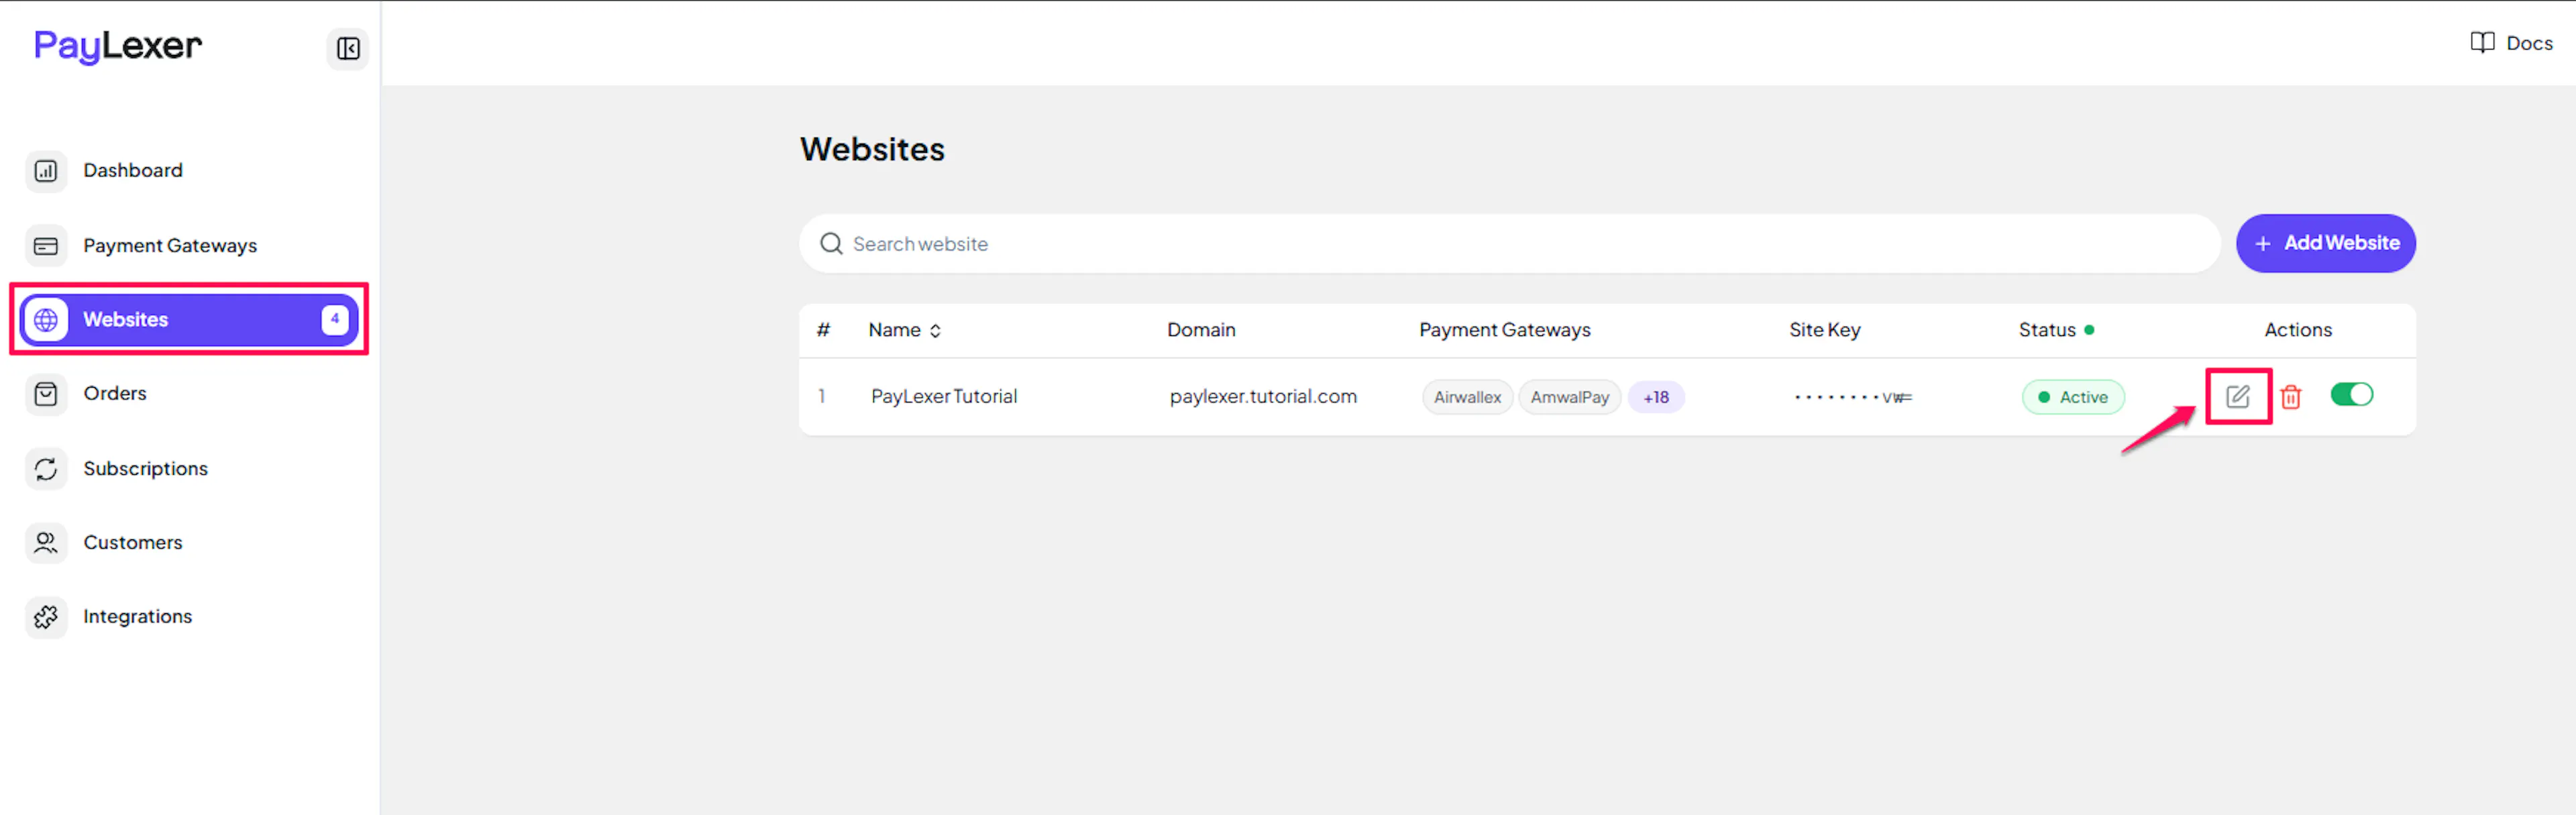
Edit your website
Click the Edit Icon of your added website.
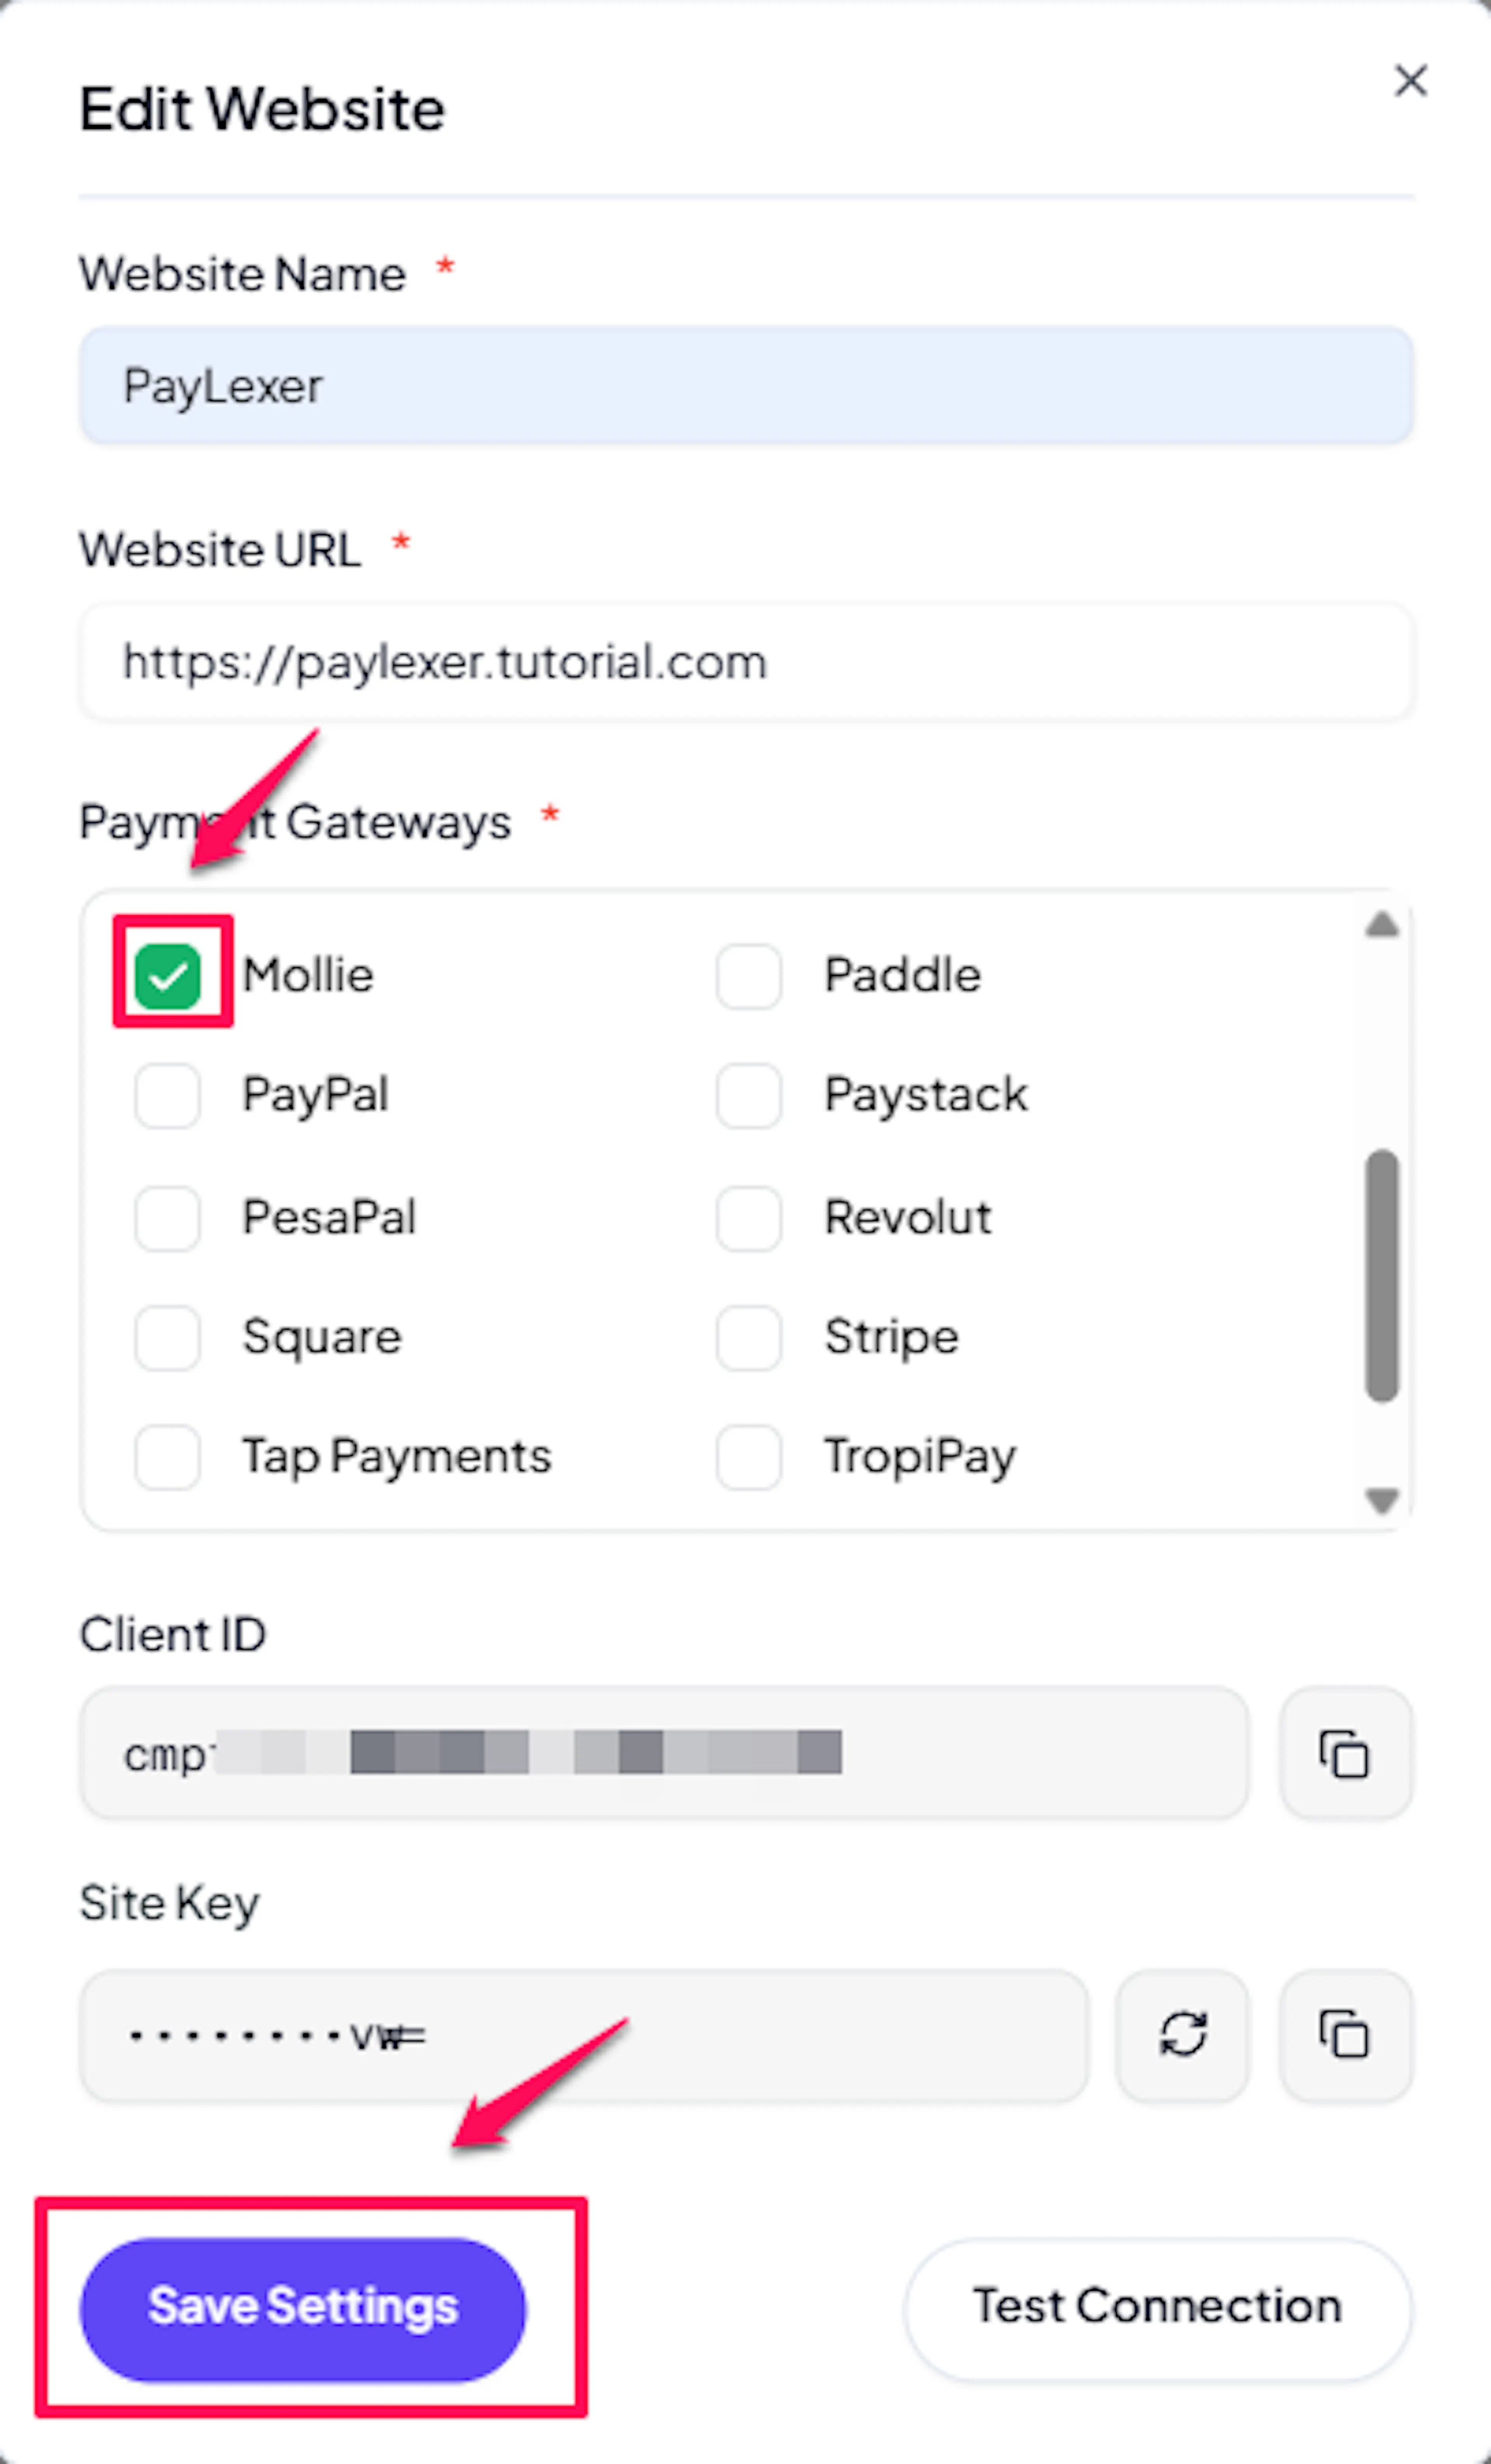
Enable Mollie
Click the checkbox to enable Mollie for the website, then click Save Settings.
Run a test transaction in Test Mode before going live. See Test Transactions for instructions.
If you haven't added a website yet, Continue to Add Your Website →
Troubleshooting
-
Confirm you copied the correct key type - Live keys start with
live_and Test keys start withtest_ -
Make sure there are no extra spaces before or after the key when pasting
-
Check that your Mollie account is fully verified and active; unverified accounts may have restricted API access
-
Re-generate the API key in your Mollie dashboard and update PayLexer with the new value
-
Verify the Webhook URL copied from PayLexer was not modified when saving
-
Ensure your website is publicly accessible - Mollie cannot reach a localhost or staging environment that is not publicly reachable
-
Check your server firewall and hosting settings to confirm inbound POST requests to the webhook URL are not blocked
-
Review Mollie's payment details in my.mollie.com to see if webhook delivery attempts are listed and their status
-
Confirm webhooks are configured correctly using the steps above
-
In Test Mode, use only Mollie test payment details - real card numbers are rejected
-
Check the PayLexer transaction log for any error messages returned from Mollie
-
If the issue persists in Live Mode, verify that the Live API key is saved (not the Test key) and that Test Mode is turned off in PayLexer
-
Mollie activates payment methods per-profile. Log in to your Mollie dashboard and go to Settings → Website profiles to check which methods are enabled for your profile
-
Some methods (such as Klarna and SEPA Direct Debit) require additional Mollie approval before they become available
-
The currency of the transaction must be supported by the chosen payment method
Best Practices
-
Always test the full payment flow in Test Mode before switching to Live credentials
-
Enable webhooks - without them, order status updates depend on the customer returning to your site, which is unreliable
-
Store your Live and Test API keys securely and never expose them in client-side code or public repositories
-
Keep your Mollie account profile up to date; outdated business information can trigger payment holds
-
Review Mollie's payment method availability in your target markets before launch - not all methods are available in every country
-
Enable only the payment methods your customers actually use to keep checkout clean and conversion high
FAQs
Live credentials are mandatory to save the configuration. Test credentials are optional but highly recommended so you can safely test payments before going live.
Check the Debug Mode setting in your platform. When Debug Mode is ON, PayLexer uses your Test credentials. When OFF, it uses Live credentials.
Transactions appear in three places: your platform's booking or order pages, PayLexer Dashboard → Orders, and Mollie Dashboard. All three show the same transactions with different IDs.
Payments will still process, but status updates may be delayed. Check webhook logs in Mollie Dashboard to troubleshoot.
Mollie is available across most of Europe, including the Netherlands, Belgium, Germany, France, the United Kingdom, Spain, Italy, Austria, Switzerland, Poland, and more. For the full list, visit Mollie's supported countries page.
Mollie supports EUR, GBP, USD, CHF, DKK, NOK, SEK, PLN, and several other currencies depending on the payment method. EUR is the primary currency and has the broadest method support.
Yes. Mollie requires you to create a separate access token for each mode. Create one token with Live mode selected and another with Test mode selected. Enter both in PayLexer so you can switch between modes without updating credentials each time.
Yes. Mollie supports recurring payments via SEPA Direct Debit and credit card mandates. Contact Mollie Support to confirm your account is enabled for subscriptions before relying on this feature.
iDEAL is available to Mollie accounts registered for Dutch transactions. If your account is registered in another country, check your Mollie website profile settings to confirm iDEAL is activated.
Mollie typically settles funds within 2 business days for card payments. Local methods like iDEAL and Bancontact may settle faster. Check your Mollie dashboard under Finances → Settlements for your specific settlement schedule.
Still Have Questions?
-
Mollie Support: Mollie Help Center
-
PayLexer Support: Contact Support
For API references and advanced configuration, see the Mollie developer documentation.