

Moyasar
Accept payments in Saudi Arabia and the Gulf region using Moyasar's hosted checkout with PayLexer.
Moyasar is a Saudi Arabia-based payment gateway founded to serve the Middle East and Gulf markets. It supports Visa, Mastercard, mada, Apple Pay, and STC Pay, and provides a hosted checkout experience that redirects customers to a secure Moyasar-hosted payment page.
-
Supported Regions (Merchant Accounts): Saudi Arabia and Gulf region - view full list
-
Supported Currencies: SAR (Saudi Riyal) and select additional currencies - view full list
This gateway appears in checkout only when the selected currency is SAR (or another currency enabled on your Moyasar account).
Supported Features
-
Online card payments (Visa, Mastercard, mada)
-
Apple Pay and STC Pay (via Moyasar hosted checkout)
-
Hosted checkout redirect flow
-
Refunds
-
Recurring billing via card tokenization
Before You Start
Make sure you have:
-
Moyasar Account - Don't have one? Sign up for Moyasar →
-
PayLexer Account - Required to configure the integration. Create your account →
-
A website where you want to integrate
Looking for a different payment processor? View all supported gateways →
Configuring Moyasar
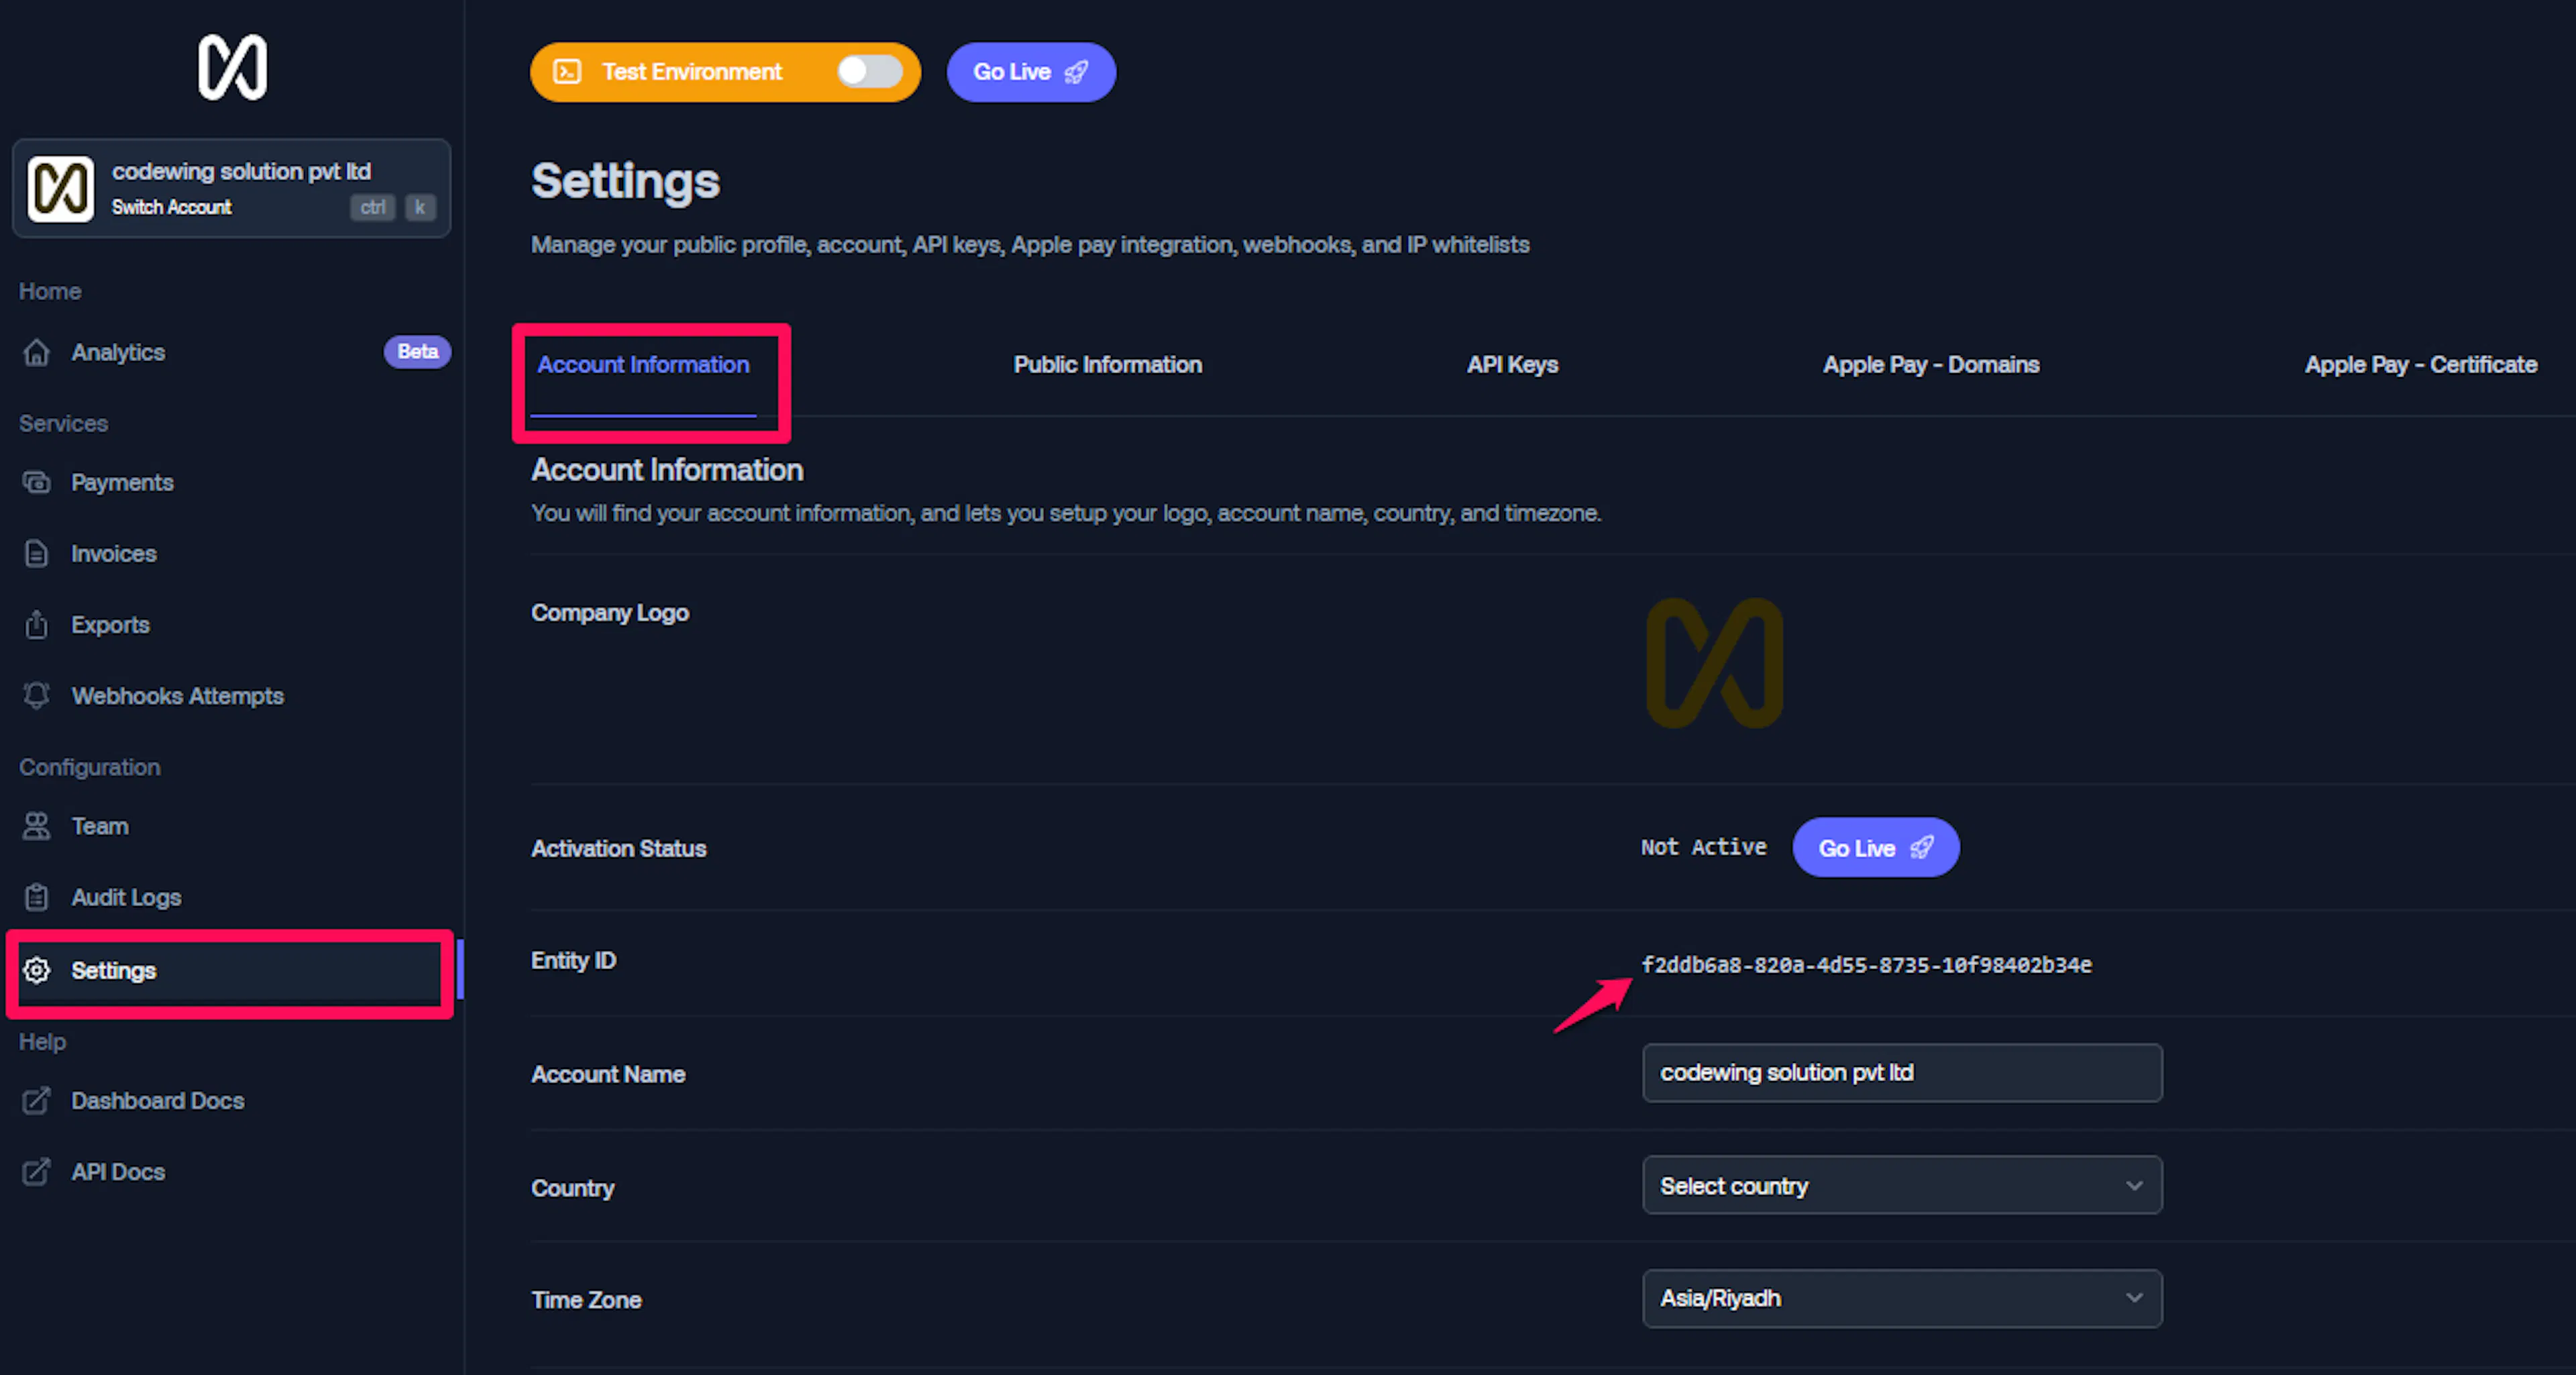
You need a Secret Key, Publishable Key, and a Webhook Secret from Moyasar for this integration.
Getting API Credentials
Log in to your Moyasar dashboard
Go to dashboard.moyasar.com and sign in to your account.
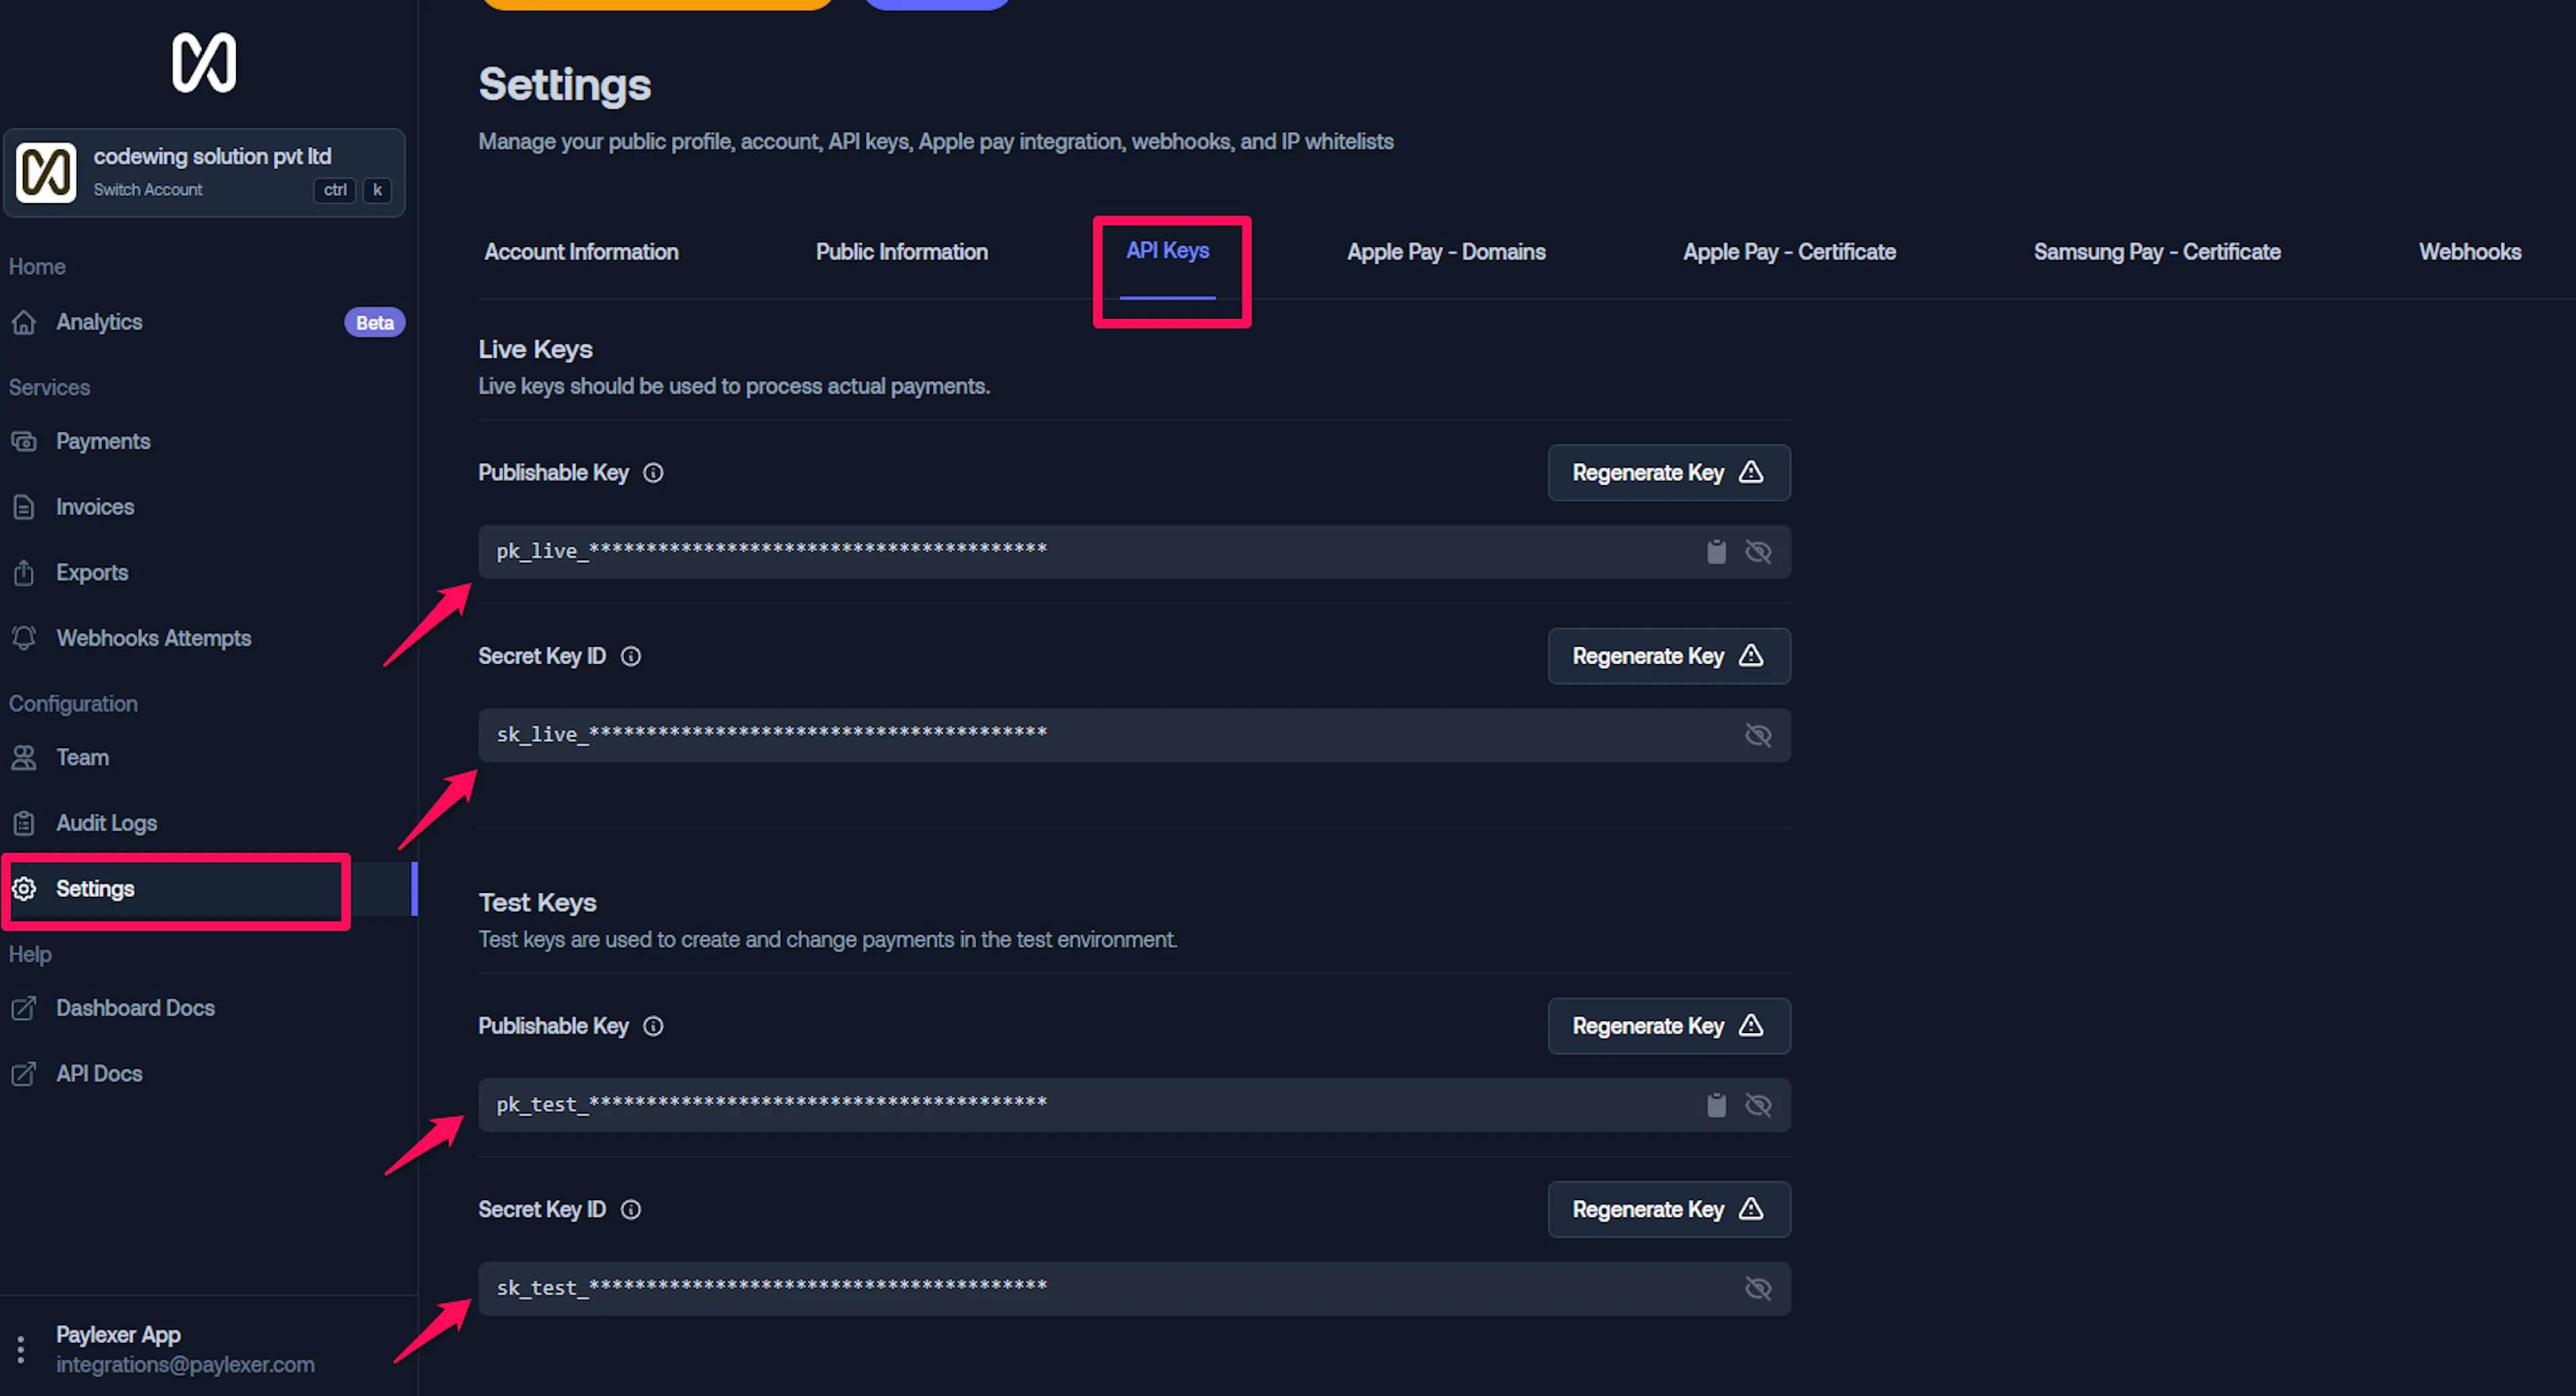
Navigate to API Keys
In the left-hand menu, go to Settings -> API Keys.
You will see two types of keys:
| Key | Label | Use |
|---|---|---|
| Secret Key | sk_live_... / sk_test_... | Server-side only - never expose publicly |
| Publishable Key | pk_live_... / pk_test_... | Client-side safe |
Copy both keys for the next step.
Adding Credentials to PayLexer
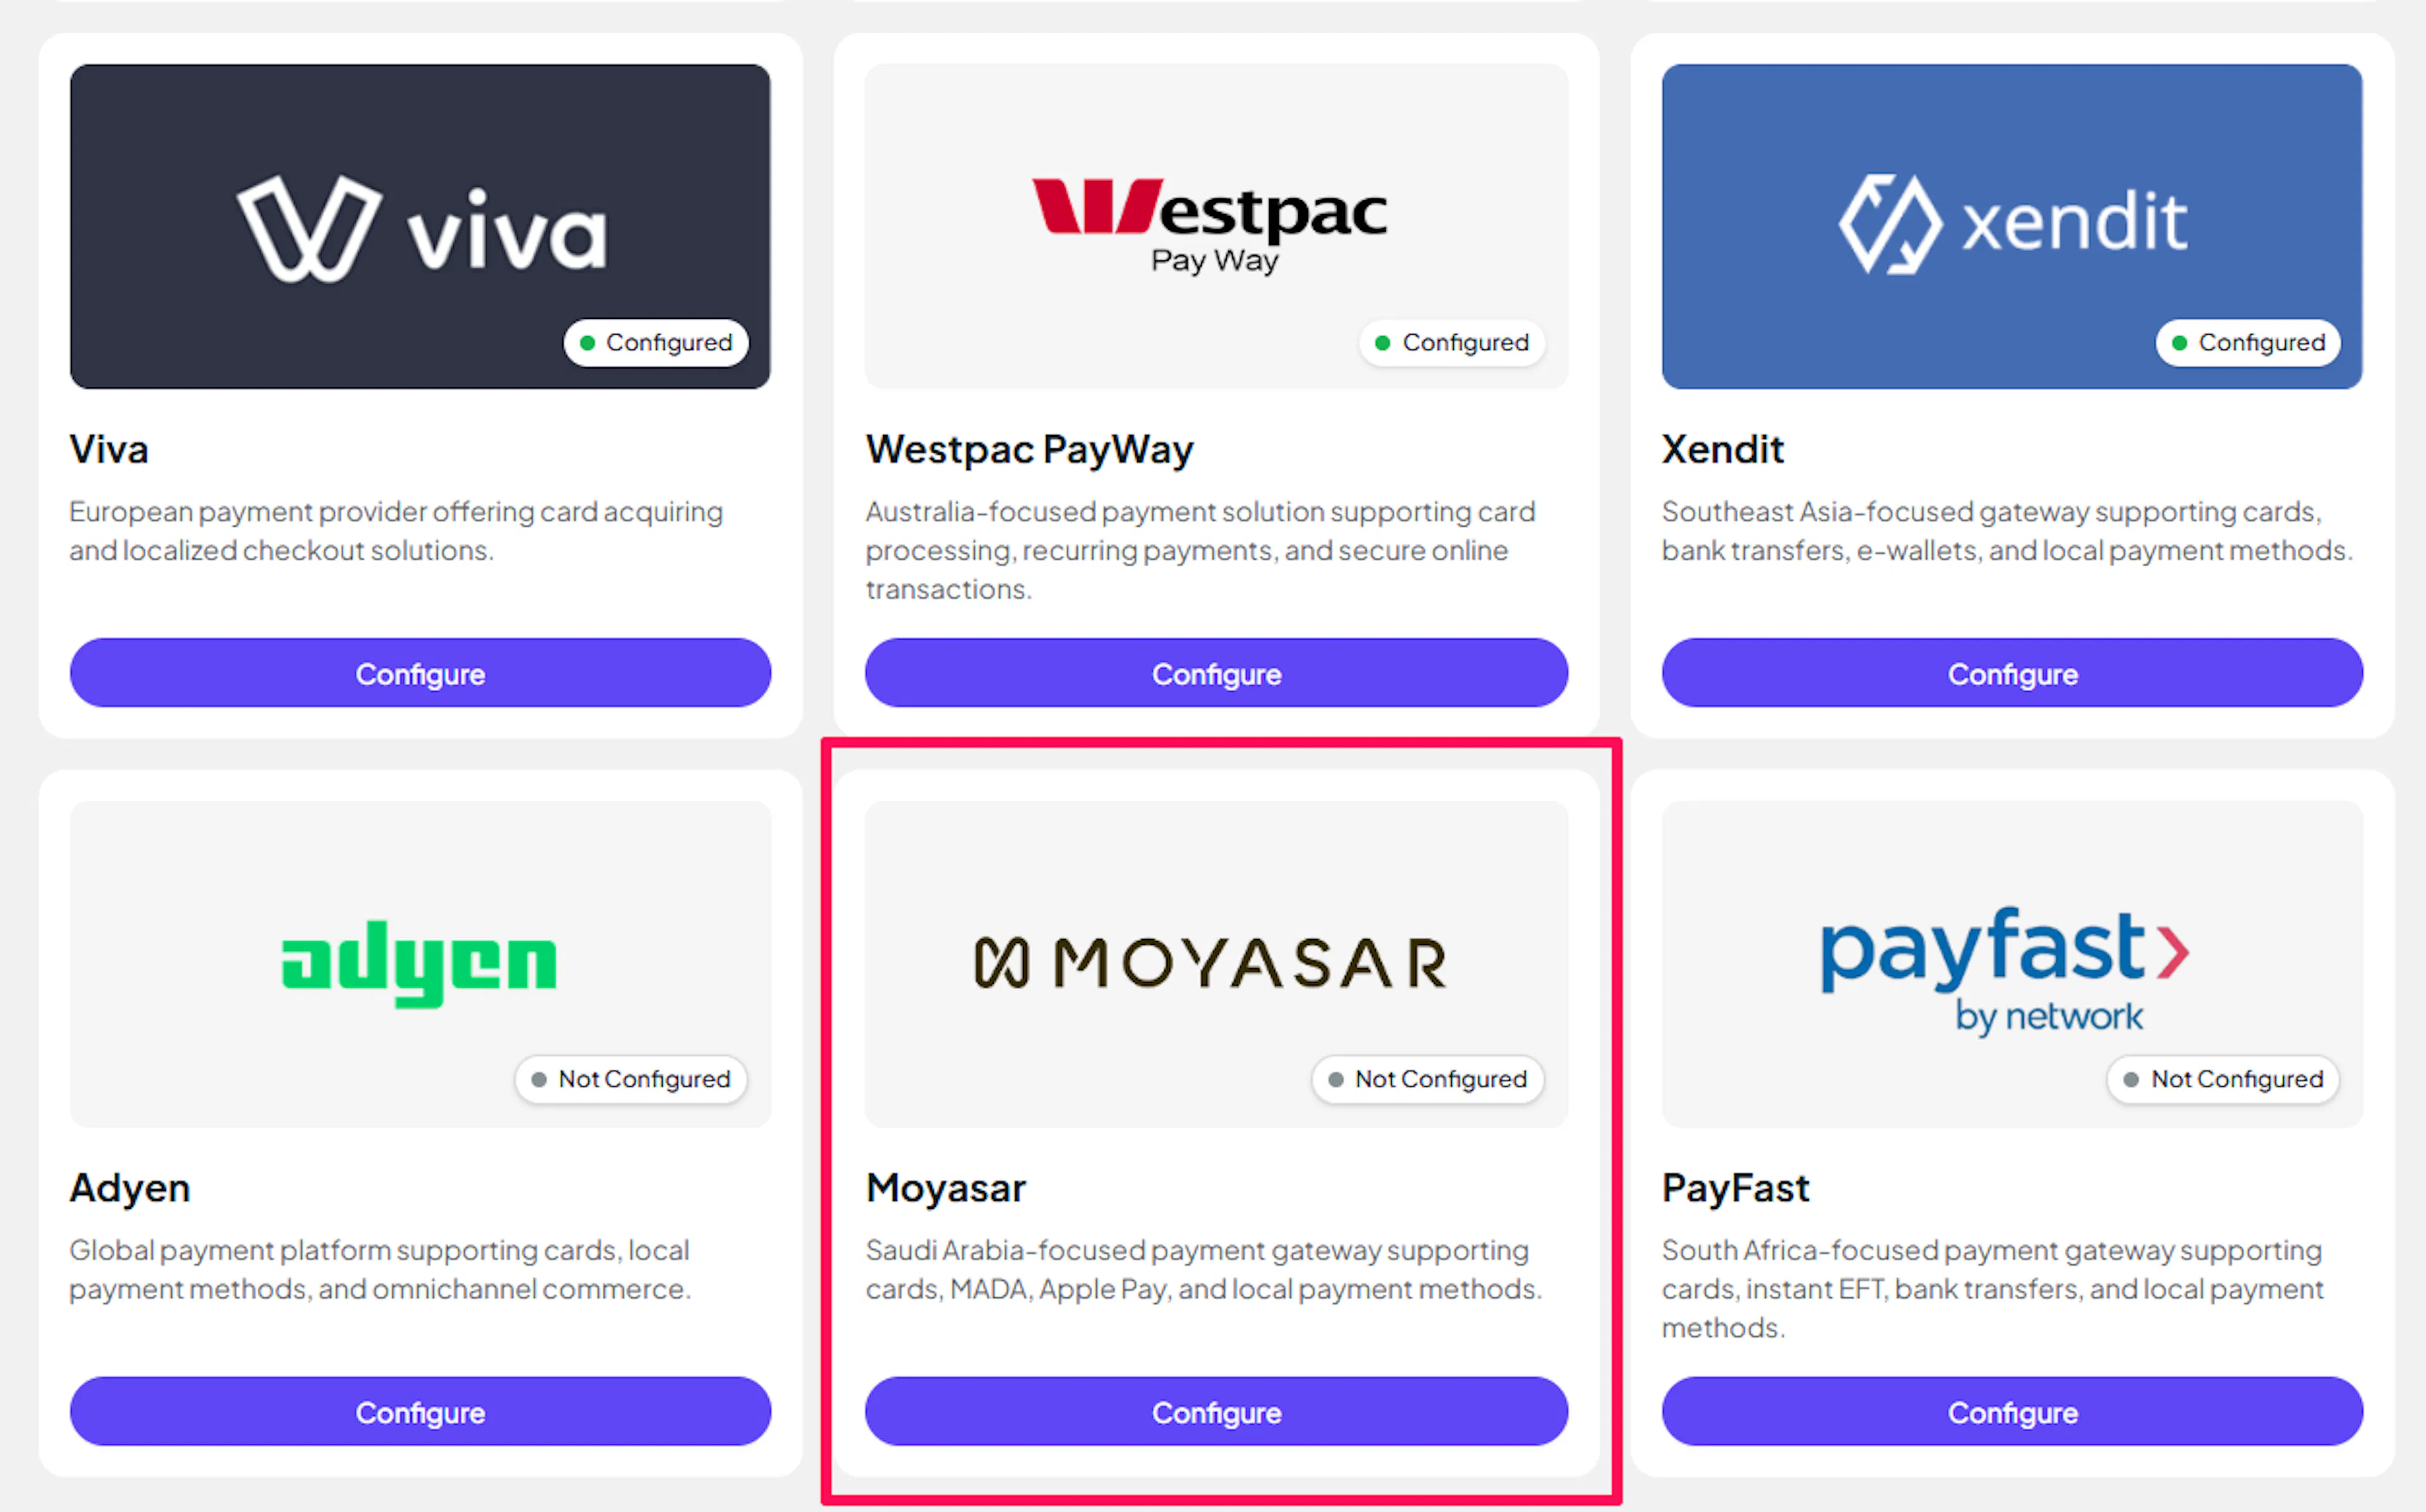
Open PayLexer Dashboard
Log in to your PayLexer dashboard and navigate to Payment Gateways -> Moyasar.
Enter your credentials
Paste the Secret Key and Publishable Key you copied from the Moyasar dashboard.
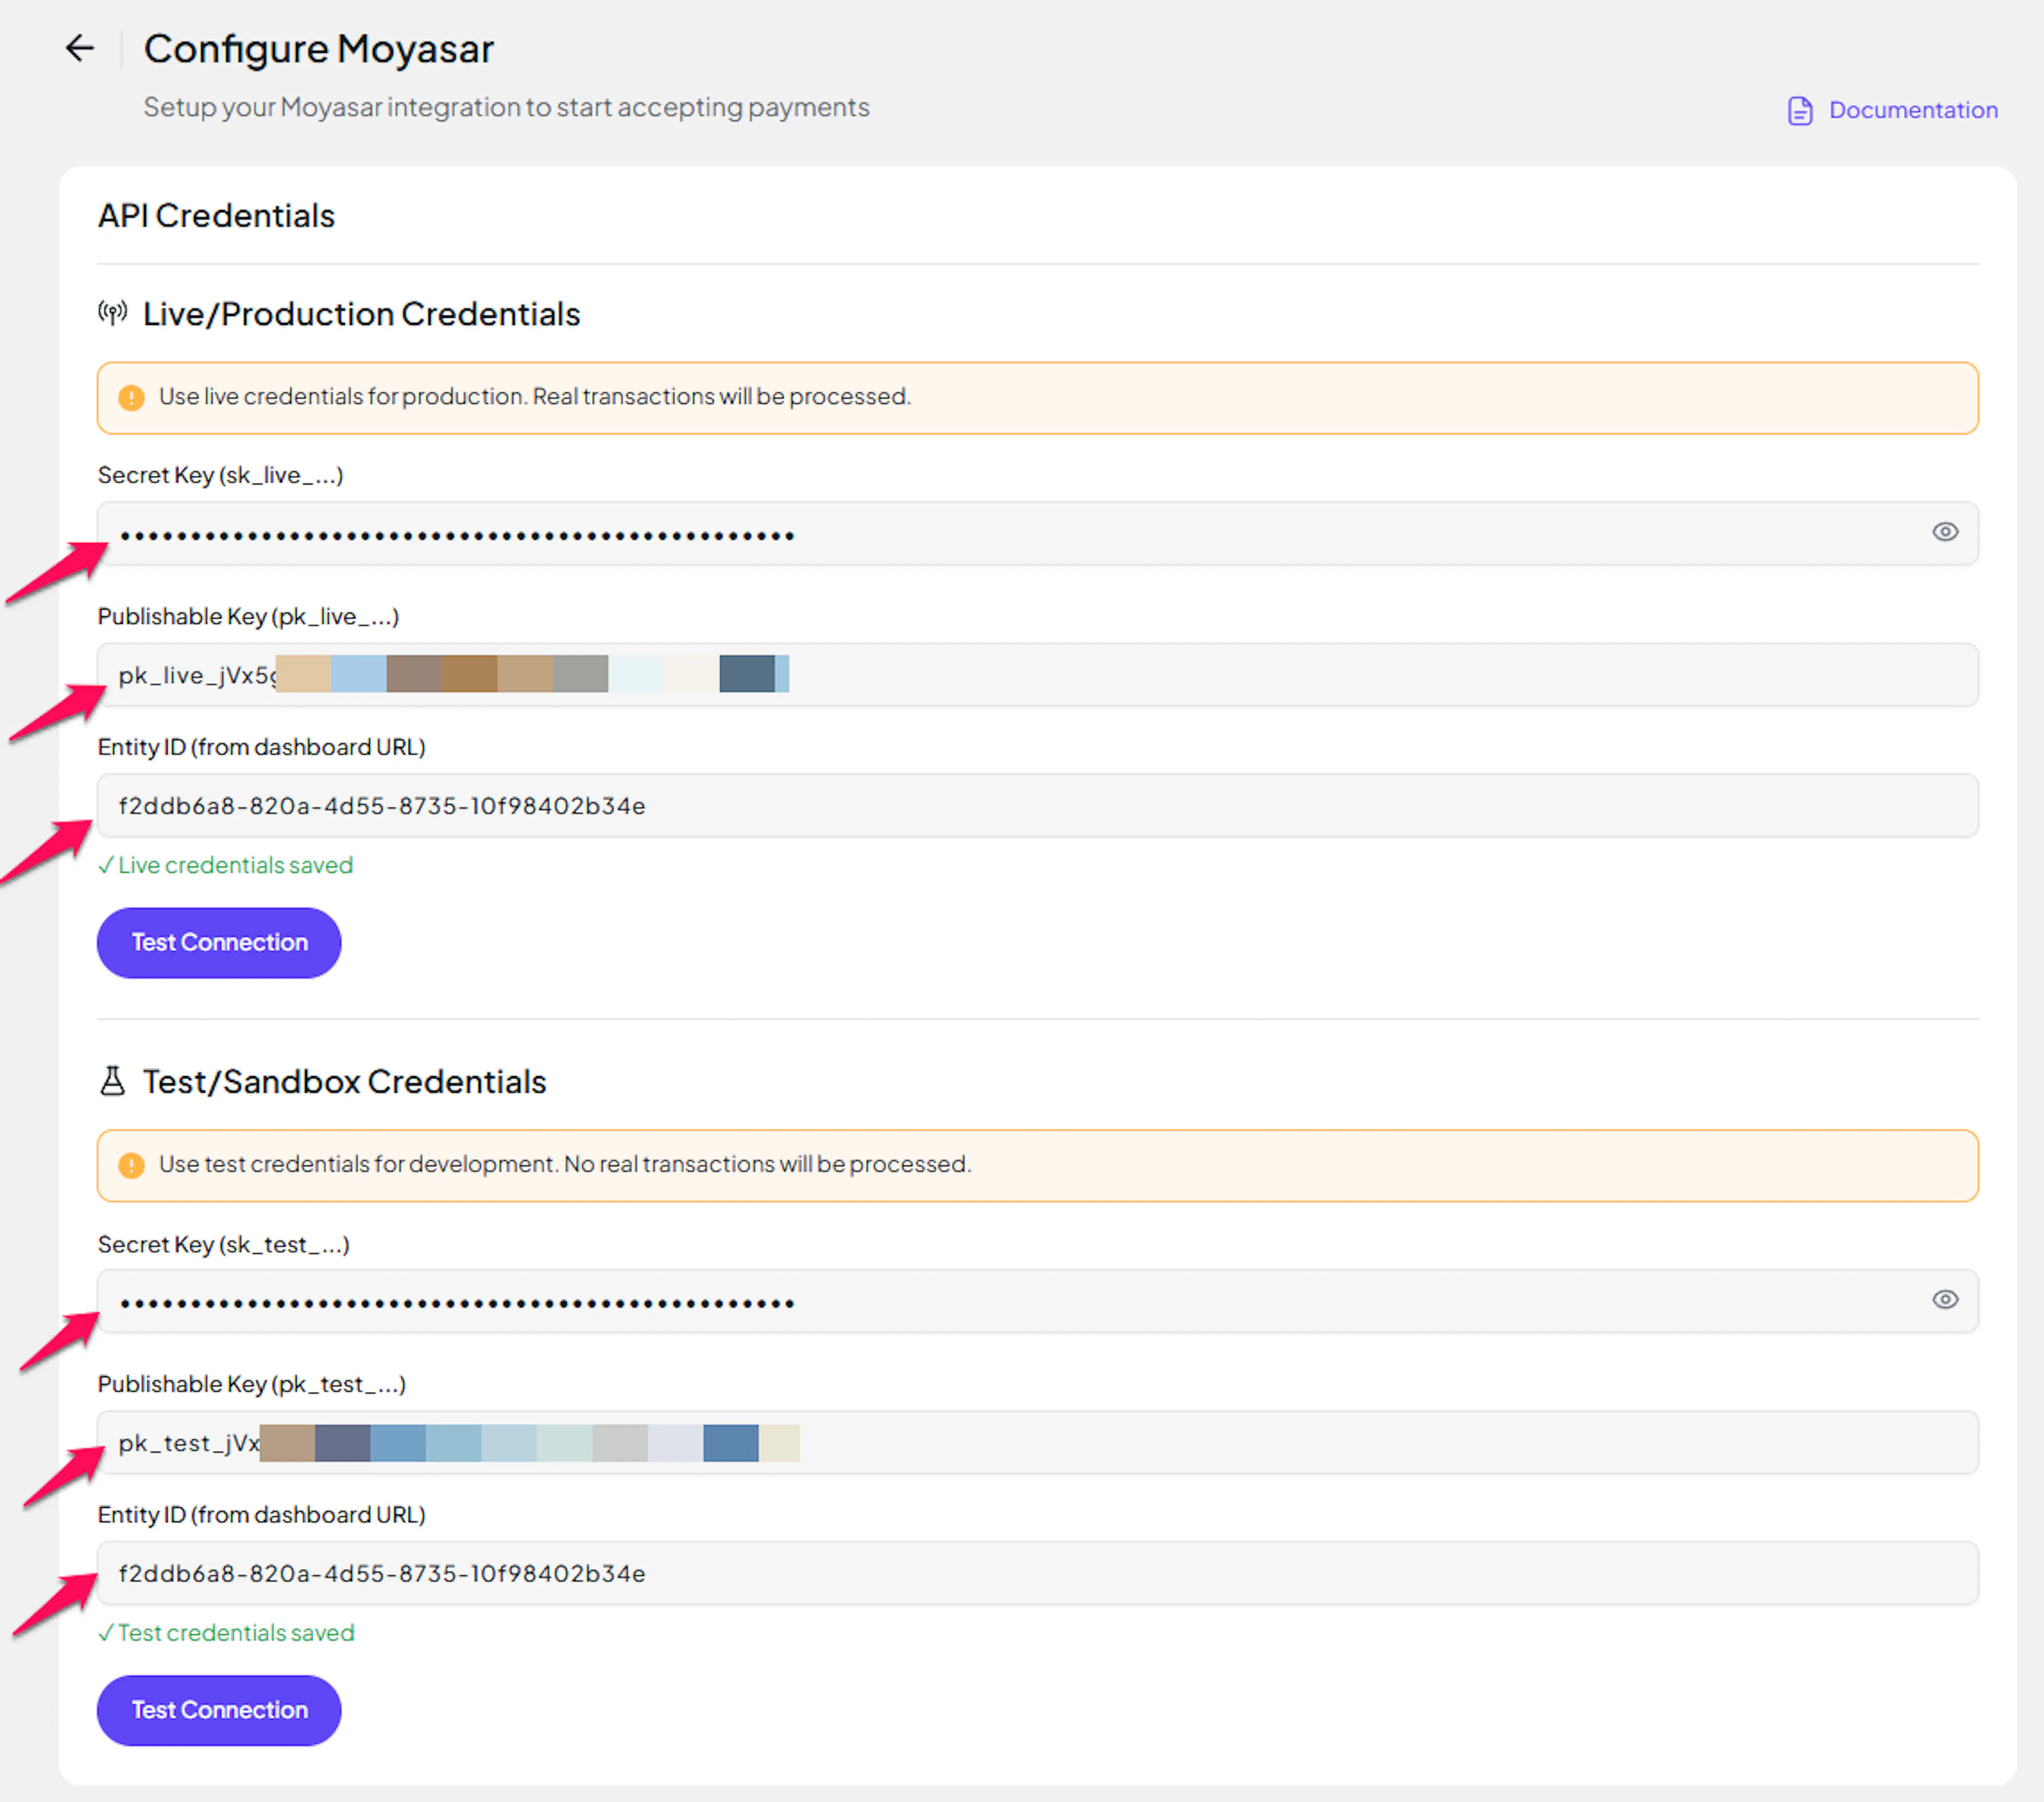
Understanding Live/Production and Sandbox Settings:
| Environment | Purpose |
|---|---|
| Live / Production (Mandatory) | Used for real transactions. Cannot be empty, even when testing. |
| Test / Sandbox (Optional) | Used for testing only. No real money is processed. |
How PayLexer selects credentials:
-
Debug/Test mode ON -> Test credentials are used
-
Debug/Test mode OFF -> Live credentials are used
Test and save
Click Test Connection to verify your credentials, then click Save Configuration.
Configuring Webhooks (Mandatory)
Webhooks enable real-time payment updates and significantly improve reliability.
Benefits of Webhooks:
-
Instant payment status updates
-
Automatic refund processing
-
Dispute notifications
Moyasar uses a merchant-defined secret token for webhook validation - not an HMAC signature. You choose the token value yourself, configure it in the Moyasar dashboard, and paste the same value into PayLexer. Moyasar sends this token inside every webhook payload so PayLexer can verify authenticity.
Go to Webhooks in Moyasar
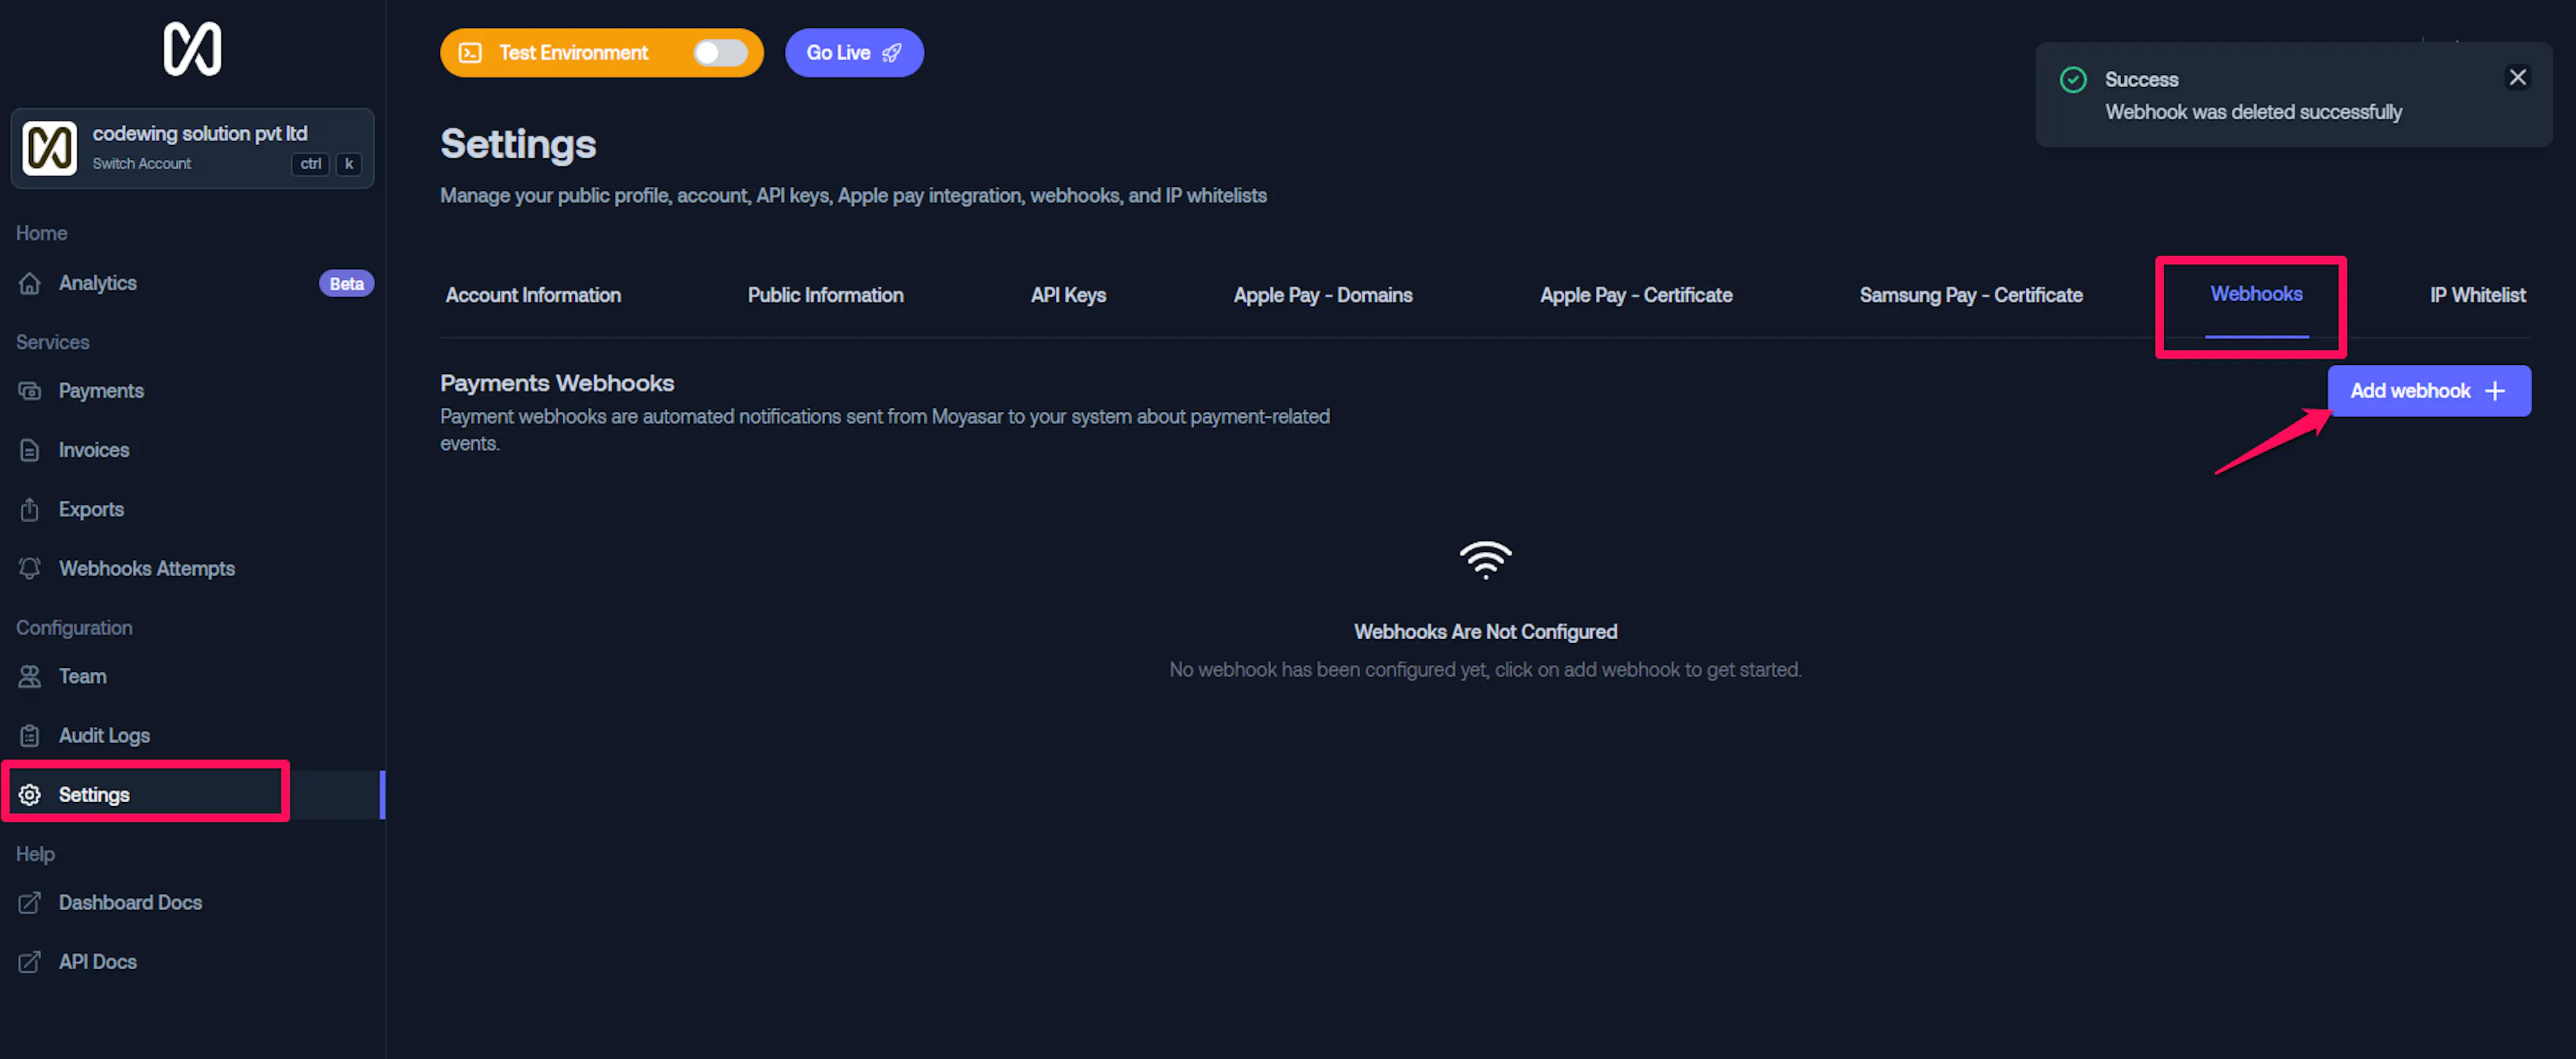
In your Moyasar dashboard, navigate to Settings -> Webhooks and click Add Webhook.
Enter the webhook URL
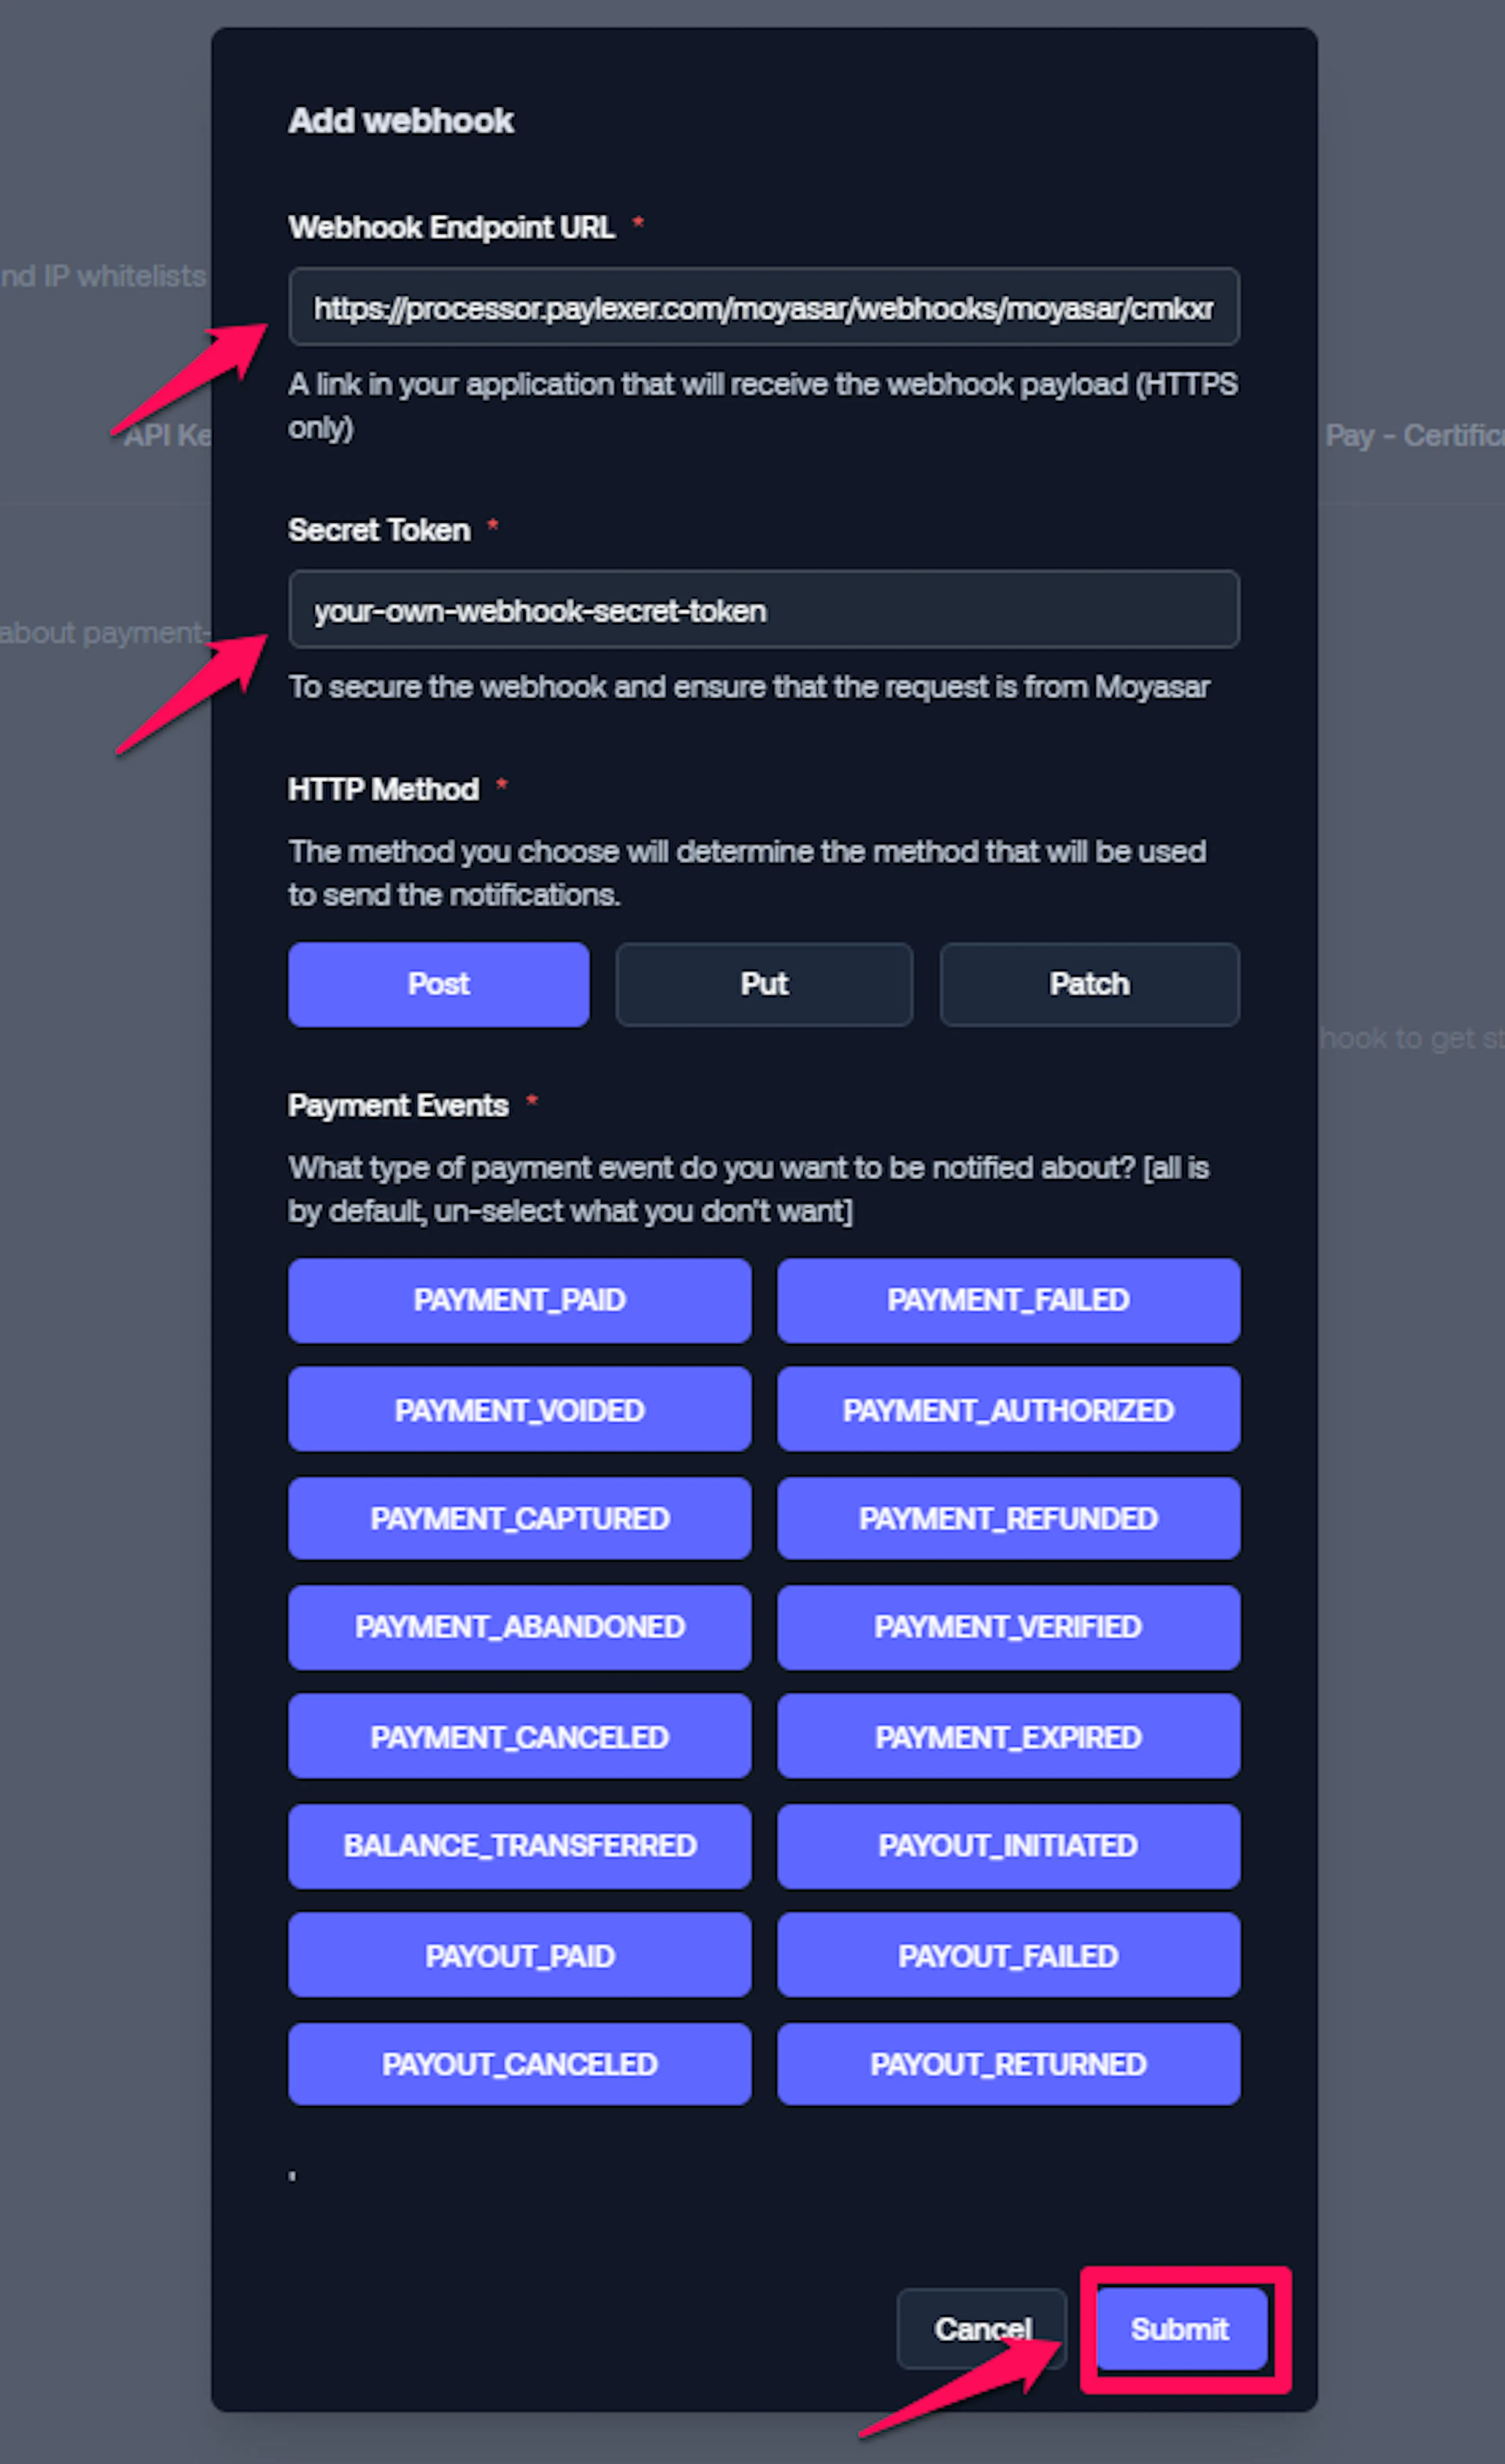
Set the webhook URL to:
https://your-paylexer-connector-url/webhooks/moyasar
Contact the PayLexer team if you are unsure of your connector URL.
Set a secret token
In the Secret Token field, enter a strong, random string of your choosing (at least 32 characters). This is the value Moyasar will send back in every webhook payload for verification.
Copy this token - you will need it in the next step.
Select webhook events
Enable the following event types:
-
payment_paid -
payment_failed -
payment_authorized -
payment_captured -
payment_refunded -
payment_voided -
payment_abandoned -
payment_verified
Click Save to create the webhook.
Add the Webhook Secret to PayLexer
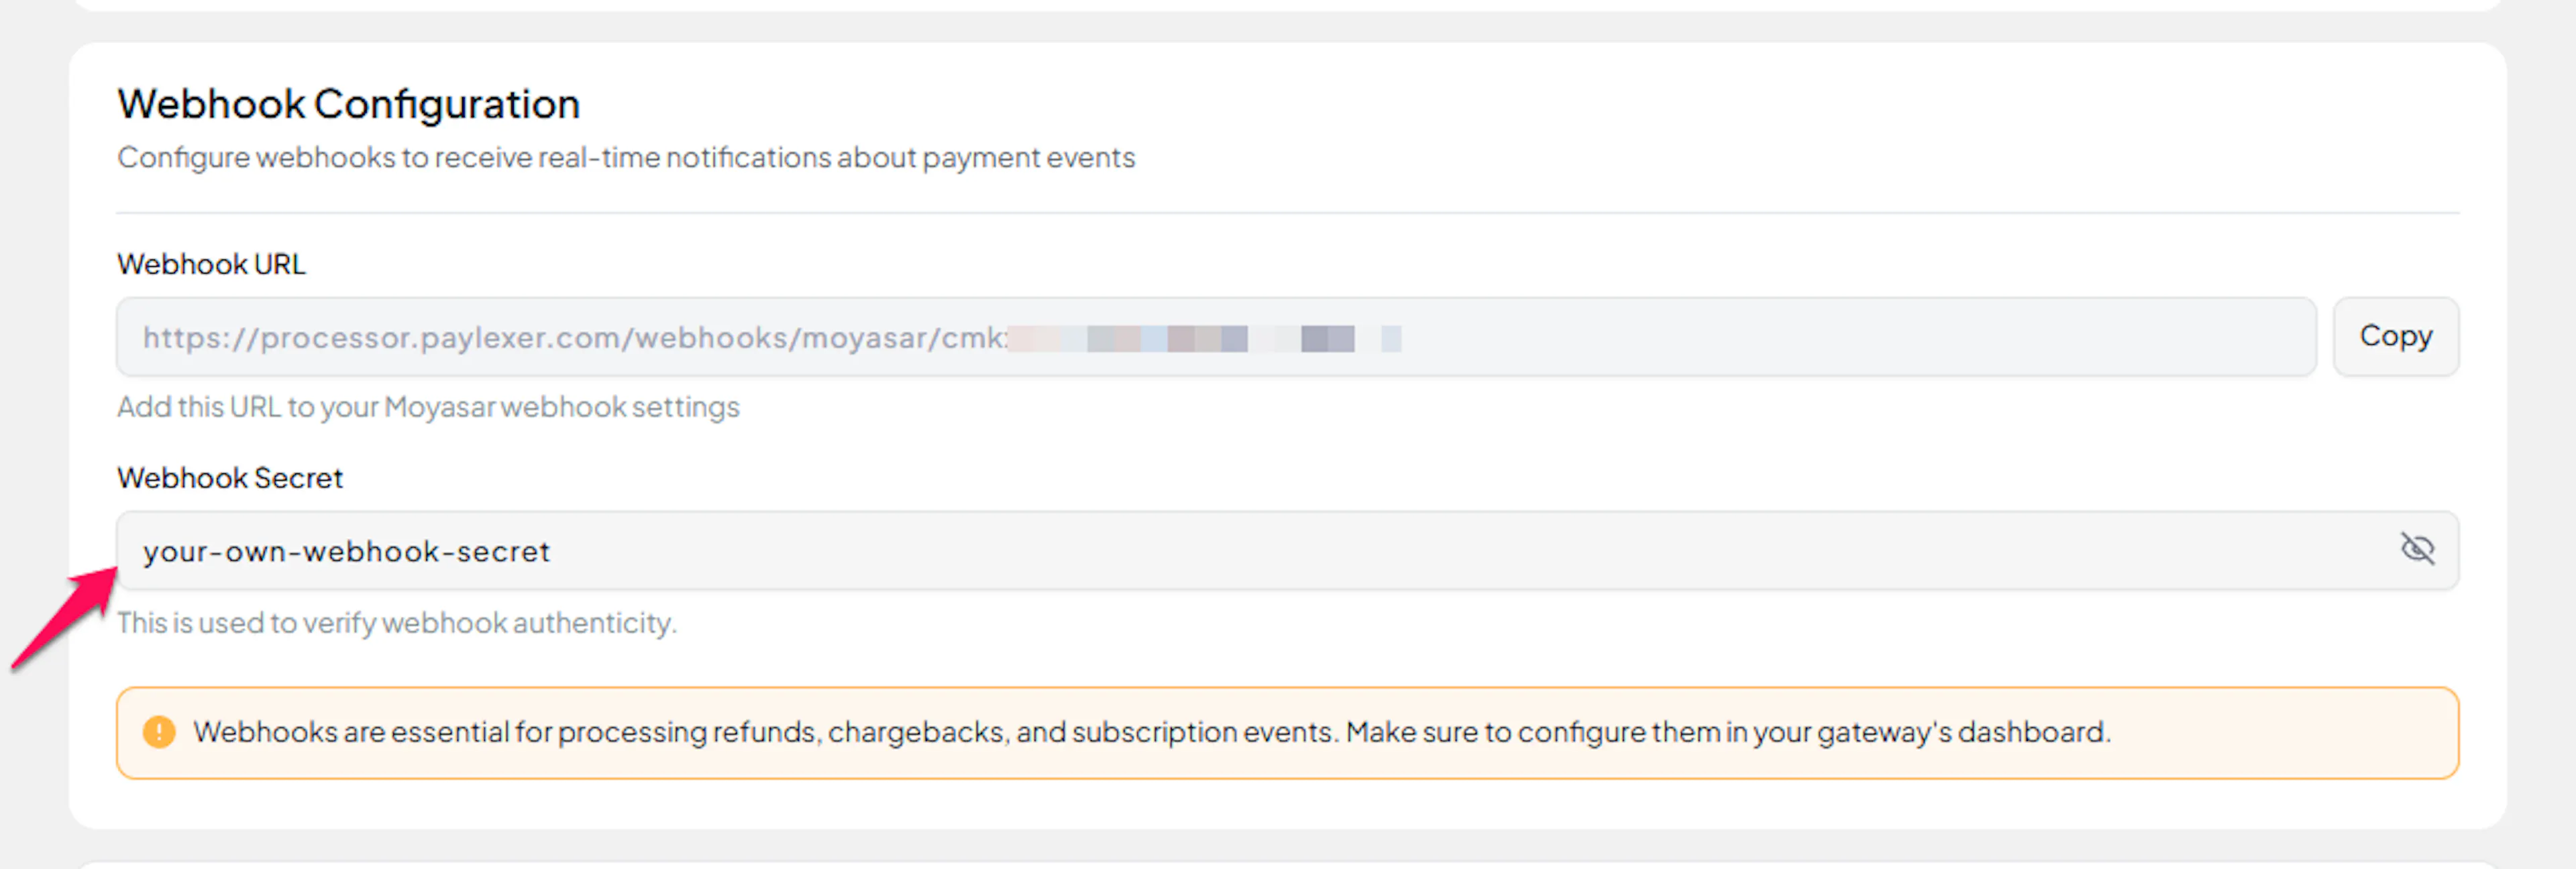
In your PayLexer dashboard, go to Payment Gateways -> Moyasar and paste the secret token you set in Moyasar into the Webhook Secret field.
Click Save Configuration.
Integrate Moyasar to Your Website
If you have already added and configured your site, you can enable Moyasar in your existing setup.
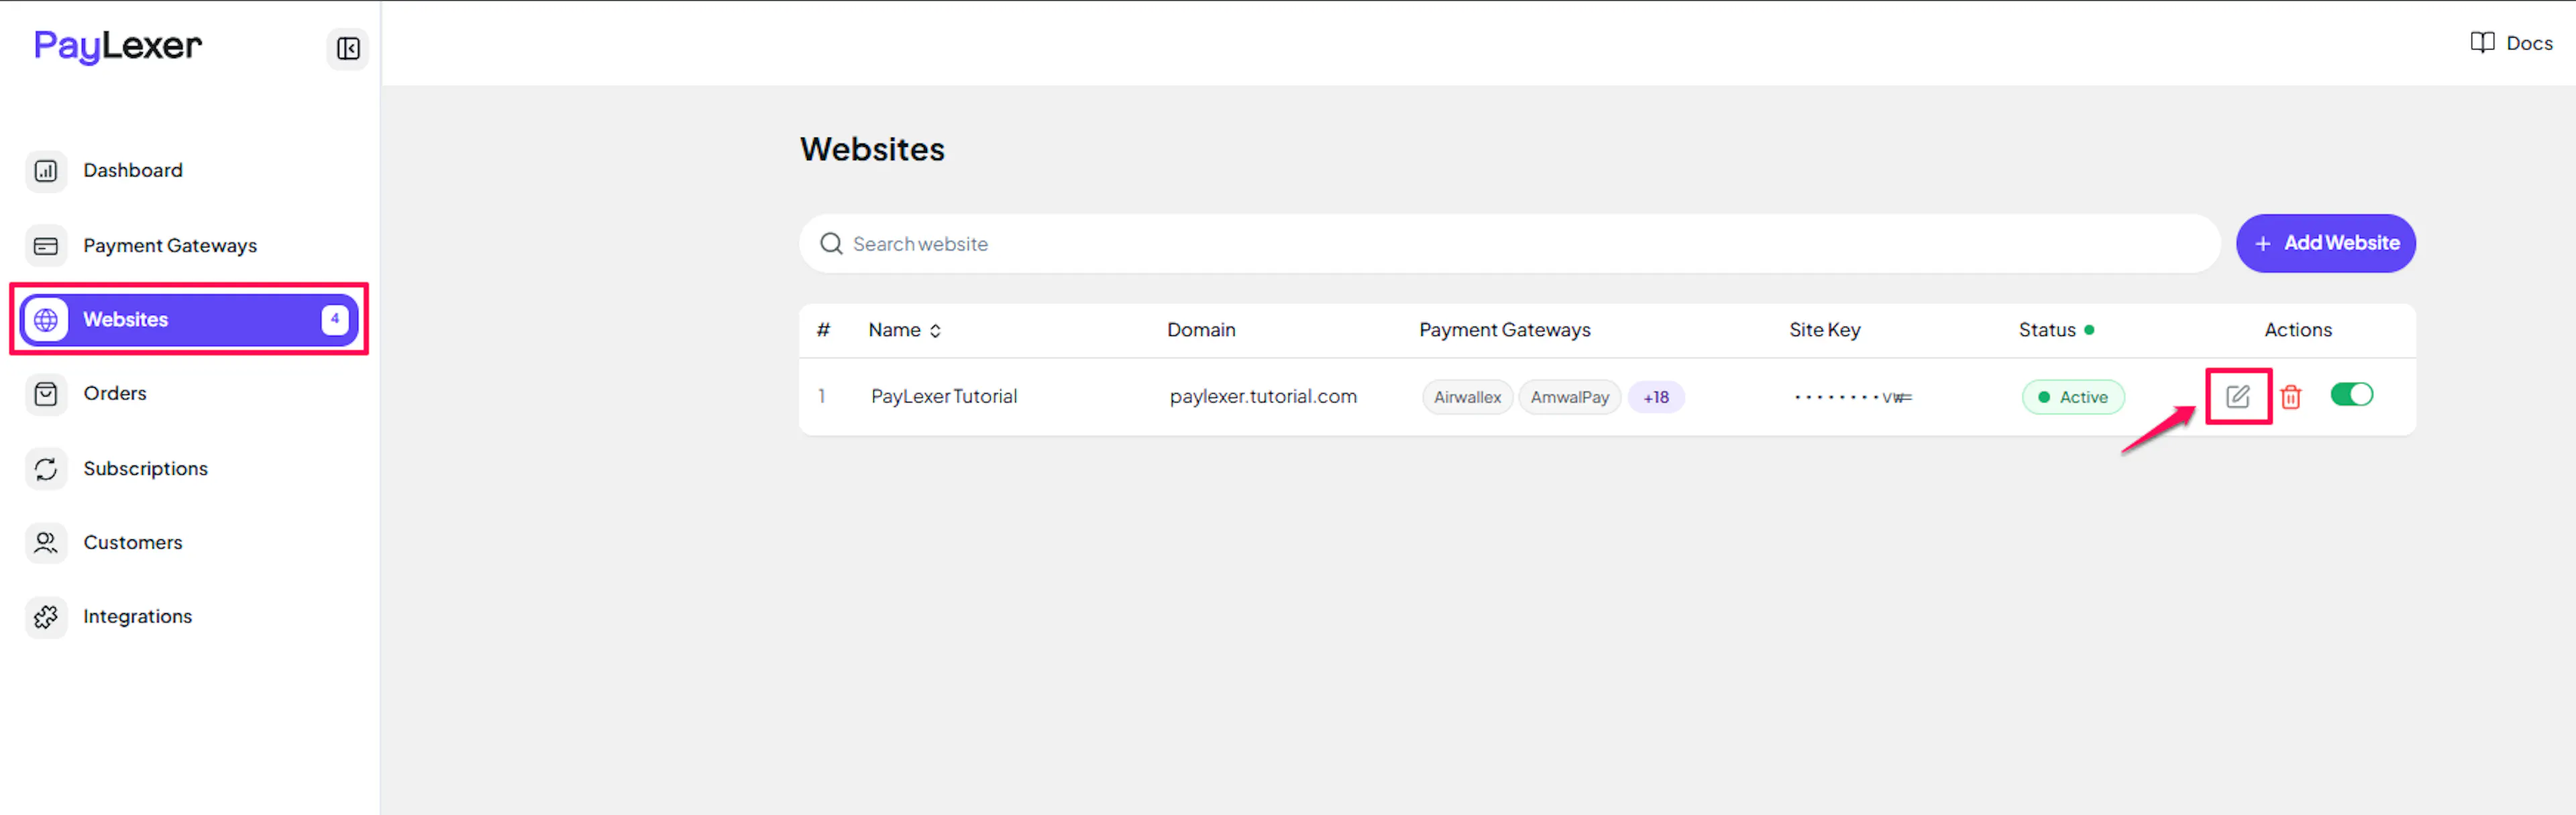
Go to Websites
Navigate to Websites in your PayLexer dashboard.
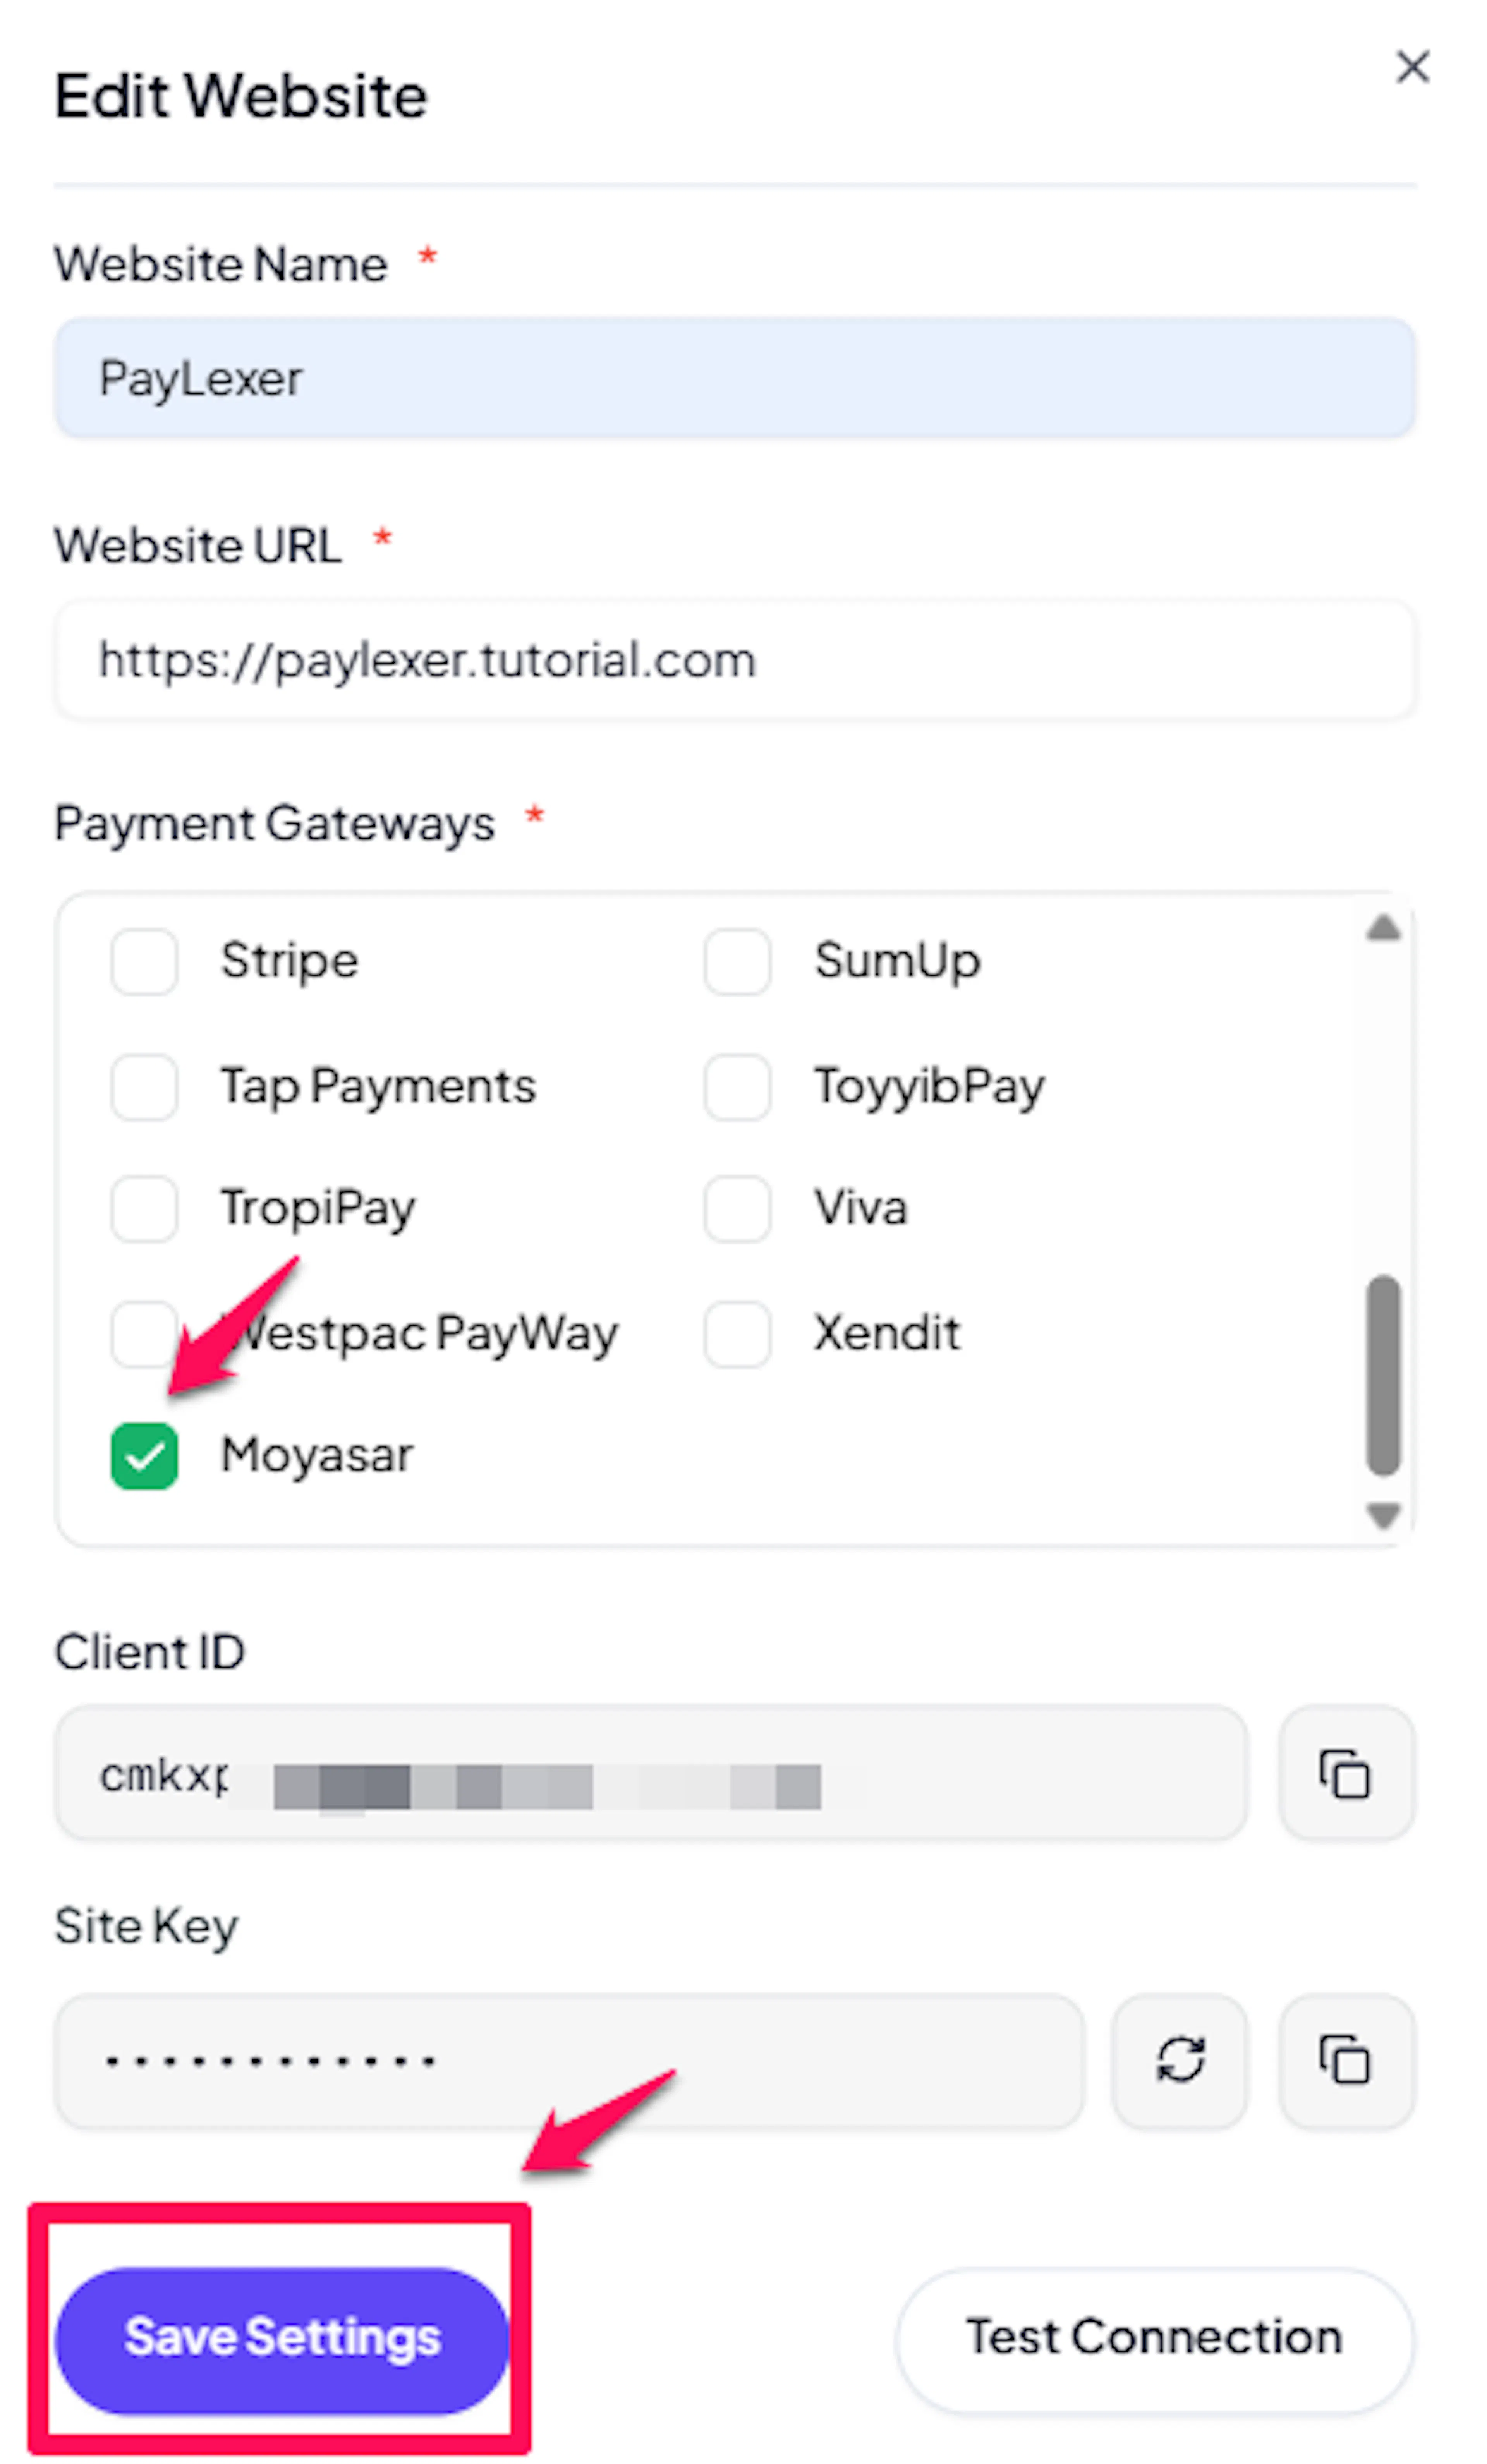
Edit your website
Click the Edit Icon of your added website.
Enable Moyasar
Click the checkbox to enable Moyasar for the website.
If you haven't added a website yet, Continue to Add Your Website →
Troubleshooting
Best Practices
-
Test payments in Moyasar's sandbox environment before enabling live credentials
-
Always configure webhooks - Moyasar's hosted checkout relies on webhooks for reliable payment status updates
-
Use a strong, randomly generated string (32+ characters) for your Webhook Secret token
-
Keep your Secret Key server-side only - never expose it in client-side code or public repositories
-
Use Test credentials in PayLexer when Debug Mode is ON, and Live credentials when going live
FAQs
Still Have Questions?
-
Moyasar Support: Moyasar Help Center
-
PayLexer Support: Contact Support
For API details and advanced configuration, see the Moyasar developer documentation.