

PayTabs
Connect PayTabs to PayLexer to accept cards, mada, KNET, STC Pay, Apple Pay, and other local MENA payment methods through a hosted payment page.
PayTabs is one of the Middle East and North Africa's established payment providers, licensed across Saudi Arabia, the UAE, Egypt, Oman, Jordan, Kuwait, Iraq, Morocco, and Qatar, with a separate Global profile for merchants selling outside those markets. It fronts the card networks alongside the local rails MENA shoppers use, including mada, KNET, STC Pay, and Apple Pay. PayLexer connects to PayTabs' hosted payment page, so the shopper is redirected to PayTabs to enter their card, then returned to your site once the payment is done. Your site never handles a card number.
- Supported Regions (Merchant Accounts): Saudi Arabia, United Arab Emirates, Egypt, Qatar, Kuwait, Jordan, Oman, Iraq, Morocco, plus a Global profile
- Supported Currencies: AED, BHD, EGP, EUR, GBP, HKD, IDR, INR, IQD, JOD, JPY, KWD, MAD, OMR, PKR, QAR, SAR, USD
PayTabs enables currencies per account, not by country. Your account only supports currencies activated by PayTabs. To add another currency, contact PayTabs at customercare@paytabs.com. Confirm supported currencies before going live to avoid "Currency not available" checkout errors.
Recurring subscriptions are not supported for PayTabs. This integration handles one-time payments only.
Supported Features
- Hosted payment page - Shoppers are redirected to PayTabs to pay, then returned to your site, keeping card details off your pages
- Cards plus the local MENA payment methods including mada, KNET, STC Pay, and Apple Pay
- Signed server-to-server notifications - PayTabs retries notifications up to five times, ensuring orders are completed even if shoppers leave before returning
- Full and partial refunds support
Before You Start
Make sure you have:
- PayTabs Merchant Account – Don't have one? Register for PayTabs →
- PayLexer Account – Required to configure the integration. Create your account →
- A website where you want to integrate
Looking for a different payment processor? View all supported gateways →
Configuring PayTabs
You need a Profile ID, Server Key, and Region from PayTabs for this integration. All three come from your PayTabs merchant dashboard, and each PayTabs profile has its own set.
Getting API Credentials
Register and complete PayTabs onboarding
Create your account at the PayTabs merchant registration page.
Live accounts require PayTabs' own onboarding review, including commercial registration, ownership documents, bank details, and a description of your business. Requirements vary by country.
A test profile is created the moment you register and needs none of that paperwork, so you can configure and test the entire integration in PayLexer while your live account is still under review.
Understand test and live profiles
PayTabs issues a completely separate profile for test and for live, each with its own Profile ID, Server Key, and settings. One PayTabs login sees all of your profiles.
To switch profiles, click the branch icon at the top right.
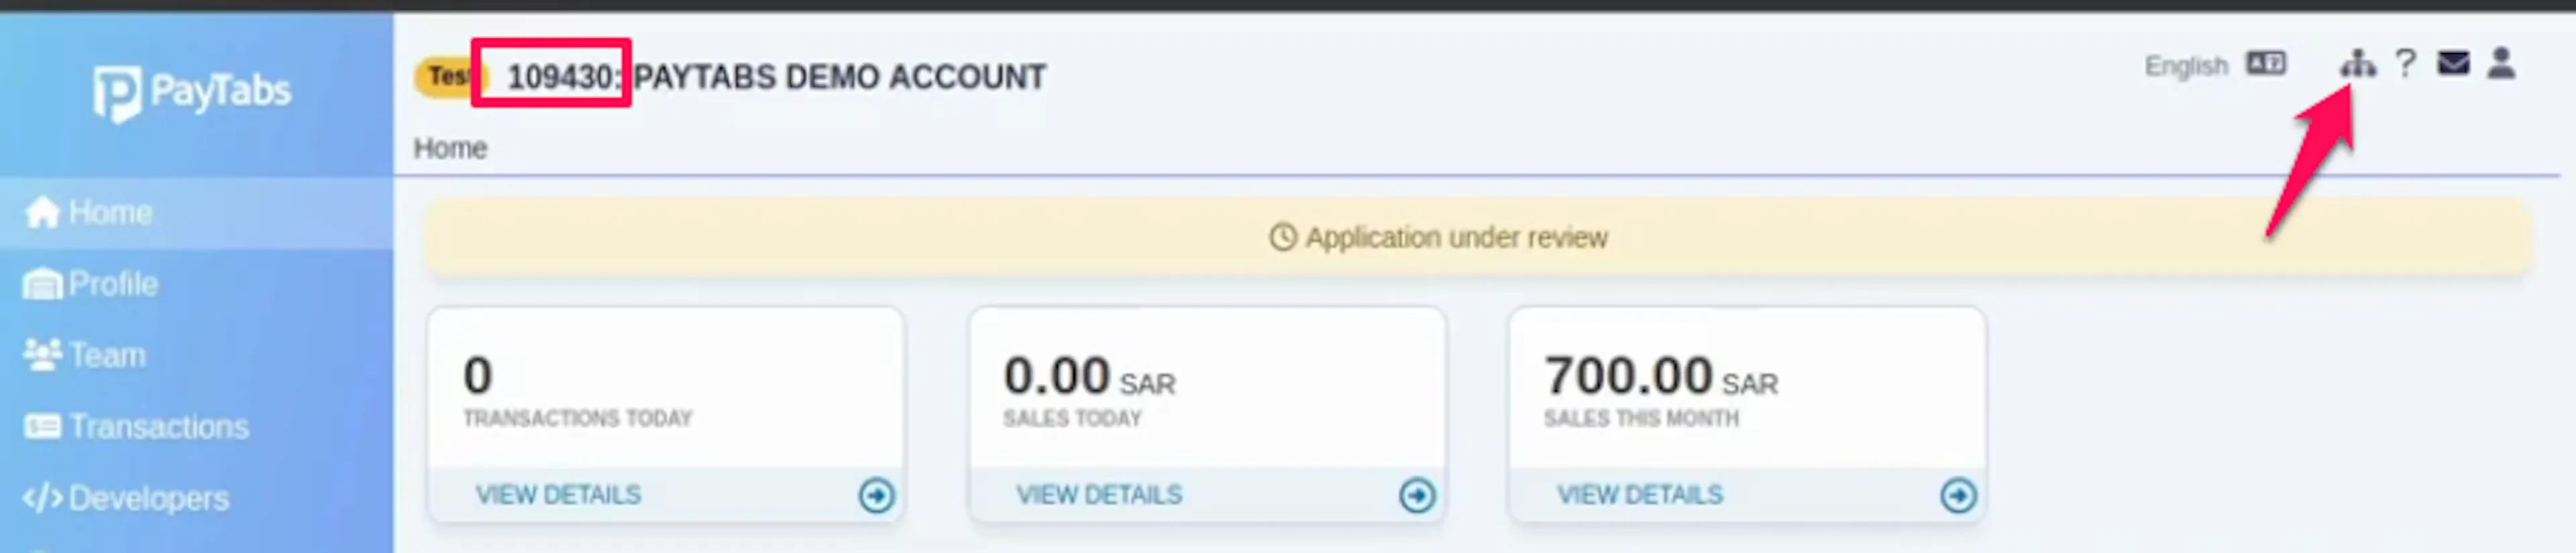
Your test profile accepts test cards only and stays active permanently, so testing never disturbs live processing.
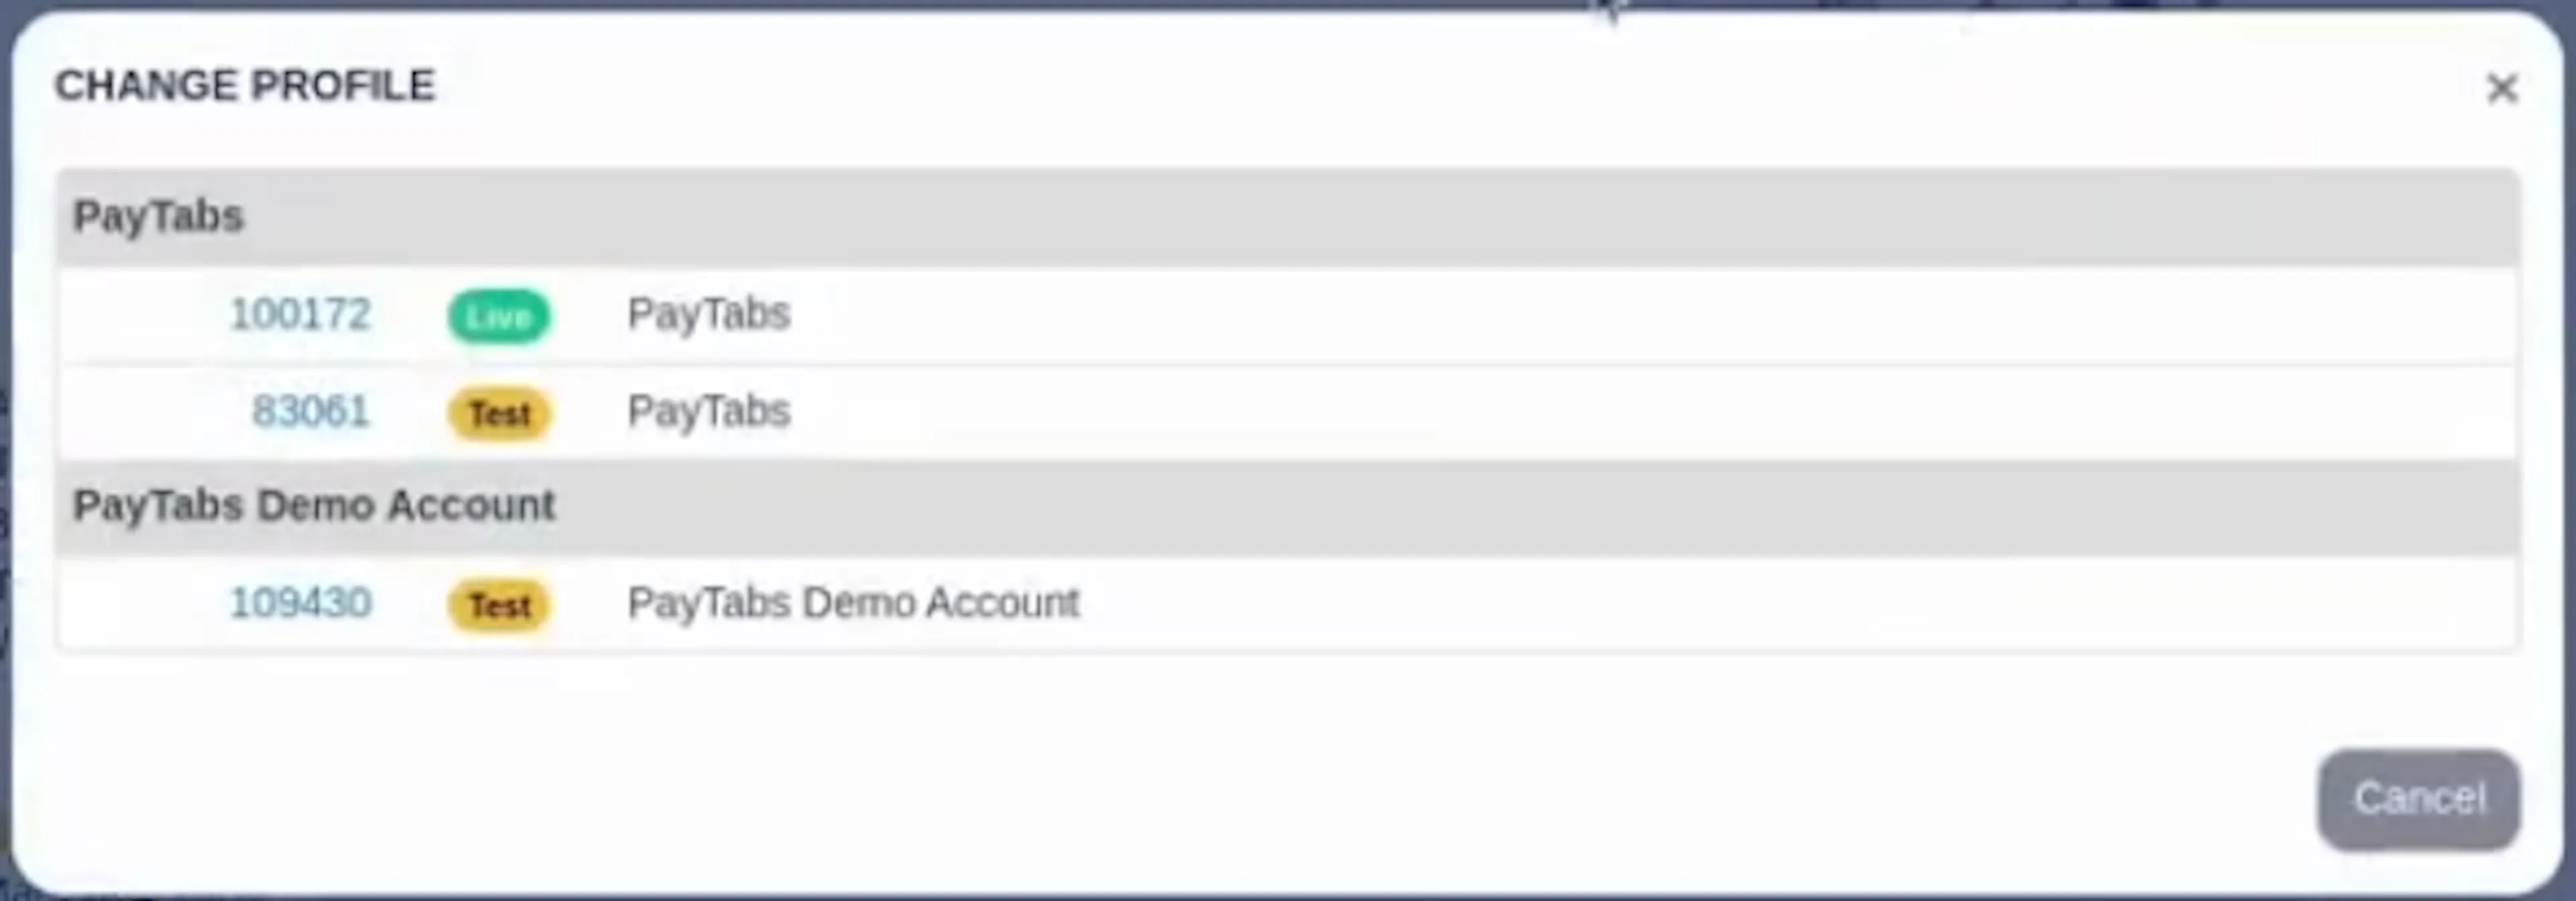
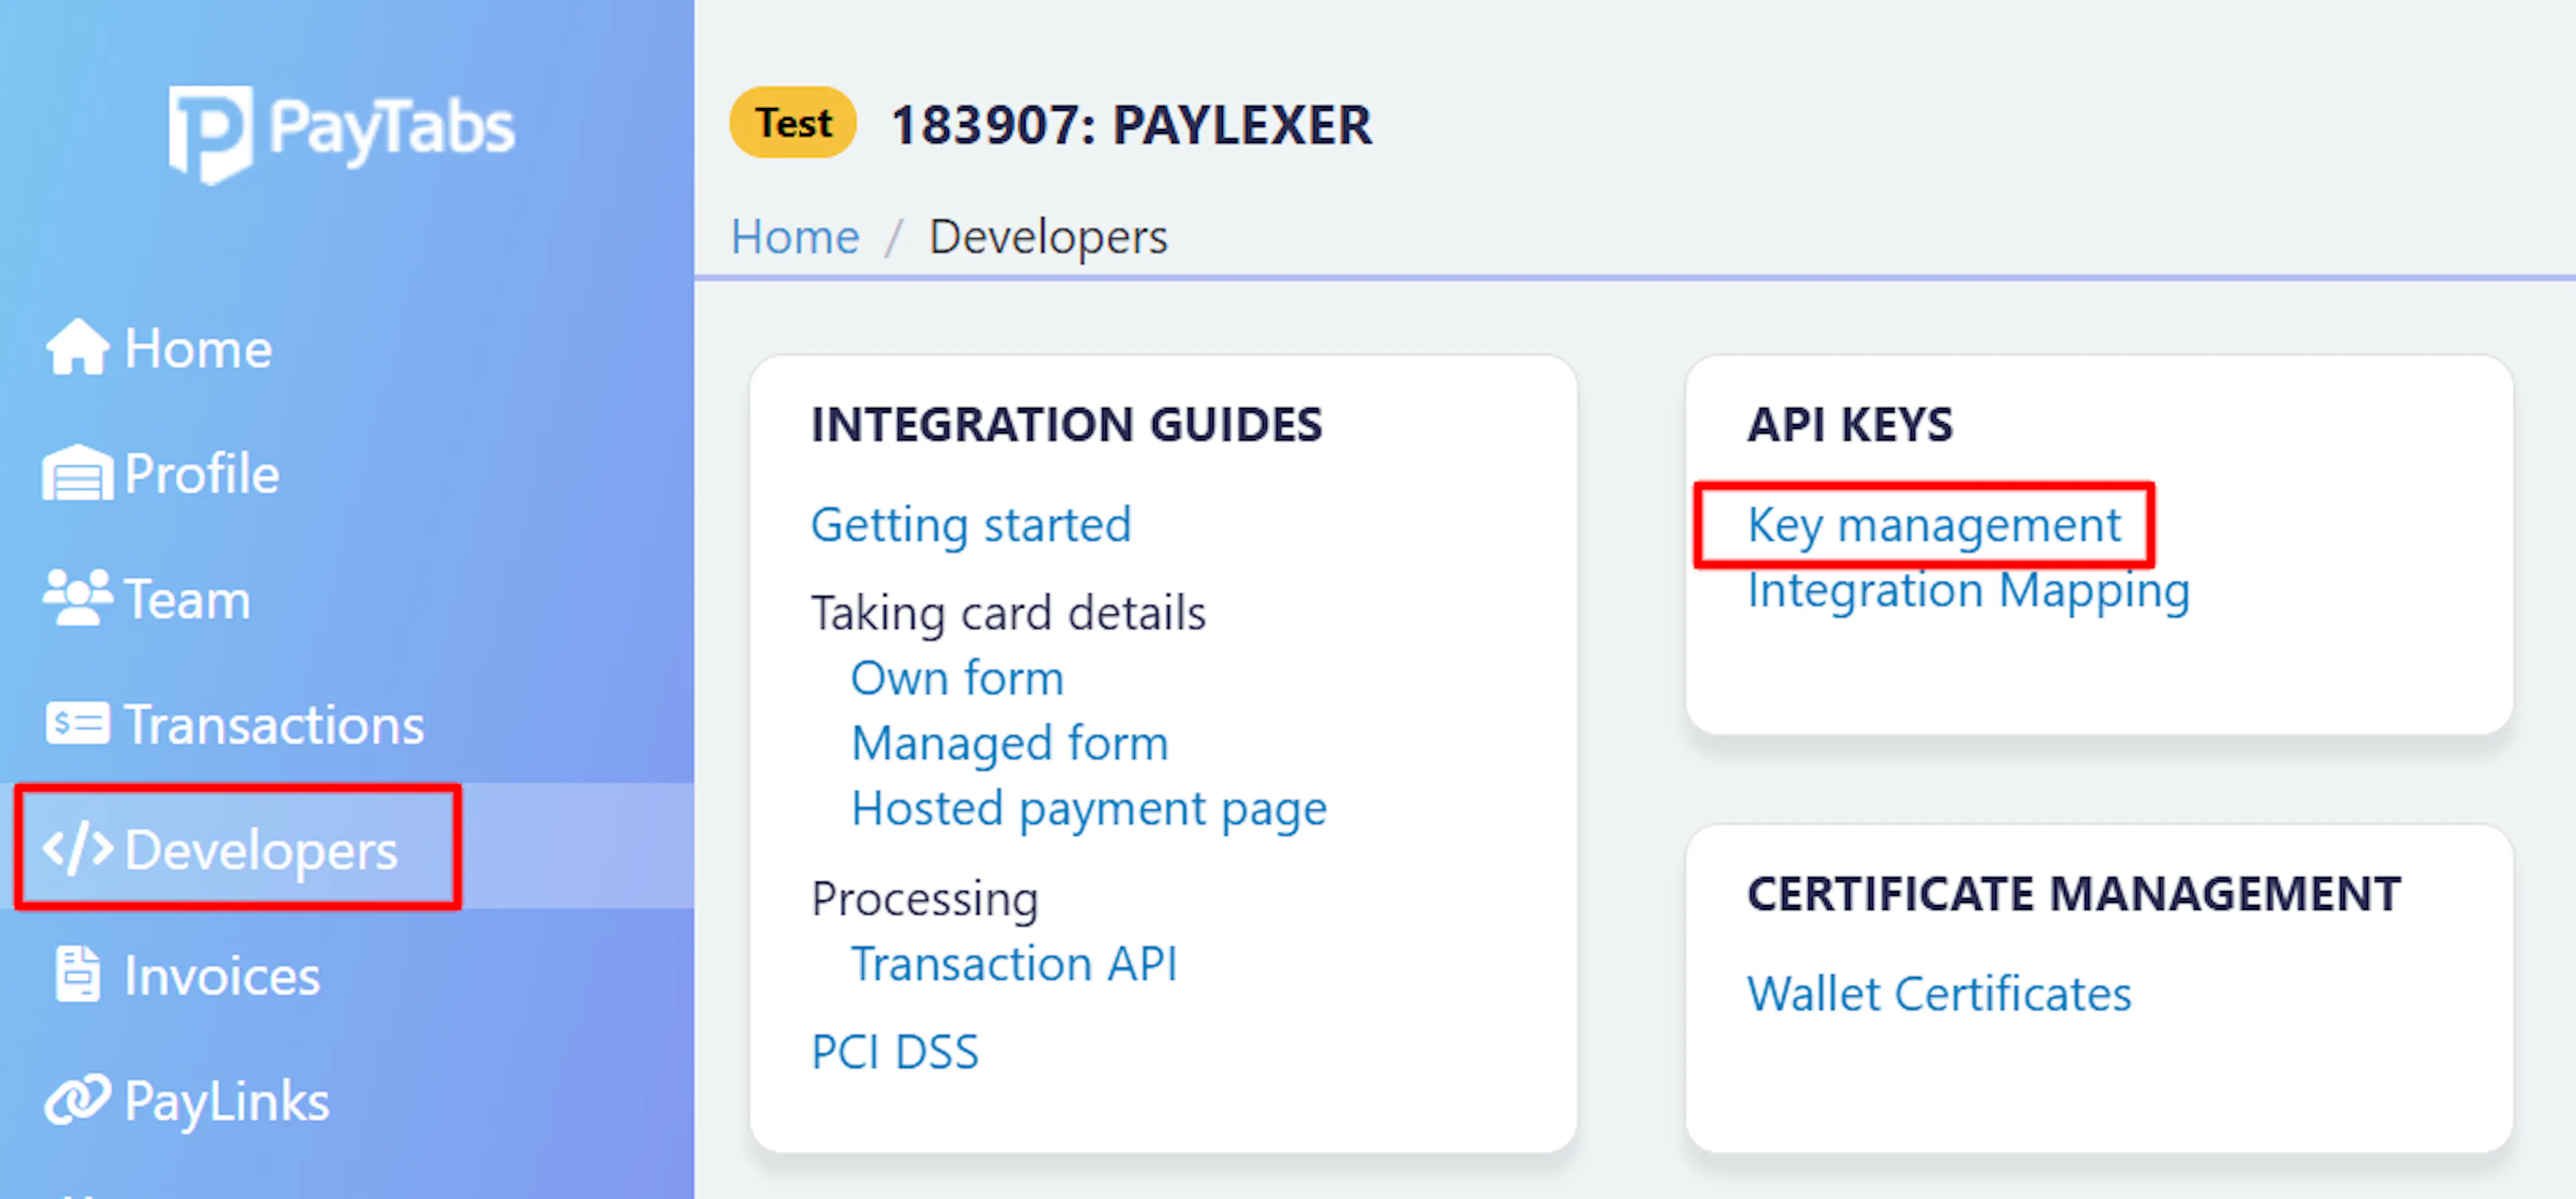
Copy your Profile ID and Server Key
With the profile you want selected, go to Developers → Key Management in your PayTabs merchant dashboard and copy:
- Profile ID - the account number PayTabs issues. Not a secret; it is sent with every request.
- Server Key - the private key that authenticates every request. PayTabs also uses it to sign the notifications it sends back, so it doubles as your notification key. Treat it like a password.
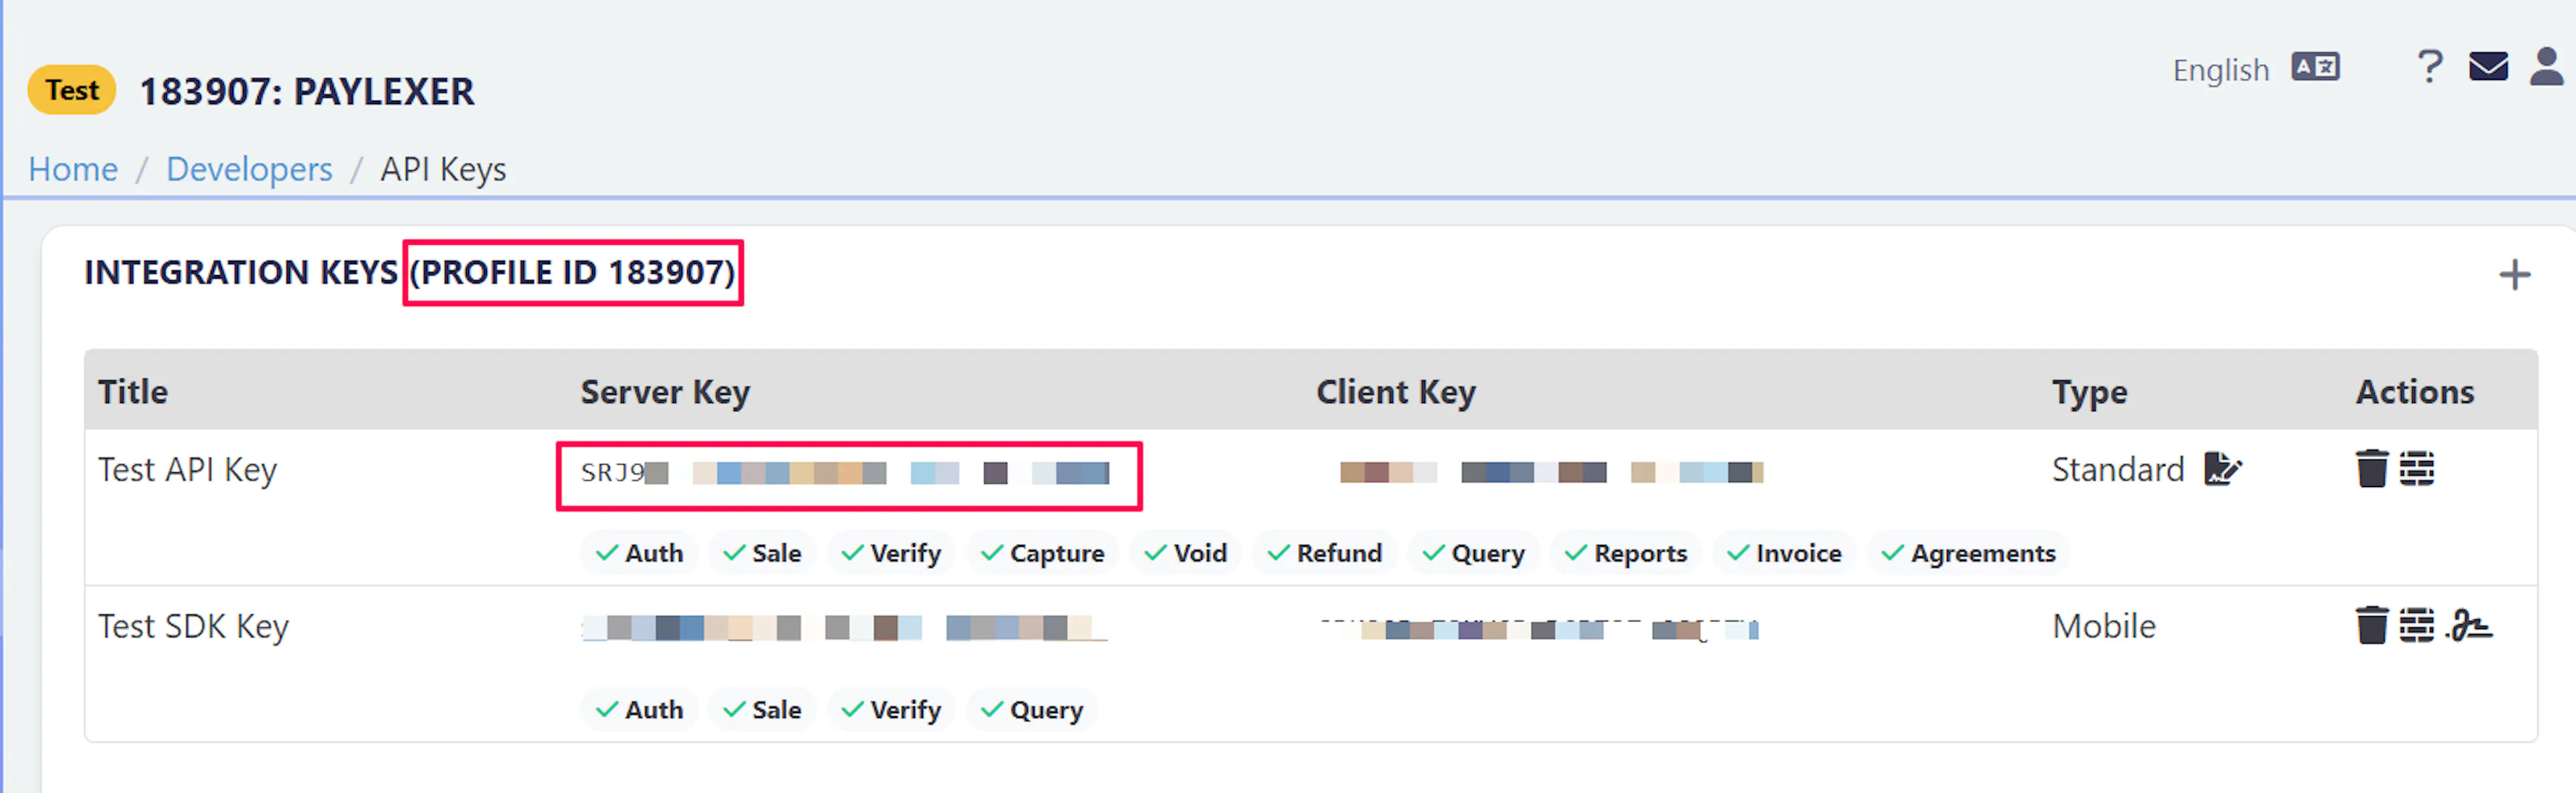
There is no third webhook secret to collect. The Server Key is what PayLexer uses to verify PayTabs' notifications.
Identify your Region
Your PayTabs account belongs to exactly one regional server. Check which one under Developers → Getting Started → Transaction API in your dashboard, and note the country it names.
| Region | API Endpoint |
|---|---|
| KSA | https://secure.paytabs.sa |
| UAE | https://secure.paytabs.com |
| Egypt | https://secure-egypt.paytabs.com |
| Oman | https://secure-oman.paytabs.com |
| Jordan | https://secure-jordan.paytabs.com |
| Kuwait | https://secure-kuwait.paytabs.com |
| Iraq | https://secure-iraq.paytabs.com |
| Morocco | https://secure-morocco.paytabs.com |
| Qatar | https://secure-doha.paytabs.com |
| Global | https://secure-global.paytabs.com |
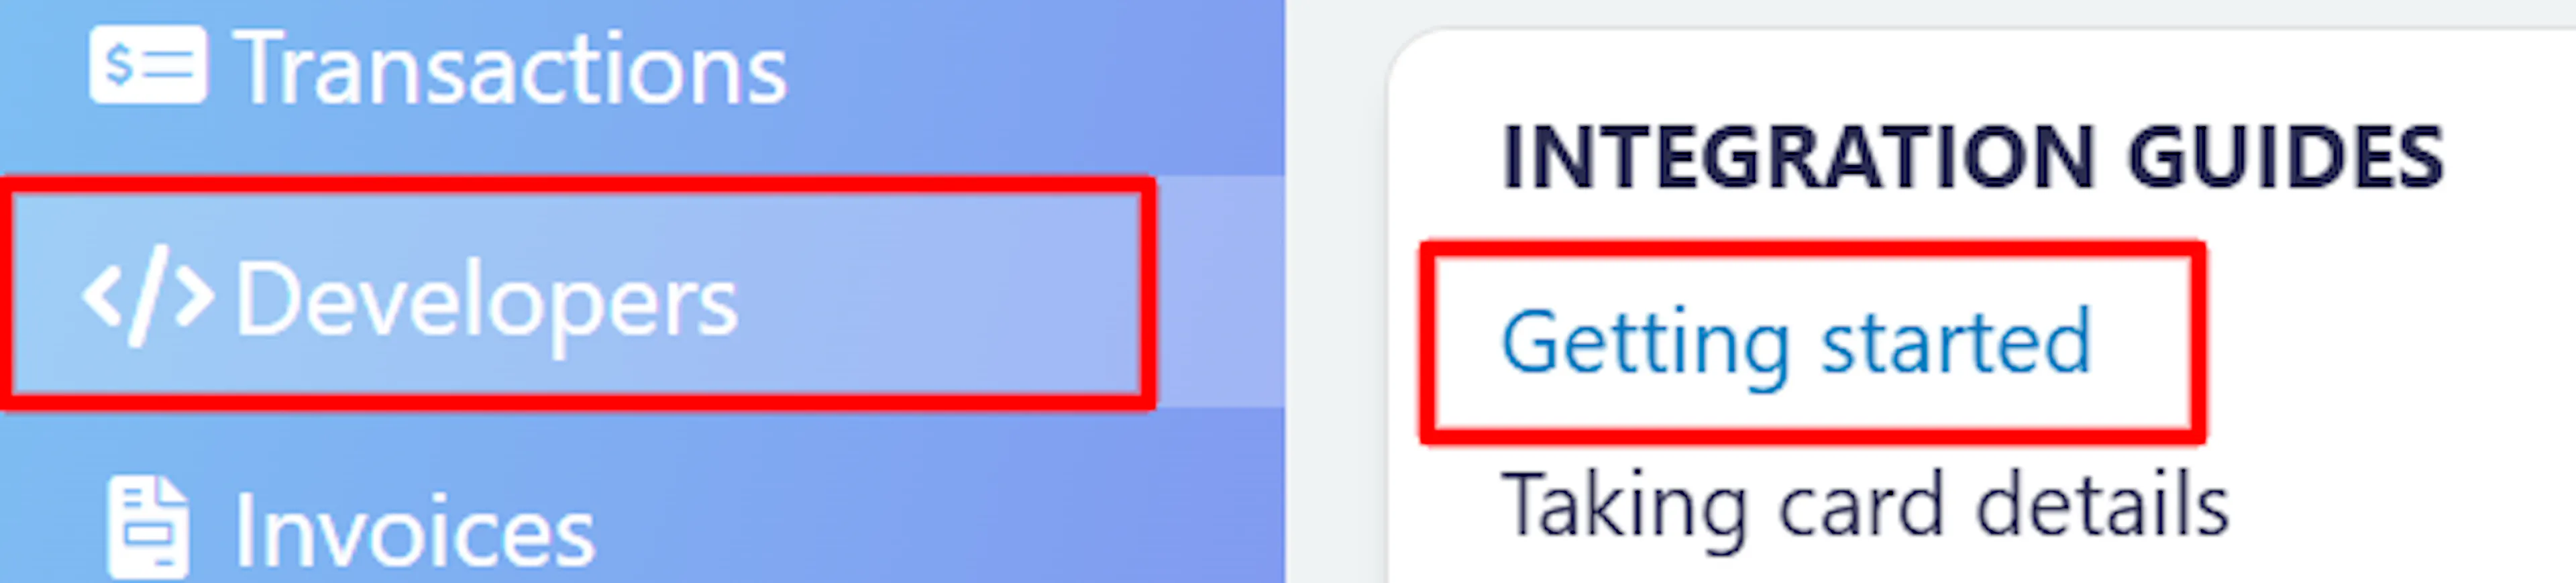
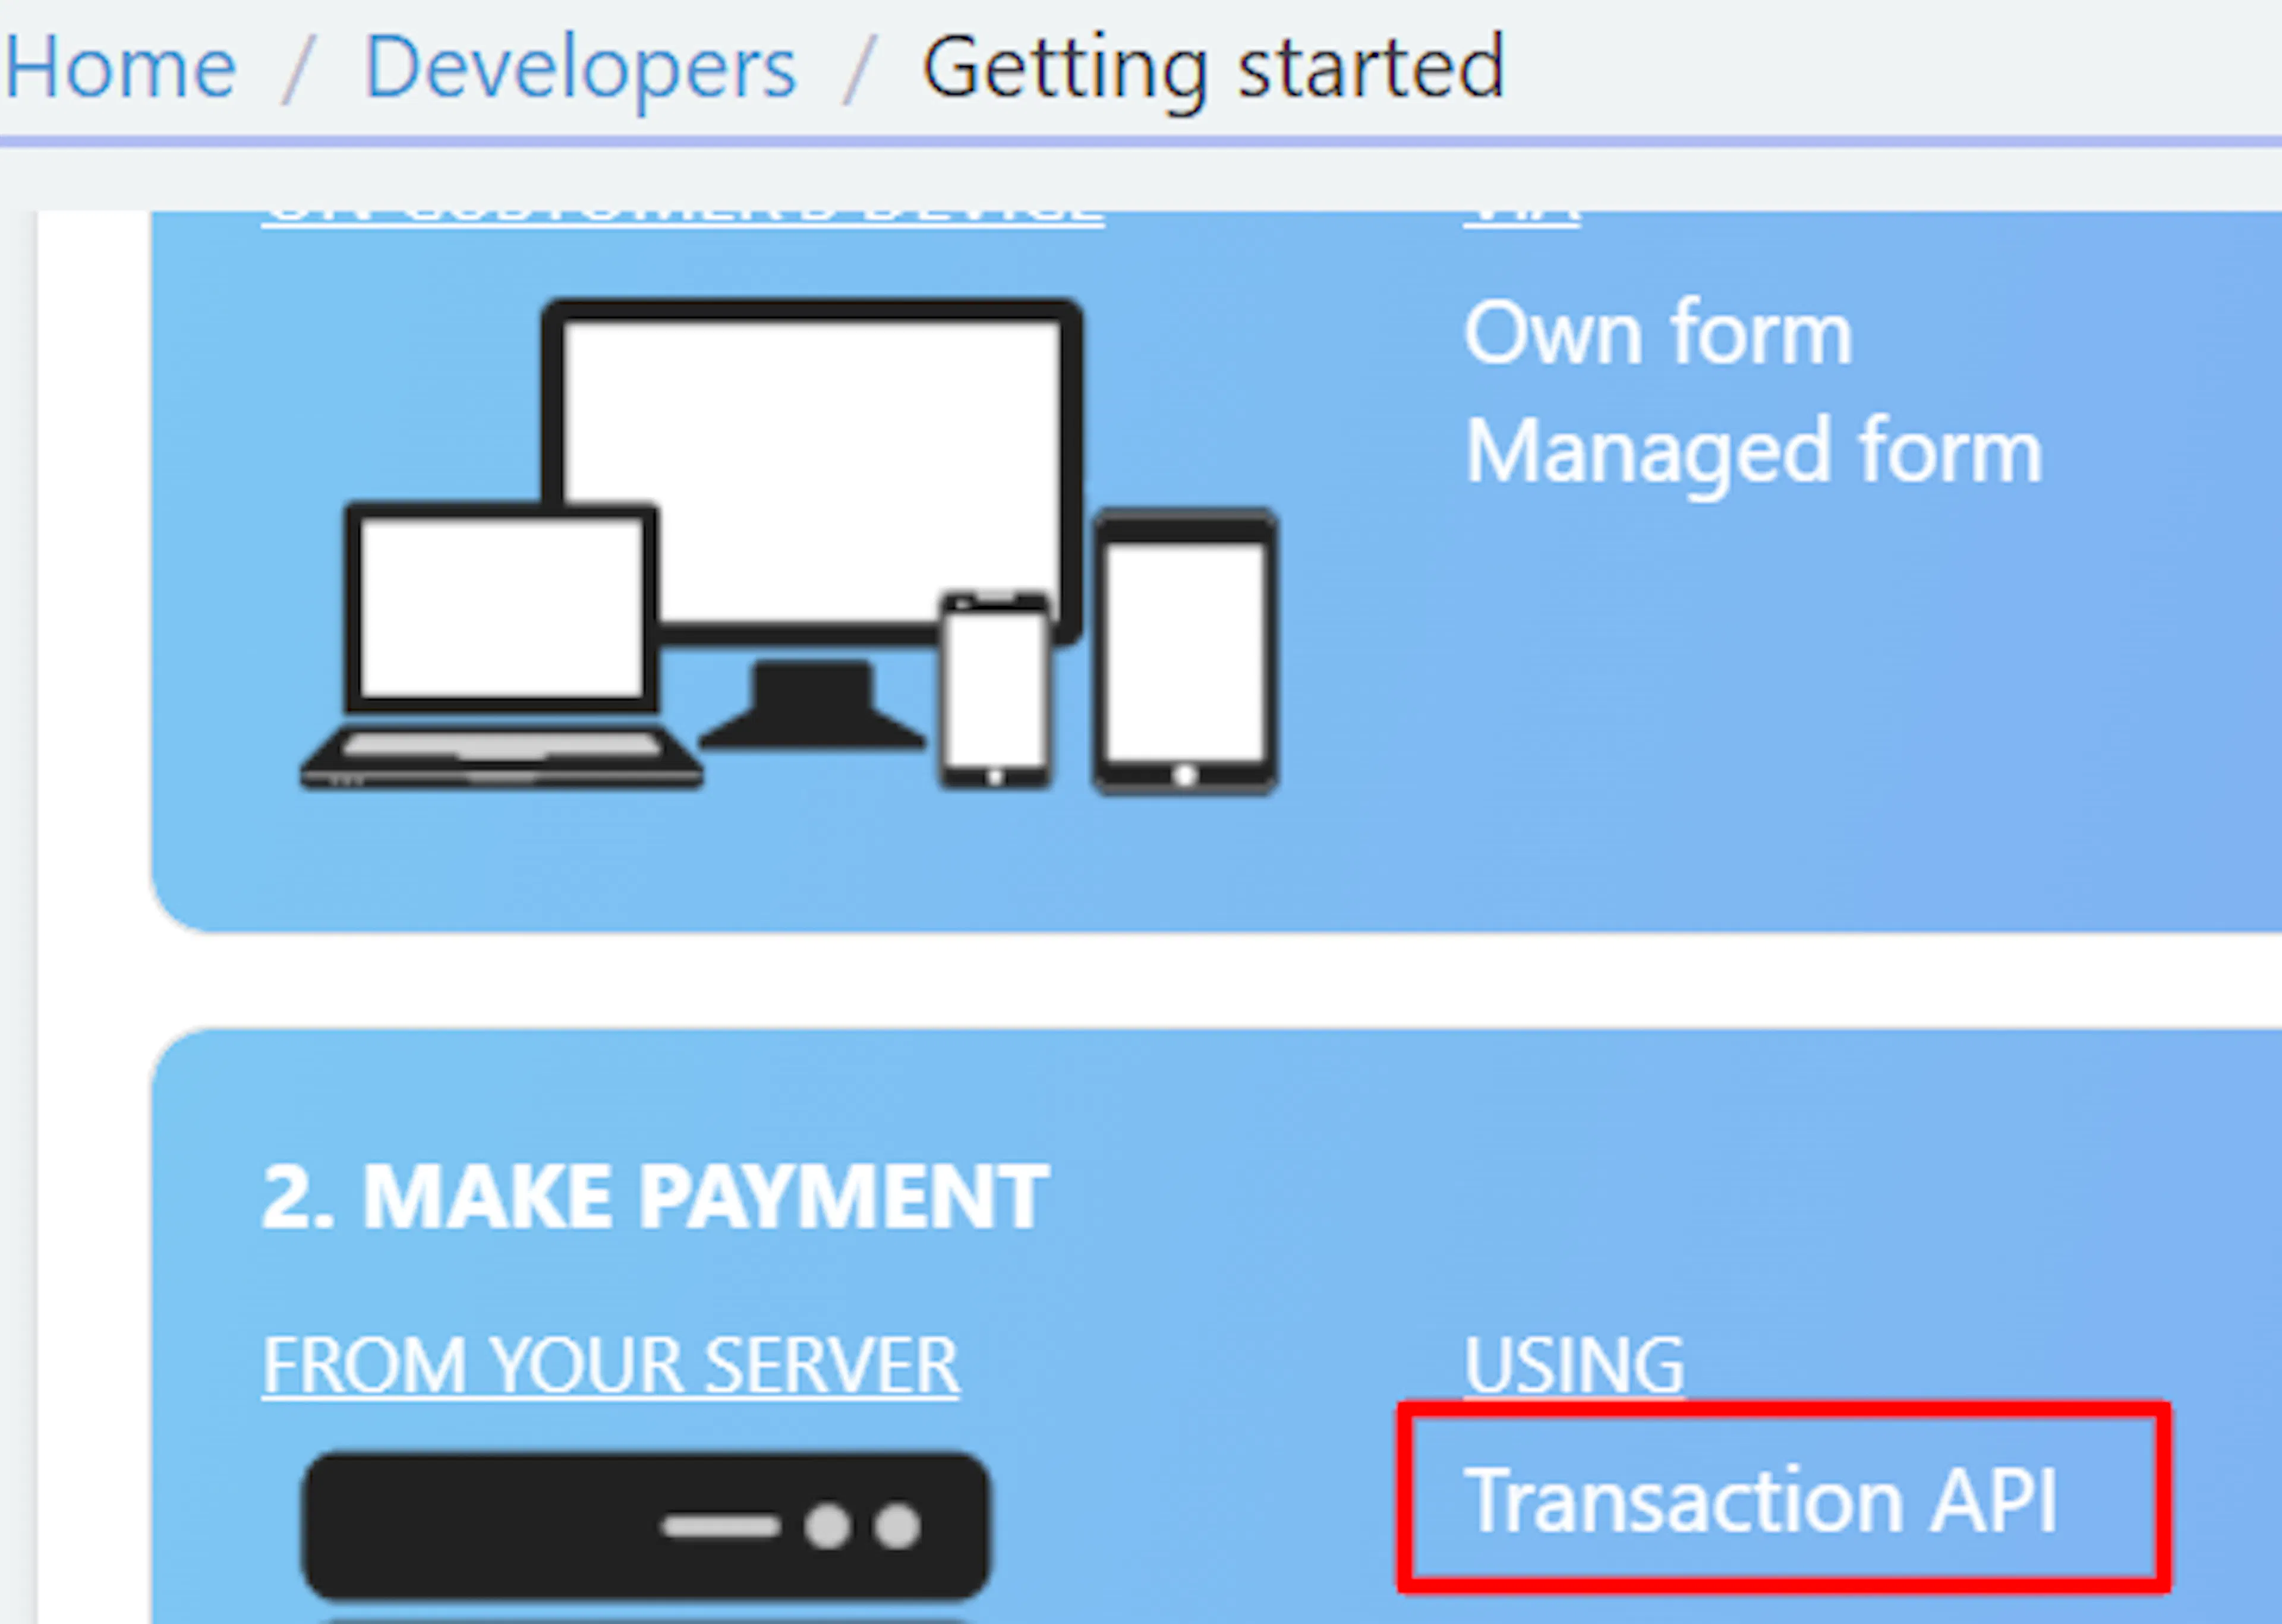
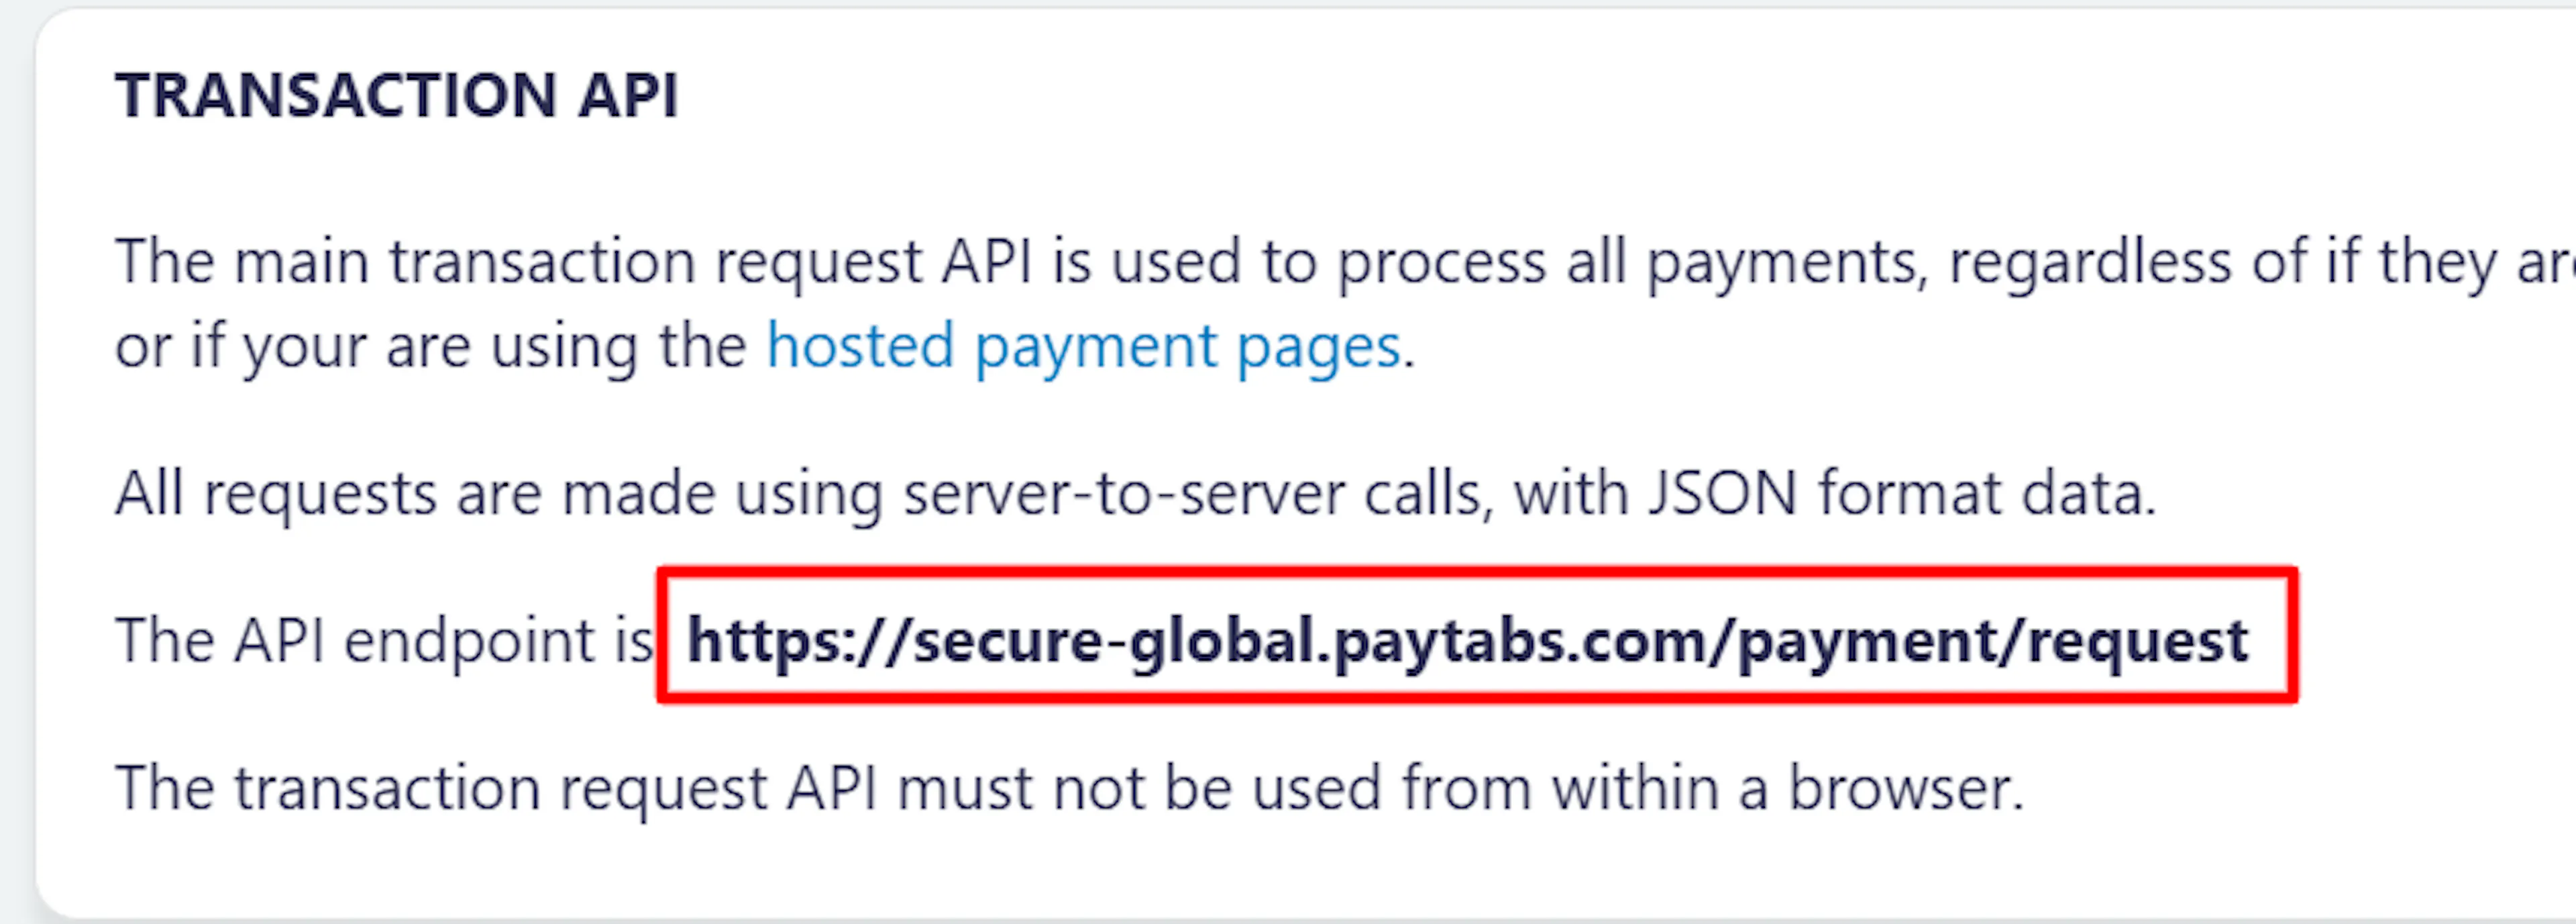
Region is part of your credentials, not a preference. Using the wrong region causes payments to fail, sometimes with misleading errors like “authentication failed” or “unable to process your request.” If your credentials look correct but payments fail, check the region first.
Adding Credentials to PayLexer
Open PayLexer Dashboard
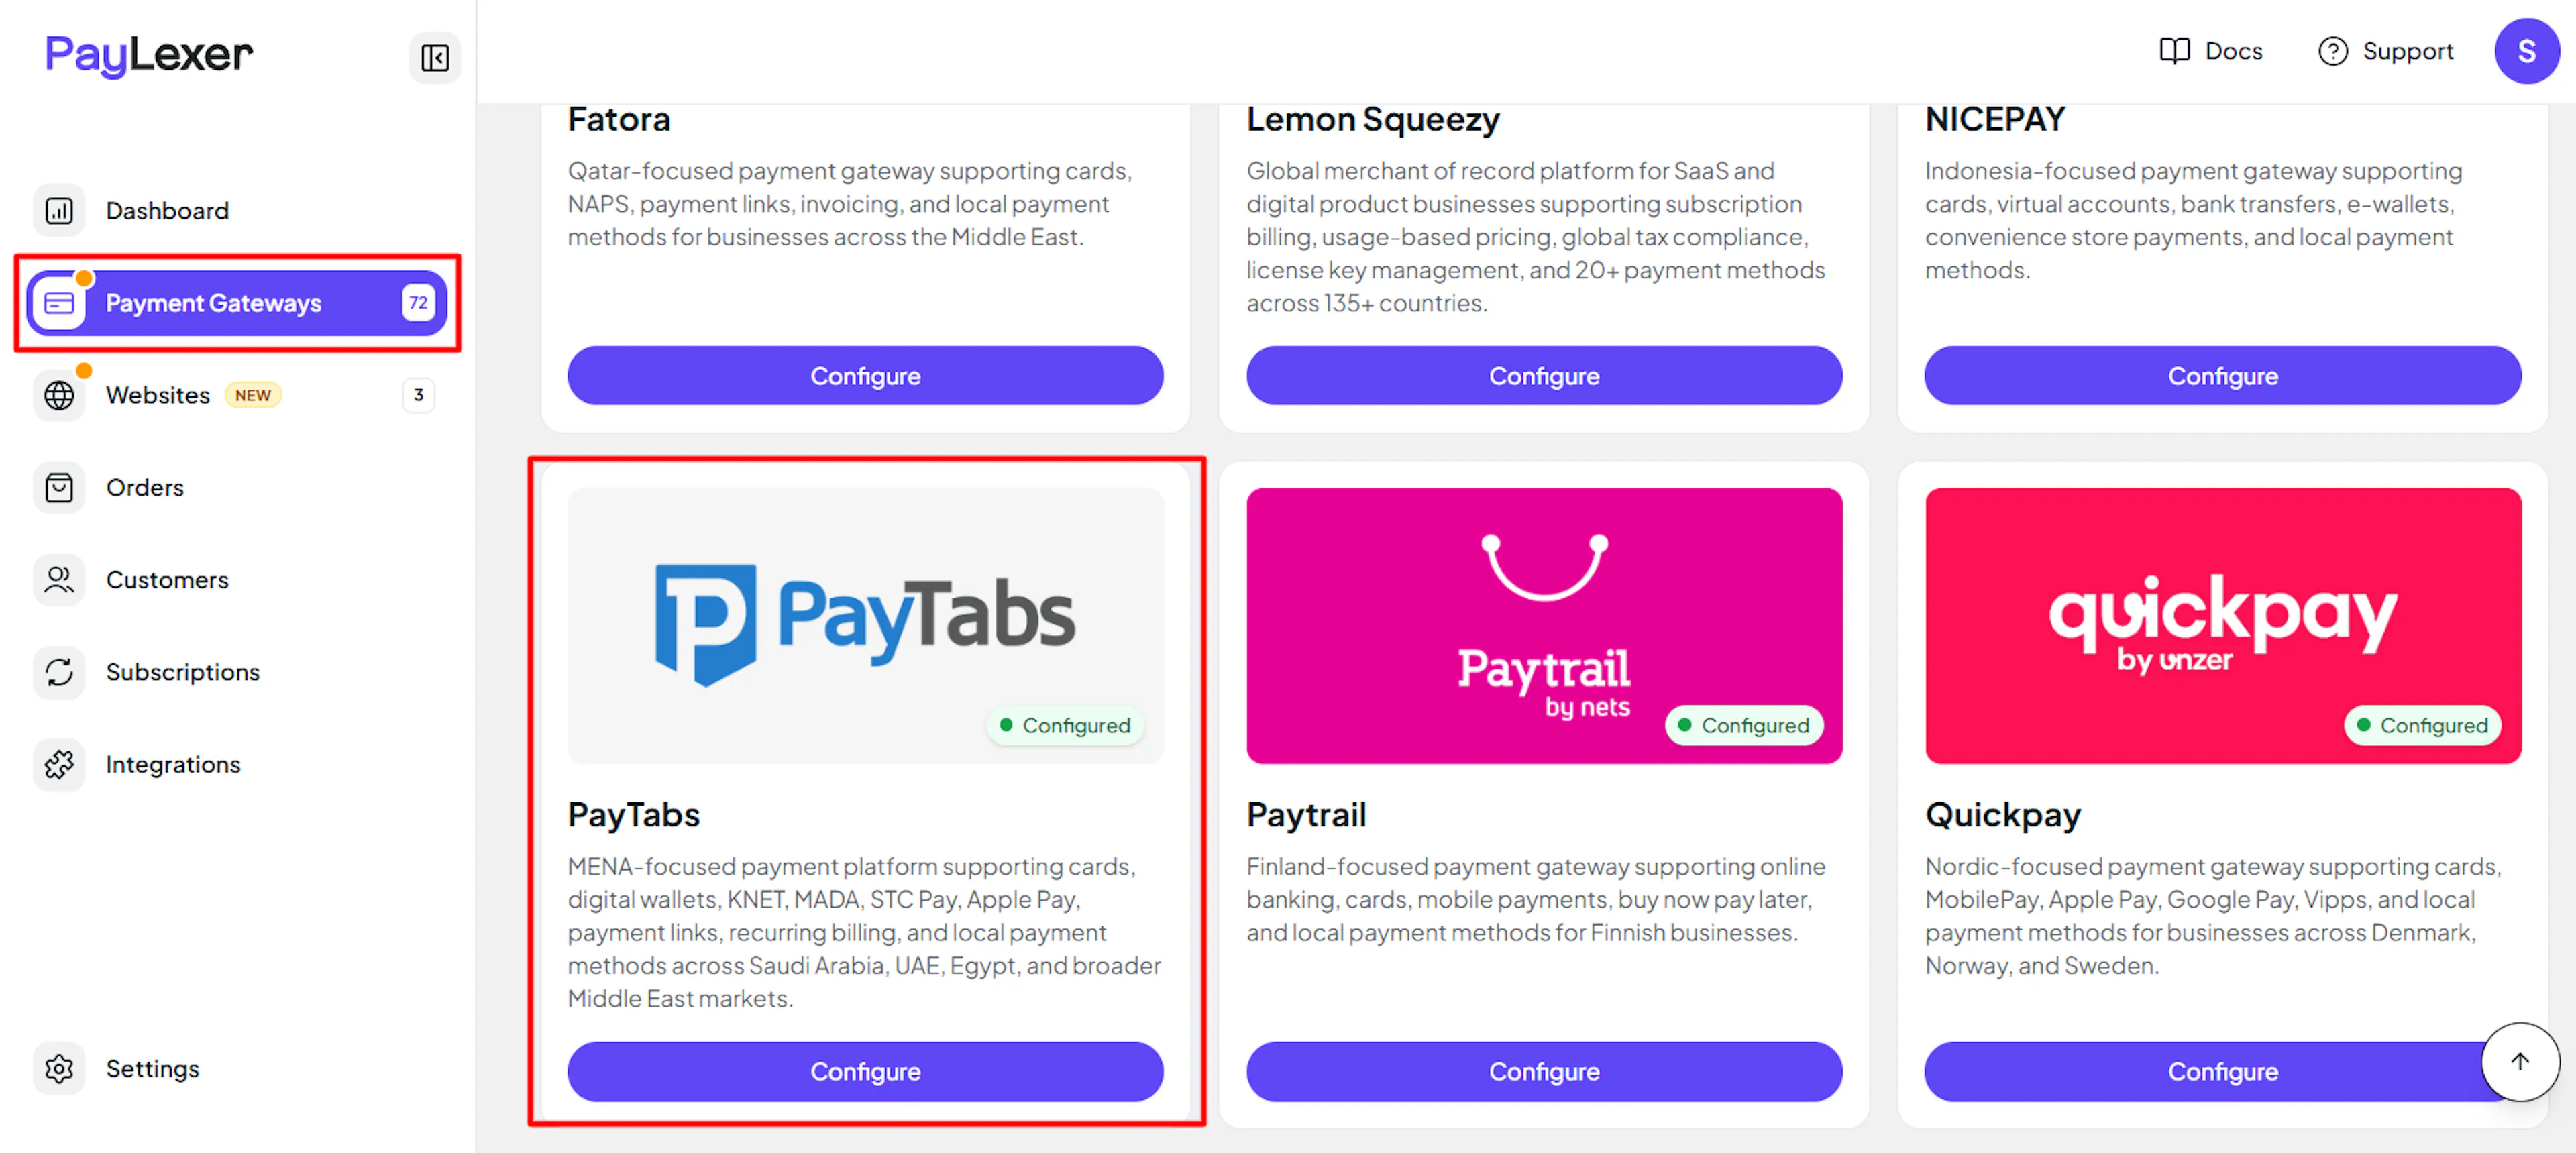
Log in to your PayLexer dashboard and navigate to Payment Gateways → PayTabs.
Enter your credentials
Paste the Profile ID and Server Key into the corresponding fields, and pick your Region from the dropdown. Use your PayTabs Test profile's values in the Test fields and your Live profile's values in the Live fields.
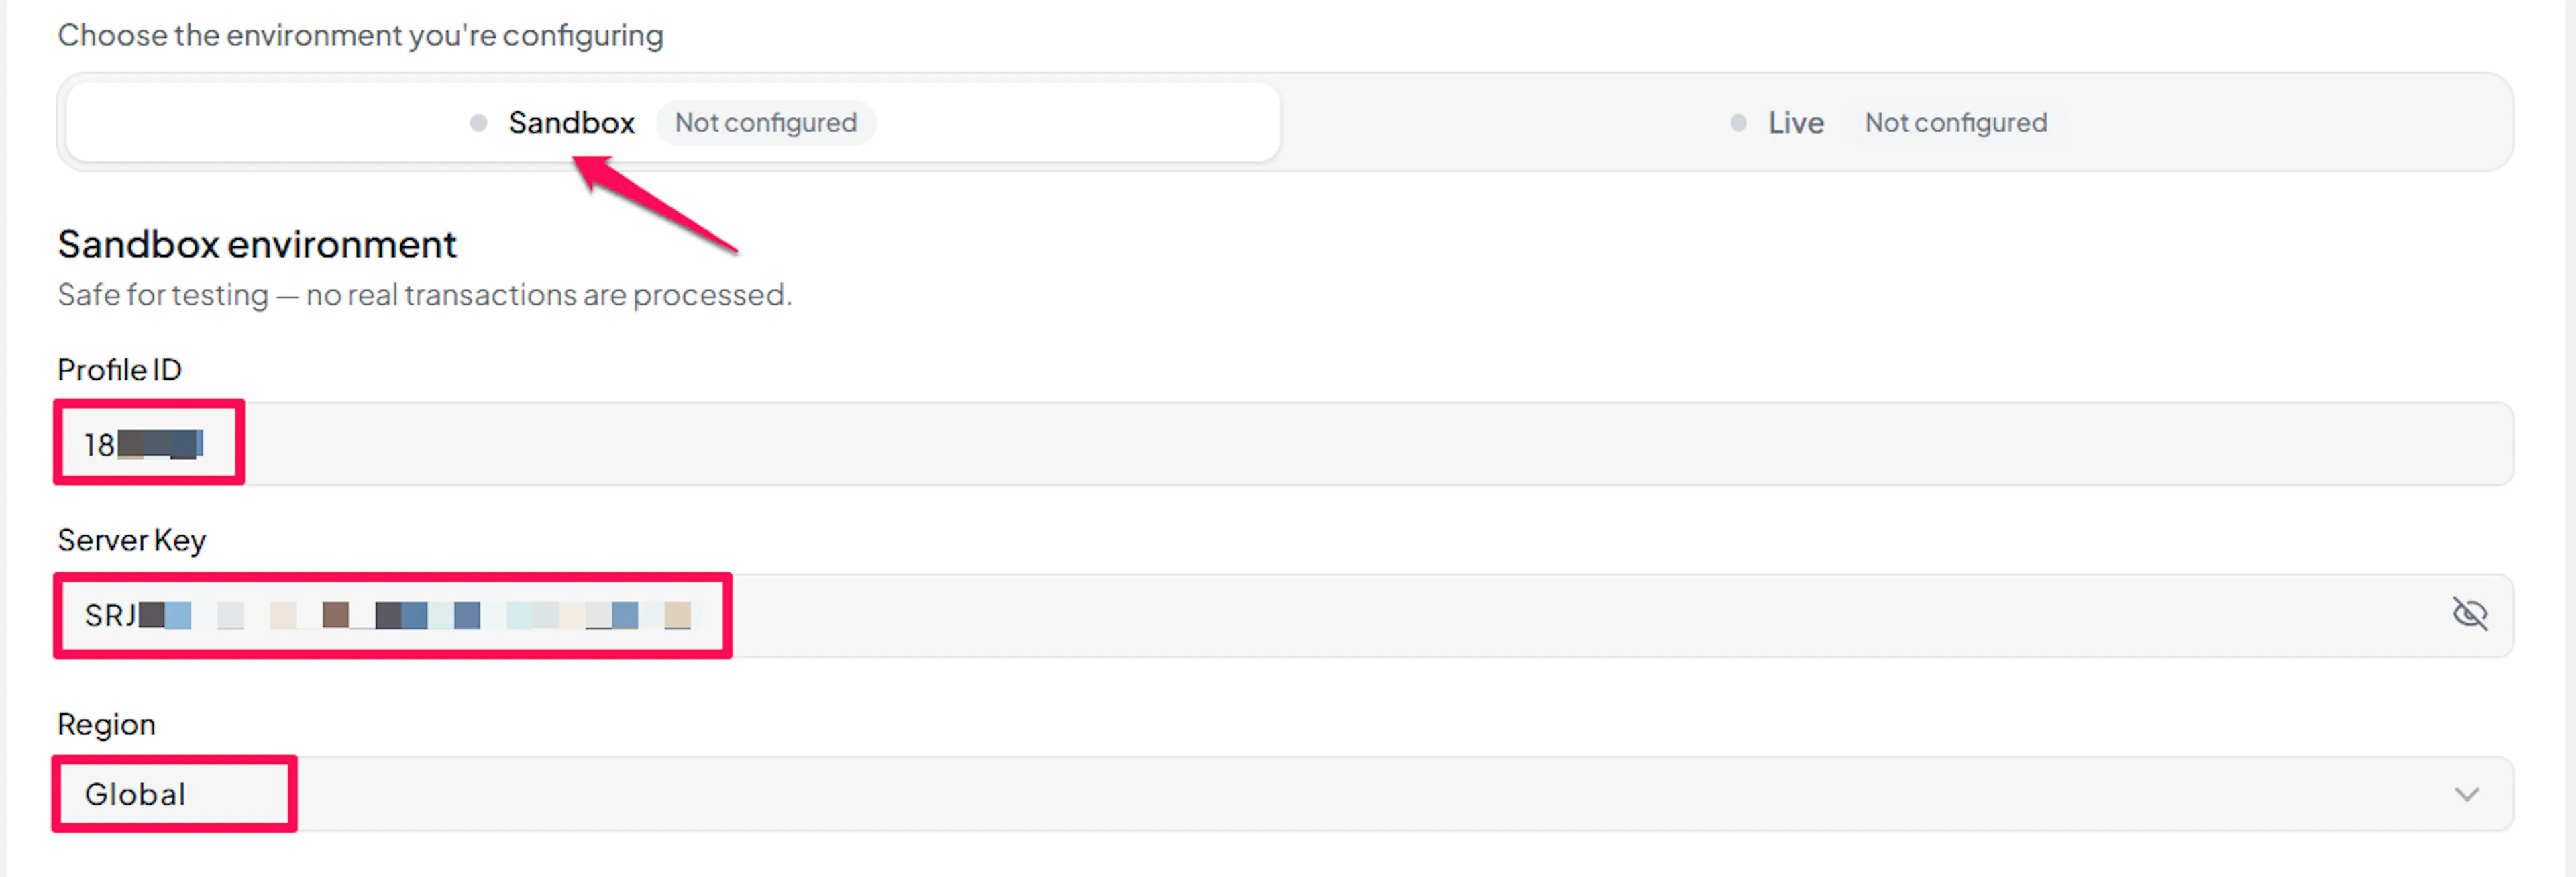
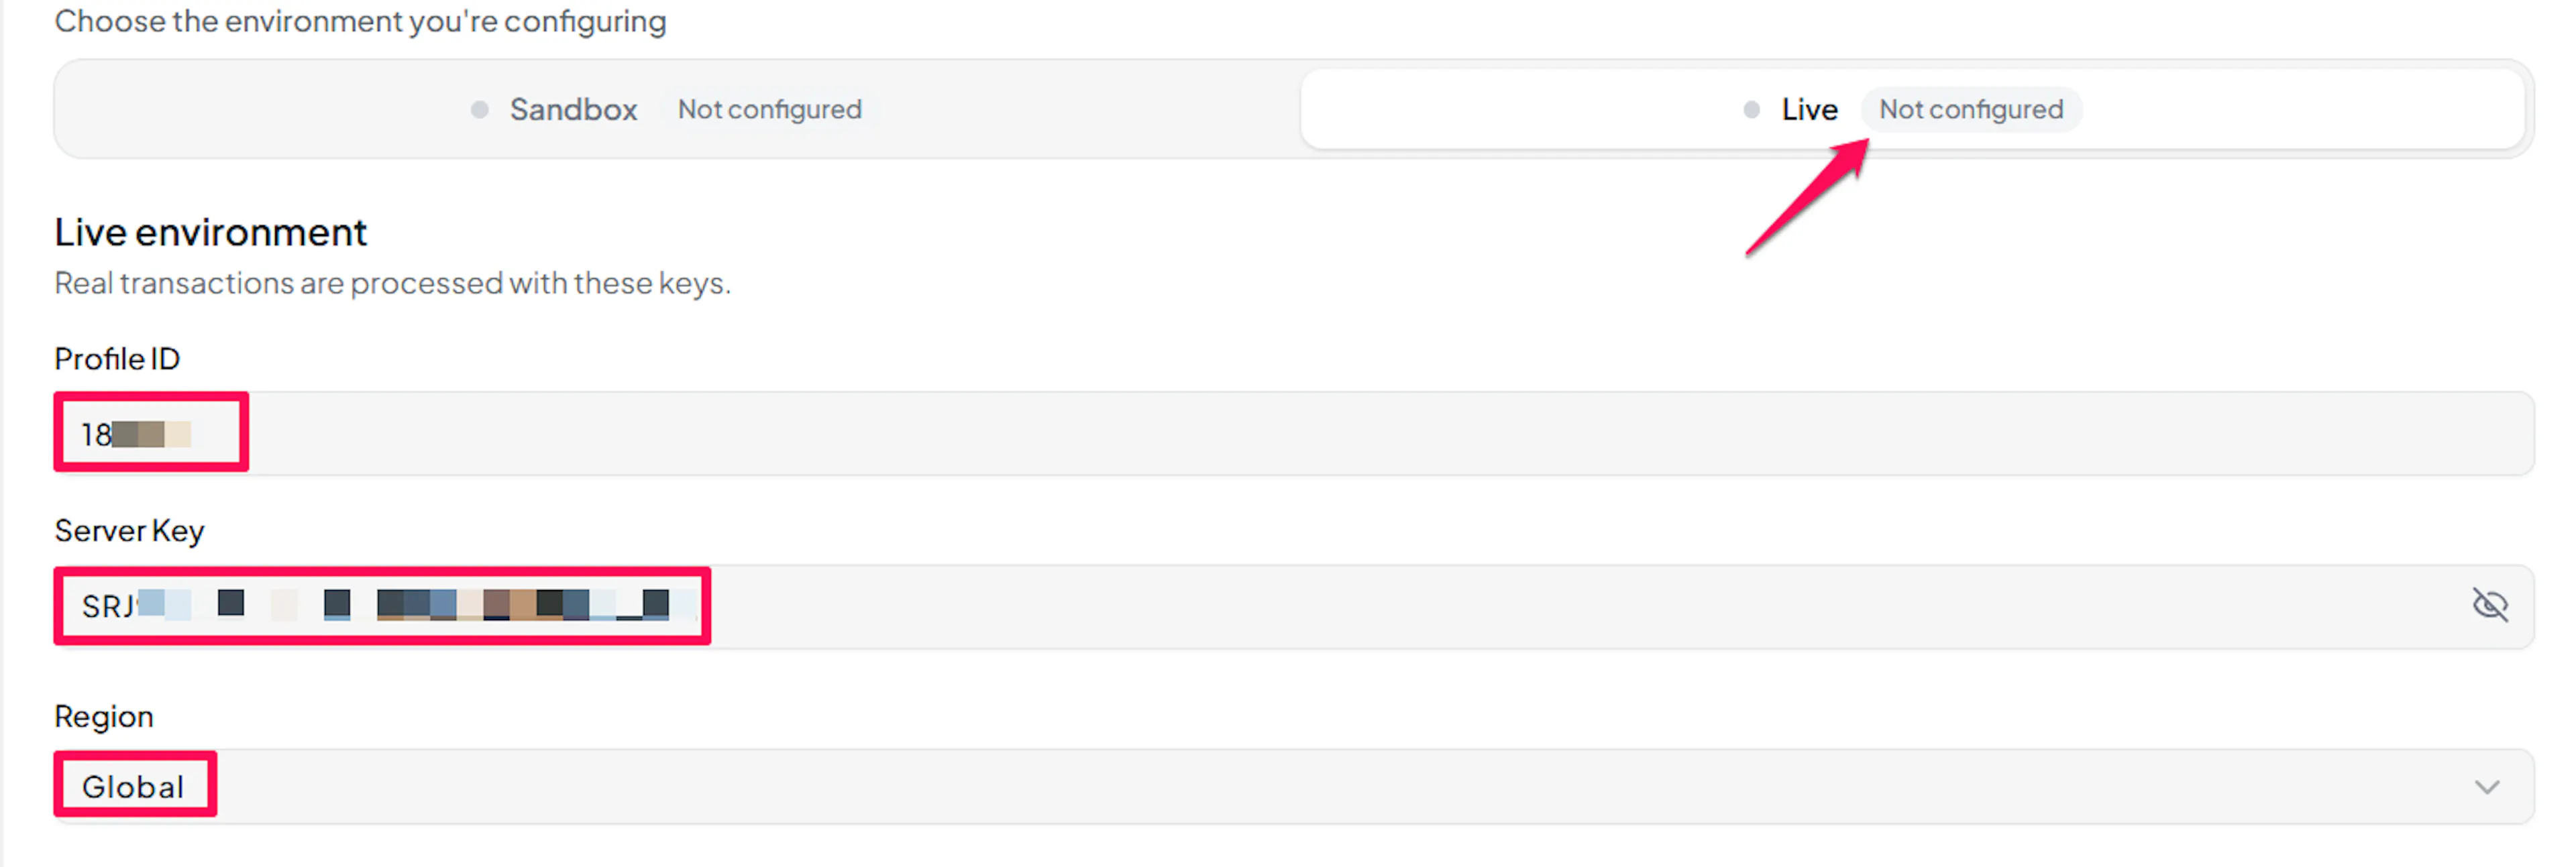
Understanding Live/Production and Sandbox Settings:
| Environment | Purpose |
|---|---|
| Live / Production | Used for real transactions. |
| Test / Sandbox | Used for testing only. No real money is processed. |
How PayLexer selects credentials:
- Debug/Test mode ON → Test credentials are used
- Debug/Test mode OFF → Live credentials are used
Test and save
Click Save to save your configuration and verify your credentials. Click Verify Connection to test the connection.
The test checks the Profile ID, the Server Key, and that your chosen Region matches the account, naming the region when that is the mismatch.
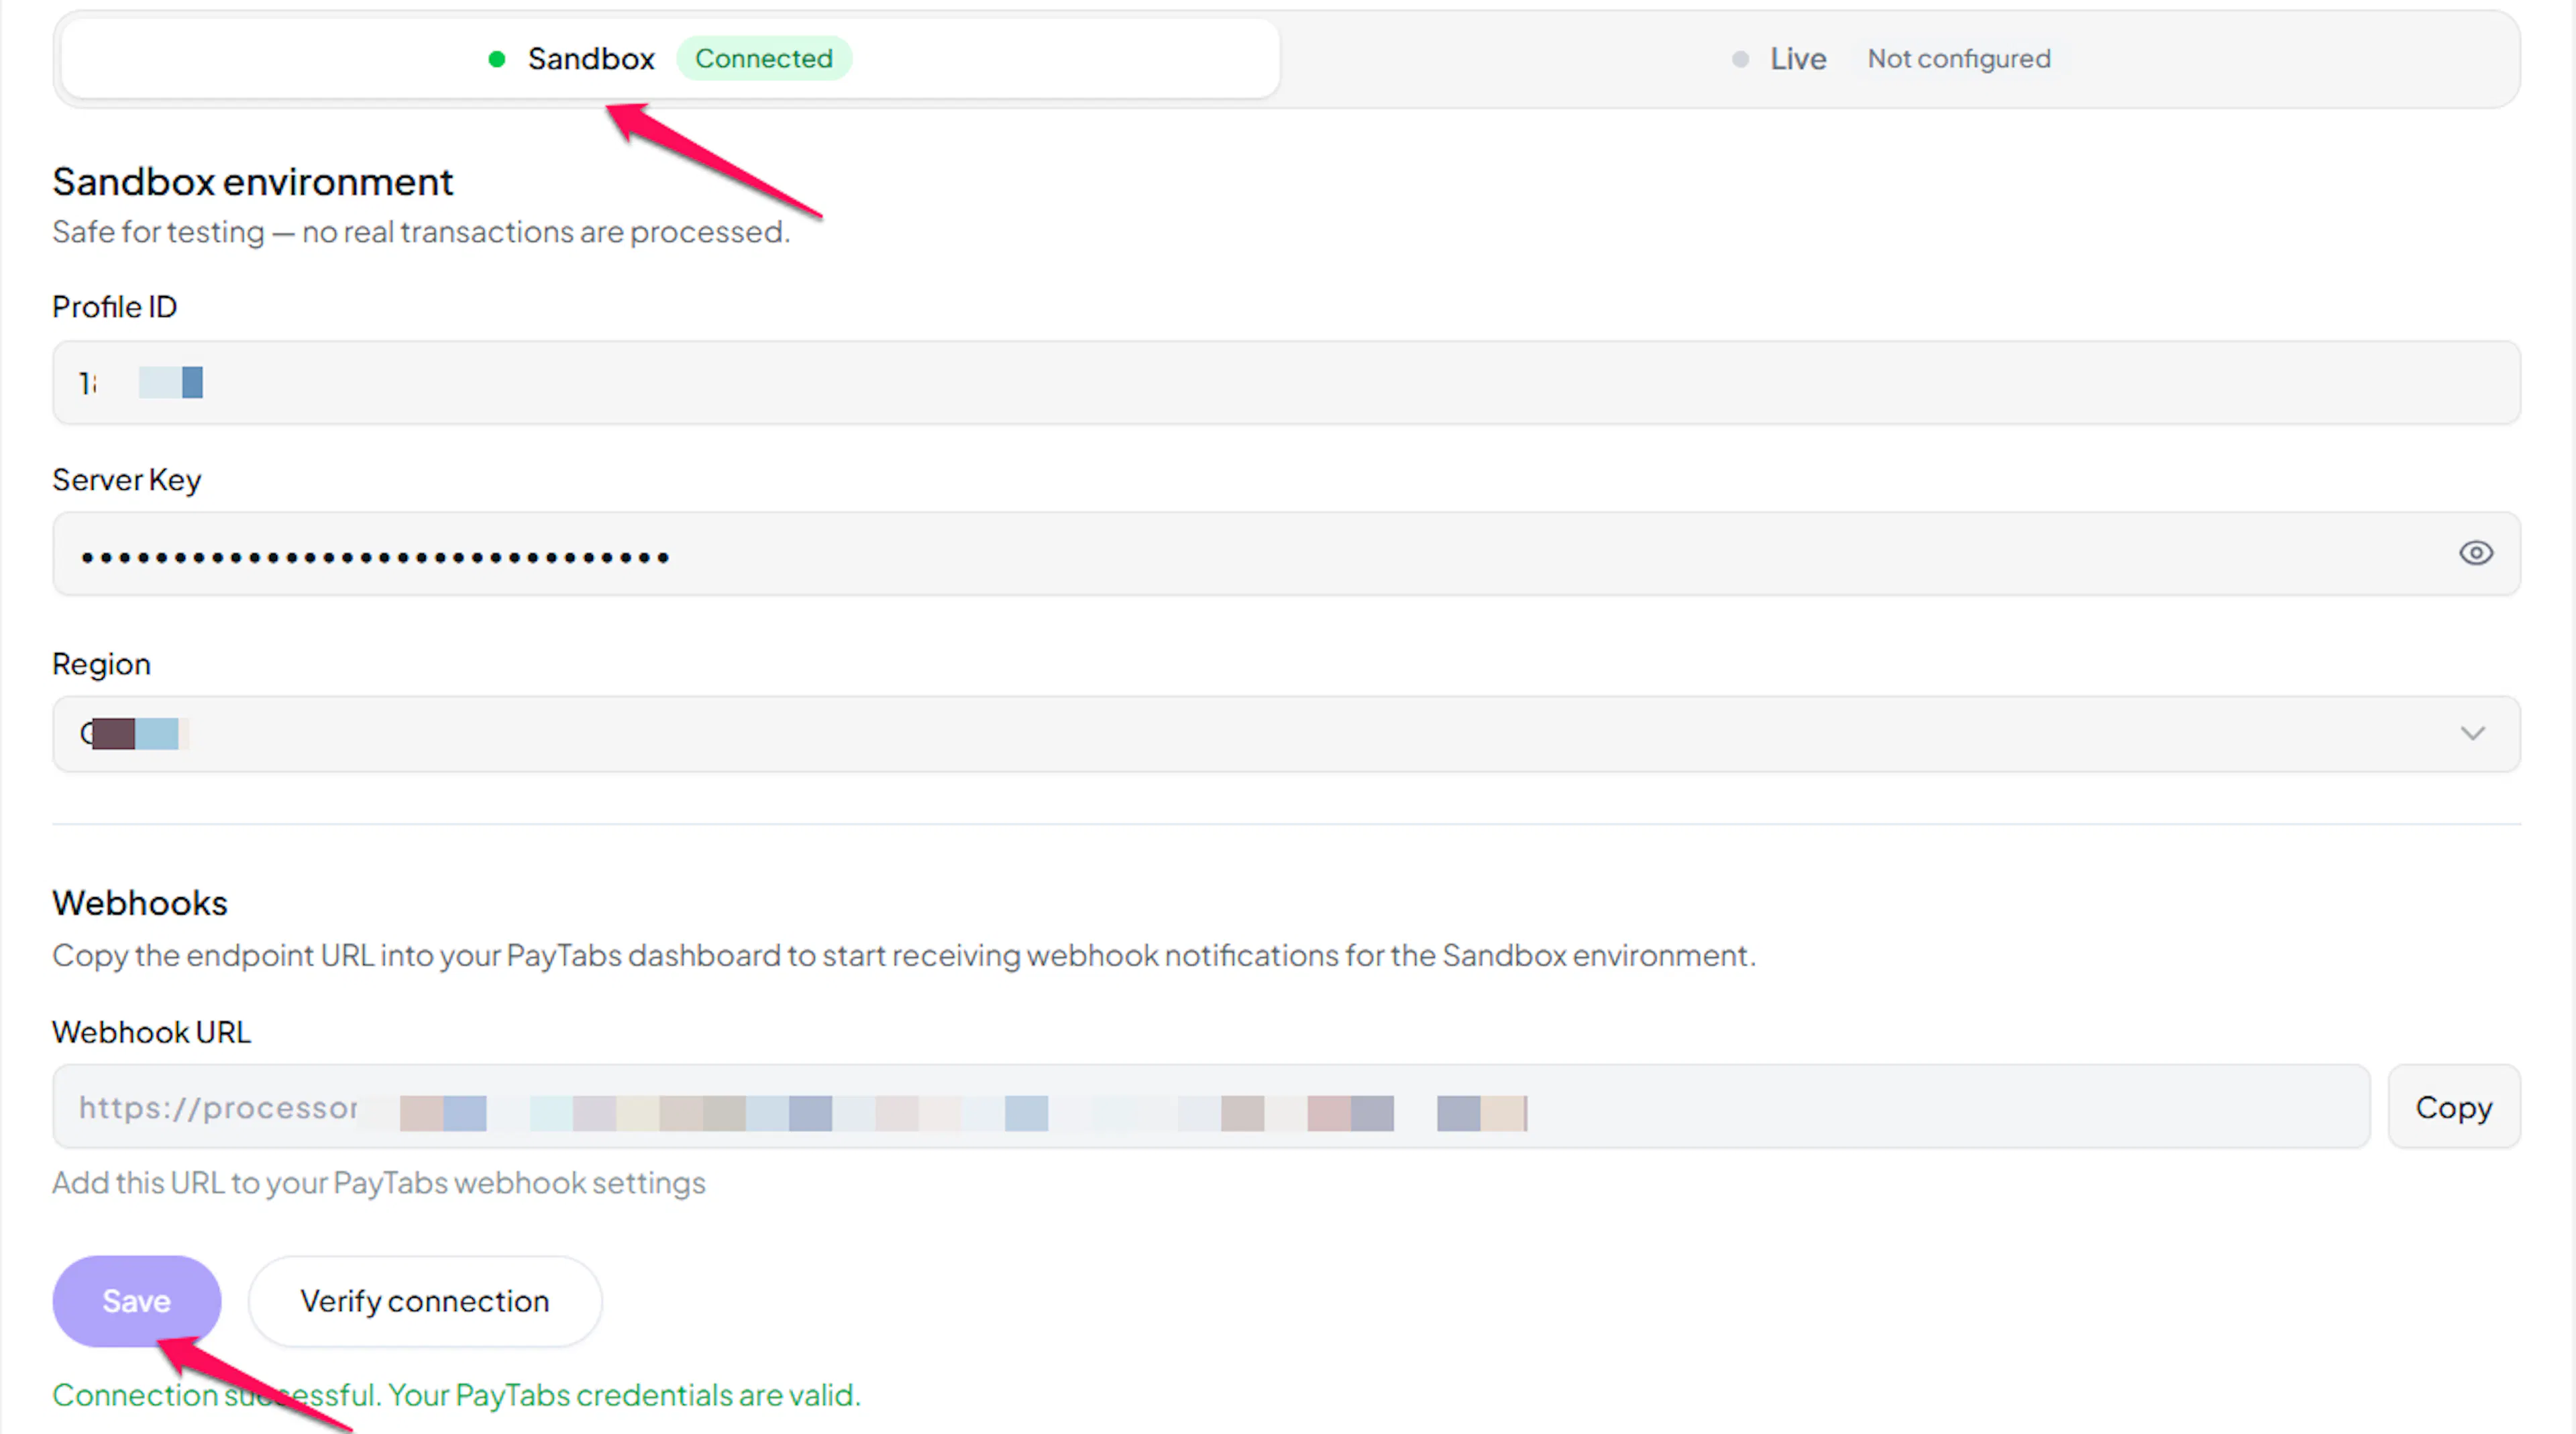
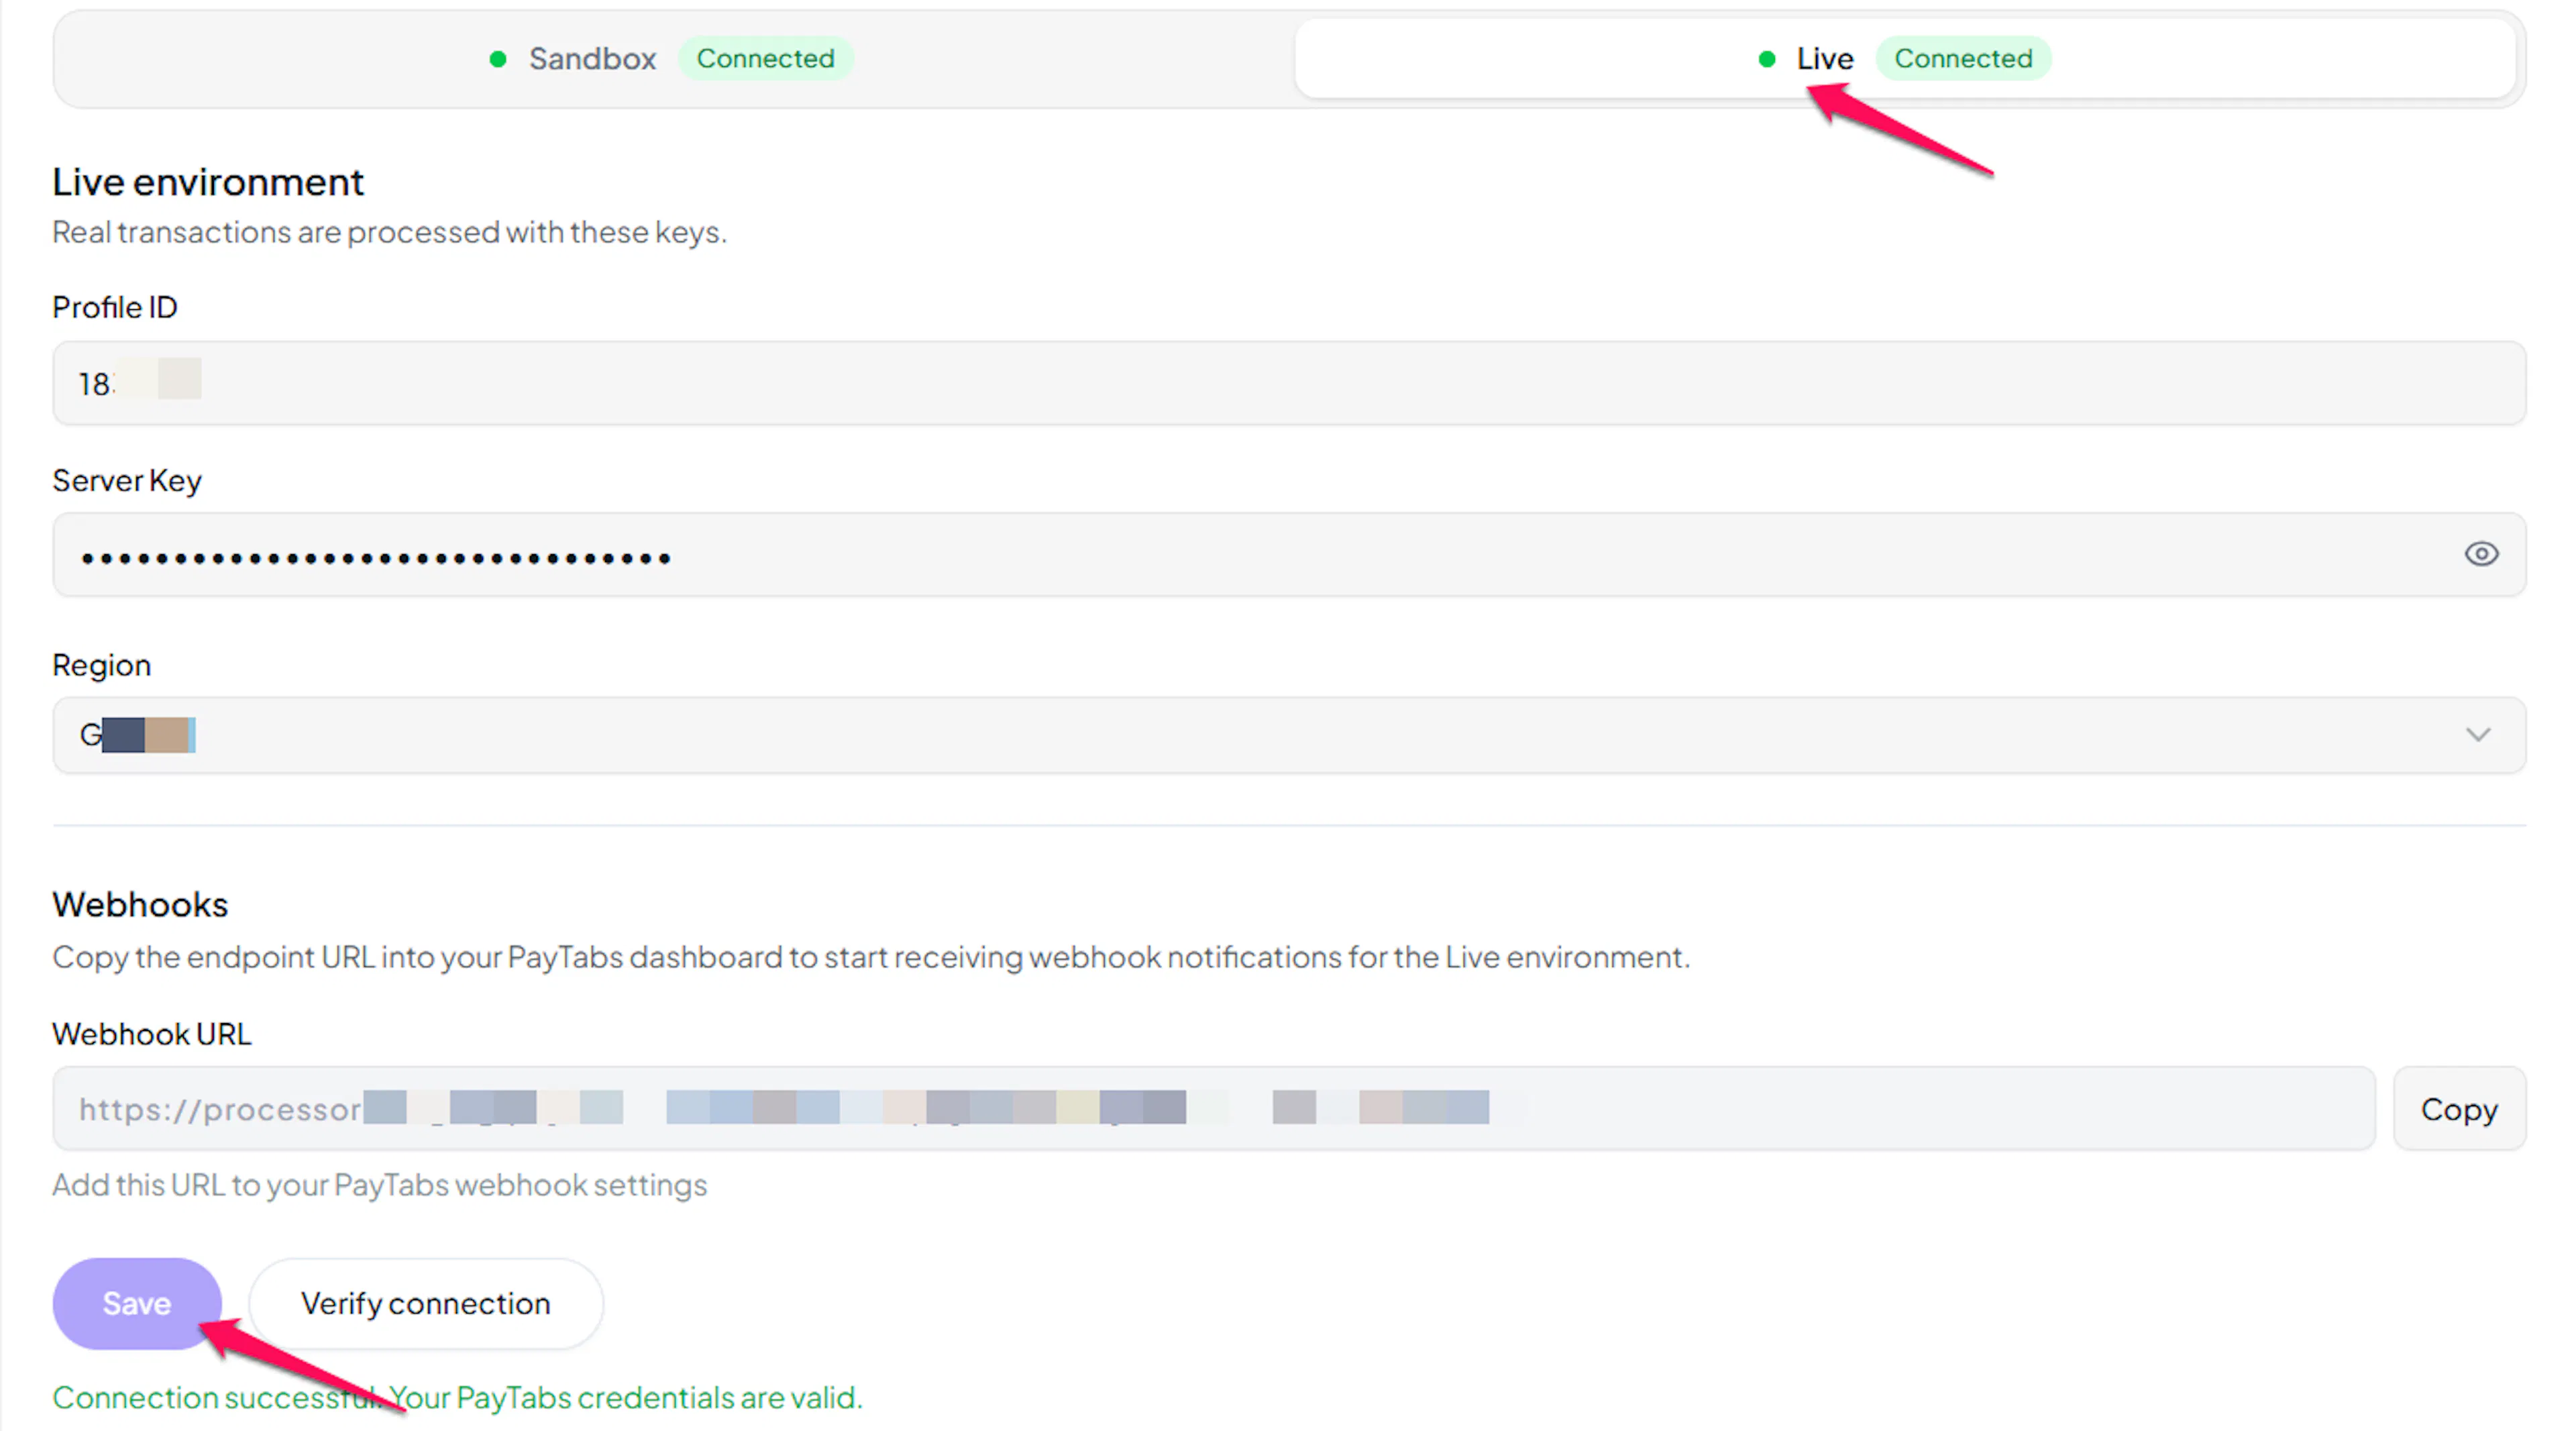
Credentials saved. Continue to the Webhooks section below before enabling PayTabs on your website.
Configuring Webhooks
Webhooks enable real-time payment updates.
Benefits of Webhooks:
- Instant payment status updates
- Refunds issued in your PayTabs dashboard reflected in PayLexer
PayTabs calls these IPNs (Instant Payment Notifications). PayLexer includes its notification URL with every payment, so no dashboard setup is needed for payment confirmations. Registering the URL also enables notifications for PayTabs-initiated transactions, especially dashboard-issued refunds.
Copy your PayLexer webhook URL
In PayLexer → Payment Gateways → PayTabs, copy the Webhook URL shown for your account.

Add the URL in your PayTabs dashboard
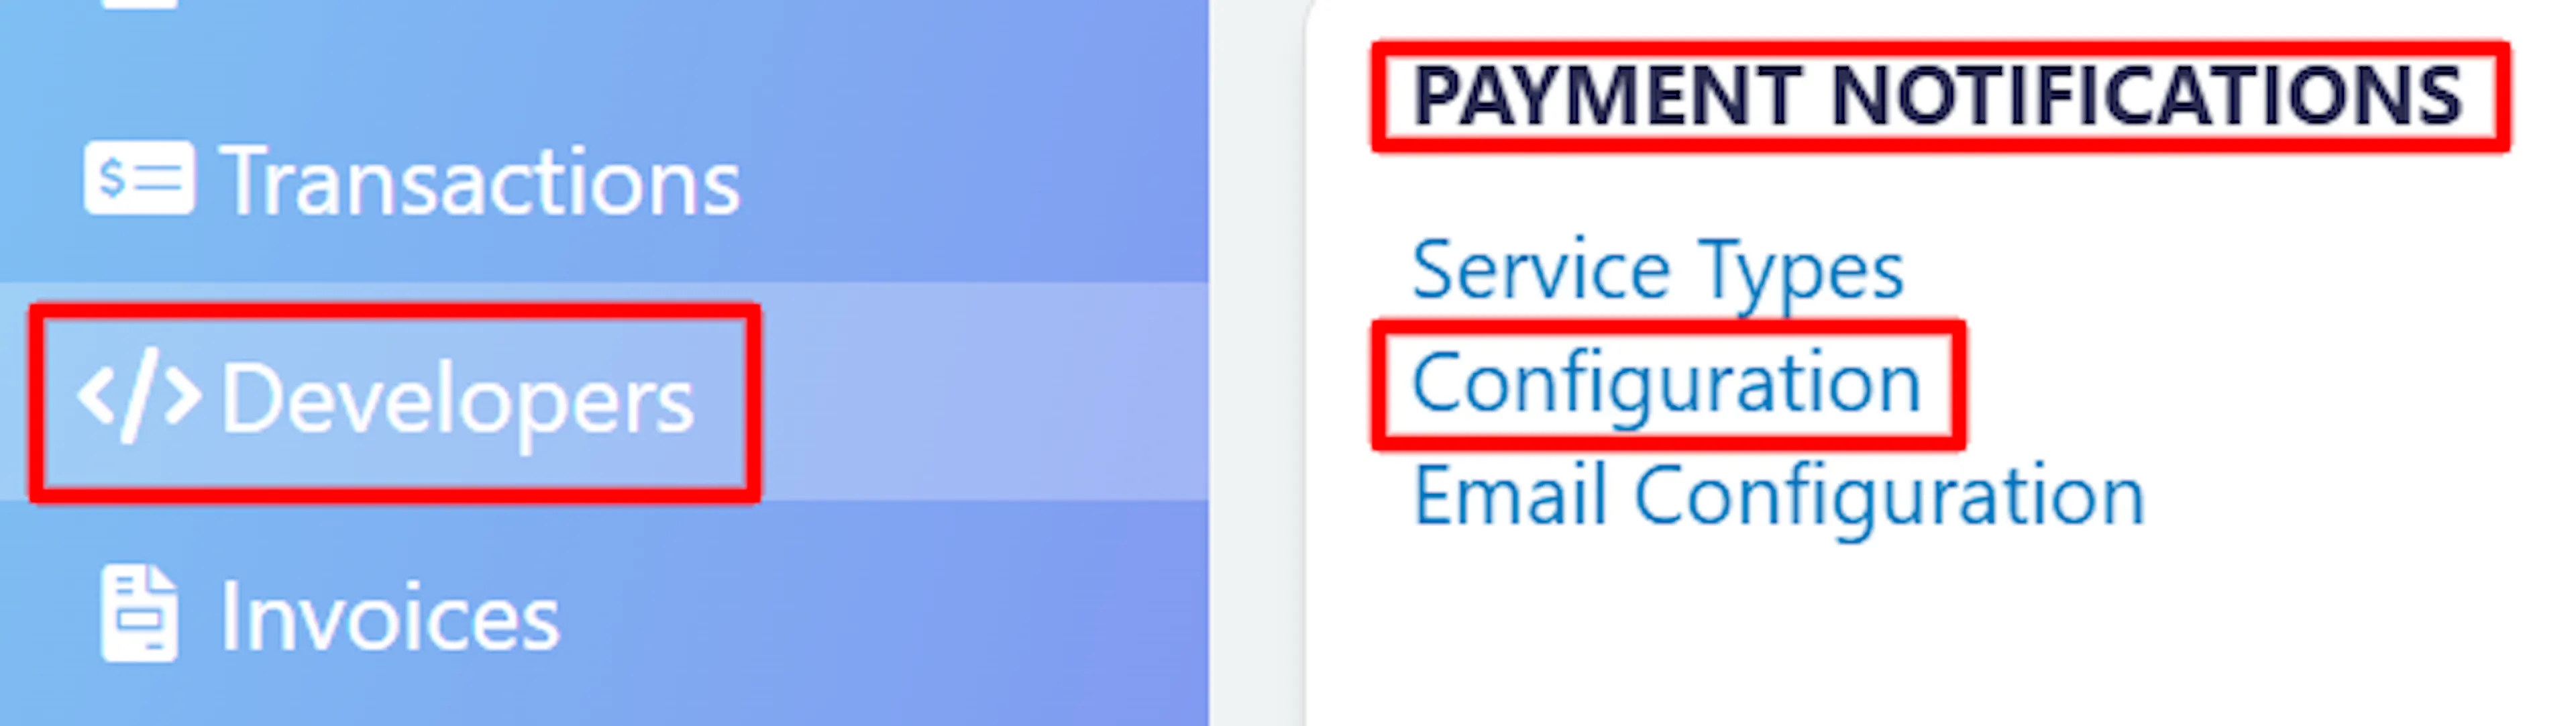
In your PayTabs merchant dashboard, go to Developers → Payment Notification → Configuration and add a new IPN with the PayLexer webhook URL.

Set the notification Service Type to Default Web, which sends the full transaction details.
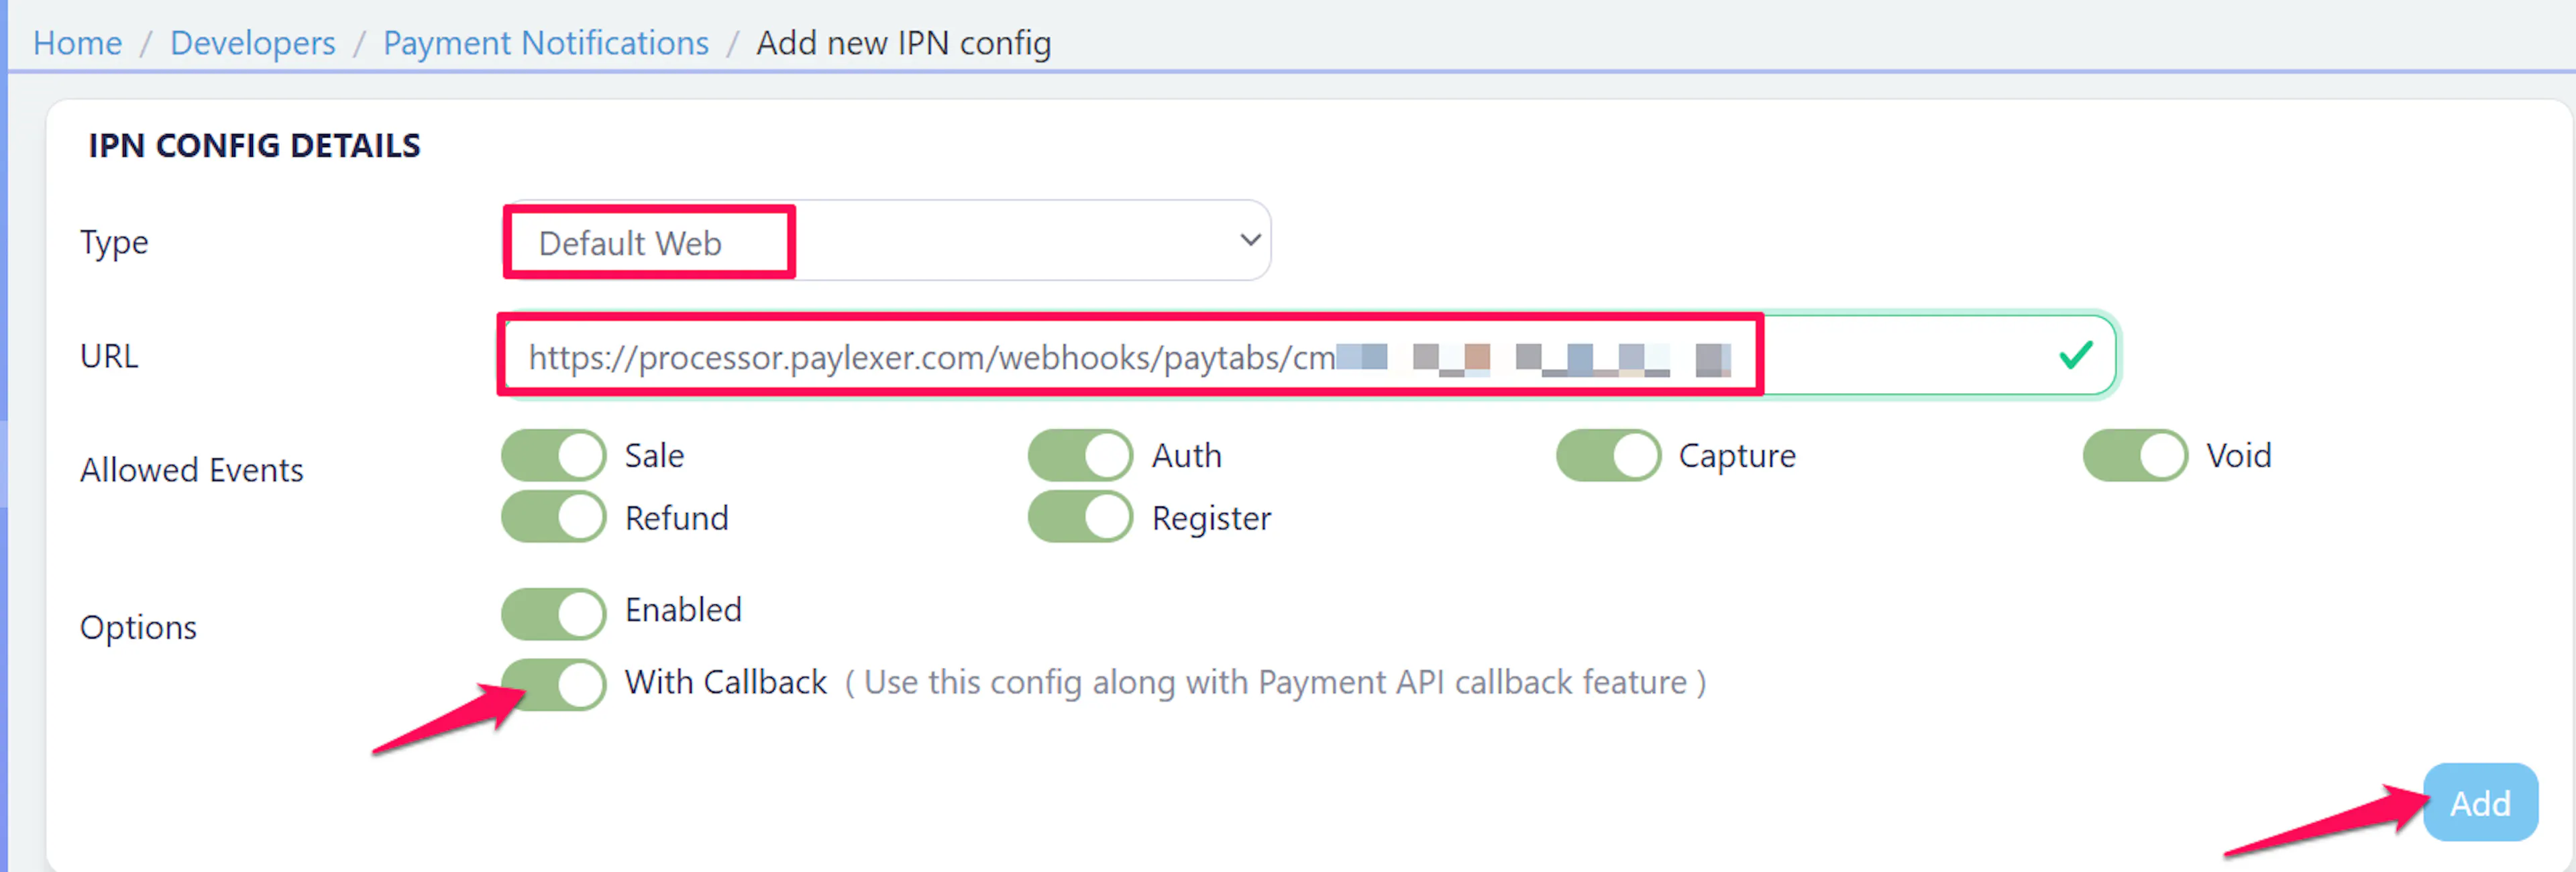
Do not choose Basic Web. It sends only basic details and omits fields PayLexer needs to match the notification to your order, so orders will not update. Default Web is the correct choice.
Set Enable Callback
On the same screen, choose Enable Callback.
With Enable Callback, both the address PayLexer sends per payment and the address you registered here are notified. With Disable Callback, the registered address is ignored, which is what silently loses your dashboard-issued refunds.
Enabling both is safe. PayLexer recognises the same transaction outcome only once, so a payment is never counted or recorded twice.
Repeat for each profile
IPN configuration belongs to the profile, not the account. Register the URL again on your test profile and on your live profile, so notifications work in whichever mode you are running.
The webhook URL must be HTTPS. PayTabs delivers an empty message to a non-secure address rather than refusing it, which looks like a working notification that carries nothing. PayLexer only ever issues an HTTPS address, so simply paste it unchanged.
Integrate PayTabs to Your Website
If you have already added and configured your site, you can enable PayTabs in your existing setup.
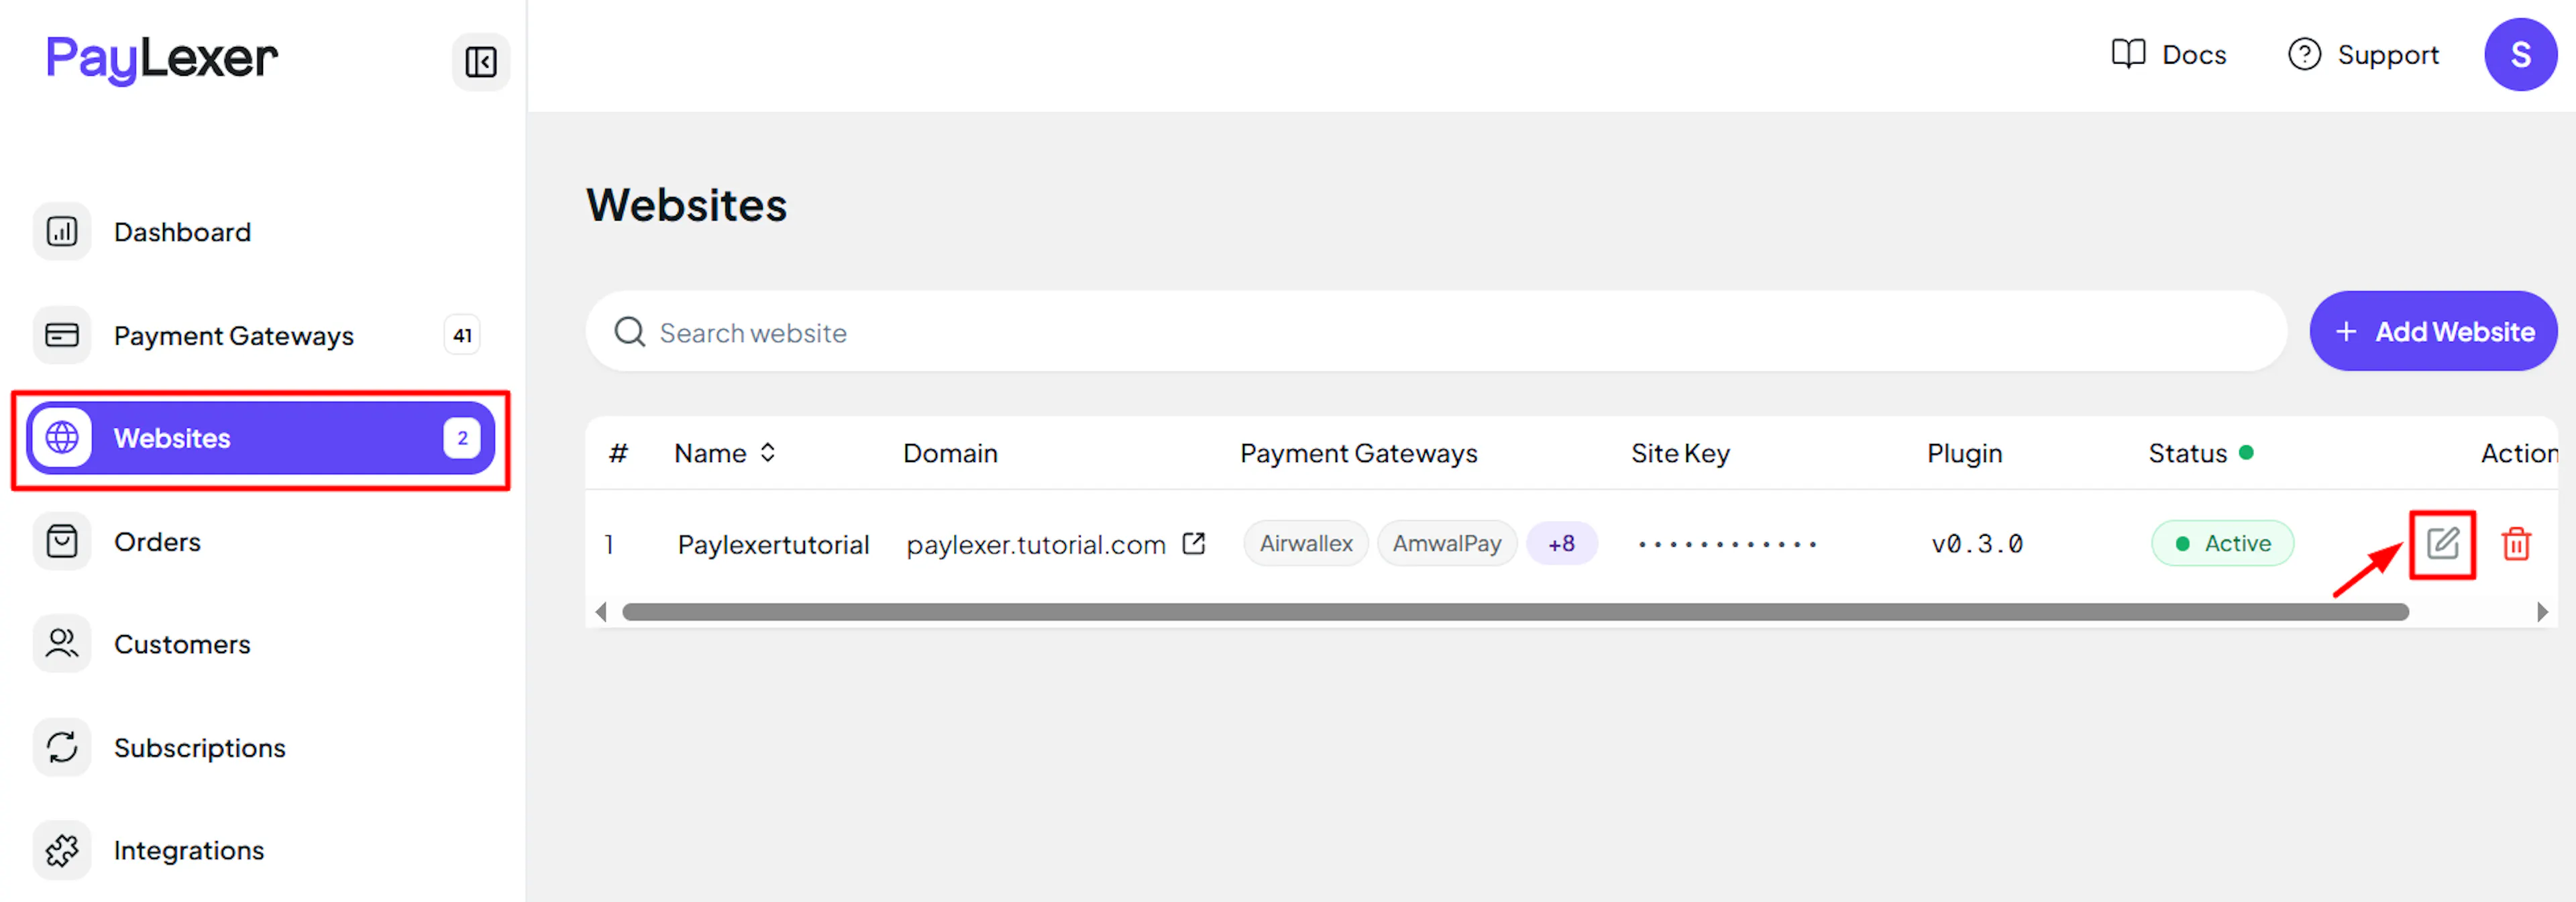
Go to Websites
Navigate to Websites in your PayLexer dashboard.
Edit your website
Click the Edit Icon of your added website.
Enable PayTabs
Click the checkbox to enable PayTabs for the website.
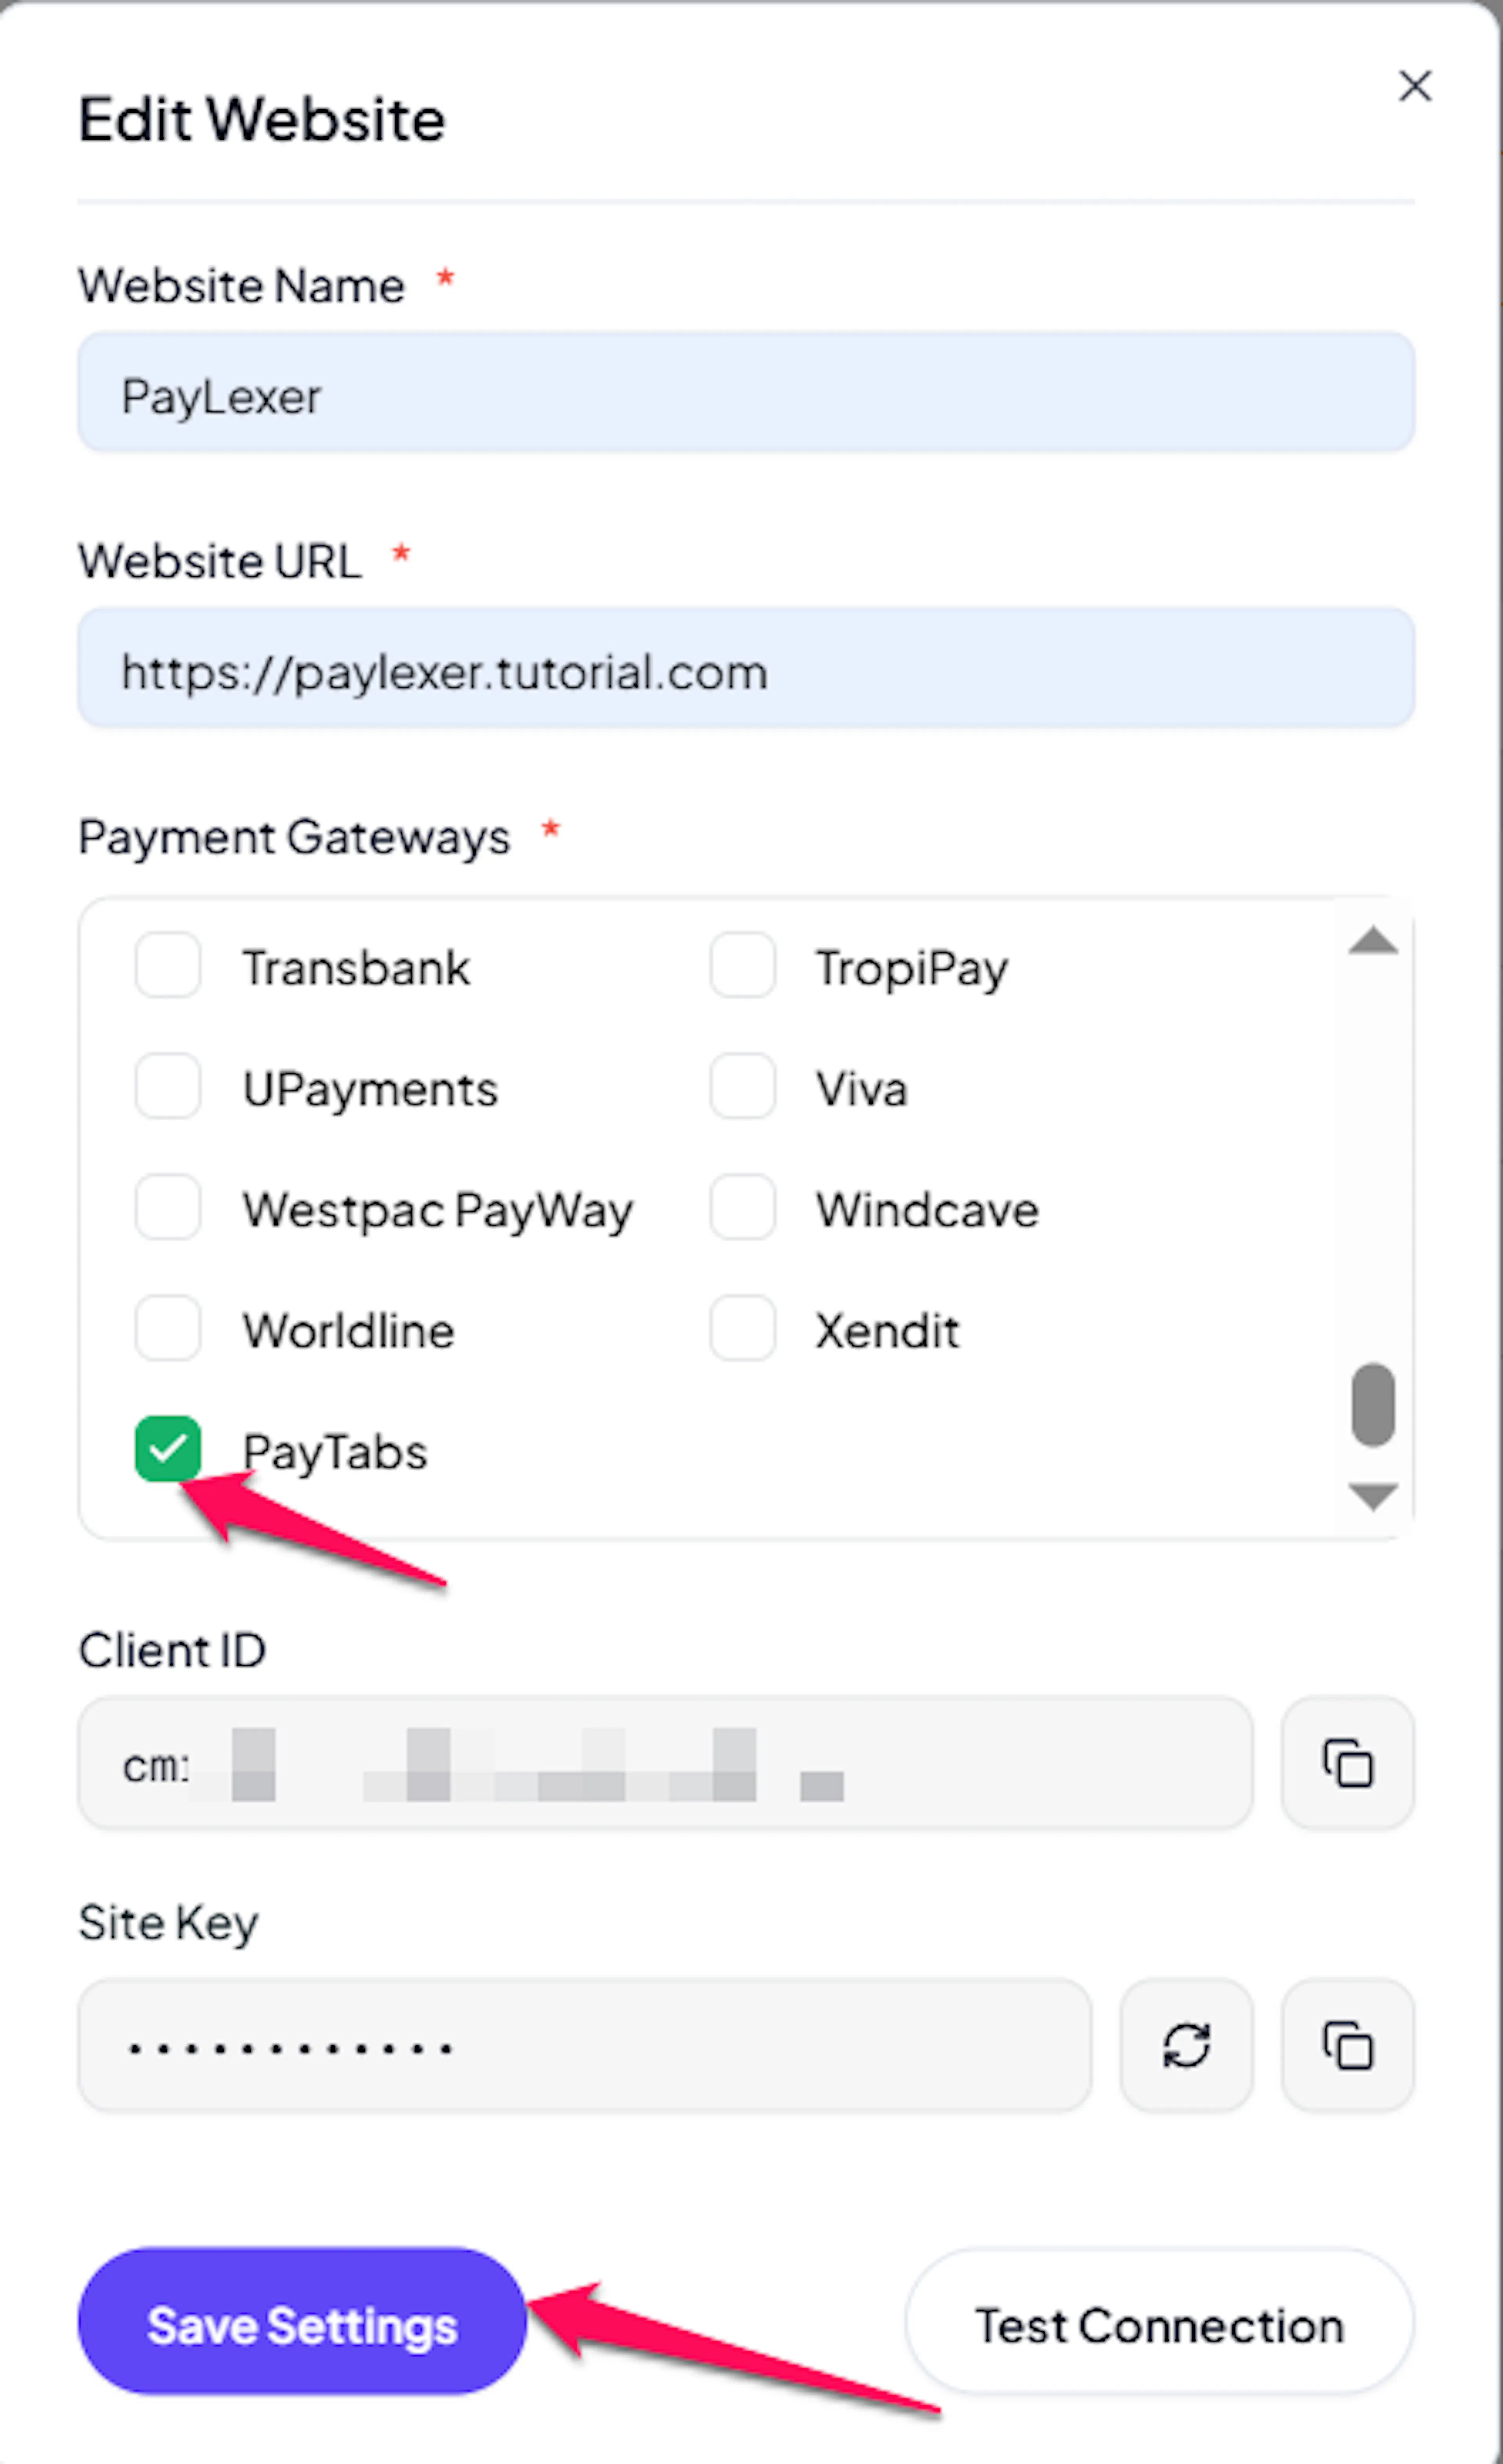
PayTabs is now active for this website. Run a test transaction before switching off Debug/Test mode.
If you haven't added a website yet, Continue to Add Your Website →
Troubleshooting
Best Practices
- Test in sandbox before enabling production. Use your PayTabs test profile with Debug/Test mode ON, and pay with the test cards from Developers → Testing → Test Cards in your PayTabs dashboard. Test cards only work against a test profile.
- Confirm which currencies your profile actually accepts before going live, and request any others from customercare@paytabs.com early, since it is a support request rather than a setting.
- Double-check your Region whenever you change credentials. It is the single most common cause of a PayTabs integration that authenticates nowhere.
- Register your webhook URL on both your test and your live profile, with Default Web and Enable Callback, so dashboard-issued refunds are never lost.
- Keep your Server Key confidential and regenerate it from Developers → Key Management if you suspect it has been exposed. It authenticates your requests and signs your notifications, so it protects both directions.
- Use a different gateway for any recurring billing, since PayTabs handles one-time payments only through PayLexer.
FAQs
Still Have Questions?
- PayTabs Support:
- Support Portal: PayTabs Support Portal
- Customer Care Email: customercare@paytabs.com (also the channel for enabling additional currencies and payment methods)
- PayLexer Support: Contact Support