

Tpay
Connect Tpay to PayLexer to accept BLIK, Polish bank transfers, cards, Apple Pay, Google Pay, and buy-now-pay-later through a hosted checkout page.
Tpay, operated by Krajowy Integrator Płatności S.A., is one of Poland's main payment providers. Its hosted Transaction Panel offers payment methods Polish buyers expect, including BLIK, major bank transfers, cards, Google Pay, Apple Pay, and buy-now-pay-later options. PayLexer sends shoppers to Tpay to complete payment, where Tpay handles their card details. Orders are marked paid only after PayLexer confirms the payment with Tpay.
- Supported Regions (Merchant Accounts): Poland
- Supported Currencies: PLN, EUR, USD
Supported Features
- Hosted checkout page: The shopper is redirected to Tpay's Transaction Panel to pay, then returned to your site, so no card details are ever entered on your own pages
- BLIK, bank-transfer buttons for every major Polish bank, cards, Apple Pay, Google Pay, and buy-now-pay-later, according to what your Tpay account has enabled
- Full and partial refunds issued from PayLexer, including several partial refunds against one payment
Before You Start
Make sure you have:
- Tpay Merchant Account – Login to your Merchant Account. Dont have one? Register for the Tpay account
- PayLexer Account – Required to configure the integration. Create your account →
- A website where you want to integrate
Going live requires Tpay's own merchant onboarding, arranged with Tpay directly. Looking for a different payment processor? View all supported gateways →
Configuring Tpay
You need a Client ID, Client Secret, and Security Code from Tpay. These come from two different screens in the Tpay panel and cannot be used interchangeably.
Getting API Credentials
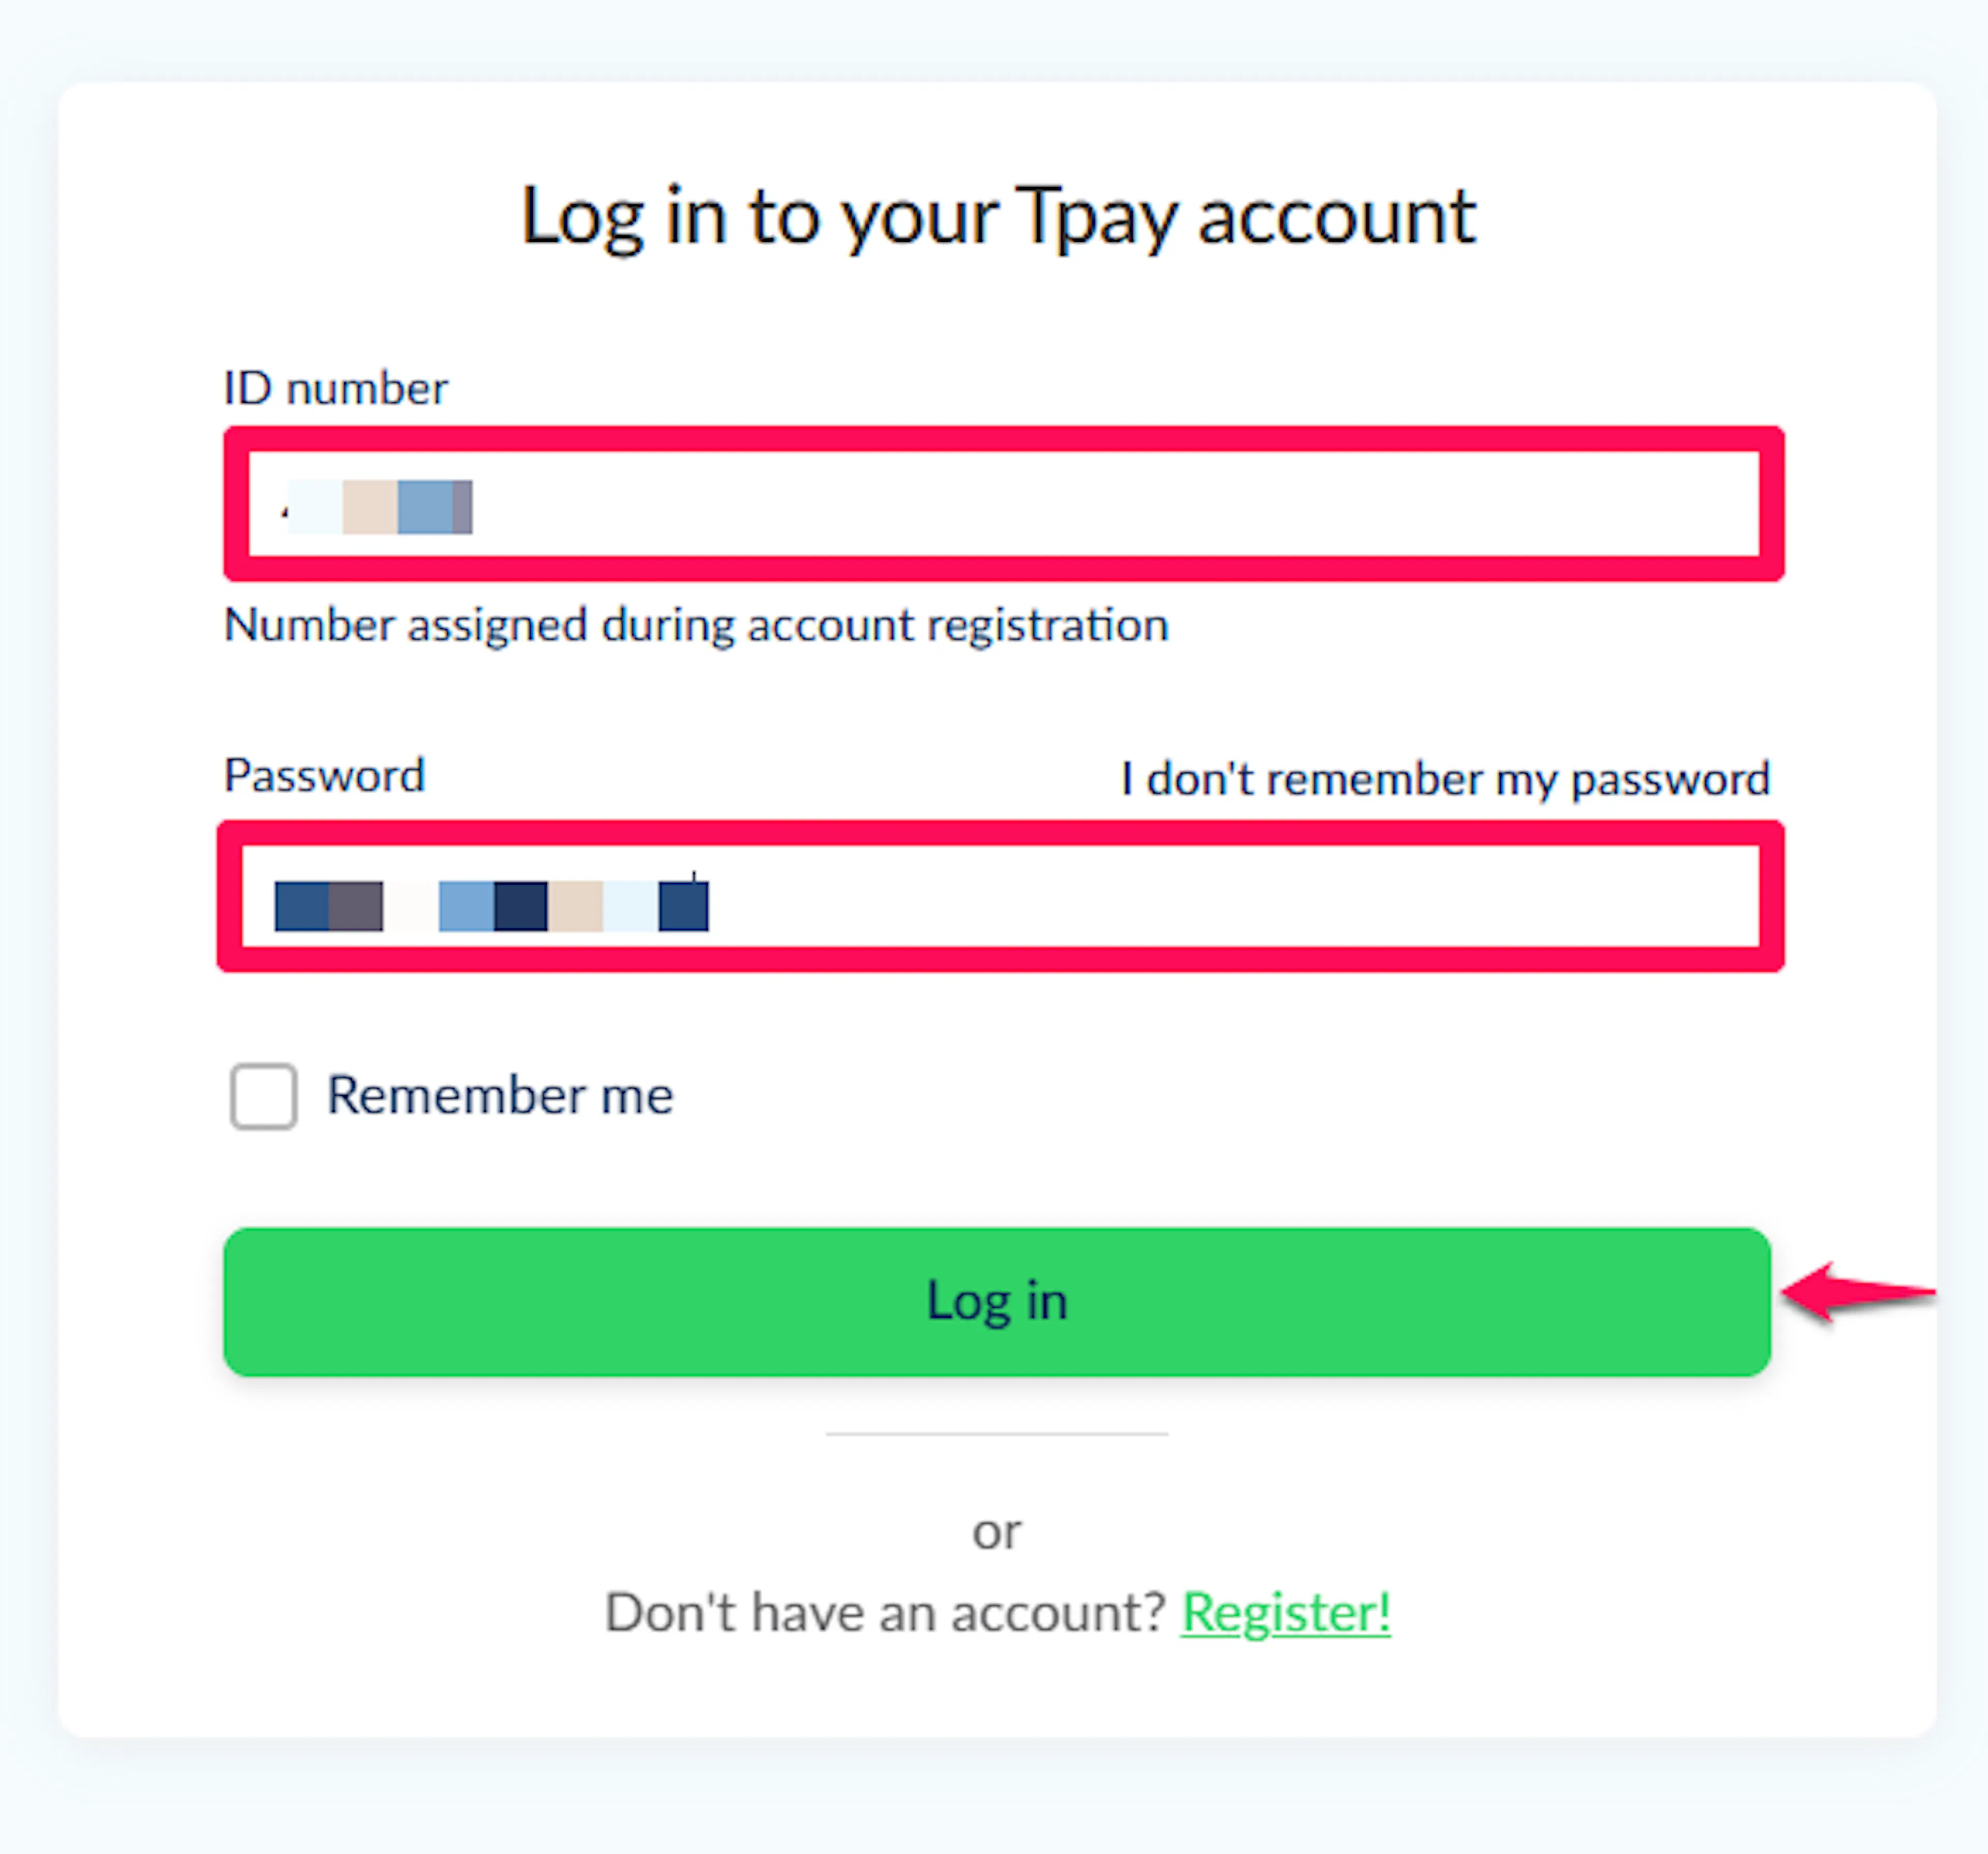
Log in to the right Tpay panel
Tpay runs completely separate sandbox and production systems, each with its own panel and its own credentials:
- Sandbox: panel.sandbox.tpay.com
- Live: panel.tpay.com
Generate a separate set of all three values in each panel. Sandbox credentials never work against production, or the reverse.
Generate your Client ID and Client Secret
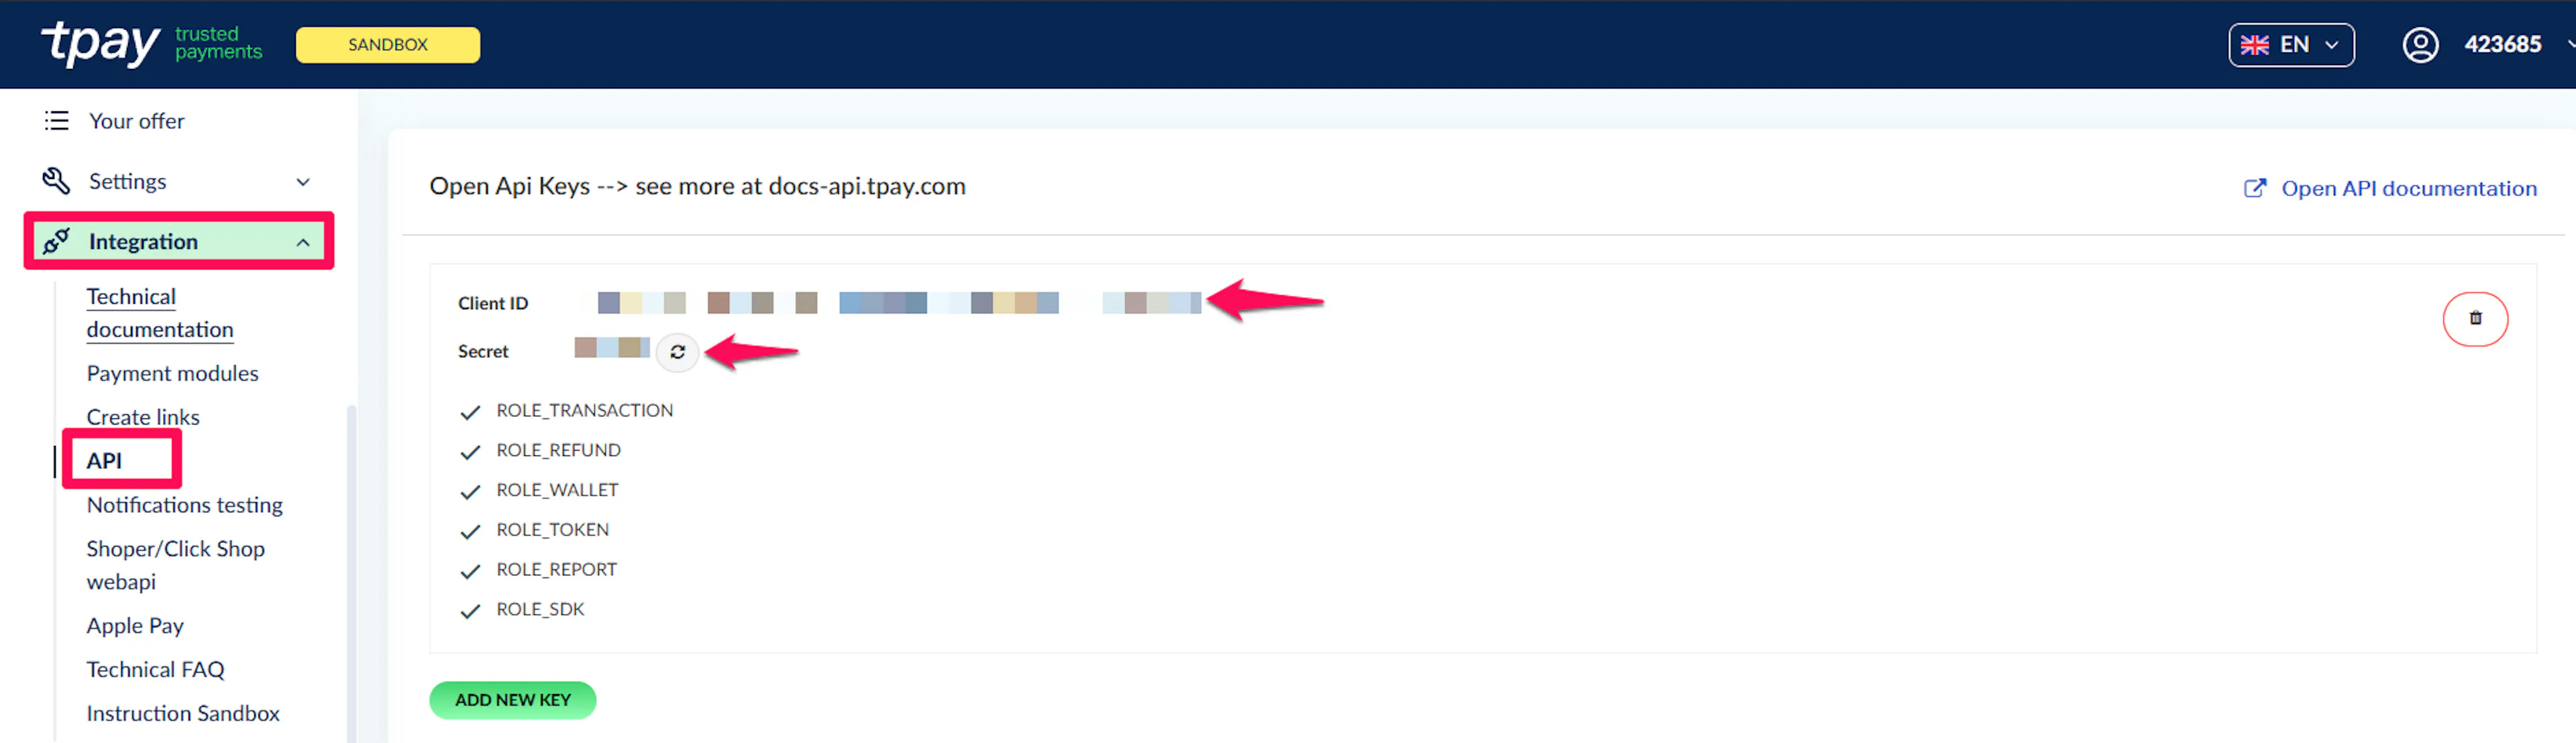
In the panel, go to Integracje → API (Integrations → API) and open Open API Keys. Generate a key pair and copy both the Client ID and the Client Secret.
Copy your Security Code
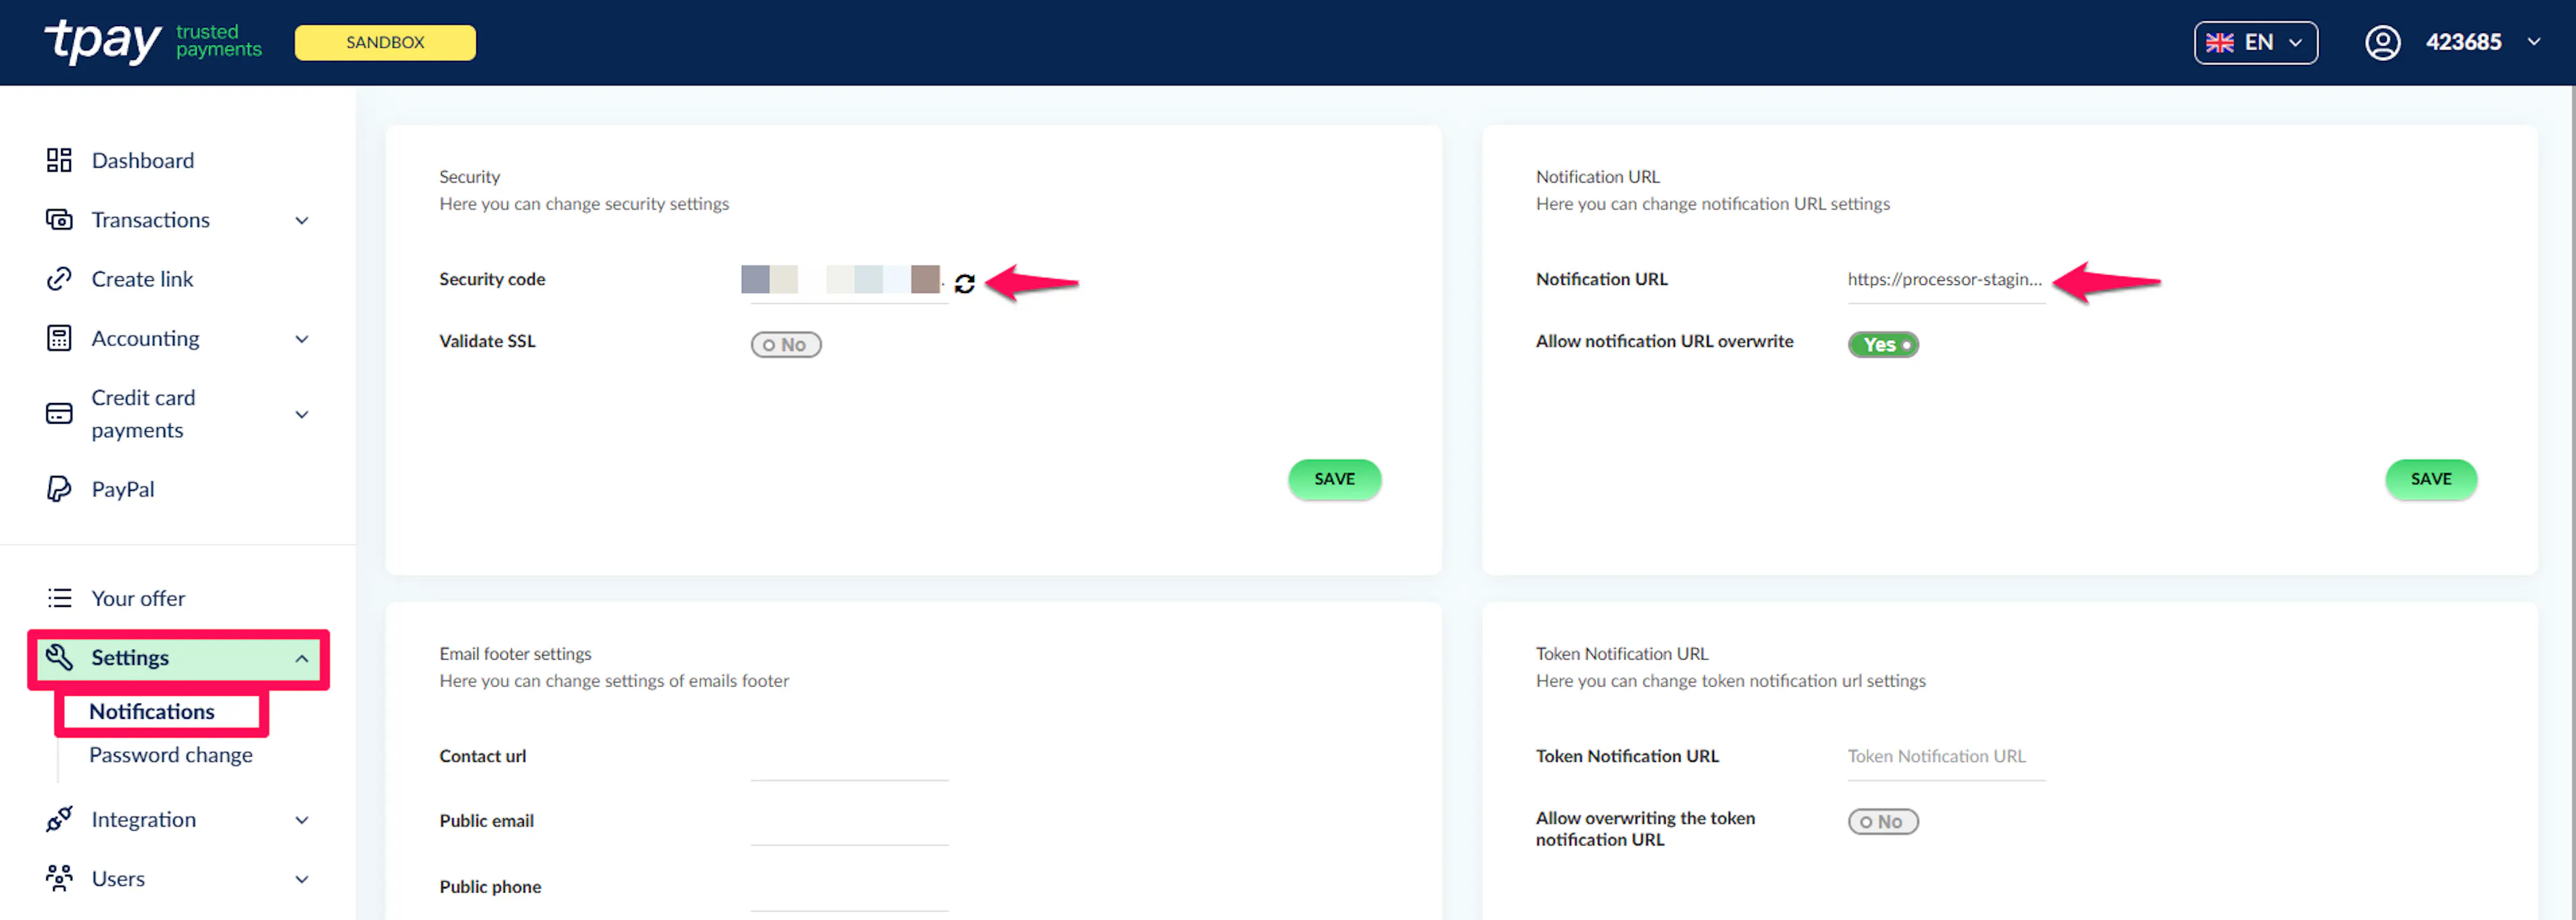
Go to Ustawienia → Powiadomienia (Settings → Notifications) and find the Security section. Copy the security code shown there.
This is a different value from your Client Secret, on a different screen. Tpay uses it to prove that a notification really came from your account.
Adding Credentials to PayLexer
Open PayLexer Dashboard
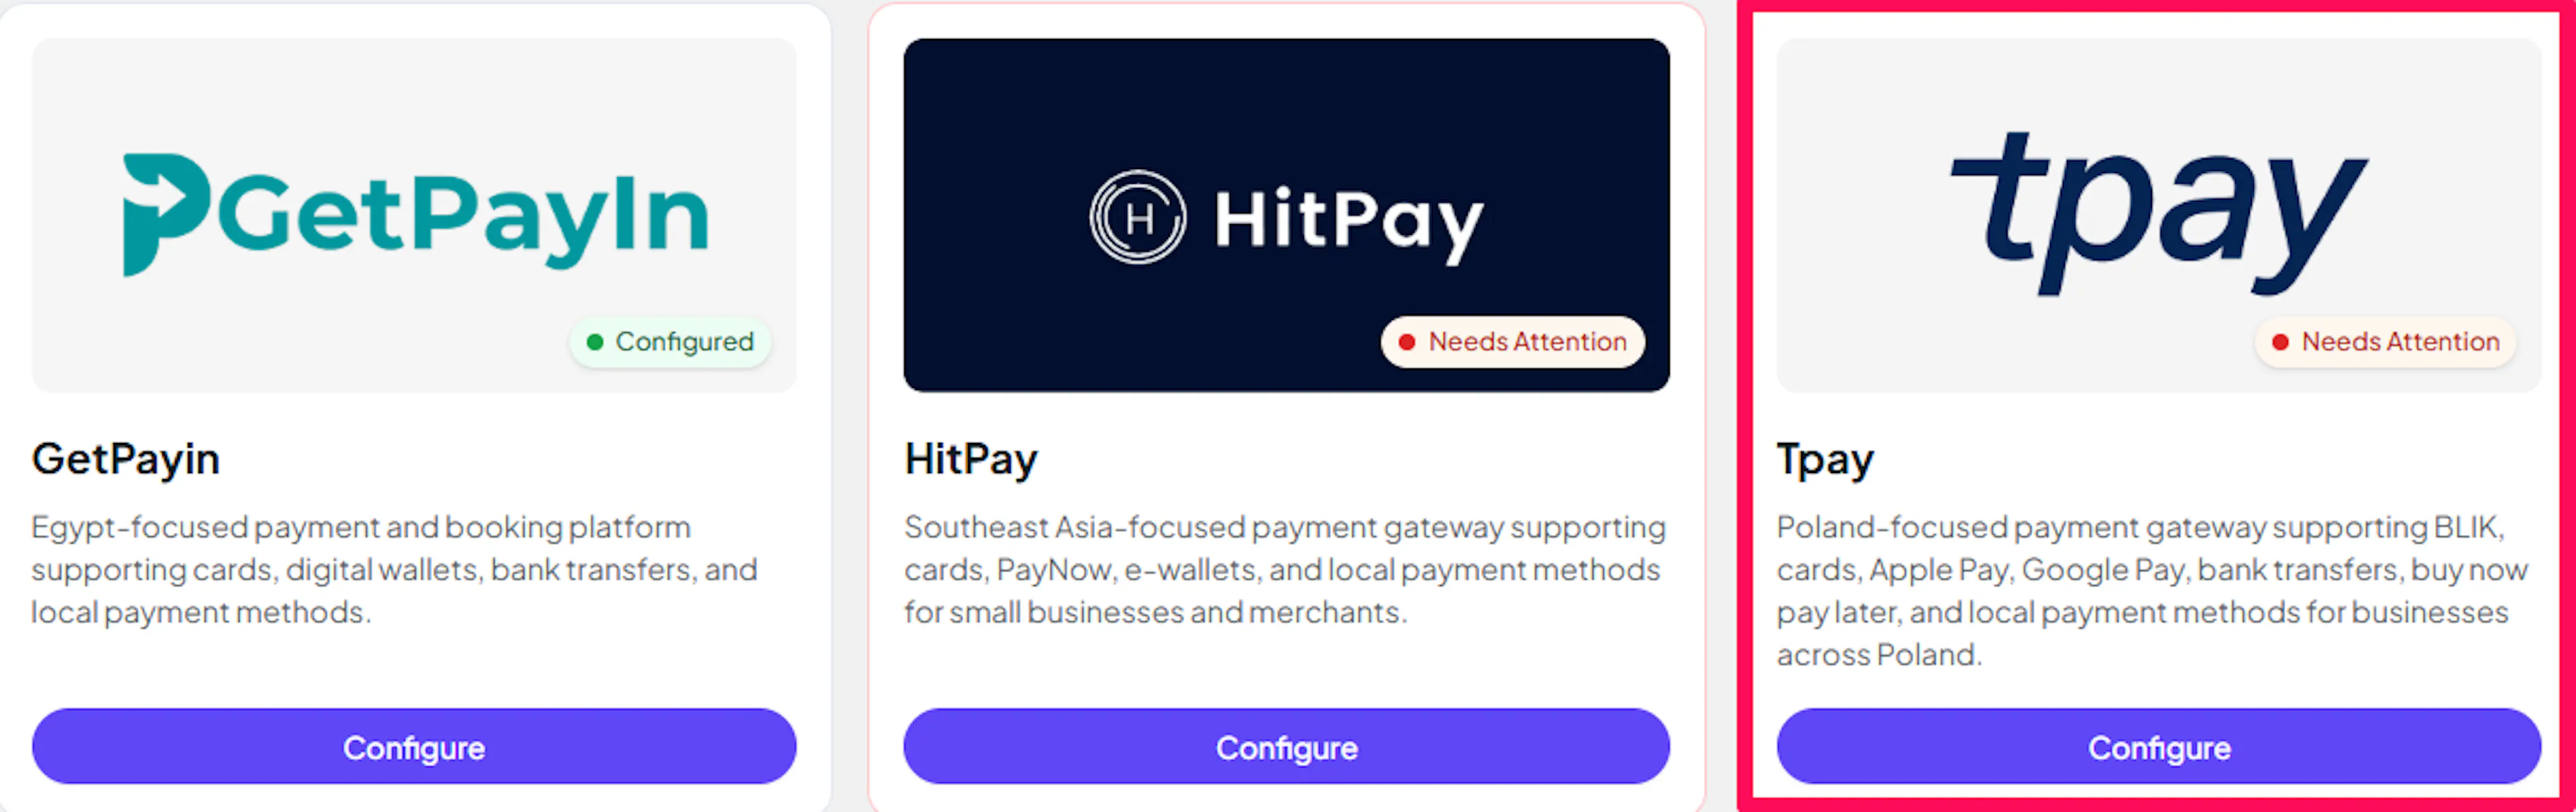
Log in to your PayLexer dashboard and navigate to Payment Gateways → Tpay.
Enter your credentials
Paste the Client ID and Client Secret into the corresponding fields. Use your sandbox panel's values in the Test fields and your live panel's values in the Live fields.
The Security Code is entered separately, in the Webhooks section of this page. The next section covers it.
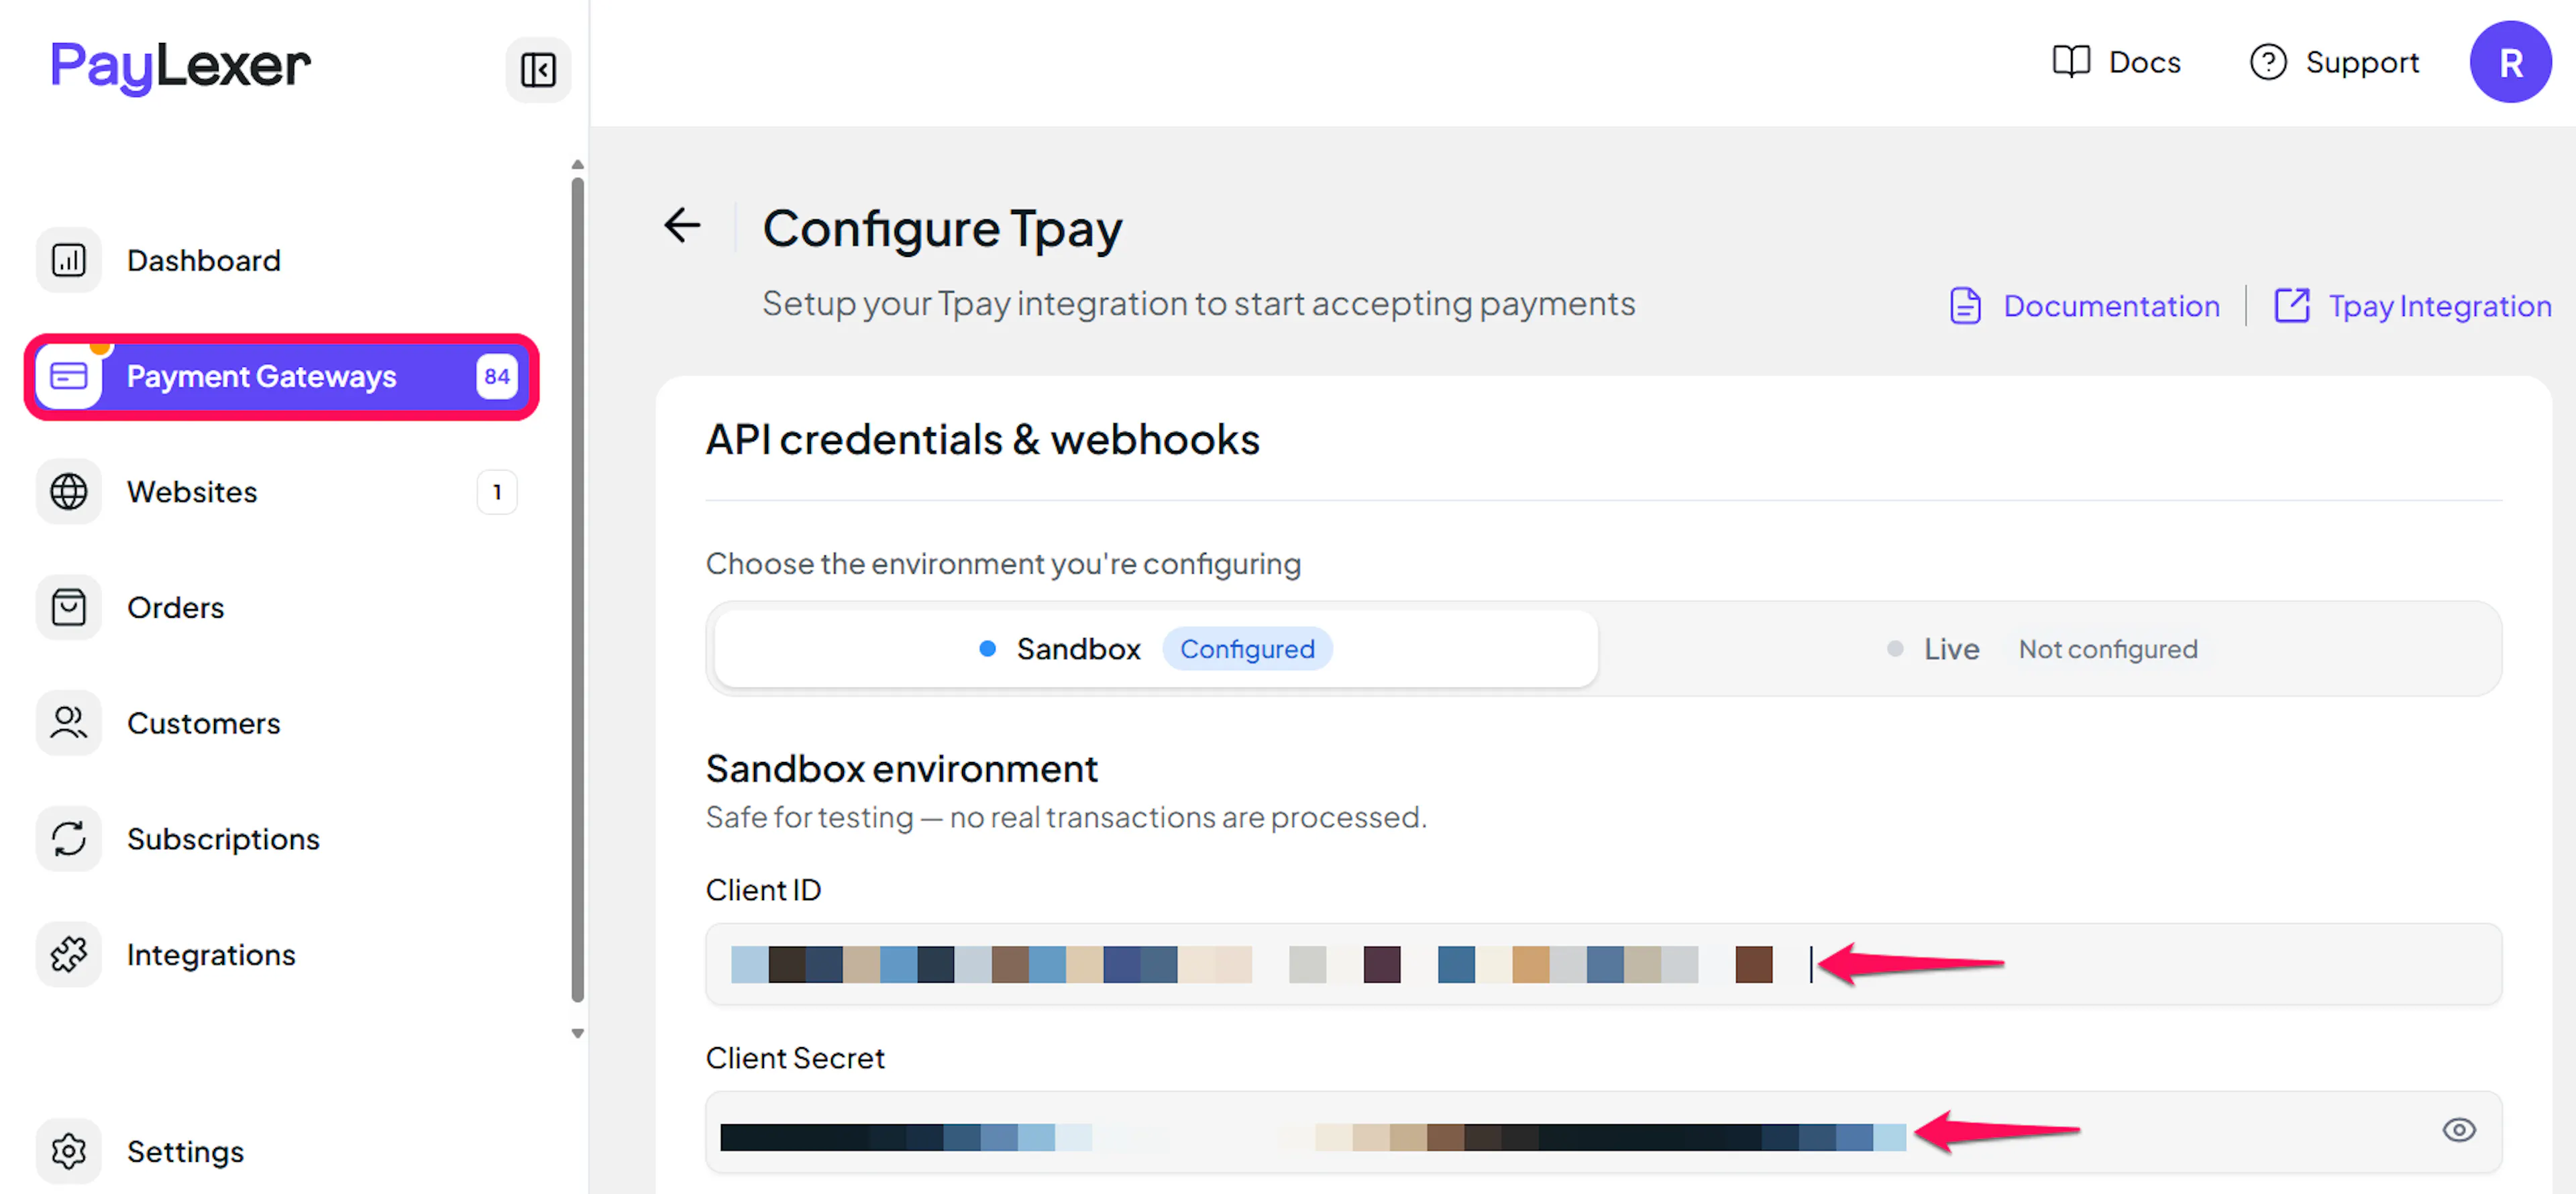
Understanding Live/Production and Sandbox Settings:
| Environment | Purpose |
|---|---|
| Live / Production | Used for real transactions. |
| Test / Sandbox | Used for testing only. No real money is processed. |
How PayLexer selects credentials:
- Debug/Test mode ON → Test credentials are used
- Debug/Test mode OFF → Live credentials are used
Test and save
Click Save to save your configuration and verify your credentials. Click Verify Connection to test the connection.
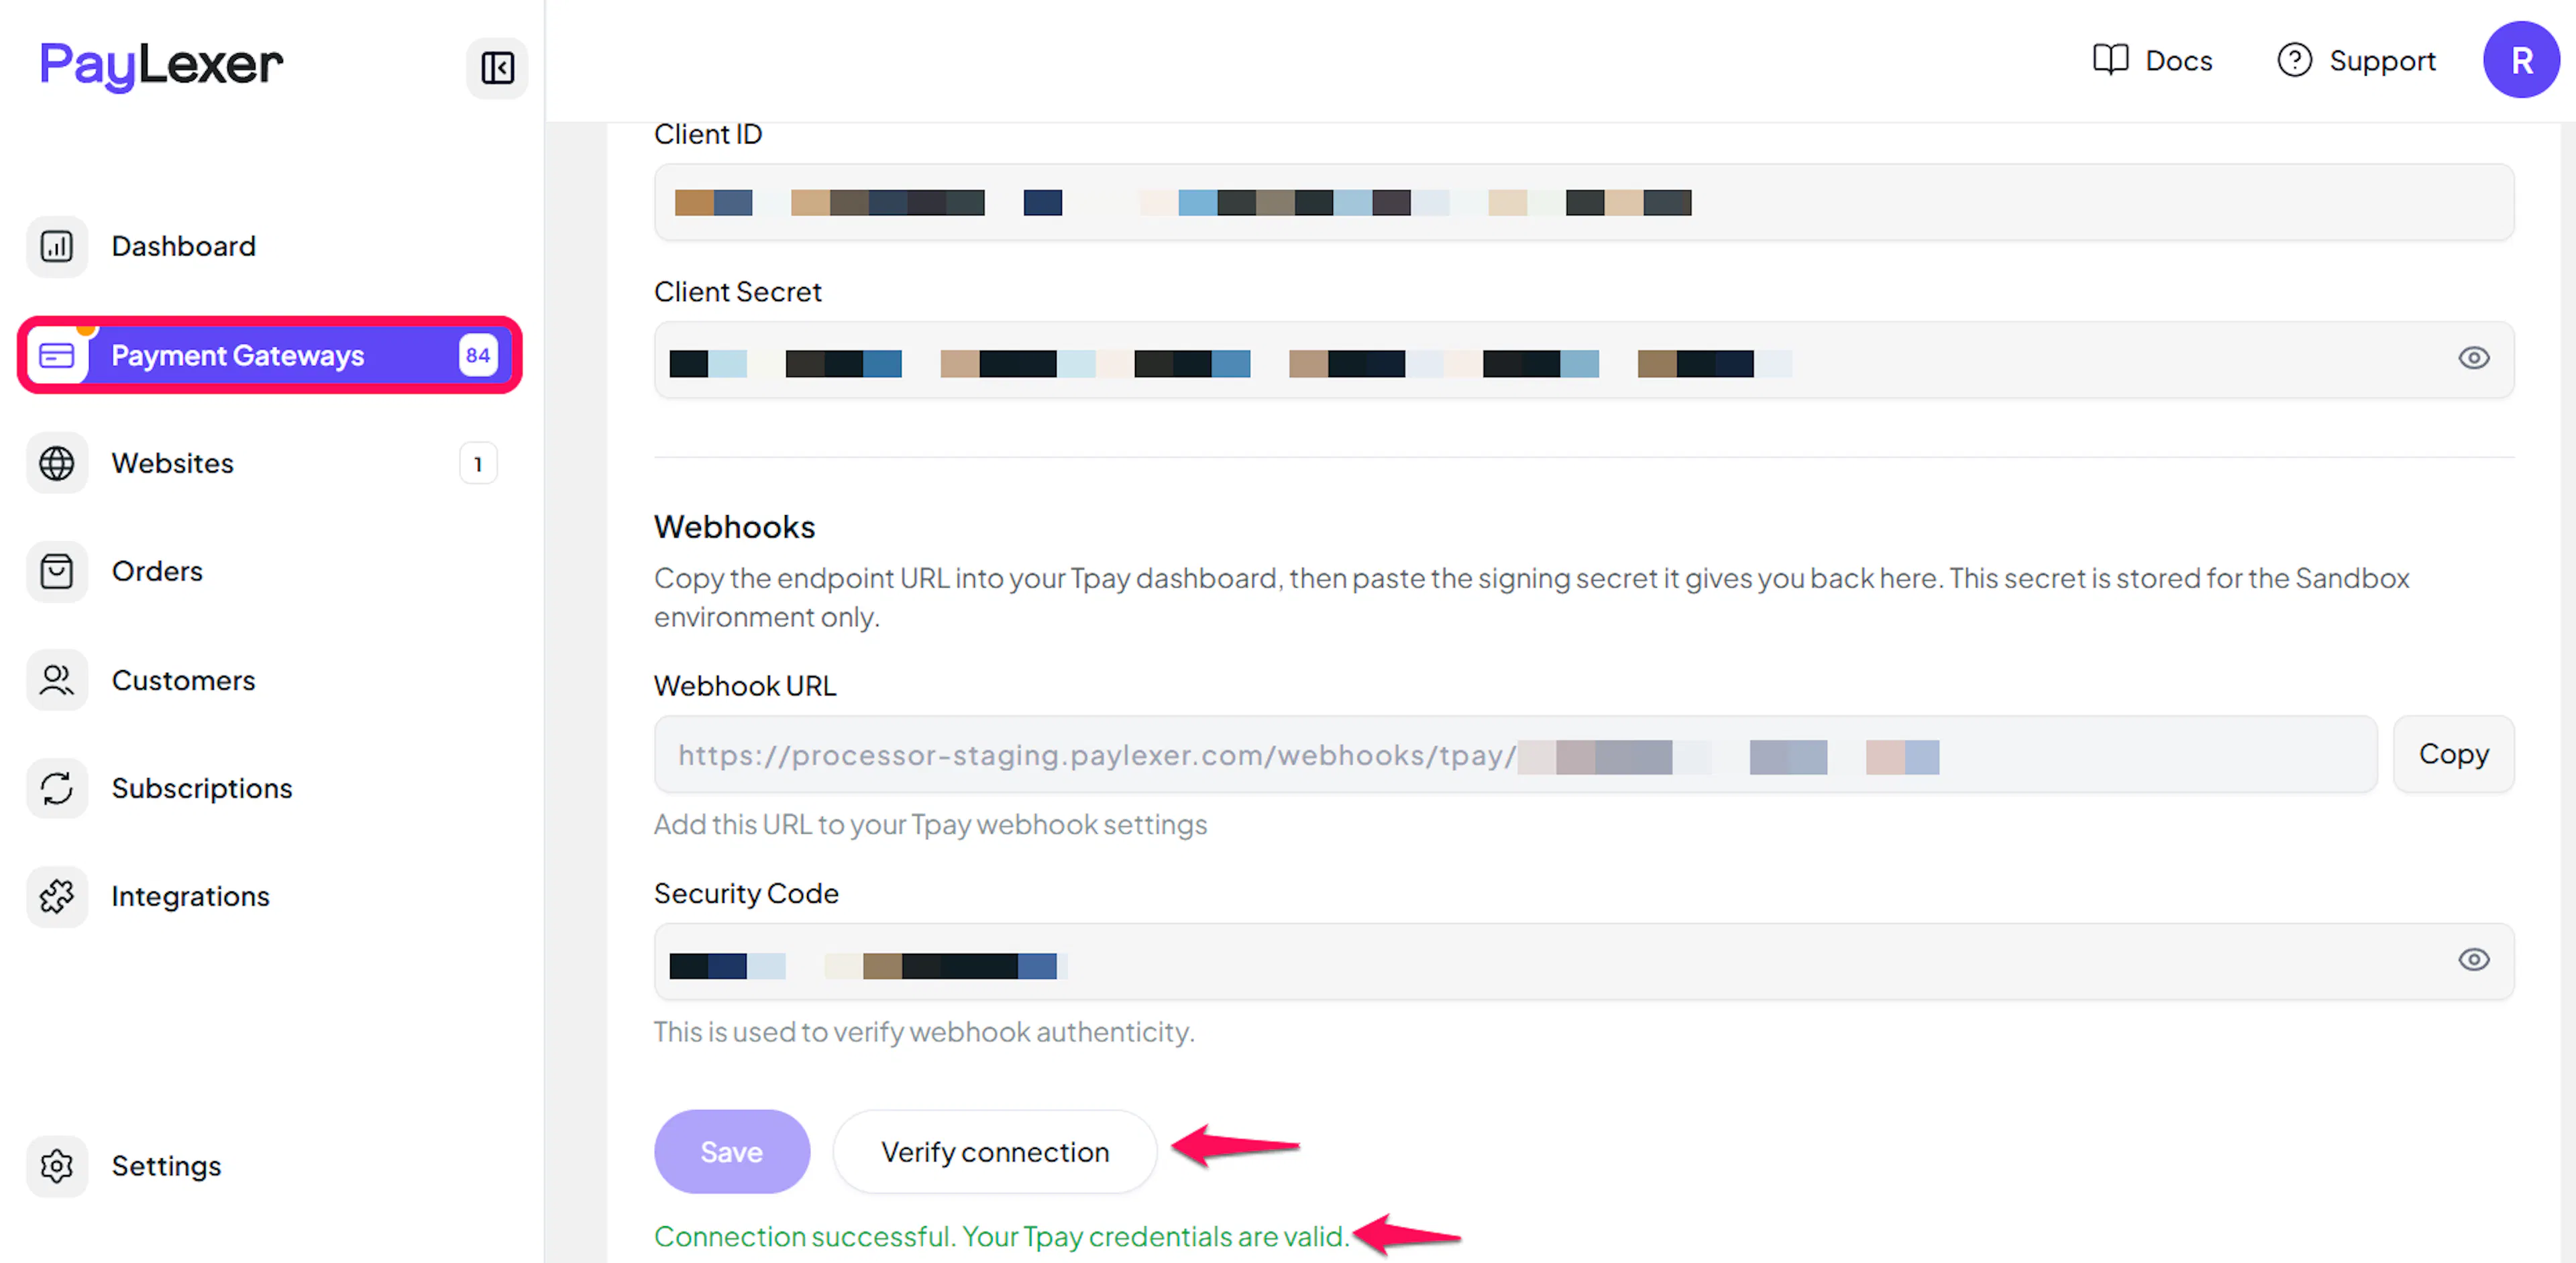
Credentials saved. Continue to the Webhooks section below before enabling Tpay on your website.
Configuring Webhooks (Mandatory)
Webhooks enable real-time payment updates and significantly improve reliability.
Benefits of Webhooks:
- Instant payment status updates
- Automatic refund processing
- Orders confirmed without waiting on a scheduled check
Tpay sends every notification for your account to a single address configured once in the panel, so this is a one-time setup per environment.
Copy your PayLexer webhook URL
In PayLexer → Payment Gateways → Tpay, copy the Webhook URL shown for your account.
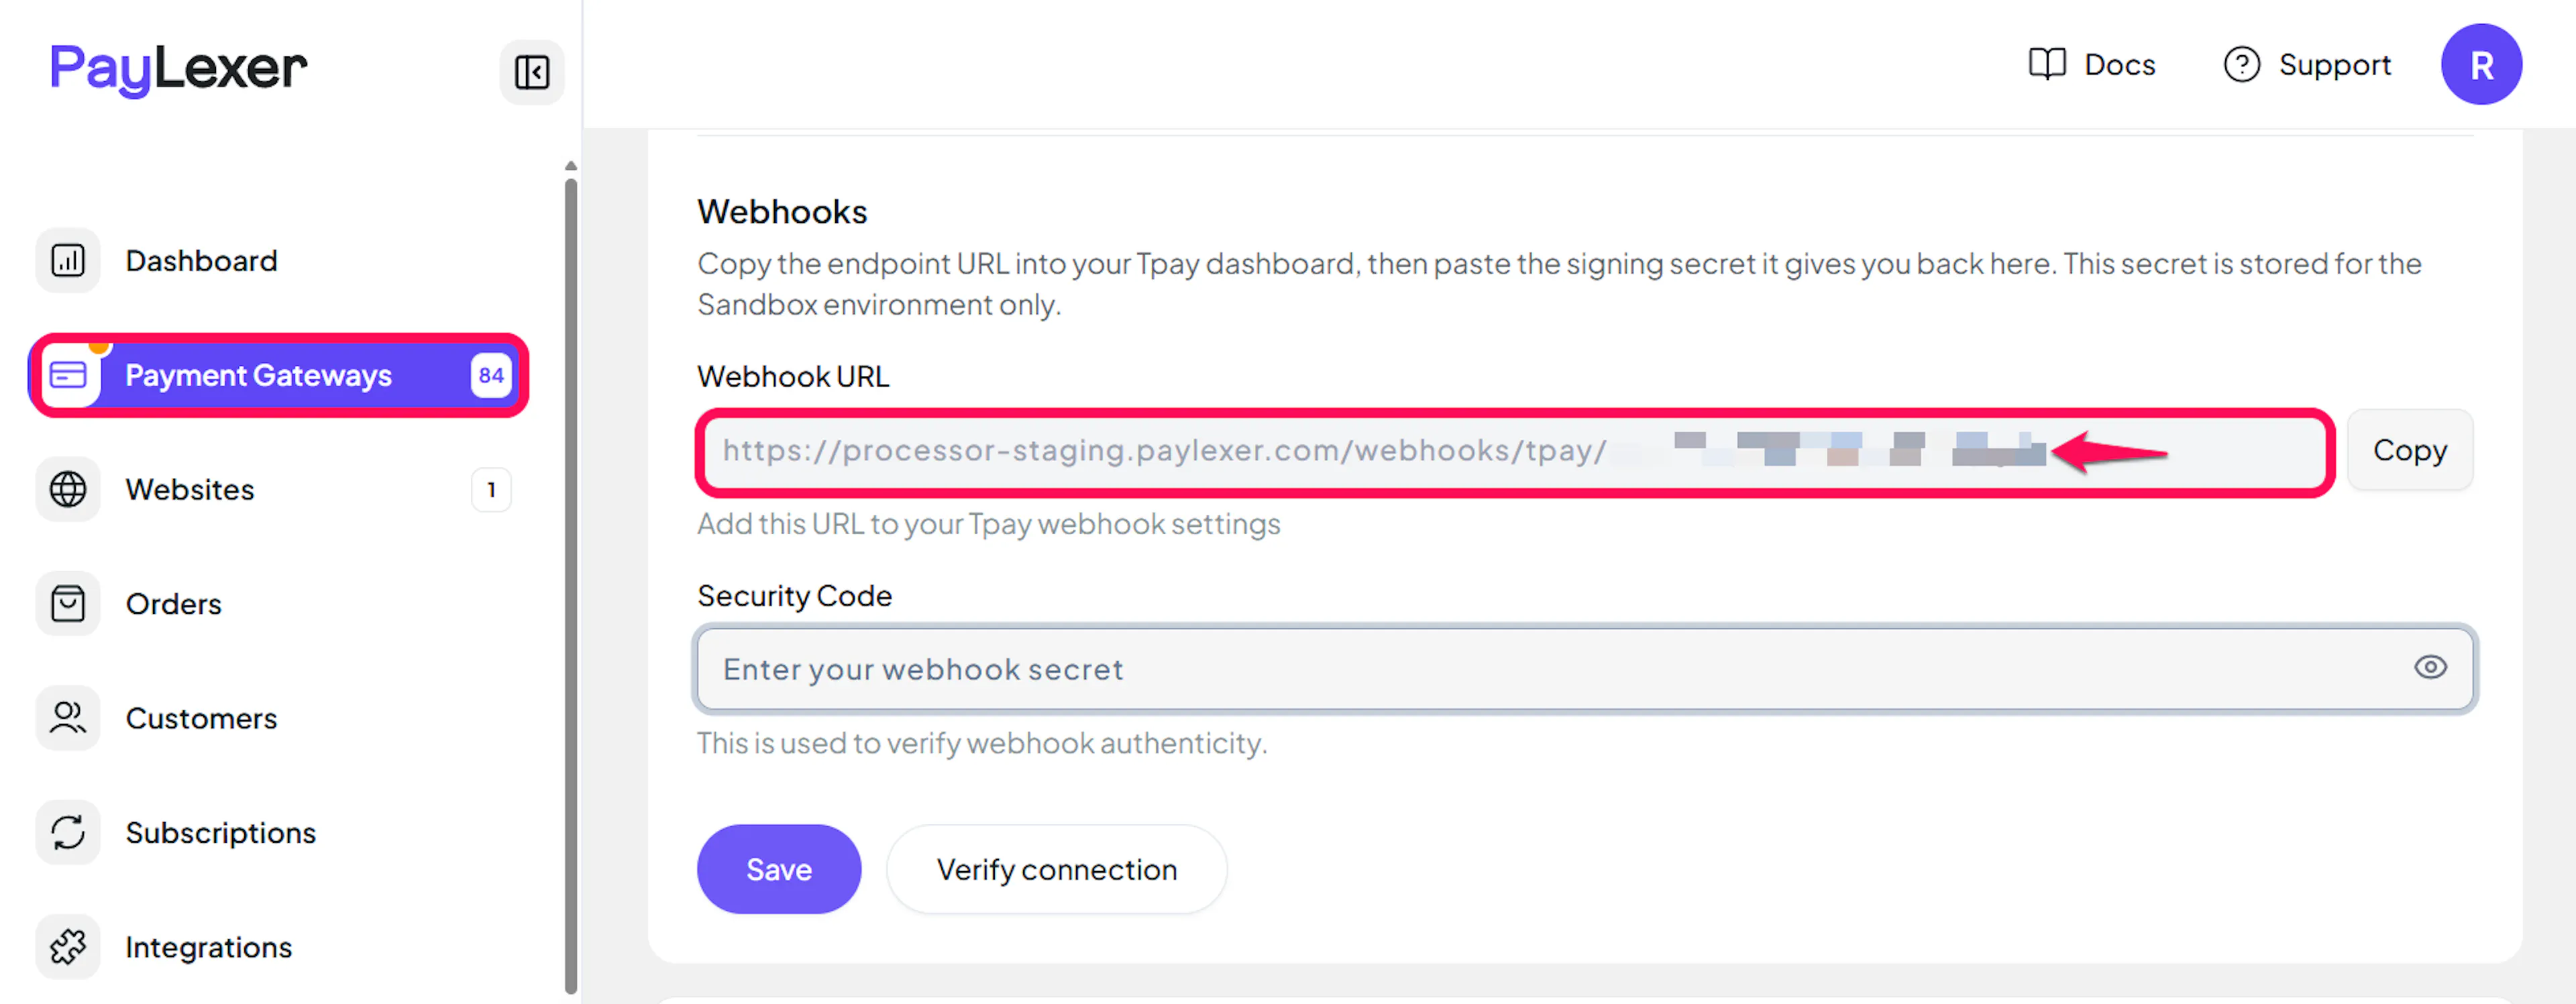
Paste it into your Tpay panel
In the panel, go to Ustawienia → Powiadomienia (Settings → Notifications) and set the notification URL to the URL you just copied.
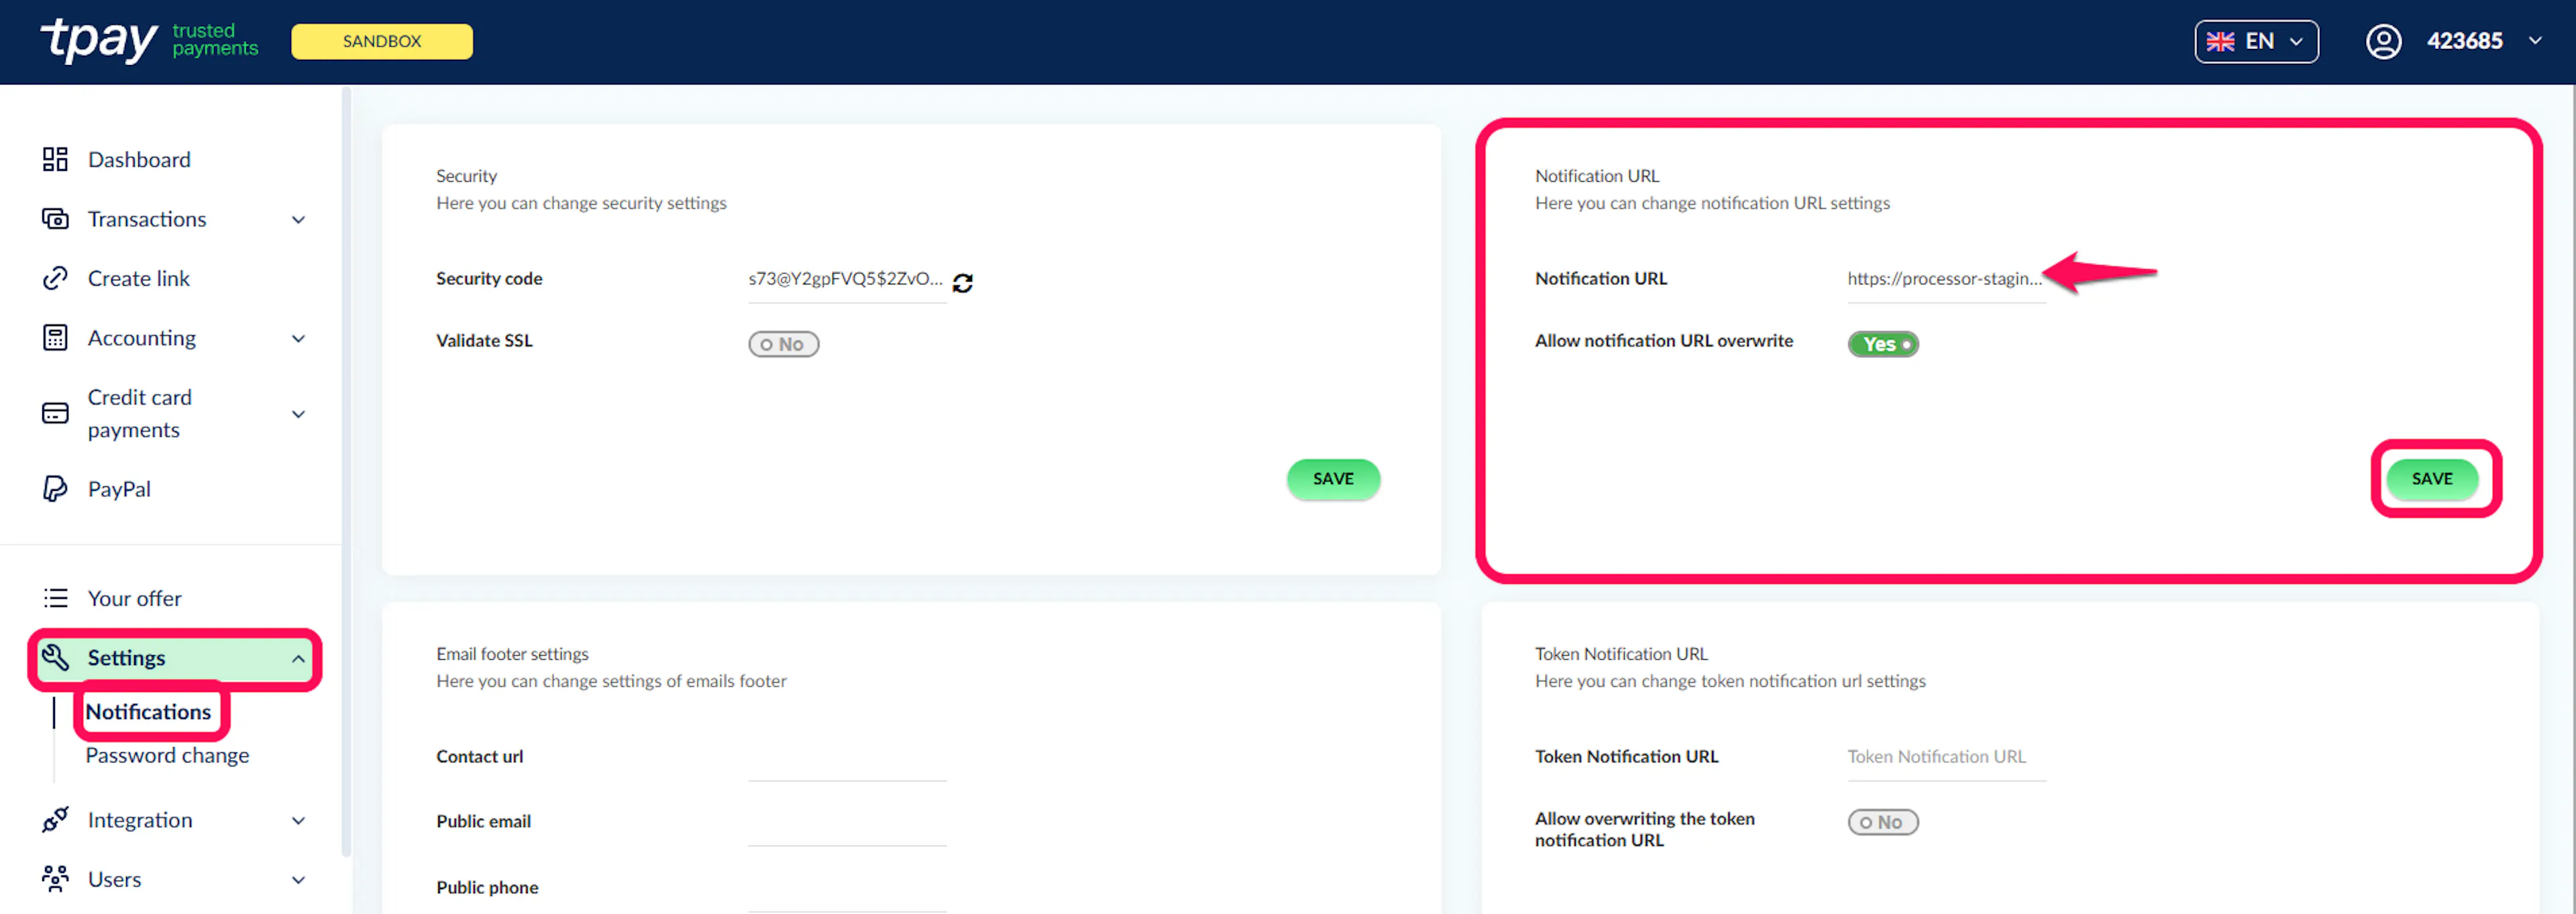
Add your Security Code in PayLexer
Back in PayLexer → Payment Gateways → Tpay, paste the Security Code into its field in the Webhooks section, then click Save.
Use the code from your sandbox panel in the Test field and the one from your live panel in the Live field.
Without the matching Security Code, notifications are rejected as unverified. Keep each pair matched: the Test code must come from the sandbox panel and the Live code from the live panel.
Repeat in the other panel
Notification settings belong to the panel you are in, so configure the address in your sandbox panel and in your live panel, and paste each one's Security Code into the matching PayLexer field.
Integrate Tpay to Your Website
If you have already added and configured your site, you can enable Tpay in your existing setup.
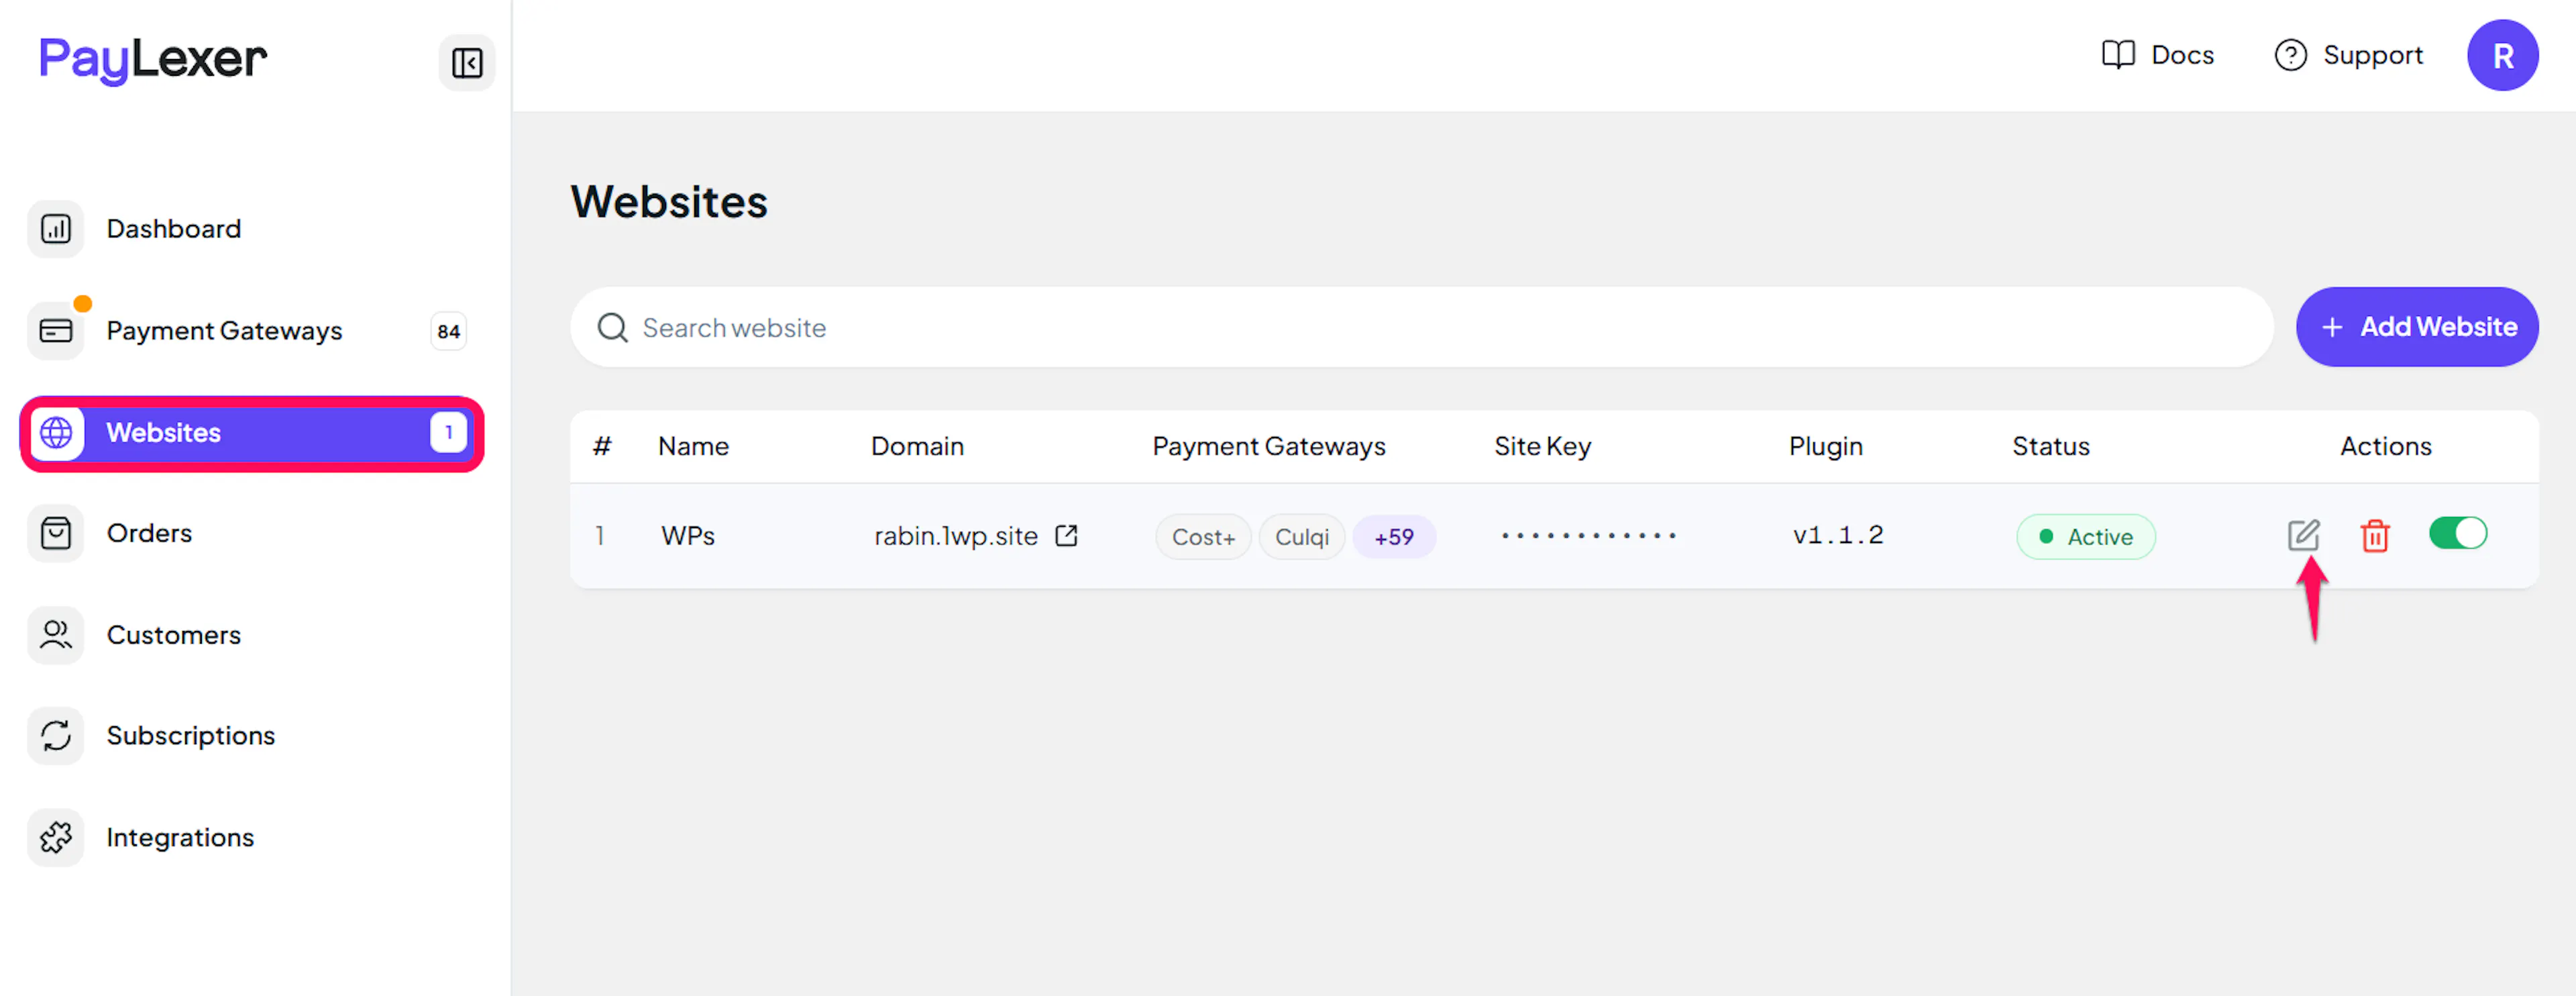
Go to Websites
Navigate to Websites in your PayLexer dashboard.
Edit your website
Click the Edit Icon of your added website.
Enable Tpay
Click the checkbox to enable Tpay for the website.
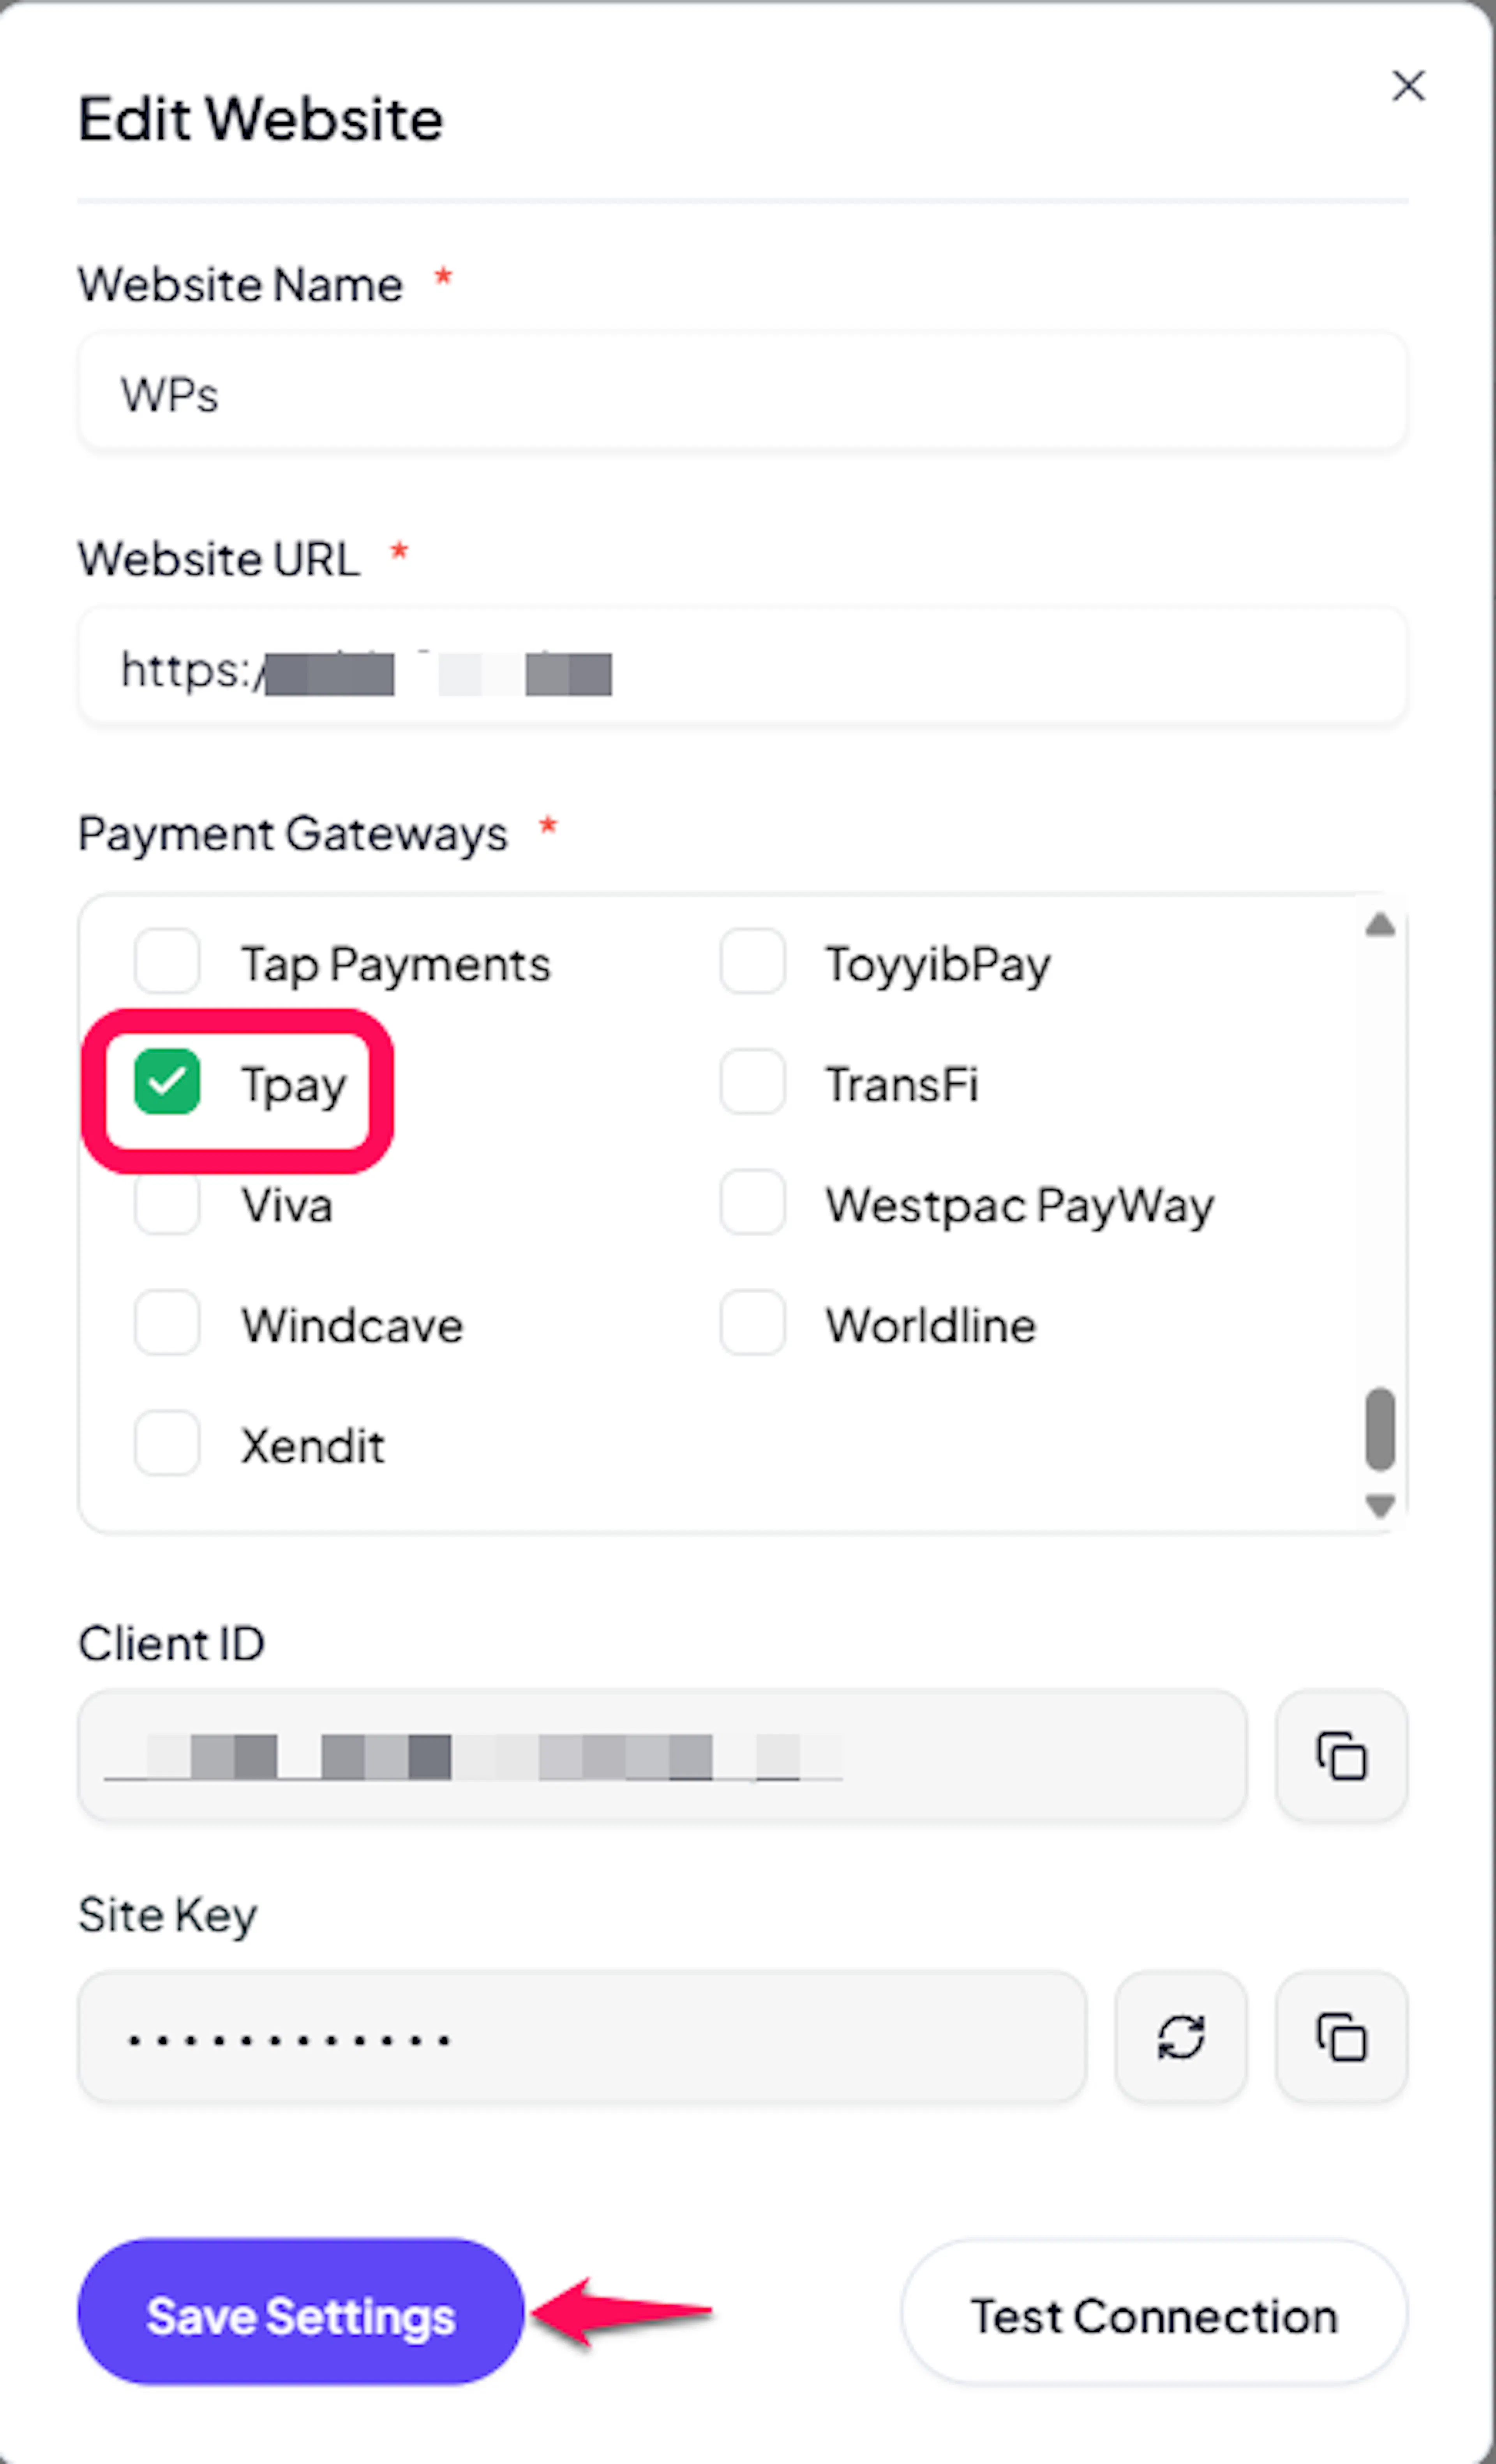
Tpay is now active for this website. Run a test transaction before switching off Debug/Test mode.
If you haven't added a website yet, Continue to Add Your Website →
Troubleshooting
Best Practices
- Test in sandbox before enabling production. A Tpay sandbox account needs only an email address and a company name, with verification disabled, so there is no reason to test on live.
- Copy the Client Secret the moment Tpay shows it, since it is displayed only once and a replacement pair has to be regenerated.
- Paste the Webhook URL into the panel exactly as PayLexer shows it. This is the single most damaging thing to get wrong, because Tpay stops retrying a bad address permanently instead of reporting an error.
- Keep each environment's set together: the panel address, the Security Code, and the Client ID and Secret must all come from the same panel.
- Keep enough Tpay balance to cover refunds and their fees, since Tpay takes both from your balance rather than from the original payment.
- Confirm multi-currency with Tpay before charging in EUR or USD on a live site.
- Expect the panel's "test notification" button to fail, and confirm your setup with a real sandbox payment instead.
- Use a different gateway for any recurring billing, since Tpay handles one-time payments only through PayLexer.
FAQs
Still Have Questions?
- Tpay Support:
- Support Centre: Tpay Support
- Contact Page: Tpay contact
- PayLexer Support: Contact Support