

PAYONE
Connect PAYONE to PayLexer to accept cards, Apple Pay, Google Pay, and international wallets across German-speaking and western European markets through a hosted checkout page.
PAYONE is a major payment provider in the German-speaking market, backed by the German savings-bank group and Worldline. Shoppers pay through PAYONE’s hosted checkout using the methods enabled on your account, while PAYONE securely handles card details. PayLexer marks orders as paid only after PAYONE confirms the payment.
- Supported Regions (Merchant Accounts): Germany, Austria, Switzerland, Netherlands, Belgium, France, Italy, Luxembourg
- Supported Currencies: EUR, CHF, DKK, GBP, NOK, SEK, CNY, USD
Recurring subscriptions are not supported for PAYONE. This integration handles one-time payments only.
Supported Features
- Hosted checkout page - the shopper is redirected to PAYONE to pay, then returned to your site, so no card details are ever entered on your own pages
- Payments captured rather than only authorized, so no manual capture step is needed in the PAYONE portal to complete a sale
- Signed server-to-server notifications verified against a dedicated webhook key, retried by PAYONE up to five times over roughly a day, and applied exactly once no matter how often they arrive
- Full and partial refunds
- Automatic 30-minute re-check for any payment or refund still awaiting an answer, so nothing stays stuck because a notification went missing
Before You Start
Make sure you have:
- PAYONE Global Online Pay Account – Live credentials require PAYONE's own merchant onboarding. Contact PAYONE to get started →
- PayLexer Account – Required to configure the integration. Create your account →
- A website where you want to integrate
Looking for a different payment processor? View all supported gateways →
Configuring PAYONE
You need a Merchant ID (PSPID), an API Key ID, a Secret API Key, and a Secret Webhook Key from PAYONE for this integration. All four come from your PAYONE Merchant Portal, and the API pair and the webhook key are generated on two separate screens.
Getting API Credentials
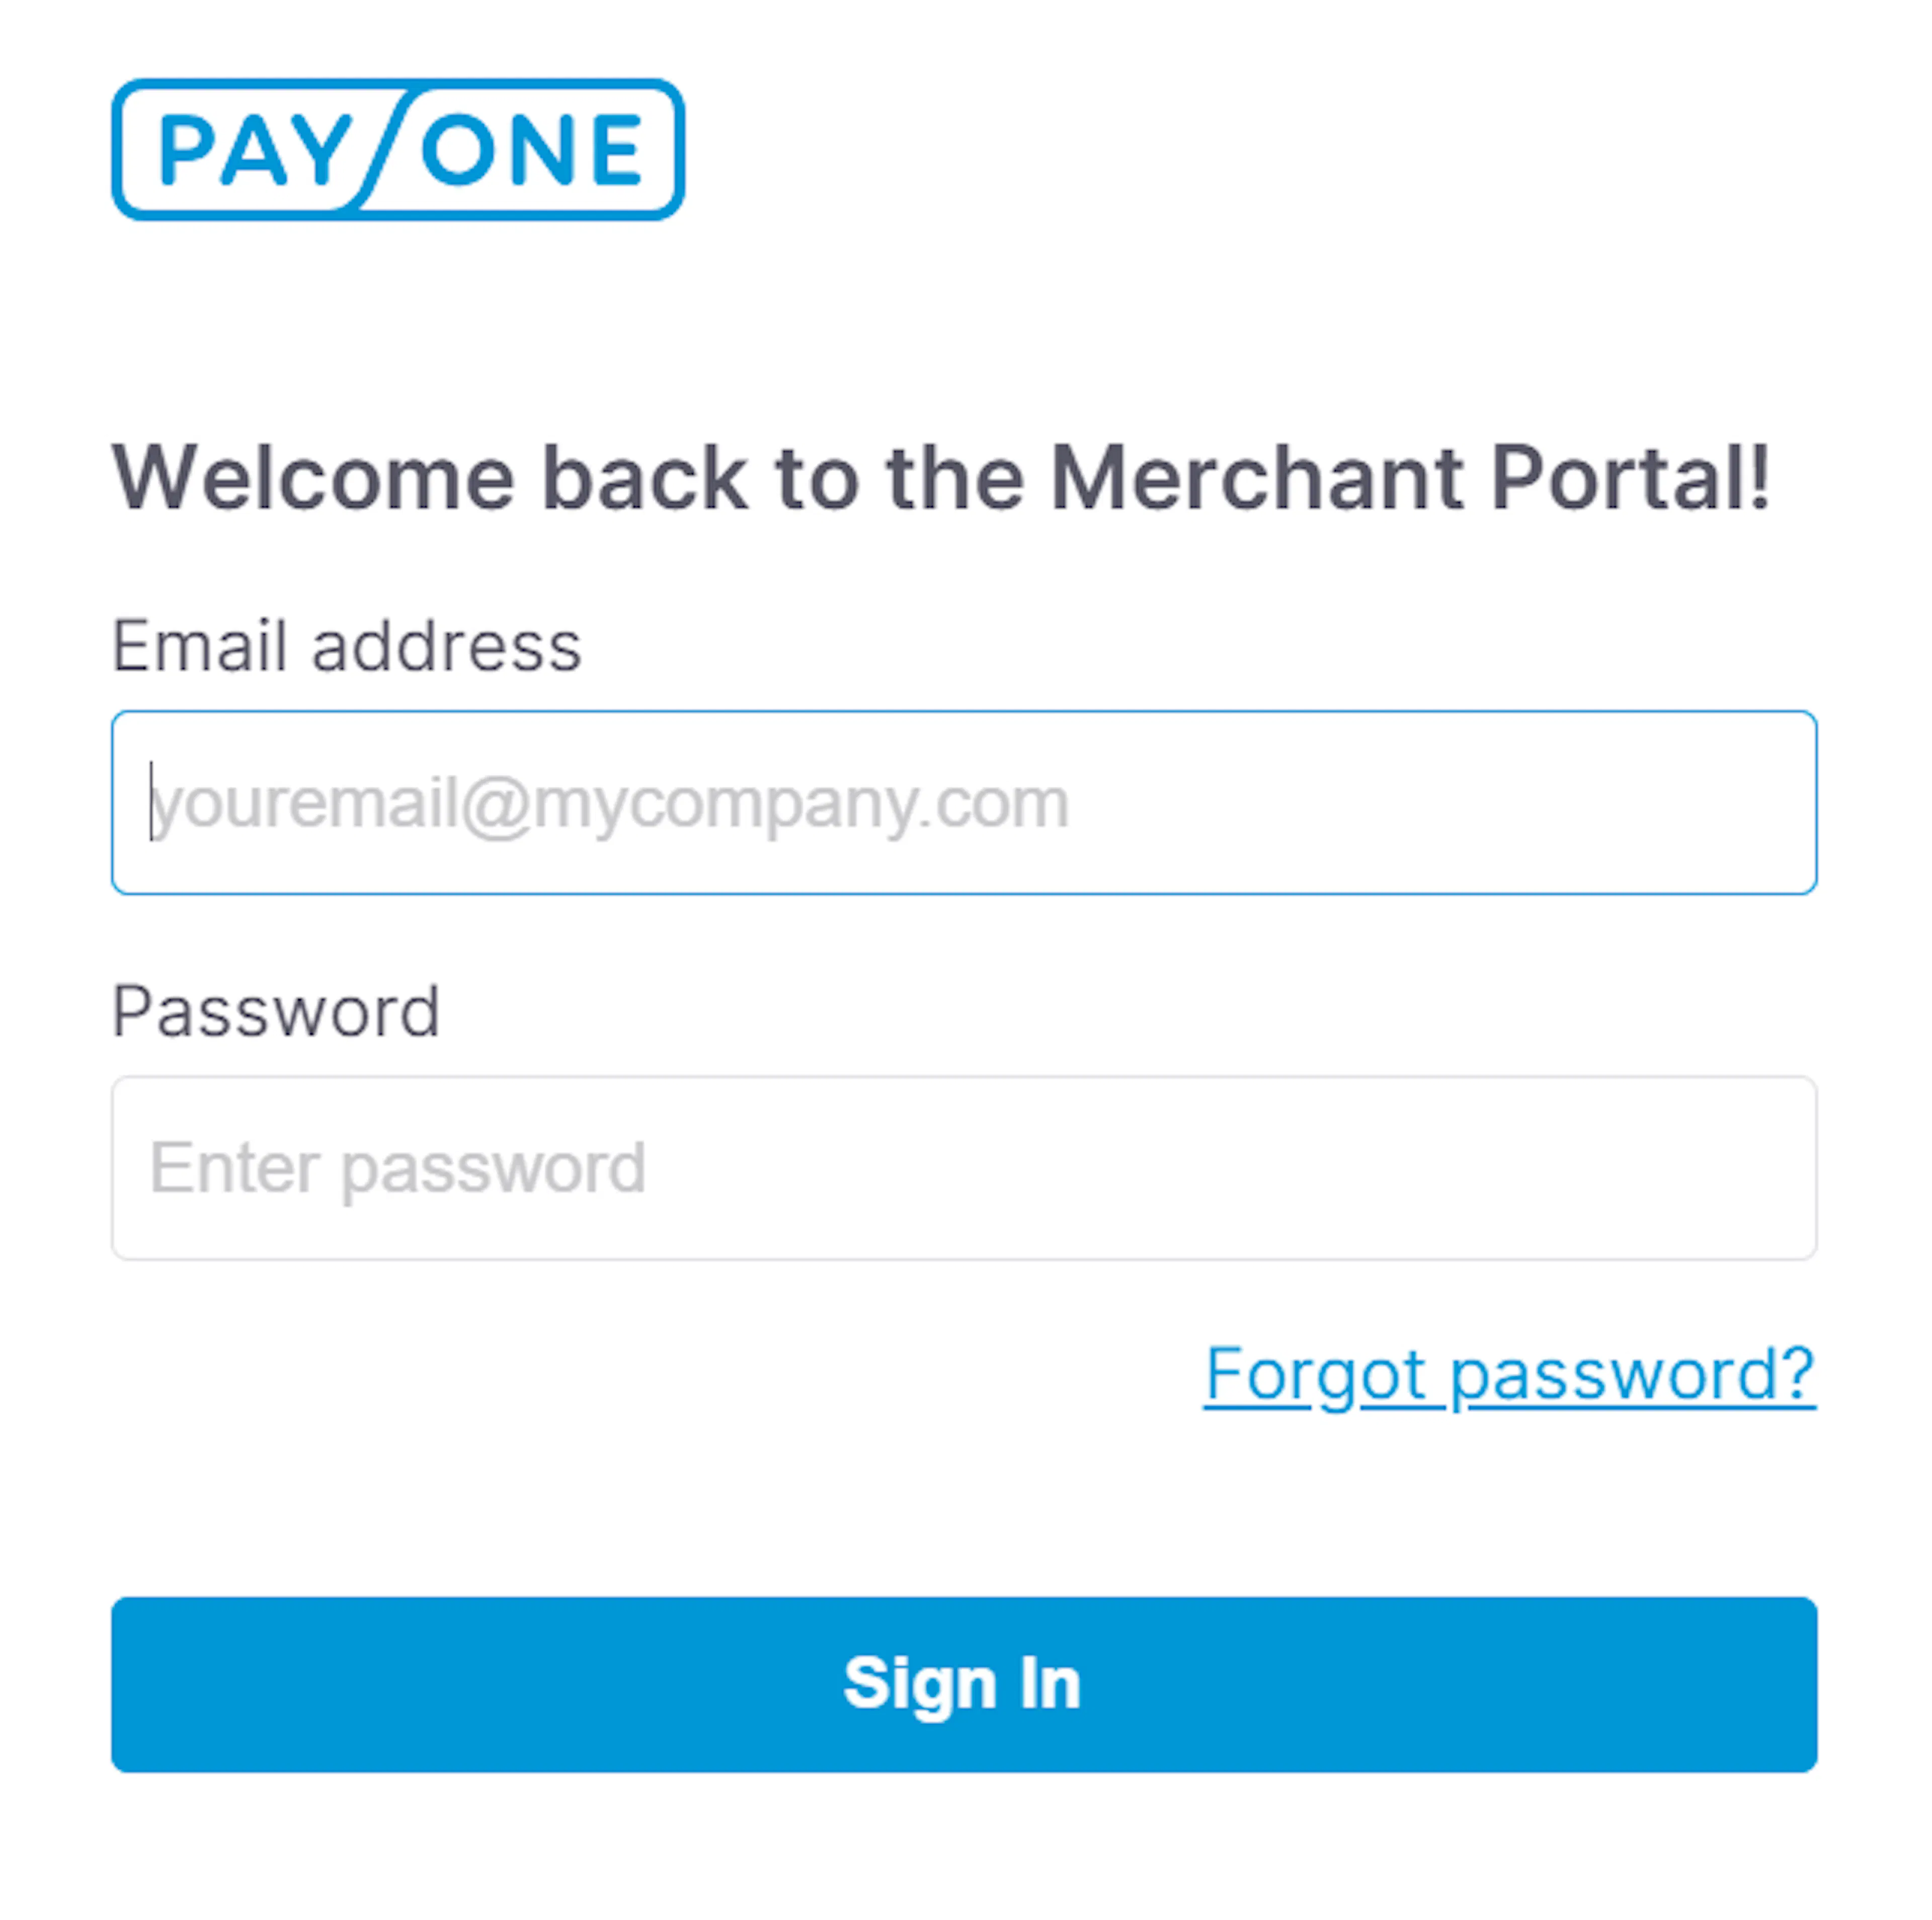
Log in to the right Merchant Portal
PAYONE runs completely separate servers for test and live, each with its own portal and its own credentials:
- Test: portal.preprod.payone.com
- Live: portal.payone.com
Generate a separate set of all four values in each portal. A test credential will not work against the live server, and the reverse is also true.
Note your Merchant ID (PSPID)
PAYONE calls your account identifier a PSPID, and it is a name, not a number. You will find it in the Merchant Portal under Developer → Payment API, the same tab where you generate your API keys in the next step.

Generate your API Key ID and Secret API Key
On the same Developer → Payment API page, click Add API Key. The screen then shows both values, labelled API Key ID and Secret API Key.


Generate your Secret Webhook Key
Still in the Merchant Portal, go to Developer → Webhooks and click Generate webhooks keys. The screen shows a Webhooks ID and a Secret Webhook Key.
Copy the Secret Webhook Key. PayLexer does not need the Webhooks ID.


Adding Credentials to PayLexer
Open PayLexer Dashboard
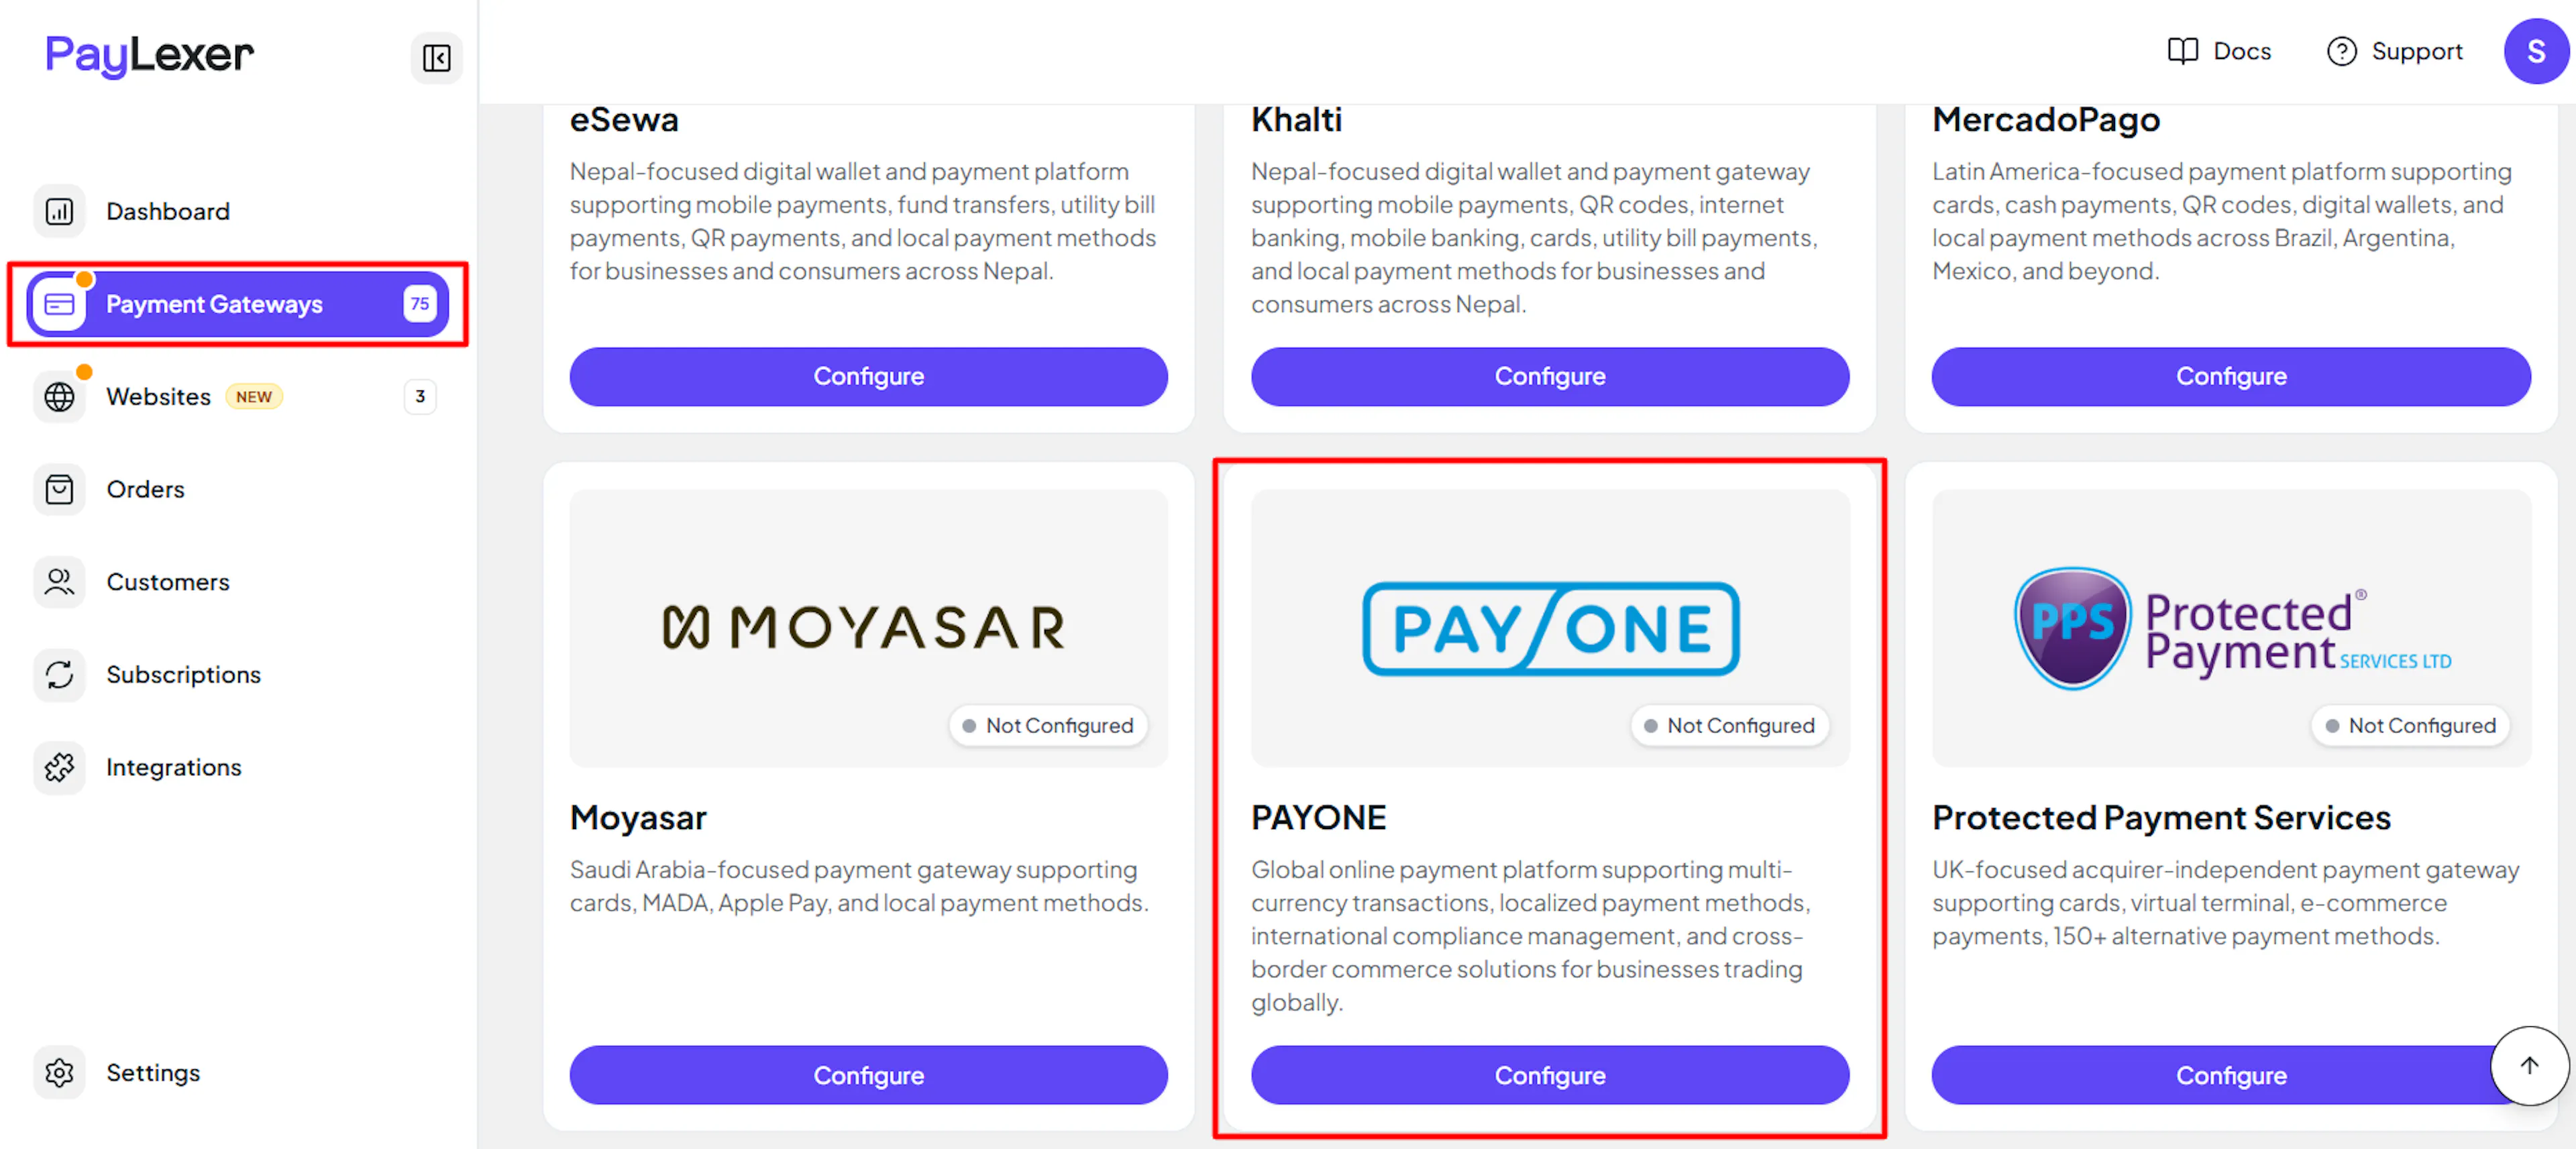
Log in to your PayLexer dashboard and navigate to Payment Gateways → PAYONE.
Enter your credentials
Paste the Merchant ID (PSPID), API Key ID, and Secret API Key into the corresponding fields. Use your preprod portal's values in the Test fields and your live portal's values in the Live fields.
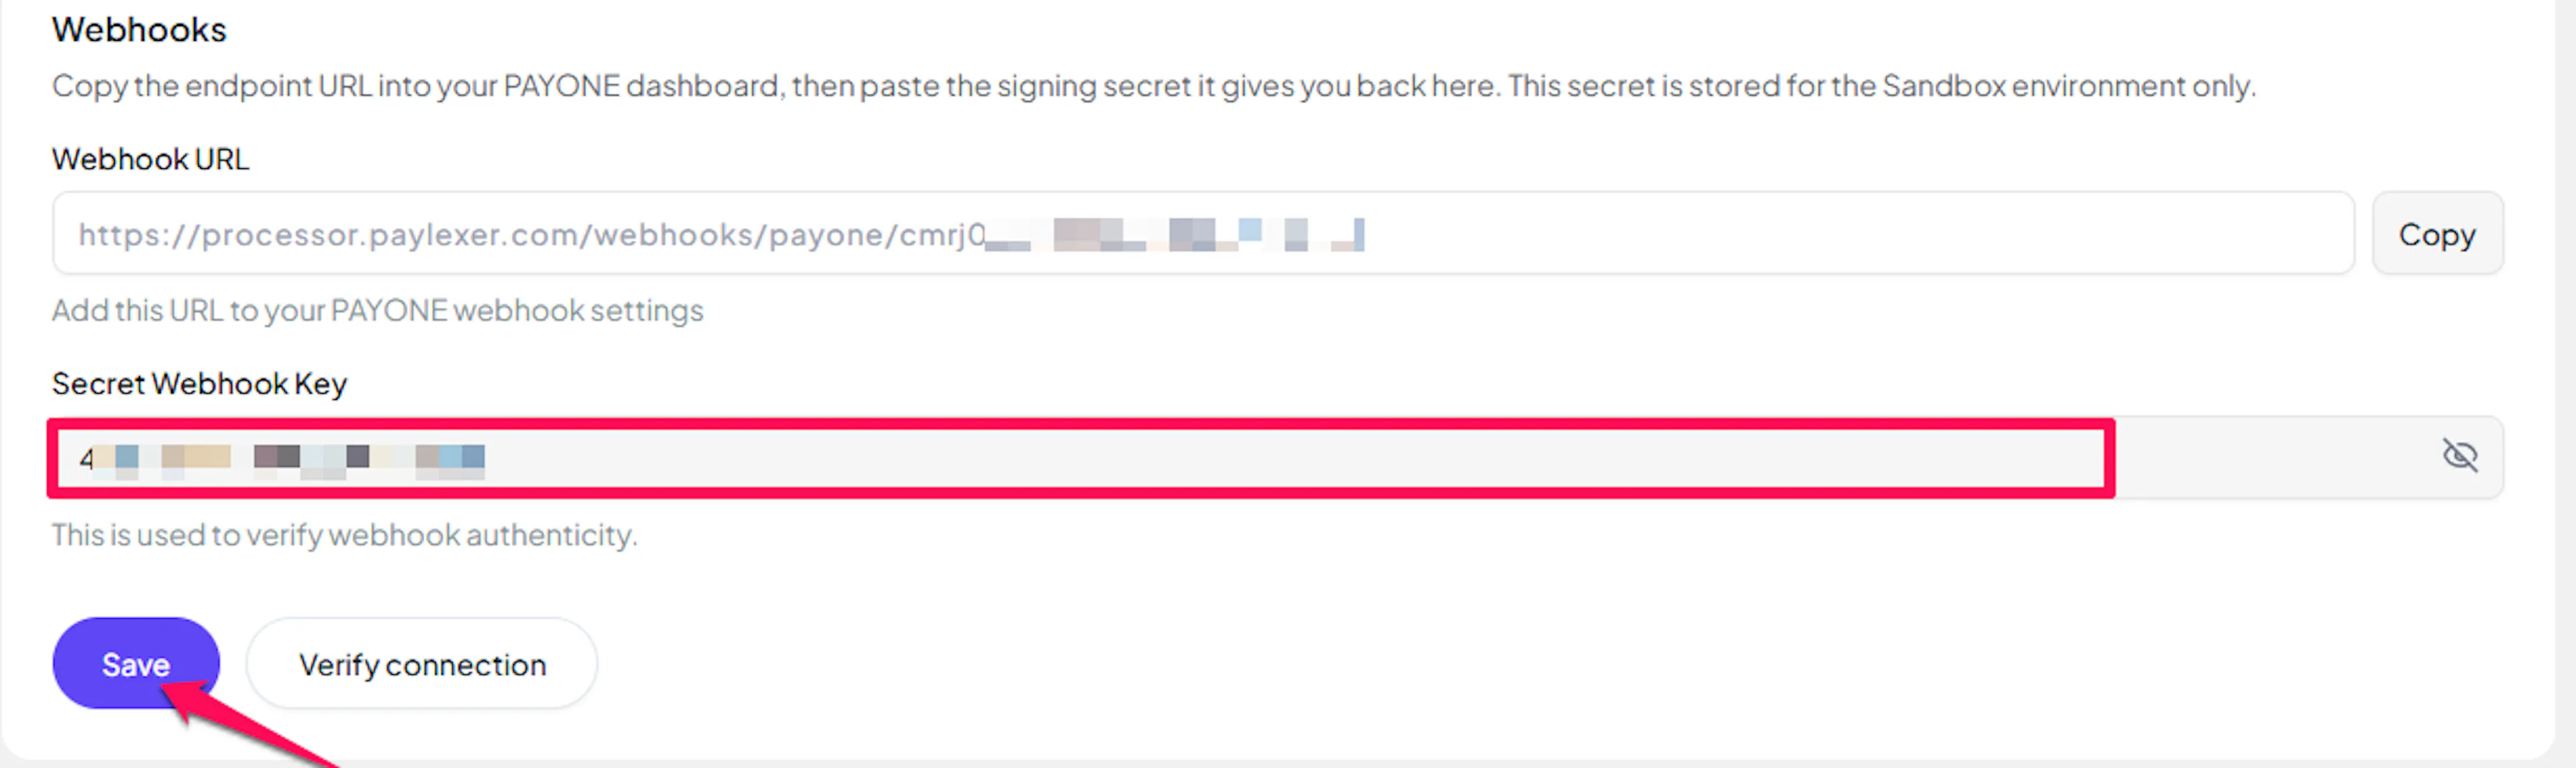
Paste the Secret Webhook Key into its own field in the webhook section.
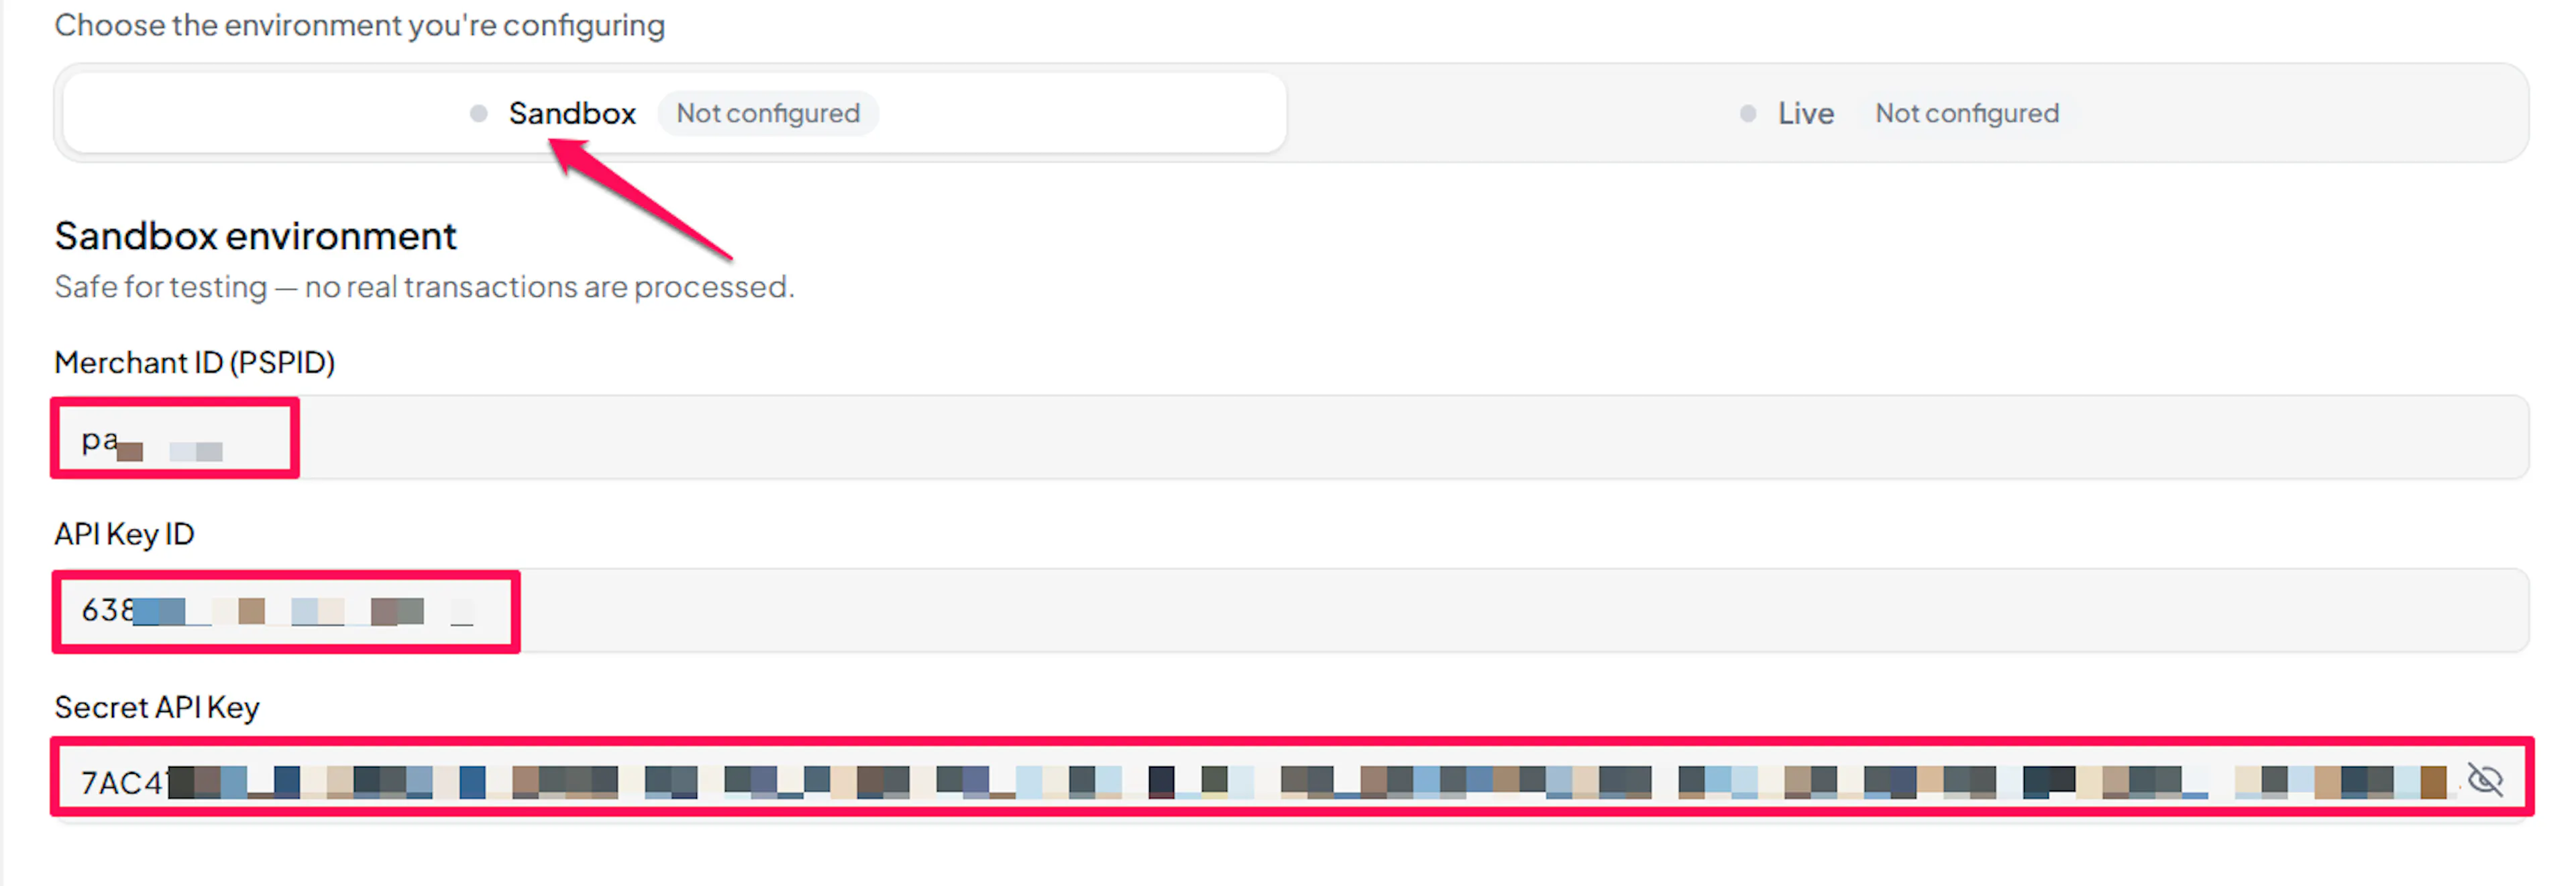
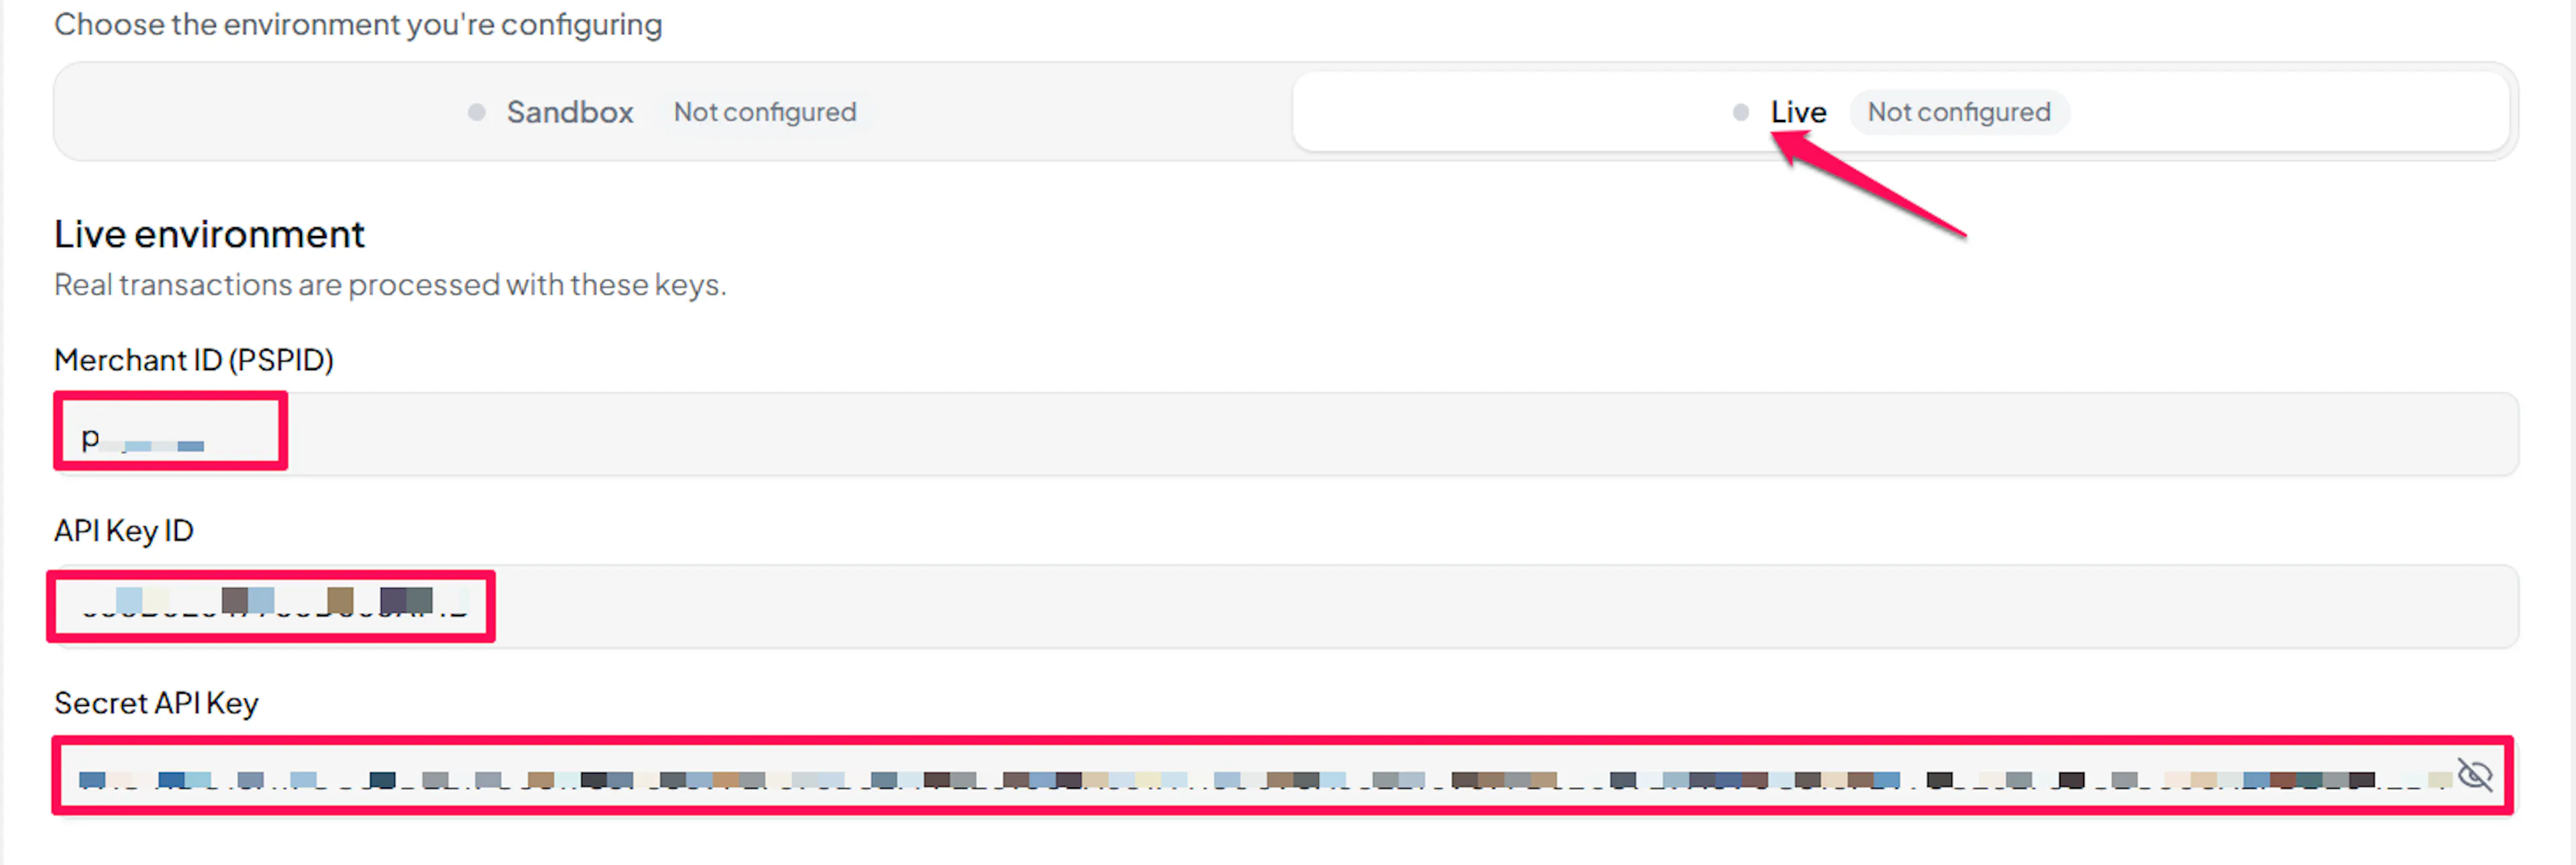
Understanding Live/Production and Sandbox Settings:
| Environment | Purpose |
|---|---|
| Live / Production (Mandatory) | Used for real transactions. Cannot be empty, even when testing. |
| Test / Sandbox (Optional) | Used for testing only. No real money is processed. |
How PayLexer selects credentials:
- Debug/Test mode ON → Test credentials are used
- Debug/Test mode OFF → Live credentials are used
Test and save
Click Save to save your configuration and verify your credentials. Click Verify Connection to test the connection.
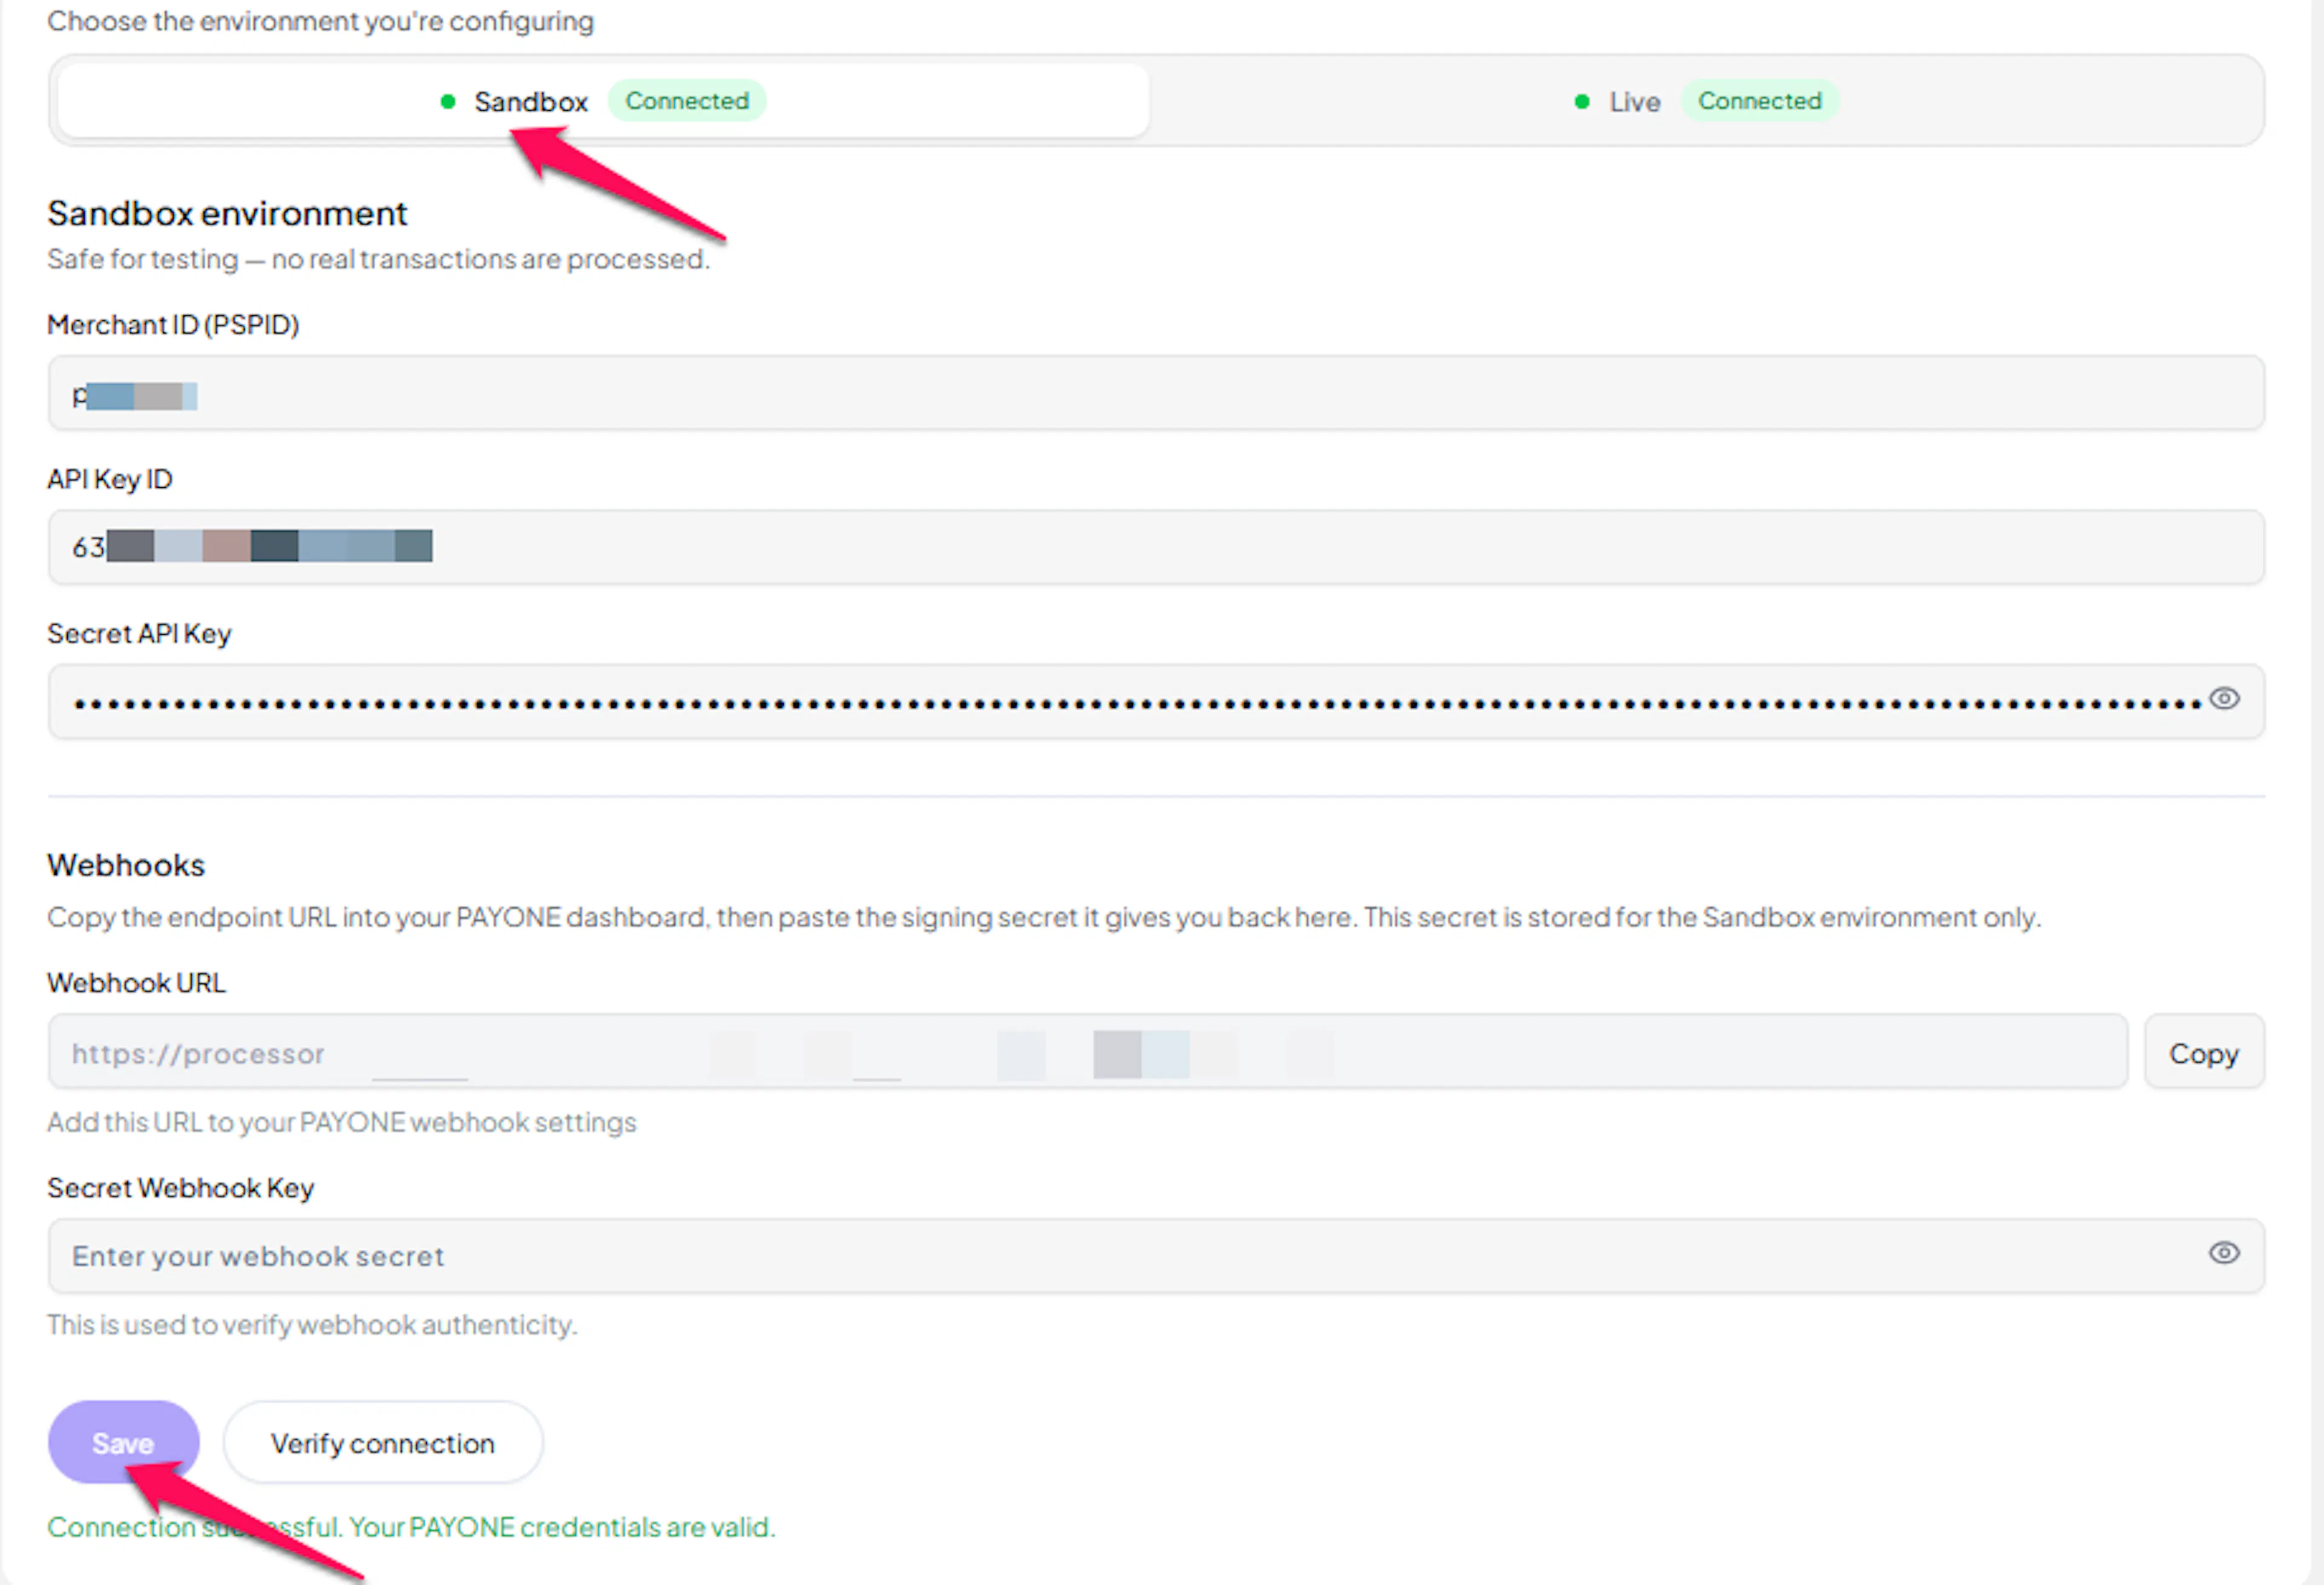
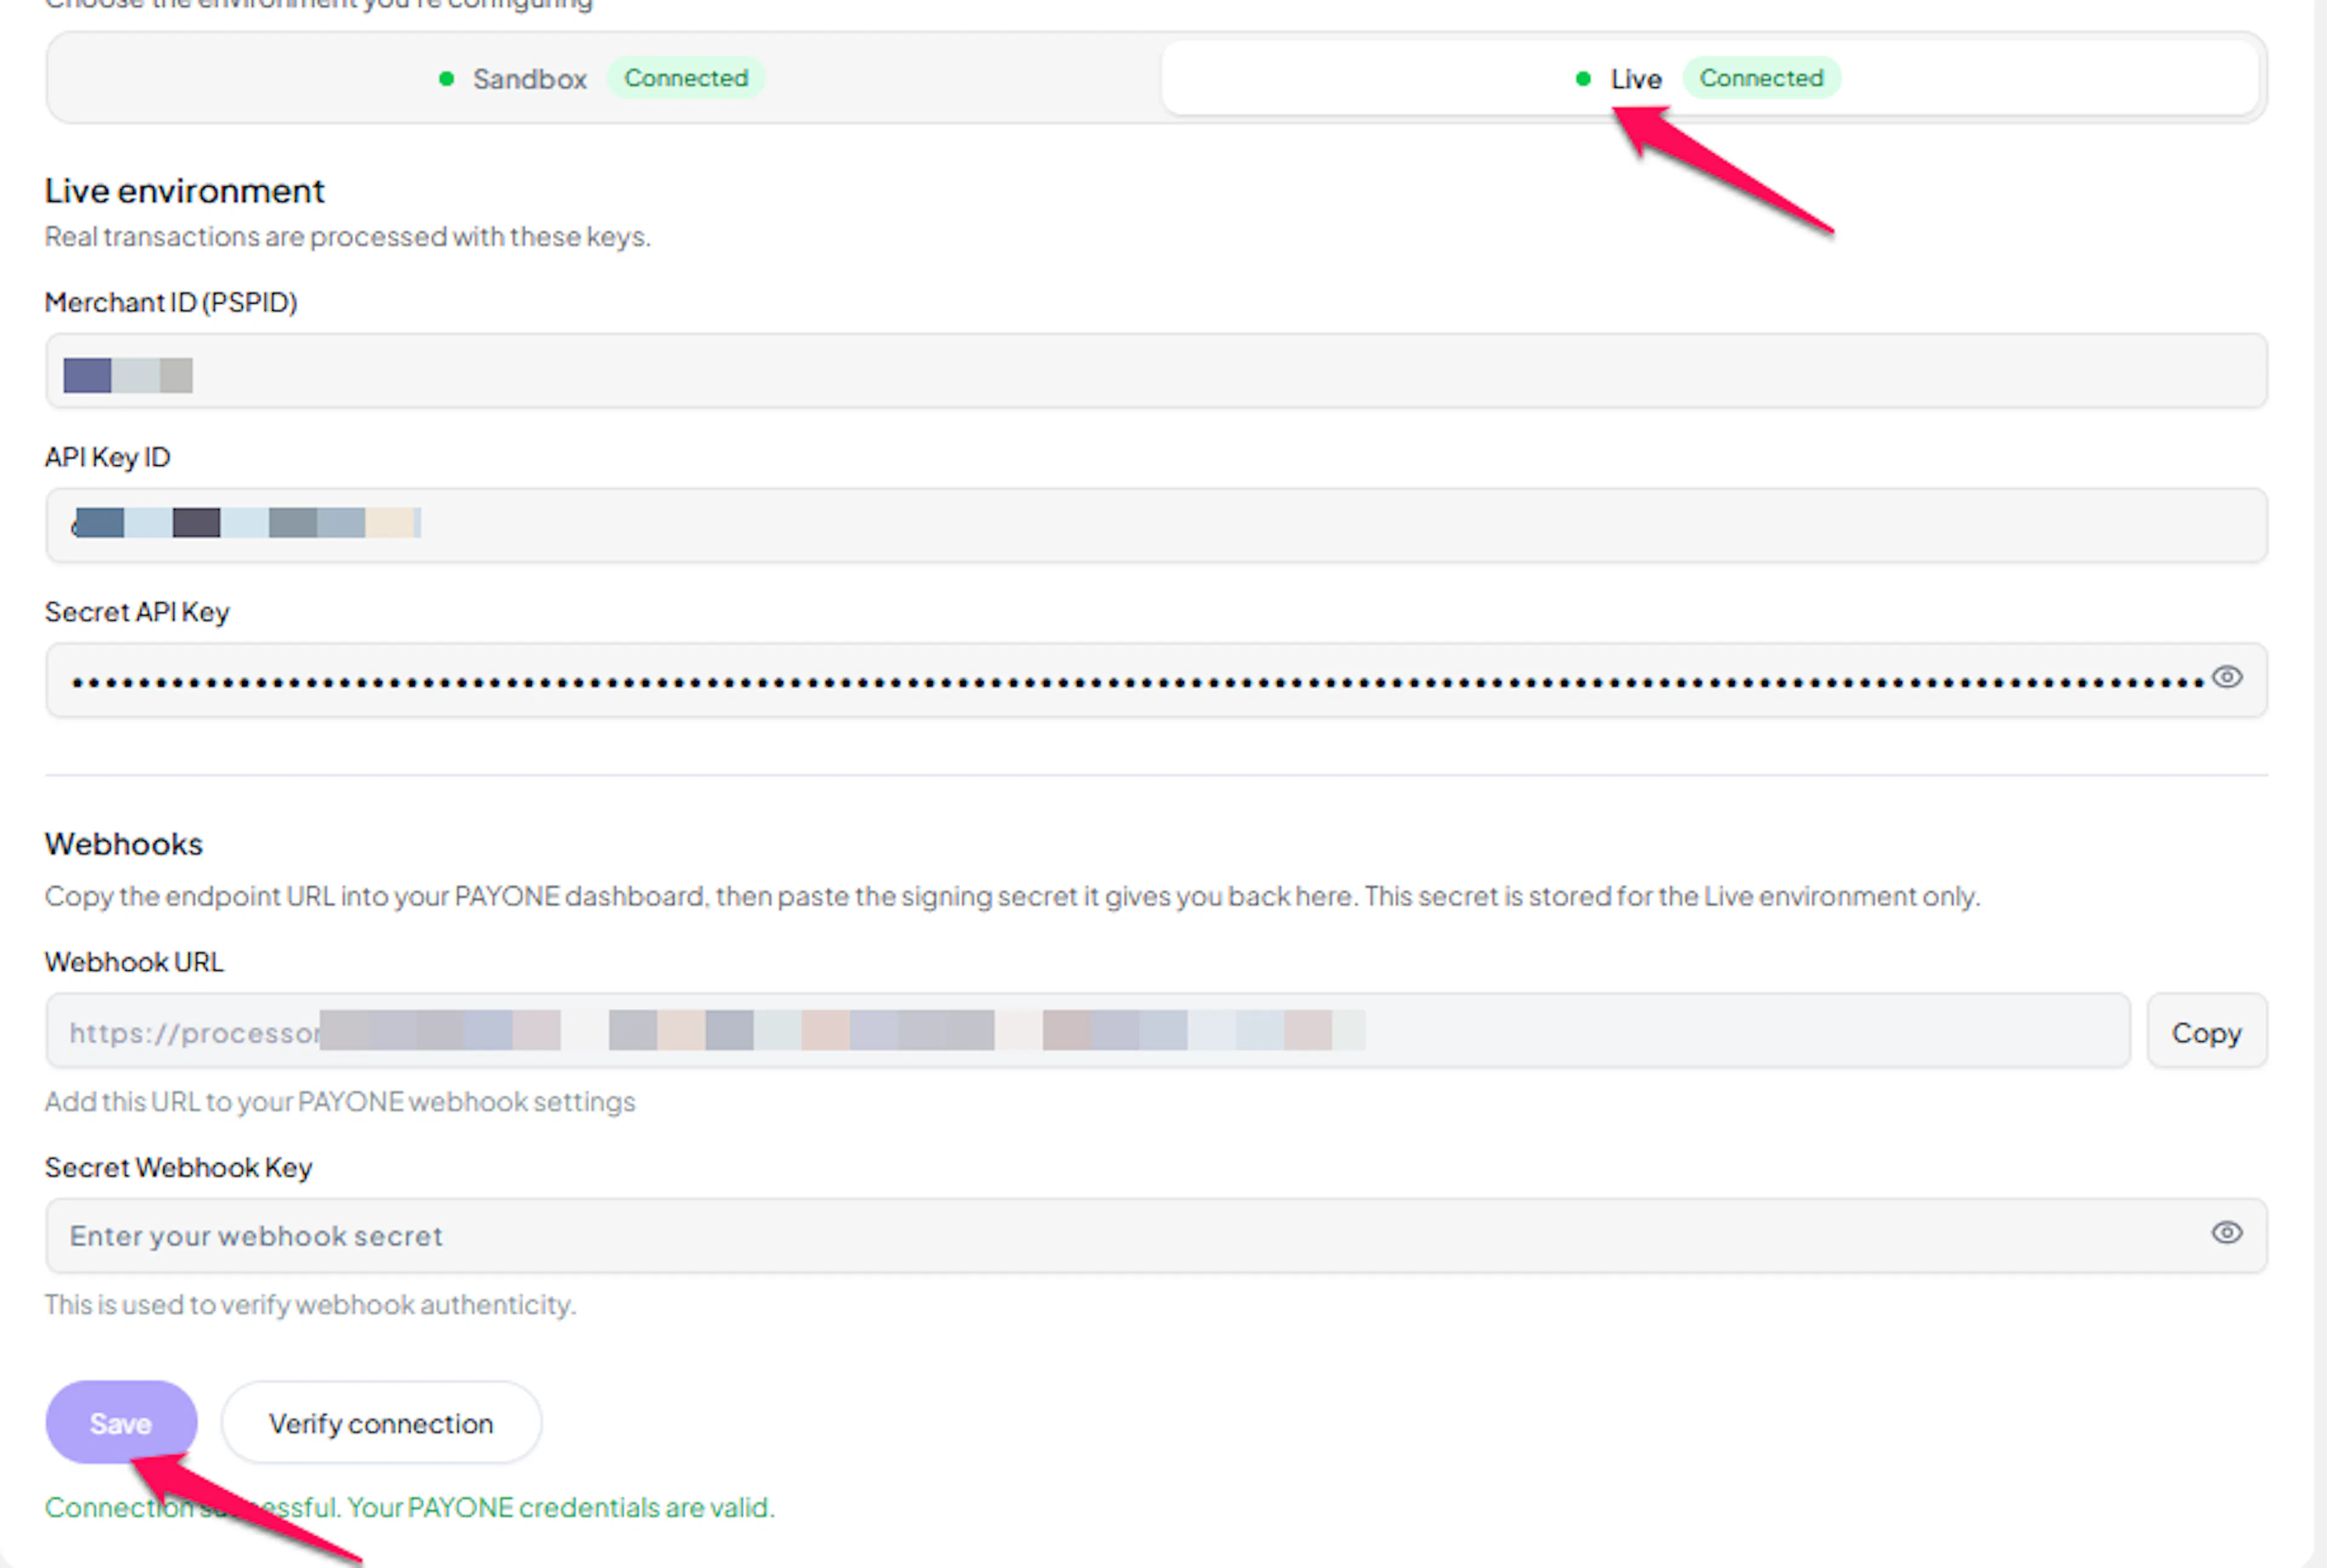
Credentials saved. Continue to the Webhooks section below before enabling PAYONE on your website.
Configuring Webhooks (Mandatory)
Webhooks enable real-time payment updates and significantly improve reliability.
Benefits of Webhooks:
- Instant payment status updates
- Refunds you issue in the PAYONE portal reflected in PayLexer
Copy your PayLexer webhook URL
In PayLexer → Payment Gateways → PAYONE, copy the Webhook URL shown for your account.

Add the endpoint in your PAYONE portal
In the Merchant Portal, go to Developer → Webhooks and click Add webhook endpoint. Paste the PayLexer webhook URL and save.
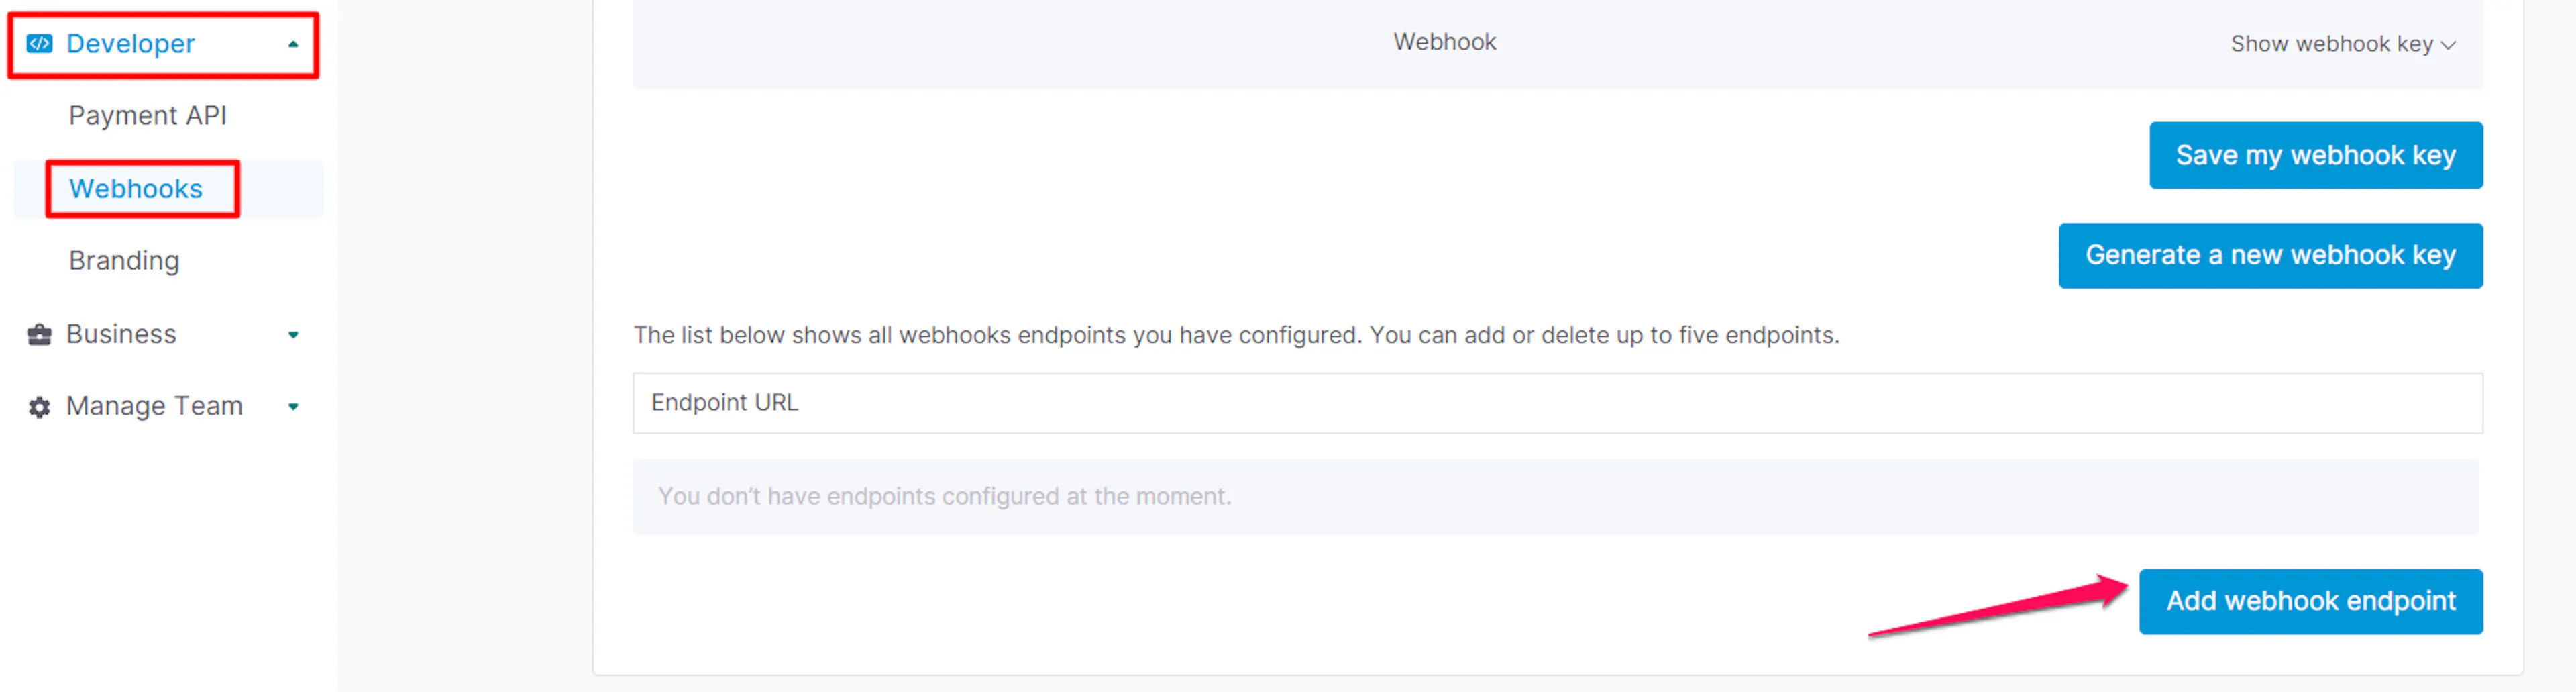
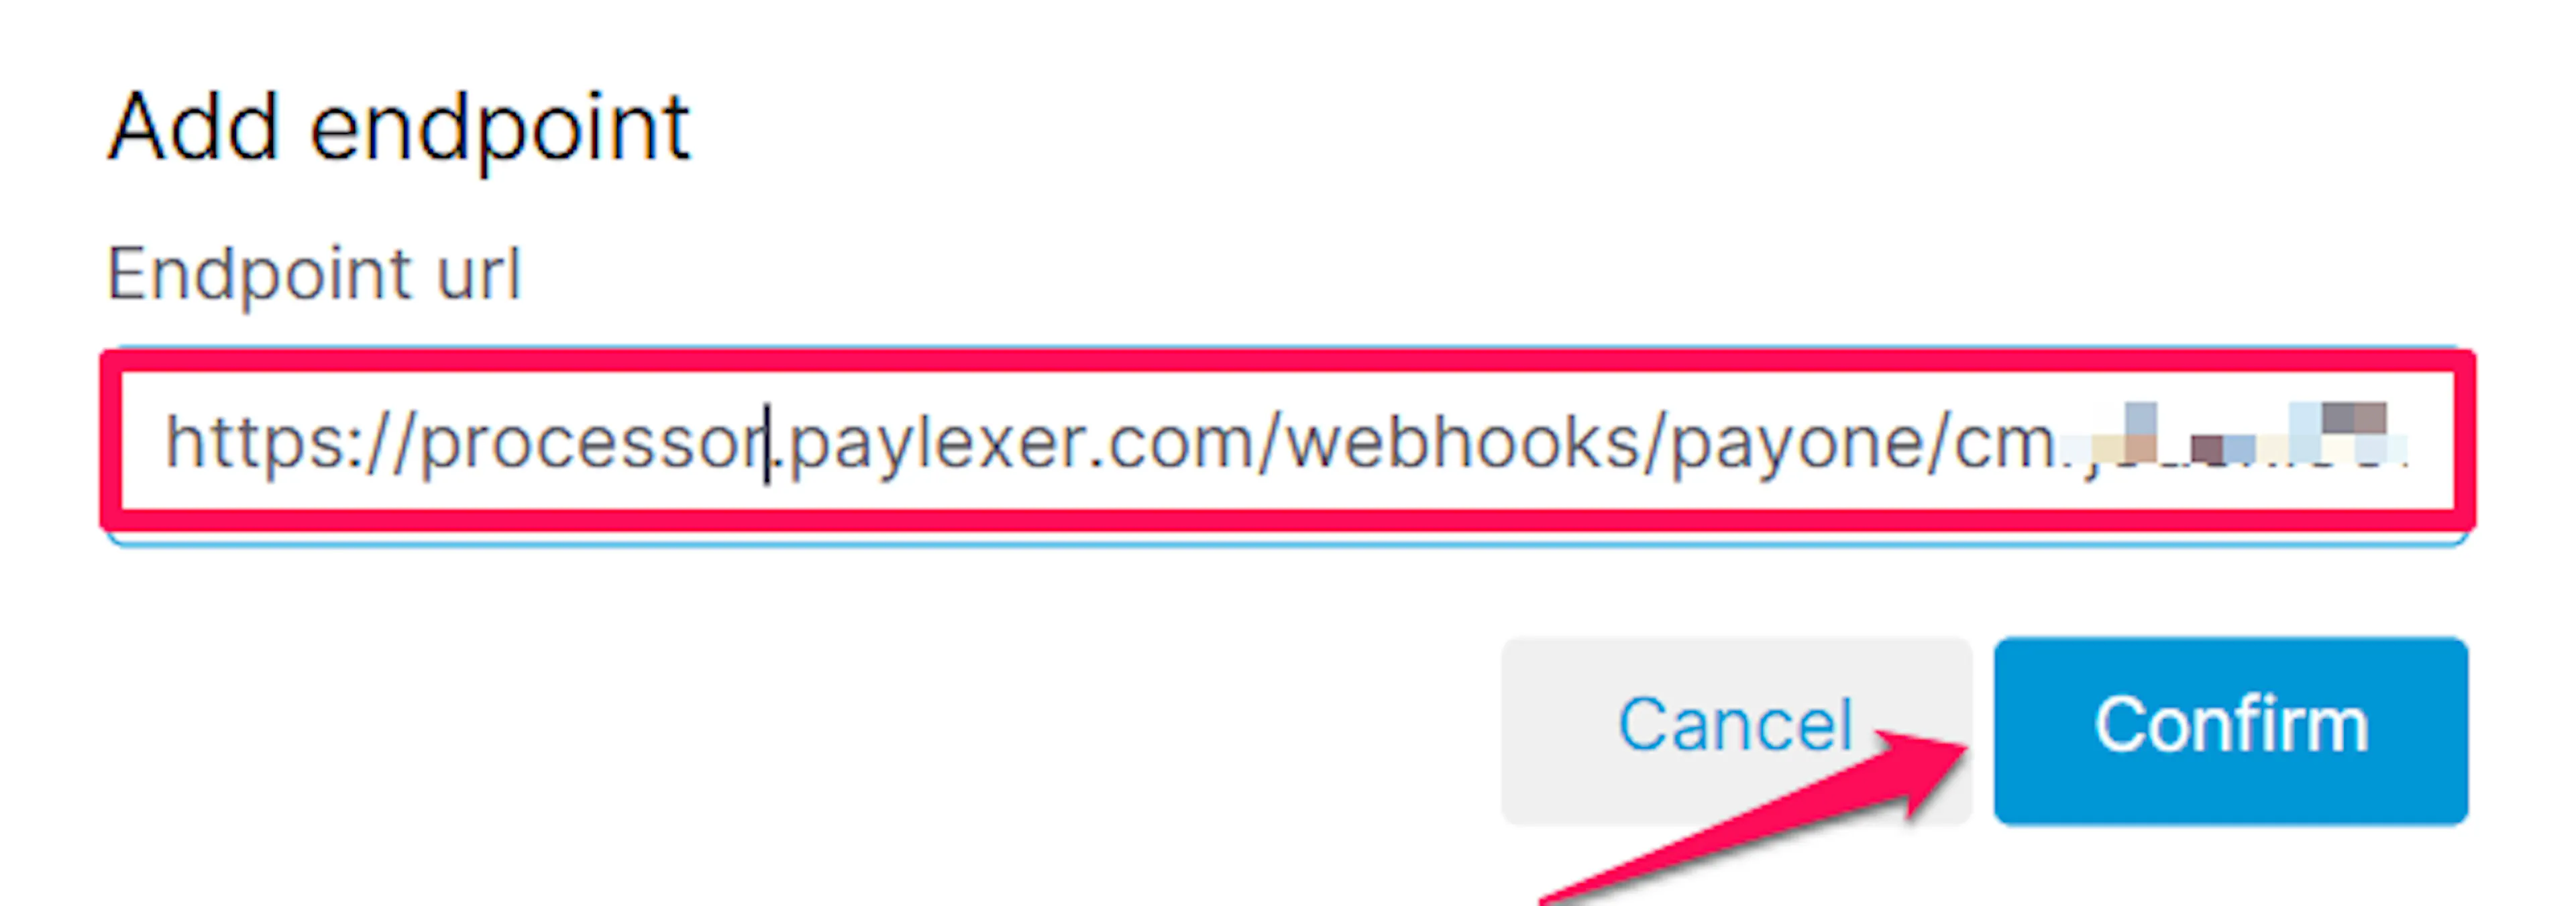
Add your Secret Webhook Key in PayLexer
Back in PayLexer → Payment Gateways → PAYONE, paste the Secret Webhook Key you generated earlier into its field in the Webhooks section, then click Save.
Use the key from your preprod portal in the Test field and the key from your live portal in the Live field.
Repeat in the other portal
Webhook configuration belongs to the portal you are in. Add the URL in your preprod portal and in your live portal, so notifications work in whichever mode you are running.
Integrate PAYONE to Your Website
If you have already added and configured your site, you can enable PAYONE in your existing setup.
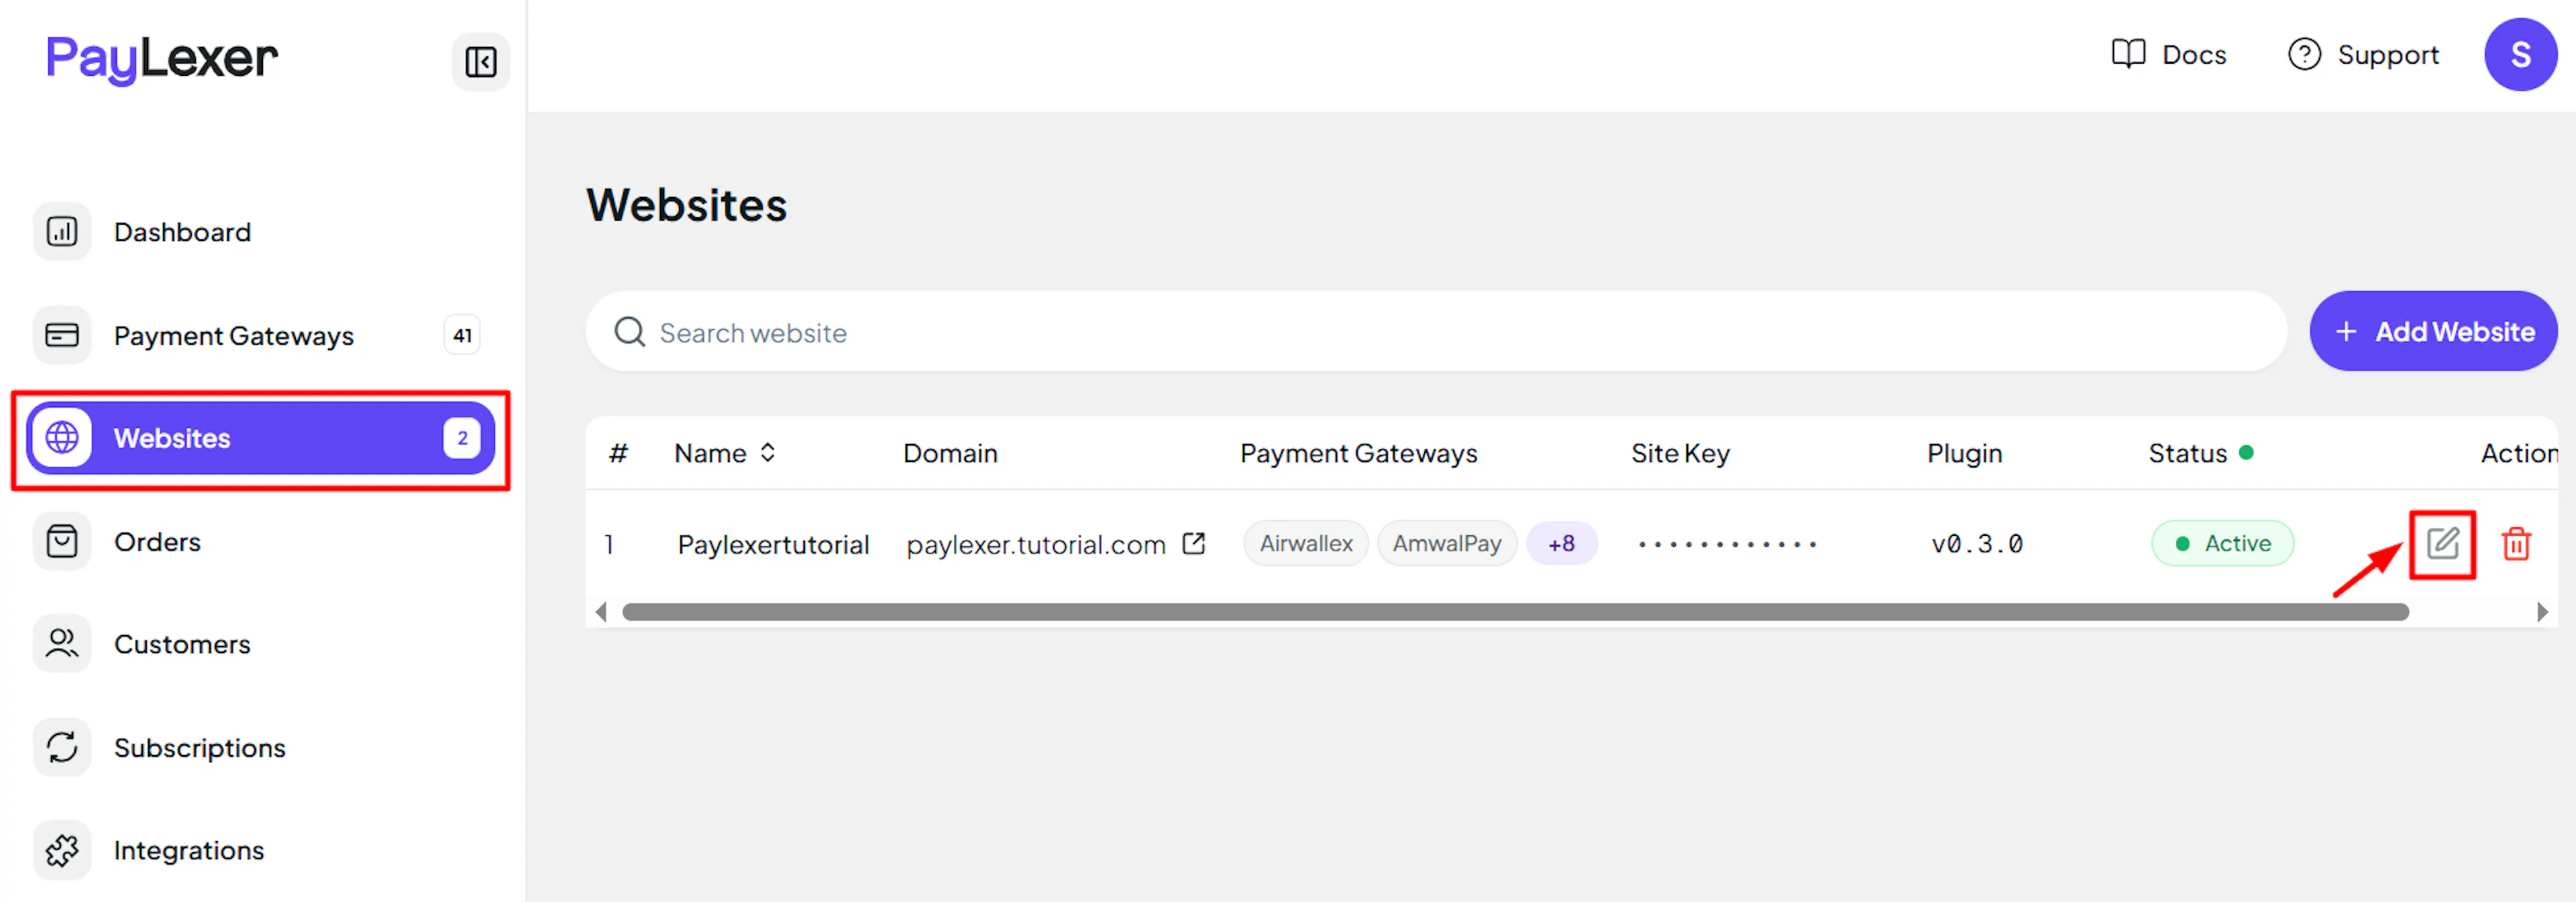
Go to Websites
Navigate to Websites in your PayLexer dashboard.
Edit your website
Click the Edit Icon of your added website.
Enable PAYONE
Click the checkbox to enable PAYONE for the website.
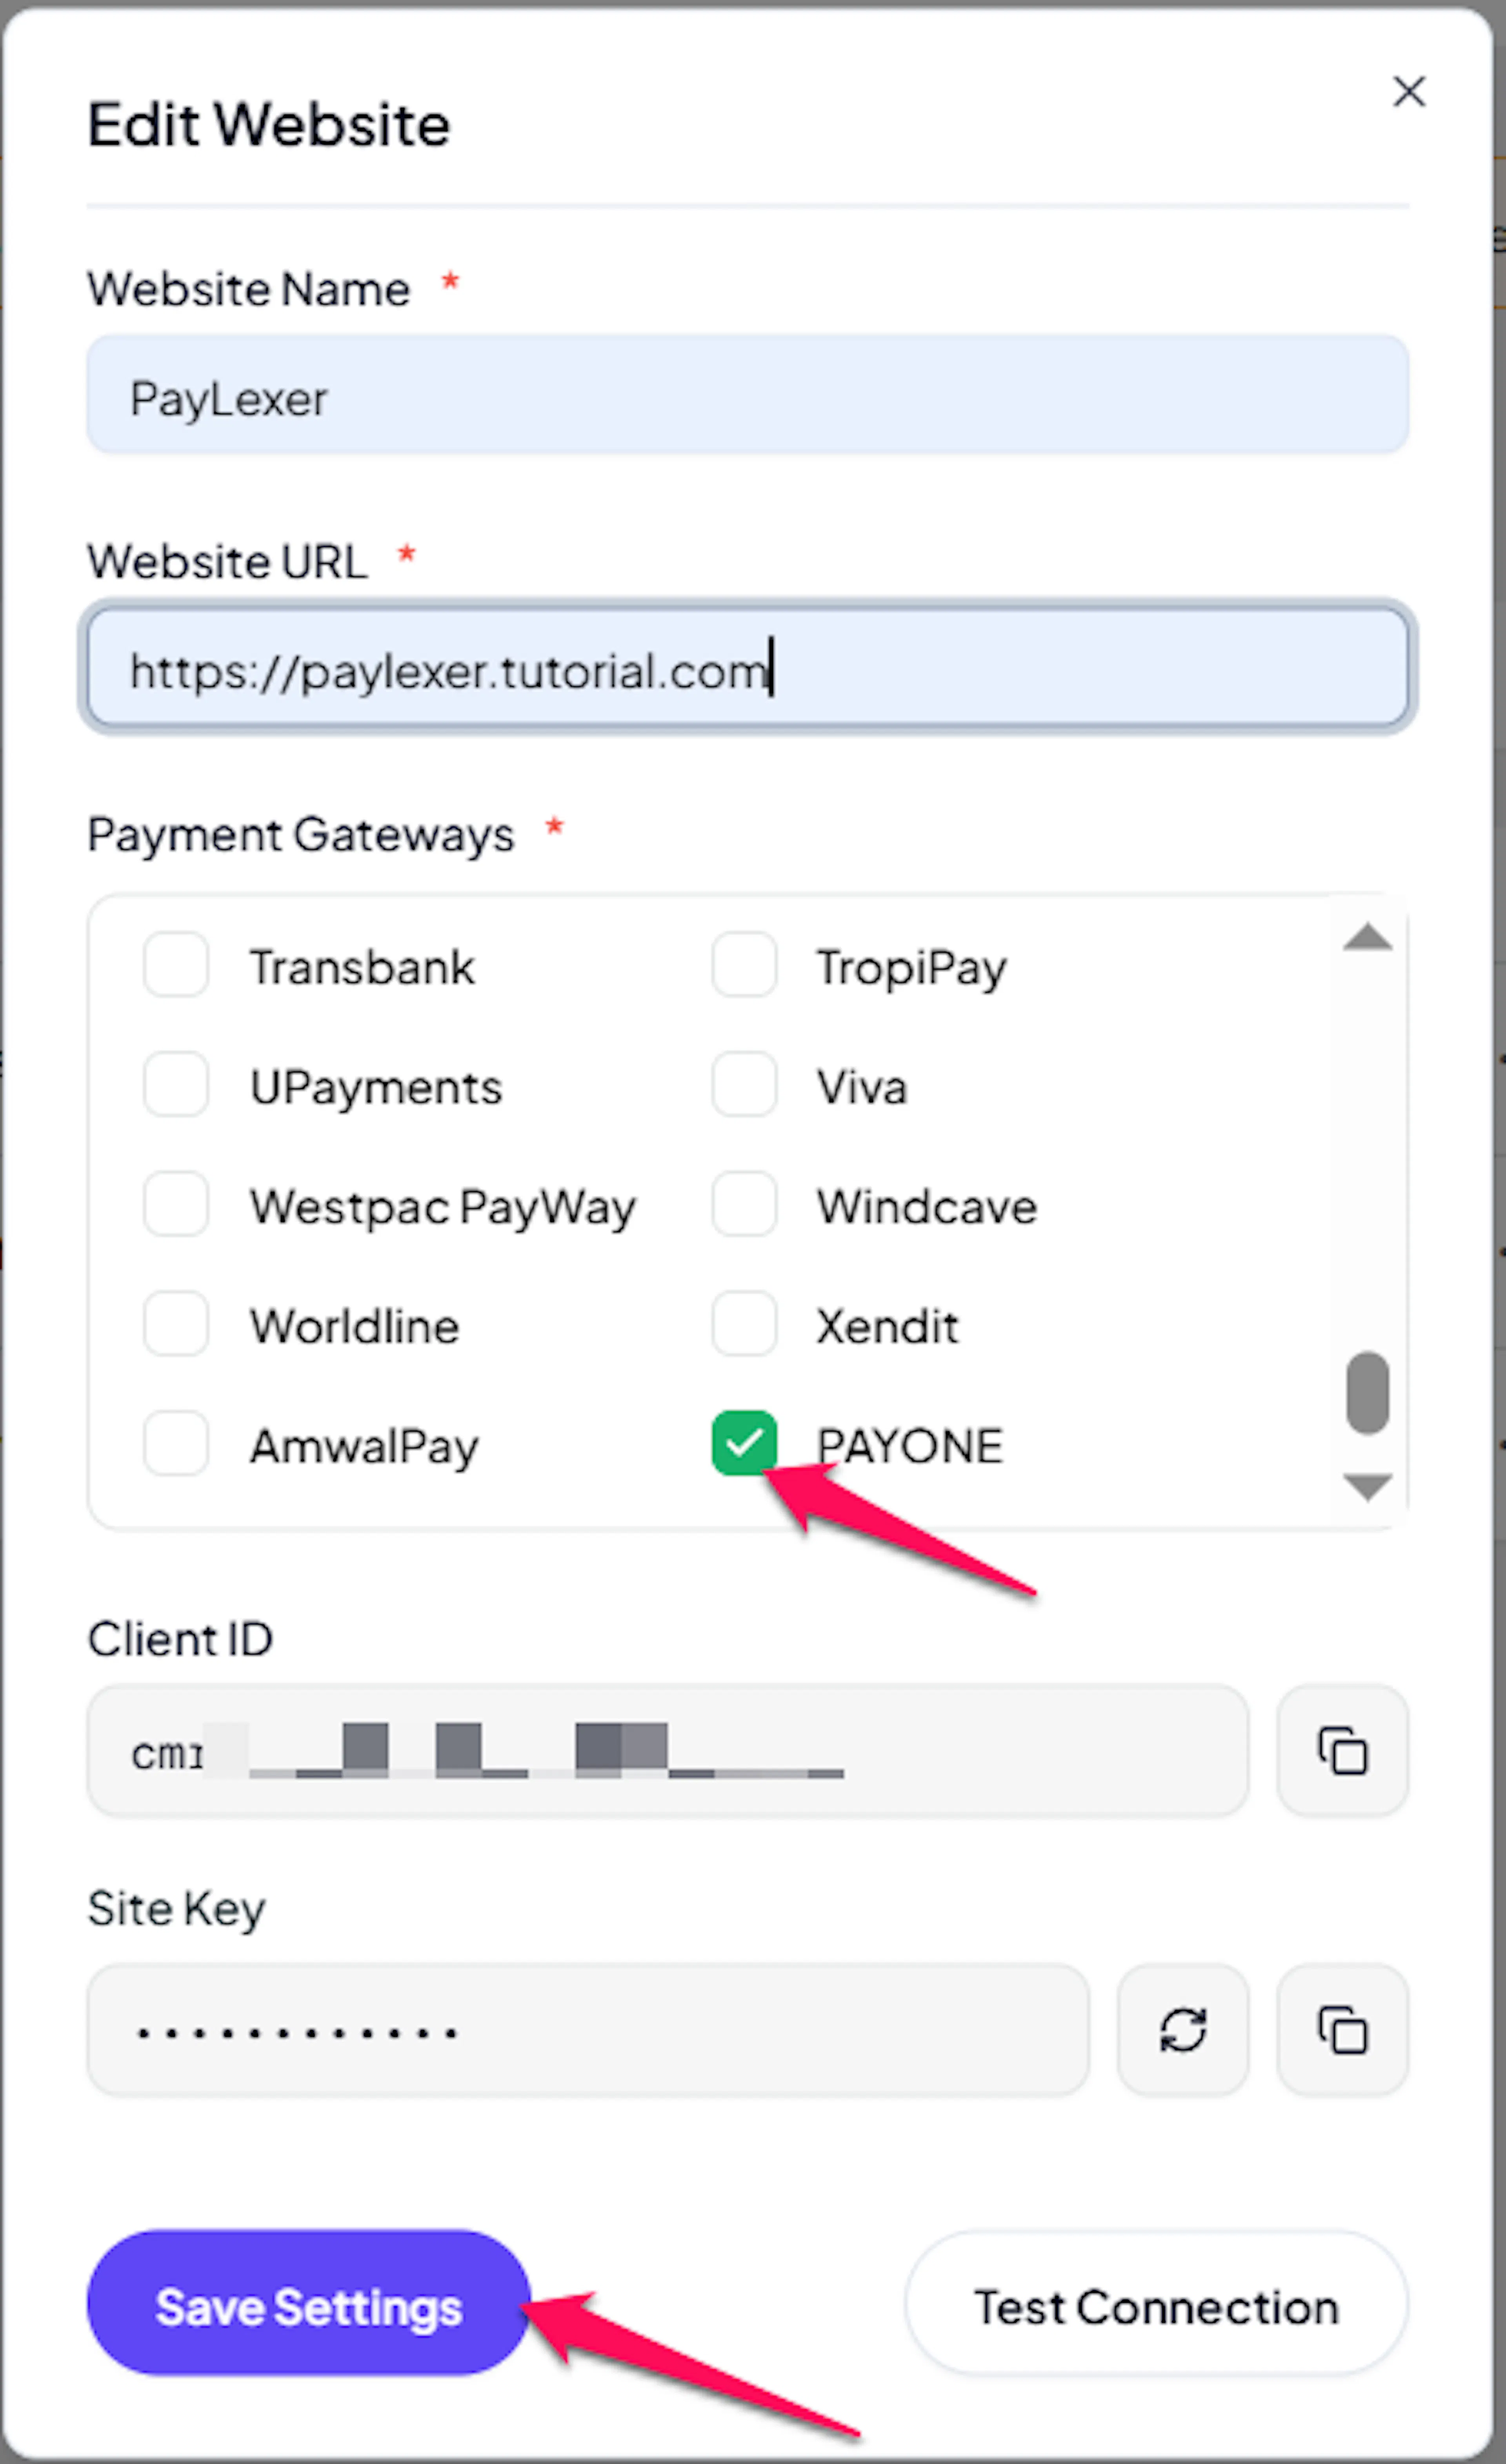
PAYONE is now active for this website. Run a test transaction before switching off Debug/Test mode.
If you haven't added a website yet, Continue to Add Your Website →
Troubleshooting
Best Practices
- Test in sandbox before enabling production. Use your preprod portal's credentials with Debug/Test mode ON, complete a full payment, and confirm the order updates in PayLexer before switching to live.
- Confirm which PAYONE platform your contract is on before you start. Global Online Pay credentials are the only ones that work, and the wrong platform's keys fail with the same error as a typo.
- Copy each secret the moment PAYONE shows it. Both the Secret API Key and the Secret Webhook Key are visible for only 60 seconds and cannot be retrieved afterwards.
- Register your webhook endpoint in both portals, and make sure each PayLexer environment holds the Secret Webhook Key from the matching portal.
- Confirm with PAYONE which currencies and payment methods are enabled on your account before going live, since PAYONE decides this per account rather than per platform.
- Note when your API key pair expires and rotate it before it lapses, remembering that a new pair revokes the old one and must be pasted into PayLexer.
- Use a different gateway for any recurring billing, since PAYONE handles one-time payments only through PayLexer.
FAQs
Still Have Questions?
- PAYONE Support:
- Contact PAYONE: PAYONE Contact
- Developer Documentation: PAYONE API Reference
- PayLexer Support: Contact Support