

LemonSqueezy
Connect LemonSqueezy to PayLexer to accept one-time payments through a merchant-of-record hosted checkout, with signed webhook callbacks and built-in sales tax and VAT handling.
LemonSqueezy is a merchant of record billing platform founded in 2020 and headquartered in Salt Lake City, Utah, acquired by Stripe in 2024. Rather than only processing your payments, LemonSqueezy stands in as the legal seller on every order, handling sales tax and VAT compliance on your behalf across the regions it supports.
- Supported Regions: sells to nearly every country worldwide, with a short exclusion list - view full list
- Supported Currencies: LemonSqueezy supports 130 currencies for checkout display, including USD, EUR, GBP, CAD, and AUD - view full list
LemonSqueezy uses one store-wide currency for checkout set in your dashboard. Make sure it matches the currency configured in PayLexer. Although customers see that currency, LemonSqueezy settles charges in USD using the exchange rate at purchase.
Supported Features
- One-time card payments and other local methods through a LemonSqueezy-hosted checkout page
- Signed webhook callbacks that verify every order update before your order status changes
- Full and partial refunds, tracked directly against the original order
- Built-in sales tax and VAT handling on every order, since LemonSqueezy is the seller of record
- Credential testing from the PayLexer dashboard, with no risk to your LemonSqueezy account
- Separate sandbox and live environments for safe testing
LemonSqueezy does not support subscription billing through PayLexer today. Use a different gateway for recurring payments. View all supported gateways →
Before You Start
Make sure you have:
- LemonSqueezy Account – Don't have one? Sign up for LemonSqueezy →
- PayLexer Account – Required to configure the integration. Create your account →
- A website where you want to integrate
Looking for a different payment processor? View all supported gateways →
New LemonSqueezy stores start in Test Mode and require manual activation before accepting live payments. Activation typically takes 1–2 business days. You can still create products, configure credentials, and test PayLexer in Test Mode while waiting.
Configuring LemonSqueezy
You need an API Key, a Store ID, and a Payment Variant ID from LemonSqueezy for this integration.
Getting API Credentials
Create a product for PayLexer to check out against
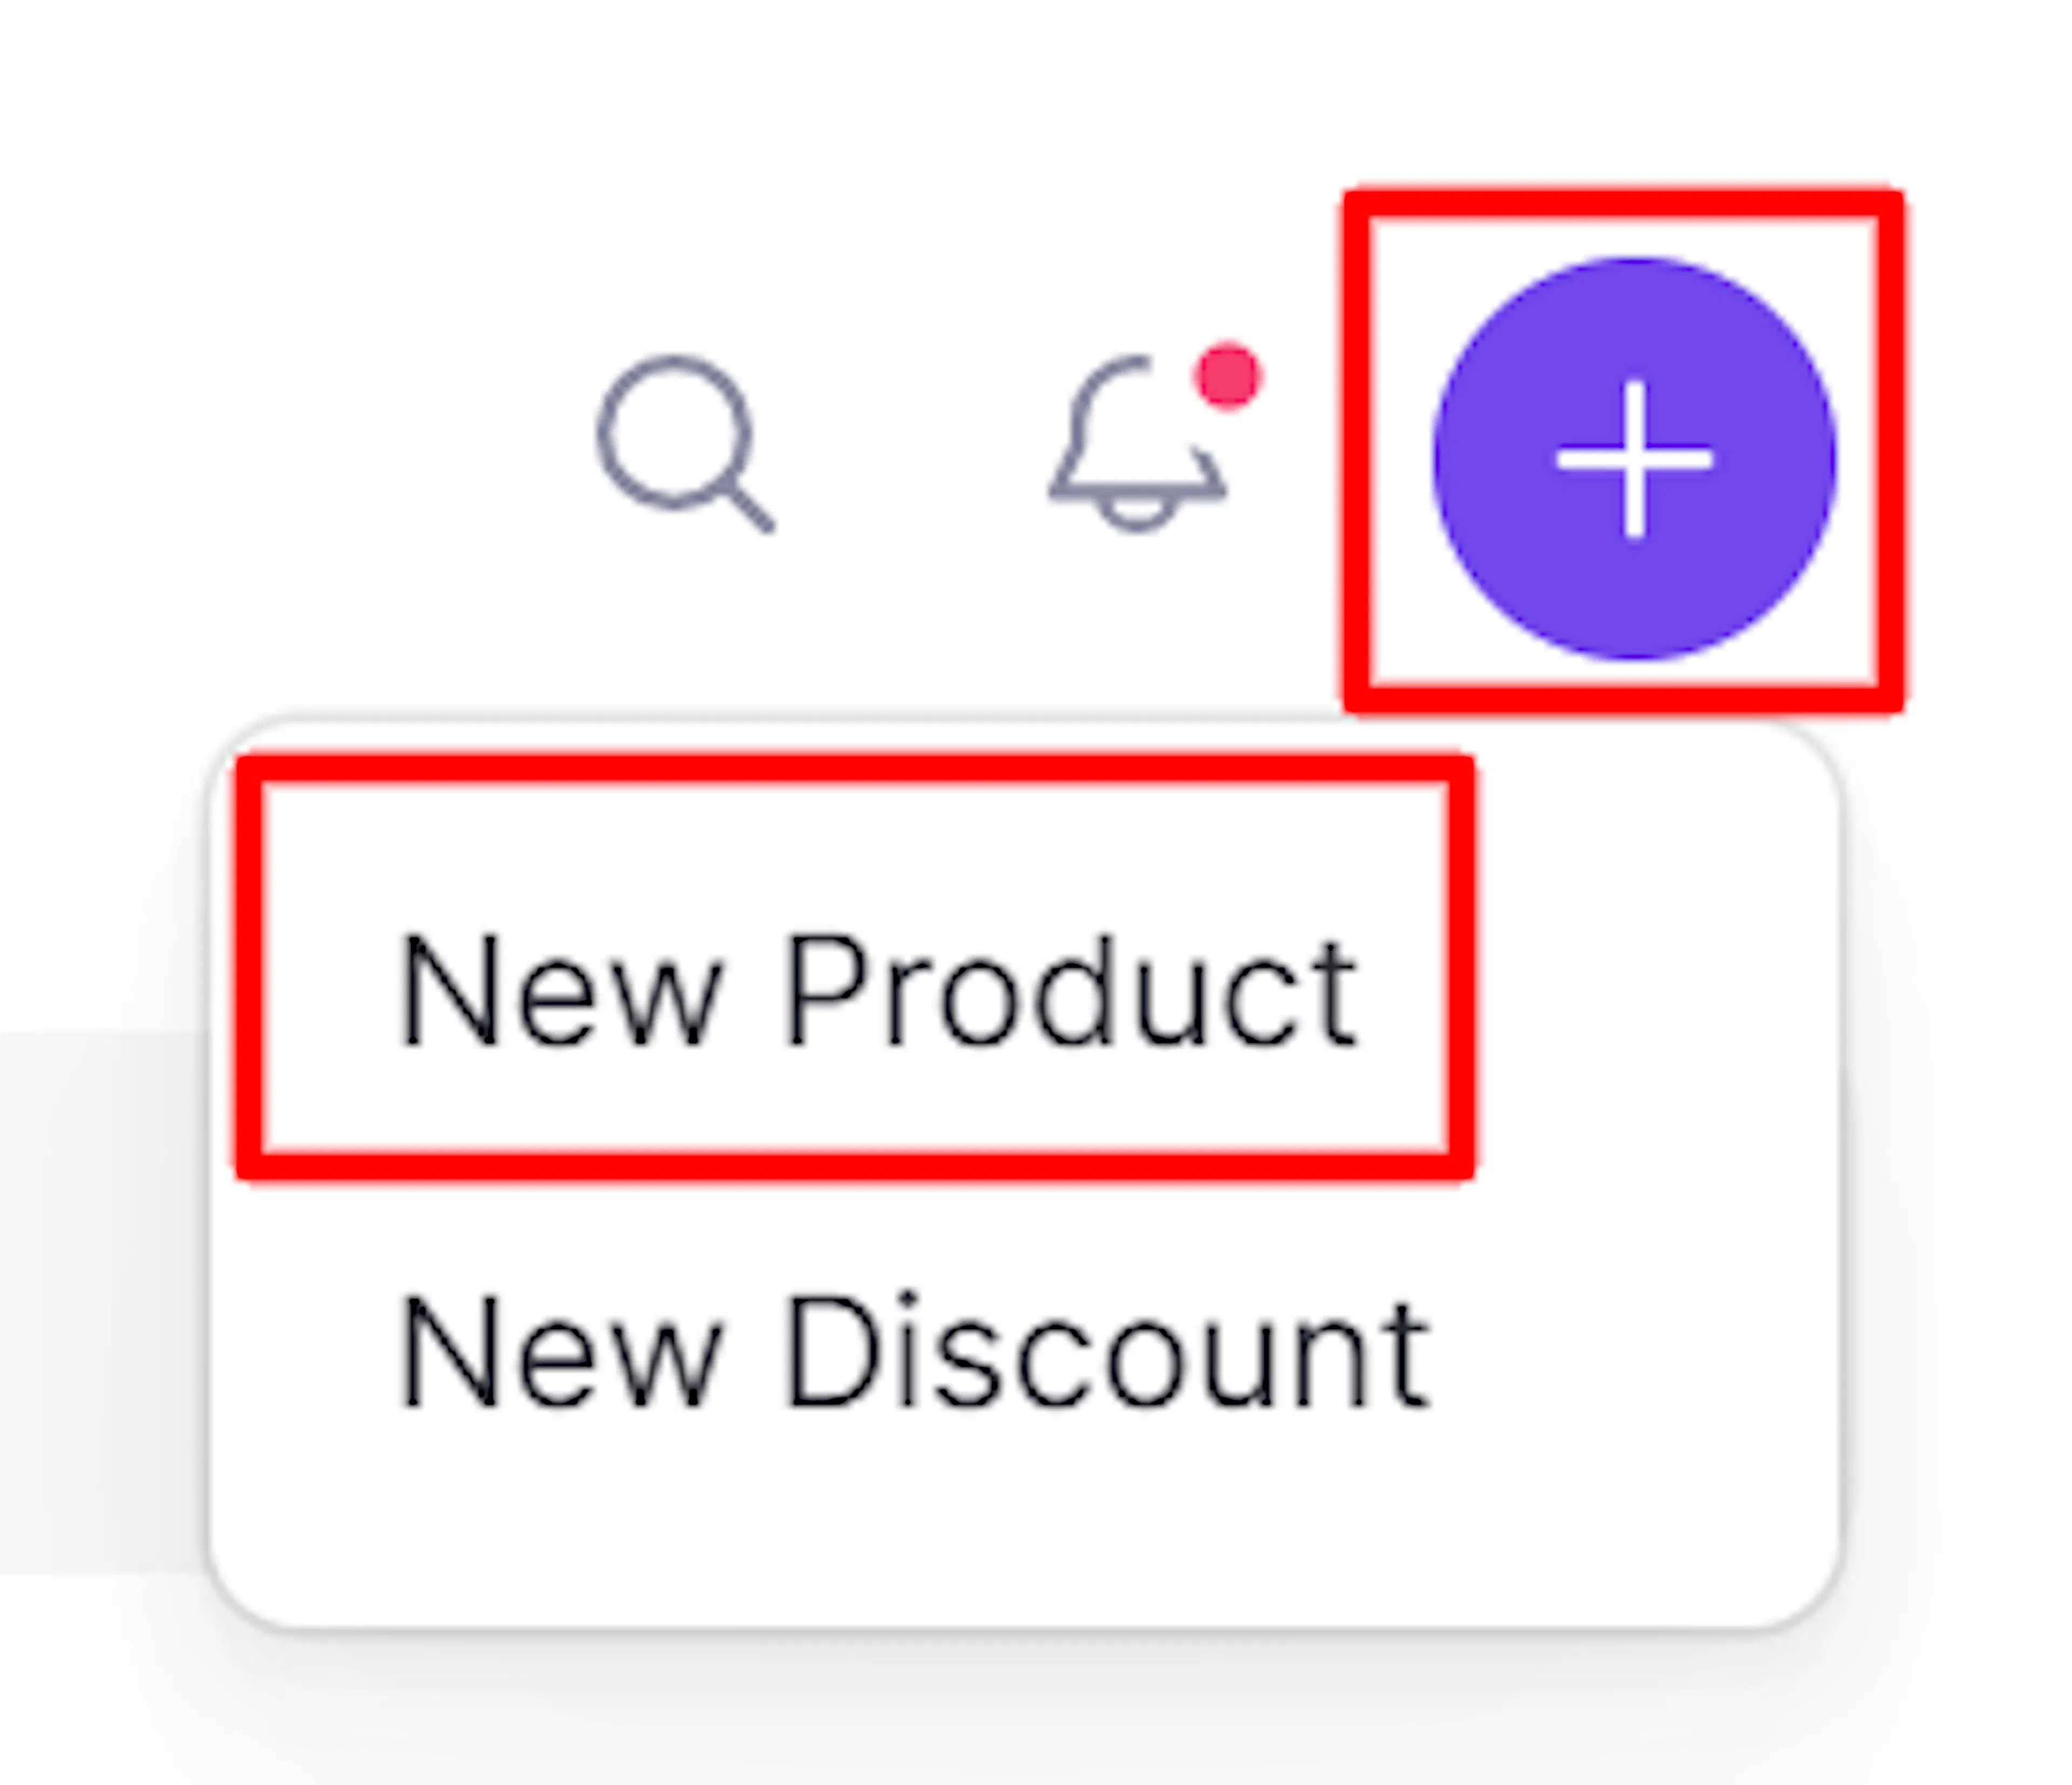
In your LemonSqueezy dashboard, click + and New Product. Create a simple Single payment product, such as “PayLexer Payment.” PayLexer requires a pre-existing product because LemonSqueezy has no API to create one on demand. Each checkout uses the product but overrides its price with the actual order amount.
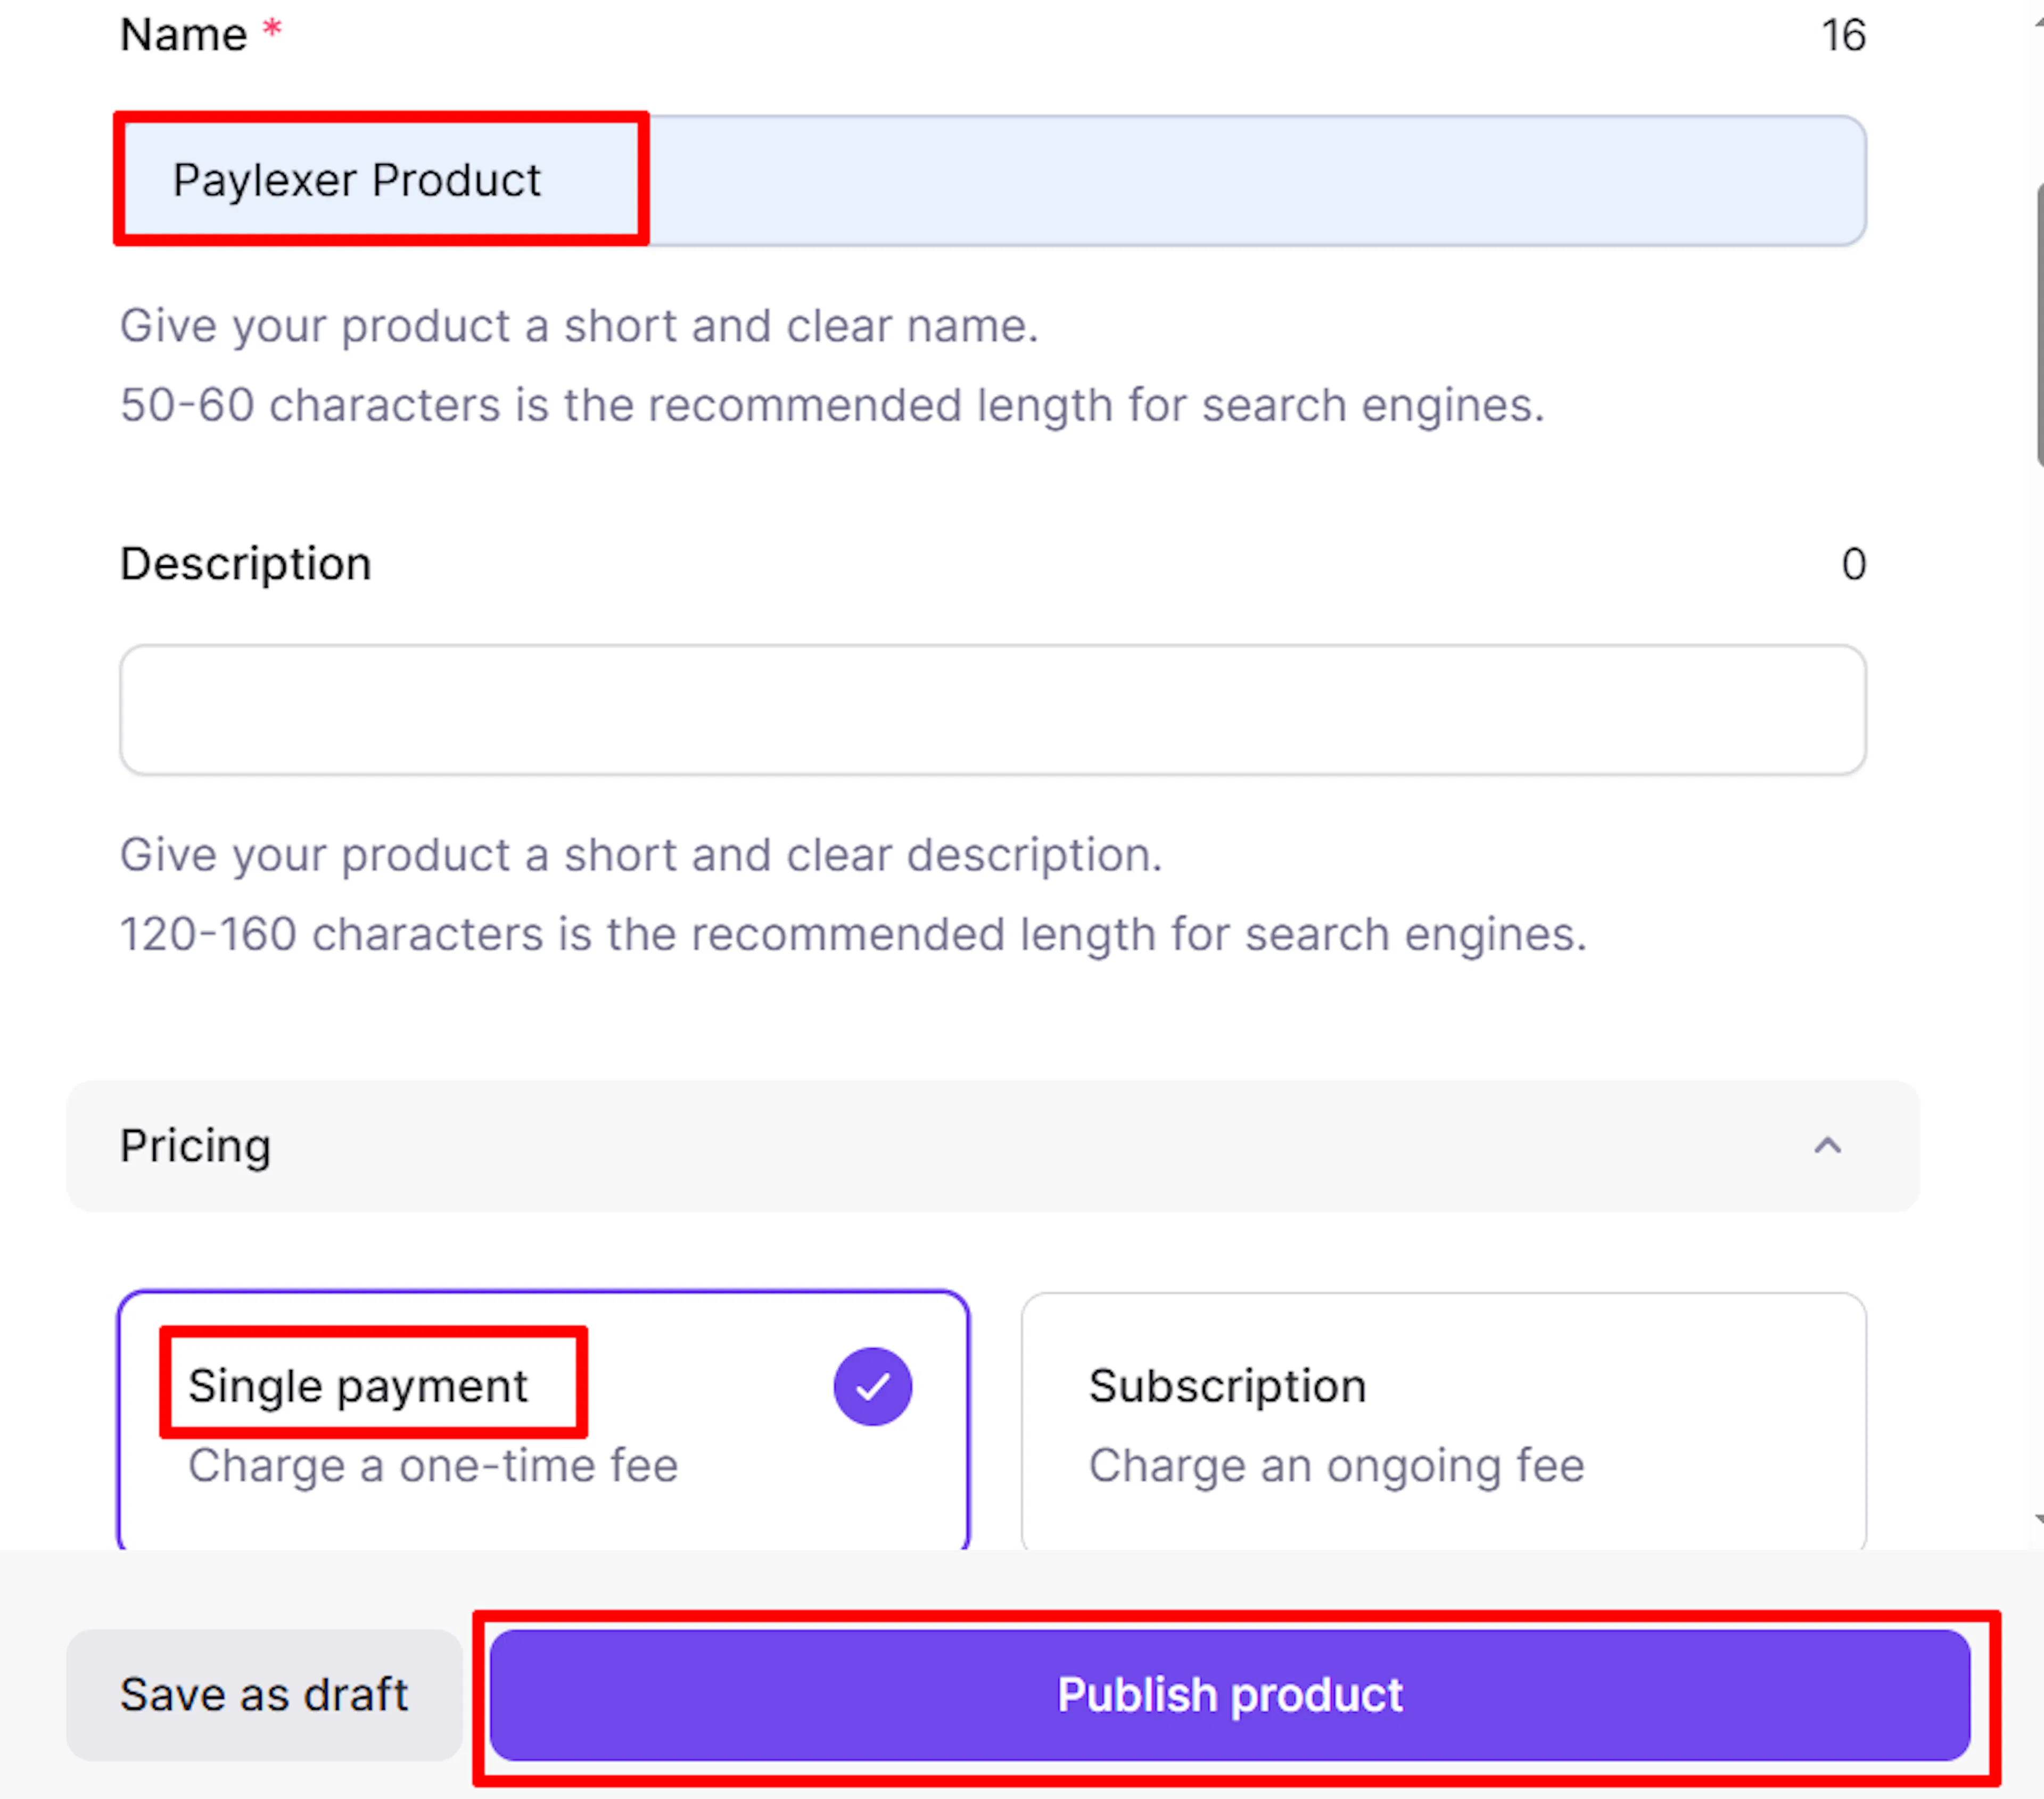
This product is never actually delivered to a real customer since PayLexer handles fulfillment on its own, so its content doesn't matter. If LemonSqueezy asks for a file or a delivery link to finish creating the product, a placeholder link (such as your own website) is enough.
Copy the Payment Variant ID
LemonSqueezy creates one variant automatically with every product, so there's no separate variant page to open. On the product you just created, click the ••• menu and select Copy variant ID.
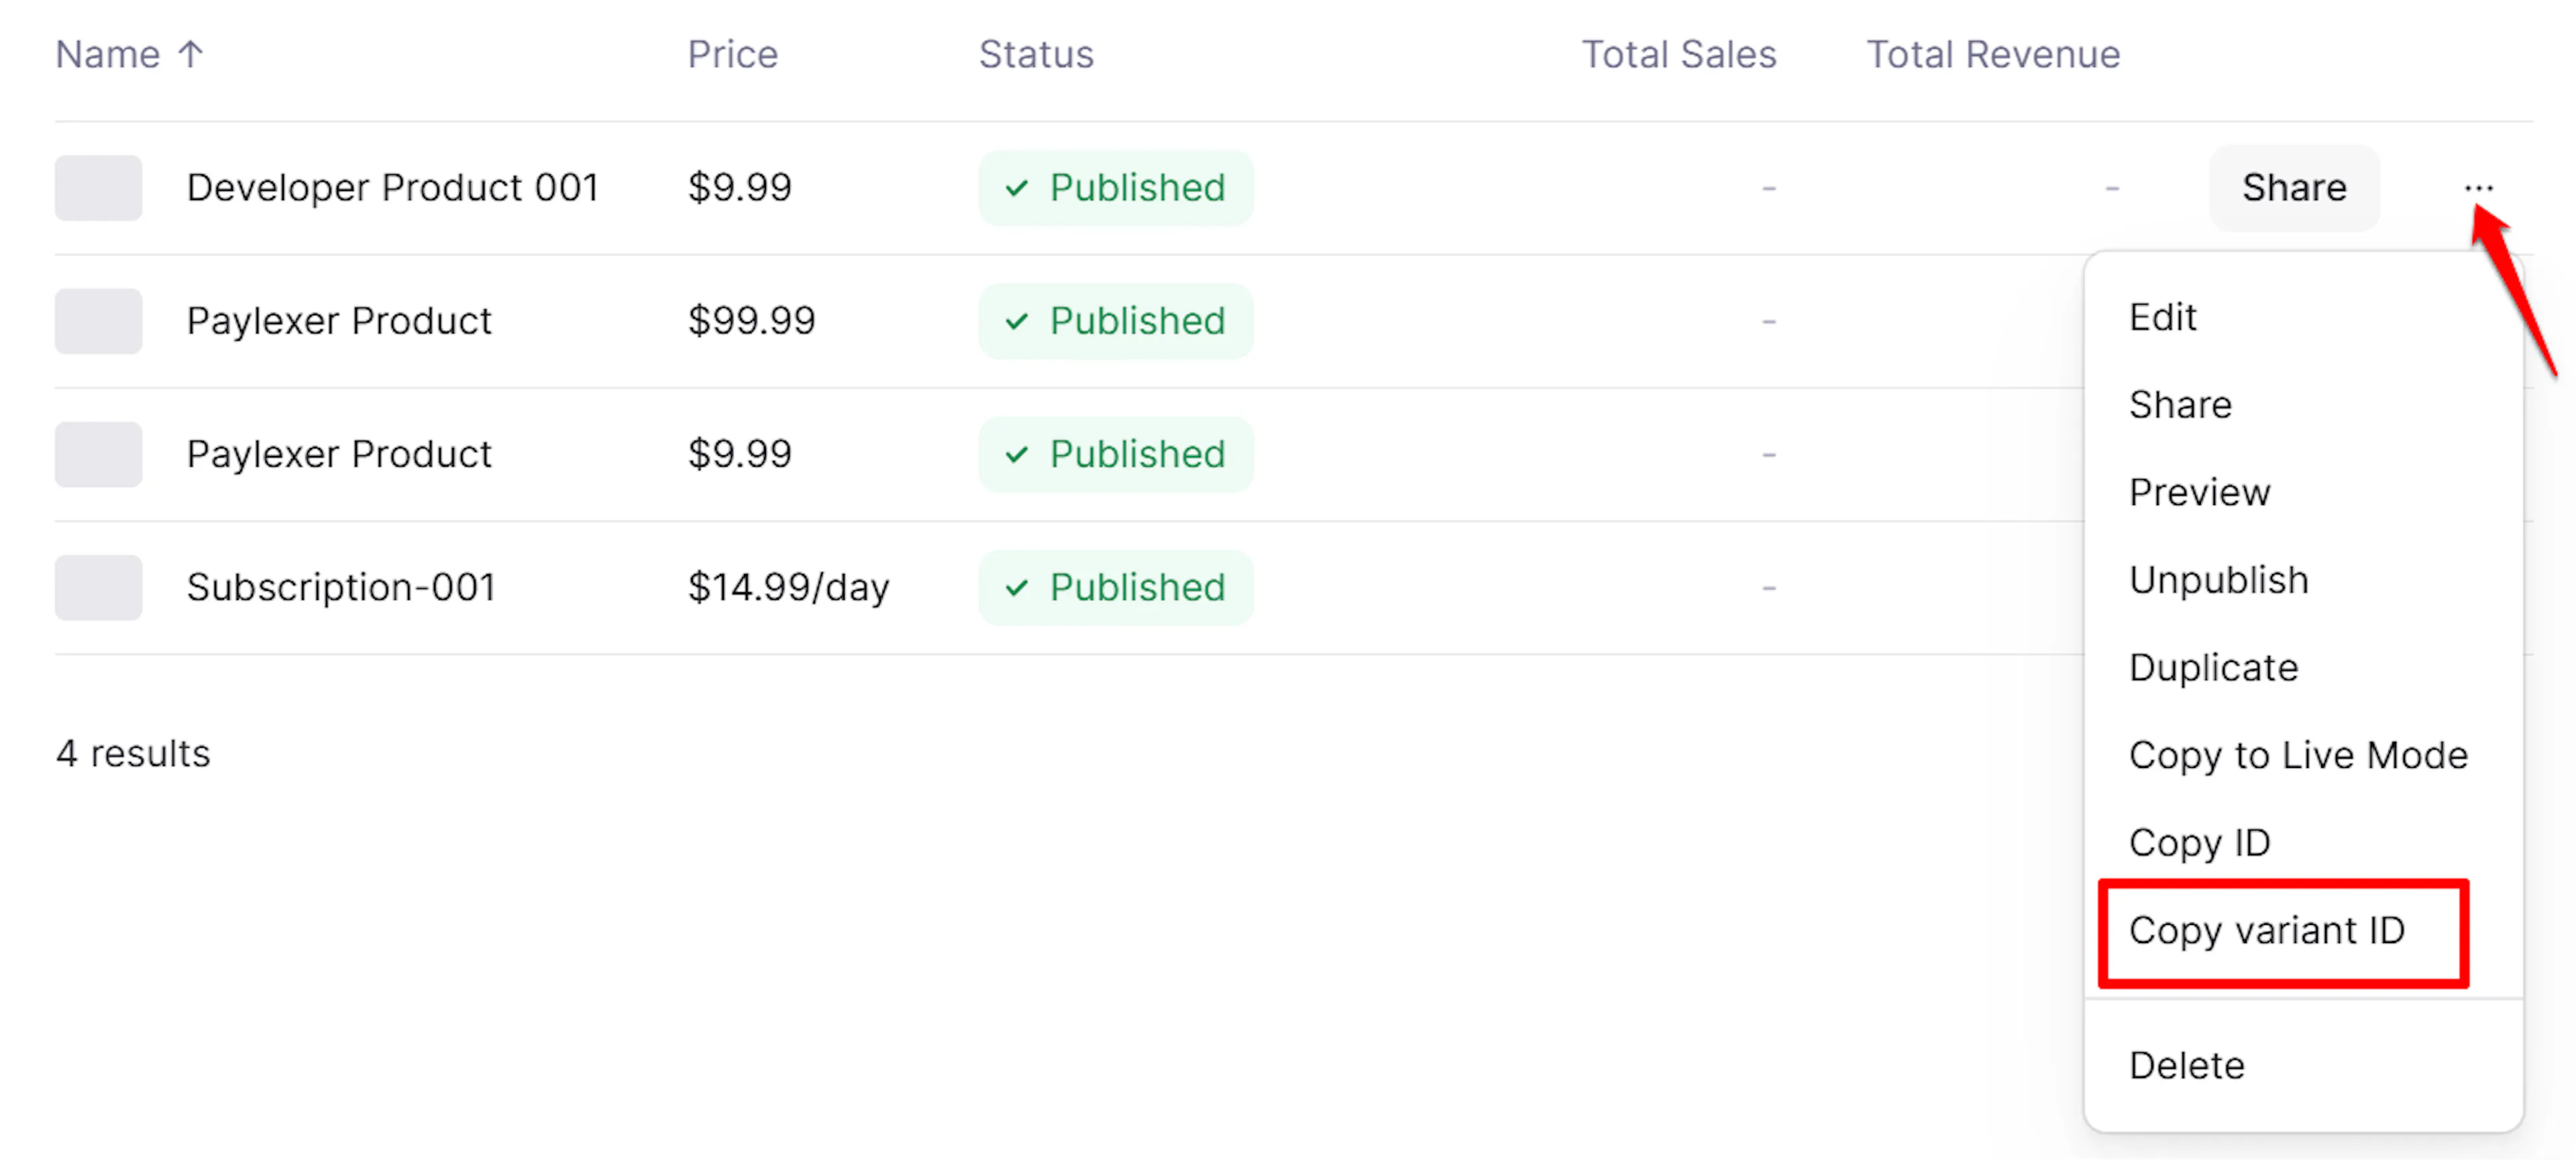
You'd only need to create an additional variant yourself if you wanted more than one price tier for the same product - the auto-created variant is enough for PayLexer, which overrides its price on every checkout anyway.
Copy your Store ID
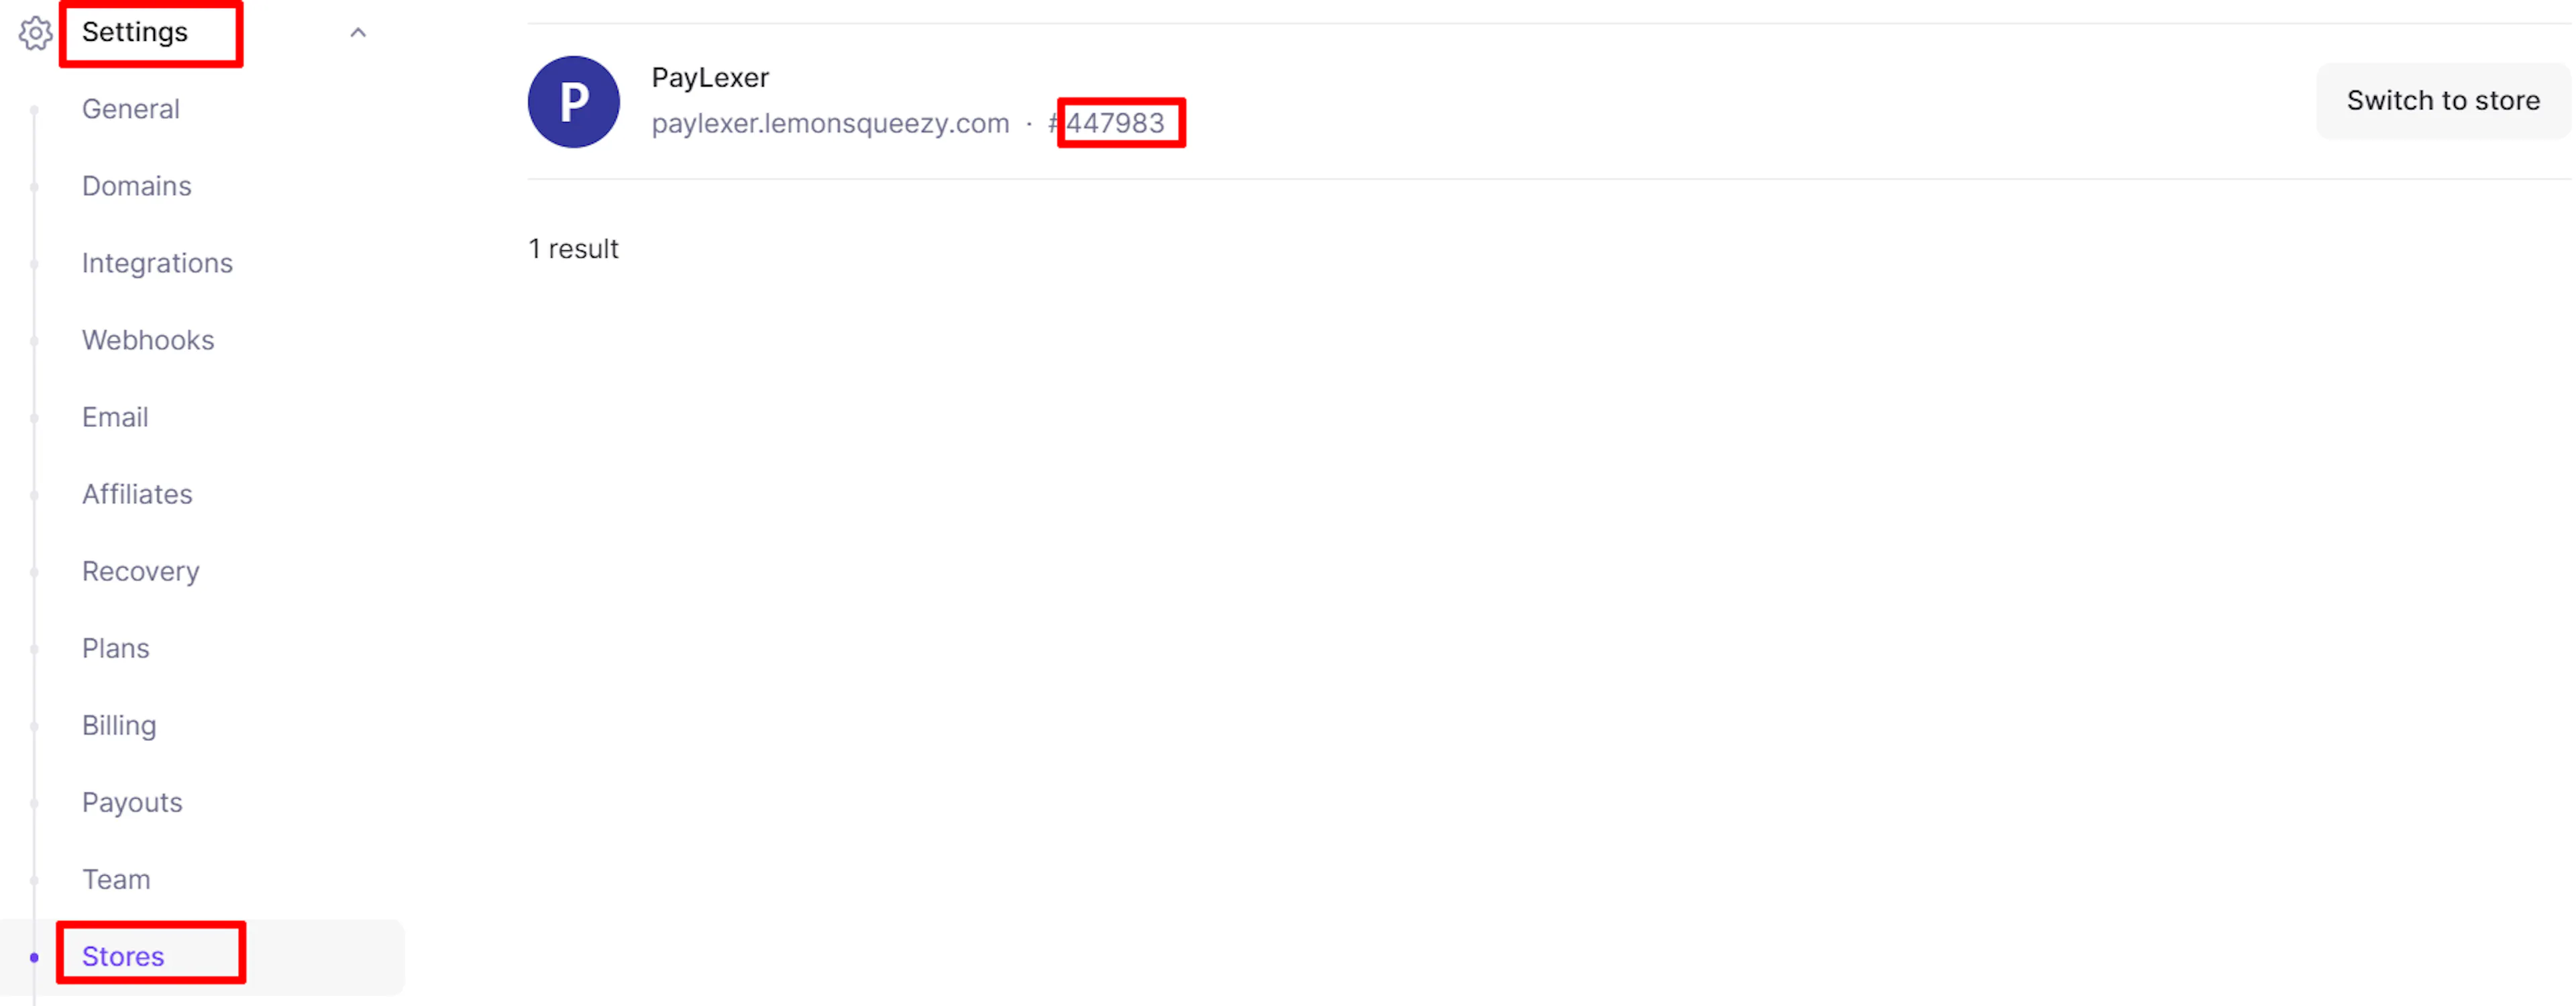
Go to Settings → Stores and copy the Store ID, the number shown after the # sign.
Create an API Key
Go to Settings → API and create a new API key.
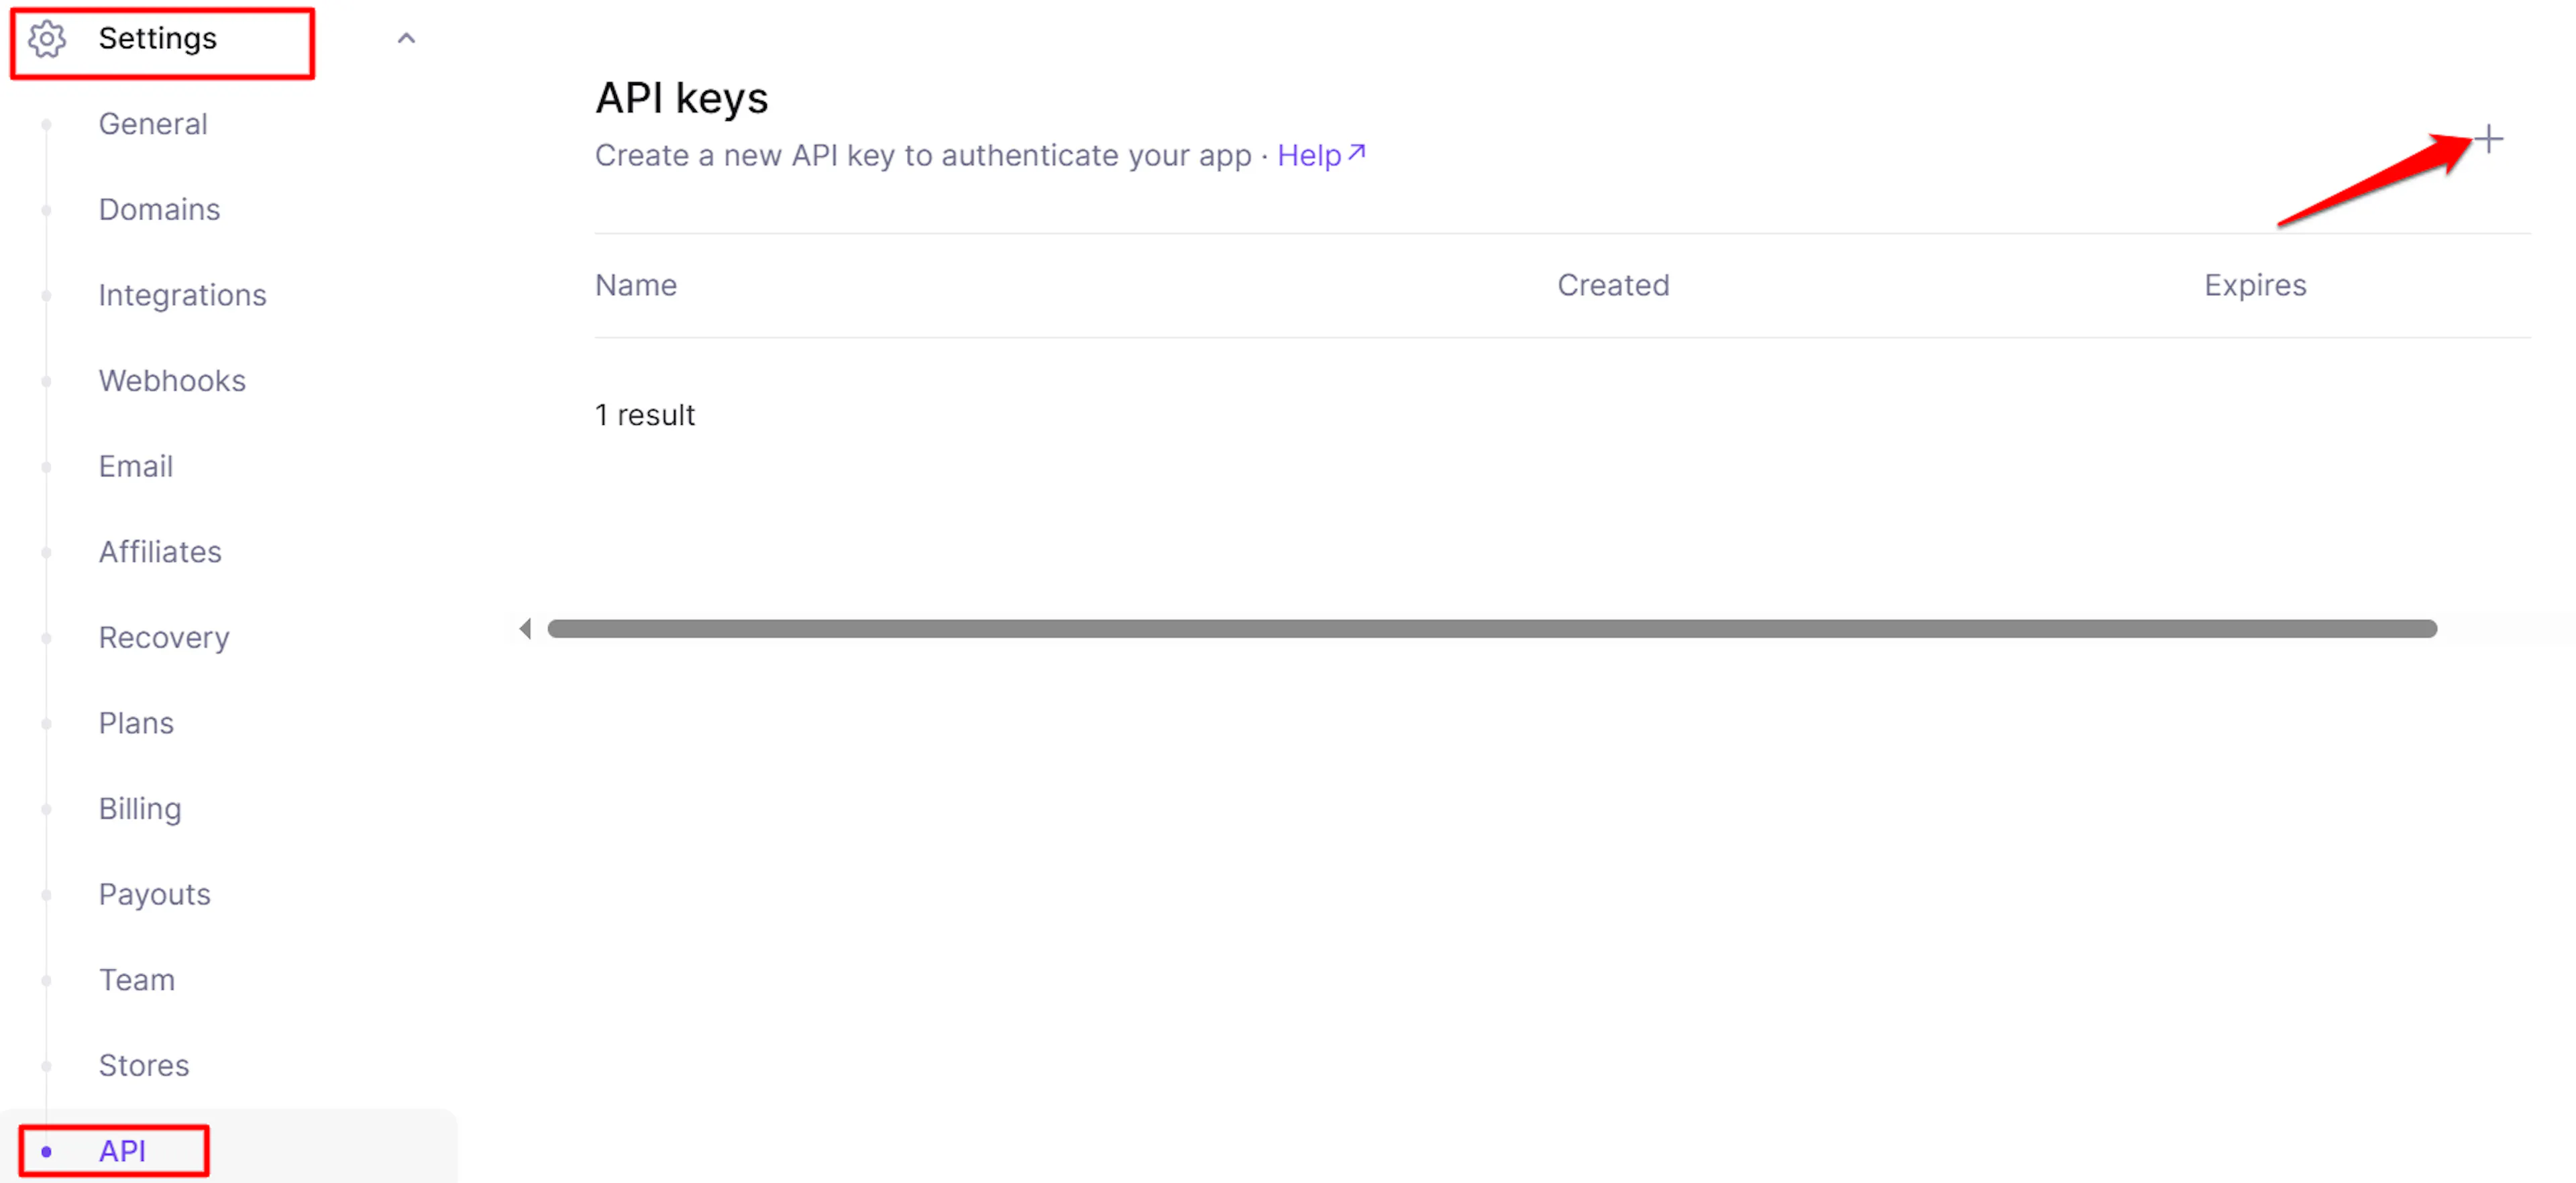
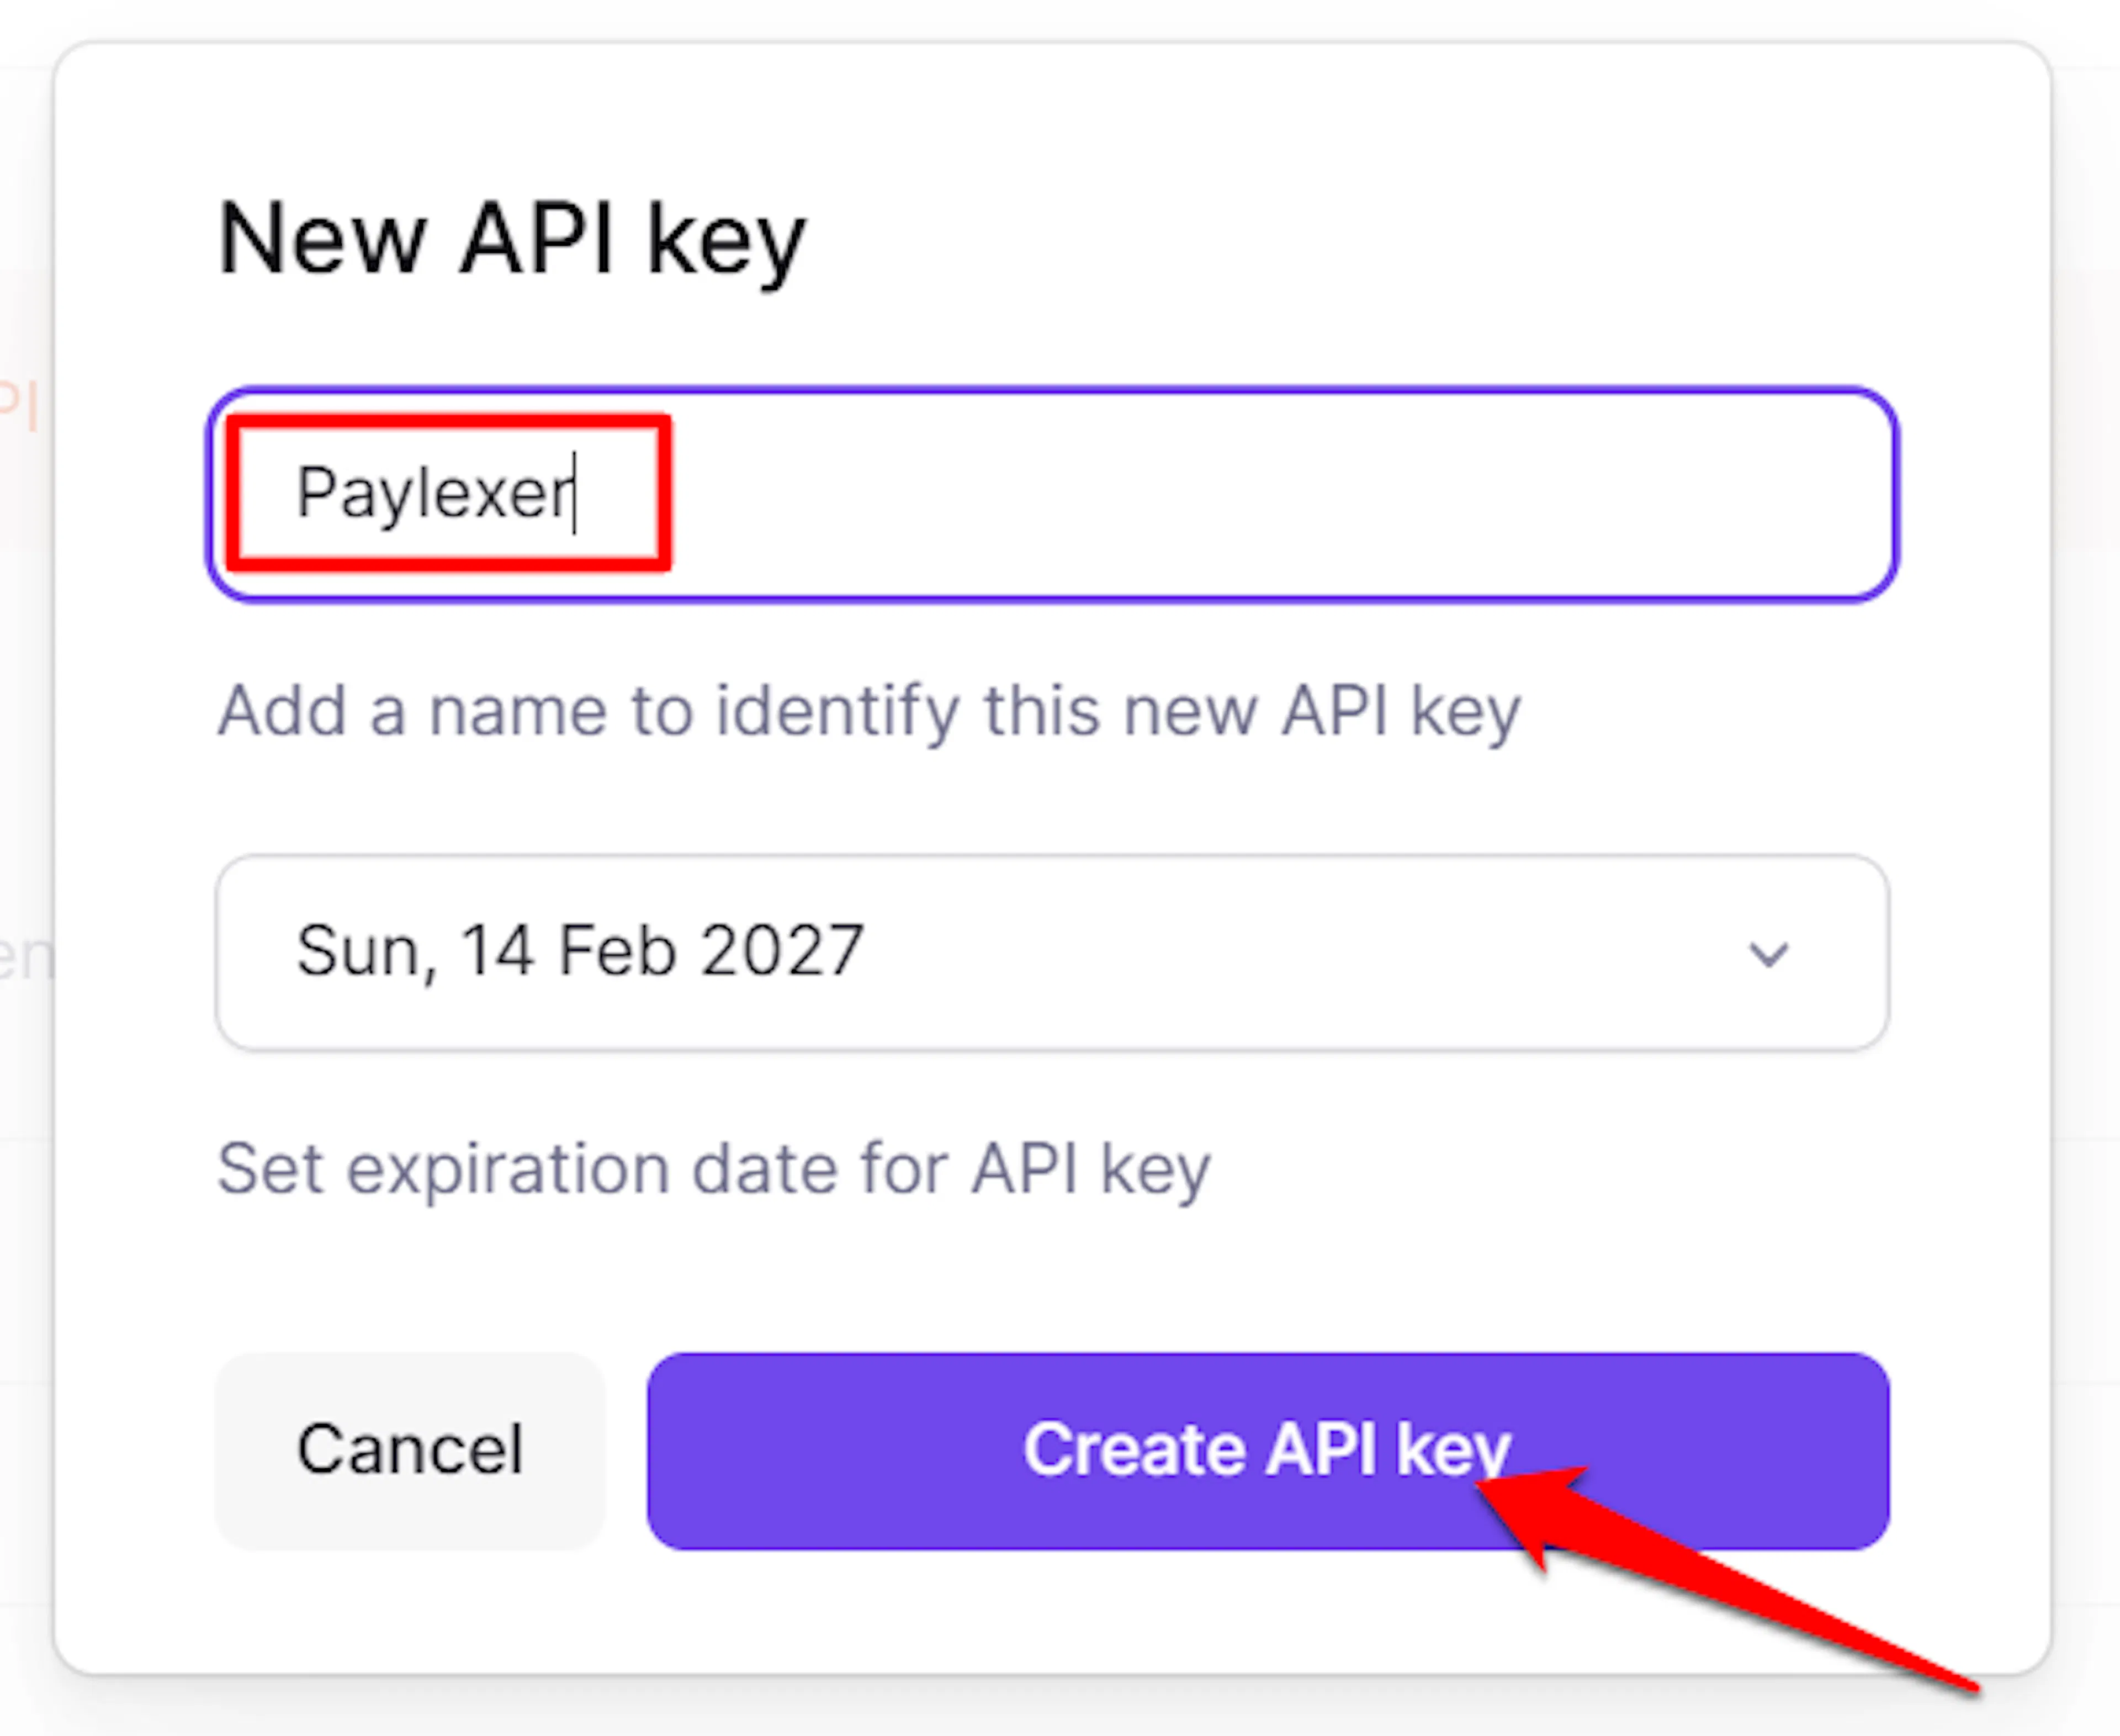
LemonSqueezy shows you a new API key only once. Copy it immediately and store it somewhere safe. If you lose it, you'll need to create a new one from the same Settings → API page.
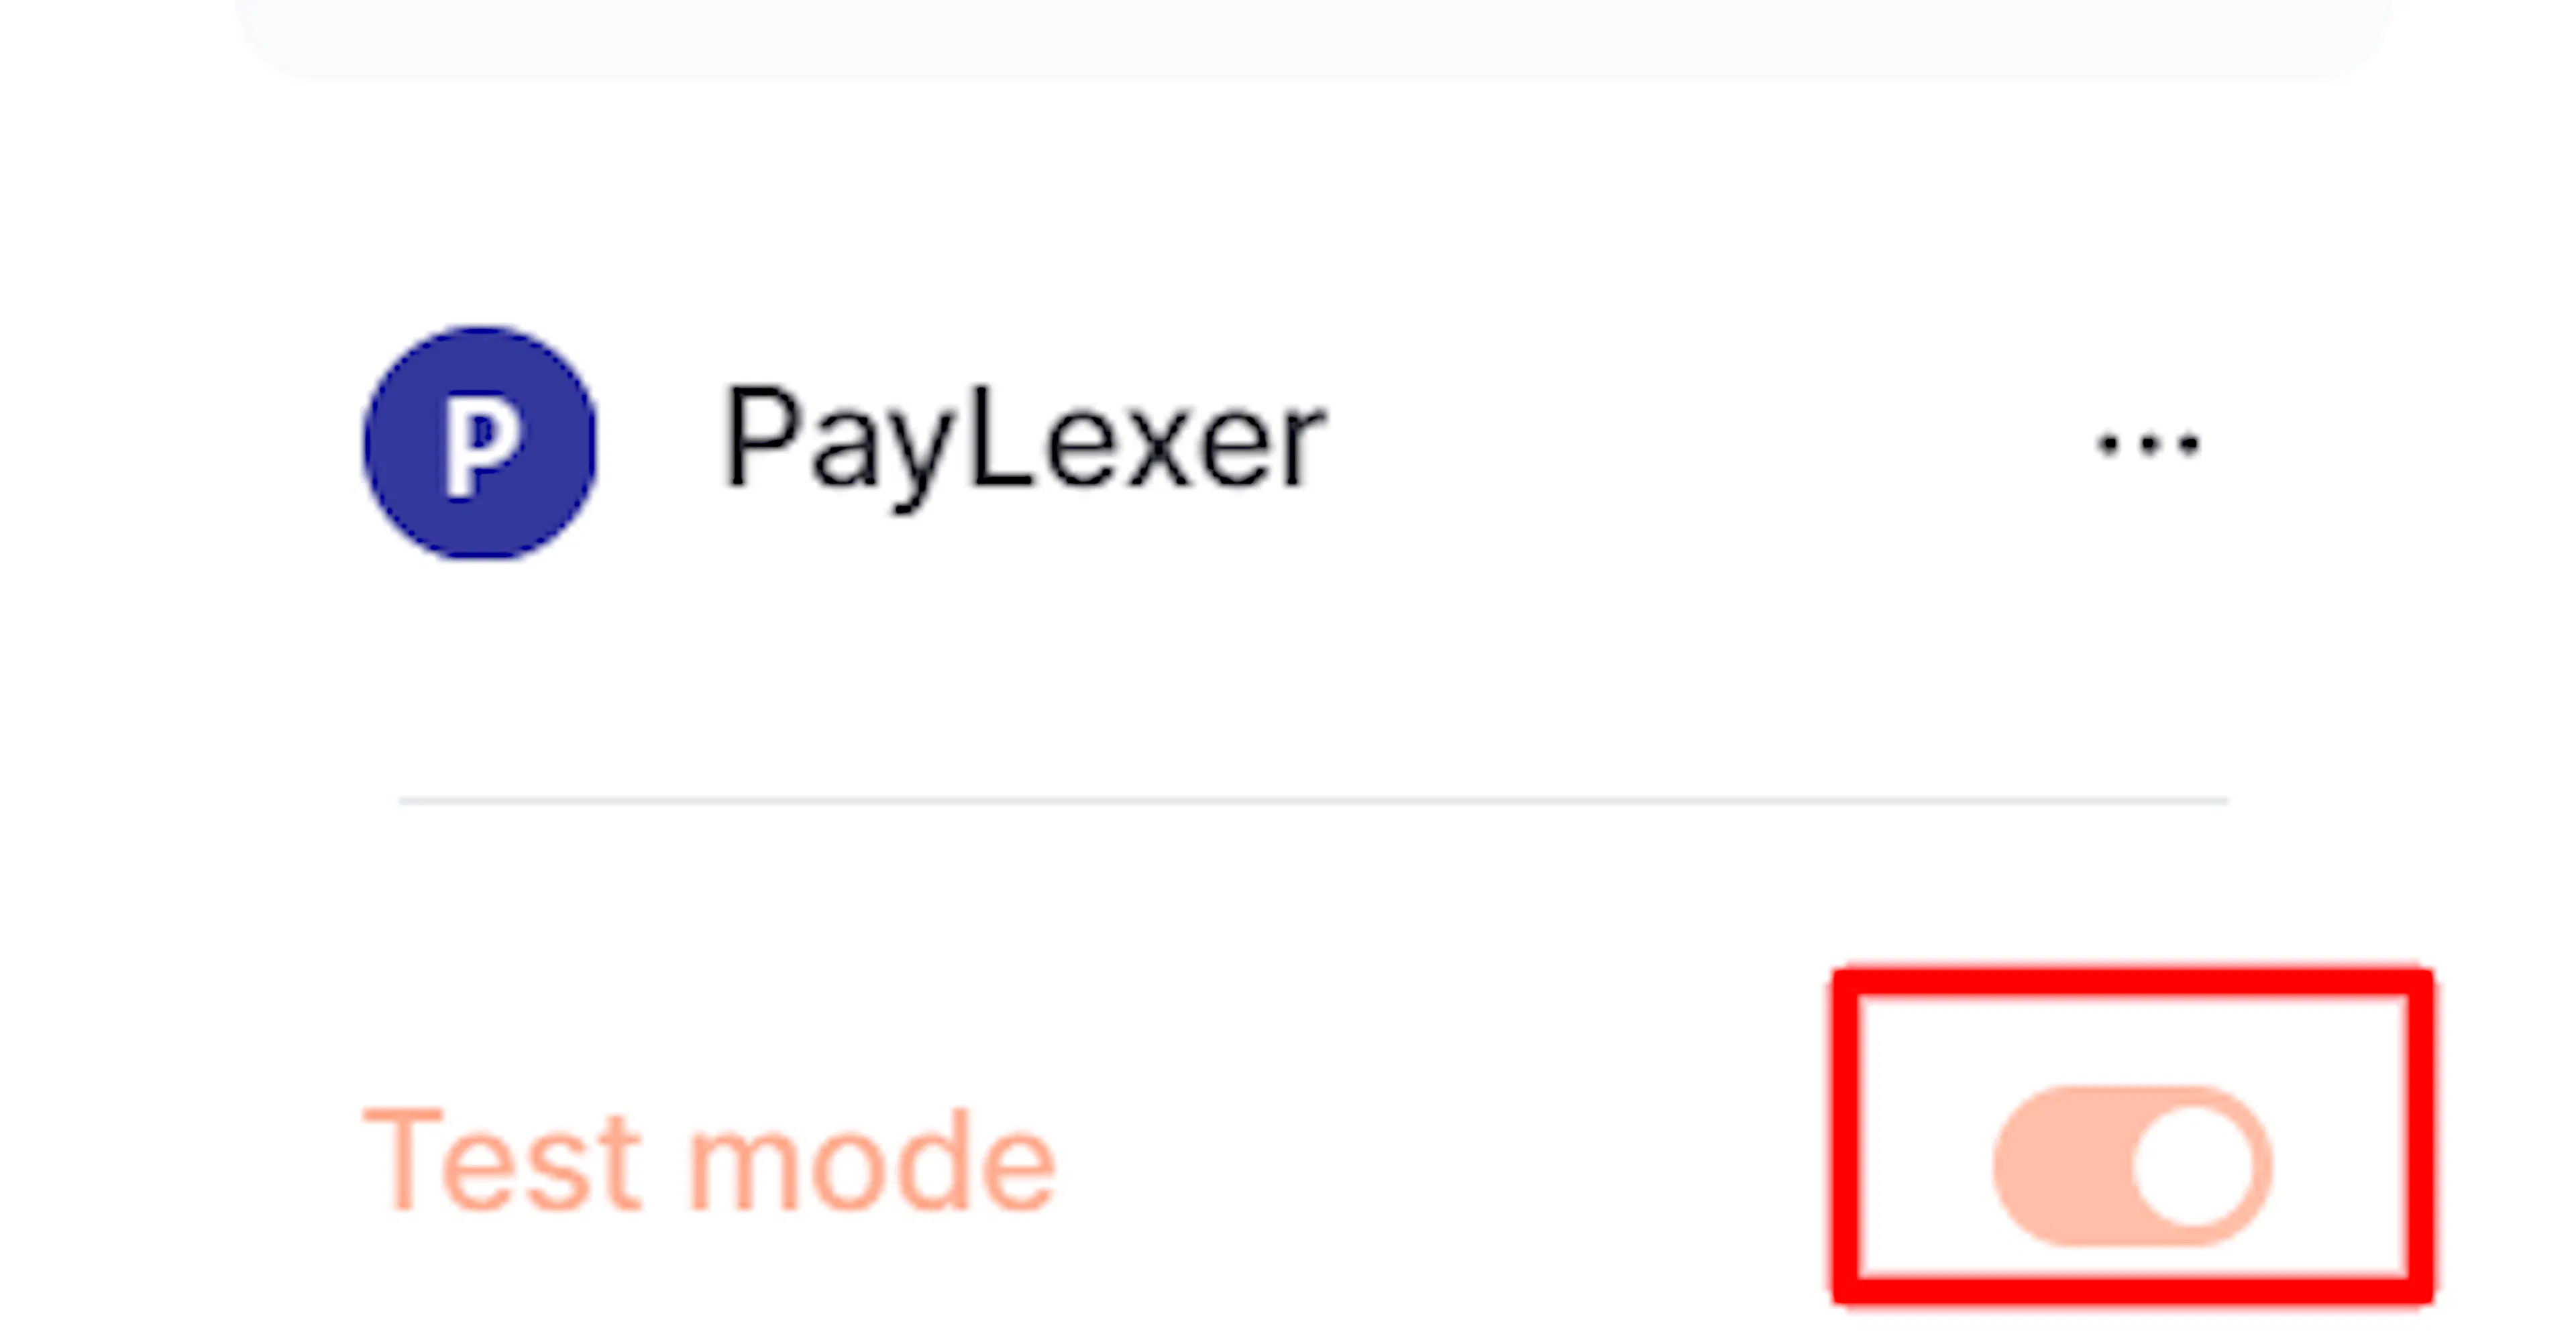
LemonSqueezy Test Mode is separate from Live, with its own products, variants, and API keys. Enable Test Mode before repeating these steps to get sandbox credentials. Once activated, Copy to Live Mode lets you move Test Mode products to Live without rebuilding them.
Adding Credentials to PayLexer
Open PayLexer Dashboard
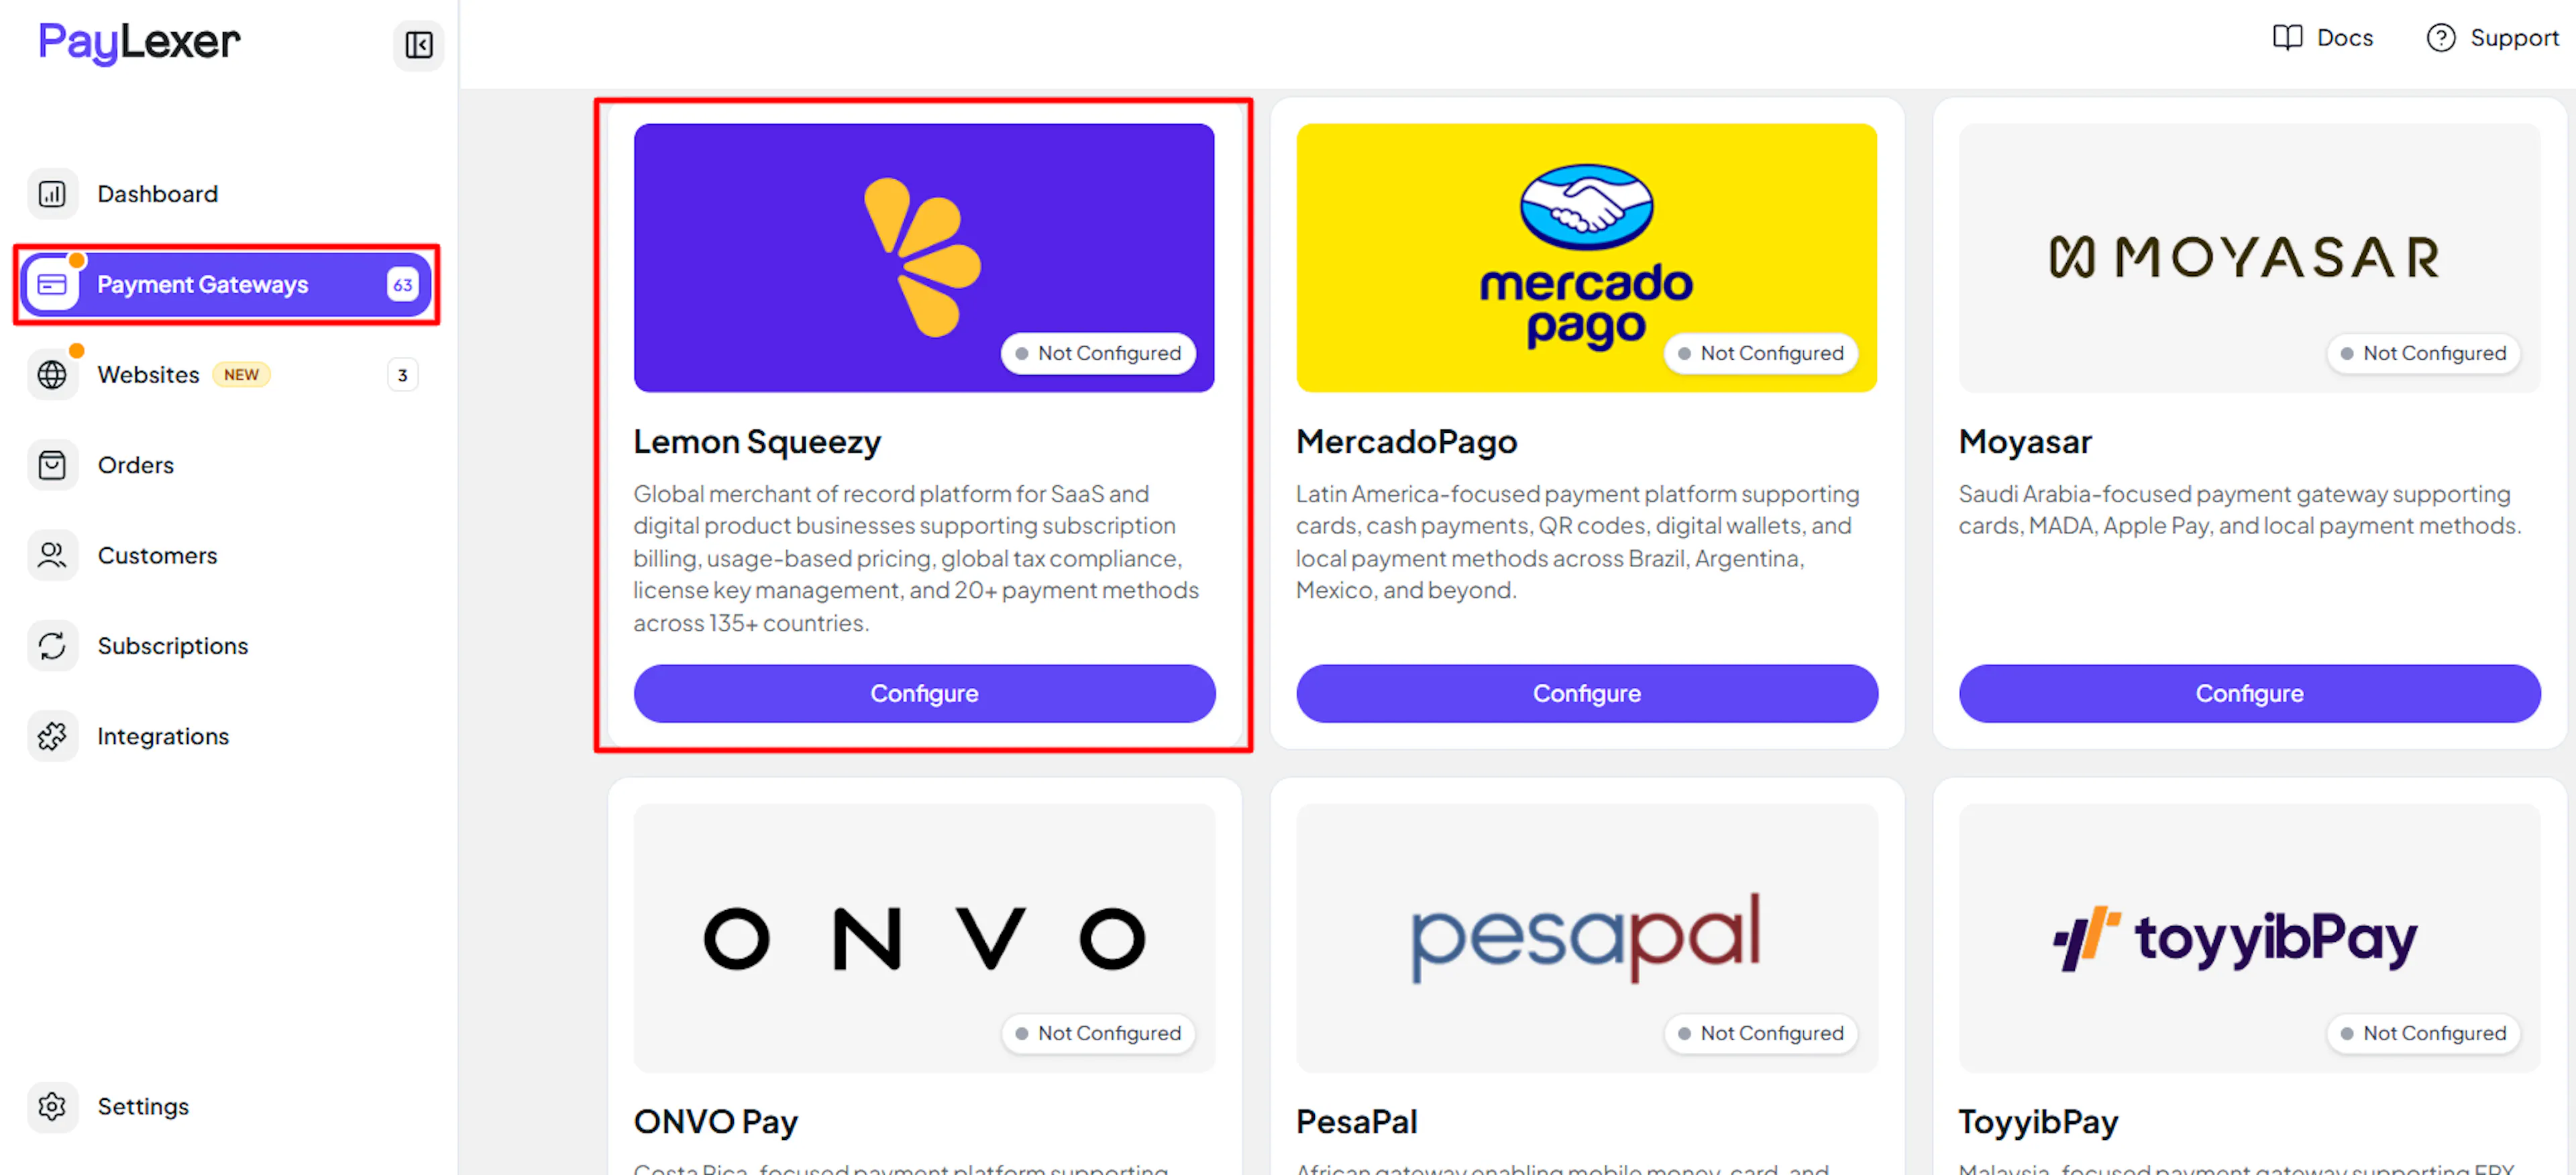
Log in to your PayLexer dashboard and navigate to Payment Gateways → LemonSqueezy.
Enter your credentials
Paste the API Key, Store ID, and Payment Variant ID you copied from LemonSqueezy.
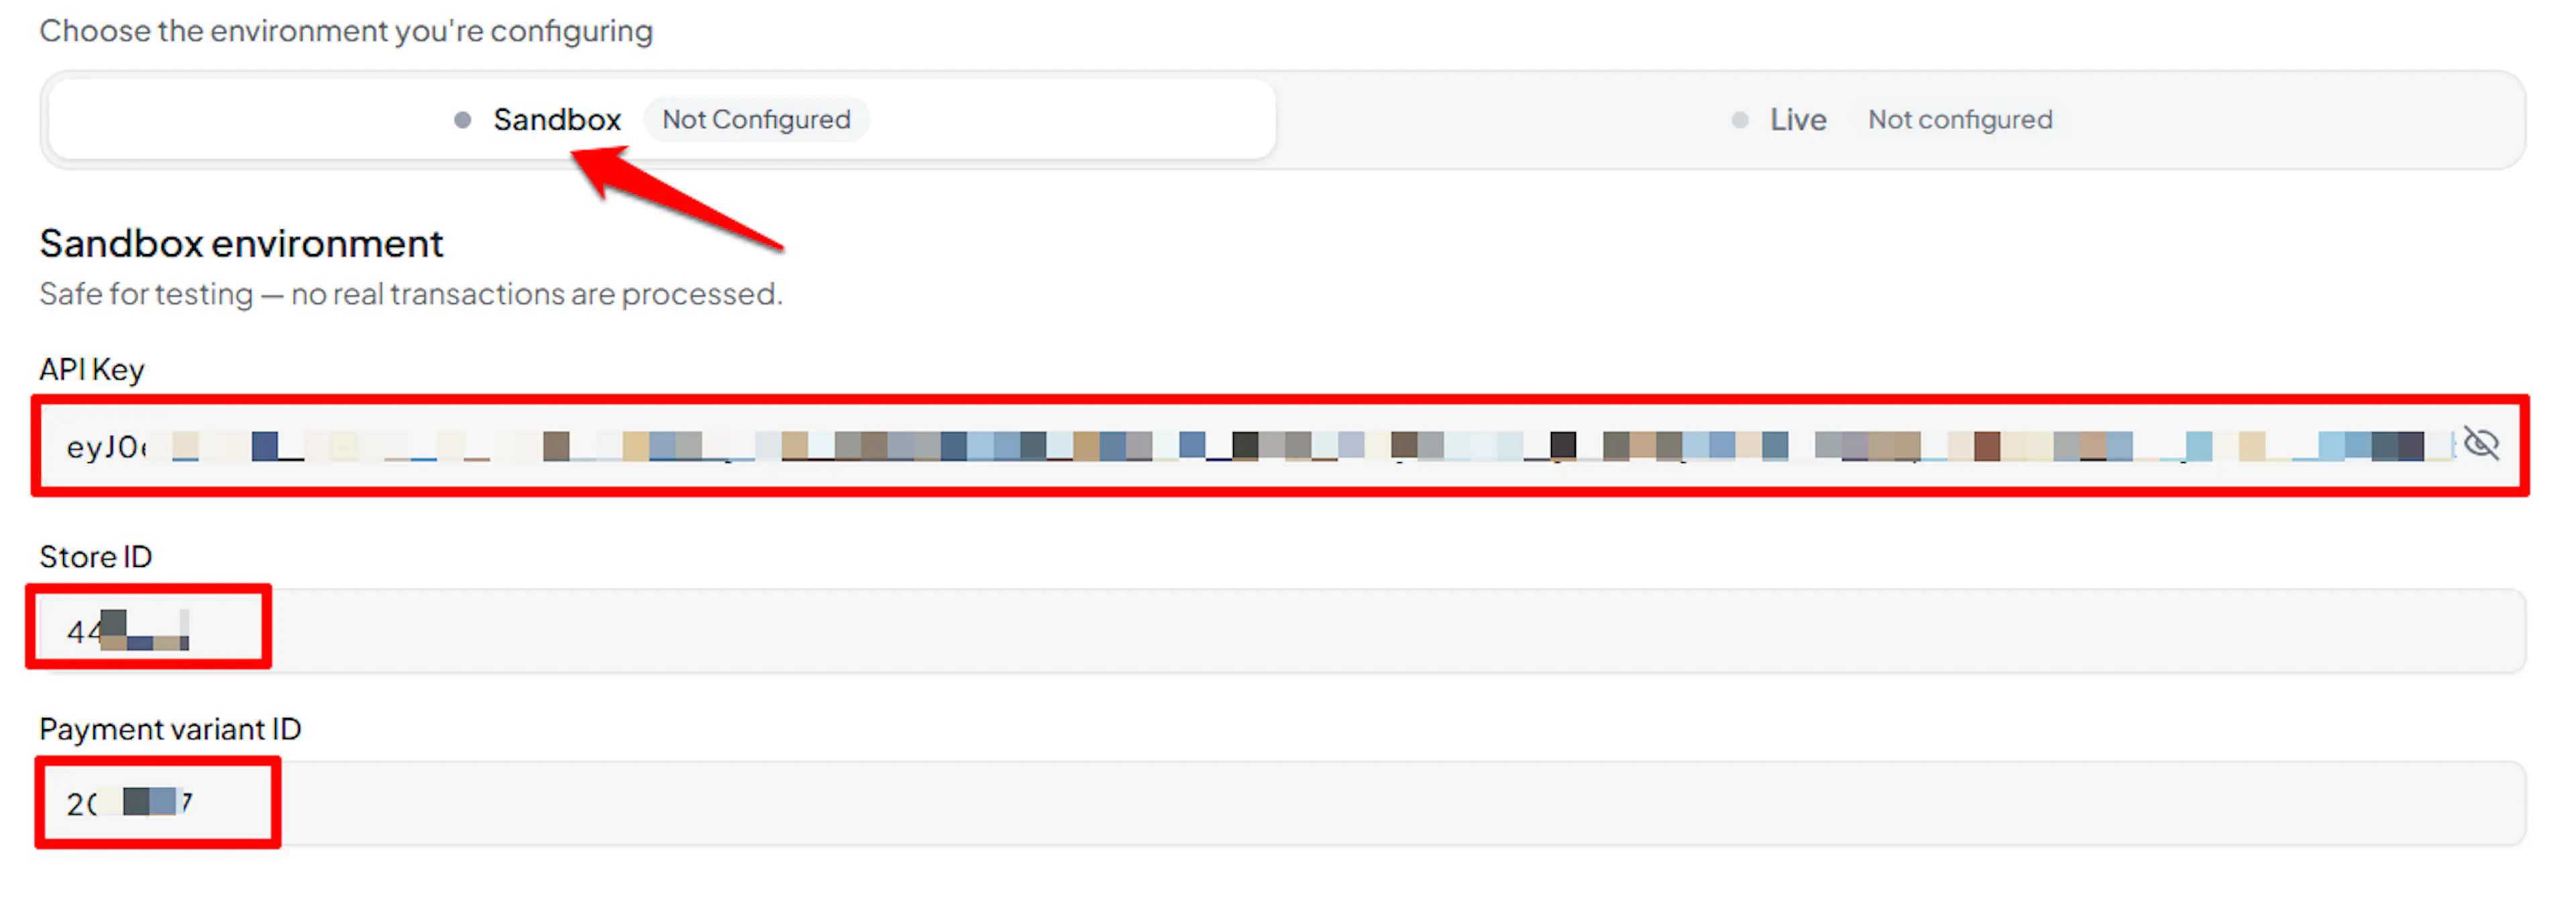
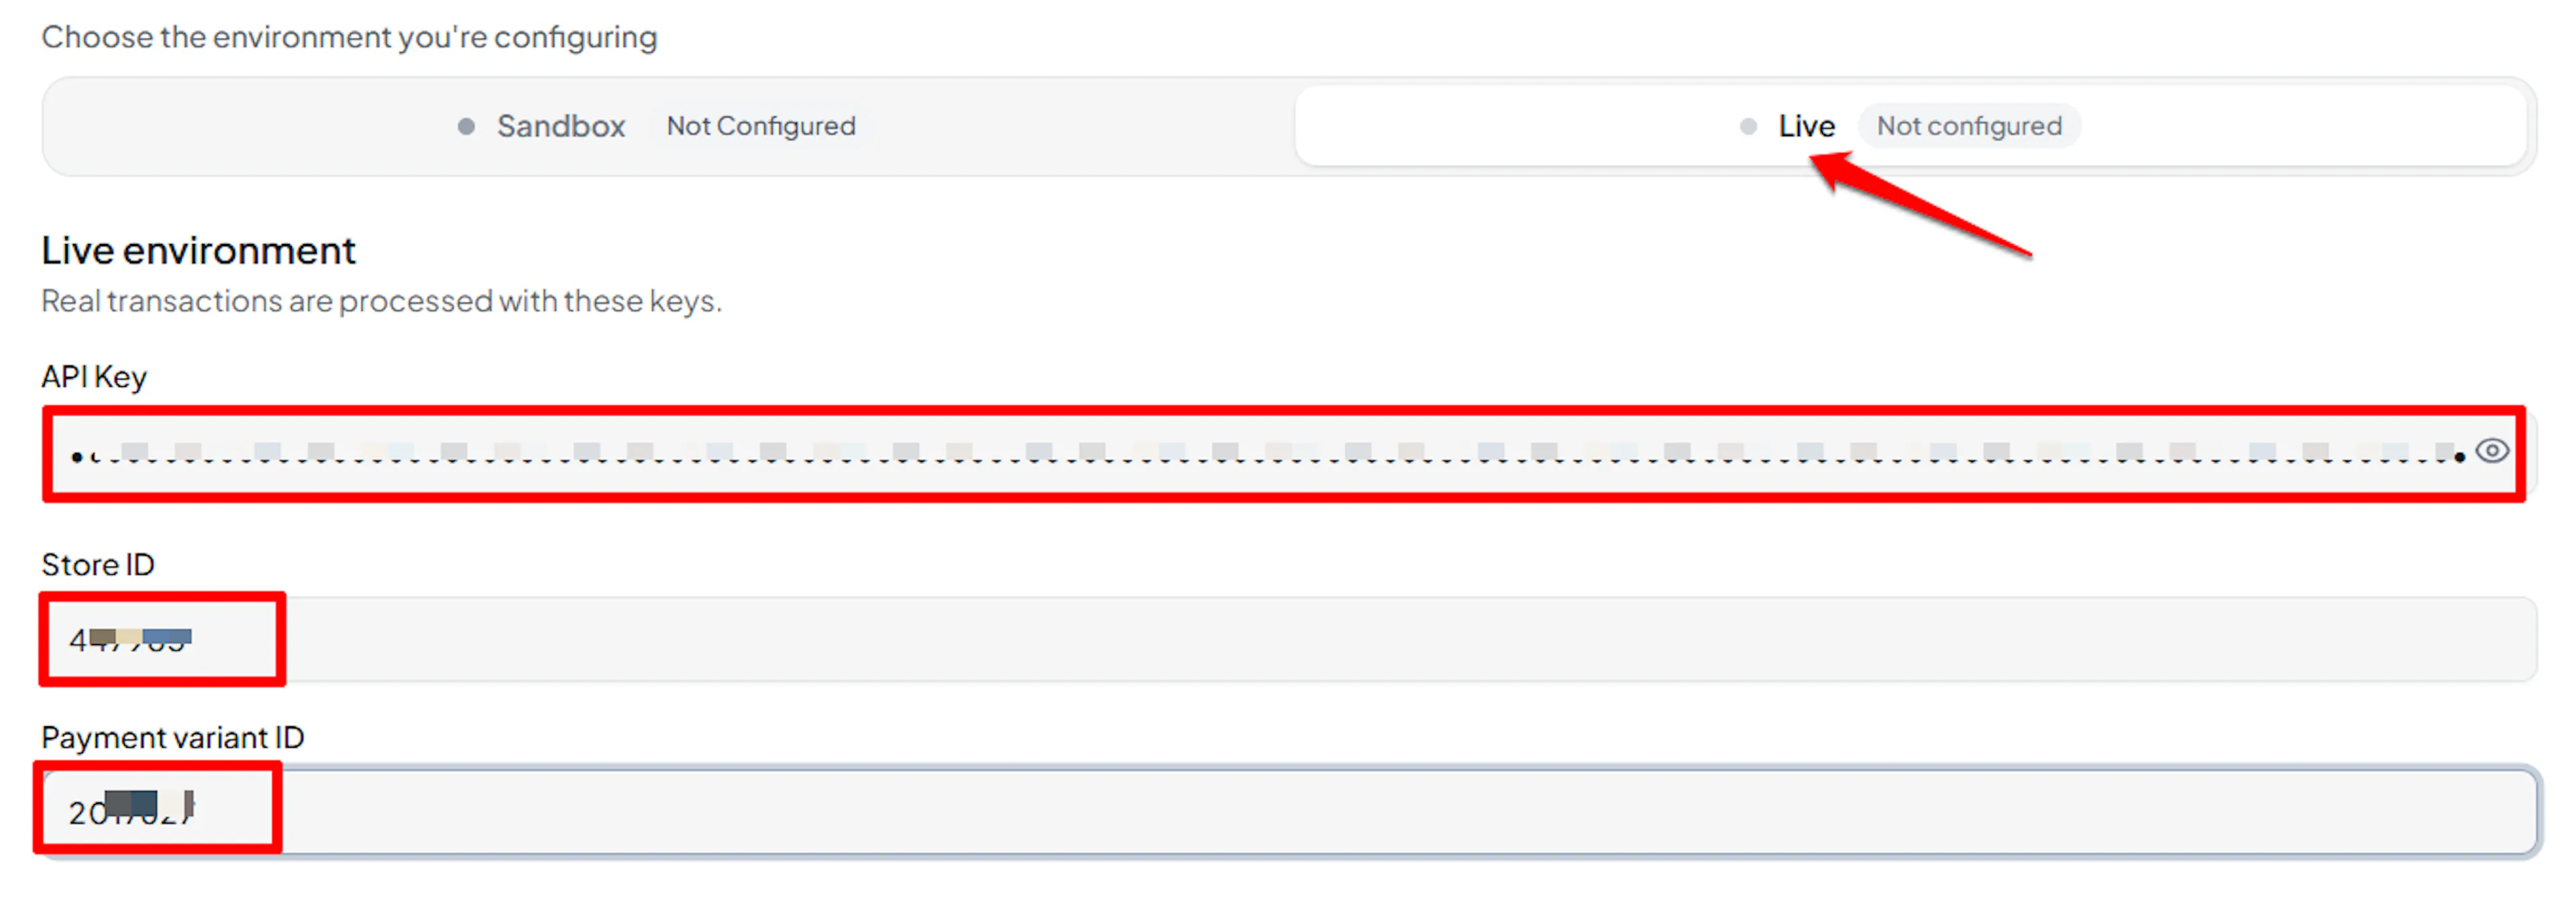
Understanding Live/Production and Sandbox Settings:
| Environment | Purpose |
|---|---|
| Live / Production (Mandatory) | Used for real transactions. Cannot be empty, even when testing. |
| Test / Sandbox (Optional) | Used for testing only. No real money is processed. |
How PayLexer selects credentials:
- Debug/Test mode ON → Test credentials are used
- Debug/Test mode OFF → Live credentials are used
Test and save
Click Save to save your configuration and verify your credentials. Click Verify Connection to test the connection.
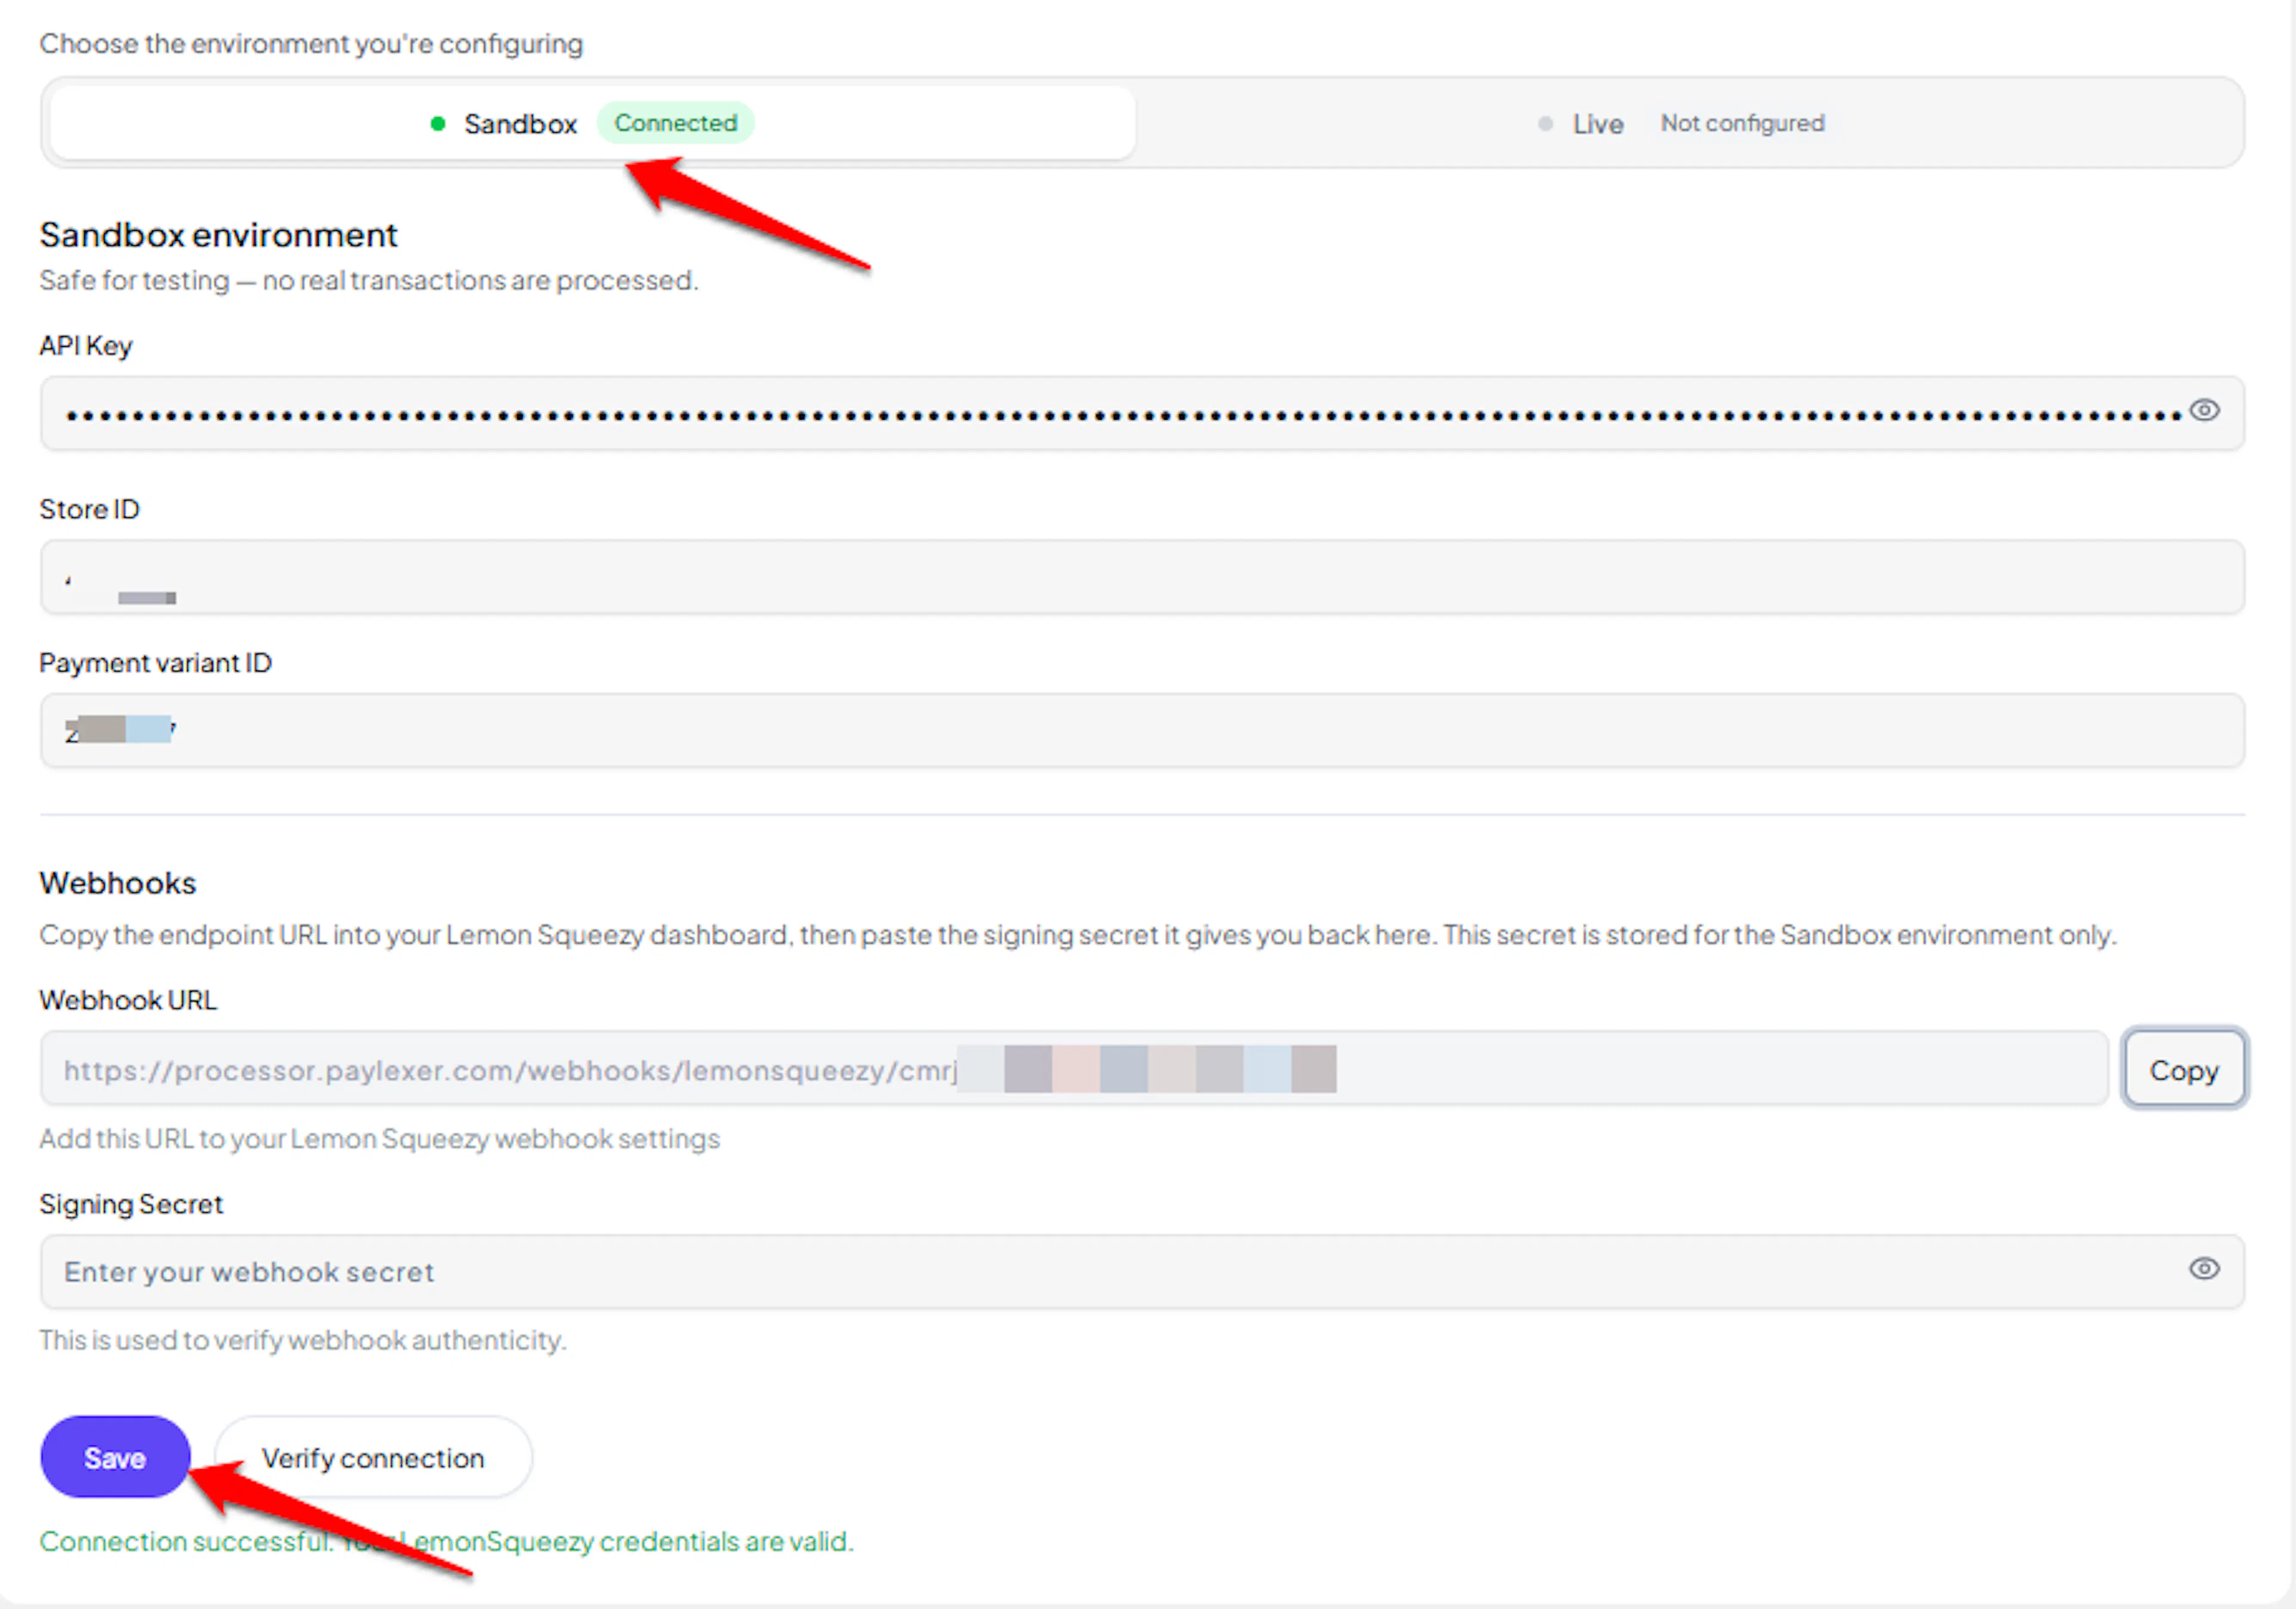
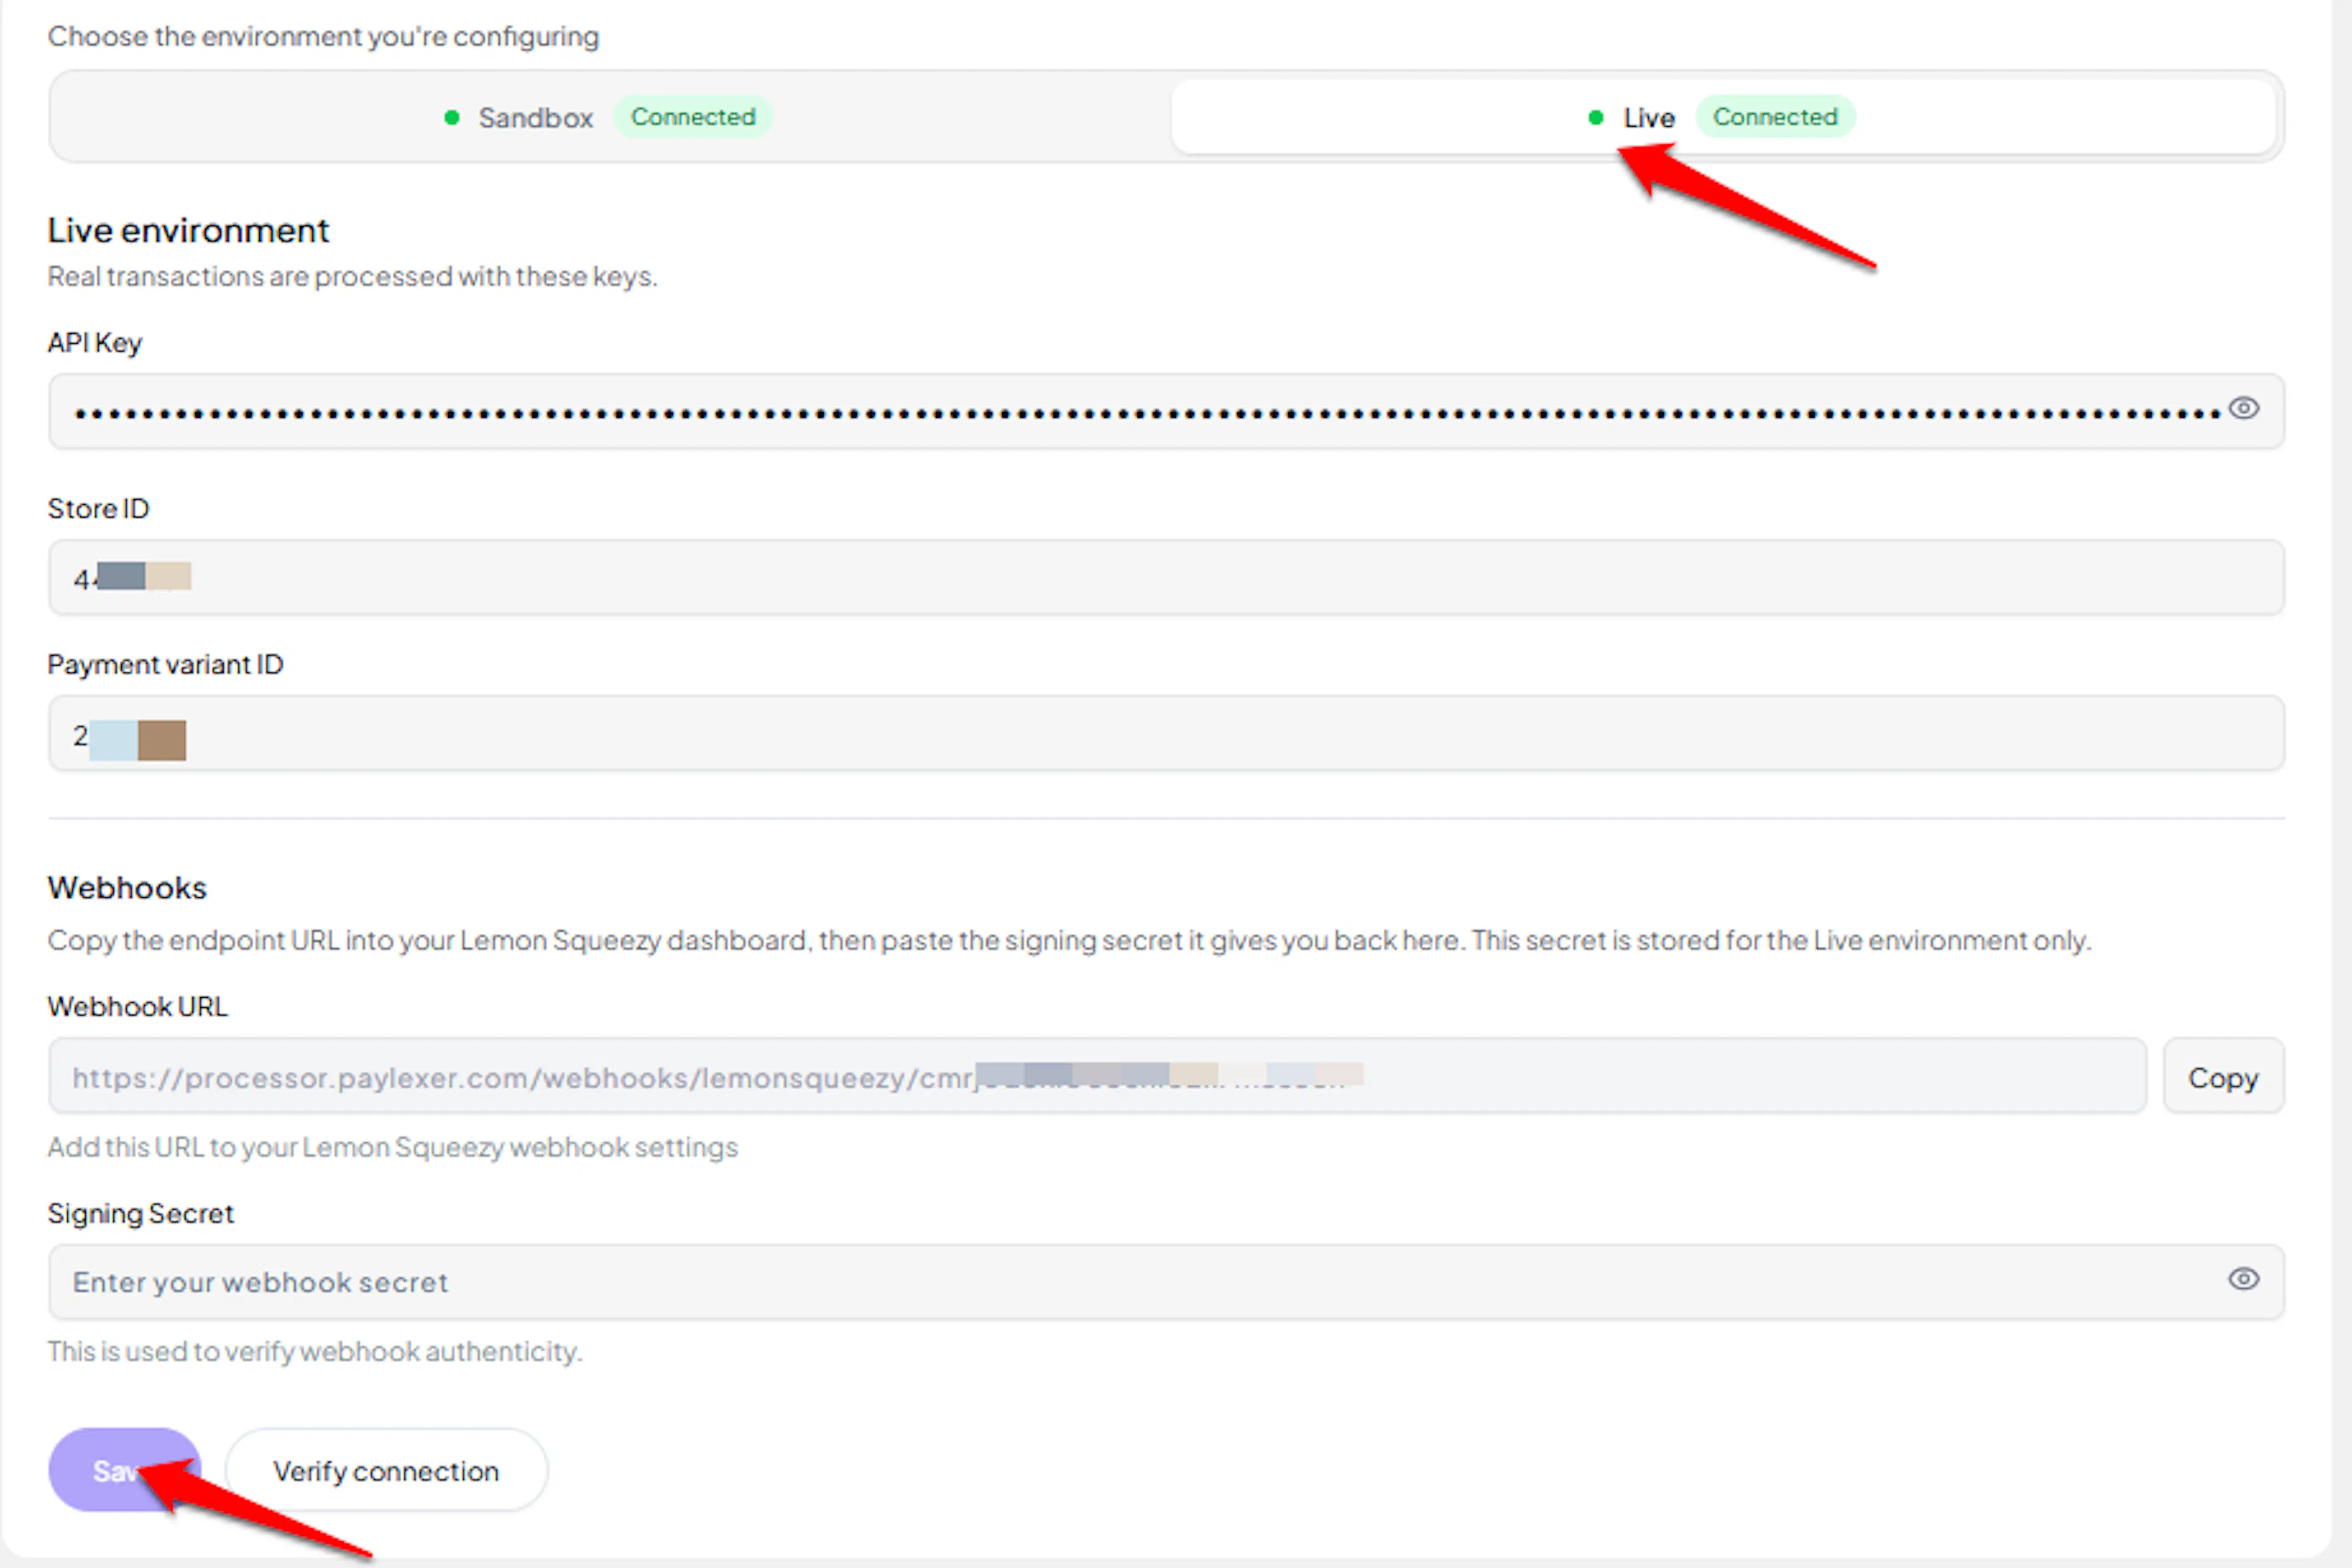
Configuring Webhooks (Mandatory)
Webhooks enable real-time payment updates and significantly improve reliability.
Benefits of Webhooks:
- Instant payment status updates
- Automatic refund processing
- Dispute notifications
LemonSqueezy signs every webhook with an HMAC-SHA256 signature in the X-Signature header for authoritative, server-to-server confirmation. Because LemonSqueezy has no per-checkout webhook URL, you register the endpoint once in your LemonSqueezy dashboard.
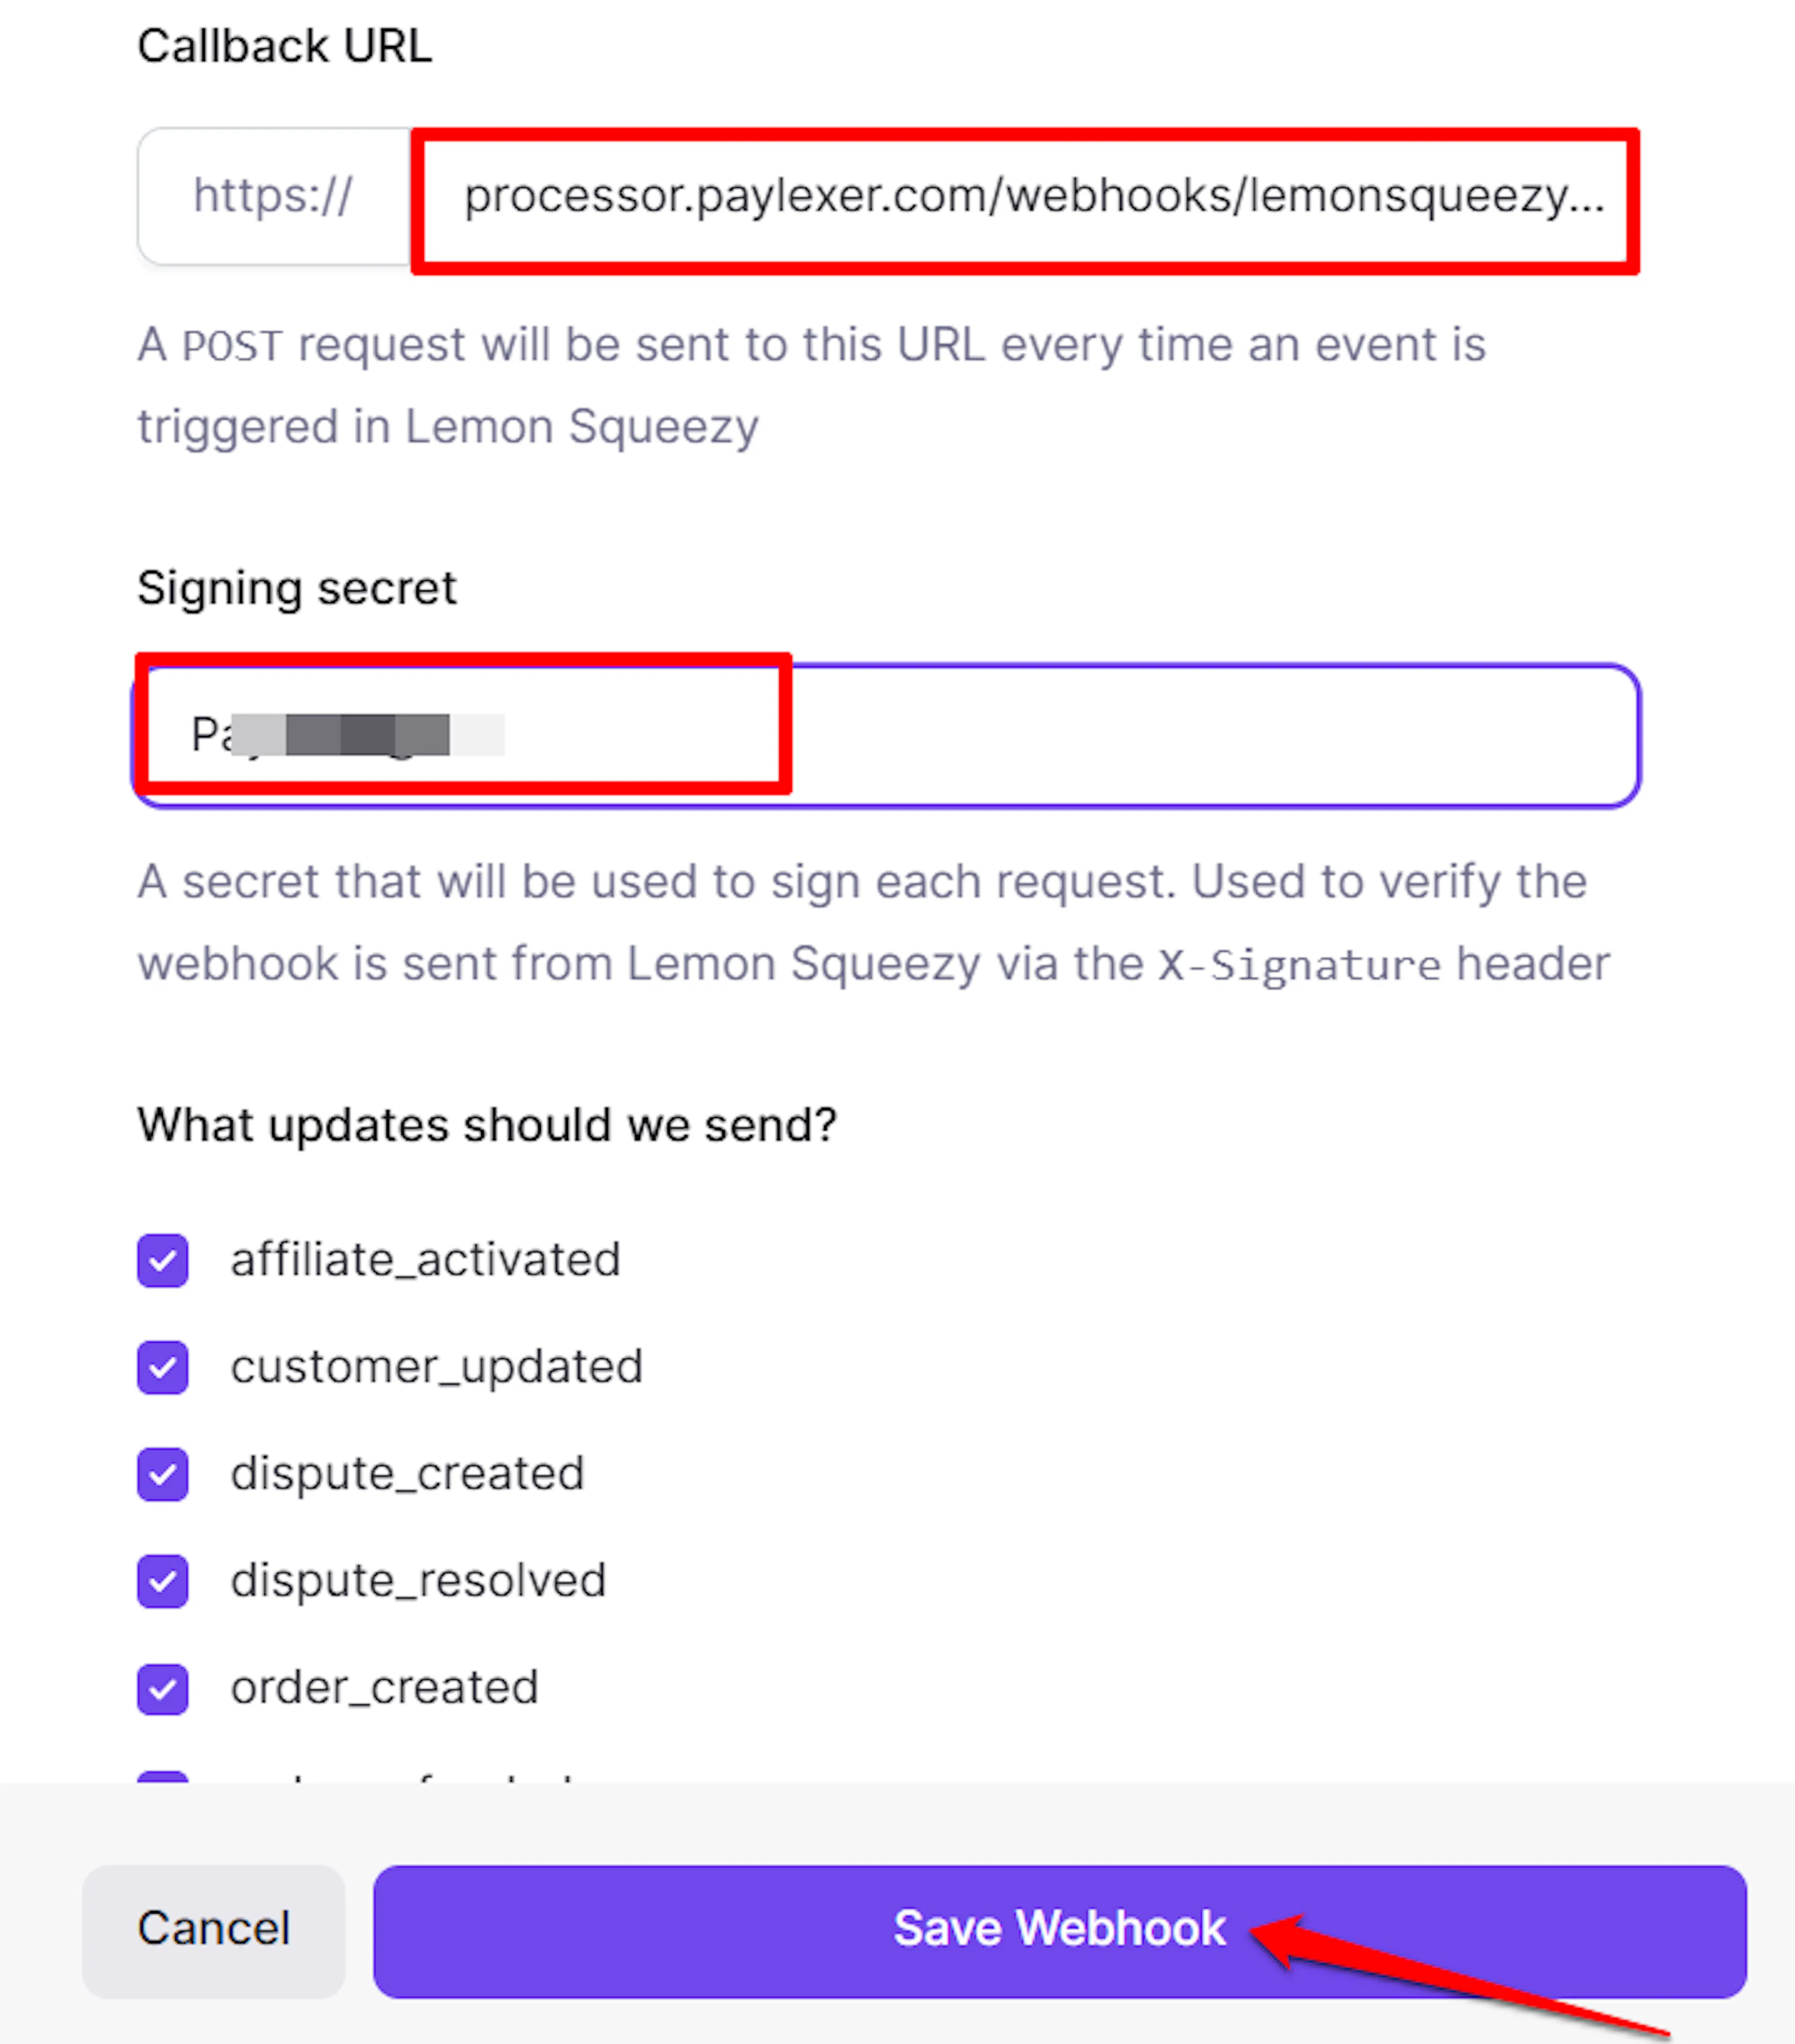
Unlike your API Key, LemonSqueezy does not generate the signing secret for you. You choose it yourself when creating the webhook, then enter that exact same value into PayLexer so both sides agree on it.
Copy your PayLexer webhook URL
In PayLexer → Payment Gateways → LemonSqueezy, copy the Webhook URL shown for your account.

Choose a signing secret
Decide on a random string between 6 and 40 characters, for example from a password generator. You will enter this exact value into both LemonSqueezy and PayLexer in the next two steps.
Create the webhook in LemonSqueezy
In your LemonSqueezy dashboard, go to Settings → Webhooks → Add webhook, paste the PayLexer webhook URL as the Callback URL, select all event types, and enter the signing secret you chose above.

Add the same secret to PayLexer
Paste the identical signing secret into the Signing Secret field in PayLexer and click Save.
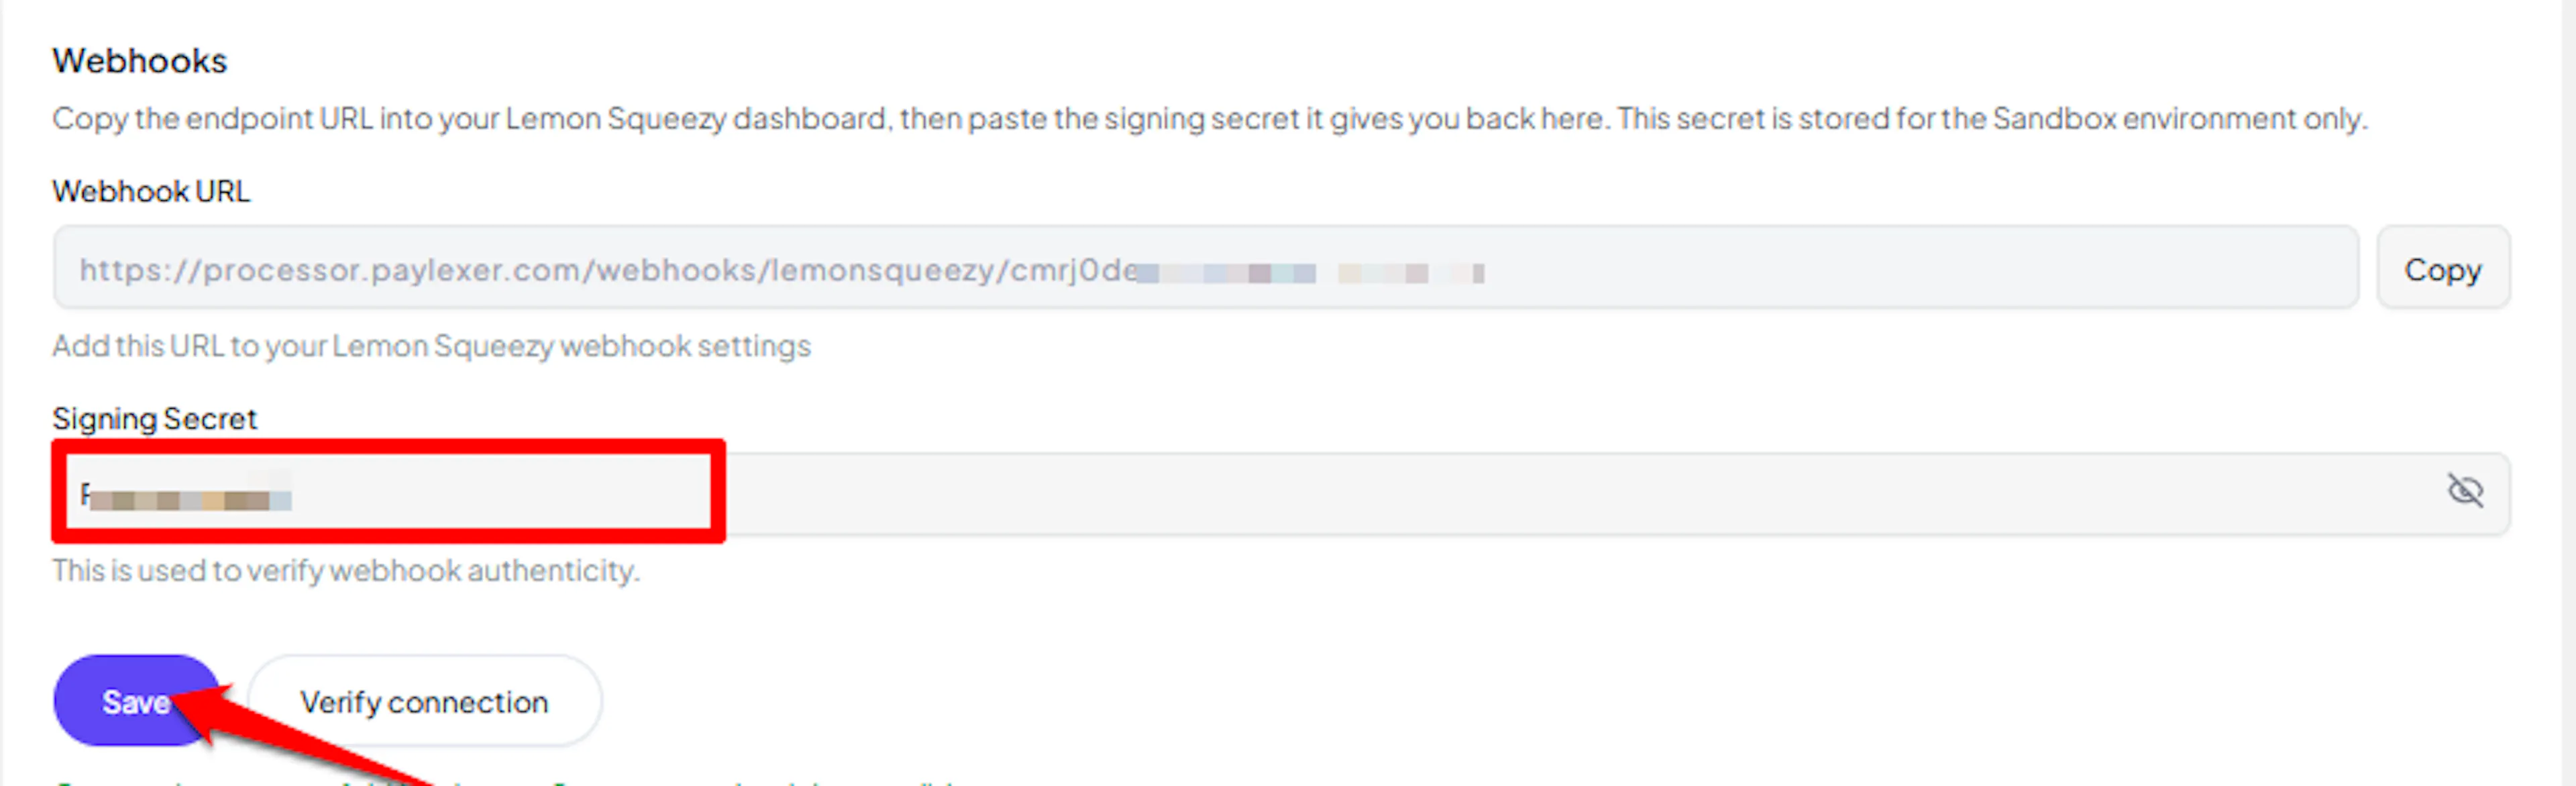
Every LemonSqueezy webhook must match the Signing Secret exactly. Orders are marked paid only after verification. If the secrets differ, all webhooks fail until both are updated to match.
Integrate LemonSqueezy to Your Website
If you have already added and configured your site, you can enable LemonSqueezy in your existing setup.
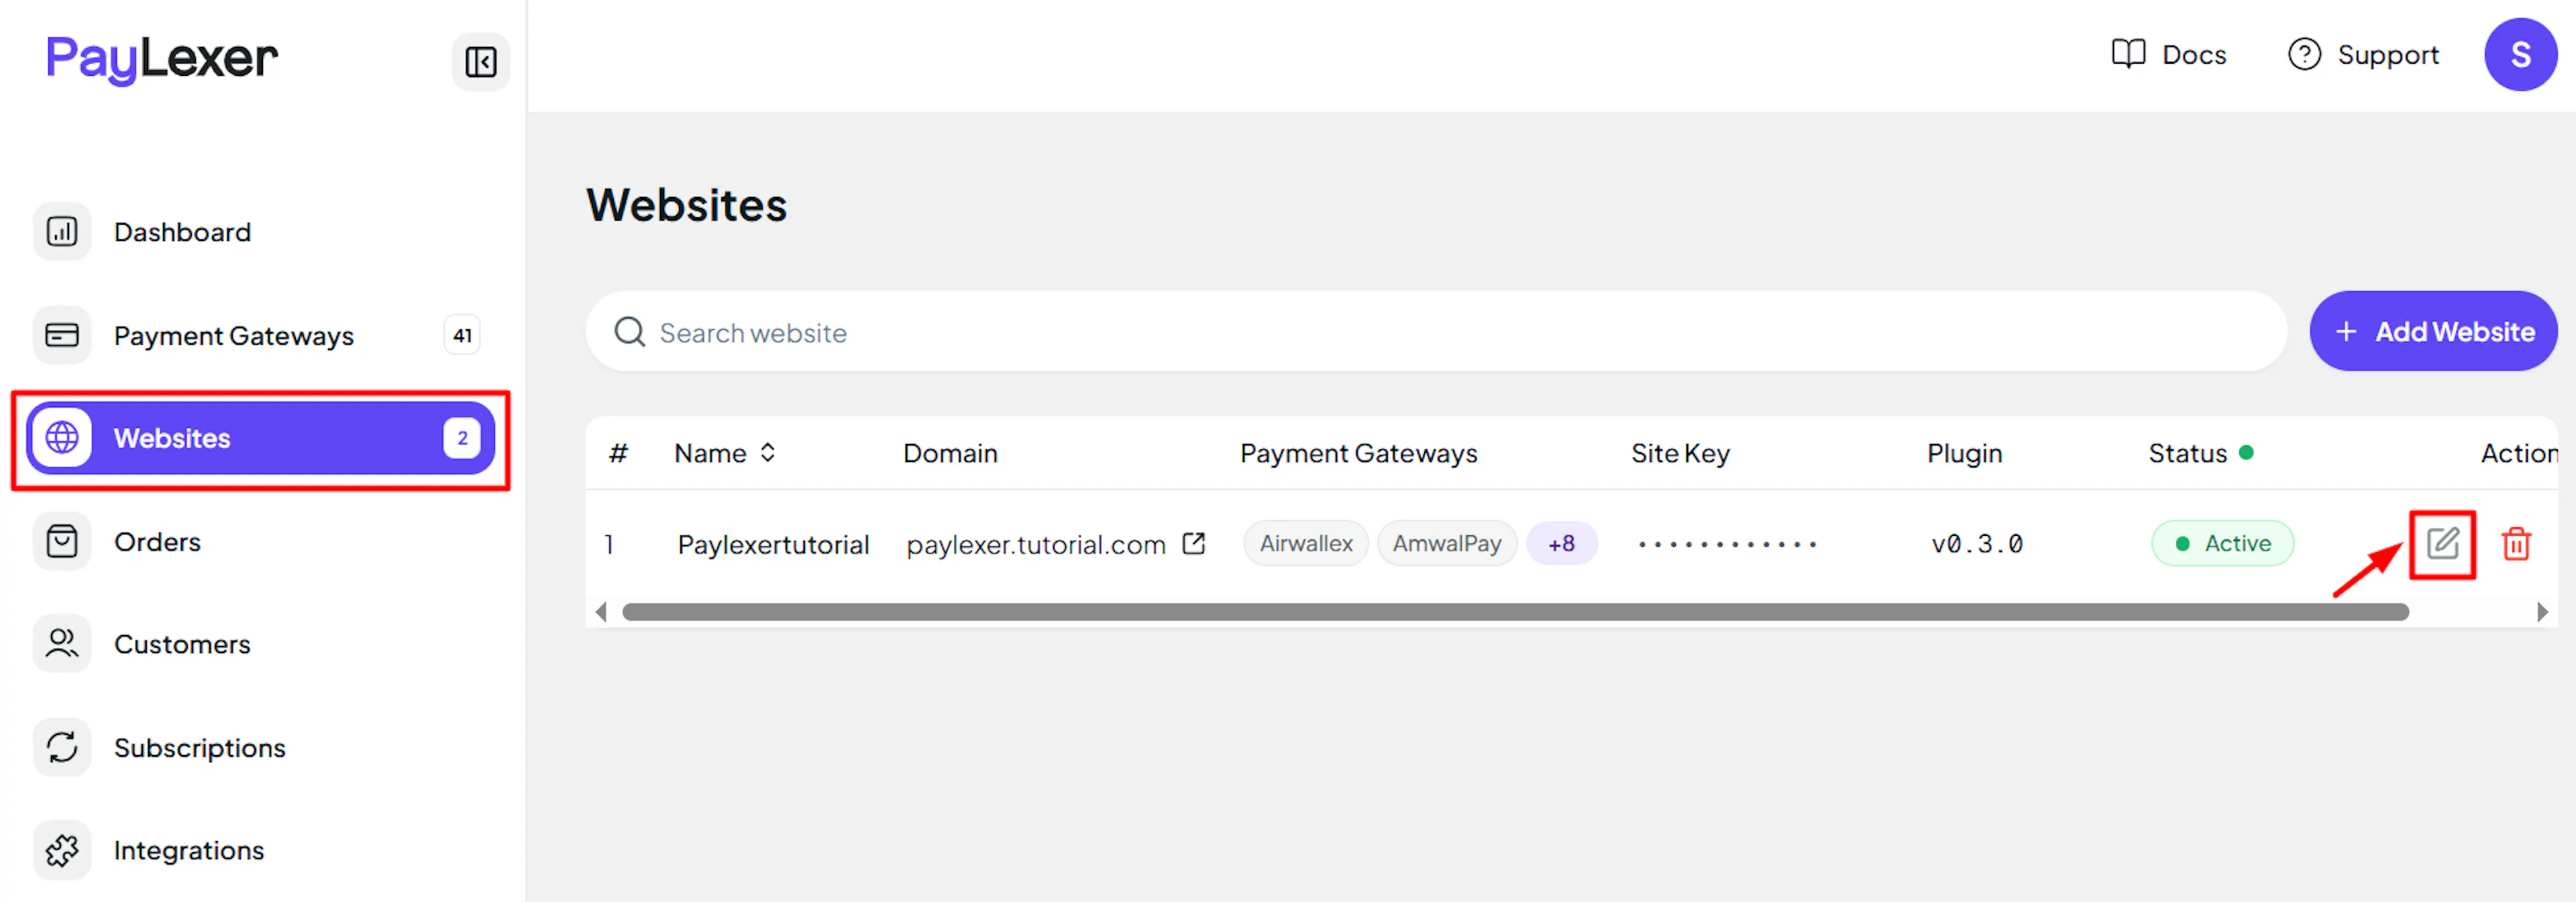
Go to Websites
Navigate to Websites in your PayLexer dashboard.
Edit your website
Click the Edit Icon of your added website.
Enable LemonSqueezy
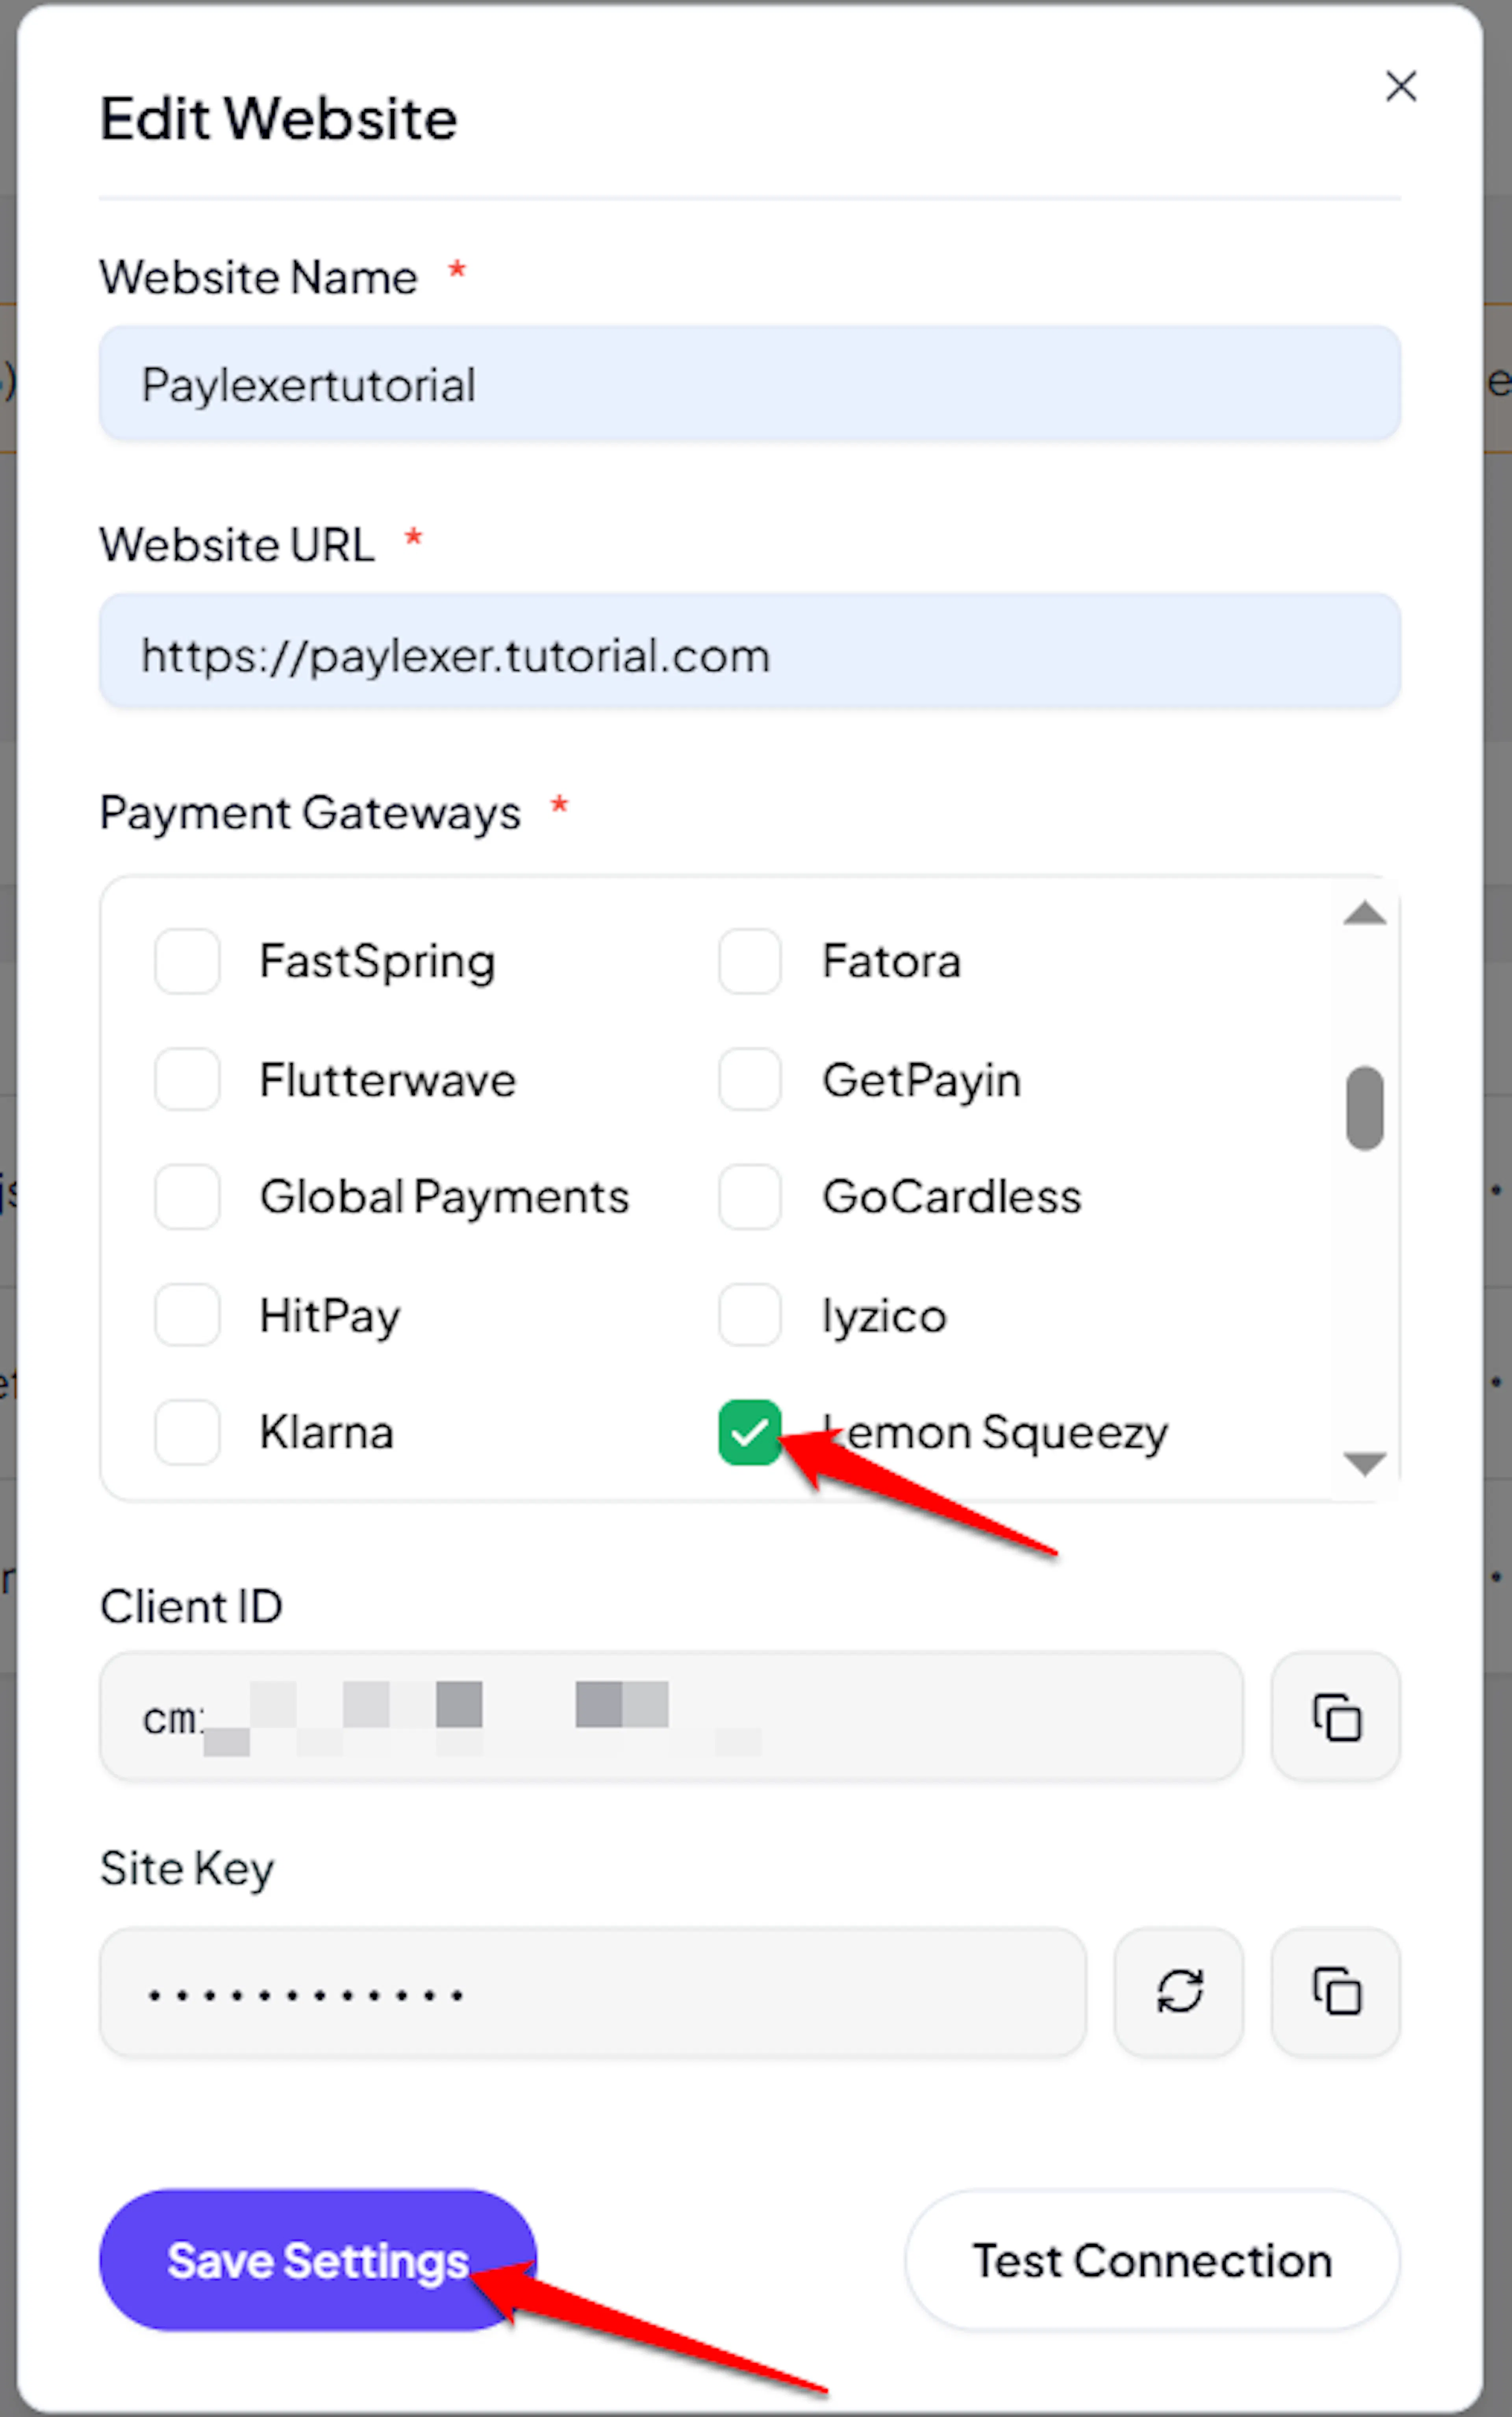
Click the checkbox to enable LemonSqueezy for the website.
If you haven't added a website yet, Continue to Add Your Website →
Troubleshooting
Best Practices
- Test in sandbox before enabling production, using LemonSqueezy's completely separate Test Mode environment
- Keep the API Key and Signing Secret confidential, and never place either in client-side code
- Make sure the currency you configure in PayLexer matches the currency your LemonSqueezy store displays checkout prices in, since every checkout is priced in that store's own currency regardless of what PayLexer requests
- Remember that LemonSqueezy settles every transaction in US dollars regardless of the display currency, so your actual payout amount will vary slightly with exchange rates even for orders of the exact same displayed price
- Enable Tax-inclusive pricing in Settings → General before going live, so a full refund through PayLexer always matches the full amount actually charged
- Reconcile PayLexer Dashboard → Orders against your LemonSqueezy dashboard regularly
FAQs
Still Have Questions?
- LemonSqueezy Support: LemonSqueezy Help Center
- PayLexer Support: Contact Support