

BlueSnap
Connect BlueSnap to PayLexer to accept cards, Apple Pay, Google Pay, PayPal, ACH, SEPA Direct Debit, and subscriptions through BlueSnap's hosted checkout, confirmed by signed webhooks.
BlueSnap is a global payment platform headquartered in Waltham, Massachusetts, offering card acquiring, digital wallets, and bank debits through a single account that reaches 200+ regions. It can act as merchant of record in many markets, so you can sell across borders without opening a local acquiring relationship in each country. PayLexer connects to BlueSnap Checkout, BlueSnap's hosted payment page, which opens within your site's checkout. Card details go directly to BlueSnap and never touch your server.
- Supported Regions (Merchant Accounts): 200+ regions across North America, Europe, LATAM, and APAC - view full list
- Supported Currencies: AED, AUD, BRL, CAD, CHF, CZK, DKK, EUR, GBP, HKD, HUF, ILS, INR, JPY, MXN, NOK, NZD, PLN, SEK, SGD, USD, ZAR - view full list
Supported Features
- Hosted BlueSnap Checkout page that opens inside your own checkout window
- Card payments, Apple Pay, Google Pay, PayPal, ACH, and SEPA Direct Debit
- The charged amount travels inside a signed token, so it cannot be altered from the page
- Signed webhook confirmation, so an order is only marked paid once BlueSnap confirms the money moved
- Full and partial refunds, issued either from your store's order screen or in the BlueSnap portal - the order updates either way
- Billing details you already collected are passed through, so shoppers are not asked twice
- Subscriptions, including free trials and sign-up fees, billed by BlueSnap on a daily, weekly, monthly, quarterly, or annual cycle
Subscriptions use BlueSnap's own billing engine, so BlueSnap runs each renewal, retries failed payments, and keeps expired cards up to date. A subscription is only treated as active once BlueSnap confirms the first payment, never when the shopper returns from the payment page.
Before You Start
Make sure you have:
- BlueSnap Account – Don't have one? Sign up for BlueSnap →
- PayLexer Account – Required to configure the integration. Create your account →
- A website where you want to integrate
Looking for a different payment processor? View all supported gateways →
Configuring BlueSnap
You need an API Username, API Password, and Merchant ID from BlueSnap for this integration. A Store ID is optional and only required on accounts that use one.
Enabling BlueSnap Checkout
BlueSnap Checkout is a separate product setting on your account. Until it is switched on, BlueSnap issues no checkout token and no payment can start, so do this before anything else.
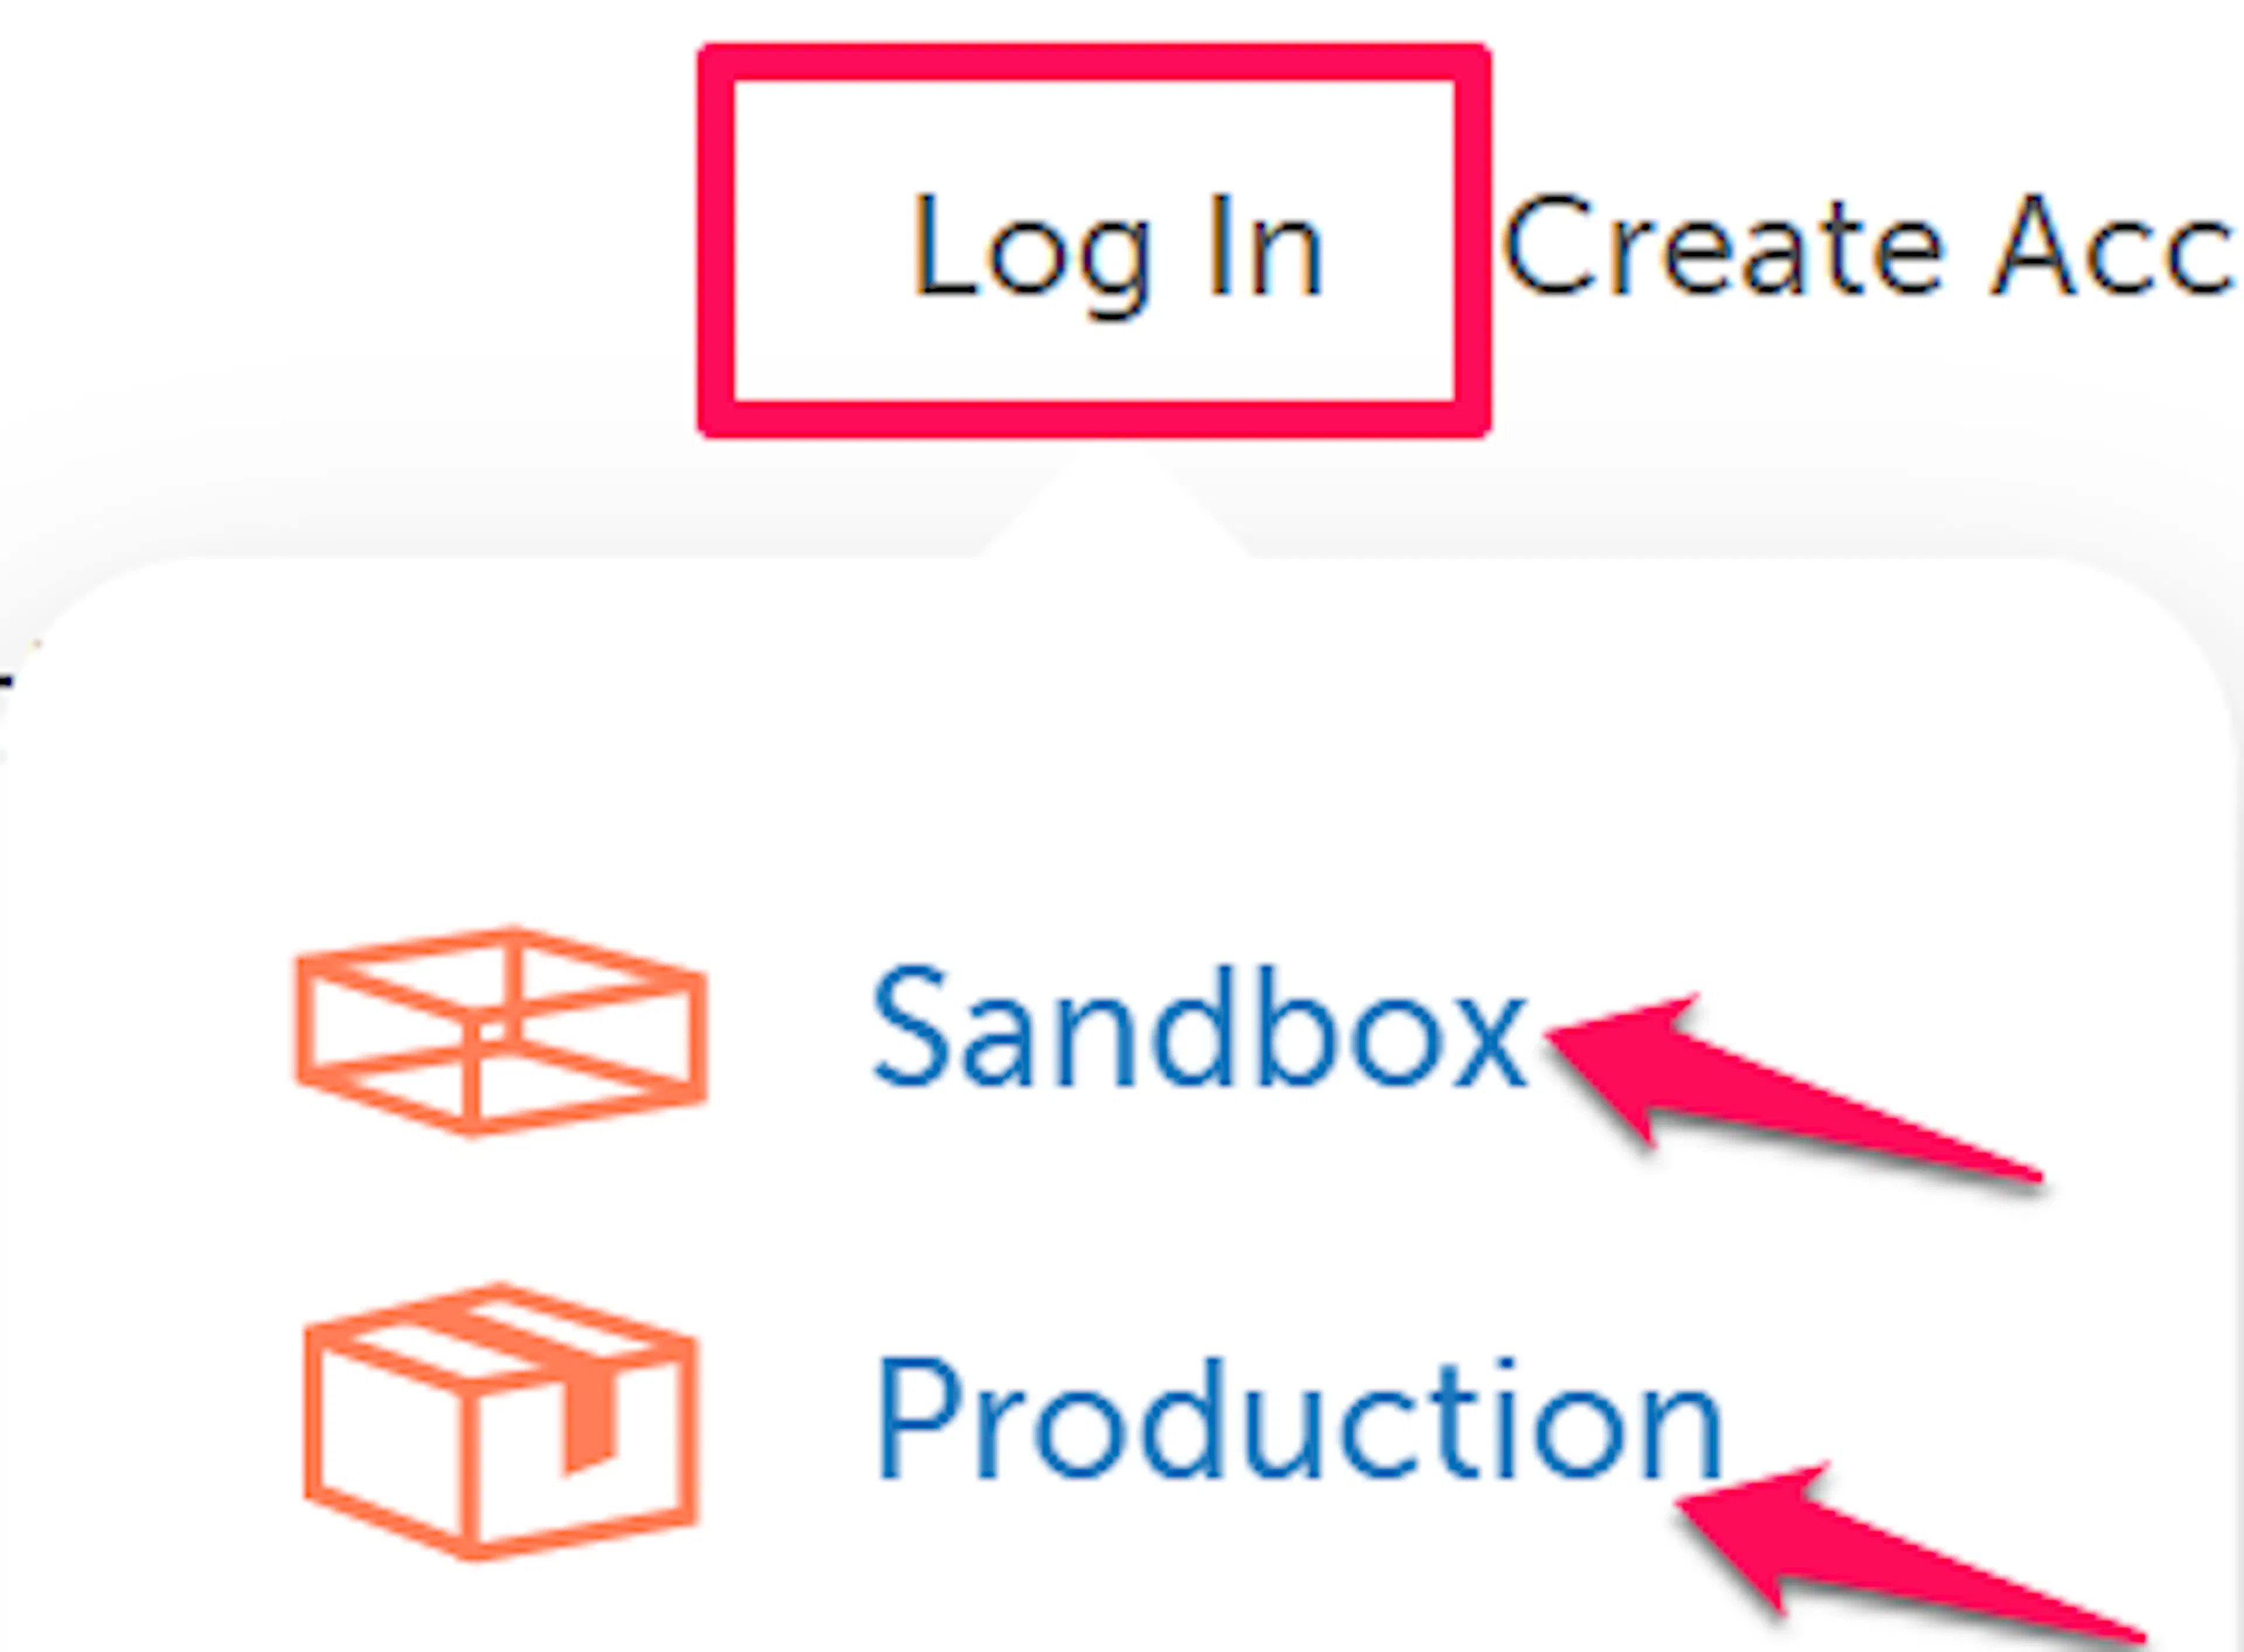
Open the BlueSnap Merchant Portal
Log in to your BlueSnap Merchant Portal. Use the sandbox portal for test credentials and the production portal for live credentials.
Turn on BlueSnap Checkout
Go to Checkout Settings and make sure BlueSnap Checkout is enabled for the account.
While you are here you can set the colours of the payment page and choose which fields it collects, such as email, full billing address, and saved cards. These are BlueSnap settings, not PayLexer settings.
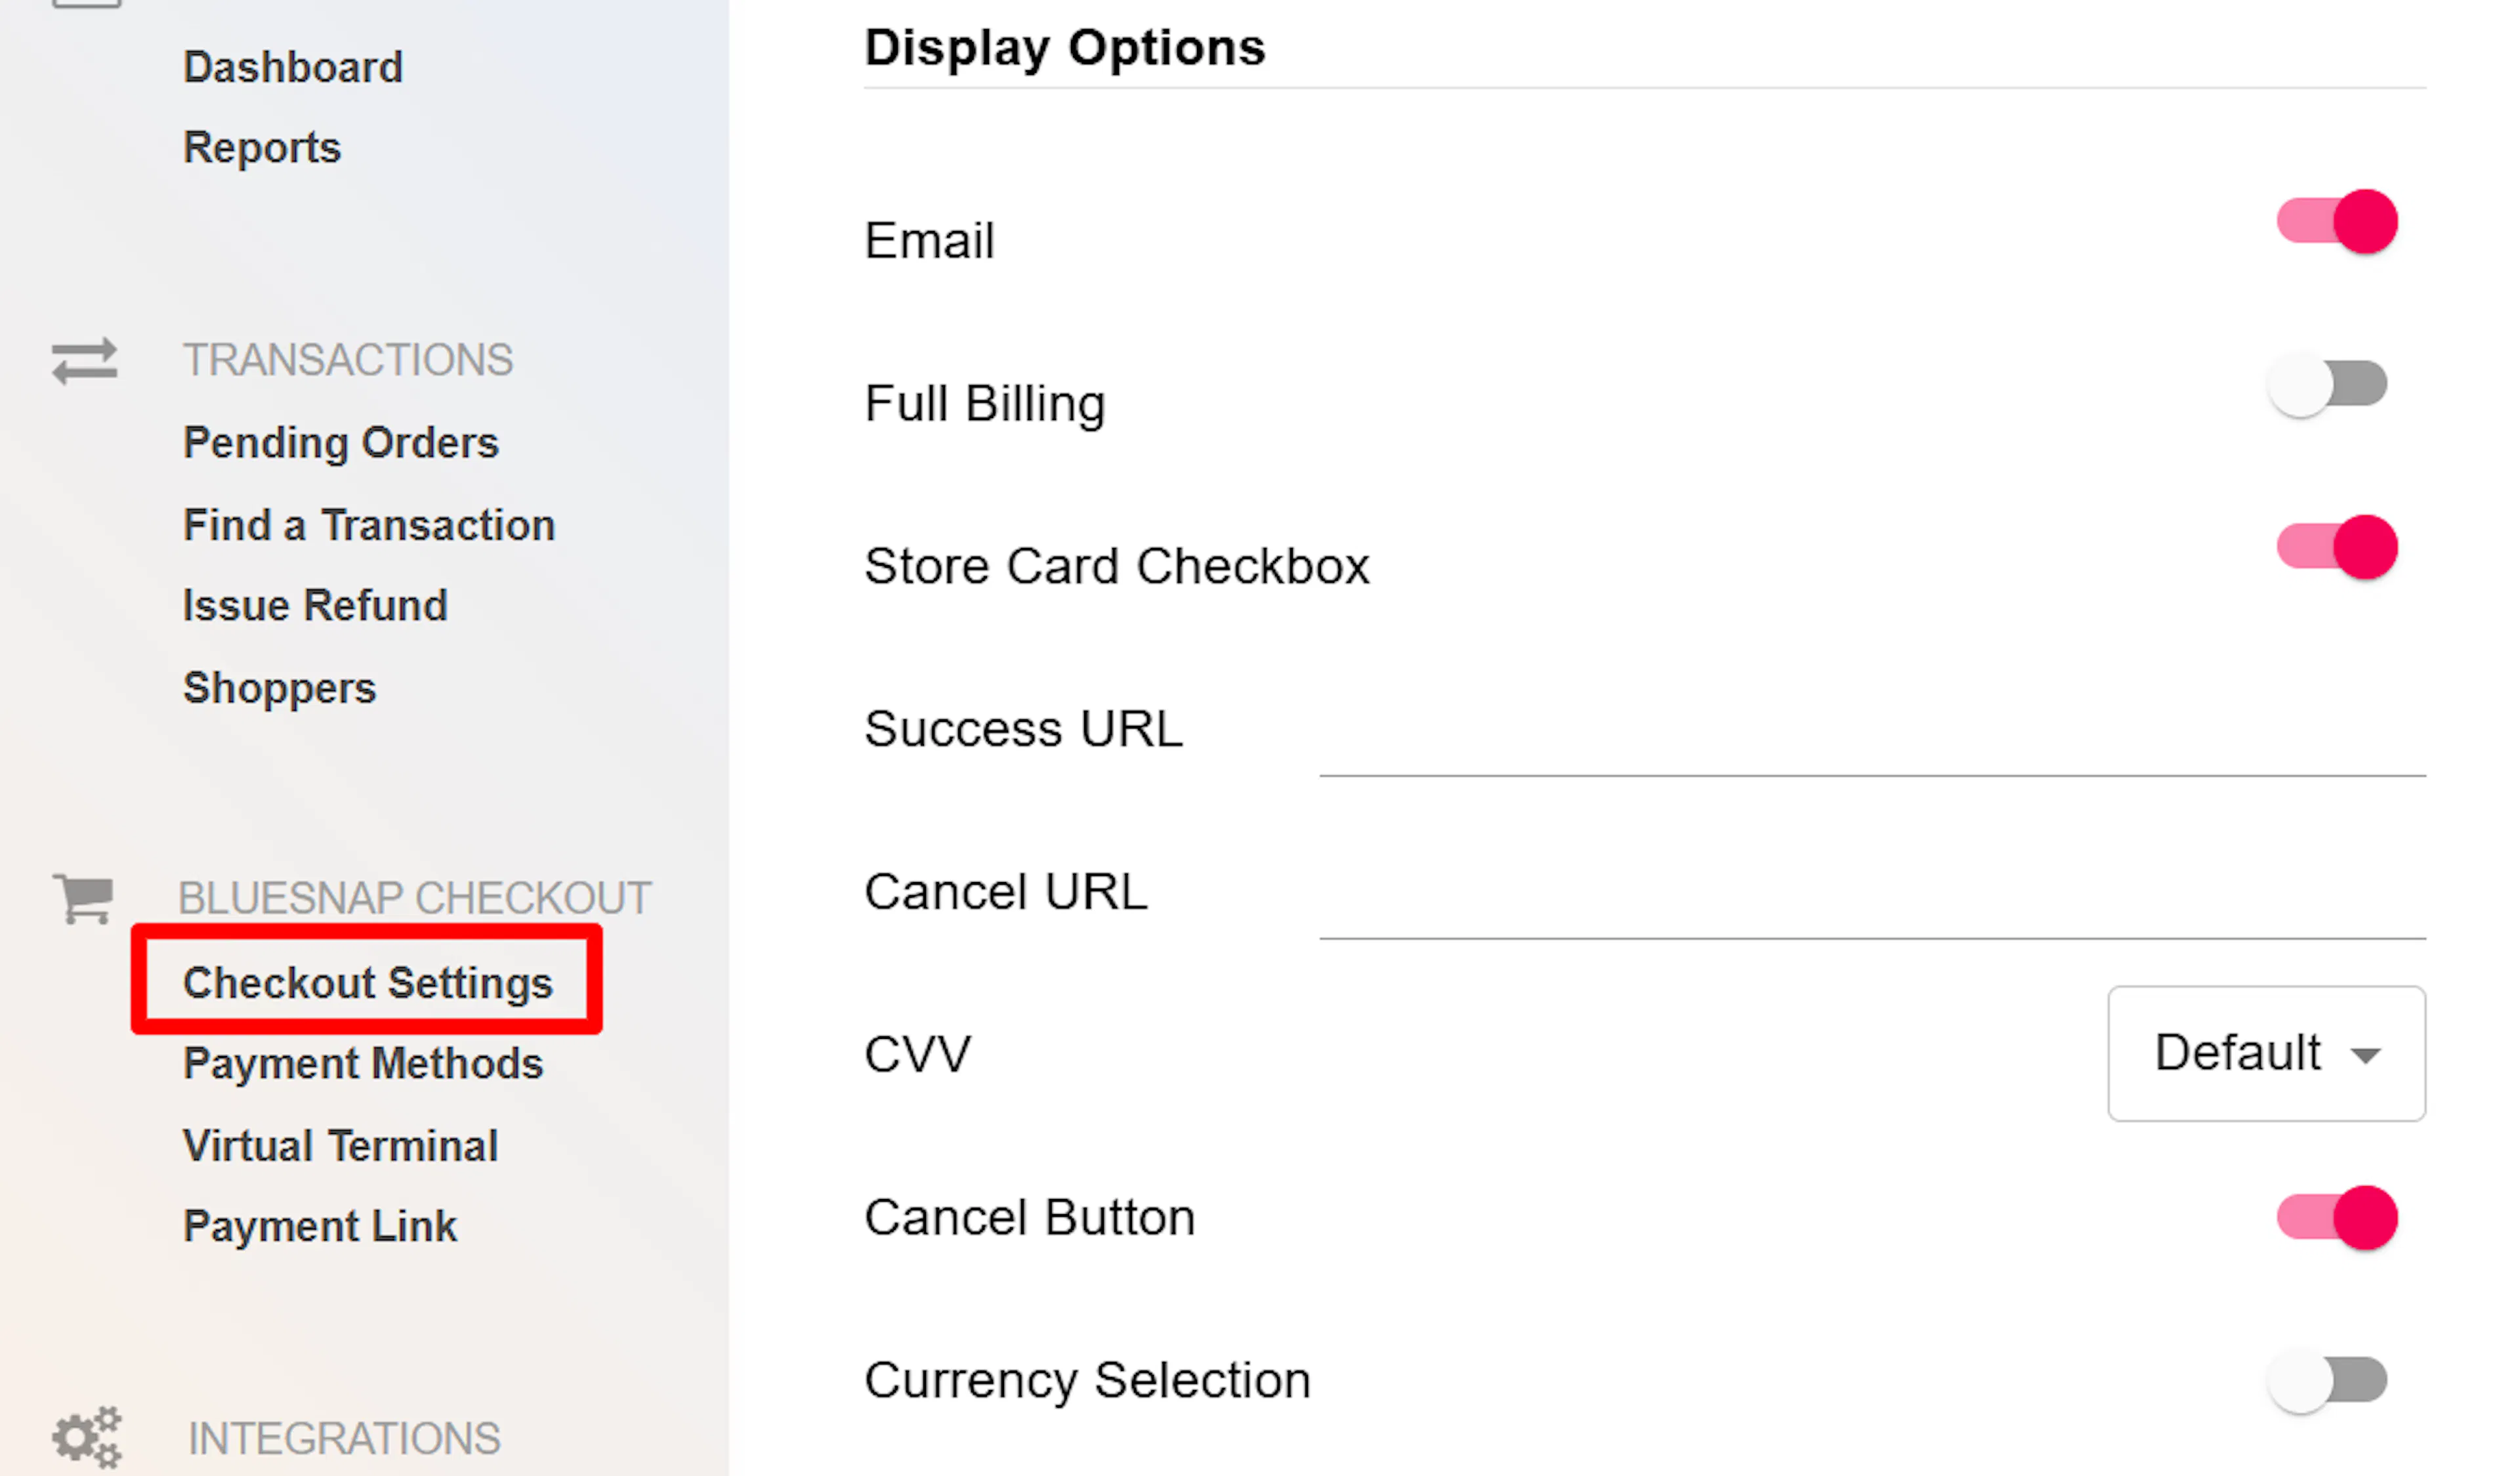
If BlueSnap Checkout is disabled, PayLexer's Test Connection shows “BlueSnap Checkout not enabled” instead of a credential error. Your credentials are valid but the account just cannot generate a checkout token yet.
Getting API Credentials
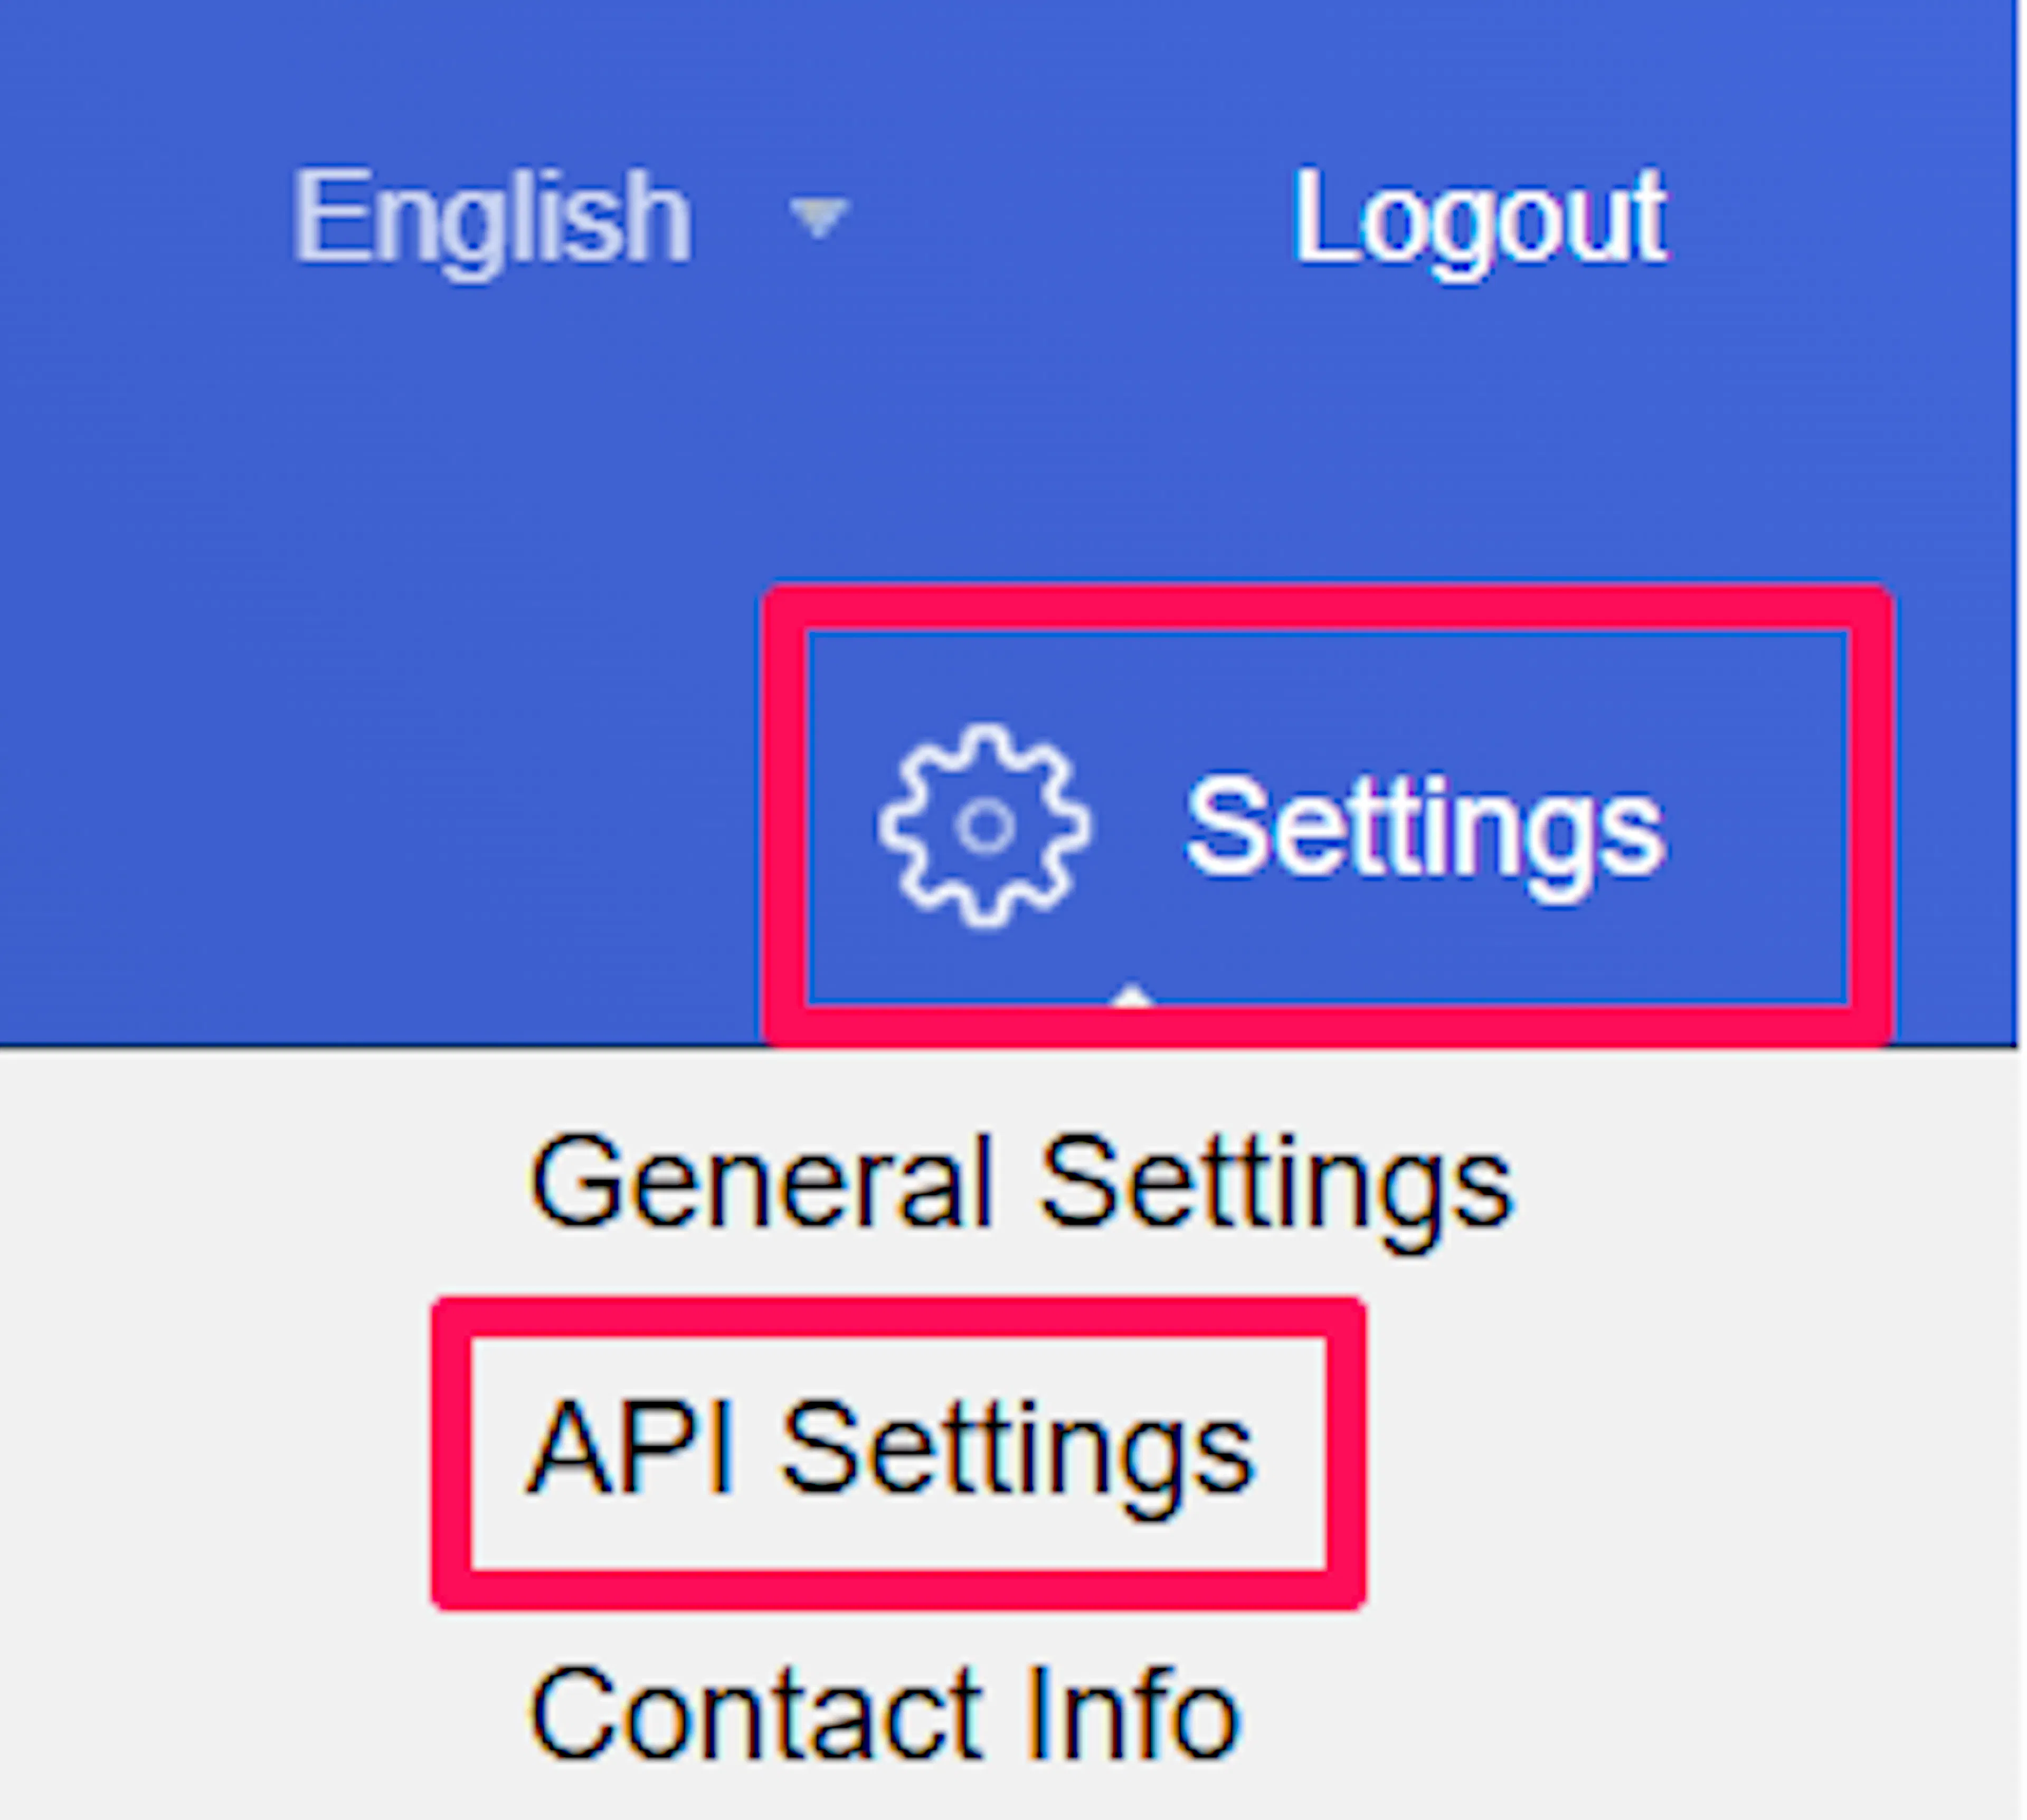
Open API Settings
In the BlueSnap Merchant Portal, go to Settings -> API Settings.
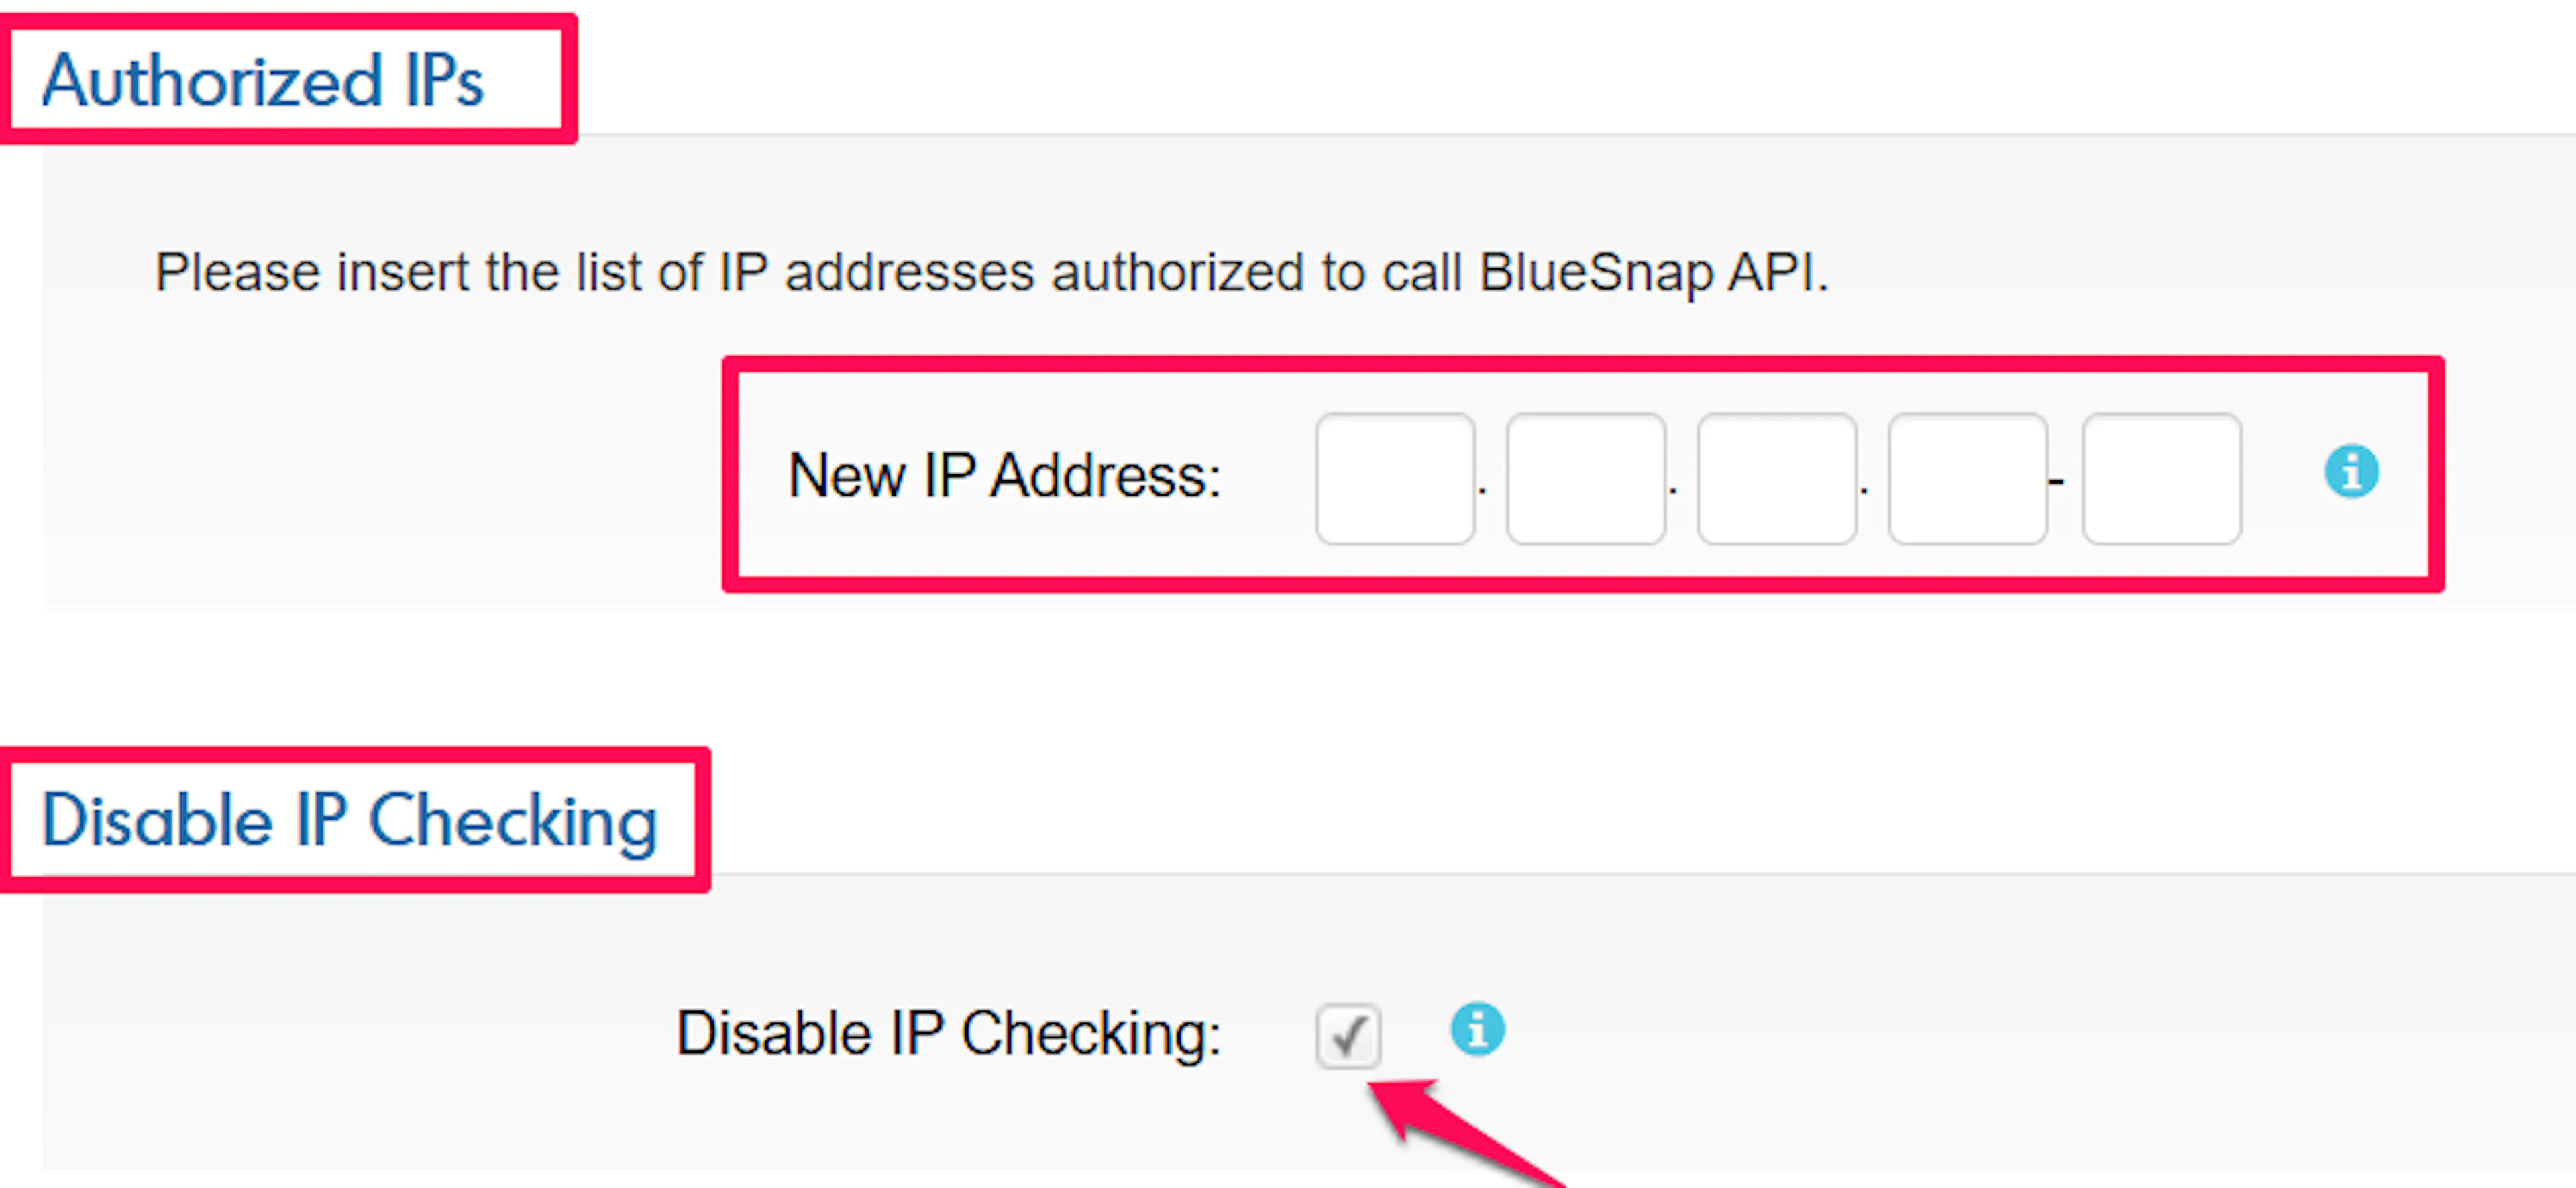
Tick Disable IP Checking
Tick Disable IP Checking, leave Authorized IPs empty, and save.
BlueSnap blocks API calls from unapproved IP addresses by default. Since PayLexer’s server IPs are not publicly listed, disable the IP check to allow PayLexer to connect. Your API credentials still authenticate each request, and the API user remains limited to your account.
Set your API Password
Set a Password of 12 to 128 characters containing upper case, lower case, a digit, and a special character. It must not look like an email address.
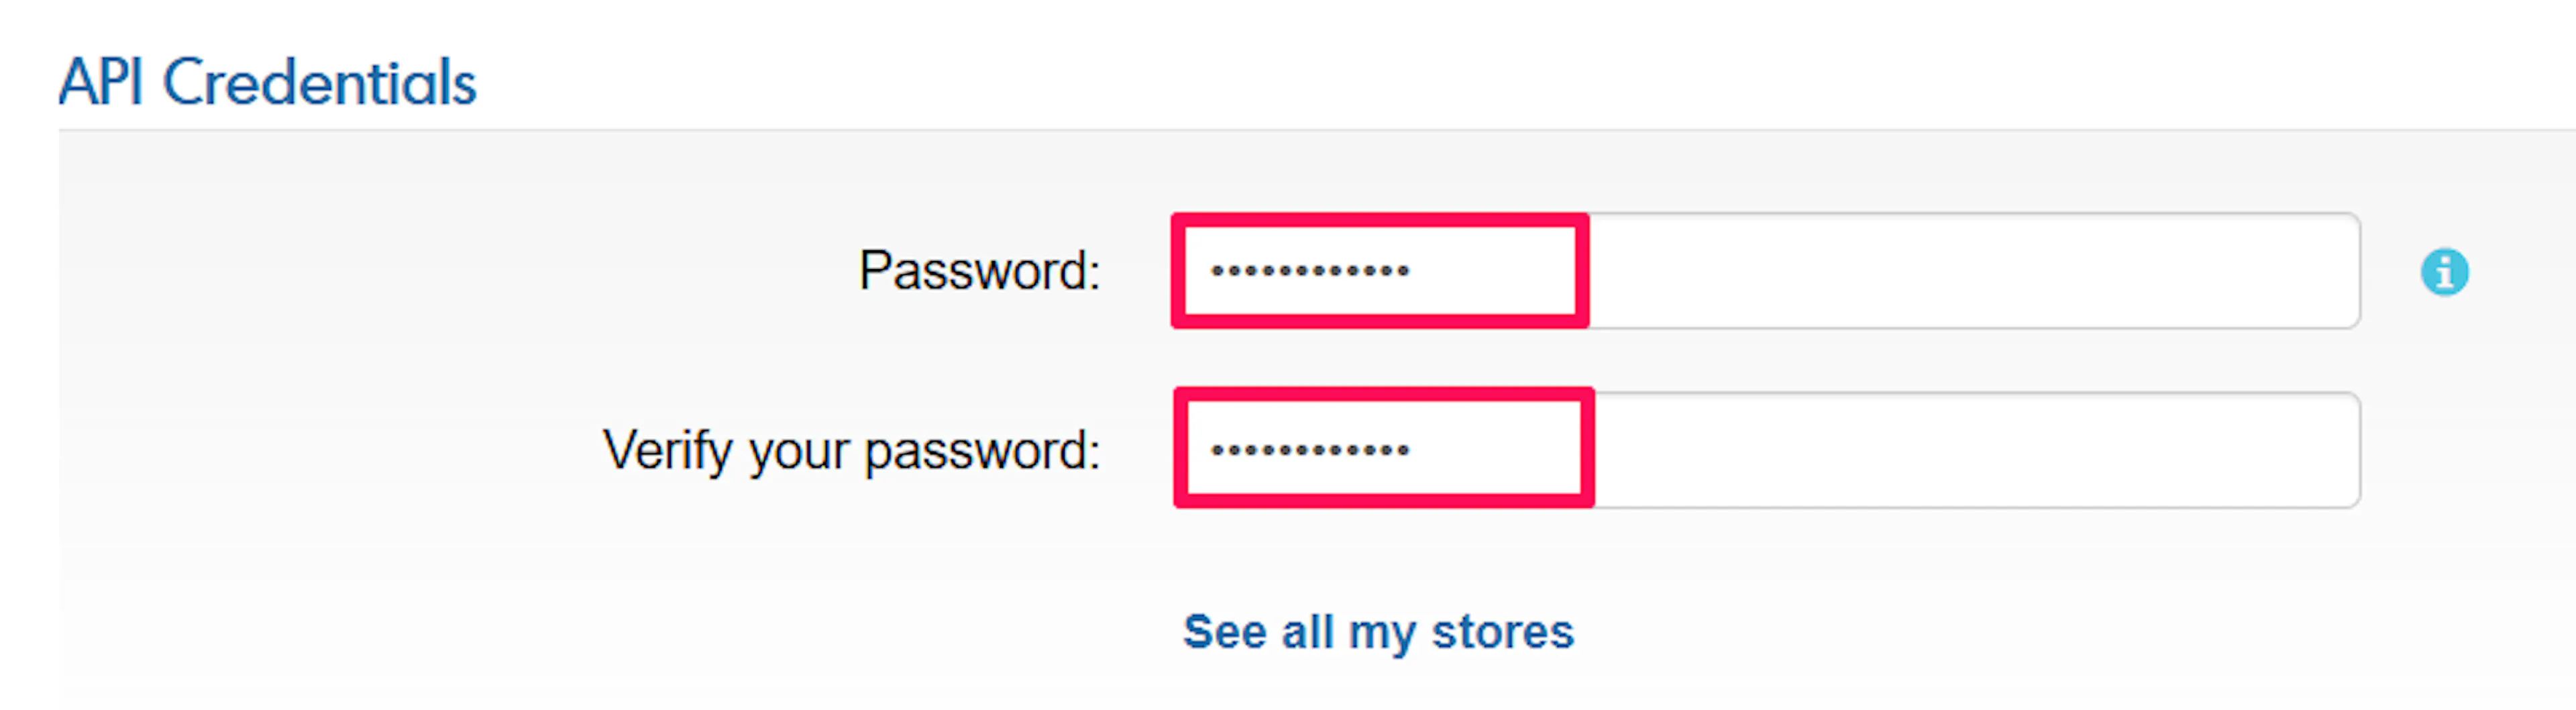
Save this password somewhere safe as soon as you set it. BlueSnap never shows it again.
Request your API credentials
Click Request API credentials. The API User Key that appears is your API Username in PayLexer. Copy it along with your Merchant ID, and your Store ID if your account uses one.
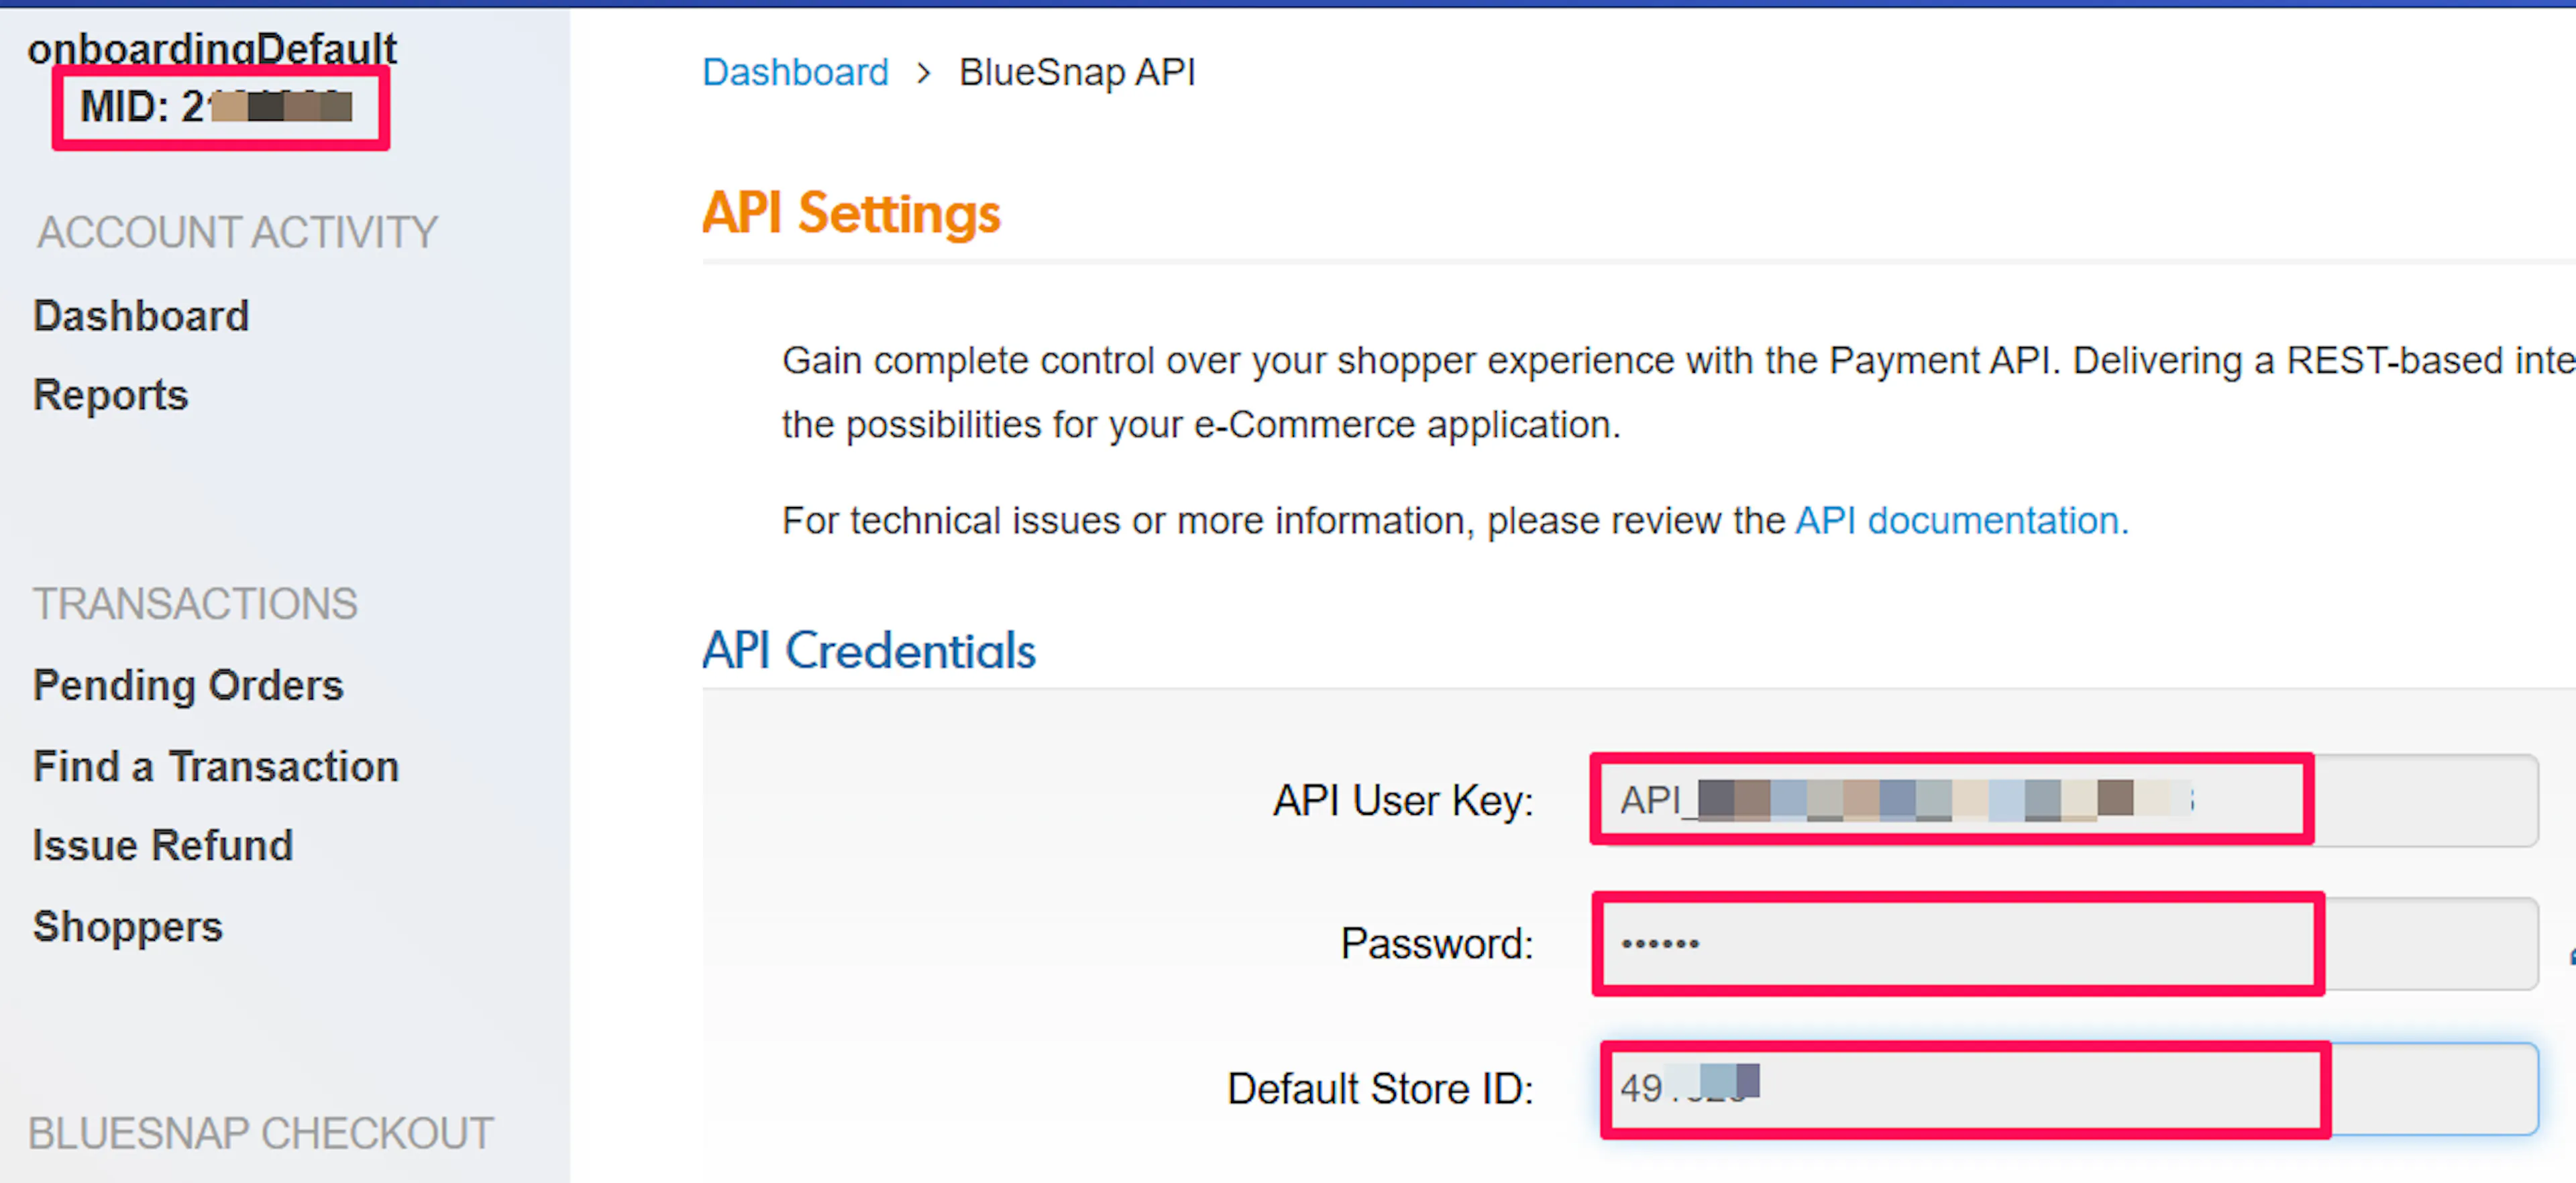
Do not click Request API credentials again later. Re-requesting can rotate the API User Key and invalidate the credentials already saved in PayLexer.
Adding Credentials to PayLexer
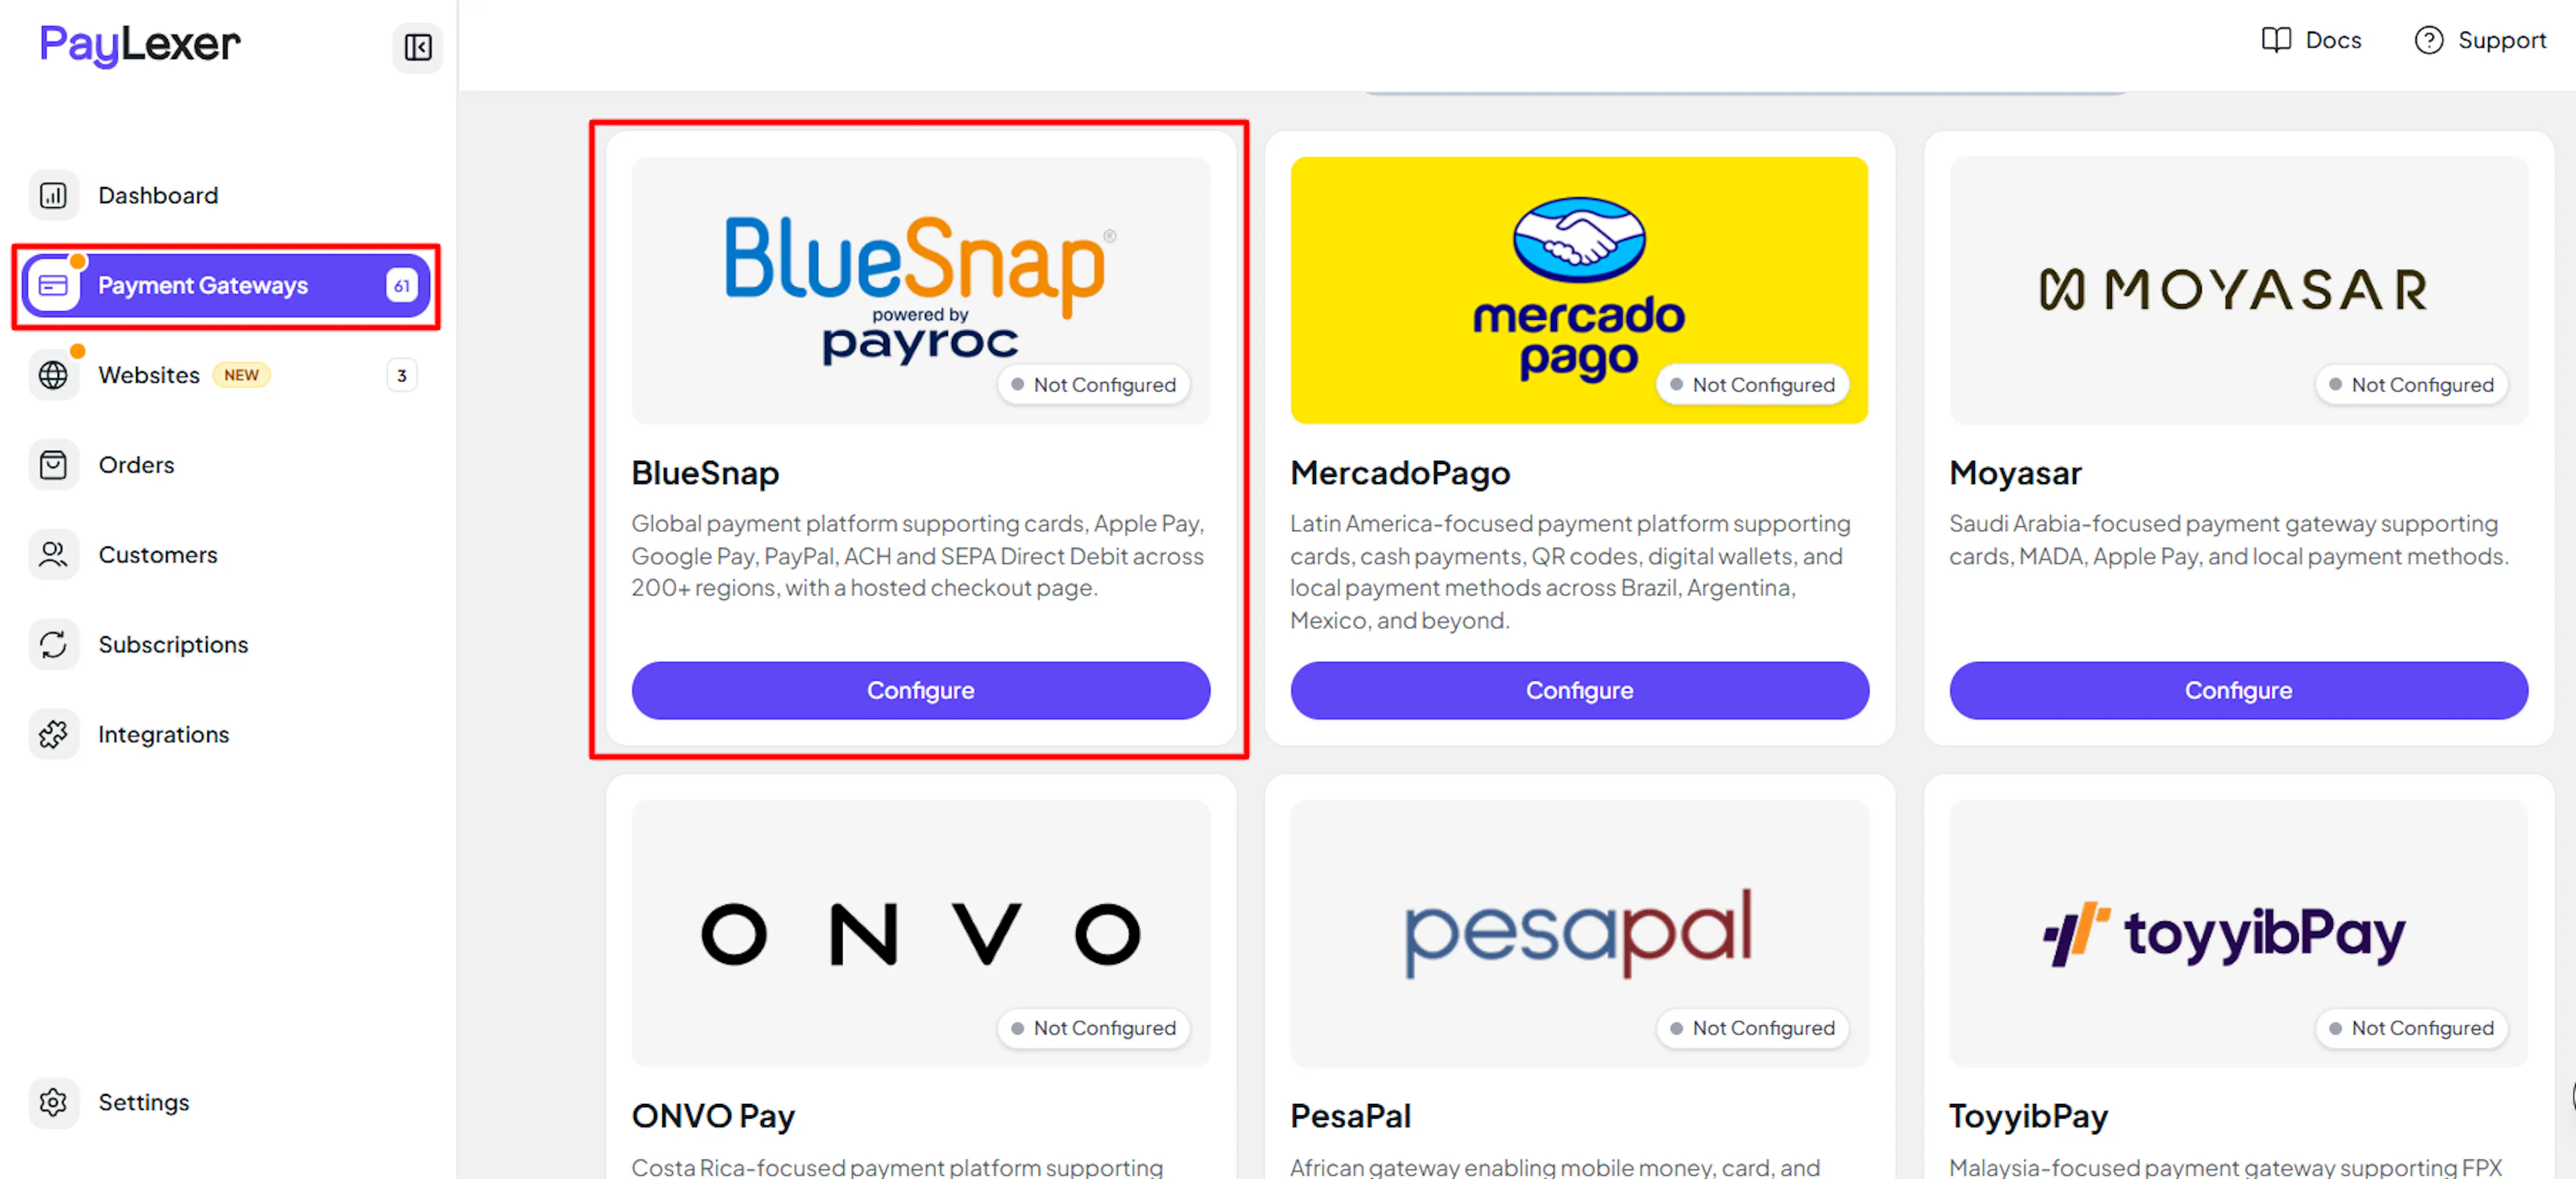
Open PayLexer Dashboard
Log in to your PayLexer dashboard and navigate to Payment Gateways -> BlueSnap.
Enter your credentials
Paste the API Username, API Password, and Merchant ID you copied from BlueSnap. Add the Store ID only if your account uses one.
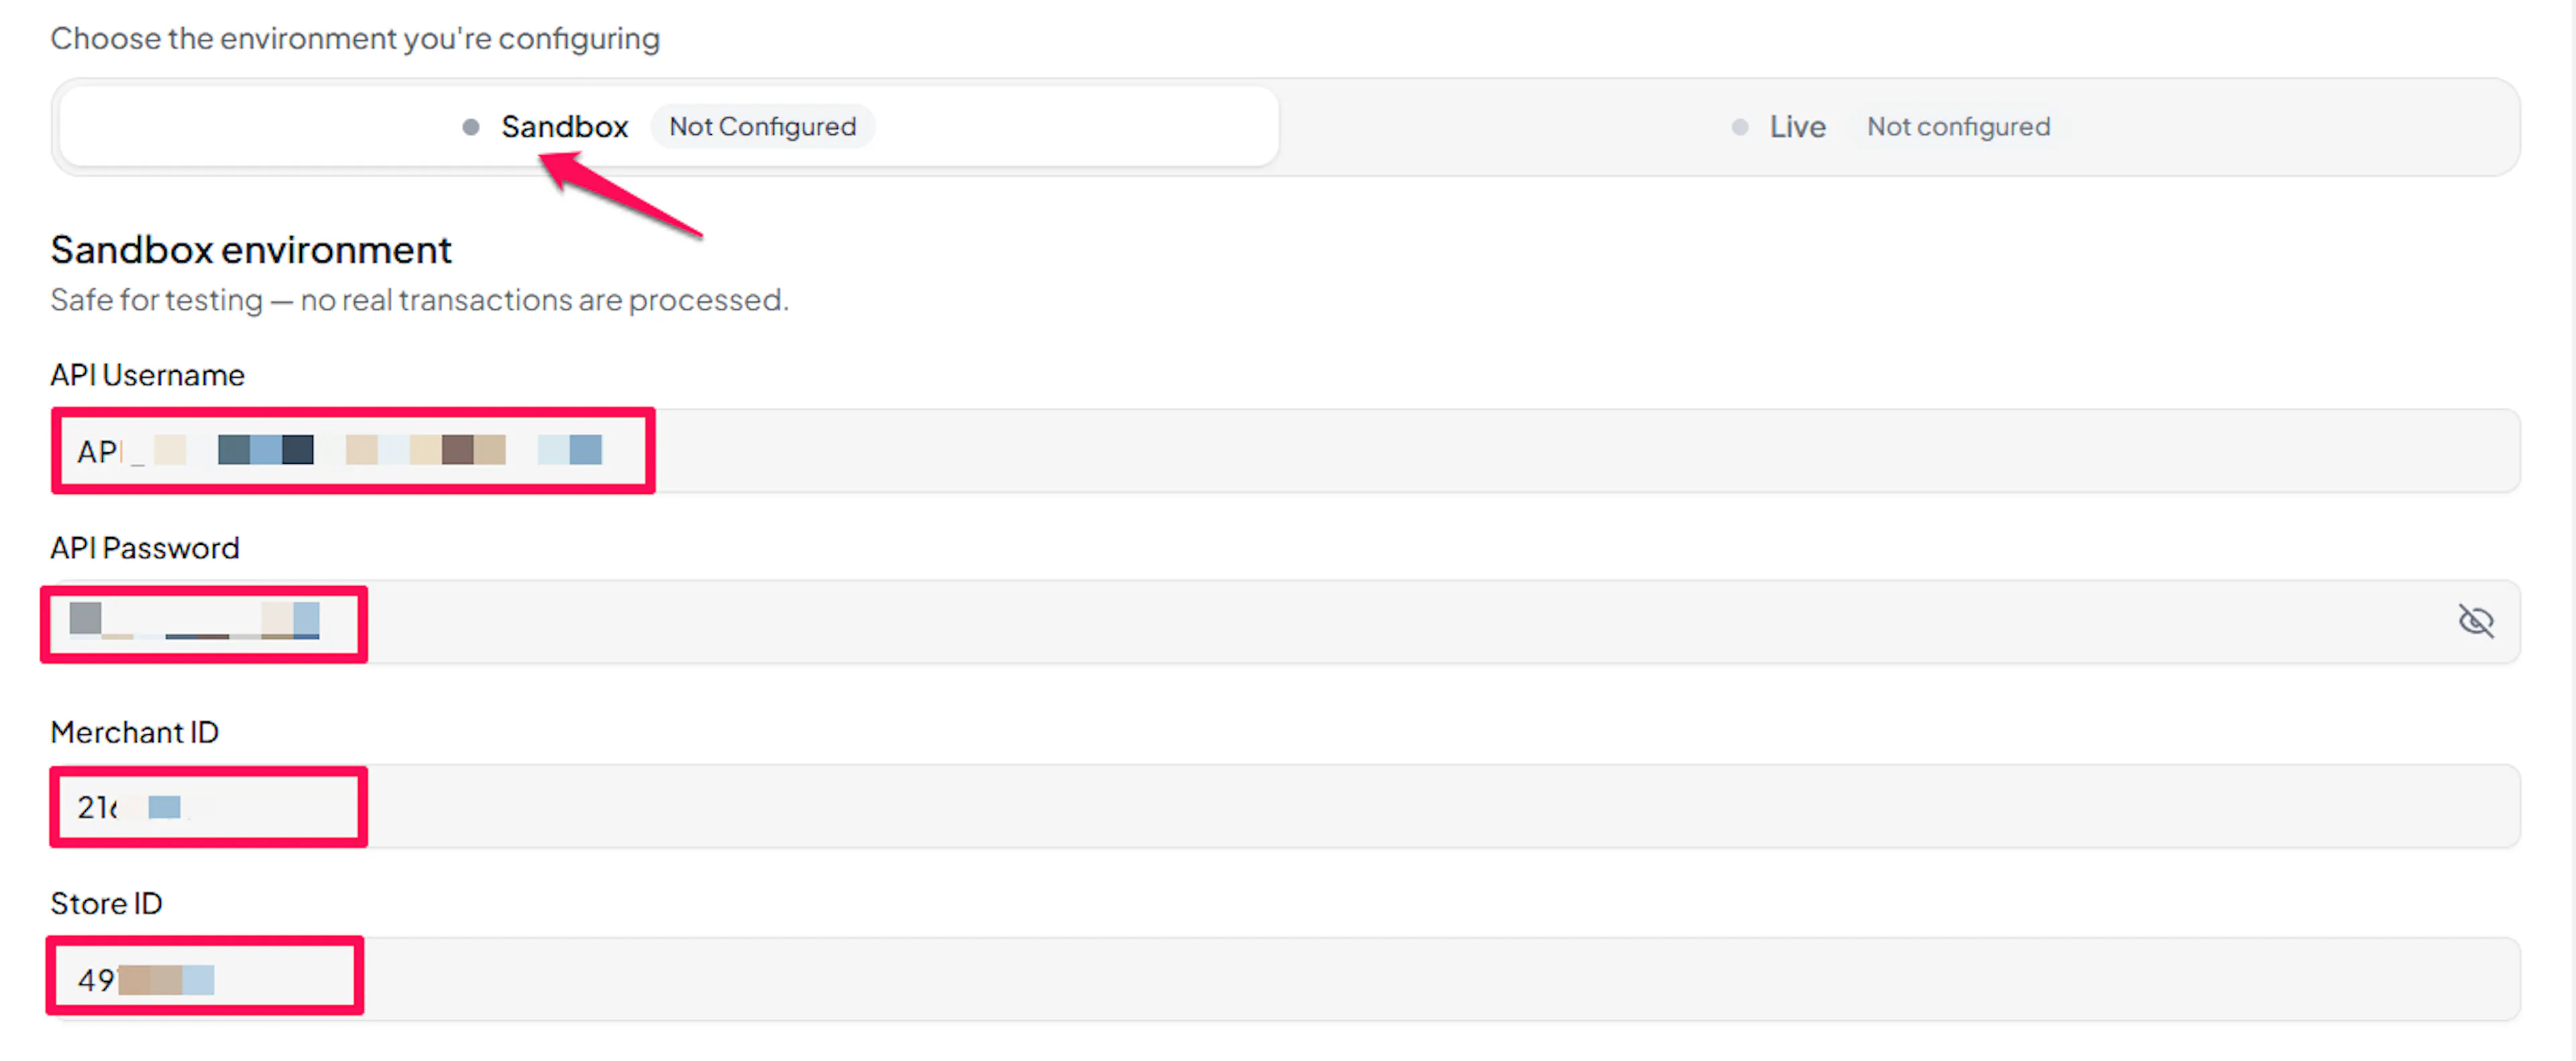
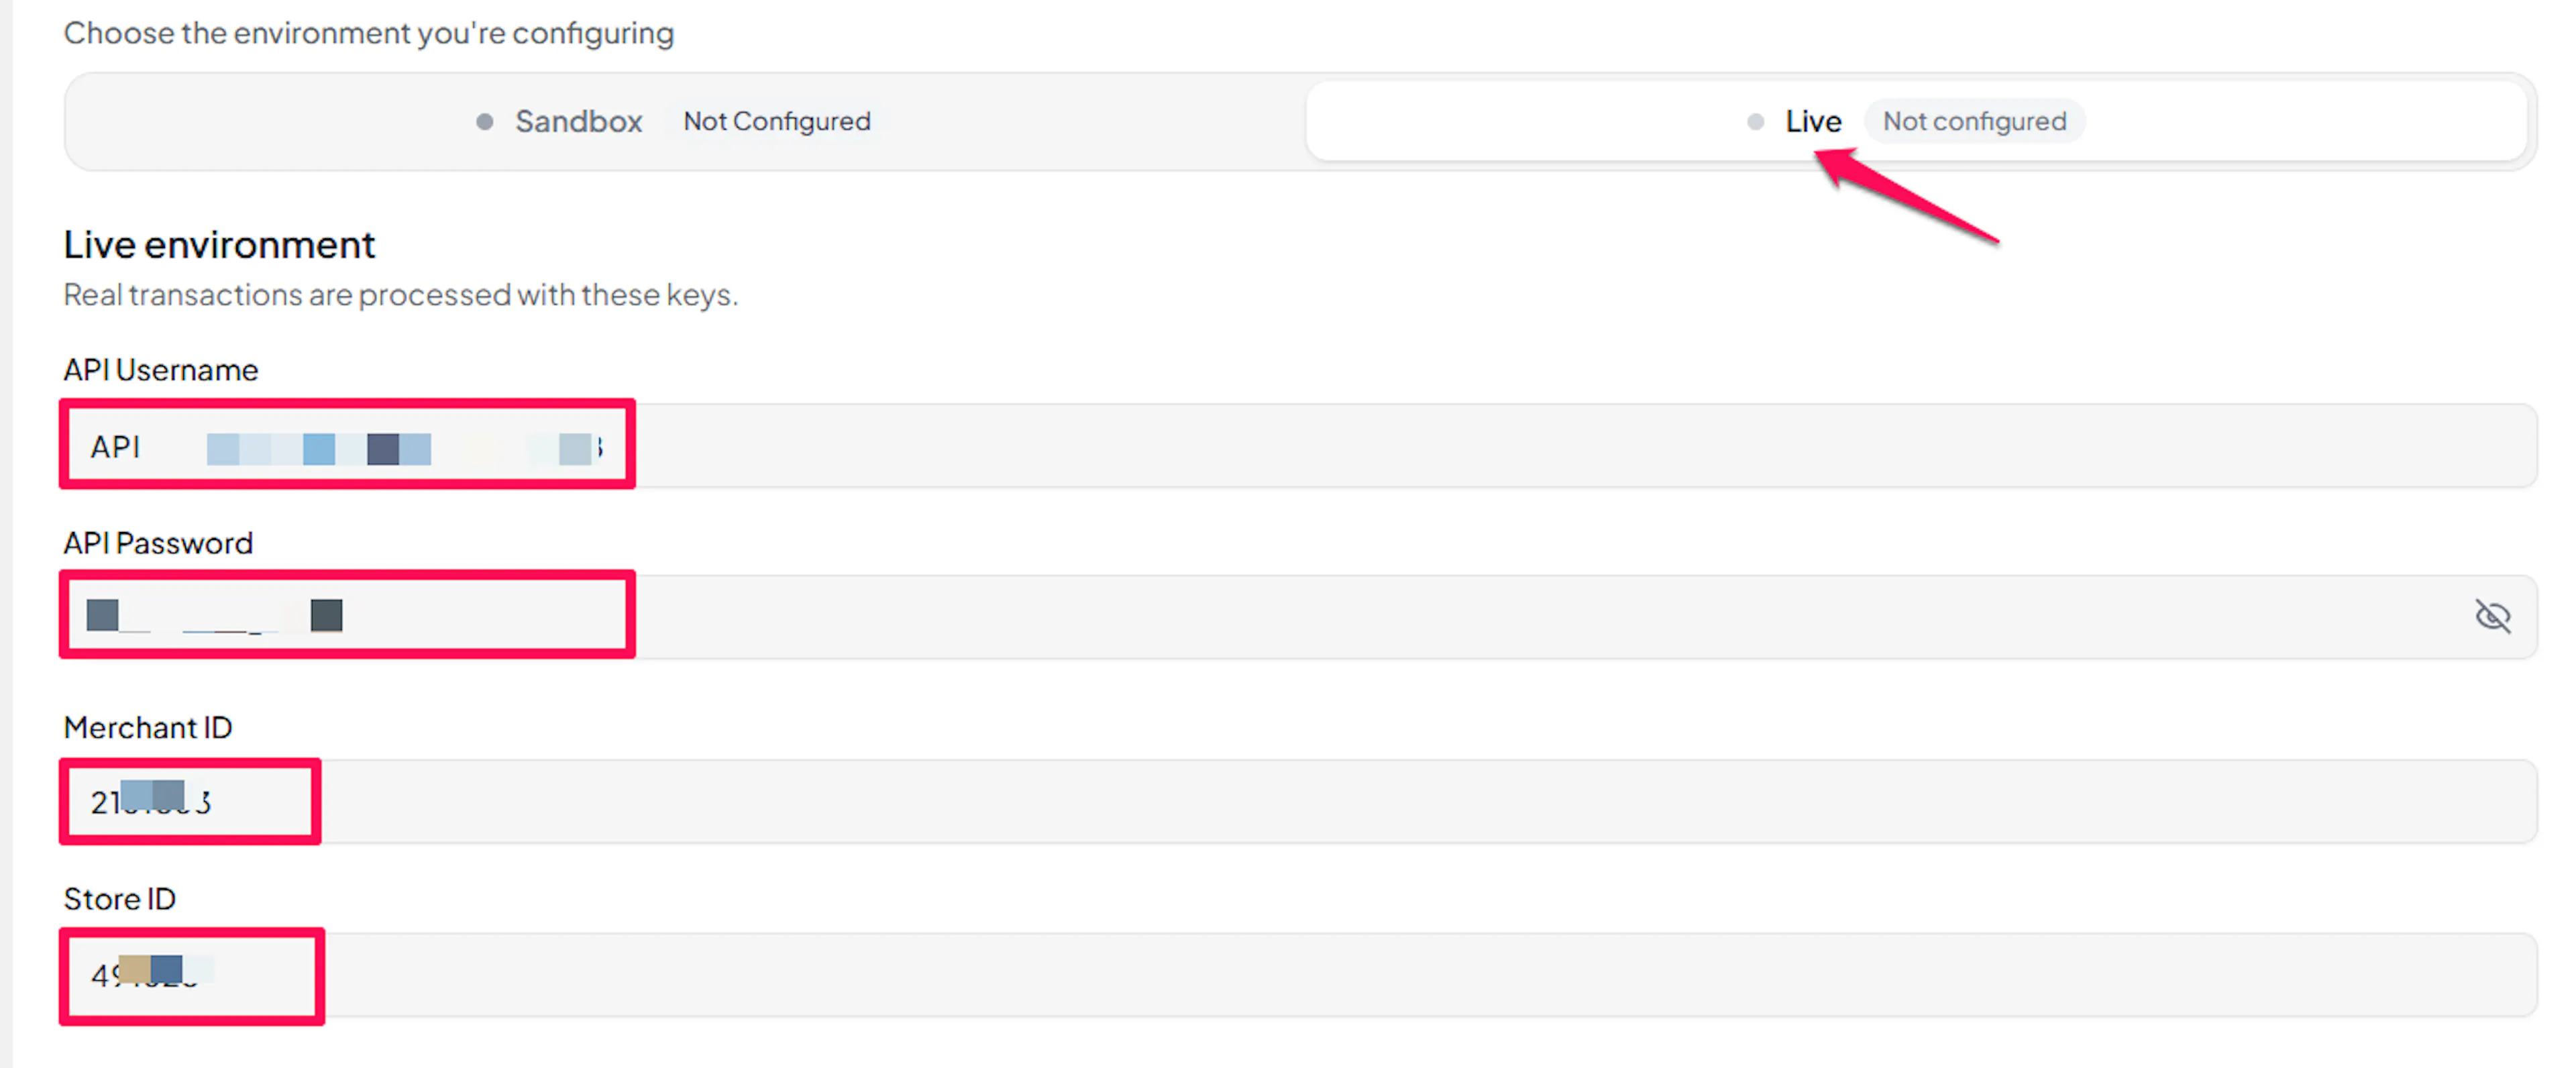
Understanding Live/Production and Sandbox Settings:
| Environment | Purpose |
|---|---|
| Live / Production (Mandatory) | Used for real transactions. Cannot be empty, even when testing. |
| Test / Sandbox (Optional) | Used for testing only. No real money is processed. |
How PayLexer selects credentials:
- Debug/Test mode ON → Test credentials are used
- Debug/Test mode OFF → Live credentials are used
Sandbox and live credentials belong to two separate BlueSnap systems and are never interchangeable. Mixing one of each always fails the connection test.
Test and save
Click Save to save your configuration and verify your credentials. Click Verify Connection to test the connection.
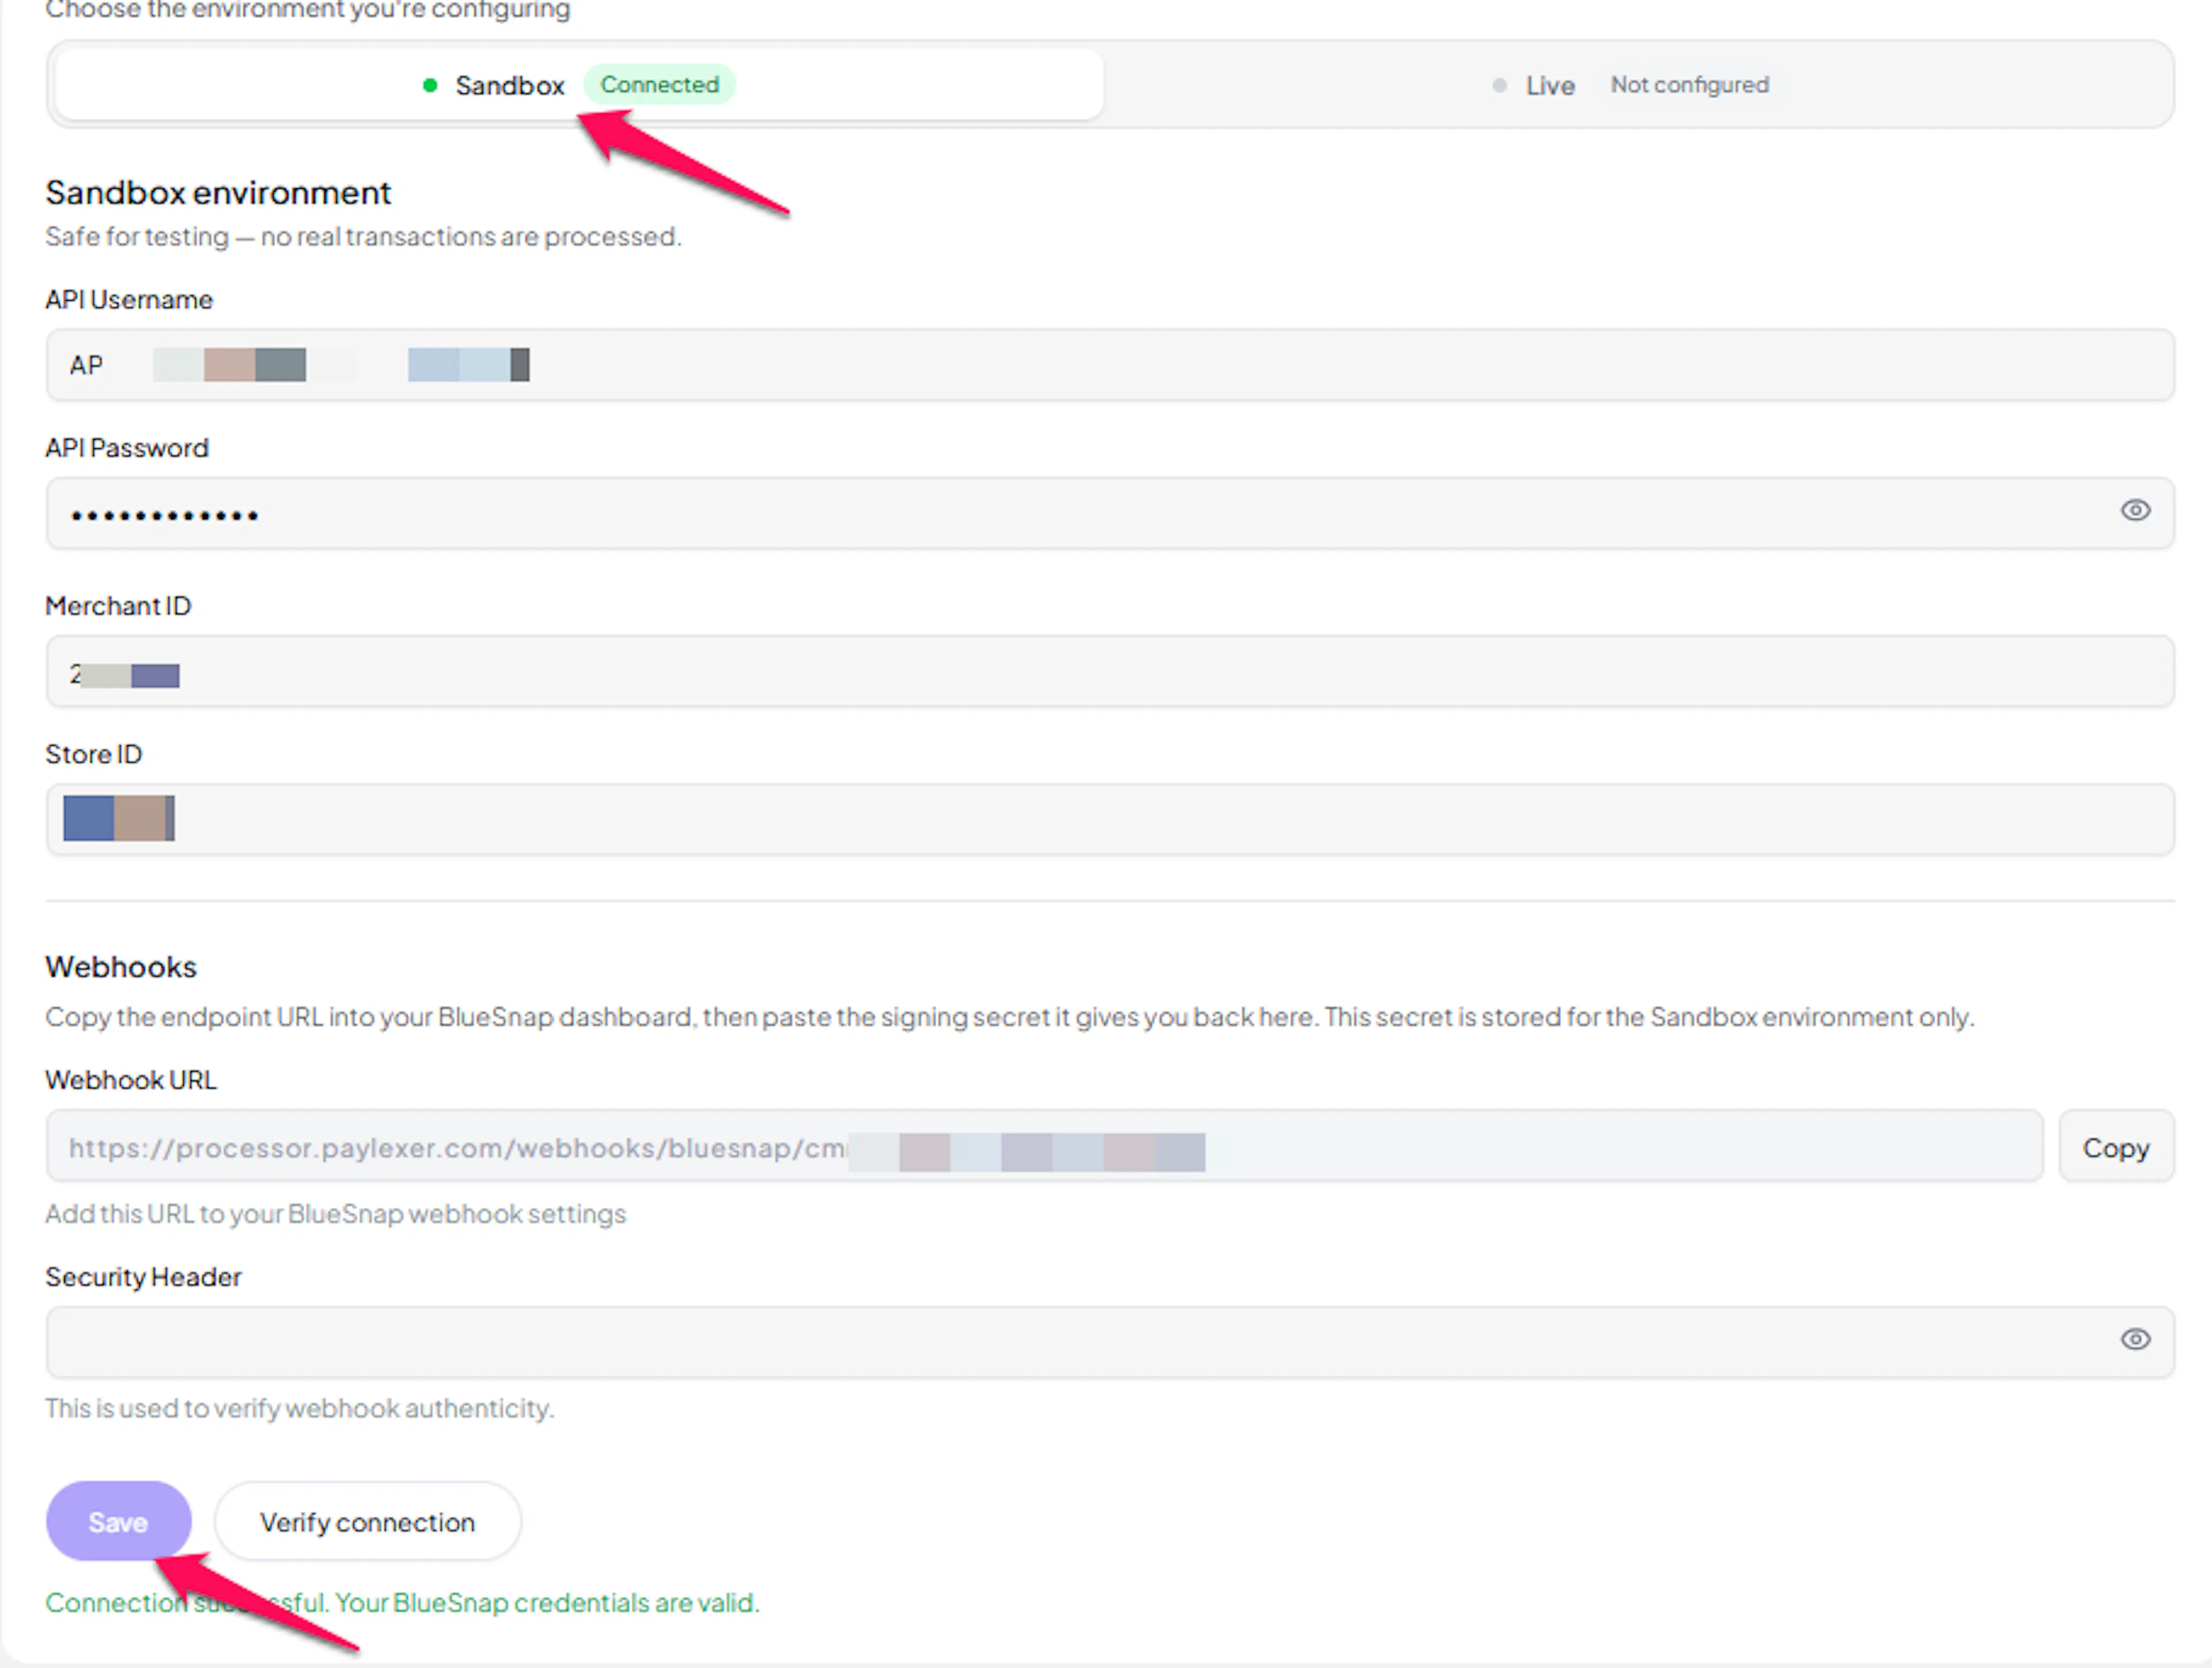
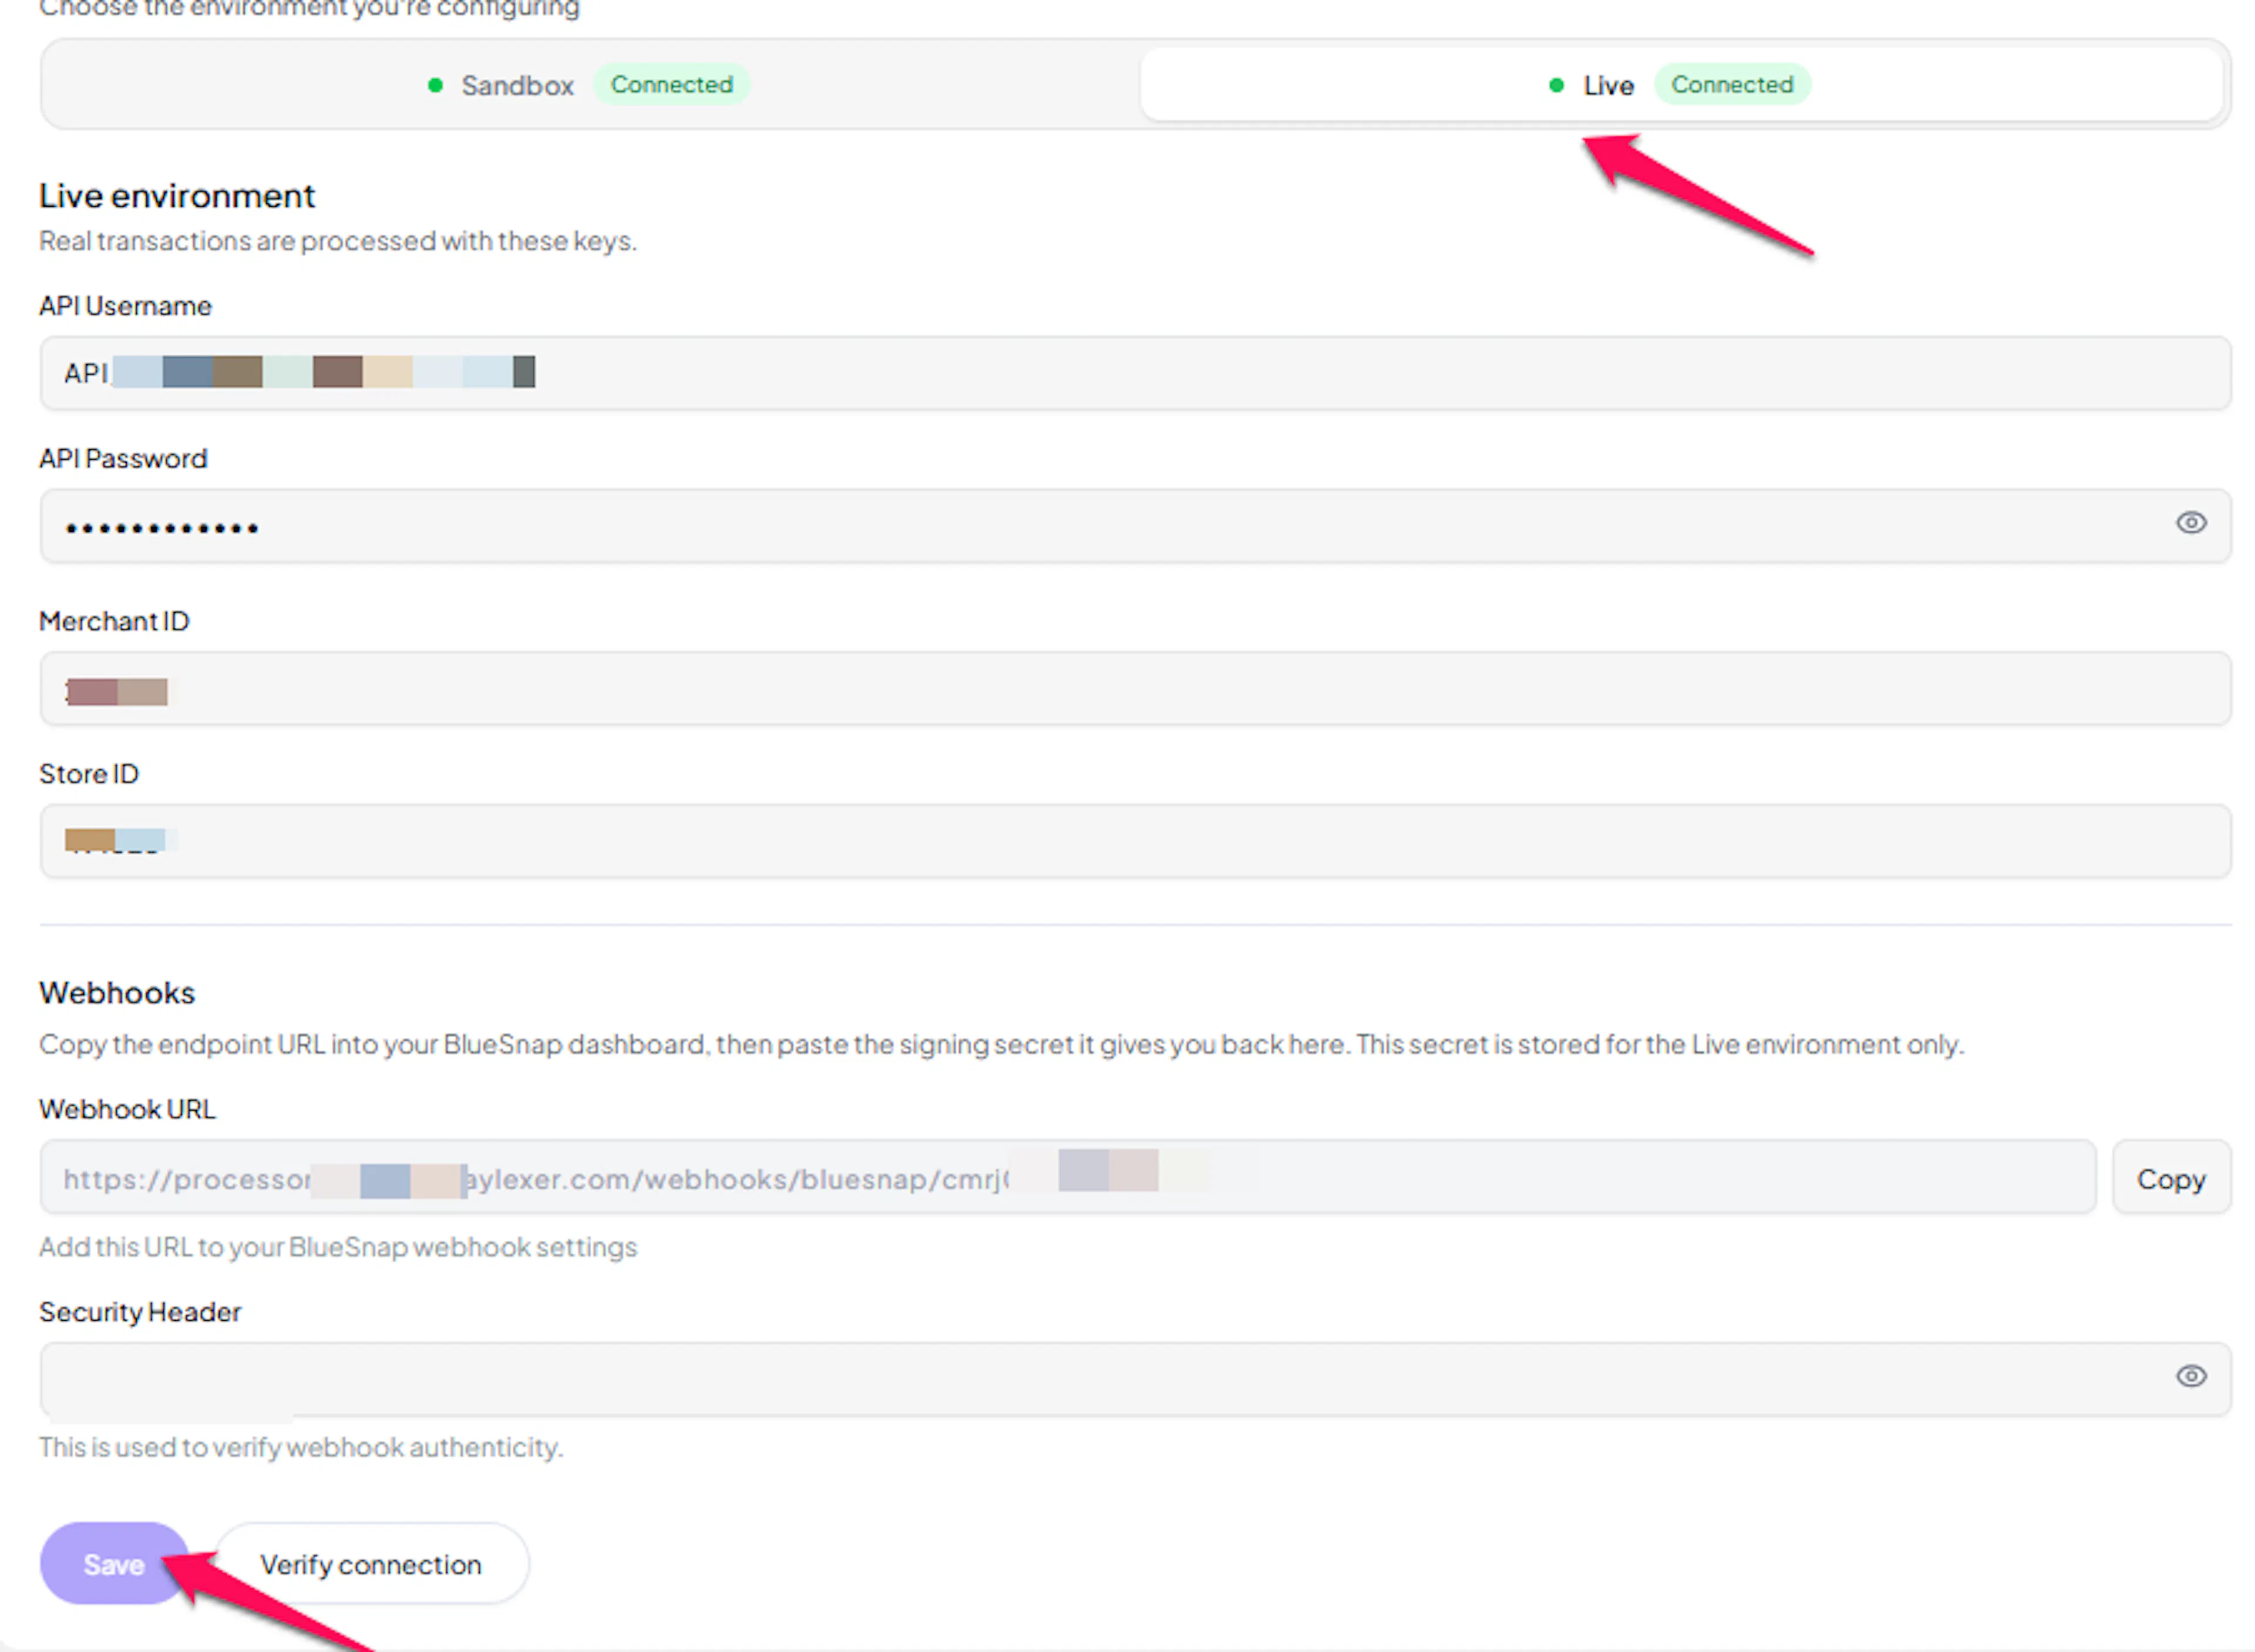
Configuring Webhooks (Mandatory)
Webhooks enable real-time payment updates and significantly improve reliability.
Benefits of Webhooks:
- Instant payment status updates
- Automatic refund status updates
- Dispute notifications
BlueSnap calls these notifications IPNs. PayLexer never treats a shopper returning from the payment page as proof of payment, so the IPN is what actually marks an order paid. The endpoint is configured once for the whole account rather than sent with each payment, so you paste it into the portal yourself. If PayLexer is briefly unreachable, BlueSnap retries delivery up to eleven times.
Copy your PayLexer webhook URL
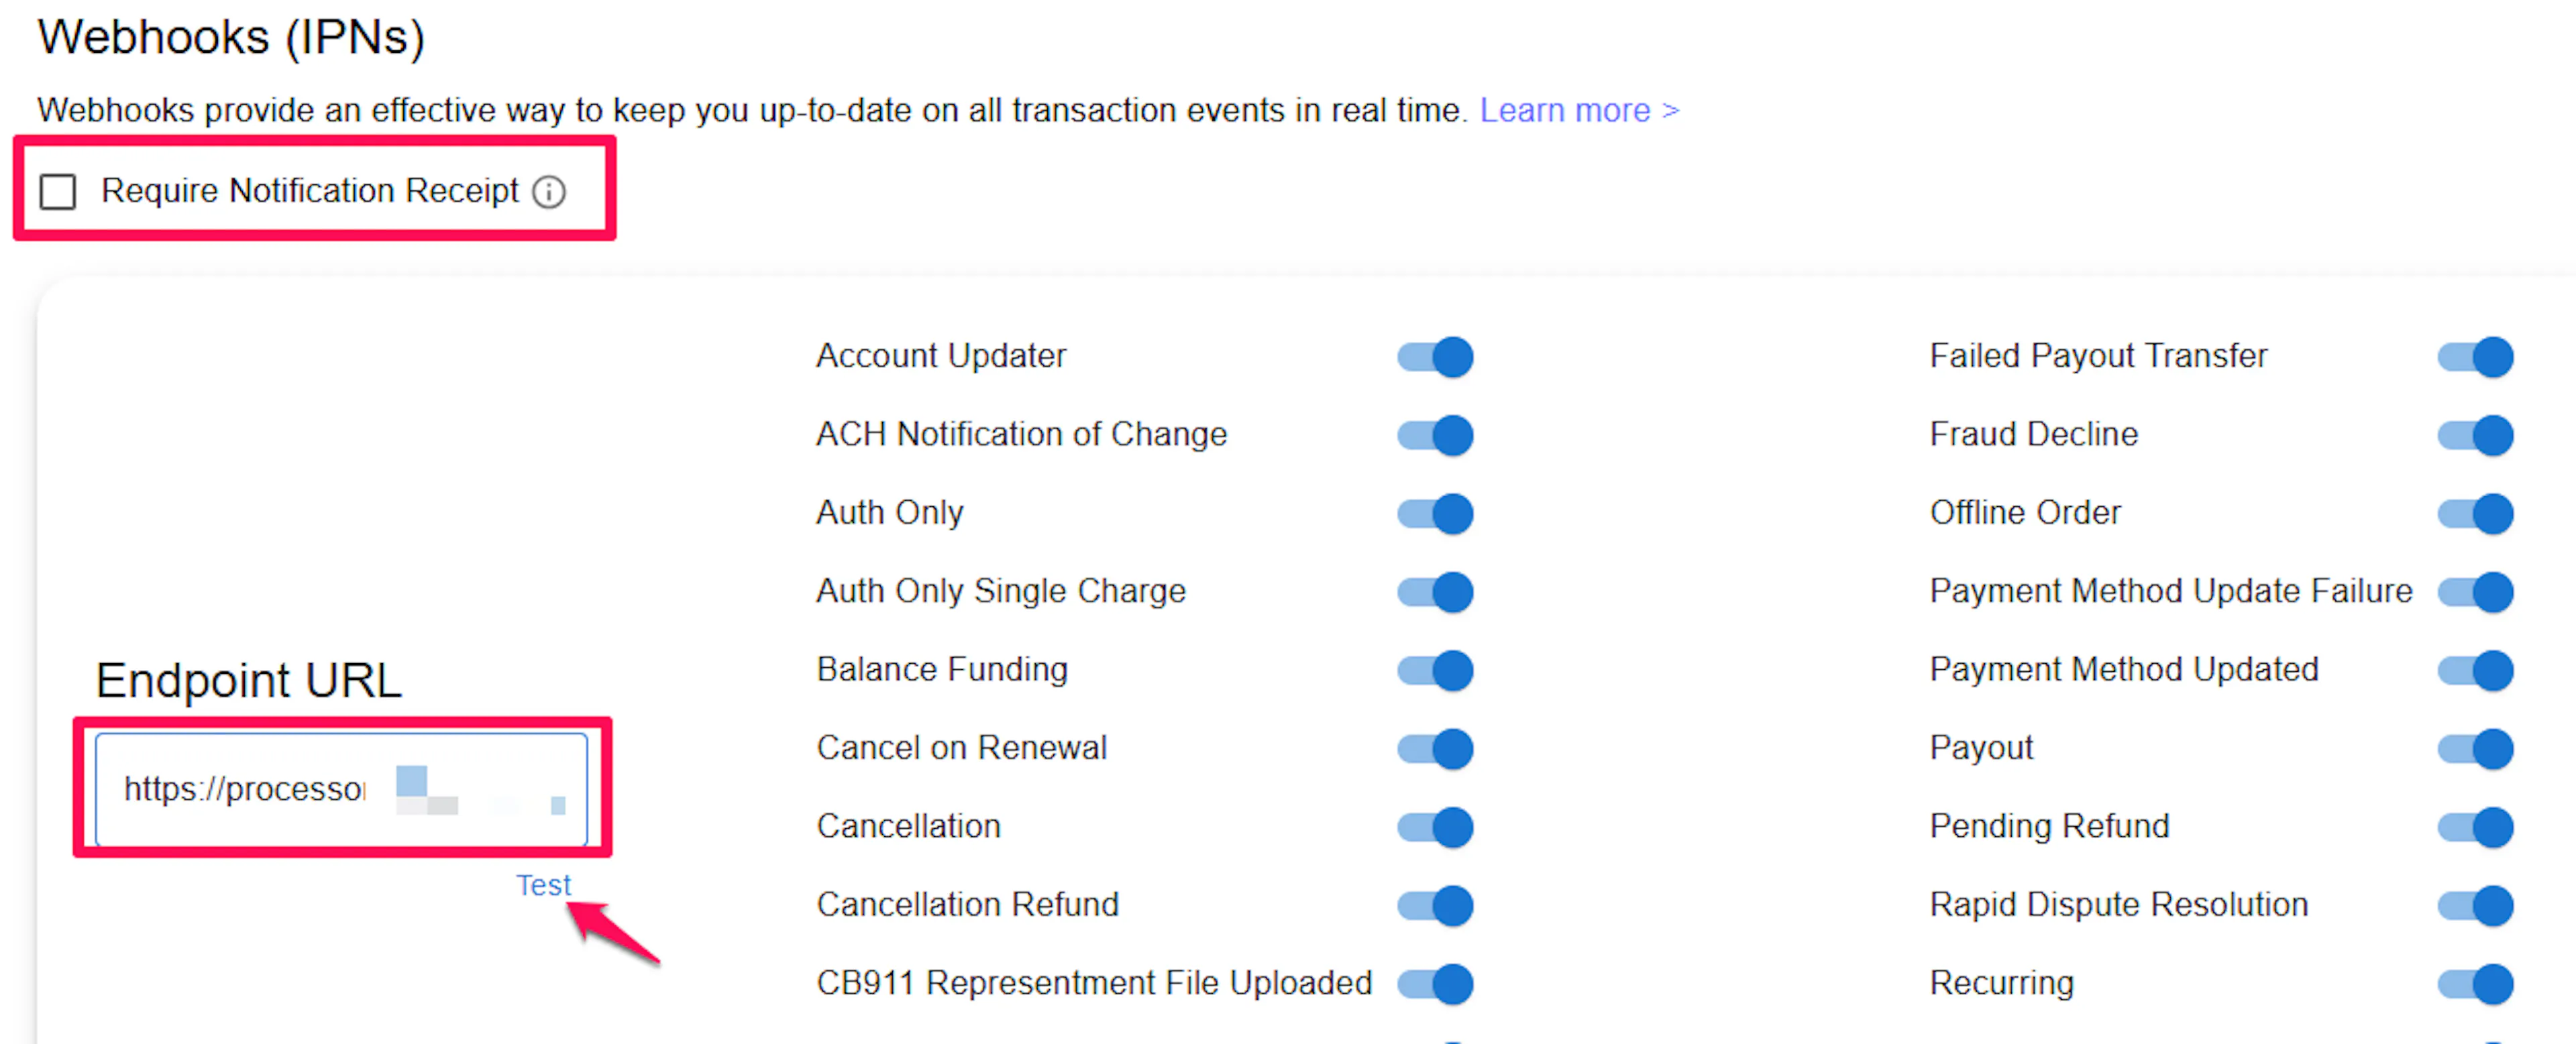
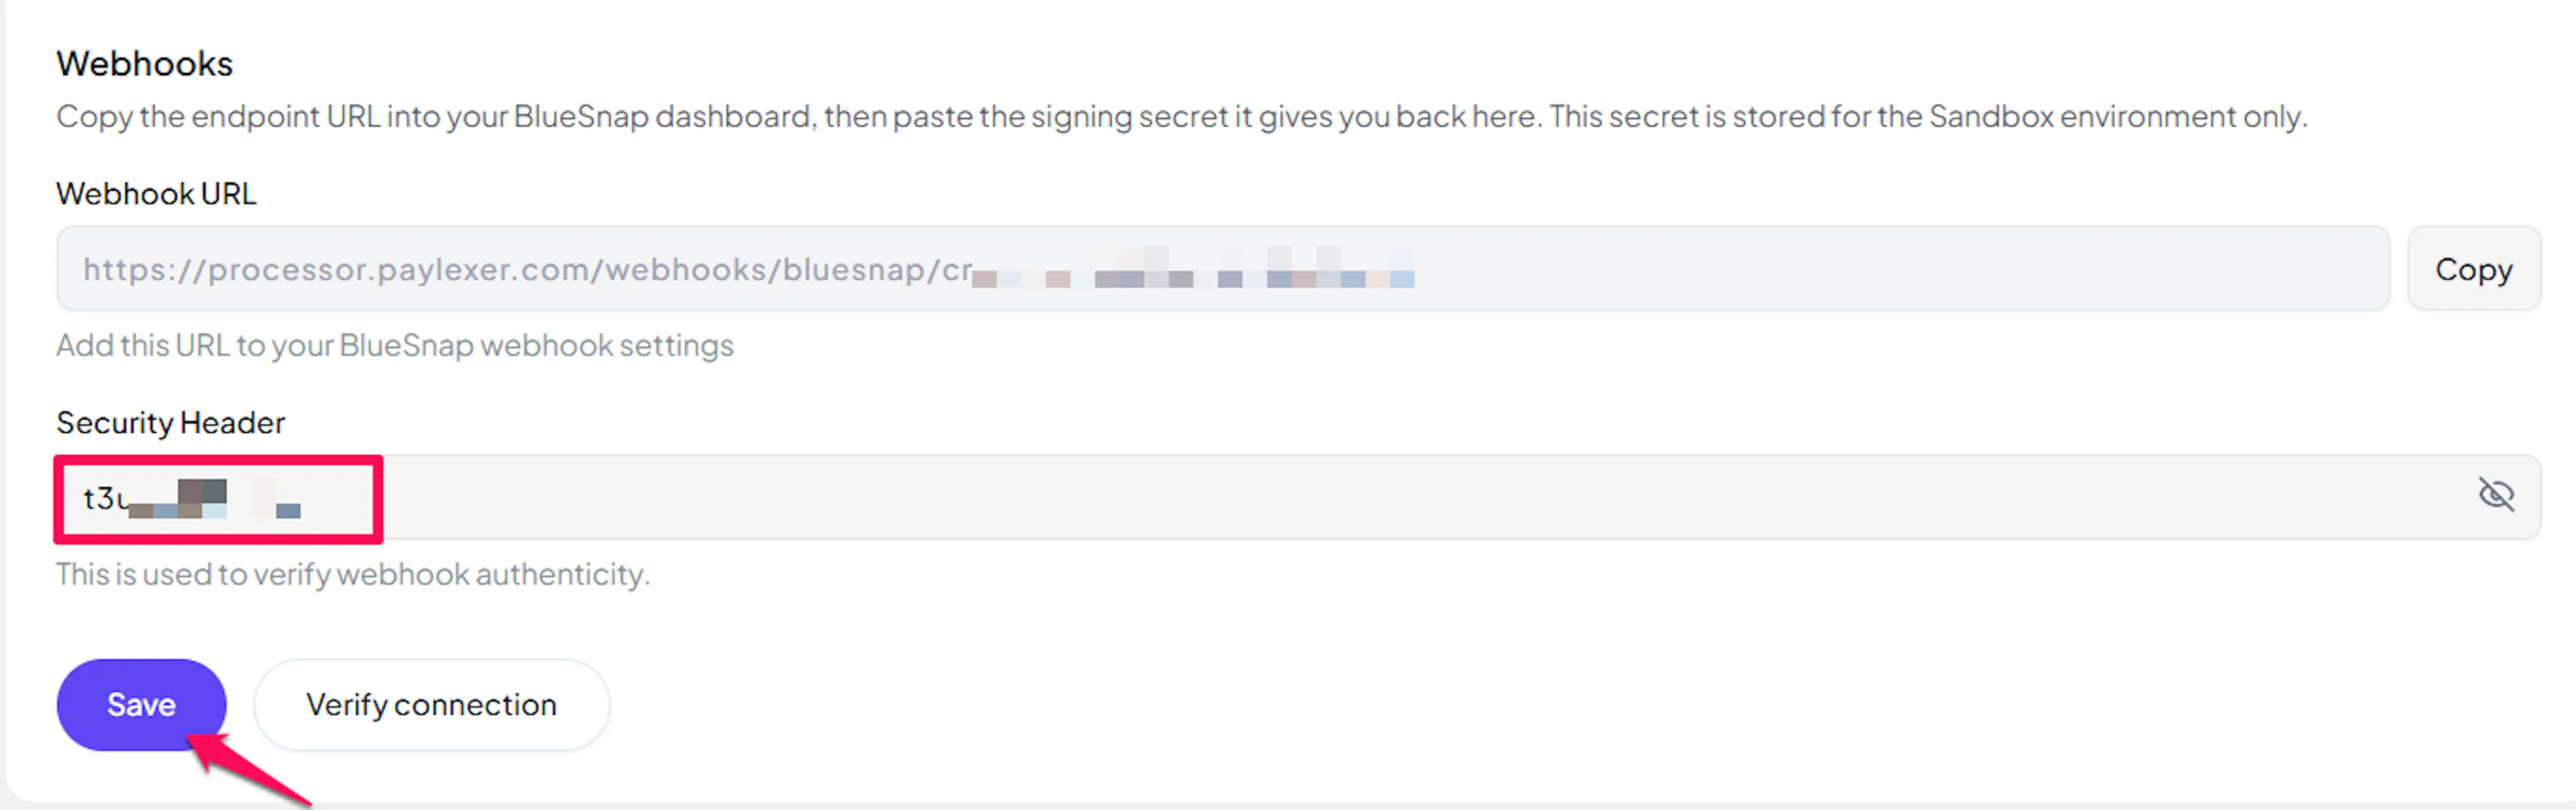
In PayLexer -> Payment Gateways -> BlueSnap, copy the Webhook URL shown for your account.

Add the URL in BlueSnap
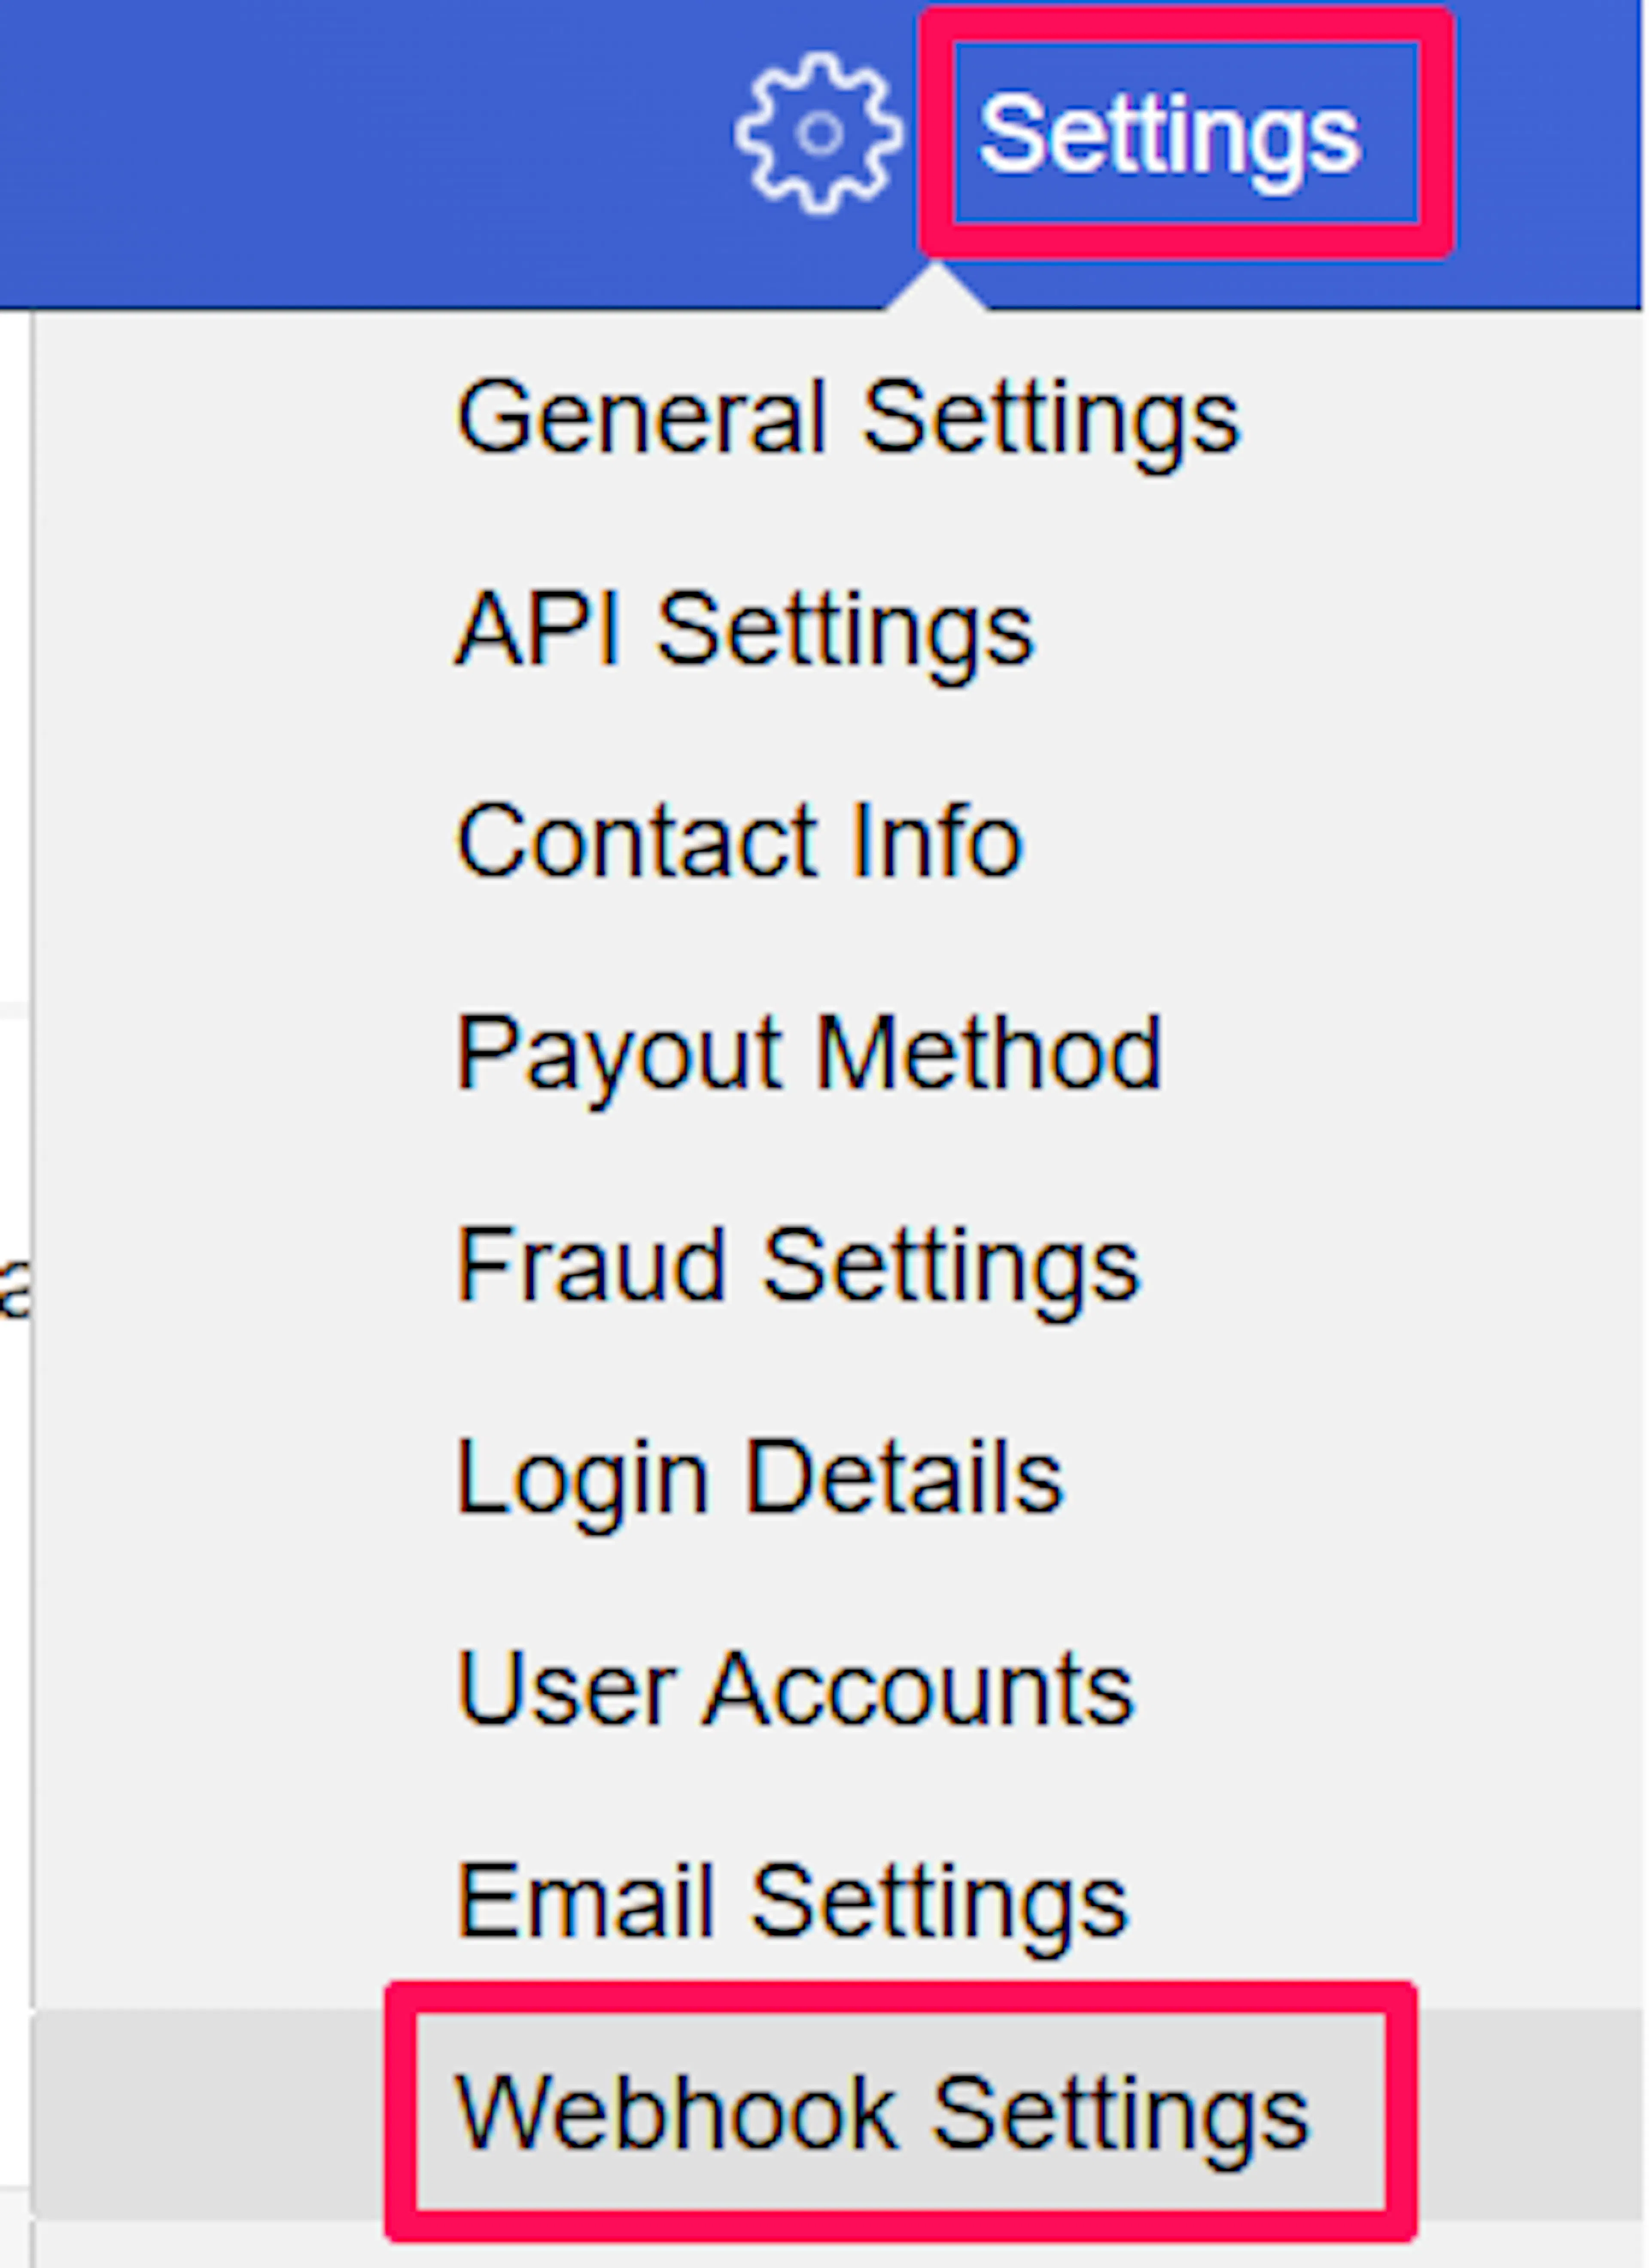
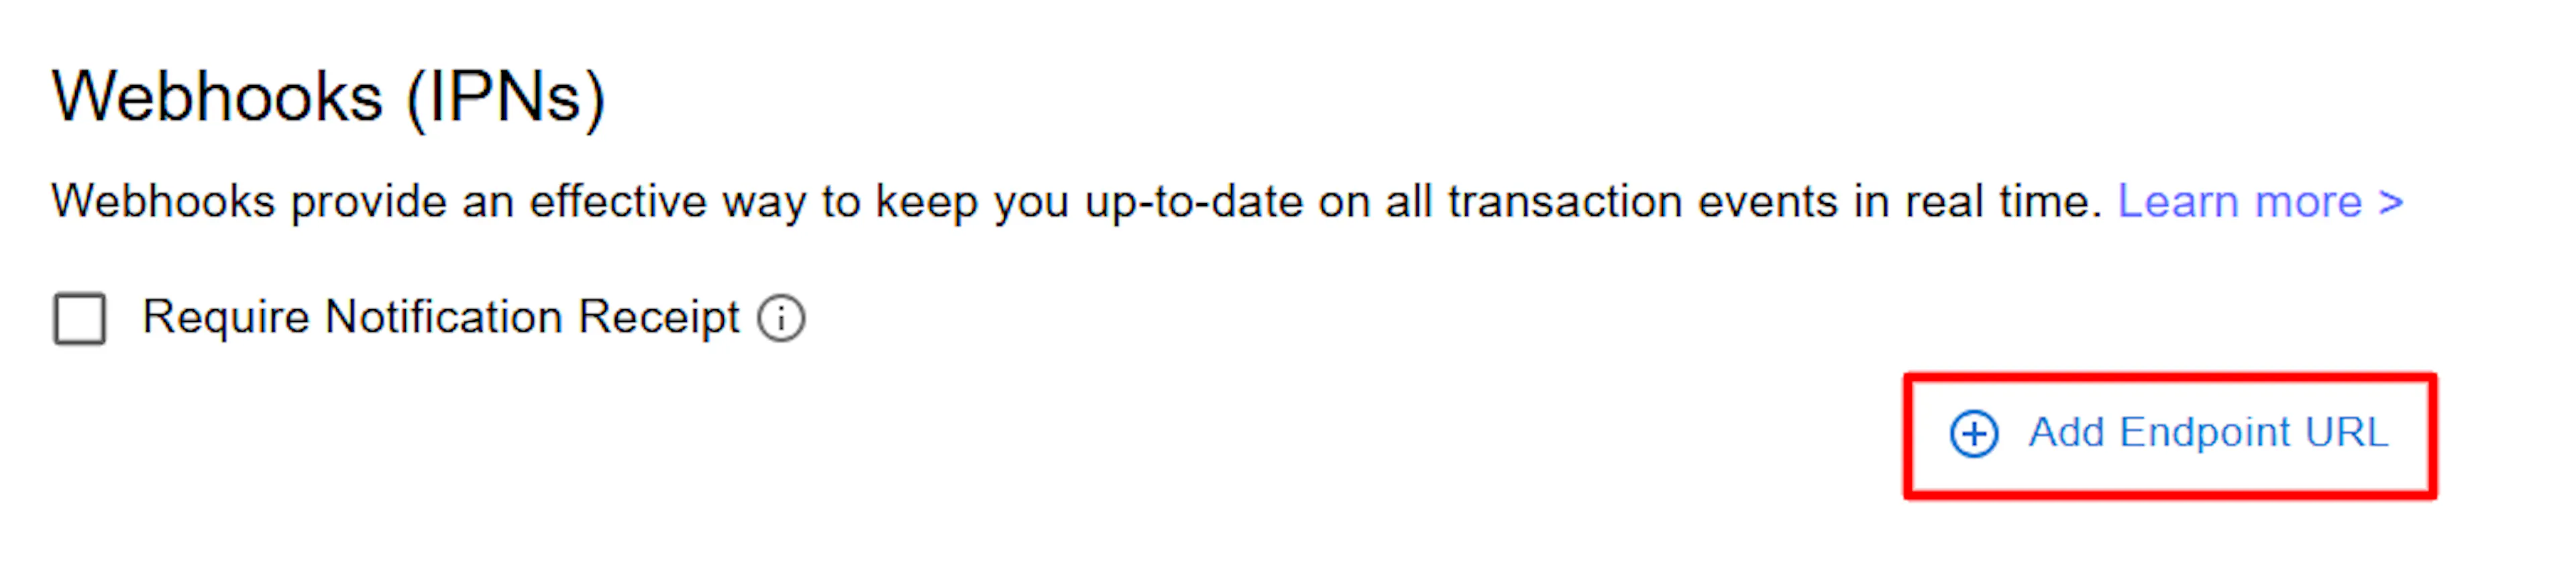
In the BlueSnap Merchant Portal, go to Settings -> Webhook Settings and paste the PayLexer webhook URL as your IPN endpoint.
Turn on the Security Header
On the same page, switch on the Security Header and copy the value BlueSnap generates. This is what proves a notification genuinely came from BlueSnap.
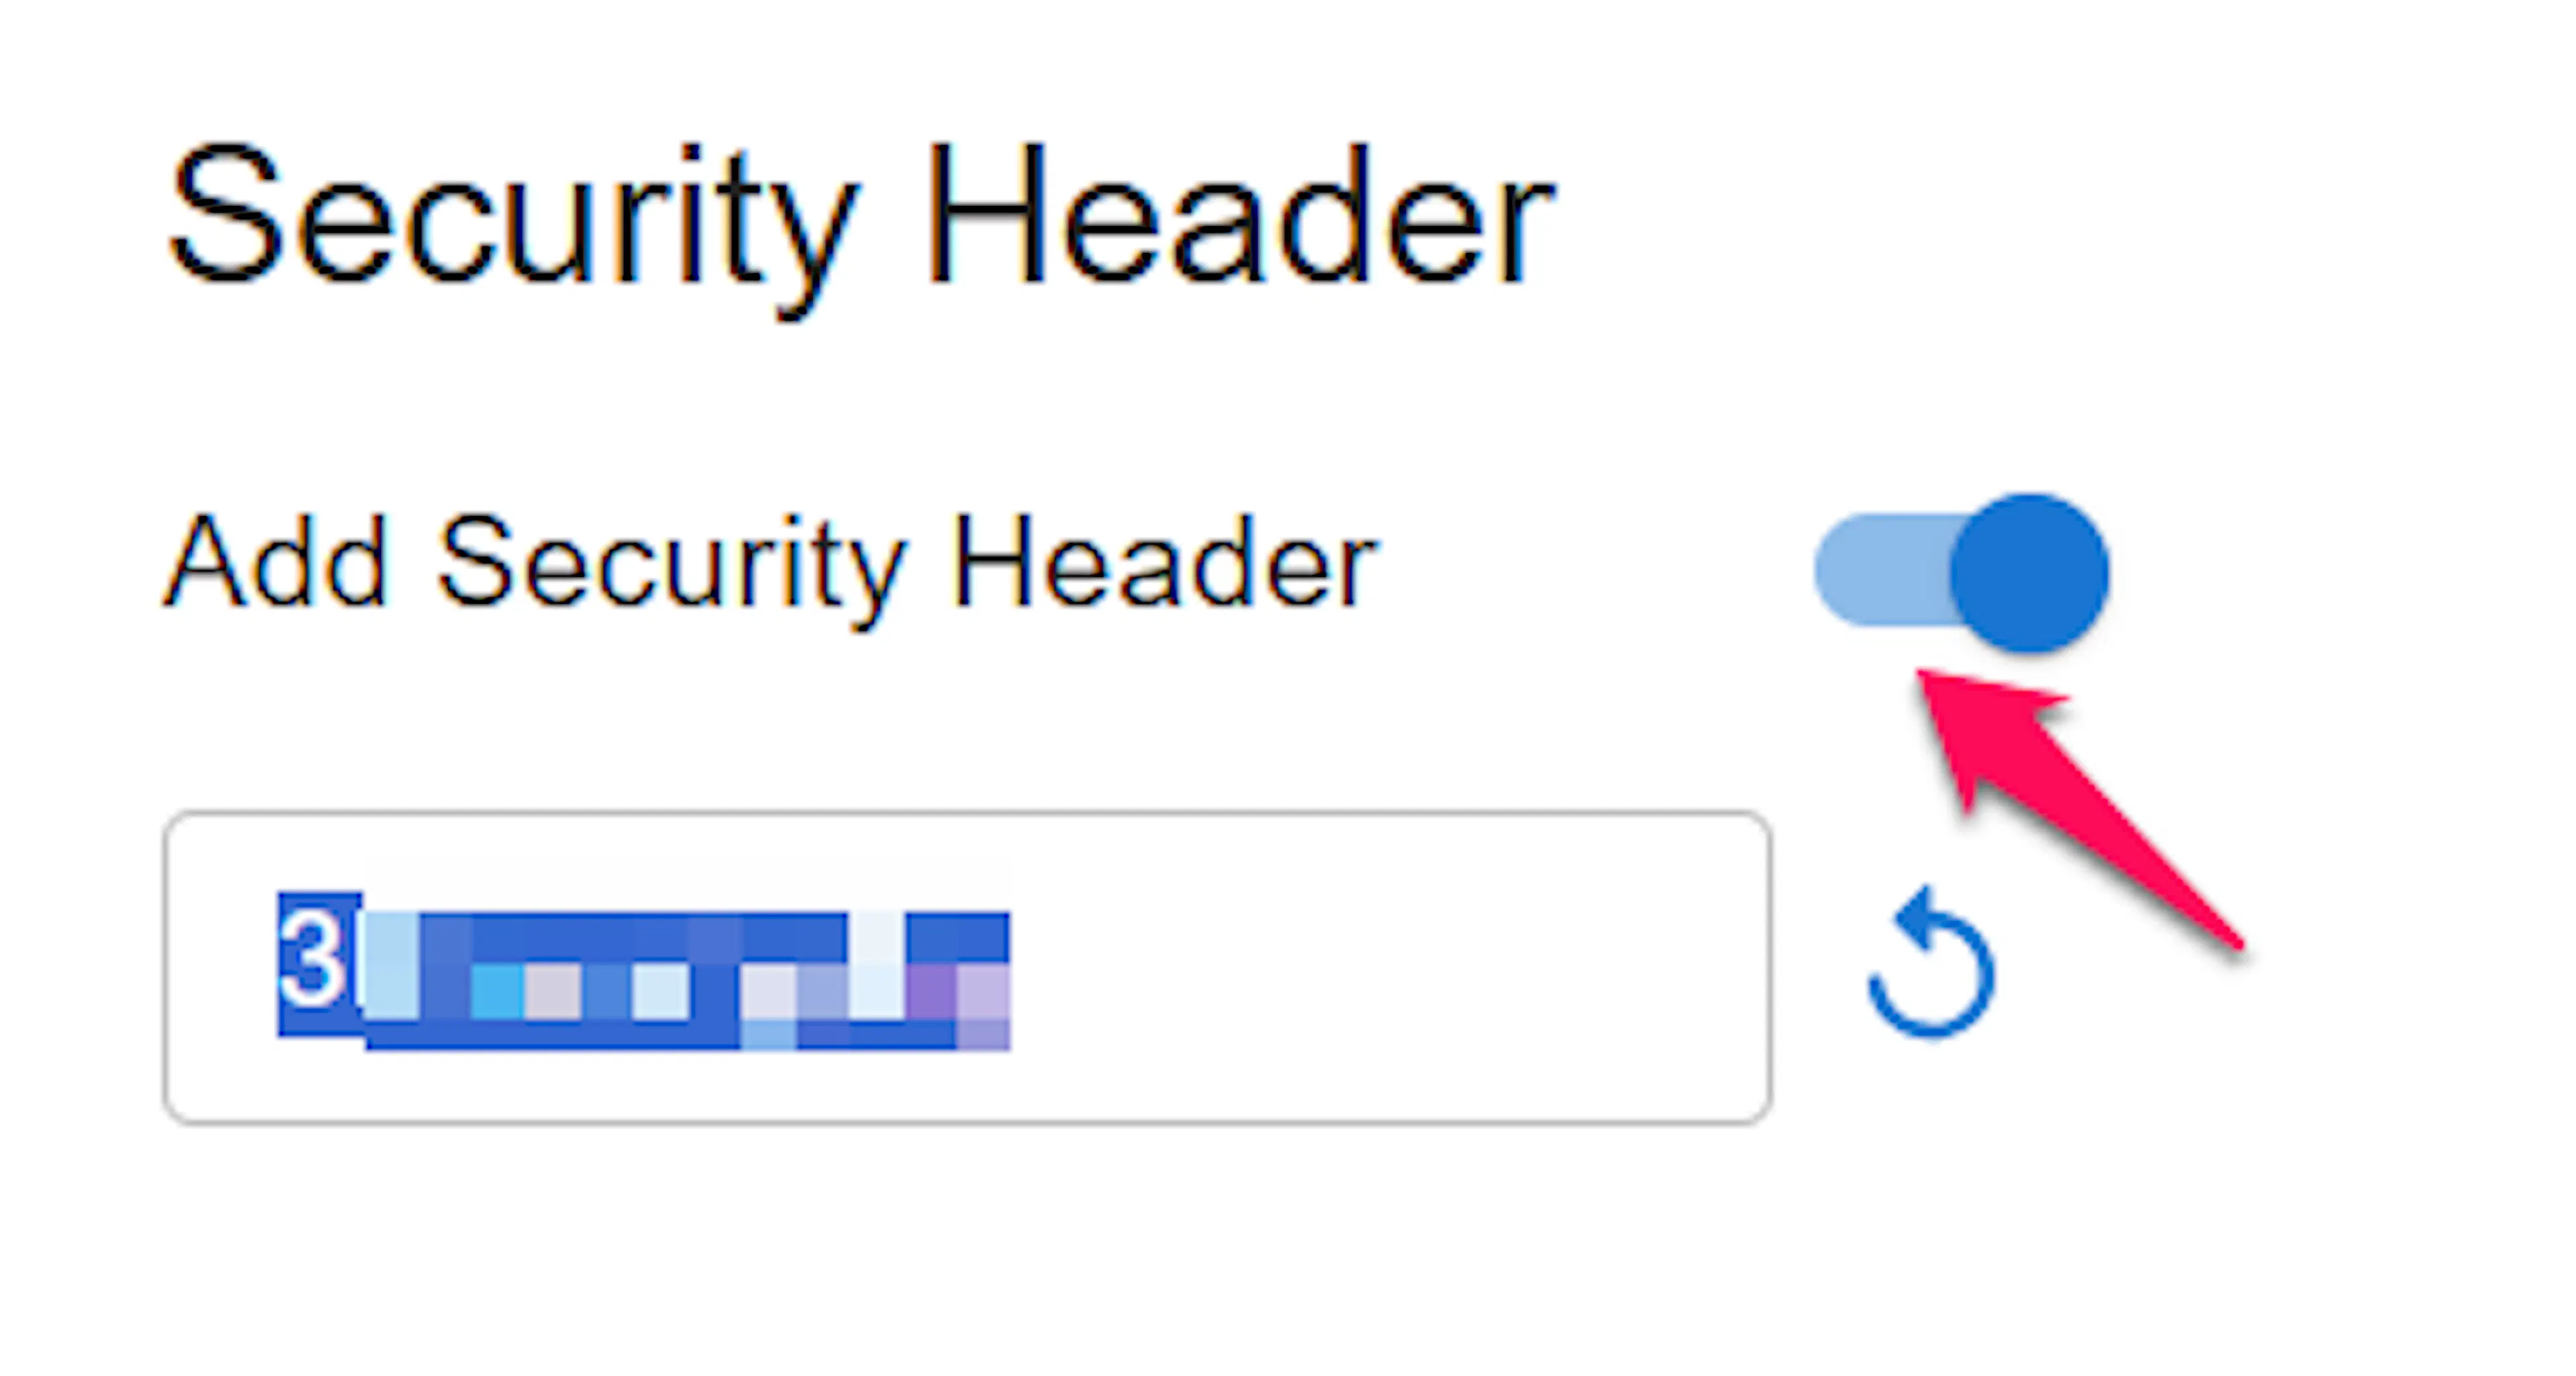
BlueSnap's own developer documentation sometimes calls this the webhook encryption key. The portal labels it Security Header, which is what PayLexer's field is called too.
Add the Security Header to PayLexer
Paste the value into the Security Header field in PayLexer for the matching environment, then click Save.
BlueSnap only delivers to servers with a valid HTTPS certificate. A local development address with a self-signed certificate never receives notifications, so use a publicly reachable URL when testing.
Integrate BlueSnap to Your Website
If you have already added and configured your site, you can enable BlueSnap in your existing setup.
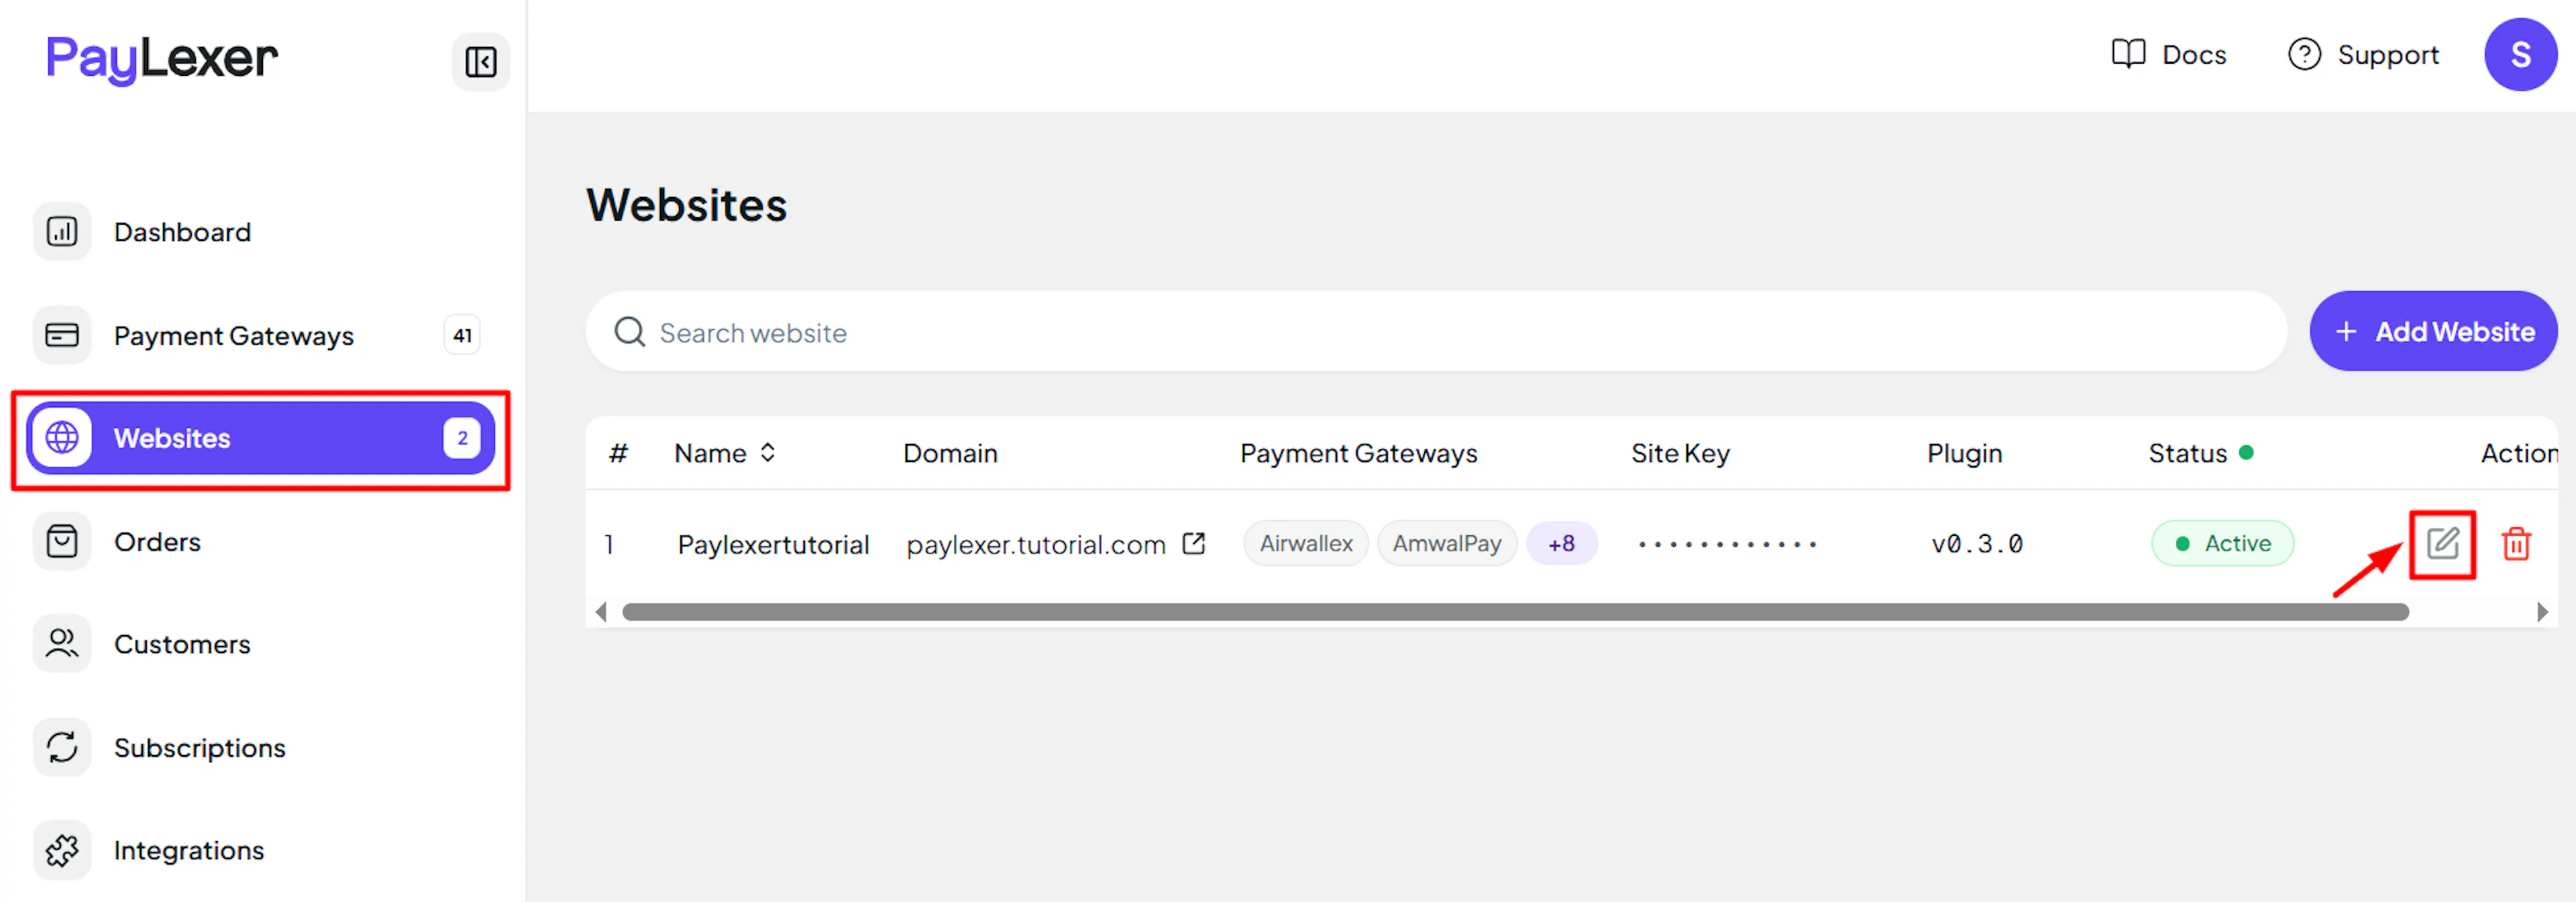
Go to Websites
Navigate to Websites in your PayLexer dashboard.
Edit your website
Click the Edit Icon of your added website.
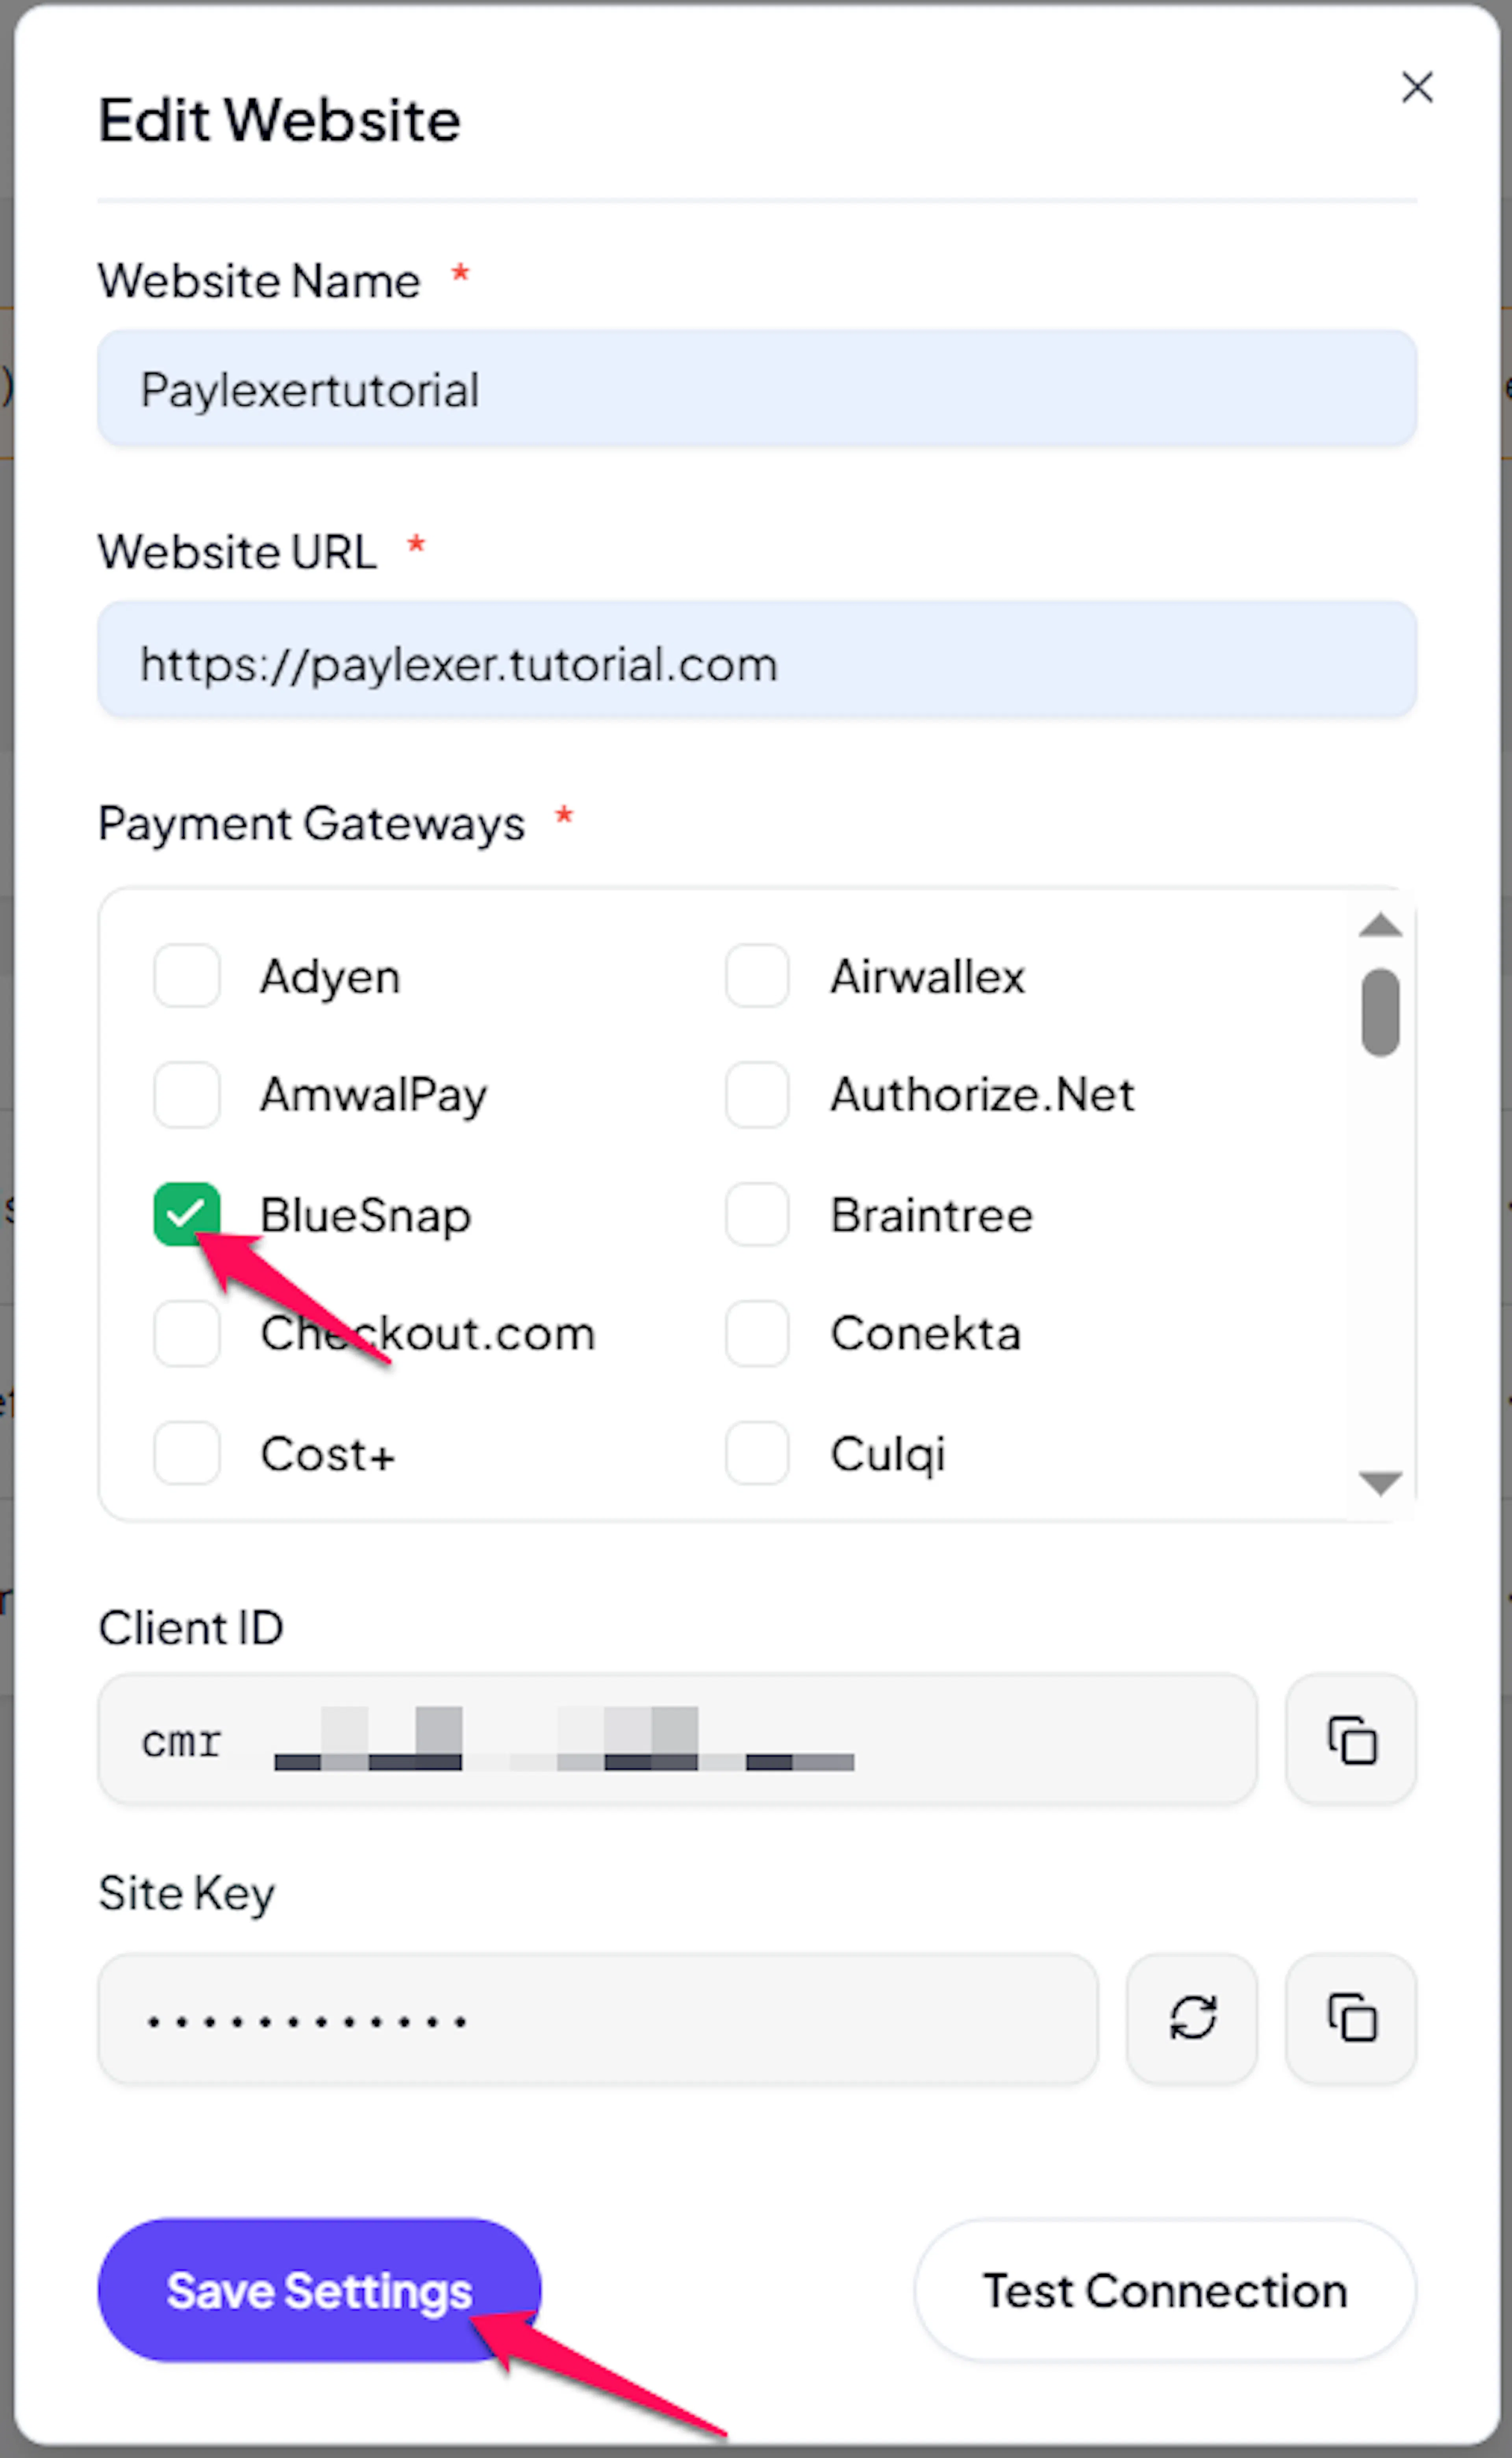
Enable BlueSnap
Click the checkbox to enable BlueSnap for the website.
If you haven't added a website yet, Continue to Add Your Website →
Troubleshooting
Best Practices
- Test in sandbox before enabling production. Complete a full payment with BlueSnap's test cards before switching to live credentials.
- Configure webhooks and the Security Header so payment and refund updates sync in real time.
- Do the setup once per environment. Disable IP Checking, BlueSnap Checkout, and the webhook URL are all per account, so sandbox and production each need their own.
- Keep your API Password and Security Header confidential, and rotate them if you suspect exposure.
- If you sell subscriptions, buy one in sandbox first. That confirms the plan is created on your BlueSnap account and the subscription turns active only after BlueSnap takes the first payment.
- Avoid clicking Request API credentials after your integration is live, as it can rotate the key and break the saved configuration.
FAQs
Still Have Questions?
- BlueSnap Support: BlueSnap Support Center
- PayLexer Support: Contact Support