

Paysafe
Connect Paysafe, a global payment platform spanning 260+ payment types, to PayLexer to accept card payments through an embedded checkout overlay with per-currency accounts, refunds, and gateway-managed subscriptions.
Paysafe is a global payment platform supporting cards, digital wallets, prepaid cards, cash payments, and local payment methods. PayLexer integrates Paysafe’s embedded checkout overlay for secure card payments, keeping shoppers on your site while card details are handled by Paysafe. Paysafe also manages recurring payments through its Payment Scheduler, automatically charging saved cards on due dates.
- Supported Regions (Merchant Accounts): Global platform, with merchant accounts settling in the United States, Canada, United Kingdom, and Europe - view full list
- Supported Currencies: USD, CAD, GBP, EUR - view full list
This integration covers Paysafe's card payments and card-backed subscriptions. Paysafe's wider catalogue of digital wallets, prepaid cards, cash payments, and pay by bank is not available through PayLexer.
Supported Features
- Embedded checkout overlay that opens over your store page, with no full-page redirect
- 3-D Secure authentication handled inside the same overlay
- Card payments authorized and settled in a single step, so every payment is immediately refundable
- Full refunds and repeated partial refunds up to the order total
- Gateway-managed subscriptions through Paysafe's Payment Scheduler, including free trials and cancellation
- Automatic routing of each transaction to the Paysafe account matching the order currency
- HMAC-signed webhooks for real-time payment, refund, and subscription updates
- Direct payment status checks, so order state never depends on notifications alone
Before You Start
Make sure you have:
- Paysafe Account – Don't have one? Contact Paysafe to open merchant account→
- PayLexer Account – Required to configure the integration. Create your account →
- A website where you want to integrate
Looking for a different payment processor? View all supported gateways →
Configuring Paysafe
You need a API Key Username, API Key Password, Public API Key, Account Number(s), and Webhook HMAC Key from Paysafe for this integration.
Getting API Credentials
Open the Paysafe Business Portal
Log in to the Paysafe Business Portal.
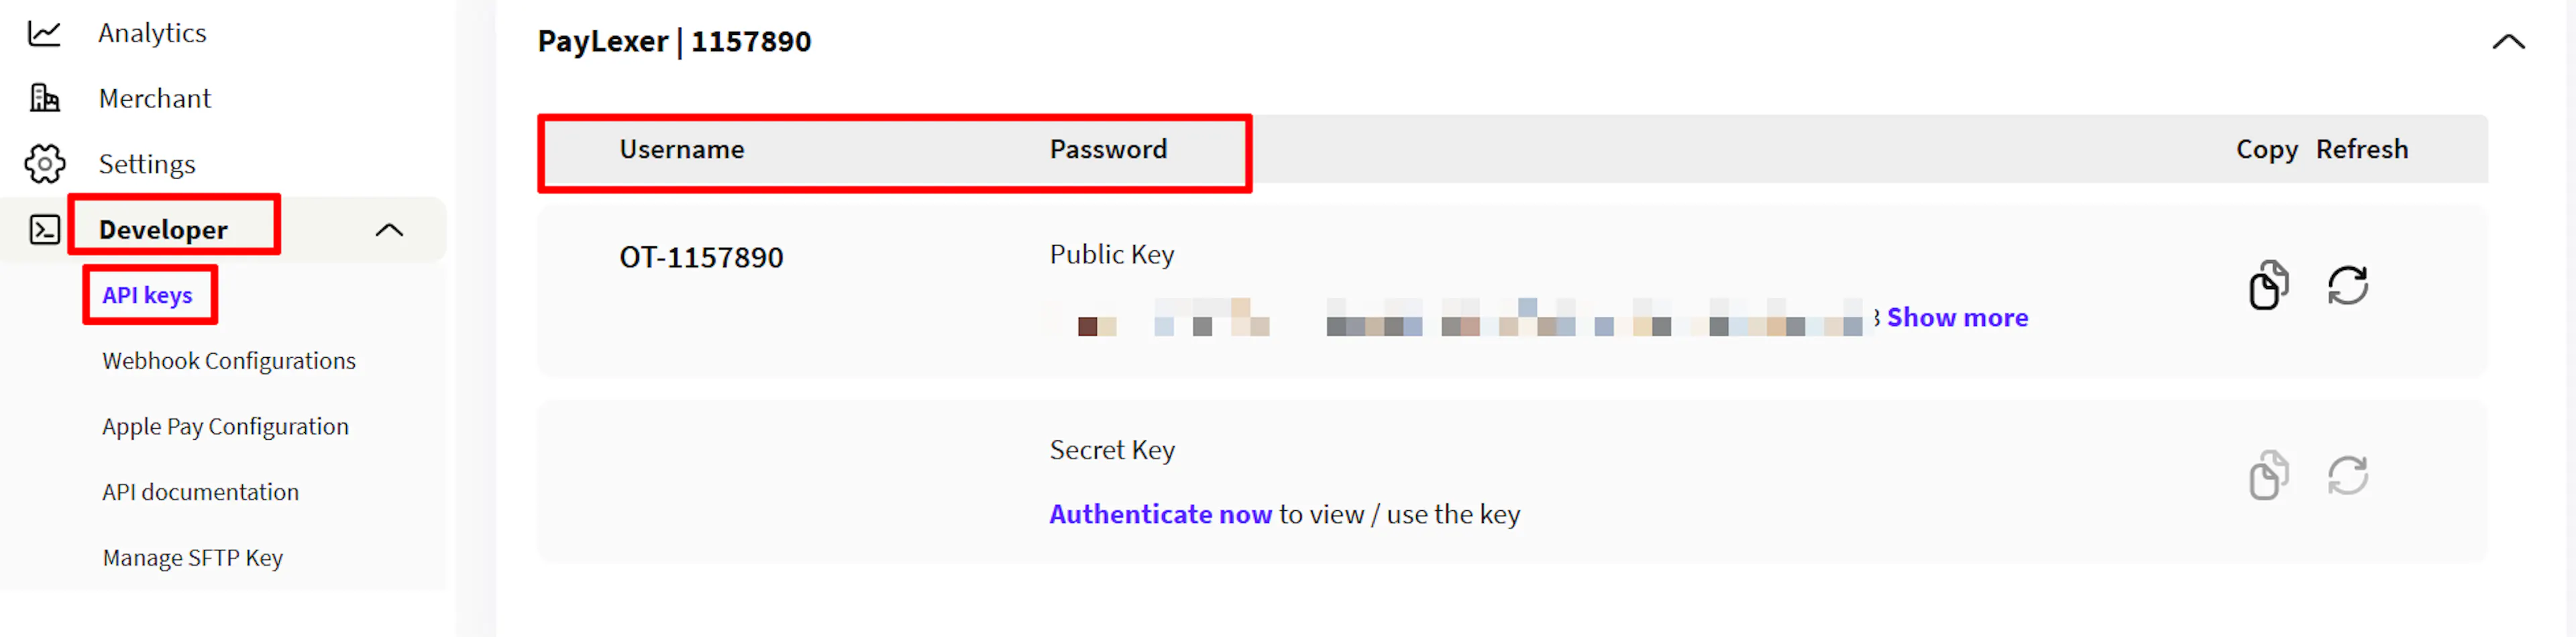
Go to your API keys
Navigate to the developer and API keys area of the portal, where your key pairs are listed.
Copy your private API key pair
Each Paysafe key is a pair: a key username and a key password, shown in separate columns.
Copy both halves of your private (server-side) key:
- The key username becomes your API Key Username in PayLexer.
- The key password becomes your API Key Password in PayLexer.
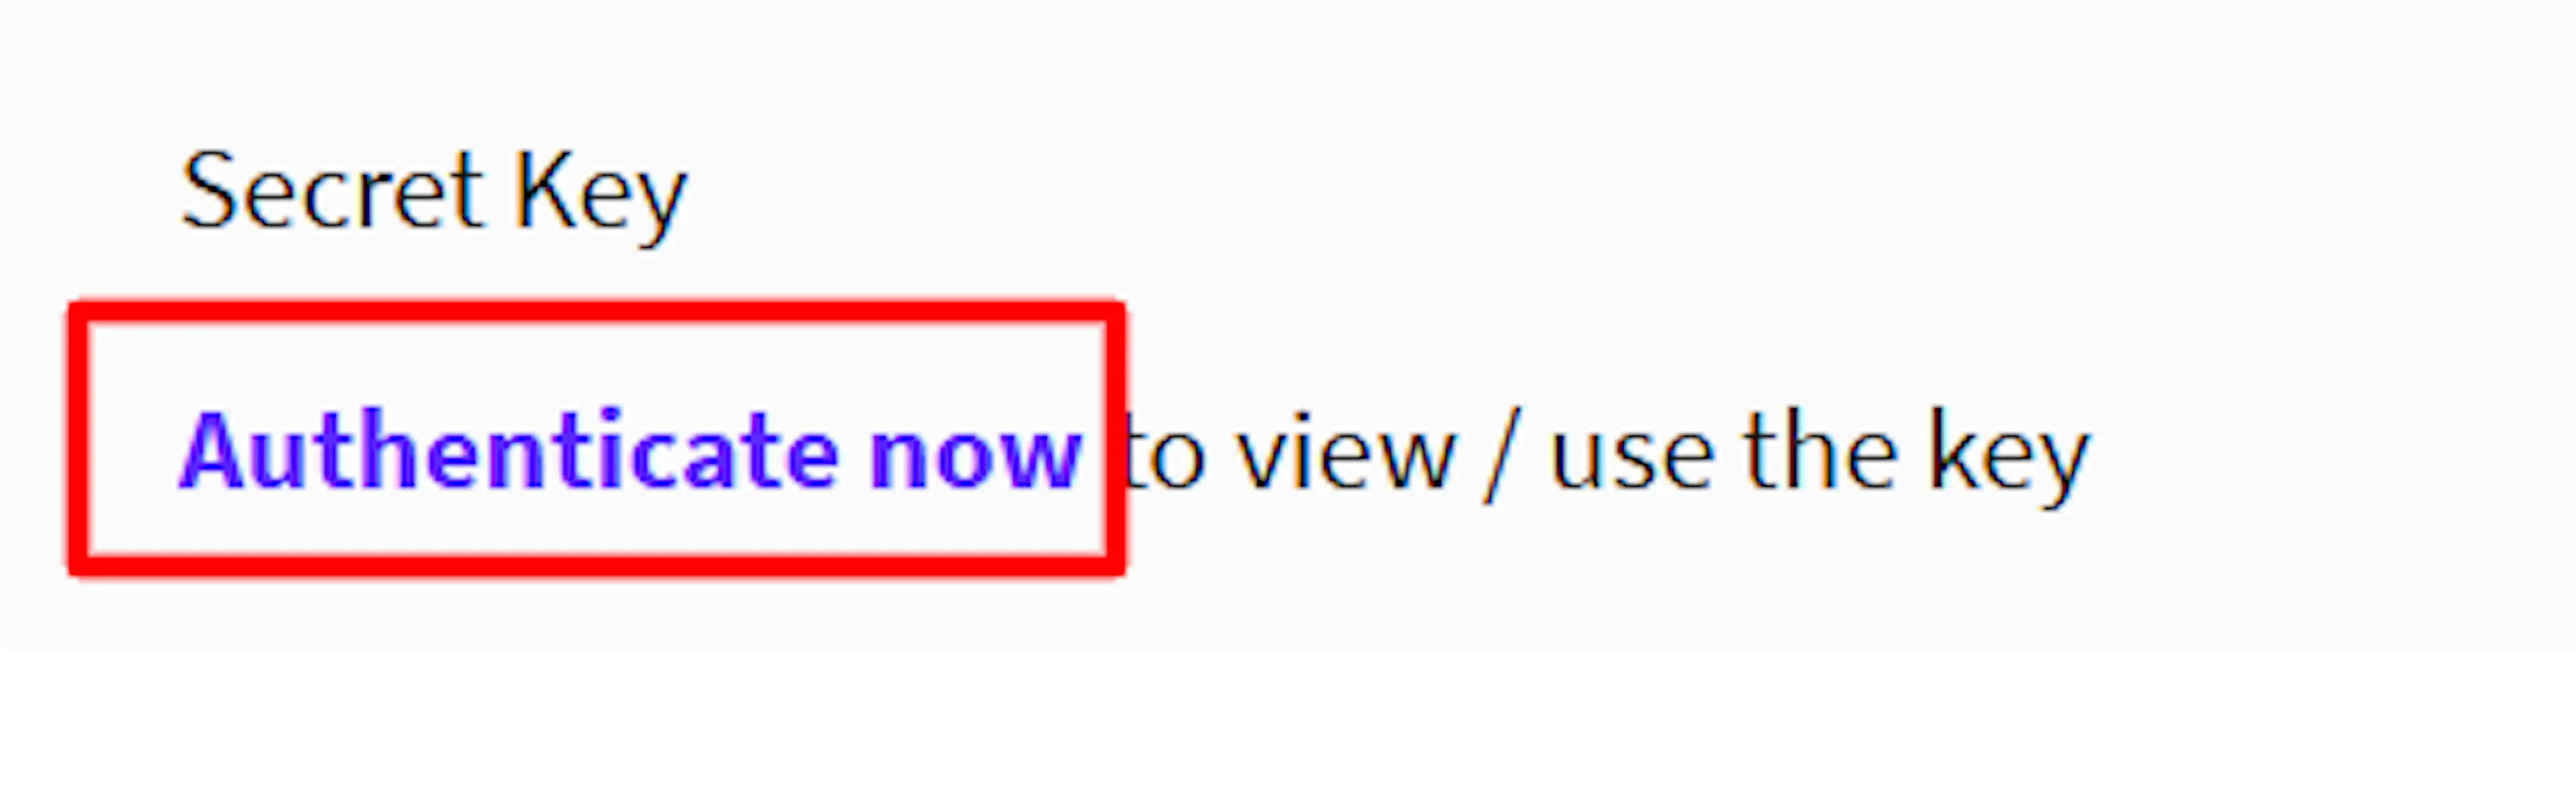

Key passwords are shown only when generated. Store them securely, as Paysafe will not display them again.
Copy your public key pair
Find the Public Key row and copy both columns. Join them with a colon in the format Username:Password (e.g., OT-1157890:B-qa2-0-...).

Paste the full Username:Password value into PayLexer. Do not enter the password alone, as it causes an Invalid apiKey parameter error.
Copy your account number for each currency
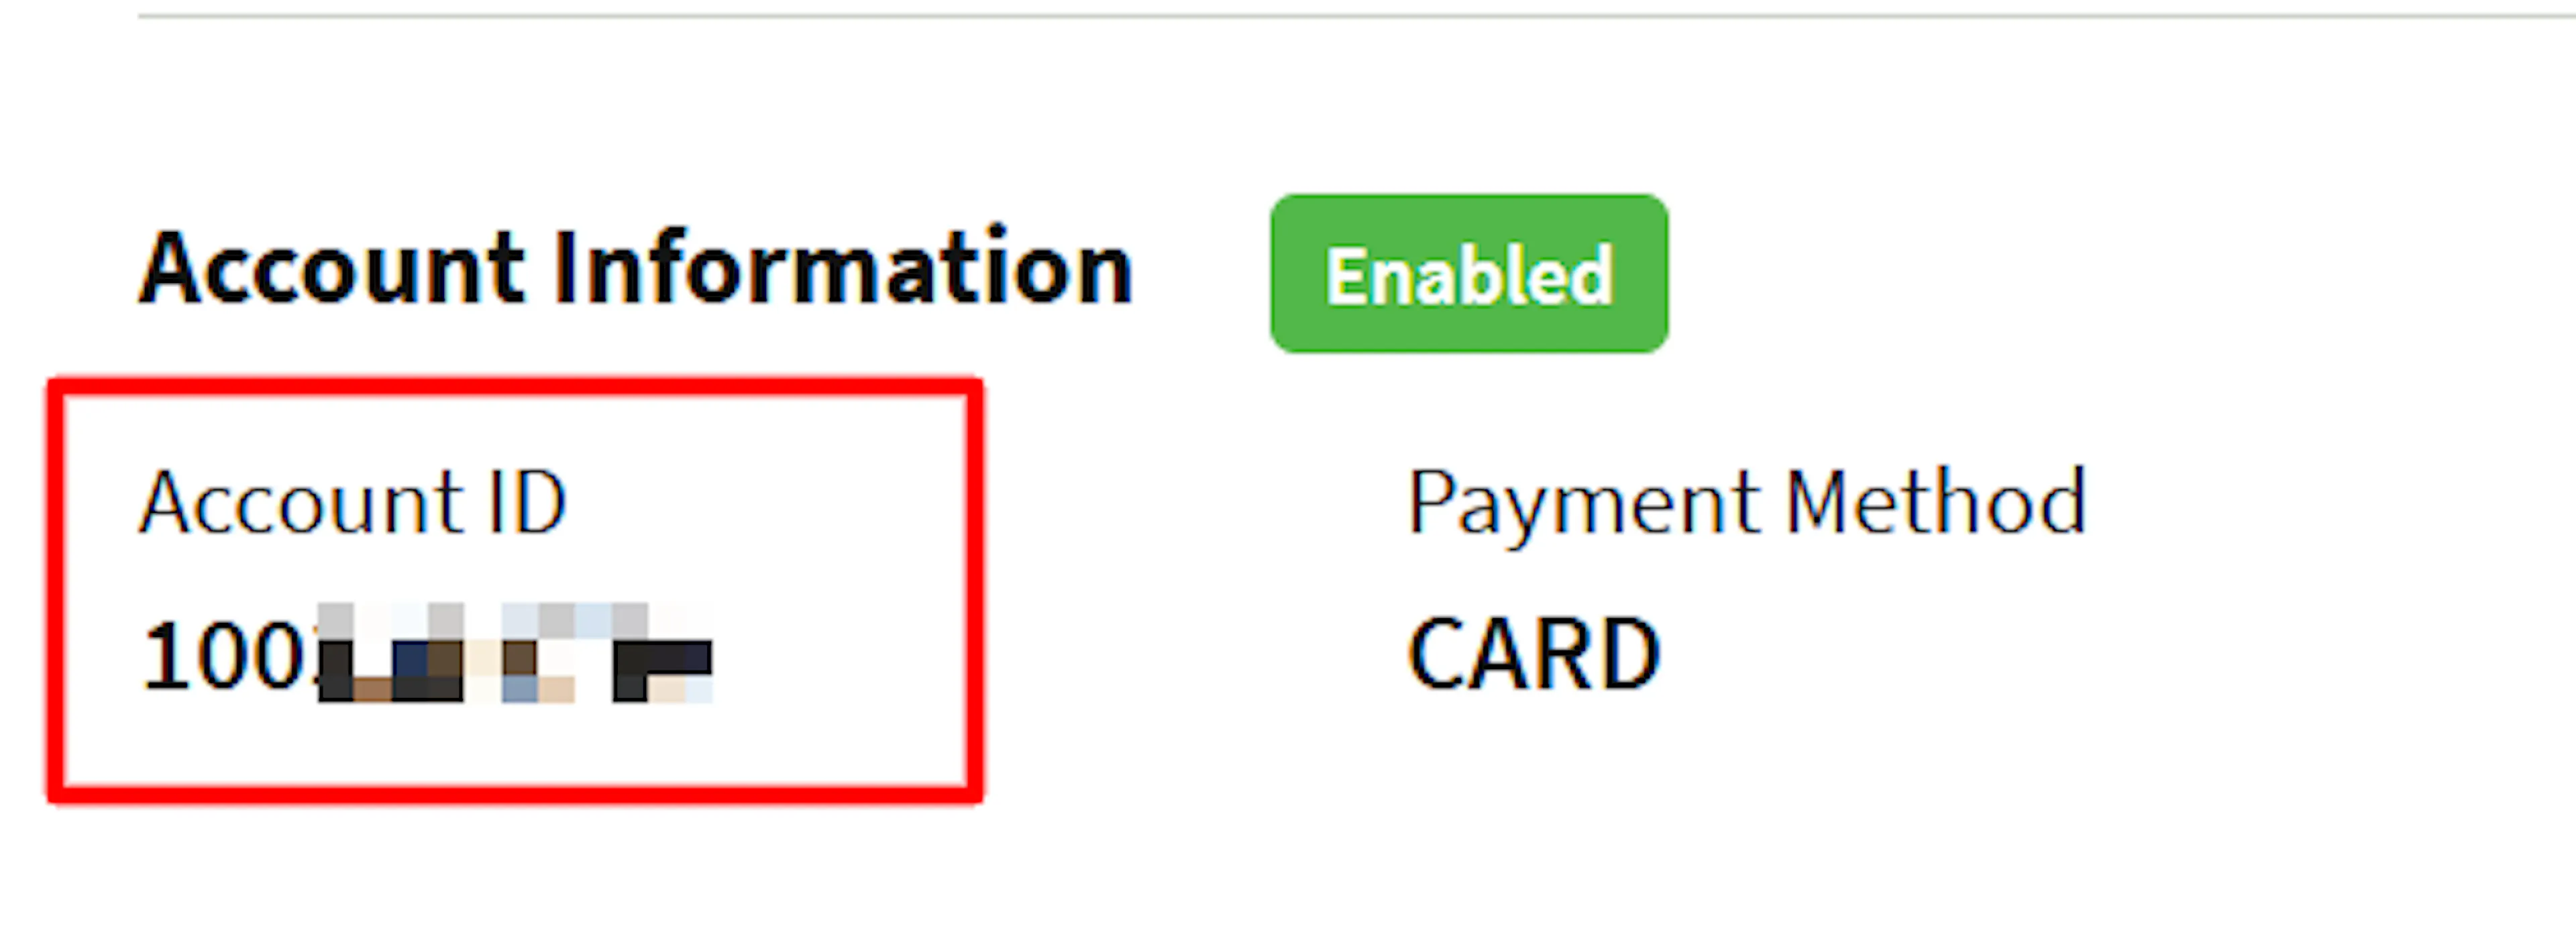
Go to Merchant → Merchant Information, select your company, and copy the Account ID under Account Information. Paysafe uses a separate account number for each currency, so copy the account number for each currency you plan to accept.

Copy your HMAC key
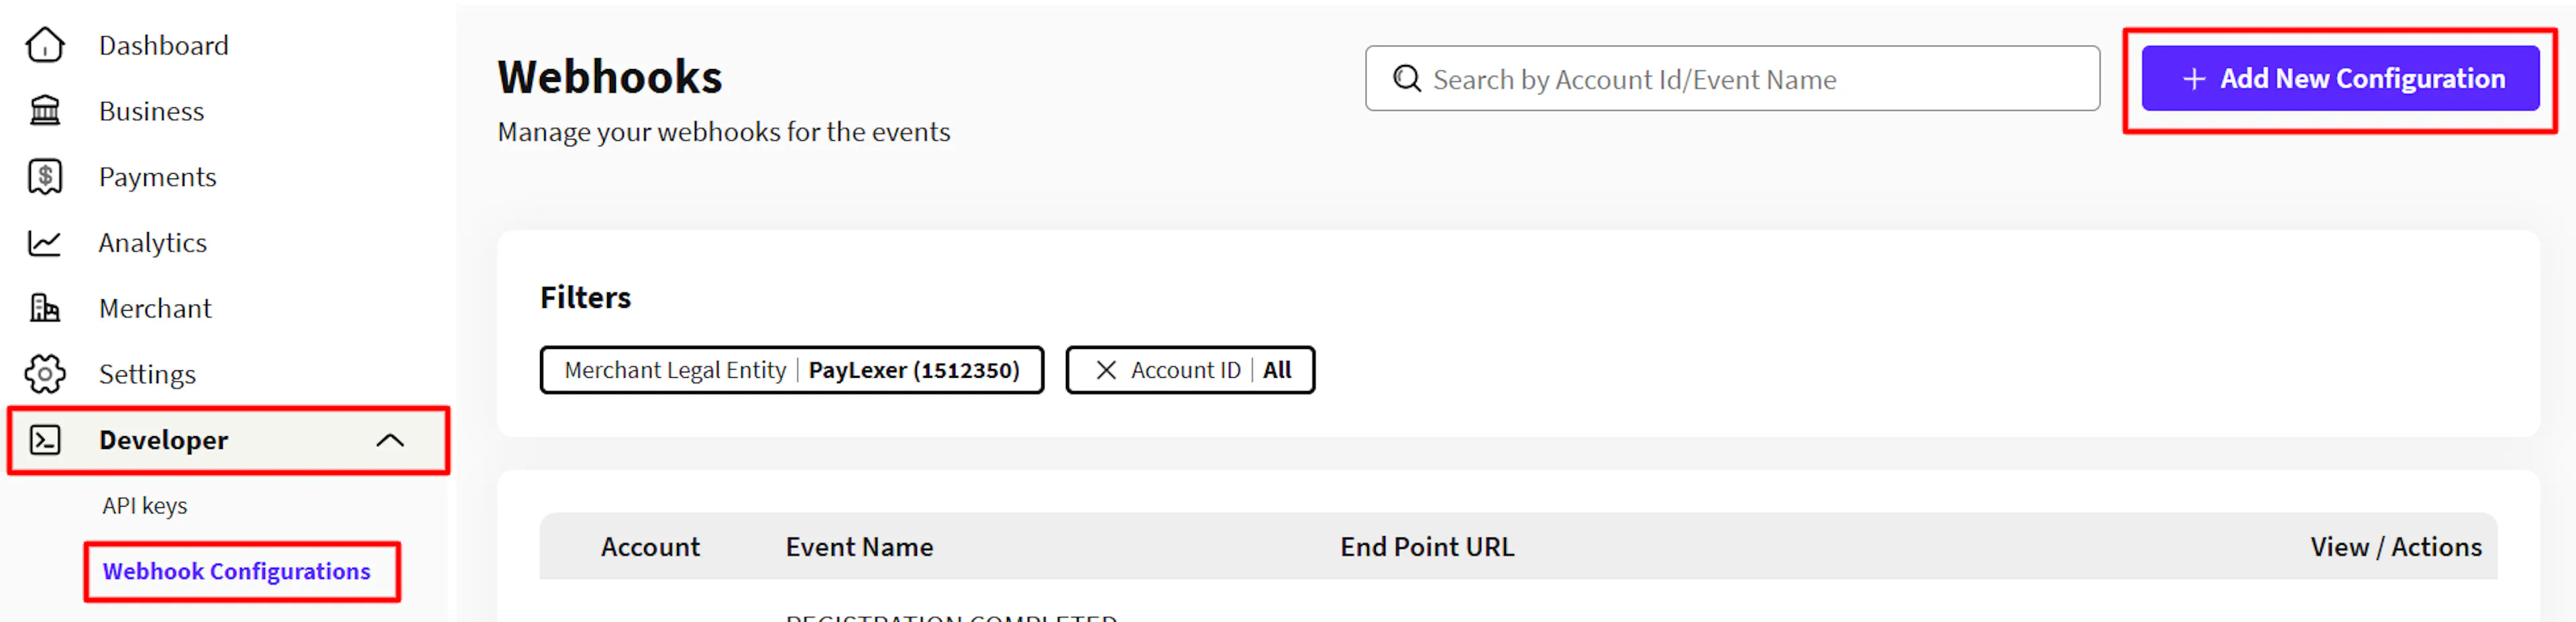
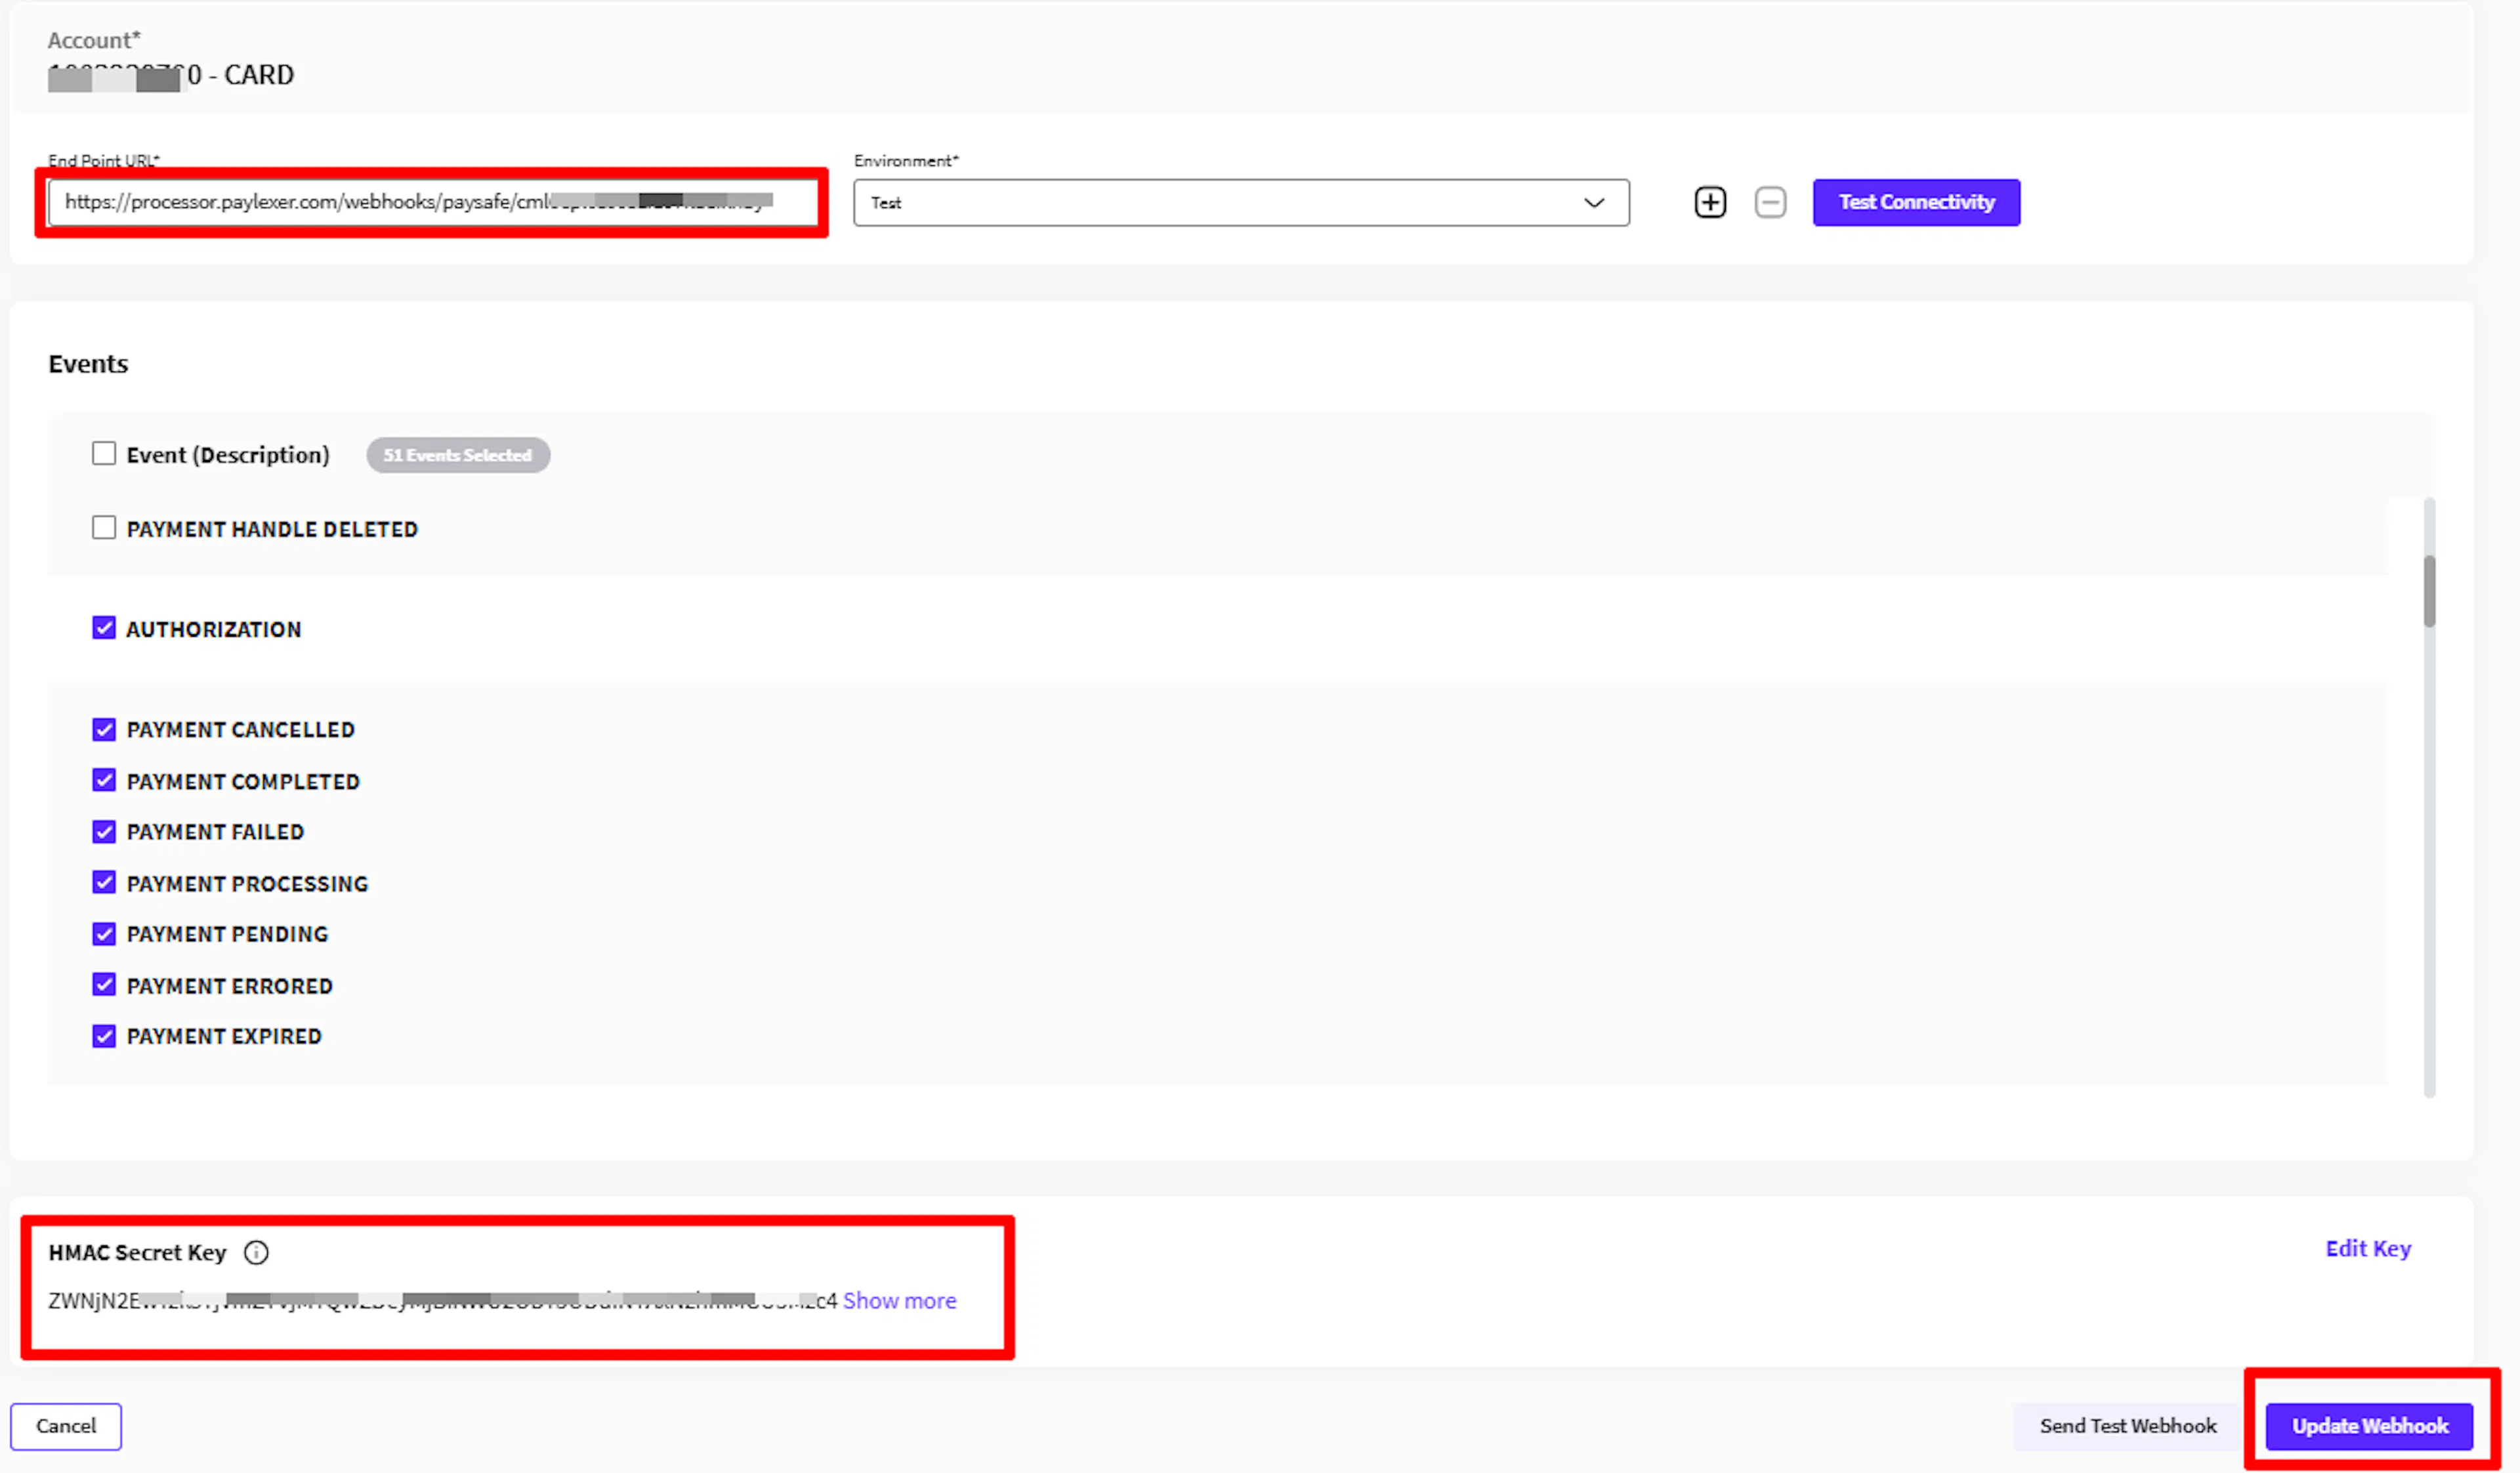
Go to Developer → Webhook Configurations in the Business Portal, open or create your account configuration, and copy the HMAC Secret Key. Click Show more to reveal it. Paysafe uses this key to sign webhooks, and PayLexer verifies the signature before processing events.
Adding Credentials to PayLexer
Open PayLexer Dashboard
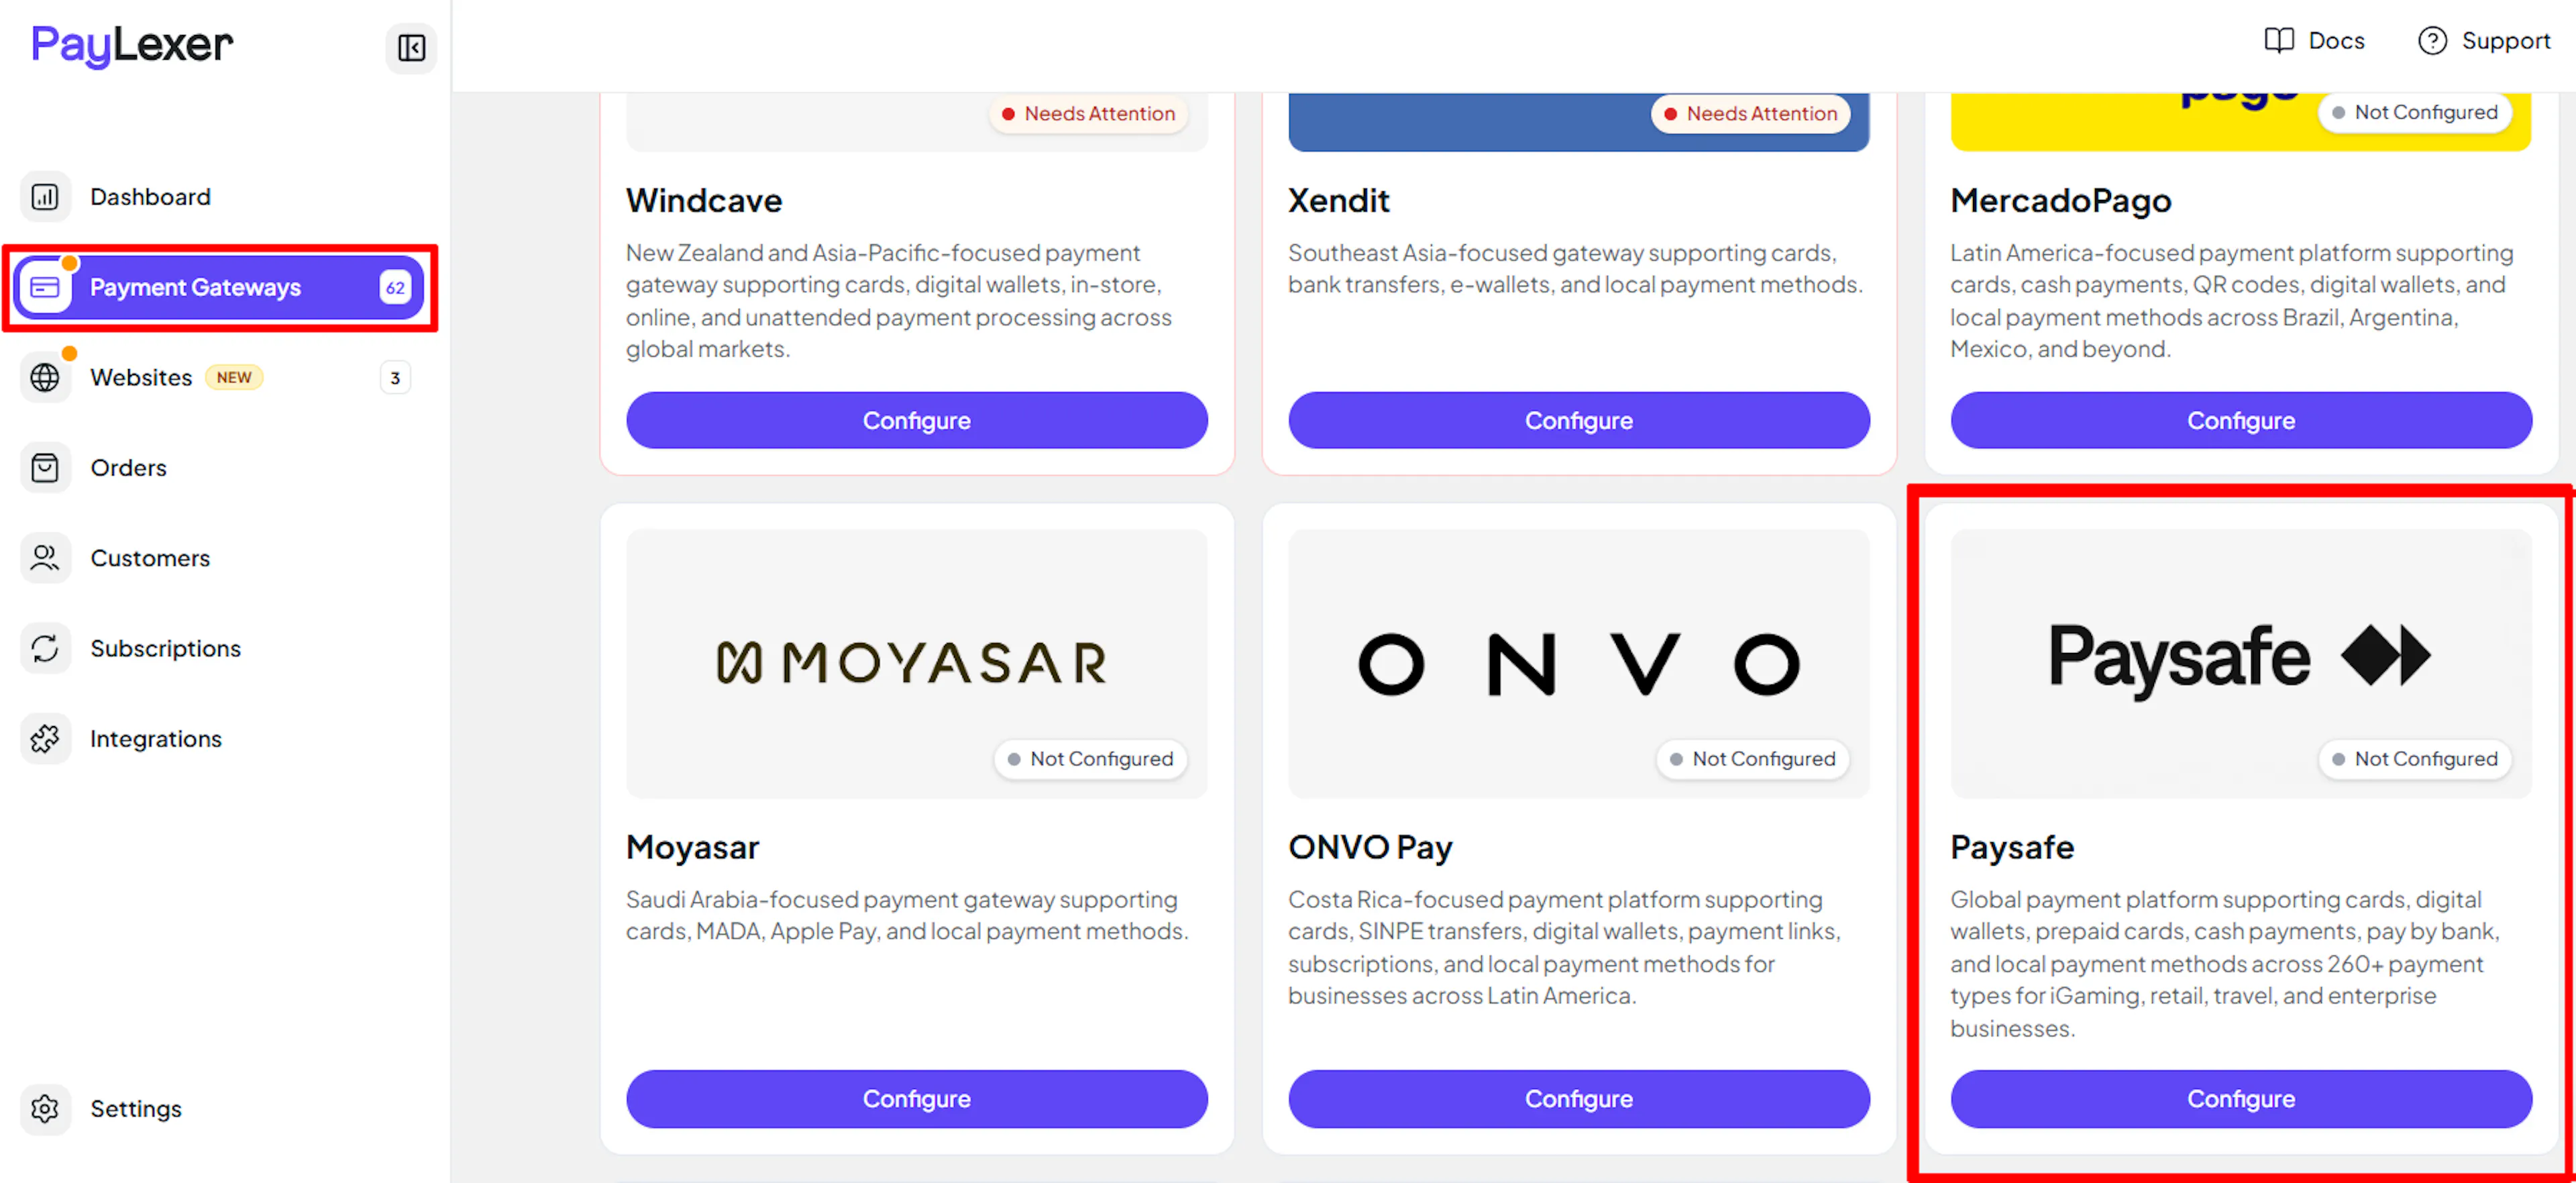
Log in to your PayLexer dashboard and navigate to Payment Gateways -> Paysafe.
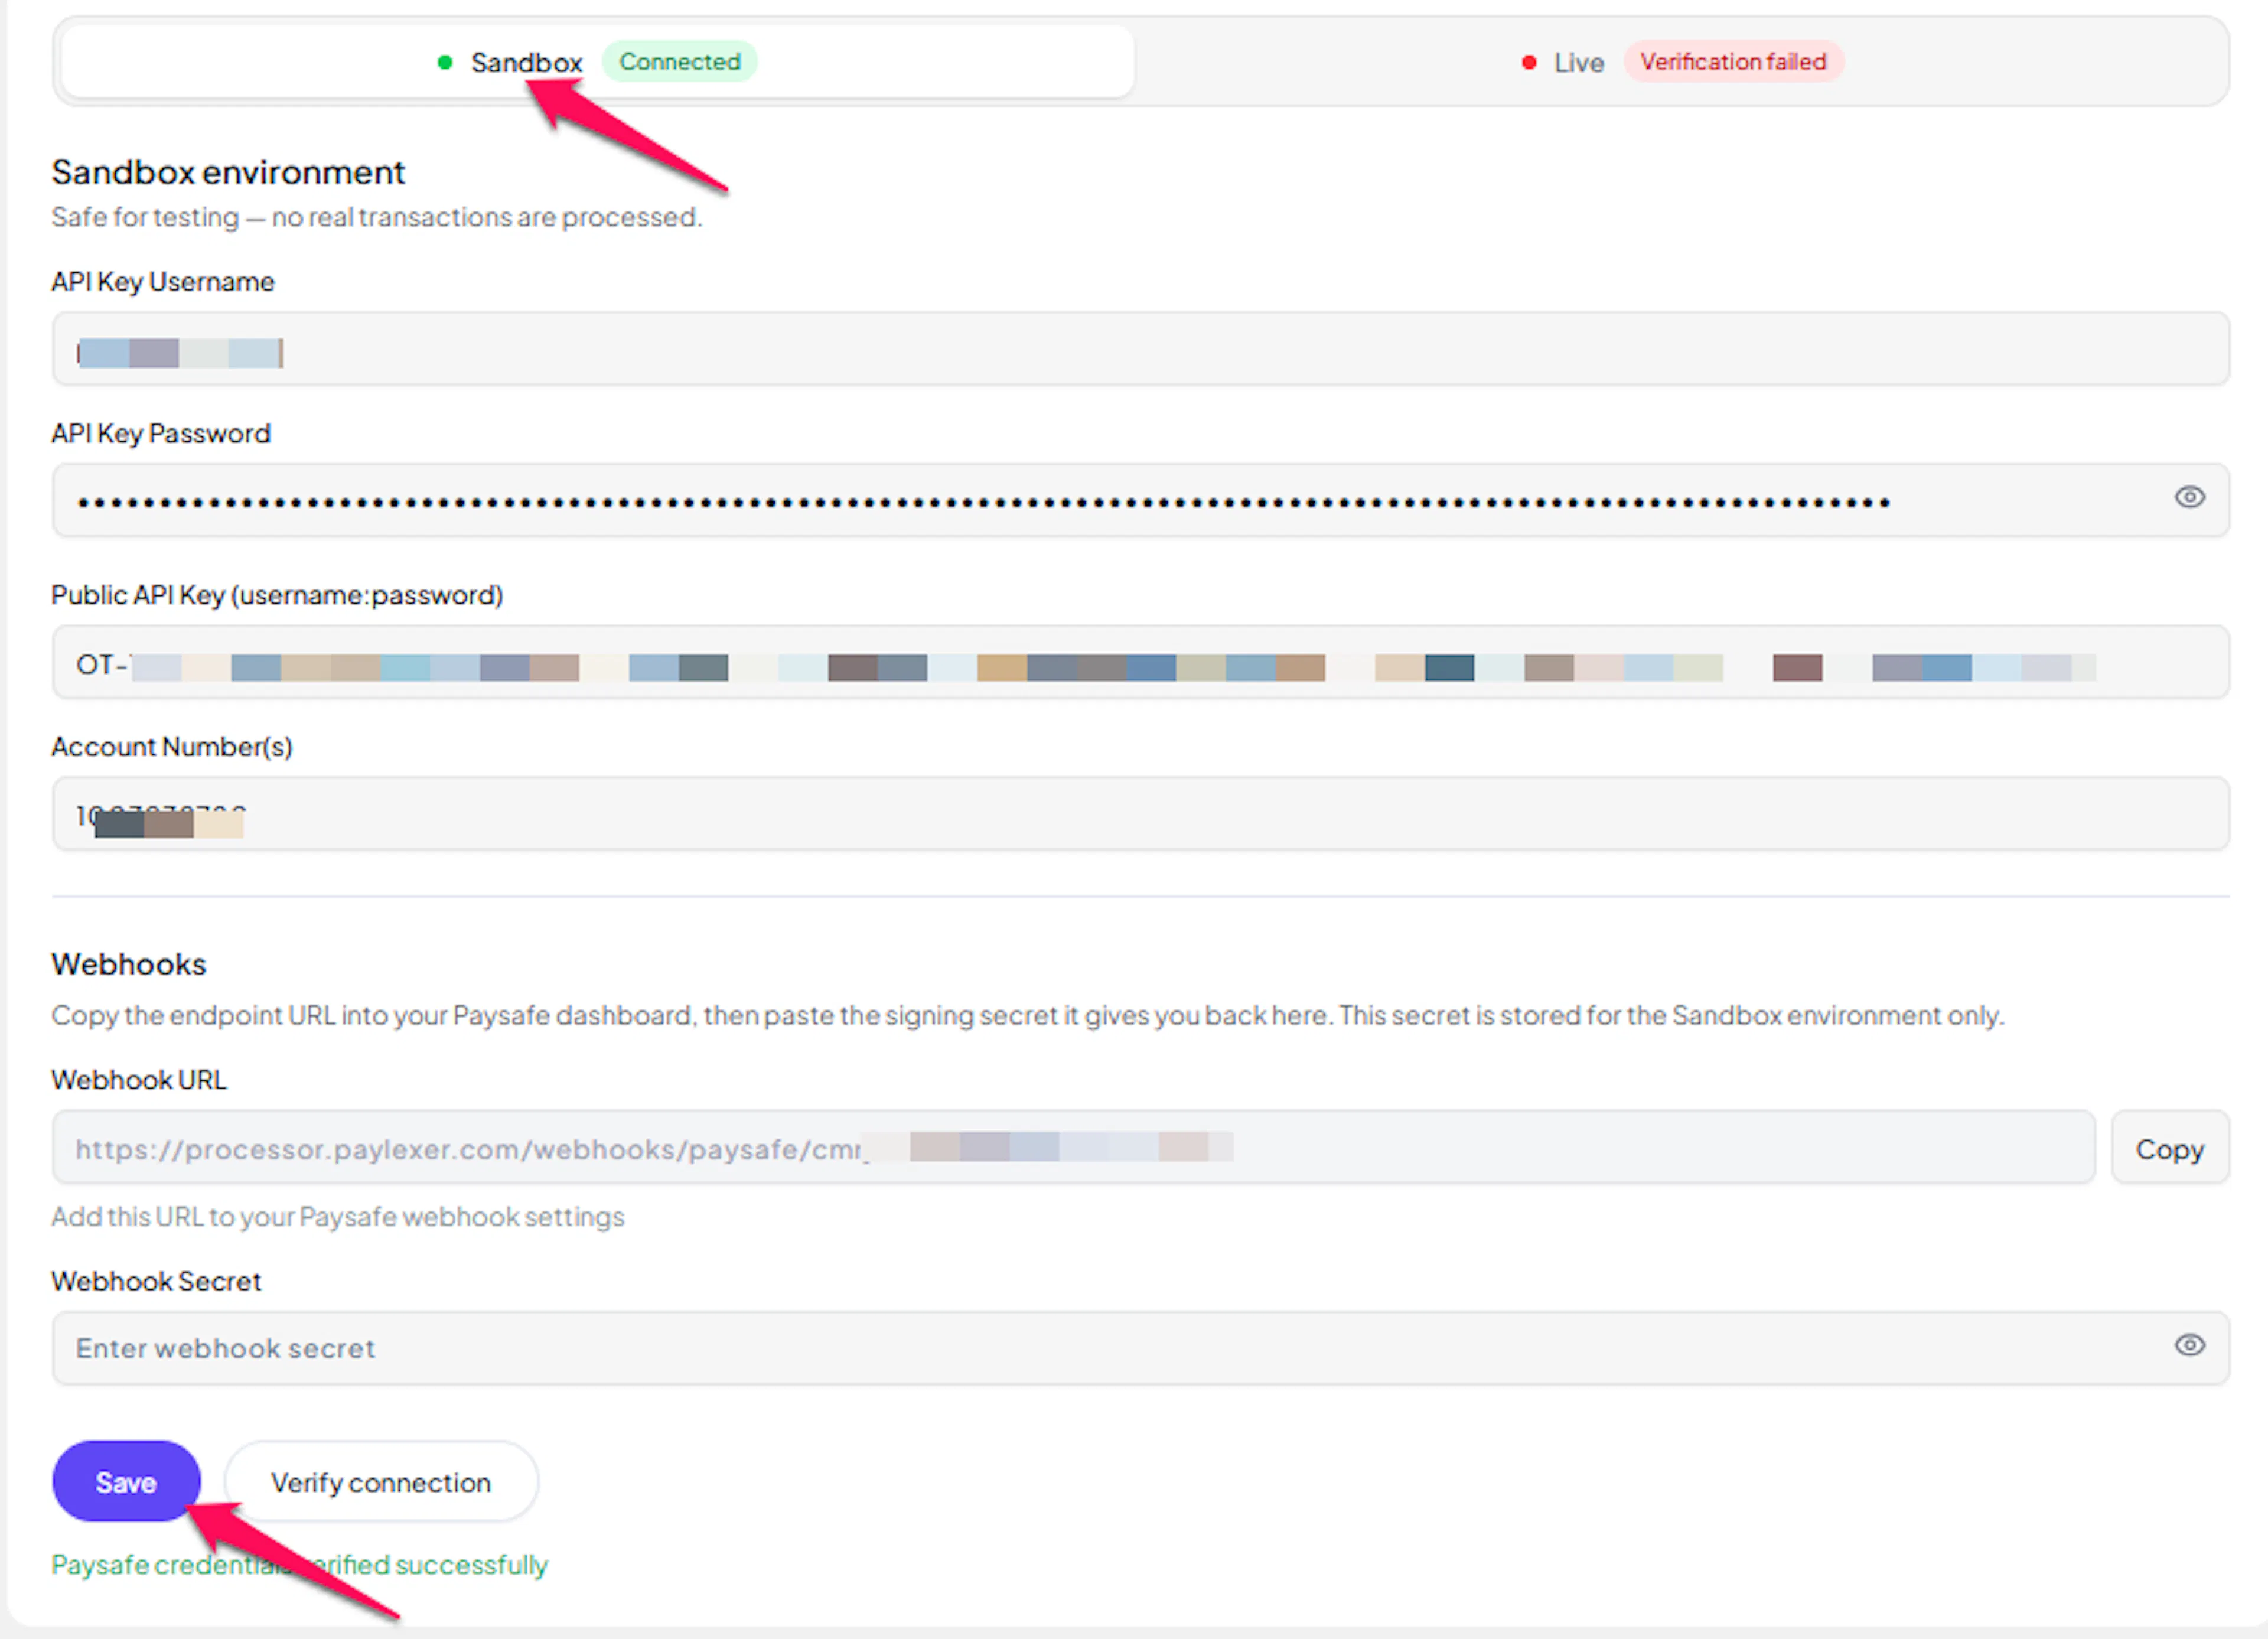
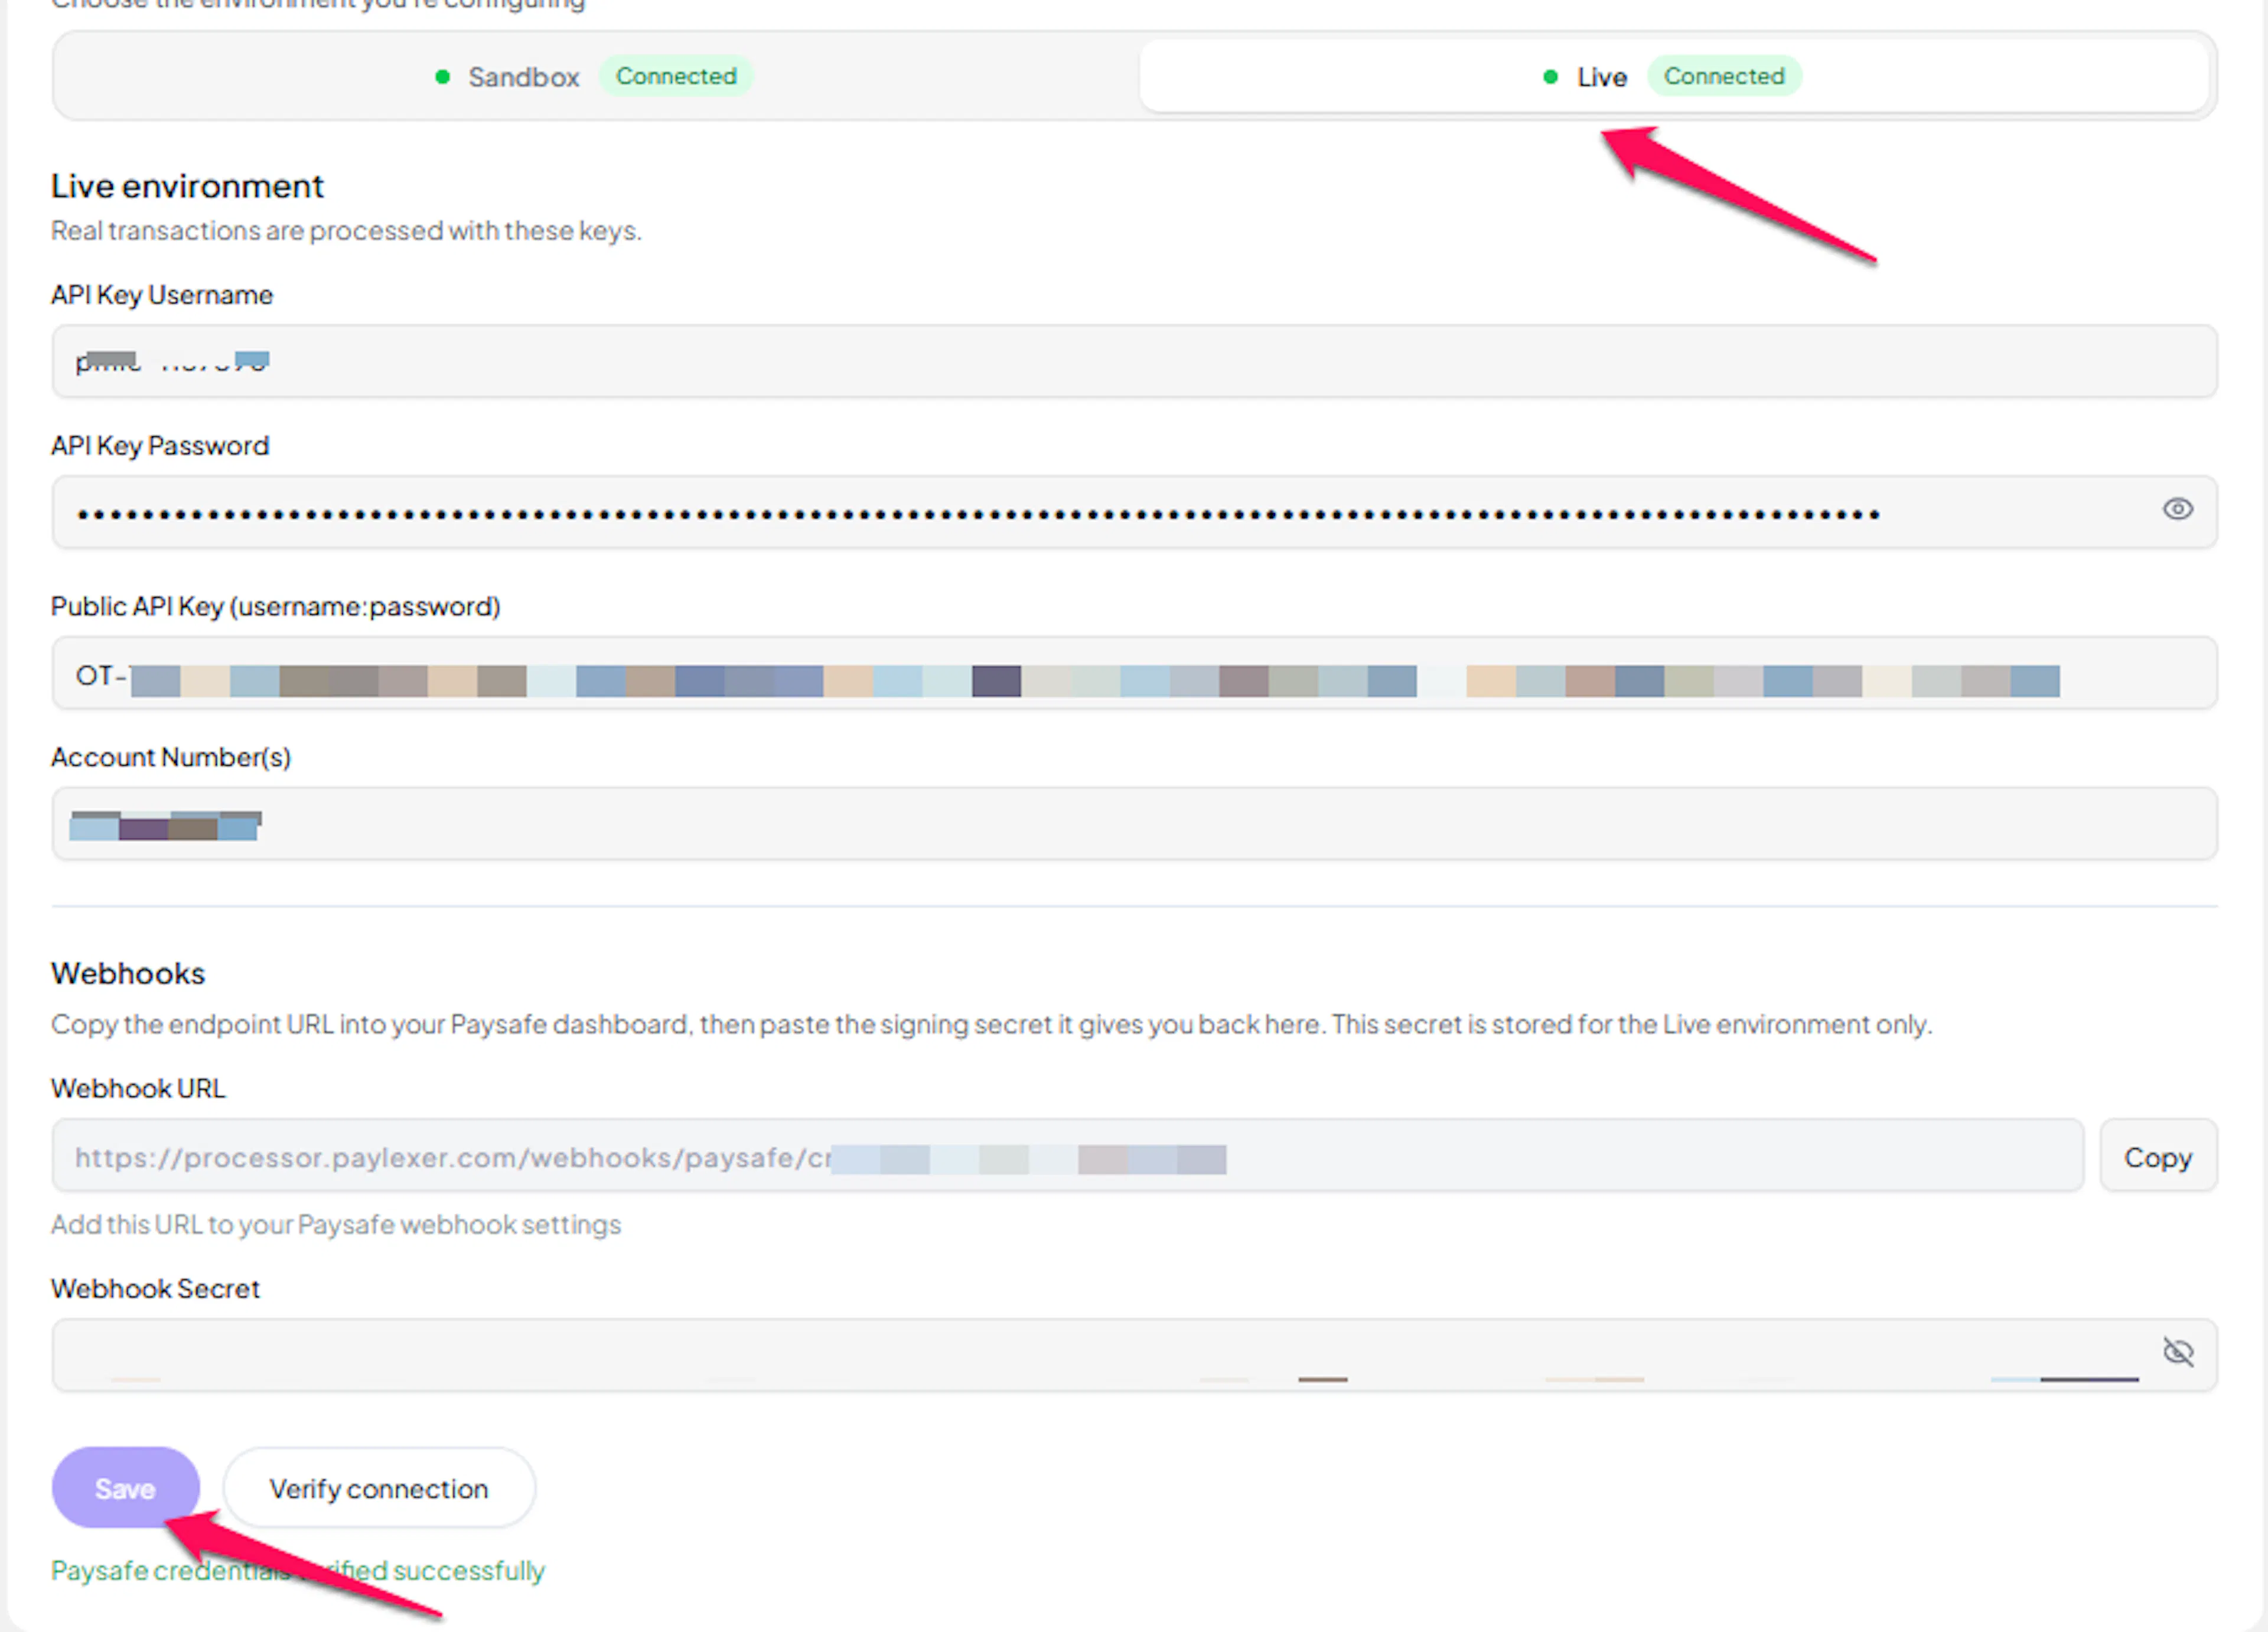
Enter your credentials
Paste the API Key Username, API Key Password, Public API Key, Account Number(s), and Webhook HMAC Key into the corresponding PayLexer fields.
For Account Number(s):
- Single currency:
1009688230 - Multiple currencies:
USD:1009688230, EUR:1009688231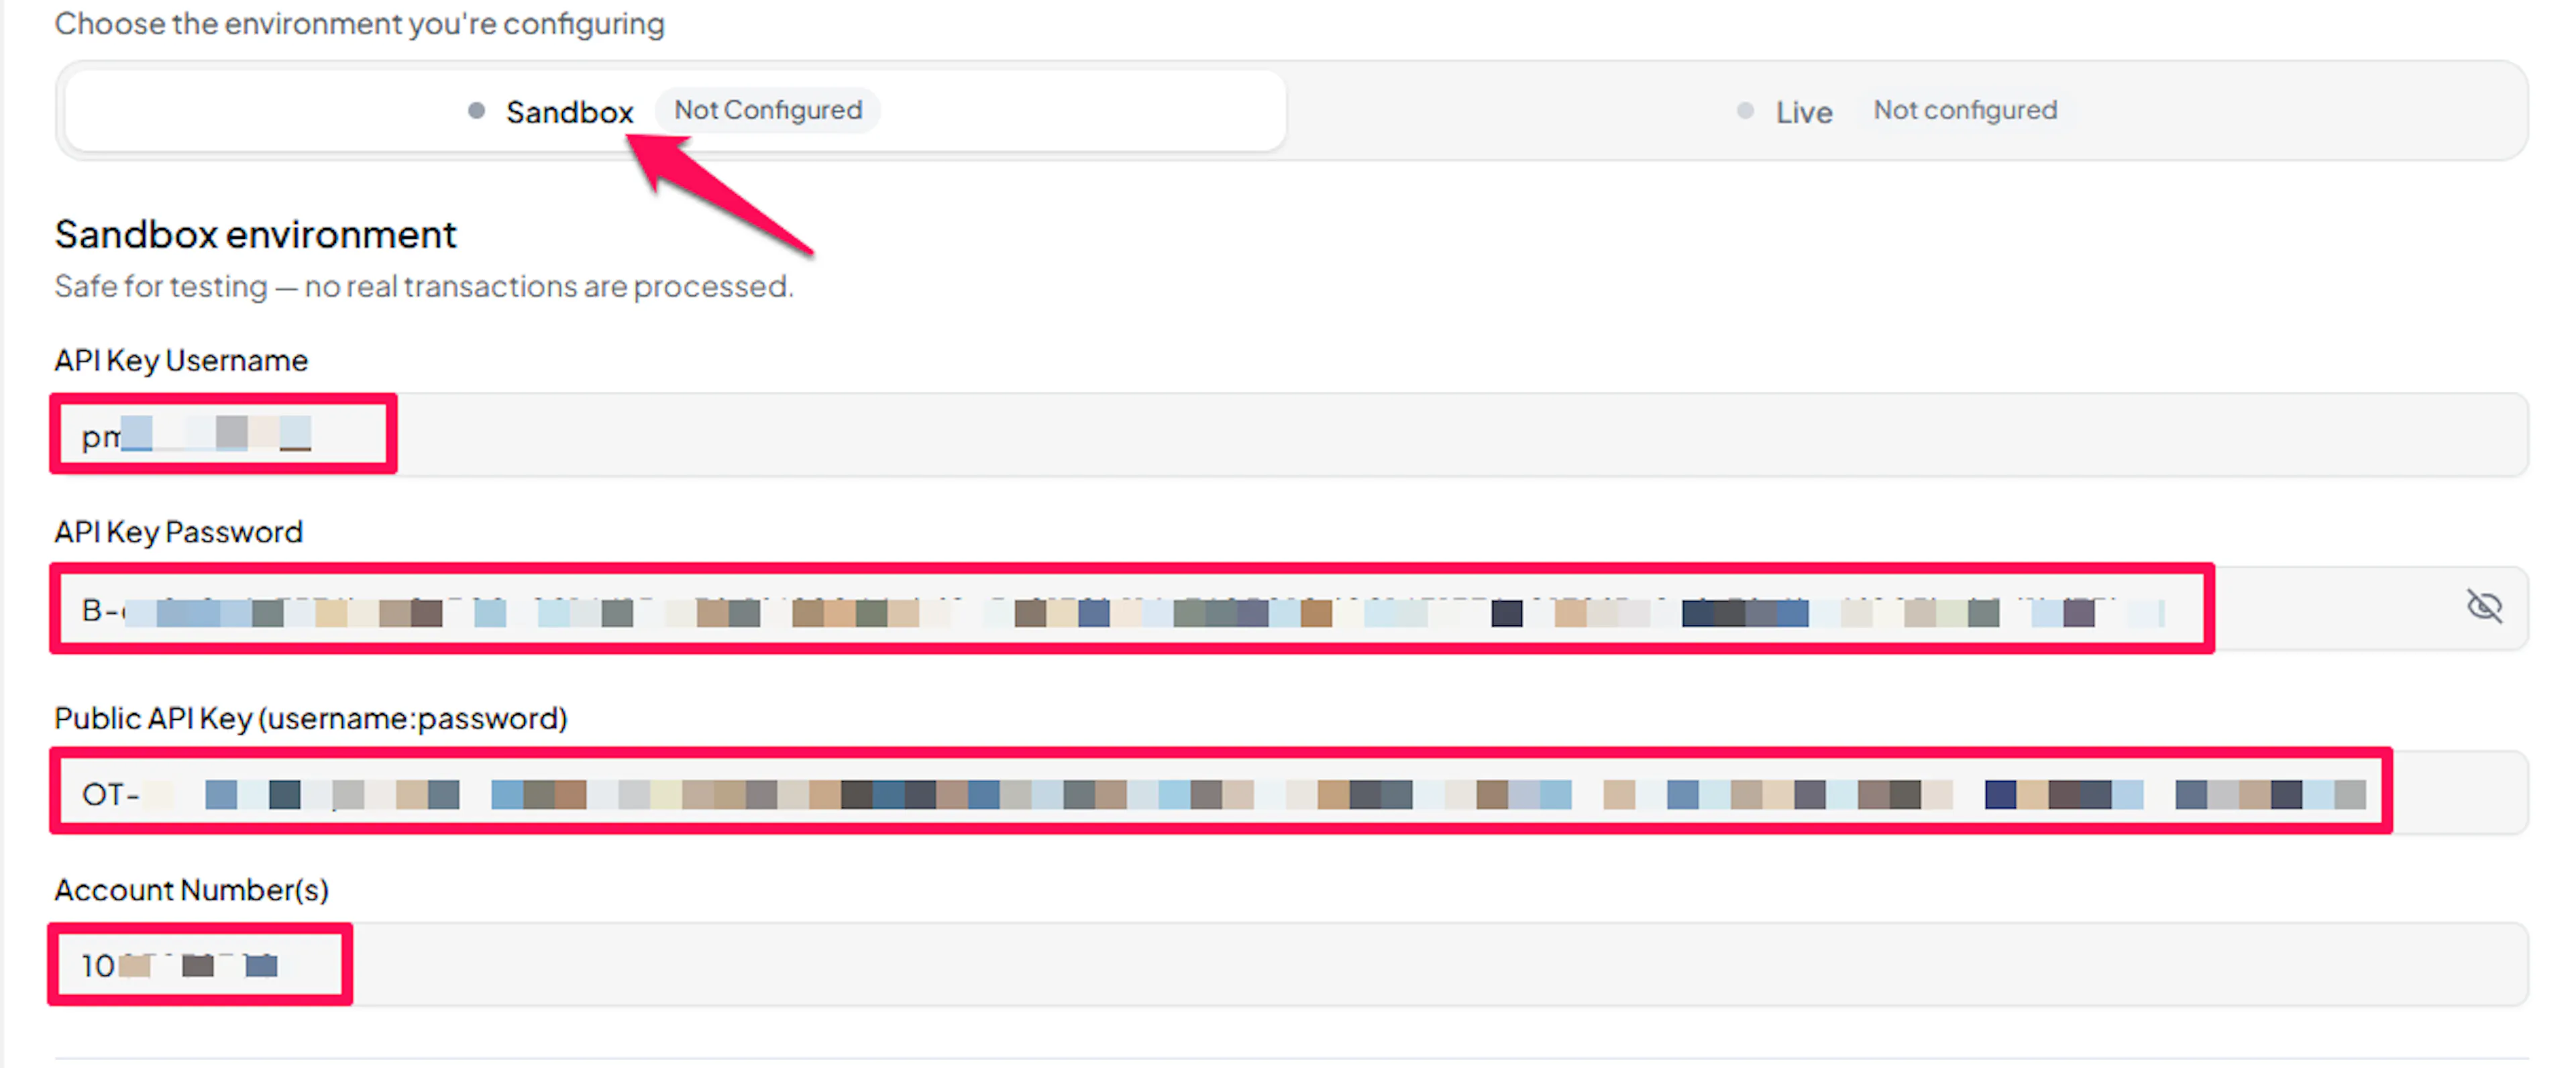
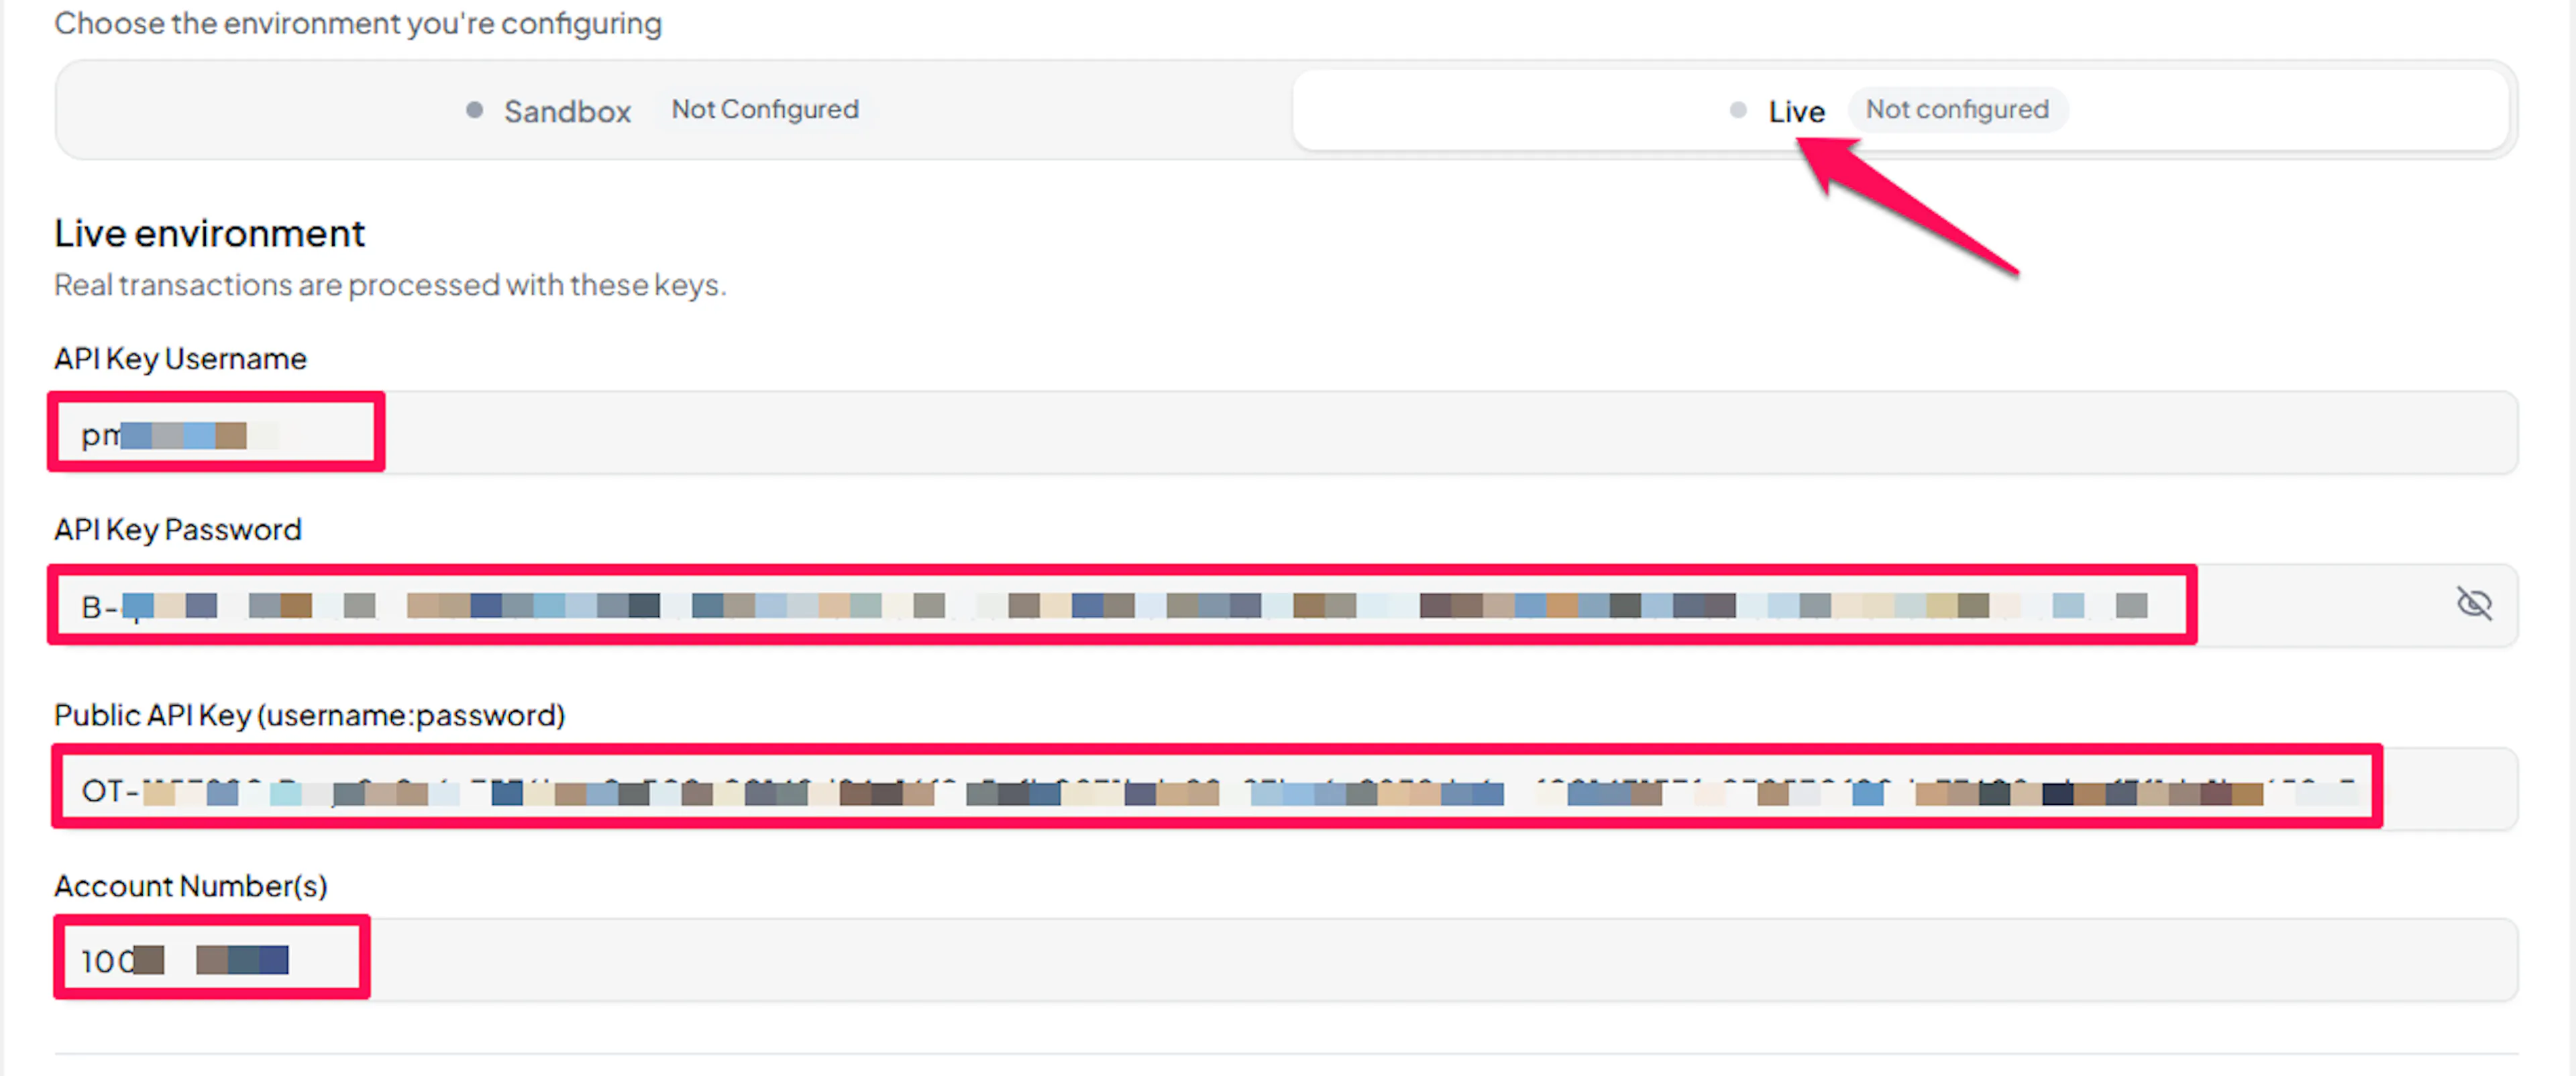
Understanding Live/Production and Sandbox Settings:
| Environment | Purpose |
|---|---|
| Live / Production (Mandatory) | Used for real transactions. Cannot be empty, even when testing. |
| Test / Sandbox (Optional) | Used for testing only. No real money is processed. |
How PayLexer selects credentials:
- Debug/Test mode ON → Test credentials are used
- Debug/Test mode OFF → Live credentials are used
Test and save
Click Save to save your configuration and verify your credentials. Click Verify Connection to test the connection.
Configuring Webhooks (Mandatory)
Webhooks enable real-time payment updates and significantly improve reliability.
Benefits of Webhooks:
- Instant payment status updates
- Automatic refund processing
- Dispute notifications
Paysafe sends an HMAC-signed webhook for server-to-server confirmation of payments, refunds, and subscription renewals. Paysafe has no self-service webhook screen, so the endpoint is registered by the Paysafe team on request.
Copy your PayLexer webhook URL
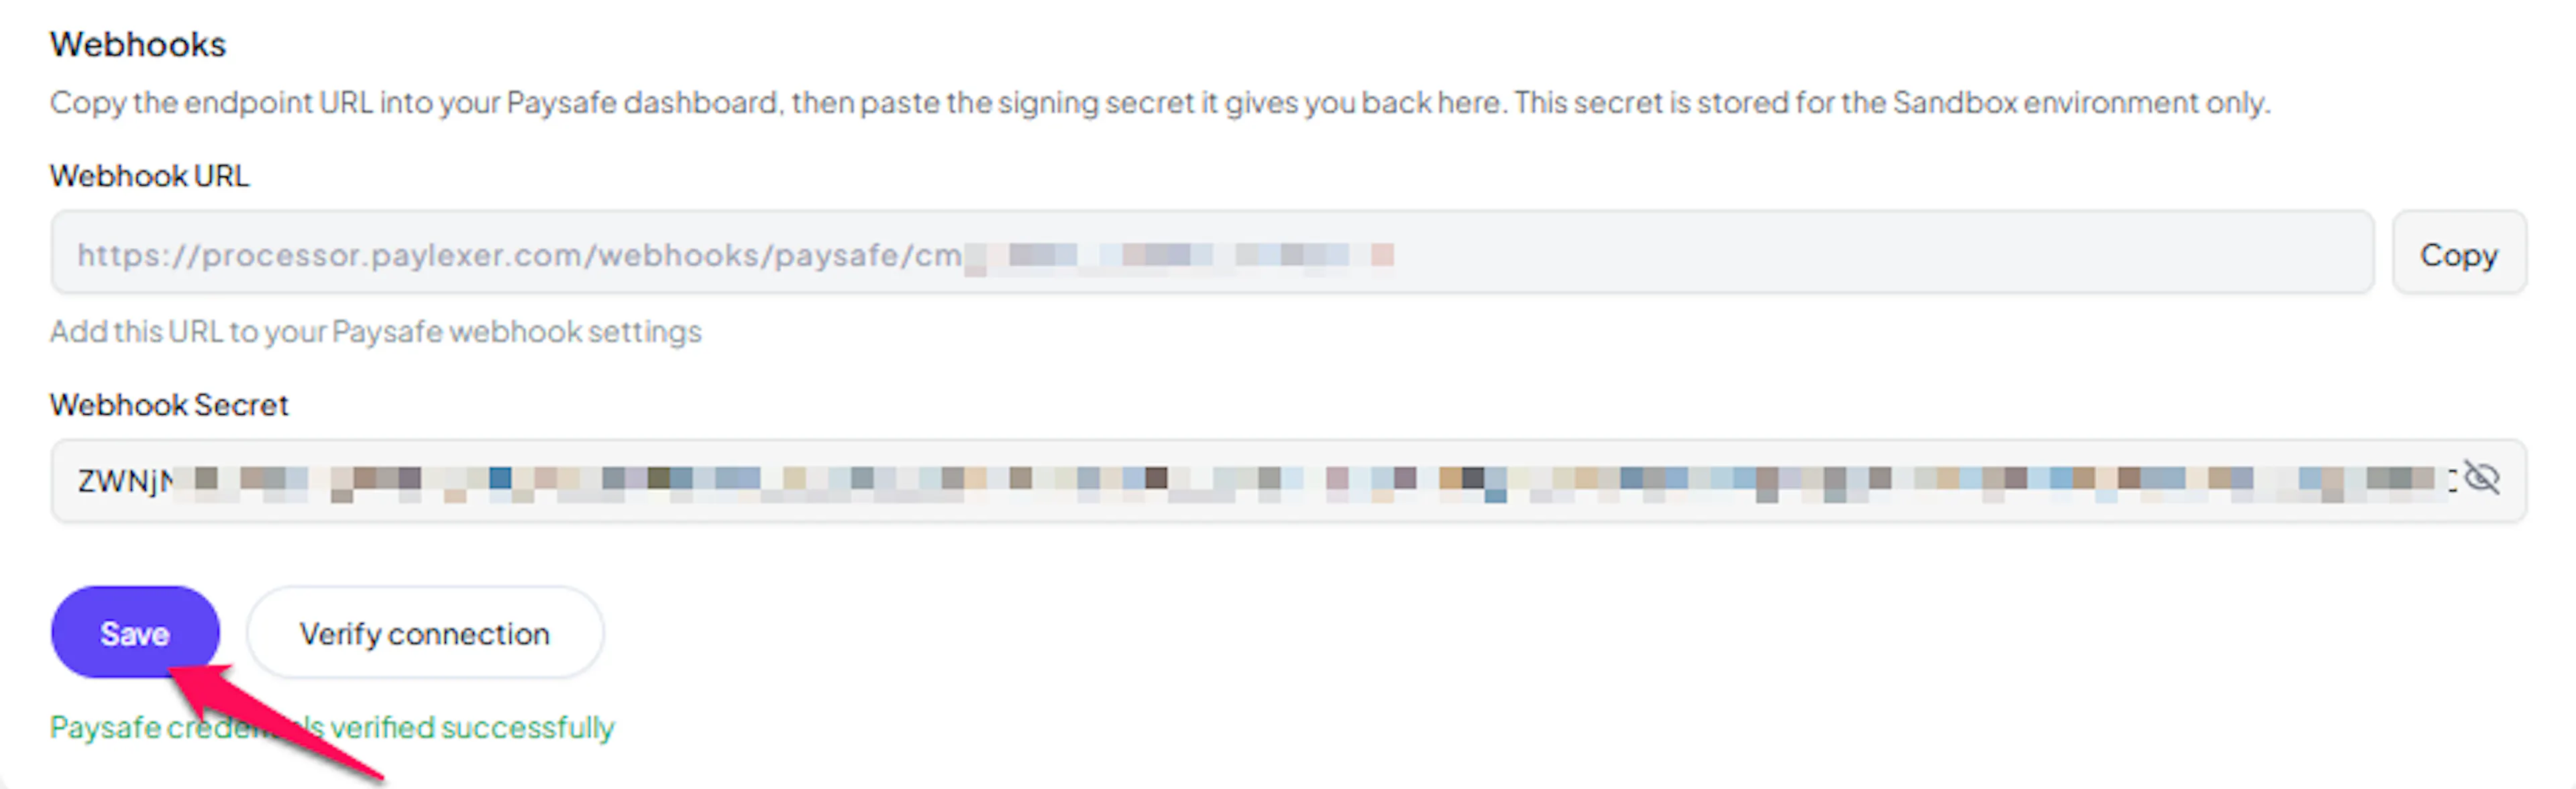
In PayLexer -> Payment Gateways -> Paysafe, copy the Webhook URL shown for your account.

Register the complete URL exactly as shown, including the path after the domain. This path identifies your account; without it, payments cannot be matched.
Request webhook registration from Paysafe
Raise a service request with Paysafe through the Business Portal or your account manager, asking them to register the PayLexer webhook URL for your account.
Ask for payment, settlement, refund, and subscription events to be enabled.
Confirm the HMAC key matches
Make sure the Webhook HMAC Key saved in PayLexer is the key associated with your registered webhook, then click Save.
Until the webhook is registered and delivering, orders stay in a pending state after payment, because Paysafe has no other way to tell PayLexer that money moved.
Integrate Paysafe to Your Website
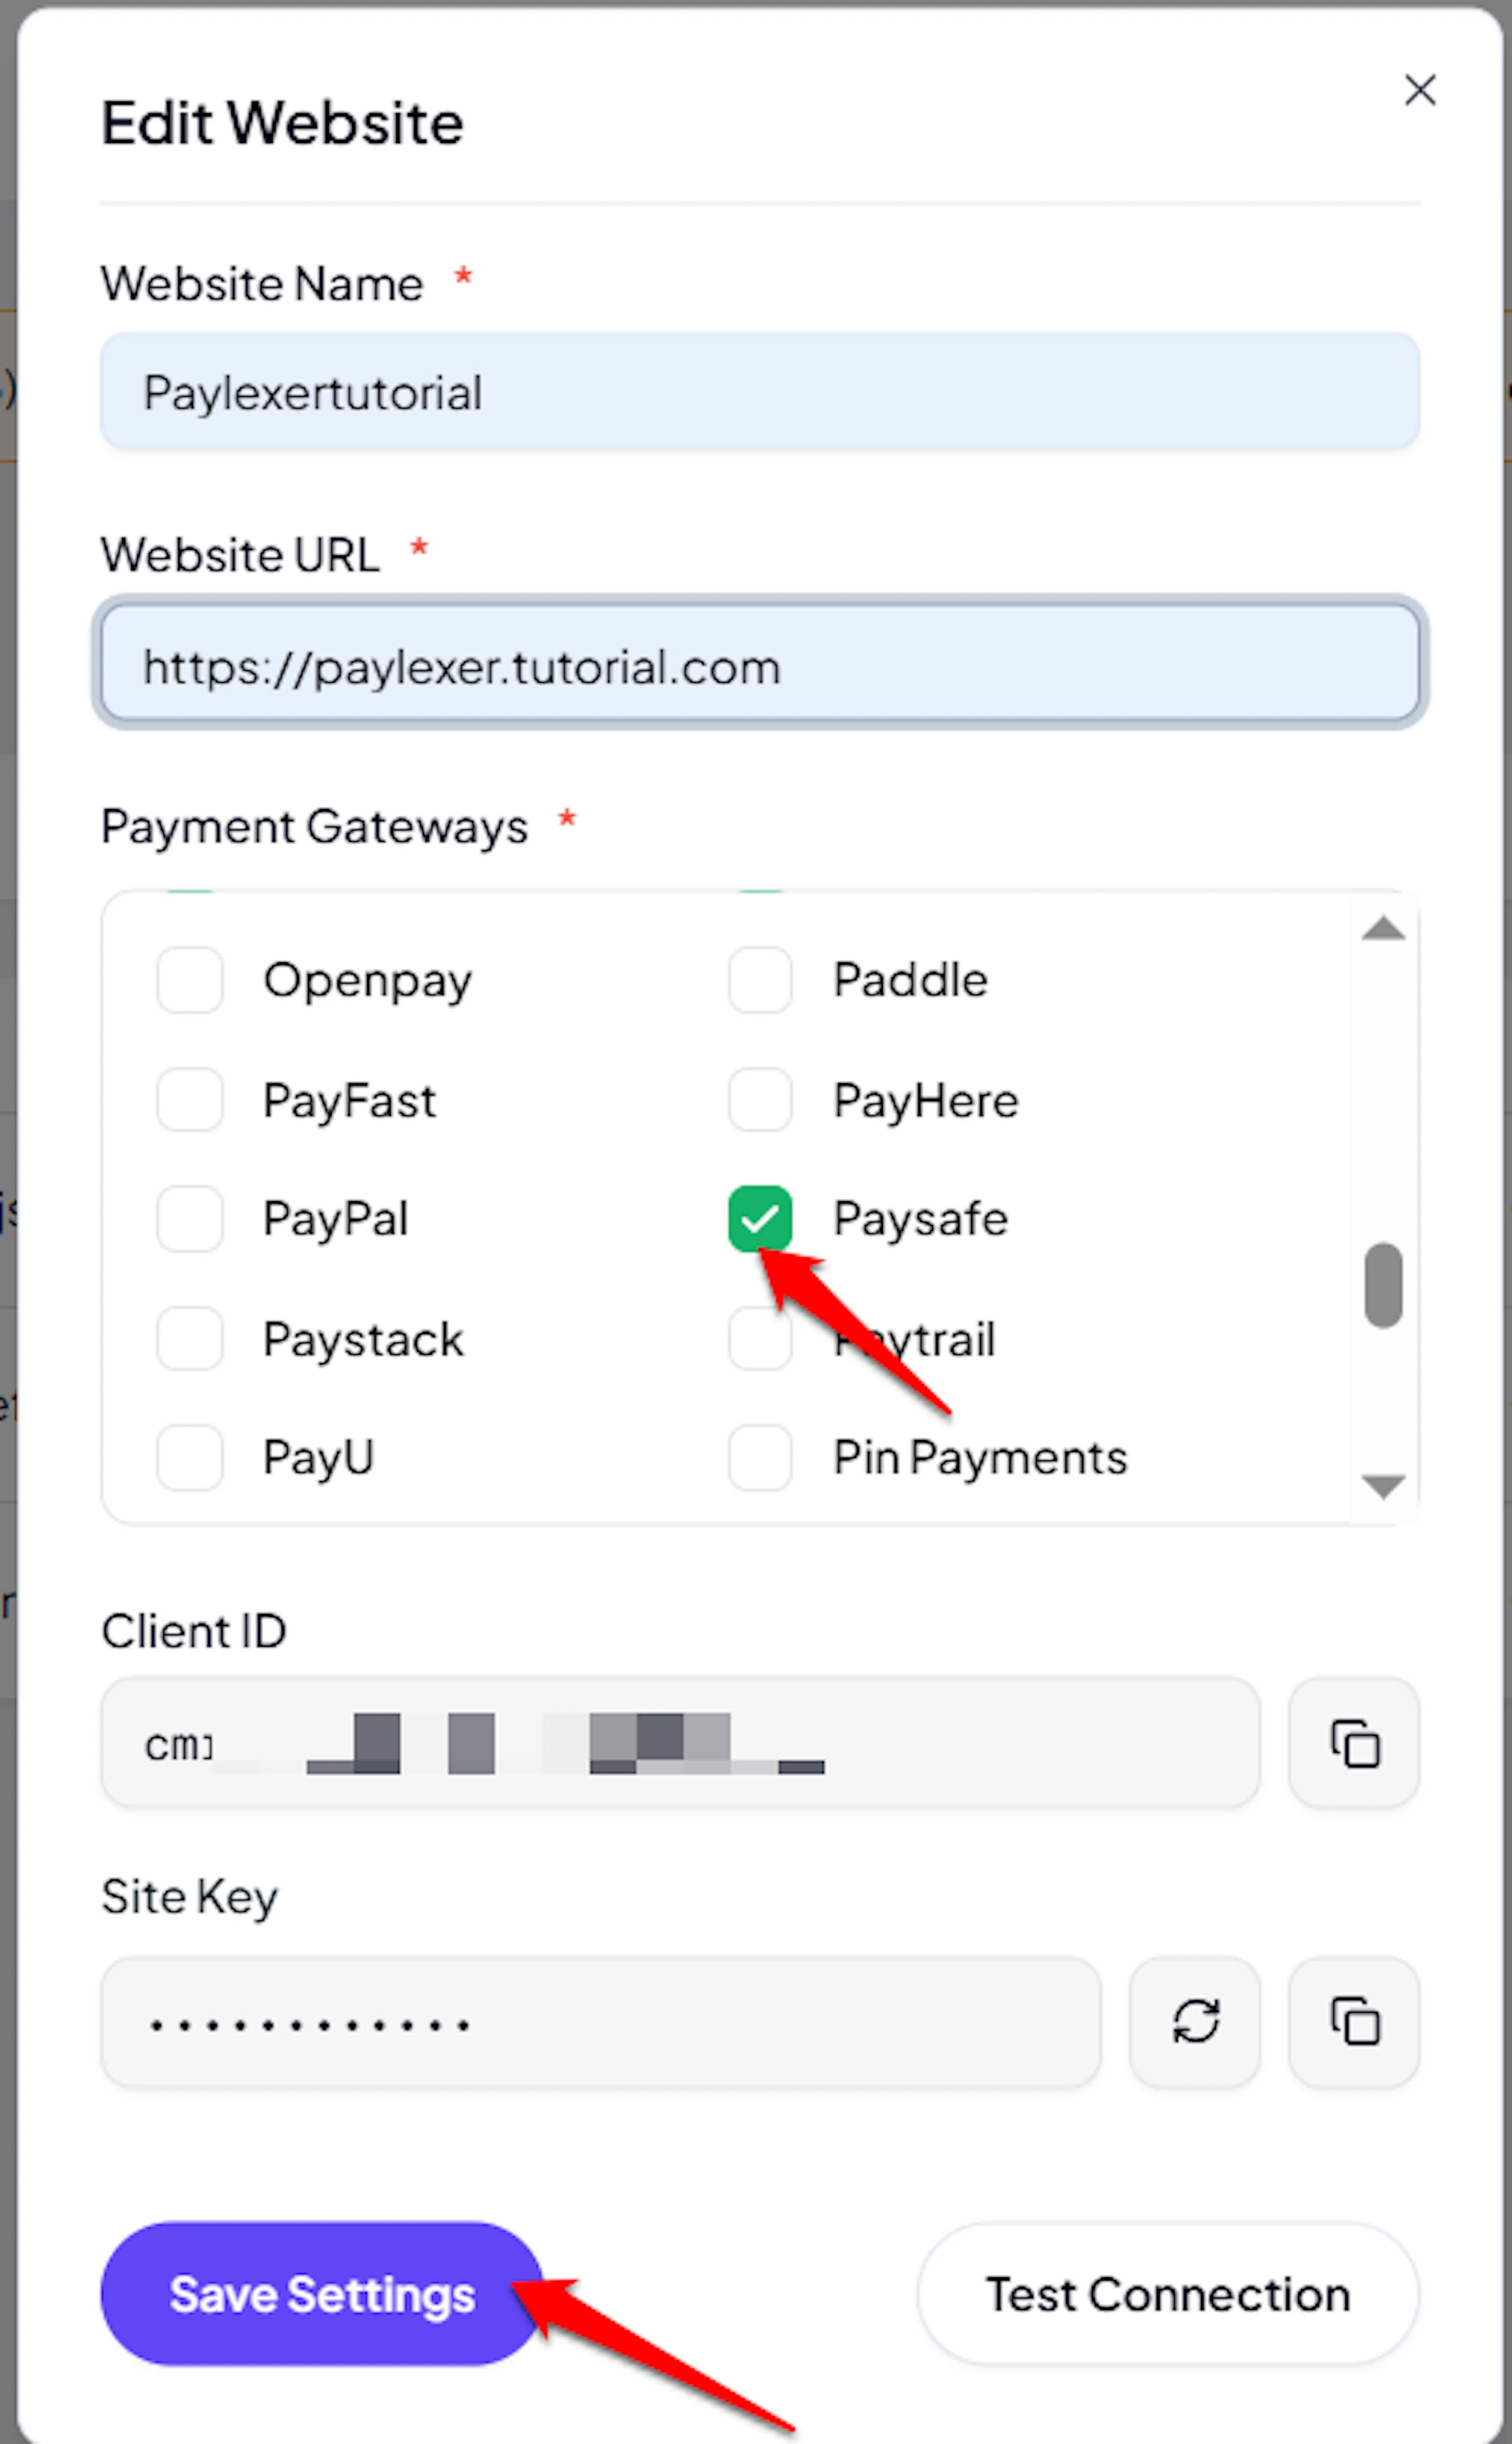
If you have already added and configured your site, you can enable Paysafe in your existing setup.
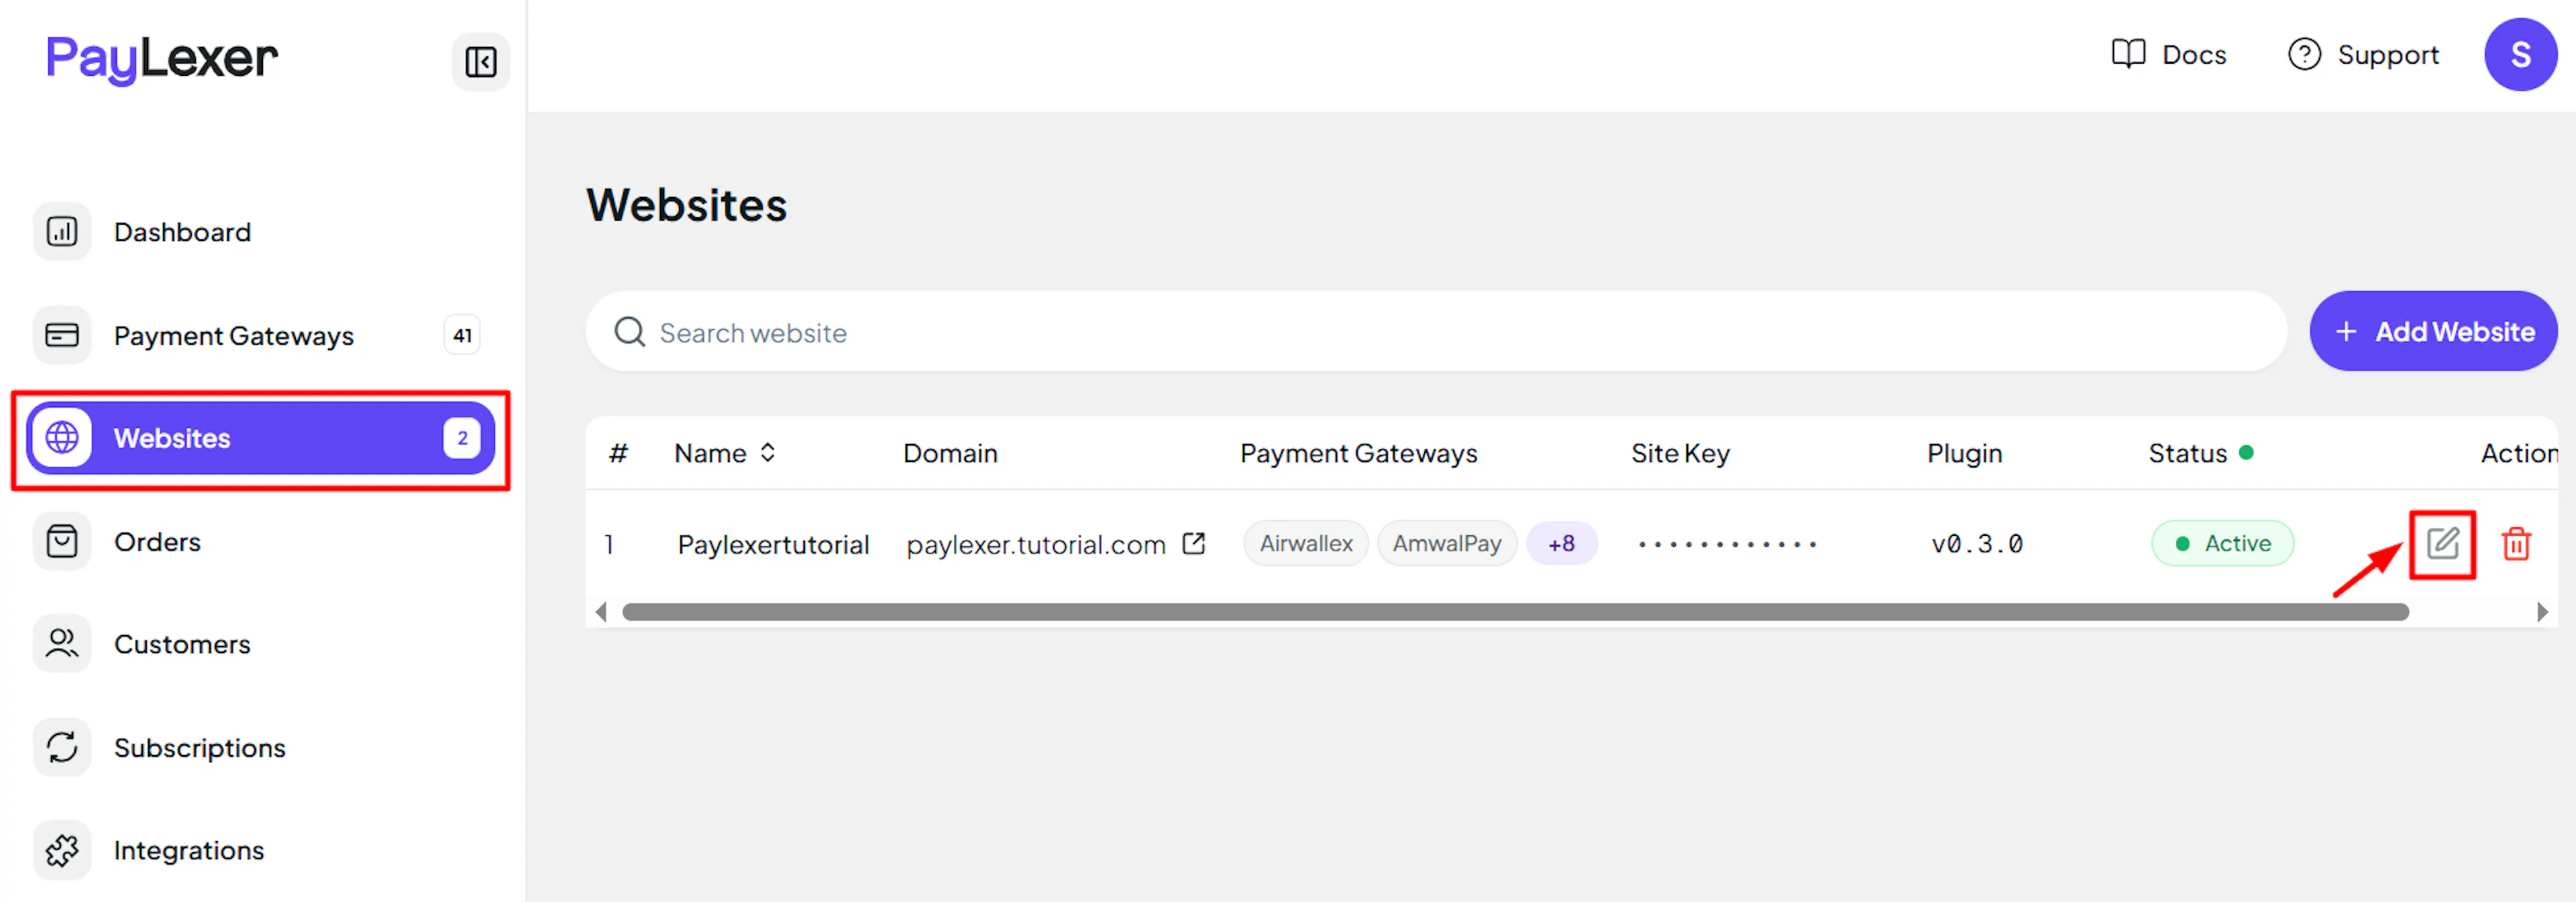
Go to Websites
Navigate to Websites in your PayLexer dashboard.
Edit your website
Click the Edit Icon of your added website.
Enable Paysafe
Click the checkbox to enable Paysafe for the website.
If you haven't added a website yet, Continue to Add Your Website →
Troubleshooting
Best Practices
- Test in sandbox before enabling production. Use your test credentials and Paysafe's test cards to complete a full payment before switching to live.
- Register your webhook before taking live payments, so orders are marked paid automatically instead of waiting in a pending state.
- Collect a billing address, including the postal code, at checkout so payments pass Address Verification.
- Add an account number for every currency you sell in, so no transaction is rejected for an unconfigured currency.
- Keep your API Key Password and Webhook HMAC Key confidential, and ask Paysafe to rotate them if you suspect exposure.
FAQs
Still Have Questions?
- Paysafe Support: Paysafe Support
- PayLexer Support: Contact Support