

Getnet
Connect Getnet to PayLexer to accept card, Pix, and boleto payments across Latin America and Iberia.
Getnet is the payment platform of Santander, serving merchants across Latin America and Iberia. It supports card, in-person, online, and omnichannel payments in Brazil, Mexico, Chile, Argentina, Uruguay, Spain, and Portugal. PayLexer connects to its Regional/Global API so you can collect card, Pix, and boleto payments directly on your own site.
- Supported Regions (Merchant Accounts): Brazil, Mexico, Chile, Argentina, Uruguay, Spain, Portugal - view full list
- Supported Currencies: BRL, ARS, CLP, USD, UYU, EUR - view full list
Getnet accepts payments in BRL, ARS, CLP, USD, UYU, and EUR only. If you sell in Mexico, Getnet settles those payments in USD rather than MXN. Orders in any other currency will not offer Getnet at checkout.
Supported Features
- Credit and debit card payments collected on your own site, with the card exchanged for a secure token before the charge is sent
- Pix instant payments and boleto bancário for Brazilian shoppers
- Installment plans that split a purchase across several monthly payments
- Full refunds issued directly from your PayLexer dashboard
- Independent payment confirmation - every Getnet notification is re-verified before an order updates
- One-click webhook registration and automatic credential validation, so setup takes minutes
Getnet currently supports one-time payments only. Recurring subscriptions, sign-up fees, free trials, and mixed carts are not supported. Subscription support is planned for a future PayLexer release; use another gateway for recurring billing for now.
Getnet supports full refunds only. Partial refunds aren’t supported because its API can only reverse the entire original charge. PayLexer blocks partial refund attempts with a clear message.
Before You Start
Make sure you have:
- Getnet Merchant Account – Getnet issues merchant accounts through its own sales and onboarding process rather than instant self-service sign-up. Contact Getnet to get started →
- PayLexer Account – Required to configure the integration. Create your account →
- A website where you want to integrate
Looking for a different payment processor? View all supported gateways →
Configuring Getnet
You need a Client ID, Client Secret, and Seller ID from Getnet for this integration. All three are required to save your configuration.
Getting API Credentials
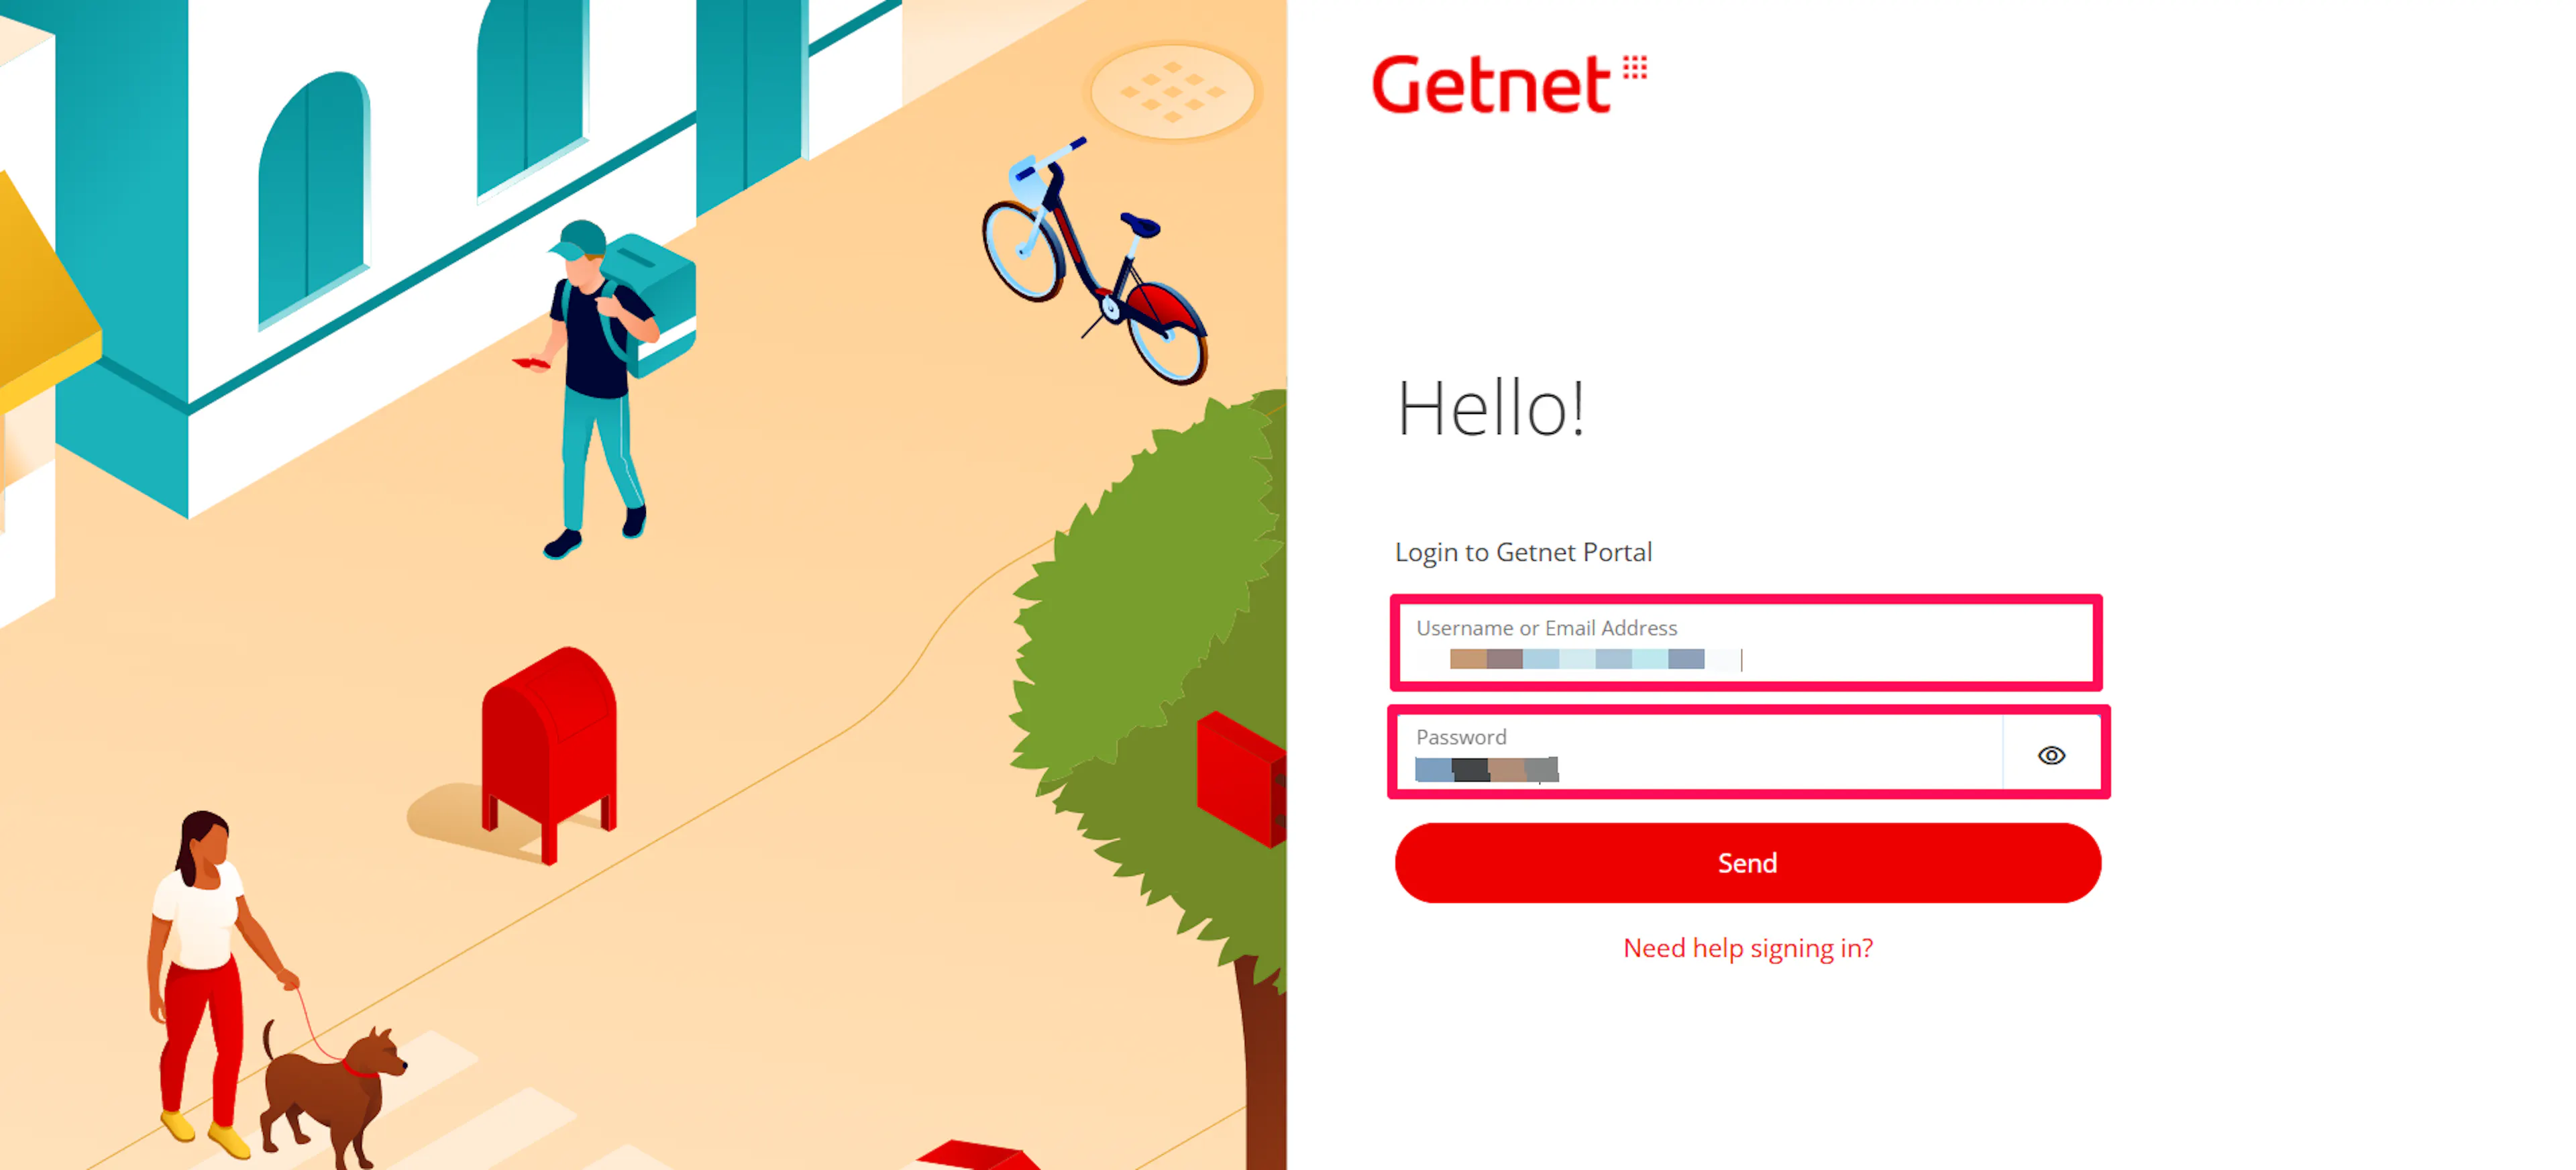
Log In to the Getnet Merchant Portal
Log in to your Getnet merchant portal, or contact your Getnet account manager for API access.
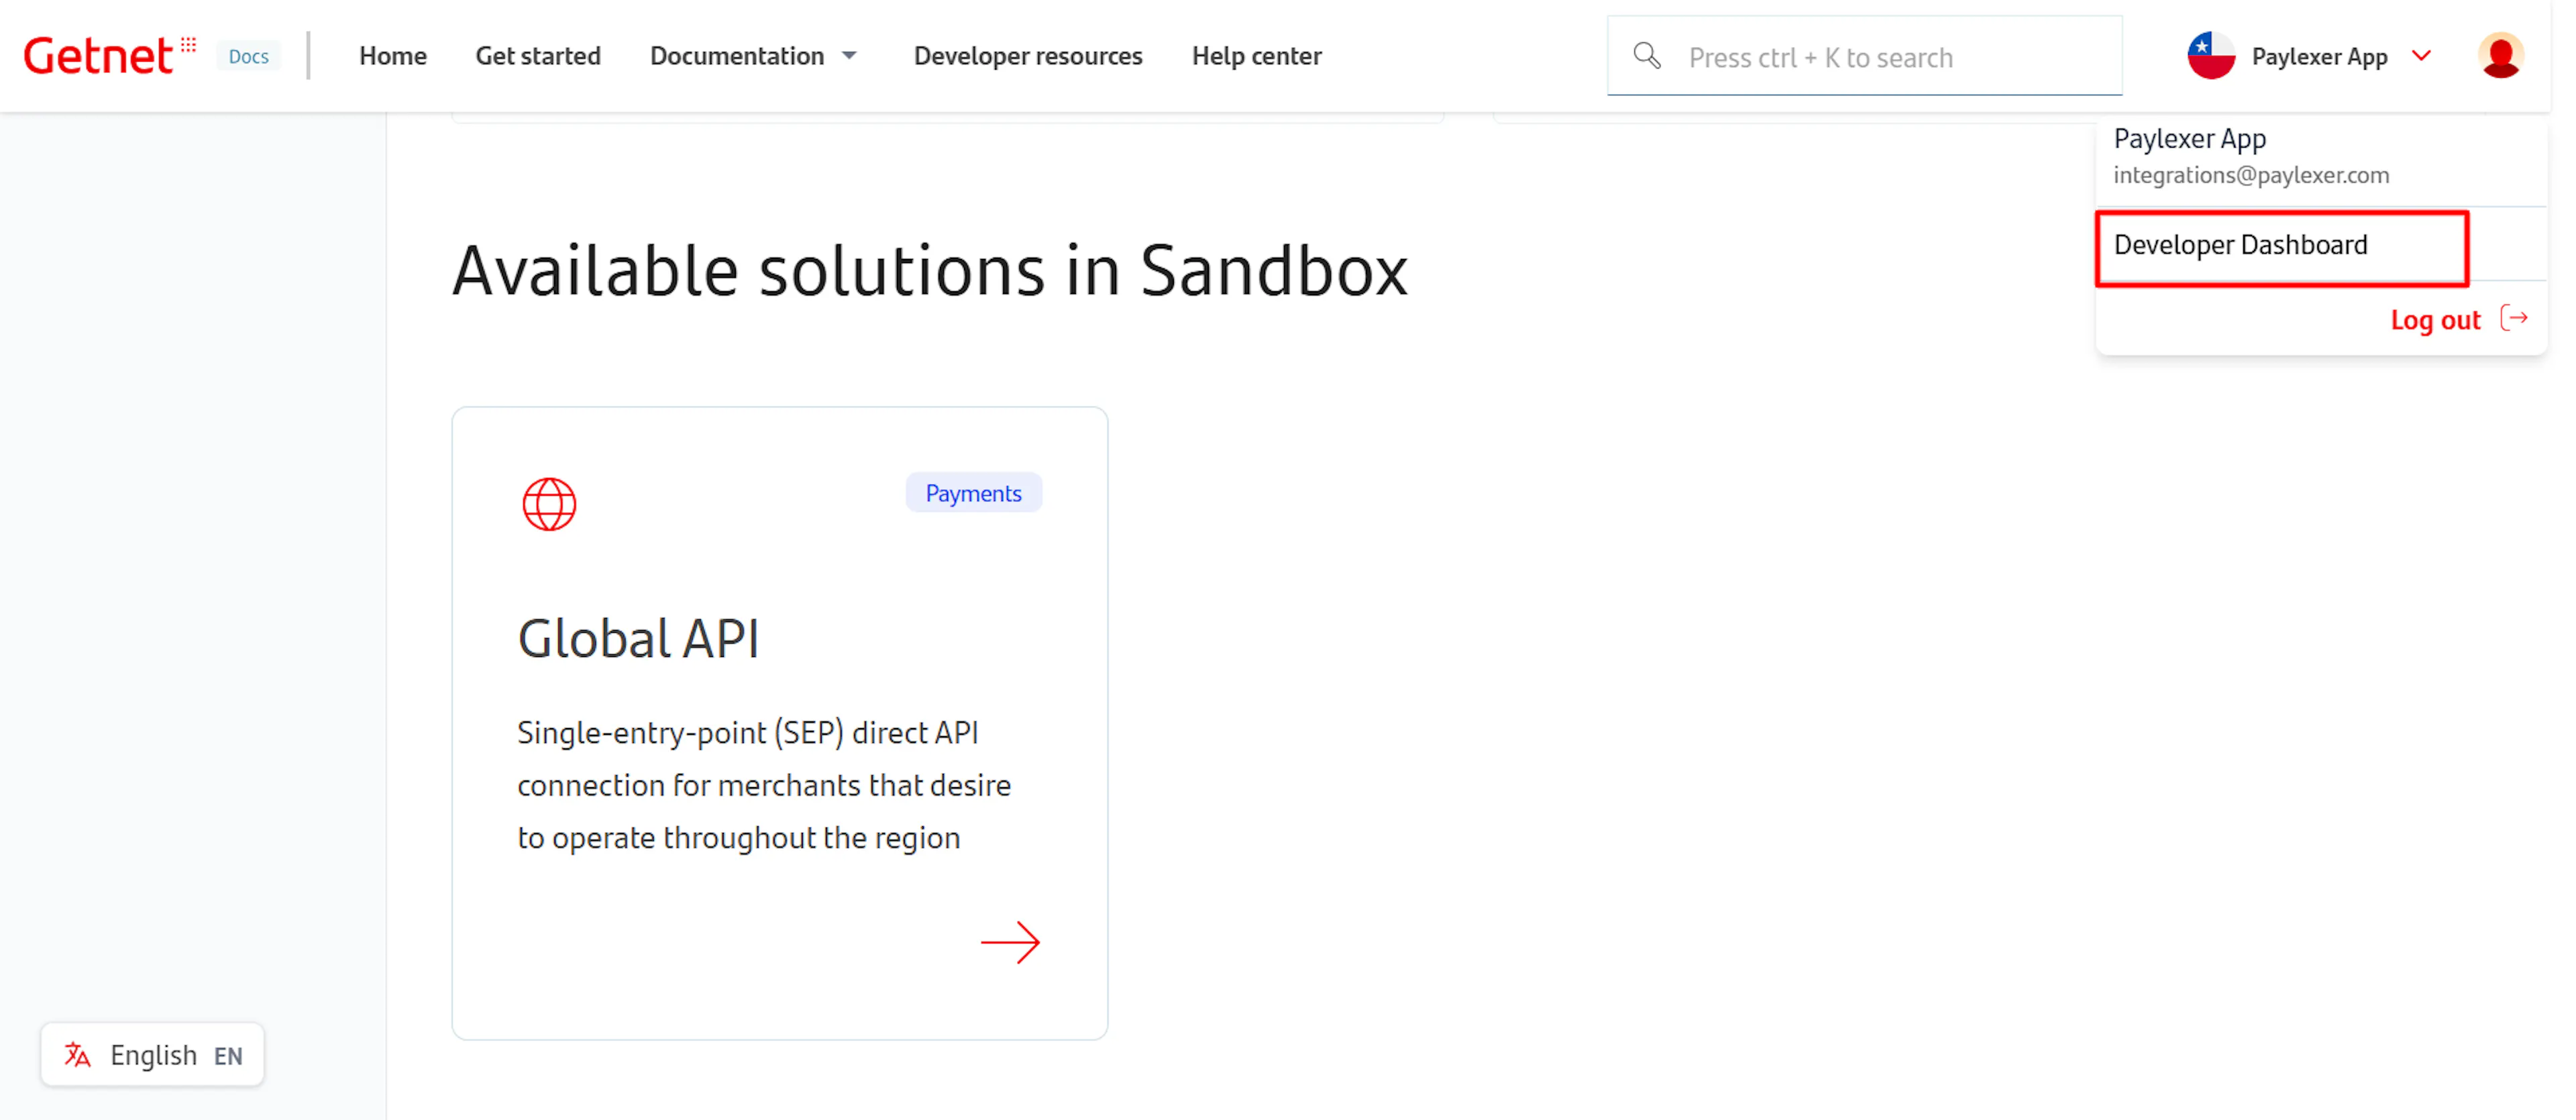
Open the API Credentials Section
Open the API or developer credentials section of your account.
Copy Your Client ID and Client Secret
Copy your Client ID and Client Secret. These are separate for your Test/Sandbox account and your Live account - copy both if you have them.
Copy Your Seller ID
Copy your Seller ID (sometimes called a Merchant ID). If you cannot find it in the portal, ask your Getnet account manager for it - you will not be able to save your PayLexer configuration without it.
Getnet credentials are tied to the exact environment they were issued for. A sandbox Client ID will not work against the live environment and vice versa, so keep your test and live pairs separate and paste each into the matching PayLexer field.
Adding Credentials to PayLexer
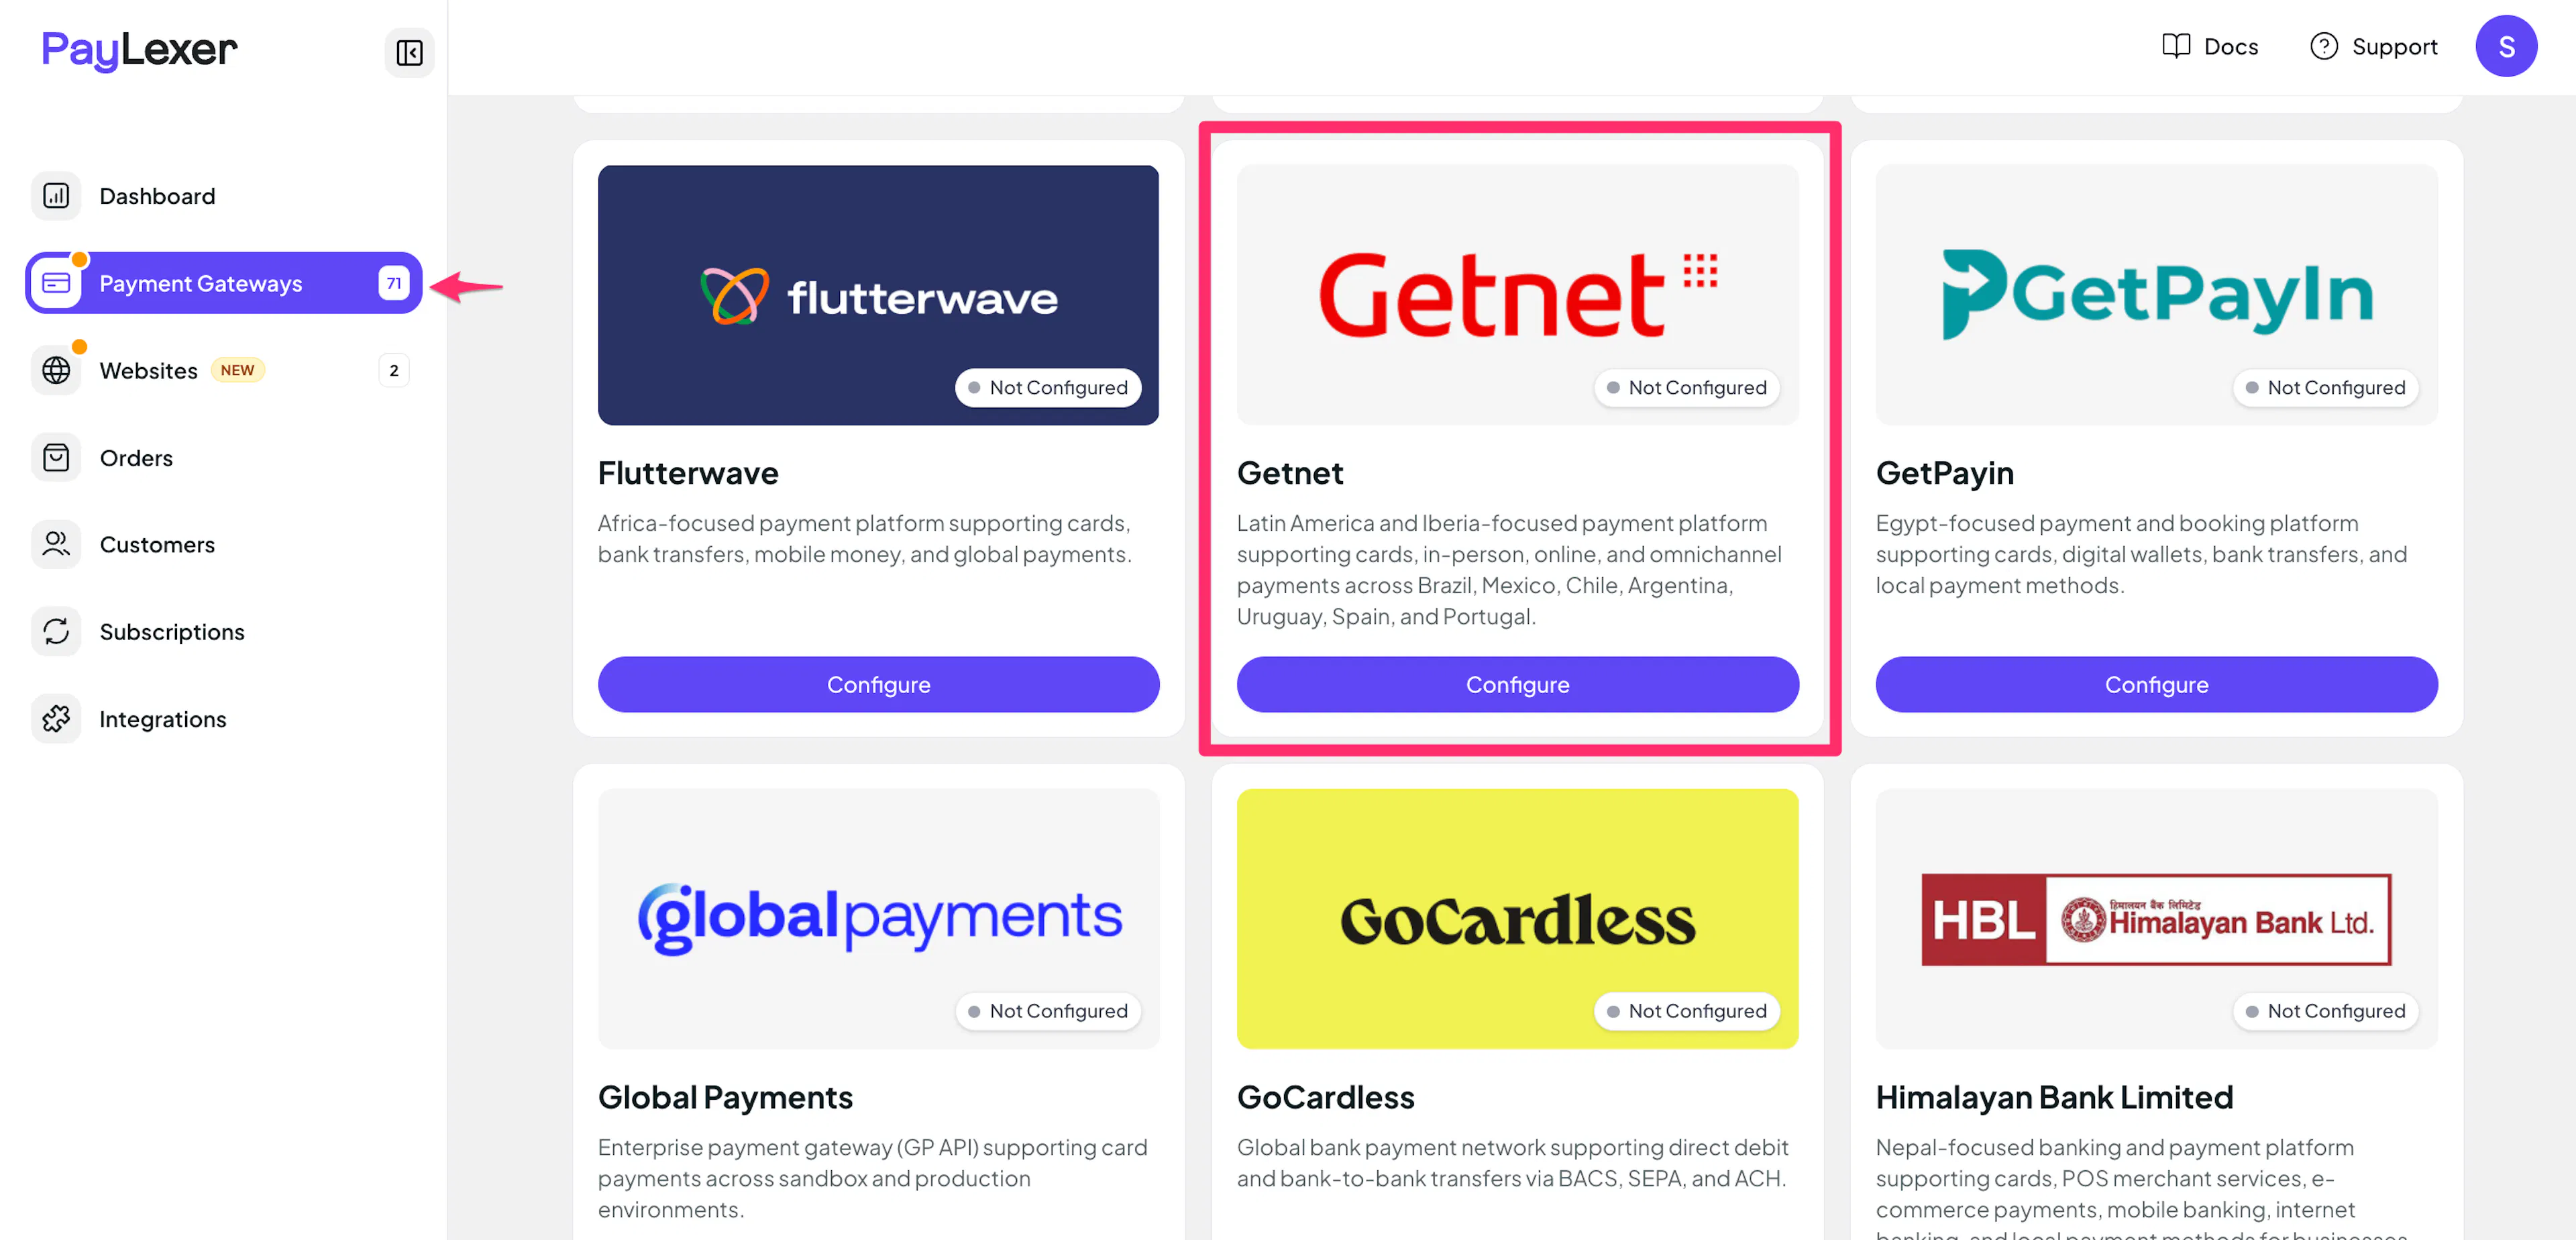
Open PayLexer Dashboard
Log in to your PayLexer dashboard and navigate to Payment Gateways → Getnet.
Enter your credentials
Paste the Client ID, Client Secret, and Seller ID you copied from Getnet into the corresponding fields. All three are required - leaving any of them empty will prevent your credentials from being saved.
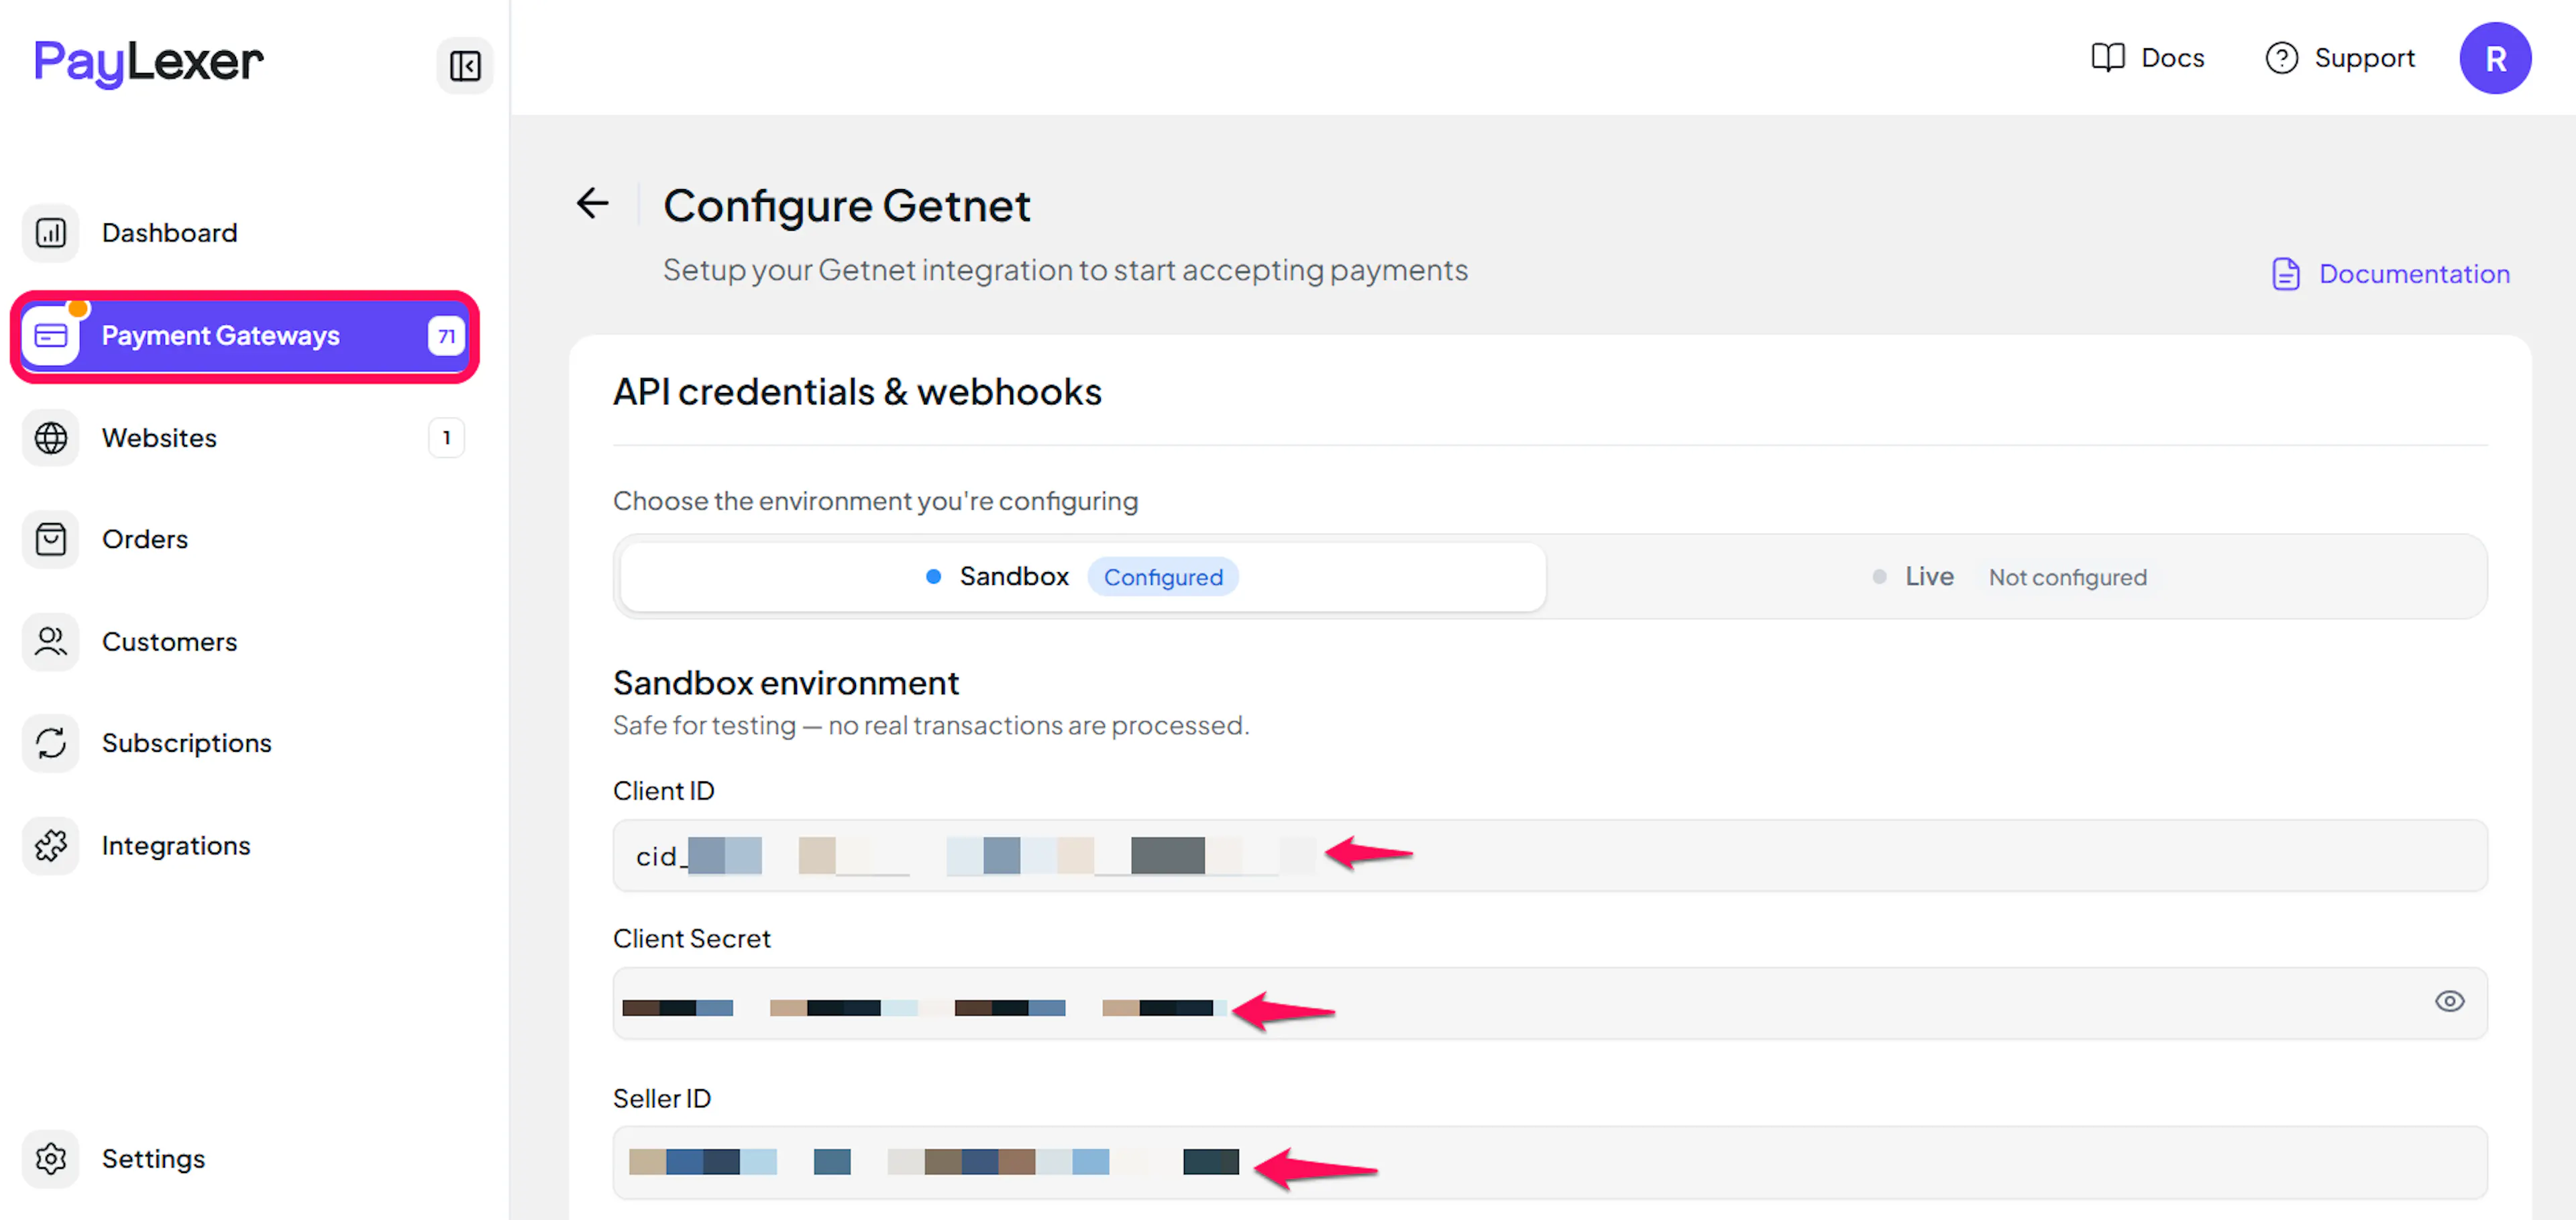
Understanding Live/Production and Sandbox Settings:
| Environment | Purpose |
|---|---|
| Live / Production (Mandatory) | Used for real transactions. Cannot be empty, even when testing. |
| Test / Sandbox (Optional) | Used for testing only. No real money is processed. |
How PayLexer selects credentials:
- Debug/Test mode ON → Test credentials are used
- Debug/Test mode OFF → Live credentials are used
Test and save
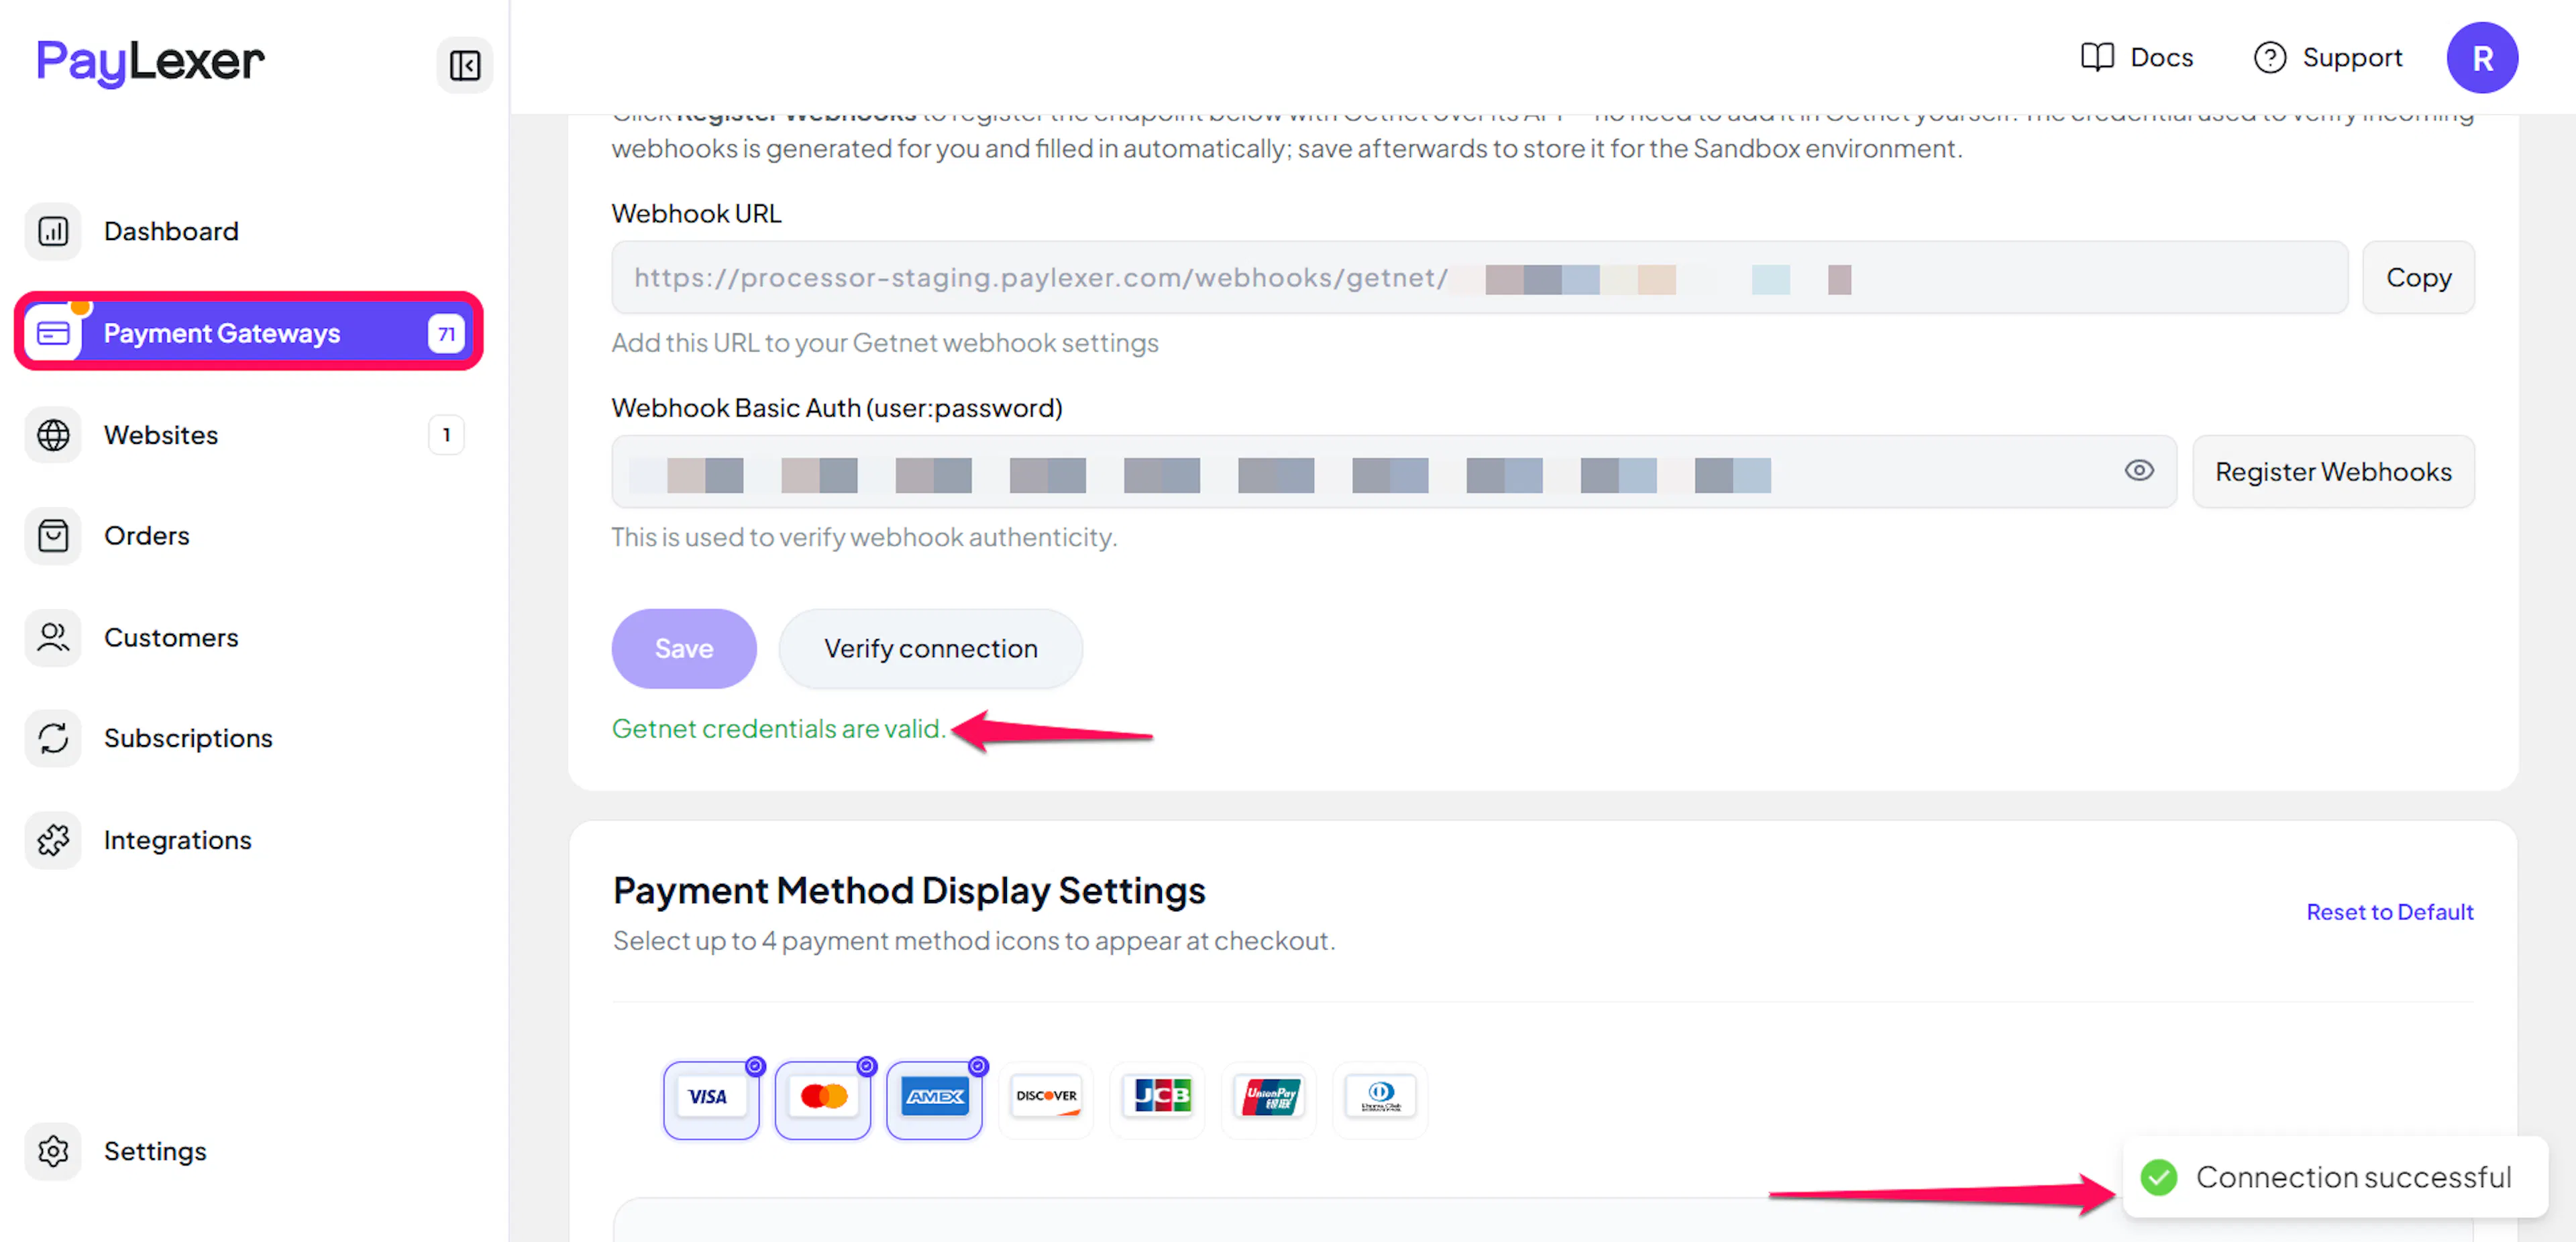
Click Save to save your configuration and verify your credentials. Click Verify Connection to test the connection.
Configuring Webhooks (Mandatory)
Webhooks enable real-time payment updates and significantly improve reliability.
Benefits of Webhooks:
- Instant payment status updates
- Automatic refund processing
- Dispute notifications
Getnet does not offer a self-service screen for adding a notification endpoint, so PayLexer registers it for you over Getnet's API. You never have to find the setting inside Getnet or invent a secret yourself.
Save your credentials first
Make sure your Client ID, Client Secret, and Seller ID are entered and saved. PayLexer needs them to talk to Getnet on your behalf, and registration is scoped to your seller id.
Click Register Webhooks
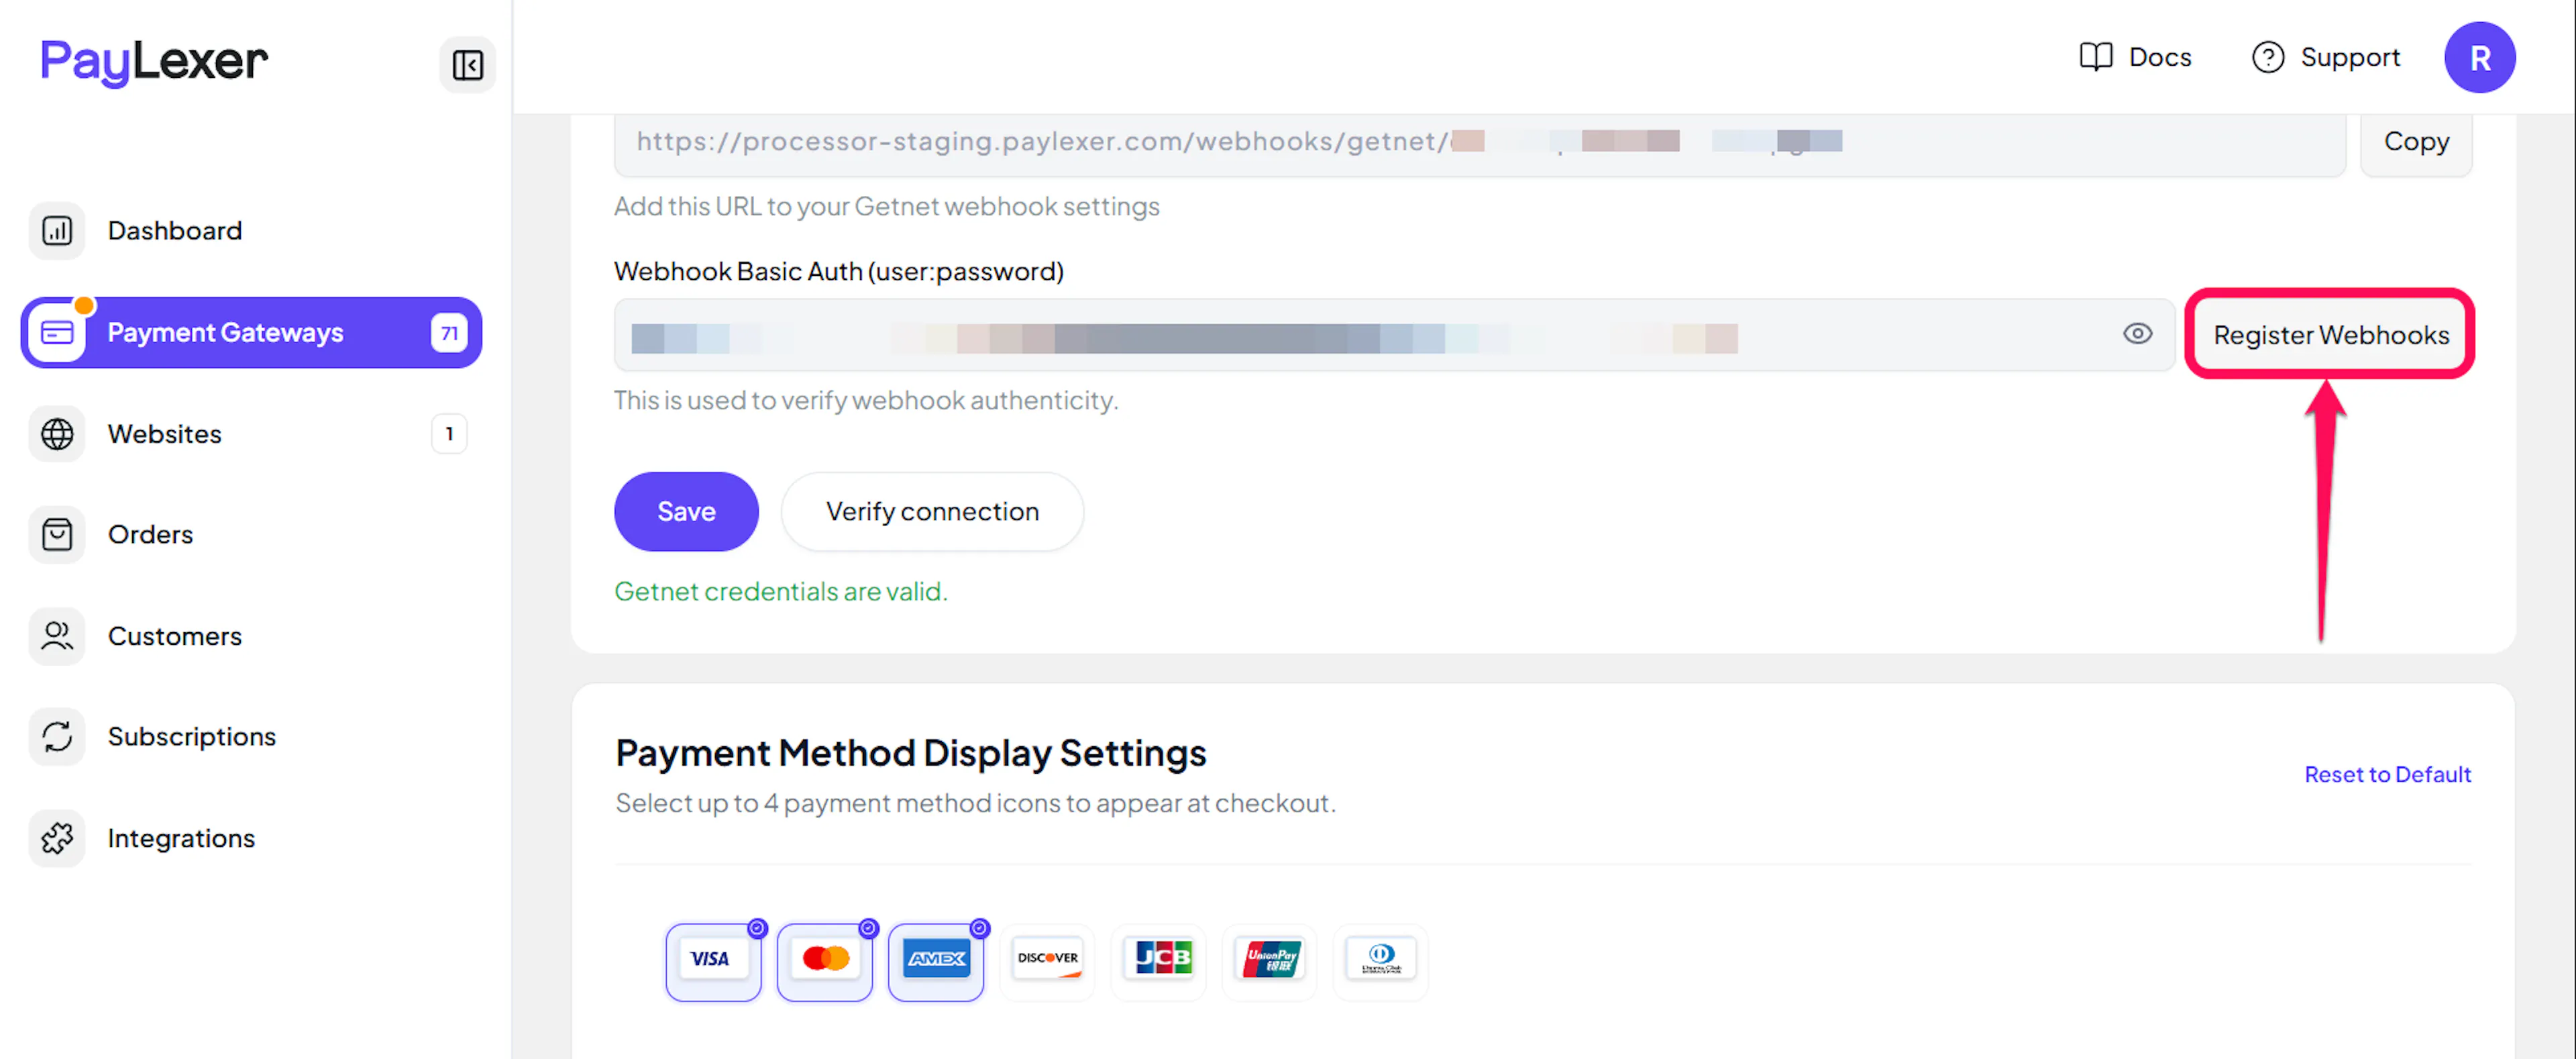
In the Webhooks section of the Getnet settings screen, click Register Webhooks. PayLexer registers your notification address with Getnet, subscribes it to all the relevant payment events, and fills in the Webhook Basic Auth (user:password) field automatically.
Save again
Click Save. This is required - the newly generated credential is only stored once you save, and until then Getnet and PayLexer hold different values.
Clicking Register Webhooks again is safe. It refreshes the credentials and updates the notification URL if needed. Just click Save afterward.
Getnet notifications are not digitally signed. PayLexer validates the registered Basic Auth credentials and re-verifies each notification with Getnet’s API before updating an order. Invalid notifications are rejected.
Integrate Getnet to Your Website
If you have already added and configured your site, you can enable Getnet in your existing setup.
Go to Websites
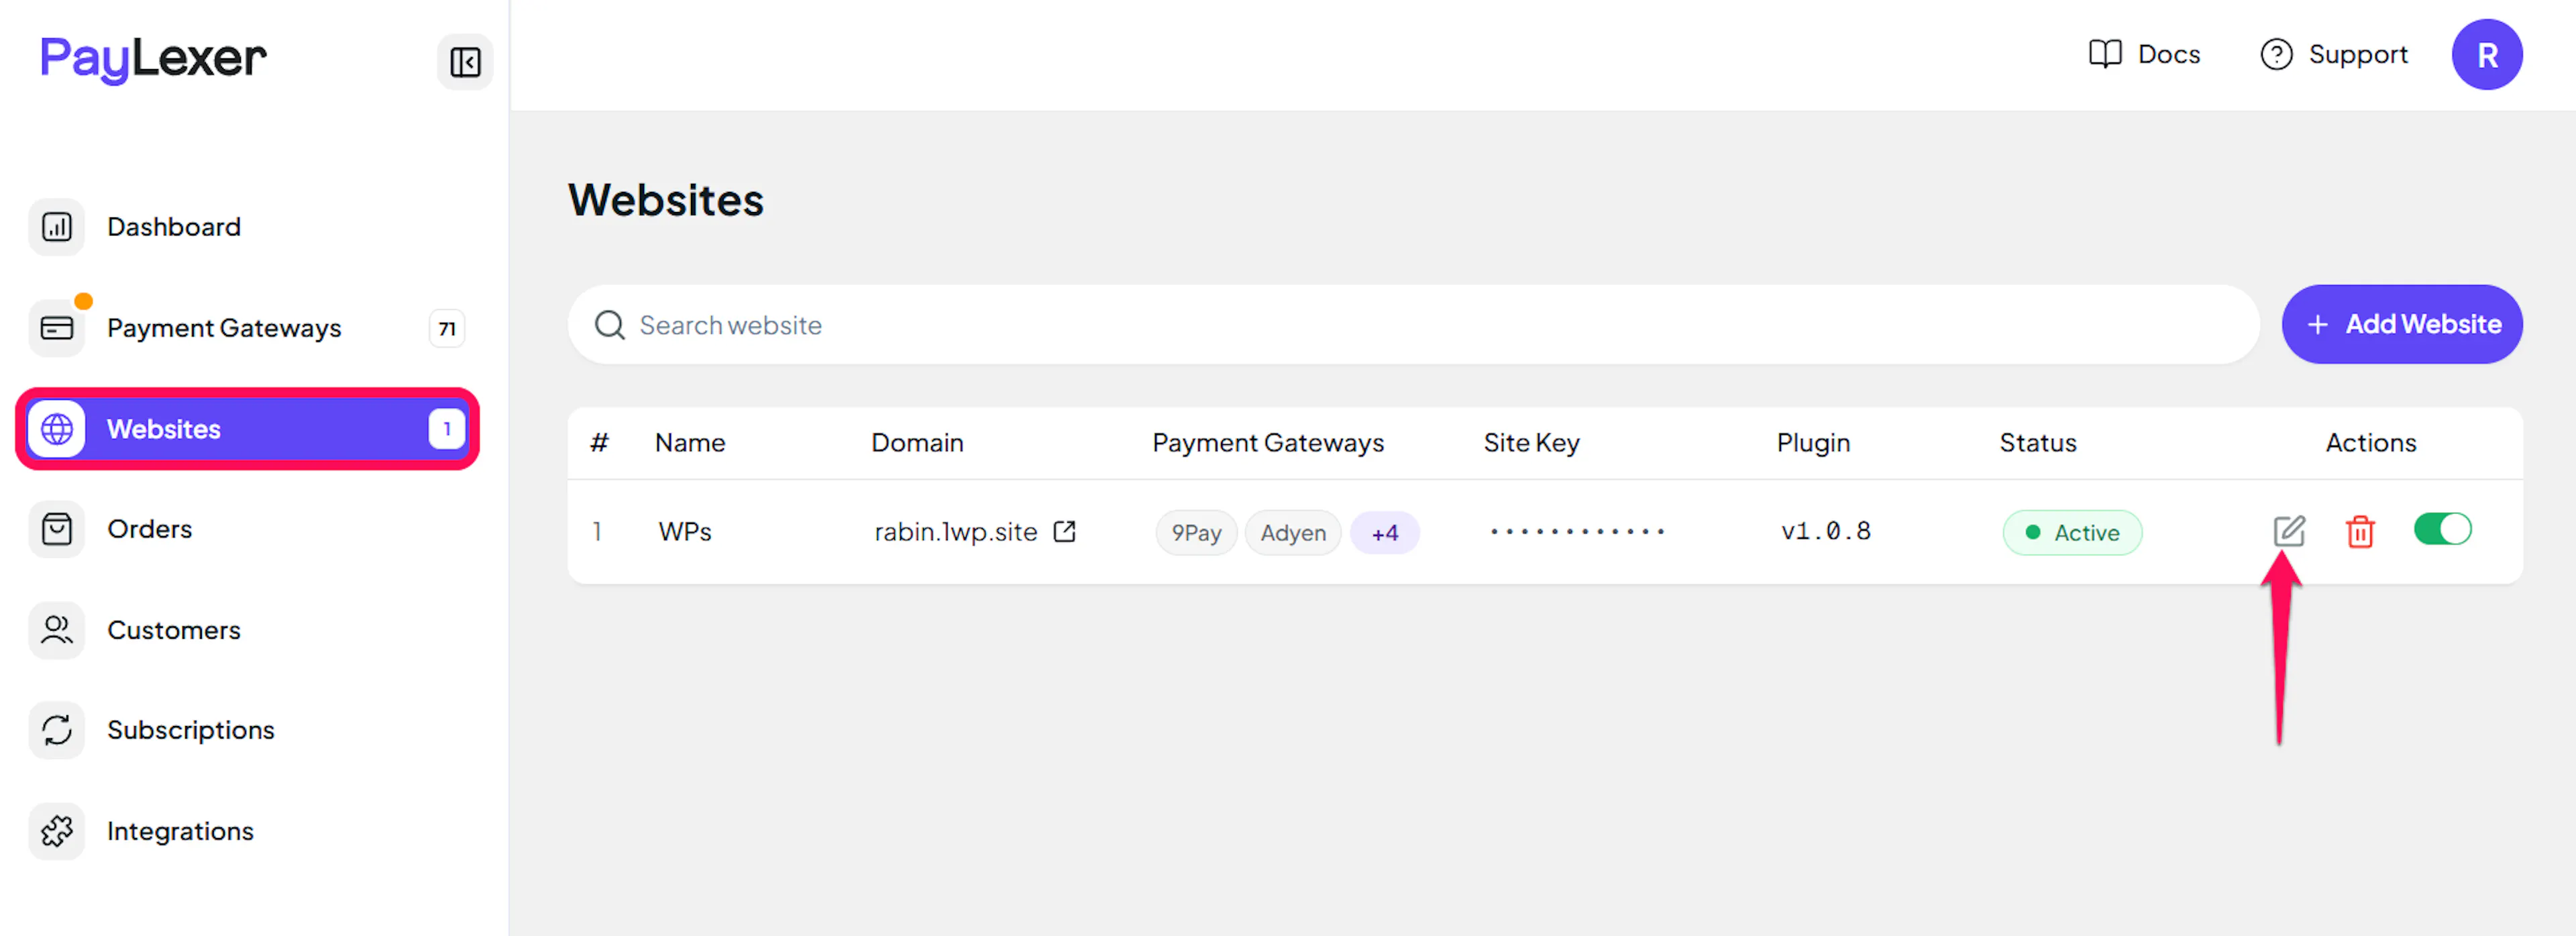
Navigate to Websites in your PayLexer dashboard.
Edit your website
Click the Edit Icon of your added website.
Enable Getnet
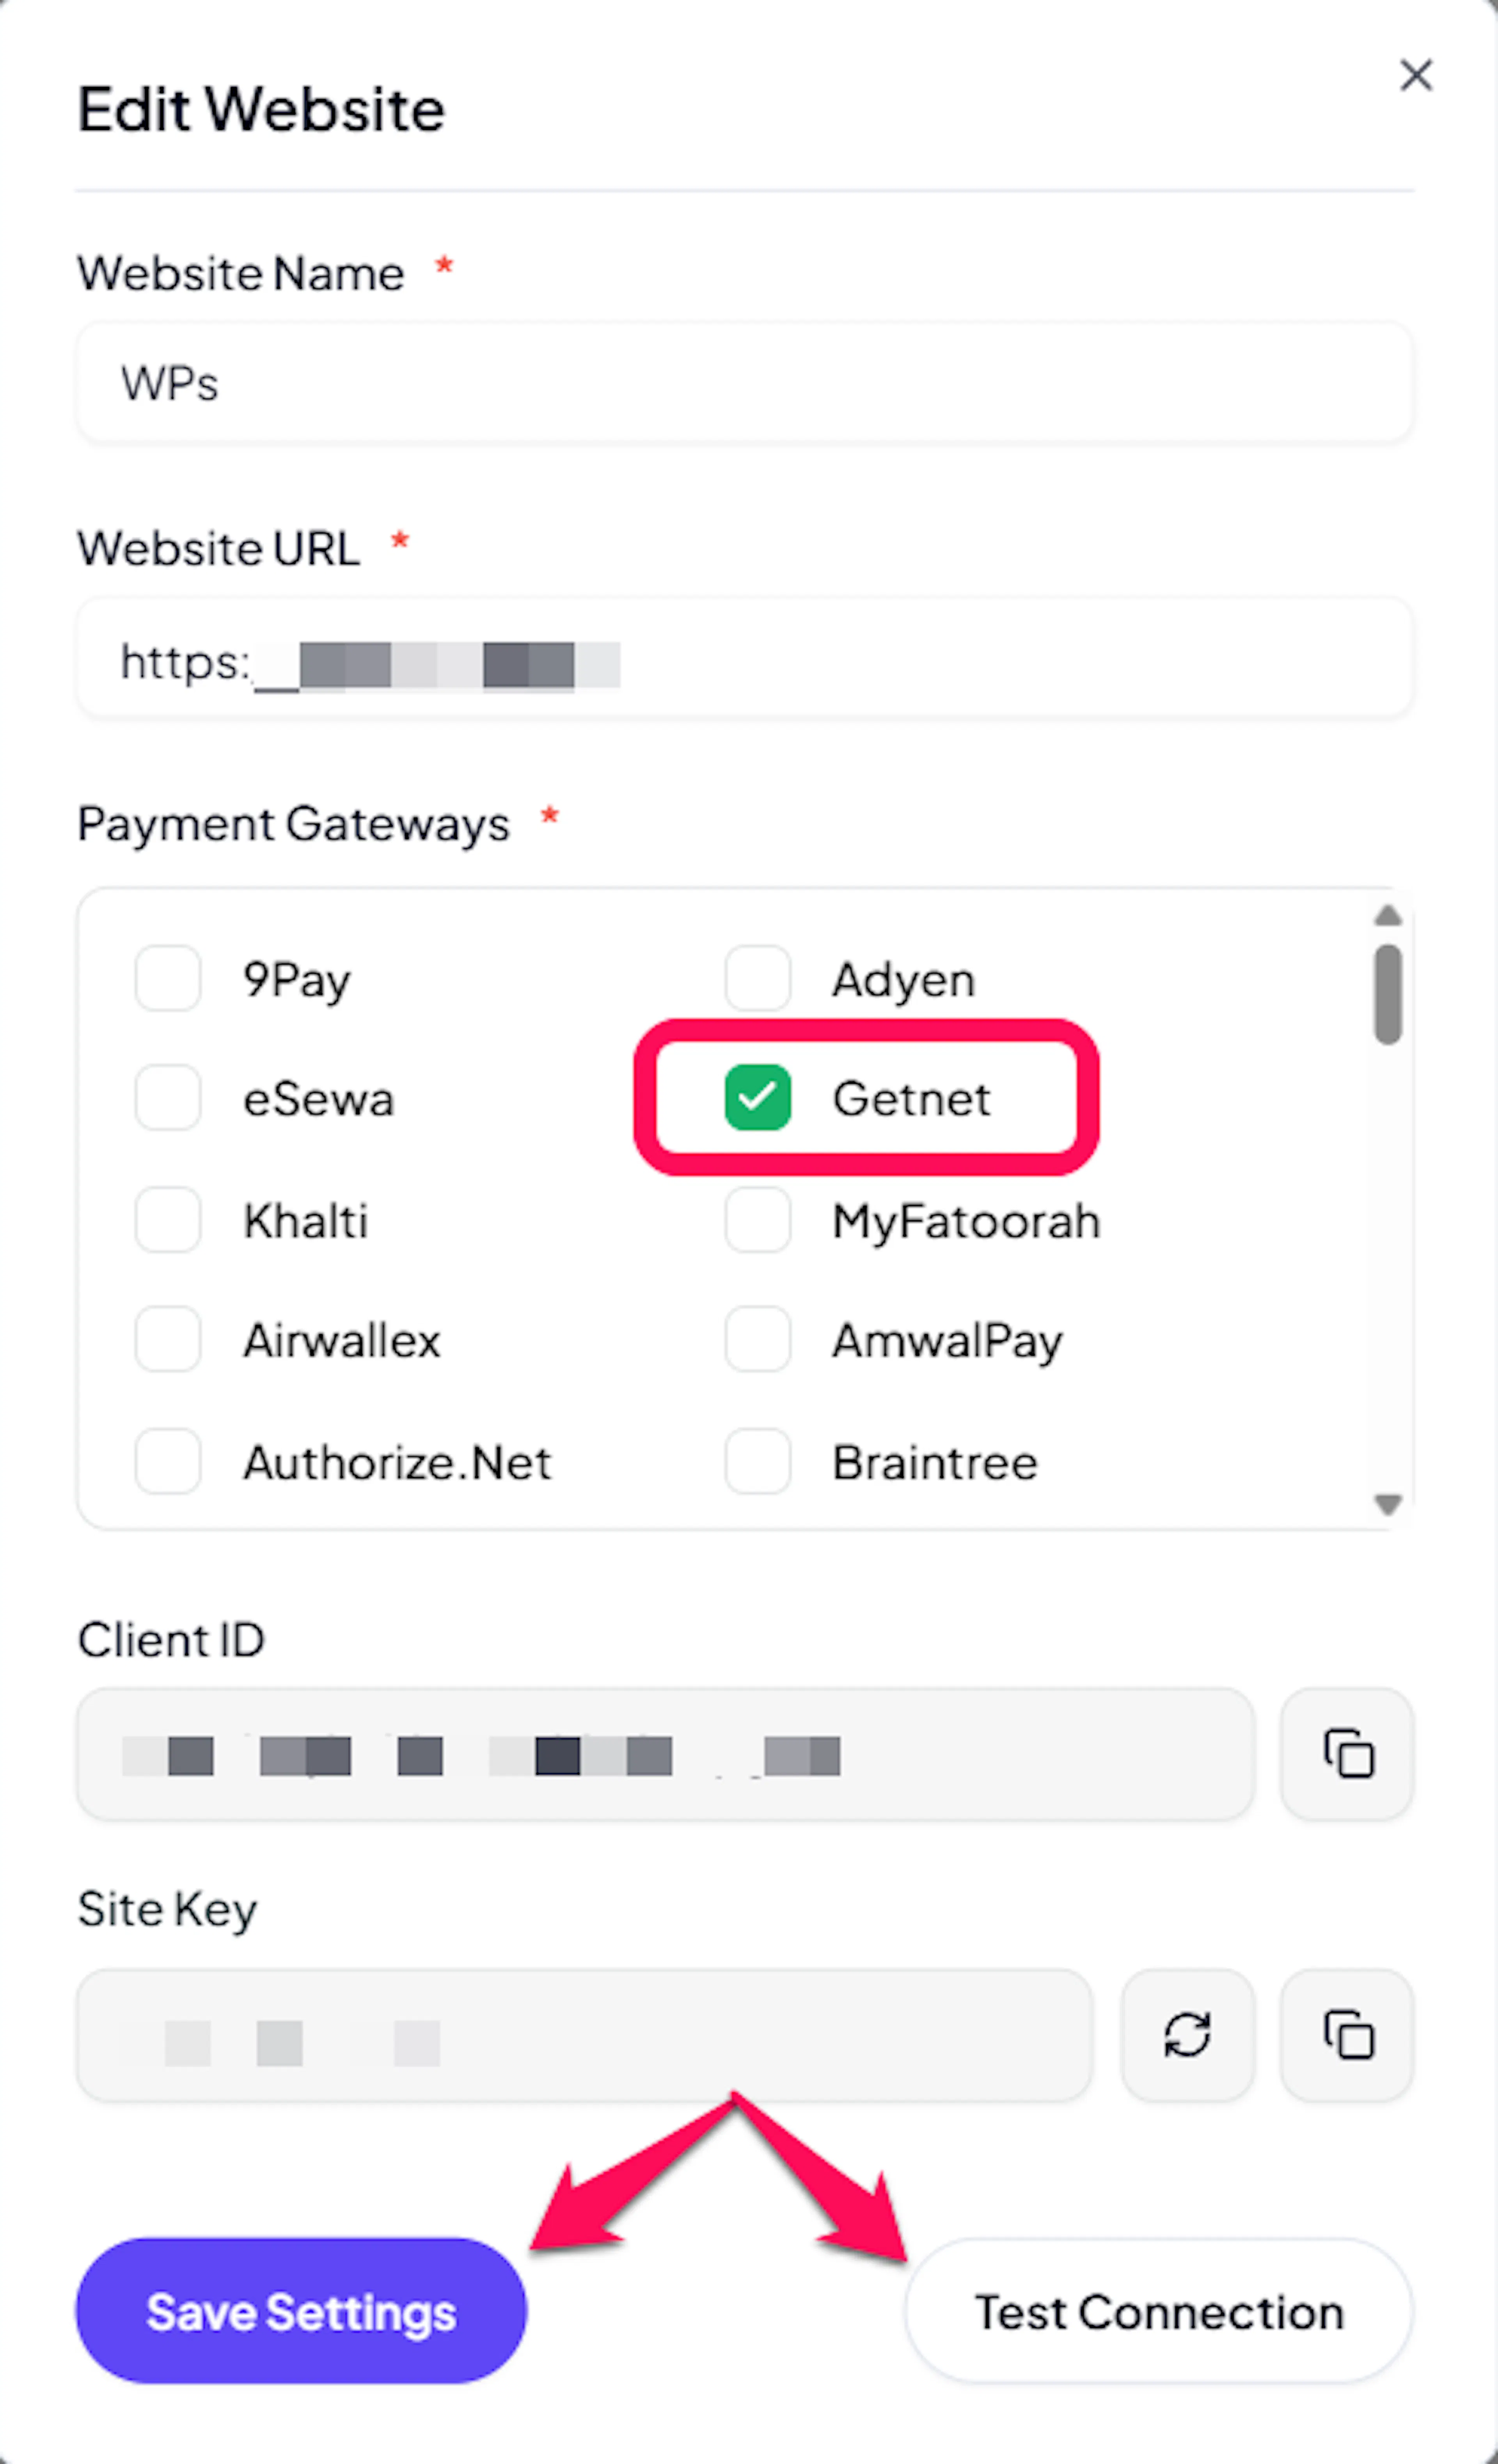
Click the checkbox to enable Getnet for the website.
If you haven't added a website yet, Continue to Add Your Website →
Troubleshooting
Best Practices
- Test in sandbox before enabling production, using your Test credentials and Debug Mode.
- Enter both your Test and Live credentials so you can switch between them without reconfiguring.
- Click Save immediately after Register Webhooks, every time, so PayLexer and Getnet stay in step.
- Confirm your store currency is one Getnet accepts before enabling it, so Getnet actually appears at checkout.
- Use a different gateway for recurring billing, since Getnet handles one-time payments only on PayLexer today.
- If you plan to offer installments, confirm with Getnet that they are enabled on your account first.
FAQs
Still Have Questions?
- Getnet Support: Getnet Support
- PayLexer Support: Contact Support