

XPay
Connect XPay to PayLexer to accept cards, Fawry cash payments, and ValU instalments from Egyptian shoppers through a hosted checkout page.
XPay is an Egyptian payment platform built for a market where most shoppers do not pay by card. Its hosted checkout offers cards, Fawry, and ValU (buy now, pay later in installments). PayLexer redirects the shopper to XPay's own page, XPay handles the card data, and the order is marked paid only once XPay confirms the money actually arrived.
- Supported Regions (Merchant Accounts): Egypt
- Supported Currencies: EGP, USD, EUR, GBP, SAR, AED, QAR, KWD, JOD, OMR, BHD, LYD, AUD, CAD, CNY - view full list
Supported Features
- Hosted checkout page - the shopper is redirected to XPay to pay, then returned to your site, so no card details are ever entered on your own pages
- Full and partial refunds issued several times up to the amount paid, each shown as pending and then refunded
Before You Start
Make sure you have:
- XPay Merchant Account – New accounts start in test mode. Live payments require requesting payment activation from XPay. Open the XPay dashboard →
- PayLexer Account – Required to configure the integration. Create your account →
- A website where you want to integrate
Looking for a different payment processor? View all supported gateways →
Configuring XPay
You need a Secret Key and a Webhook Signing Secret from XPay for this integration. Both come from the Developer Hub in your XPay dashboard.
Getting API Credentials
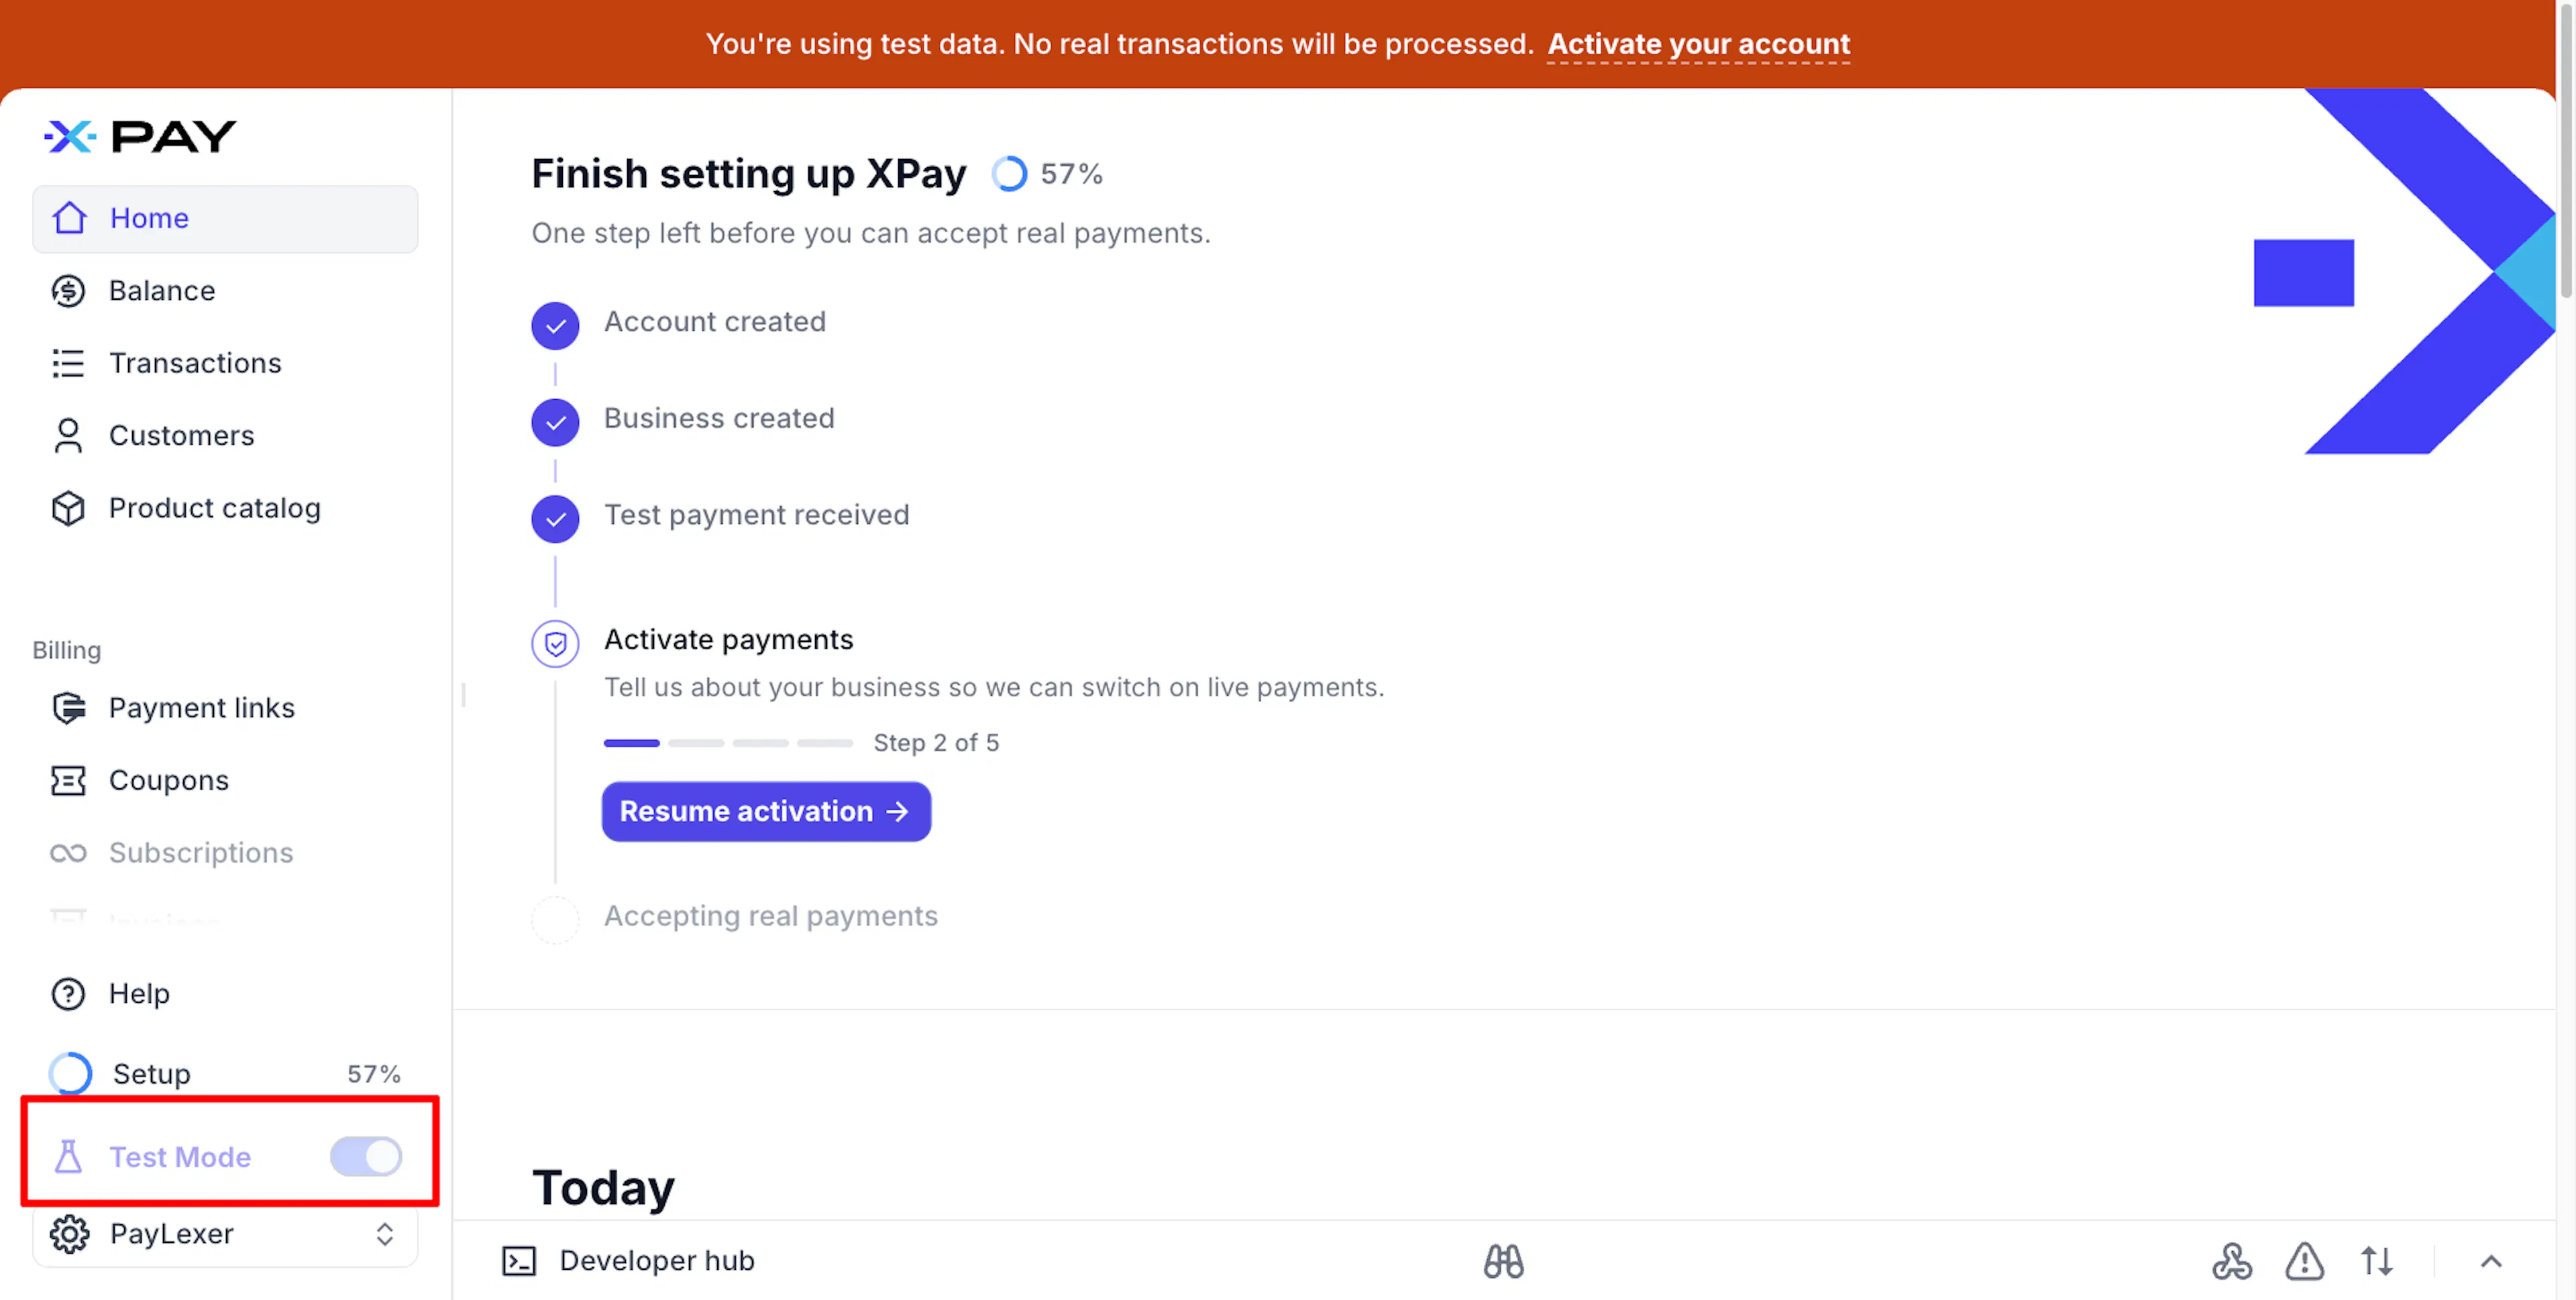
Choose test or live mode
Log in at app.xpay.app and use the mode toggle to switch between test and live.
Every account starts with test mode available. Live mode needs payment activation, which you request from XPay. Test and live are fully separate environments with their own keys, customers, and transactions.
Copy your Secret Key
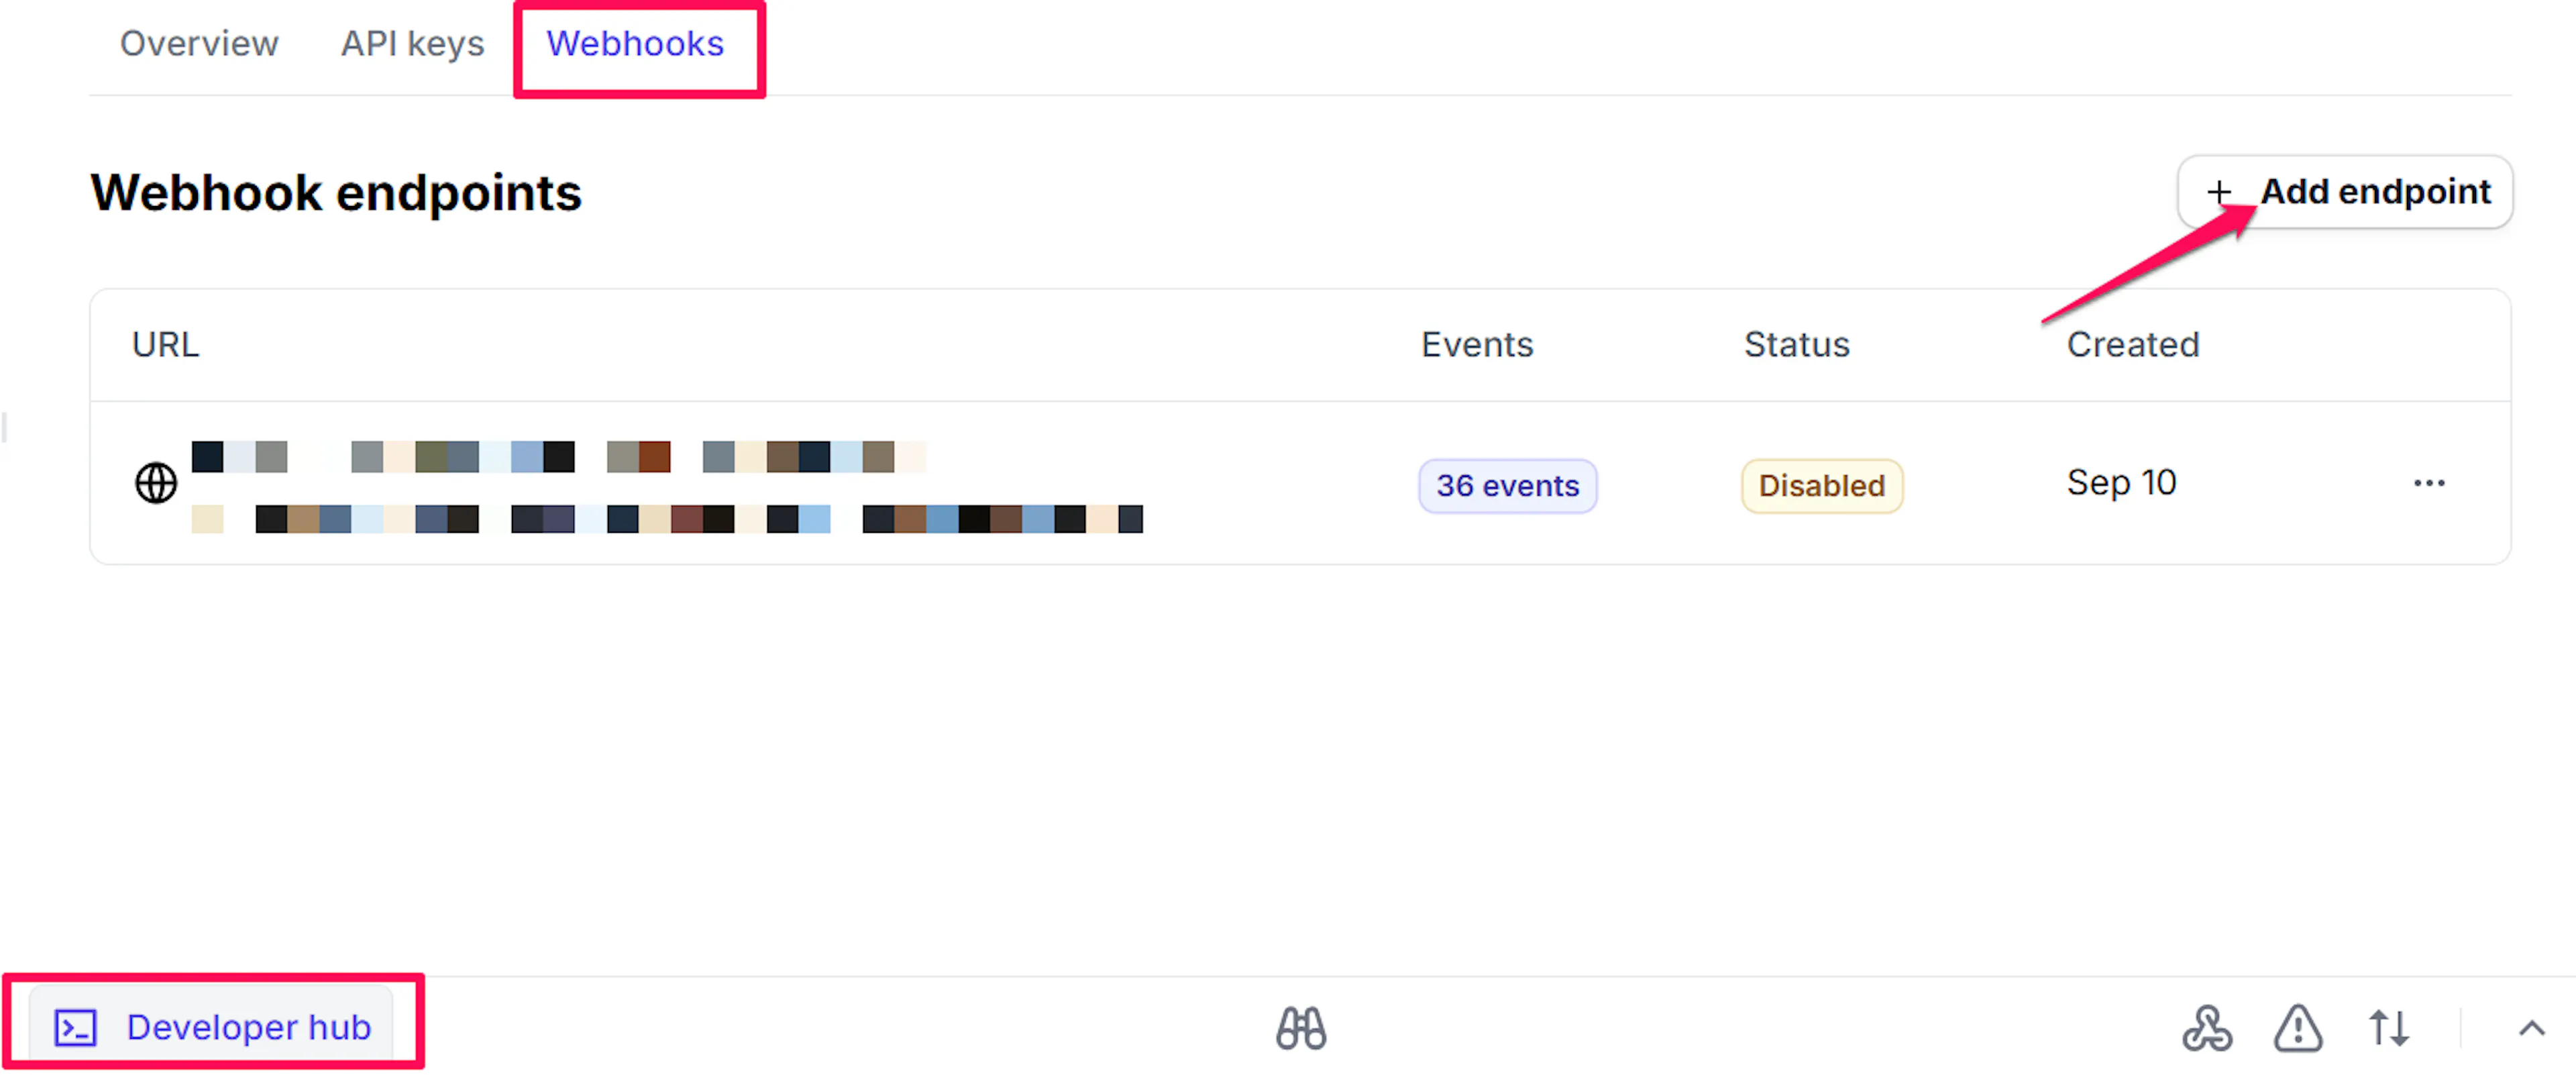
Click Developer Hub in the bottom menu of the dashboard, then open the API keys tab. Under Standard keys you will see a Publishable key and a Secret key. Click the Secret key to reveal it, and copy it.
Keys are prefixed by type and mode, so a test secret key looks like sk_test_… and a live one like sk_live_….
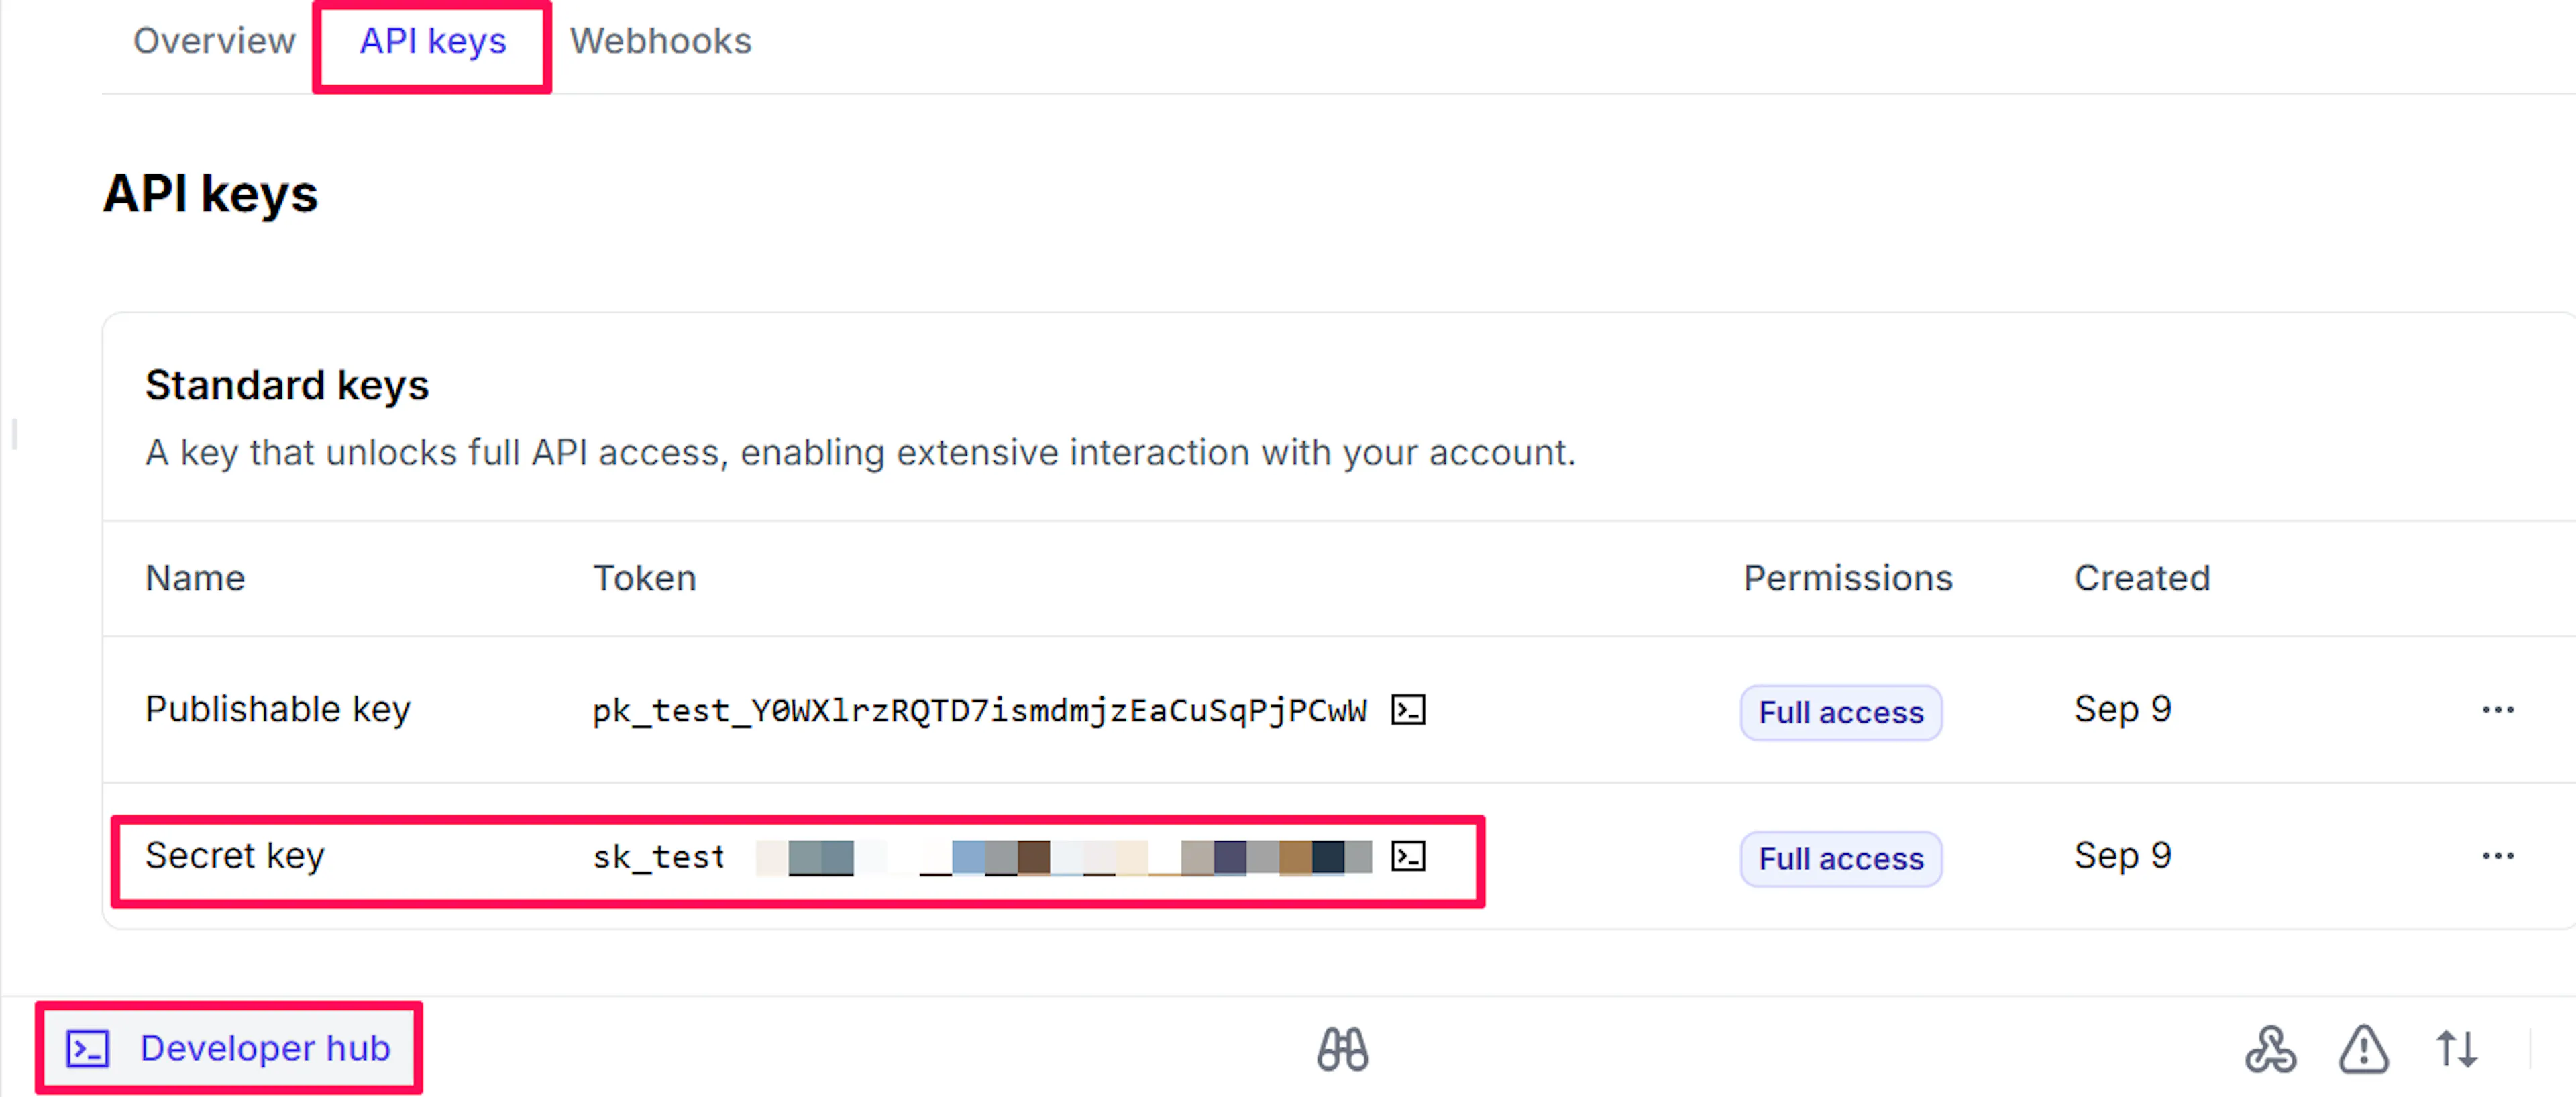
If a key is ever exposed, roll it from the three-dot menu beside it in the API keys tab, then paste the new value into PayLexer.
Adding Credentials to PayLexer
Open PayLexer Dashboard
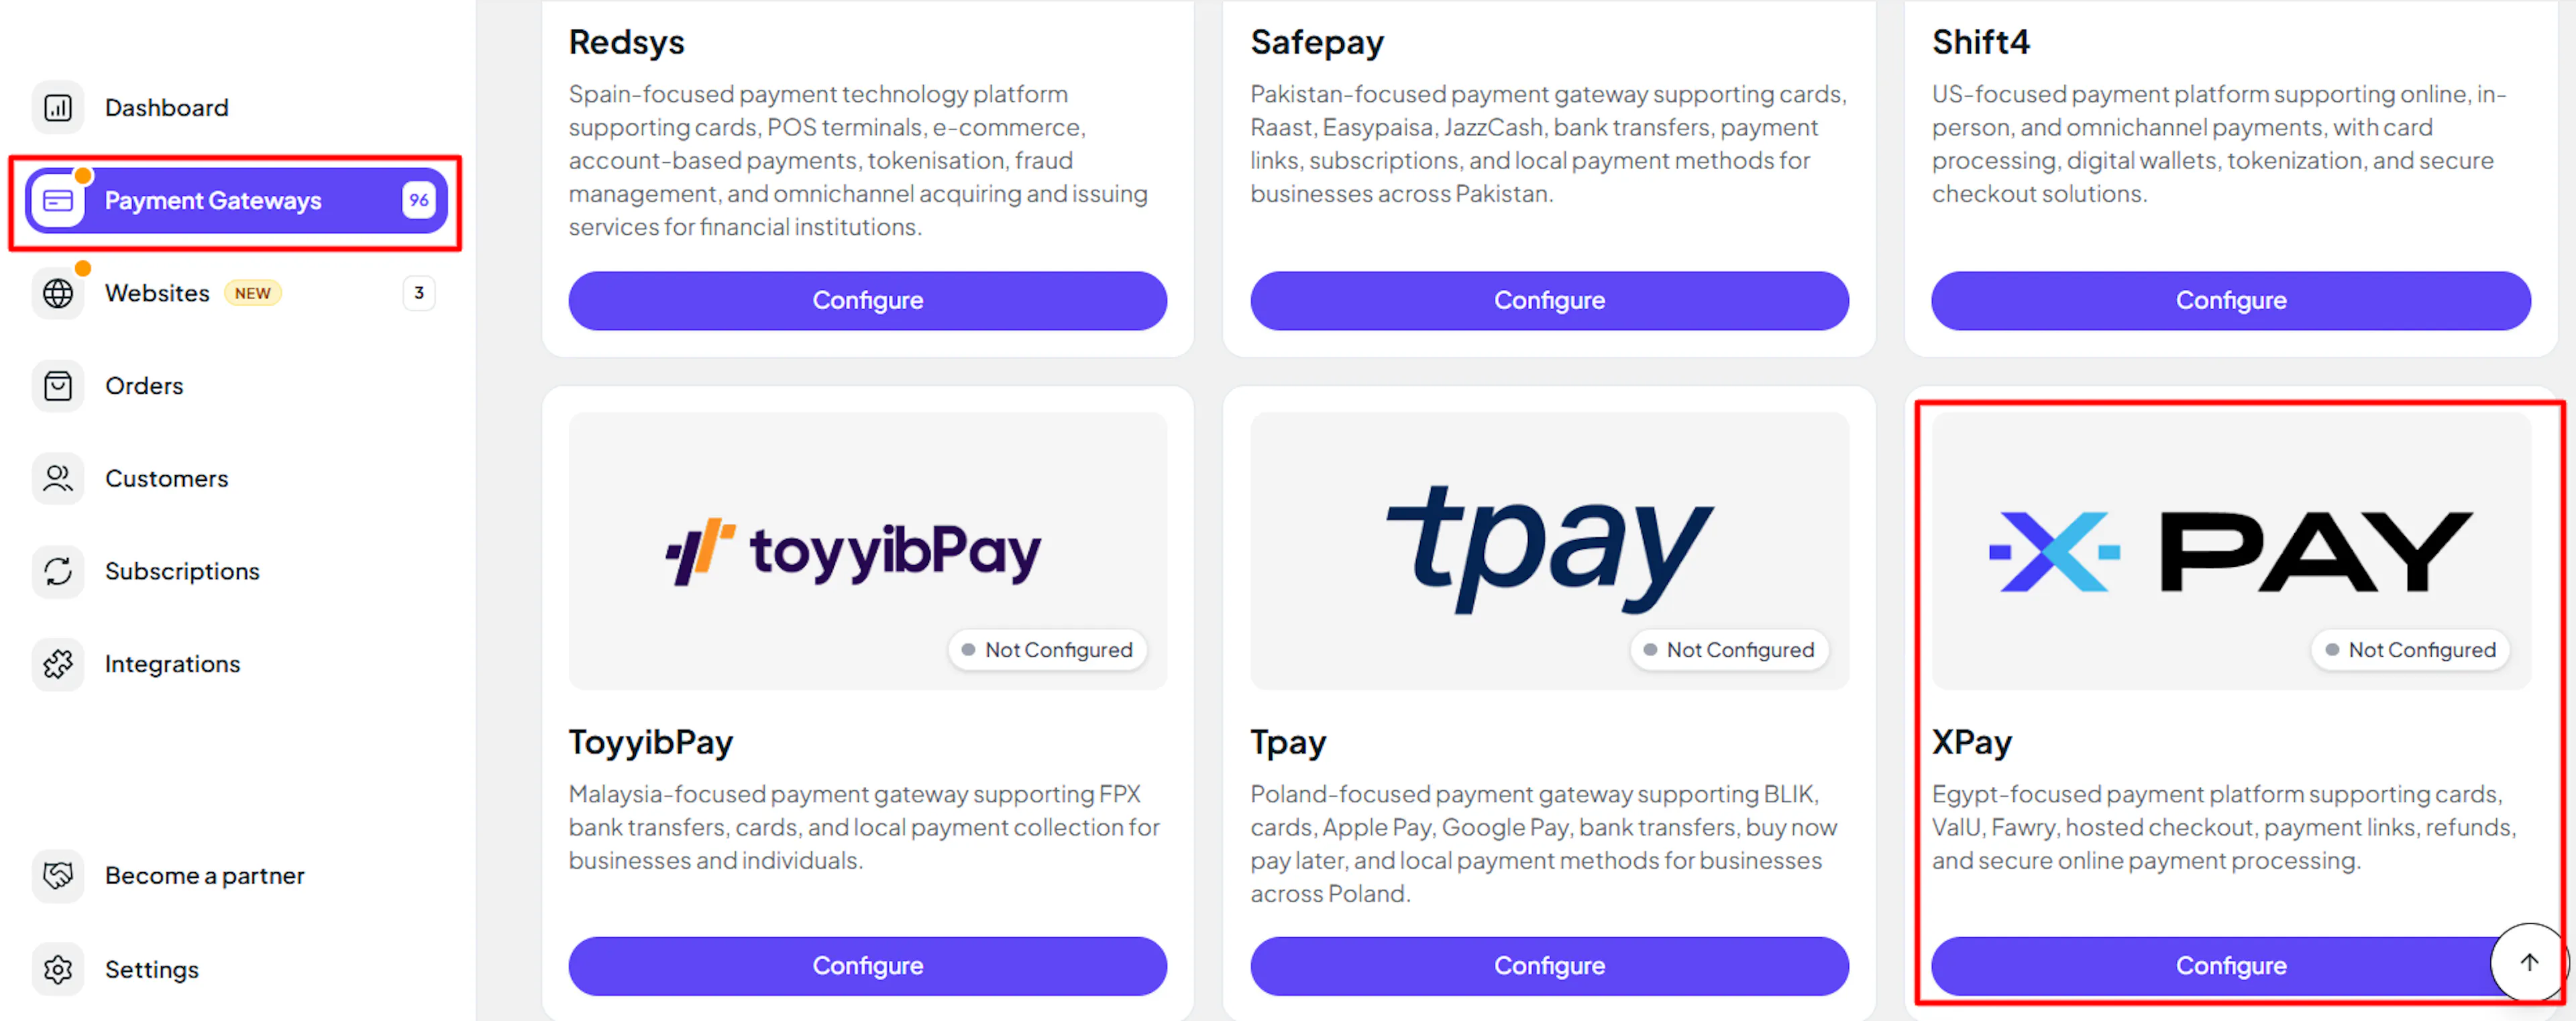
Log in to your PayLexer dashboard and navigate to Payment Gateways → XPay.
Enter your credentials
Paste your Secret Key into the corresponding field. Put your sk_test_… or rk_test_… key in the Test field and your sk_live_… or rk_live_… key in the Live field.
The Webhook Signing Secret is entered separately, in the Webhooks section of this page. The next section covers it.


Understanding Live/Production and Sandbox Settings:
| Environment | Purpose |
|---|---|
| Live / Production | Used for real transactions. |
| Test / Sandbox | Used for testing only. No real money is processed. |
How PayLexer selects credentials:
- Debug/Test mode ON → Test credentials are used
- Debug/Test mode OFF → Live credentials are used
Test and save
Click Save to save your configuration and verify your credentials. Click Verify Connection to test the connection.
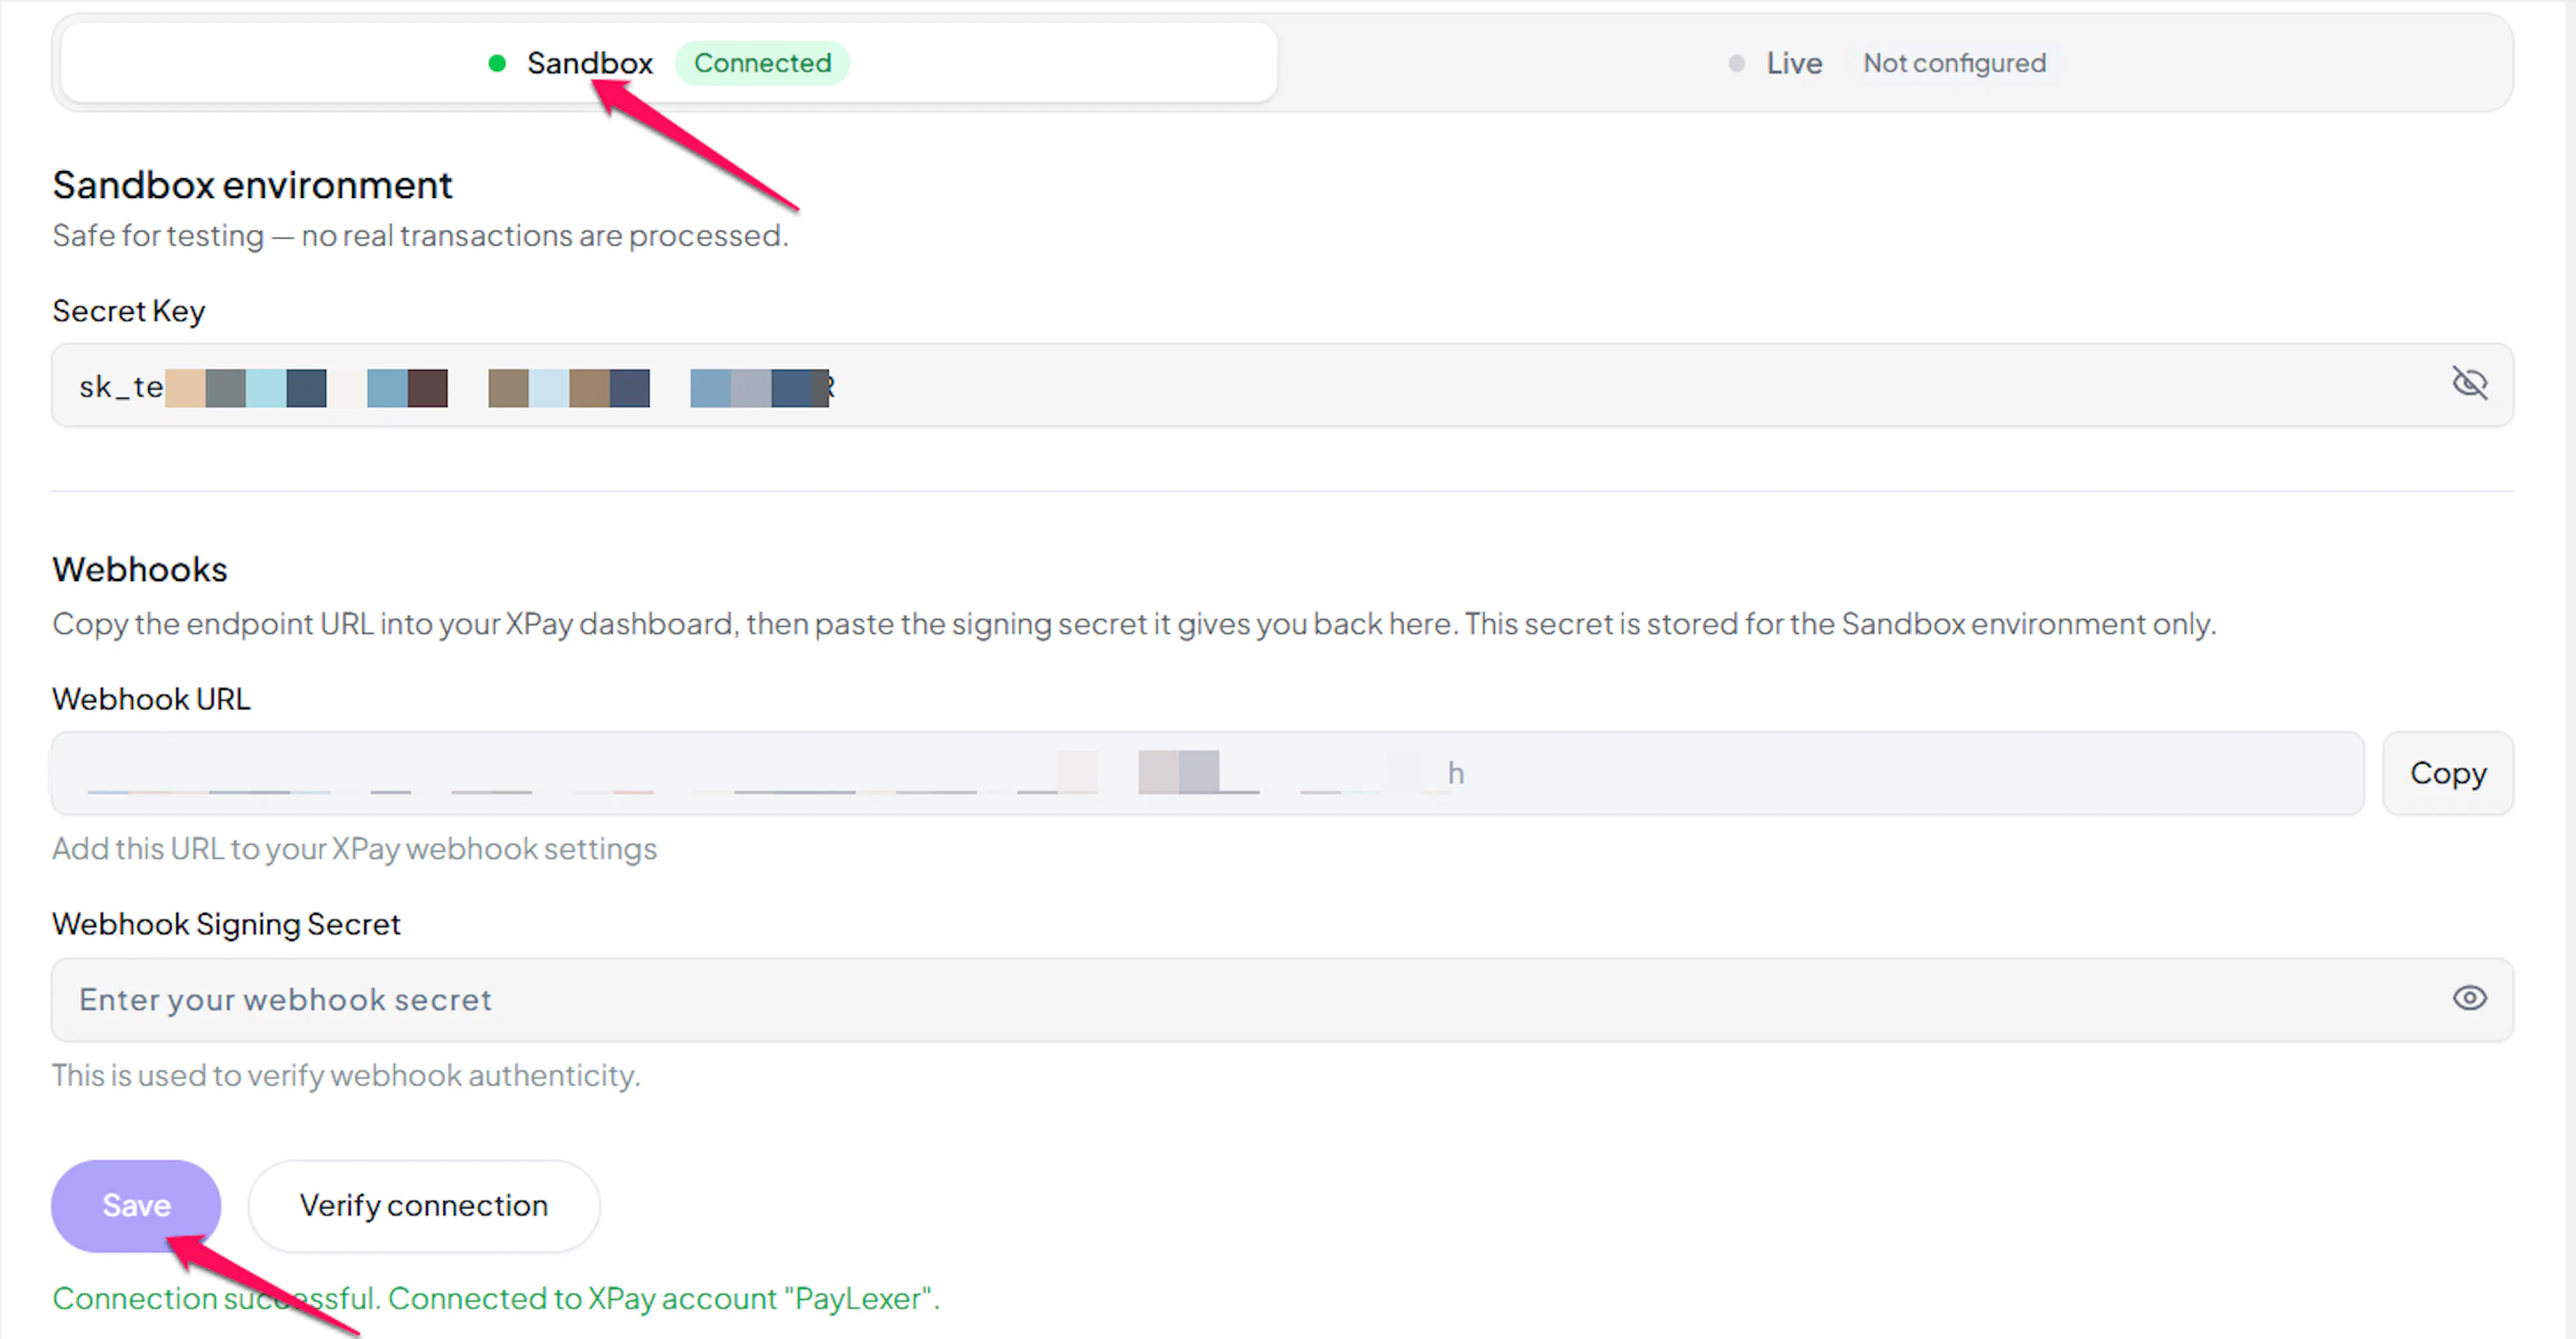
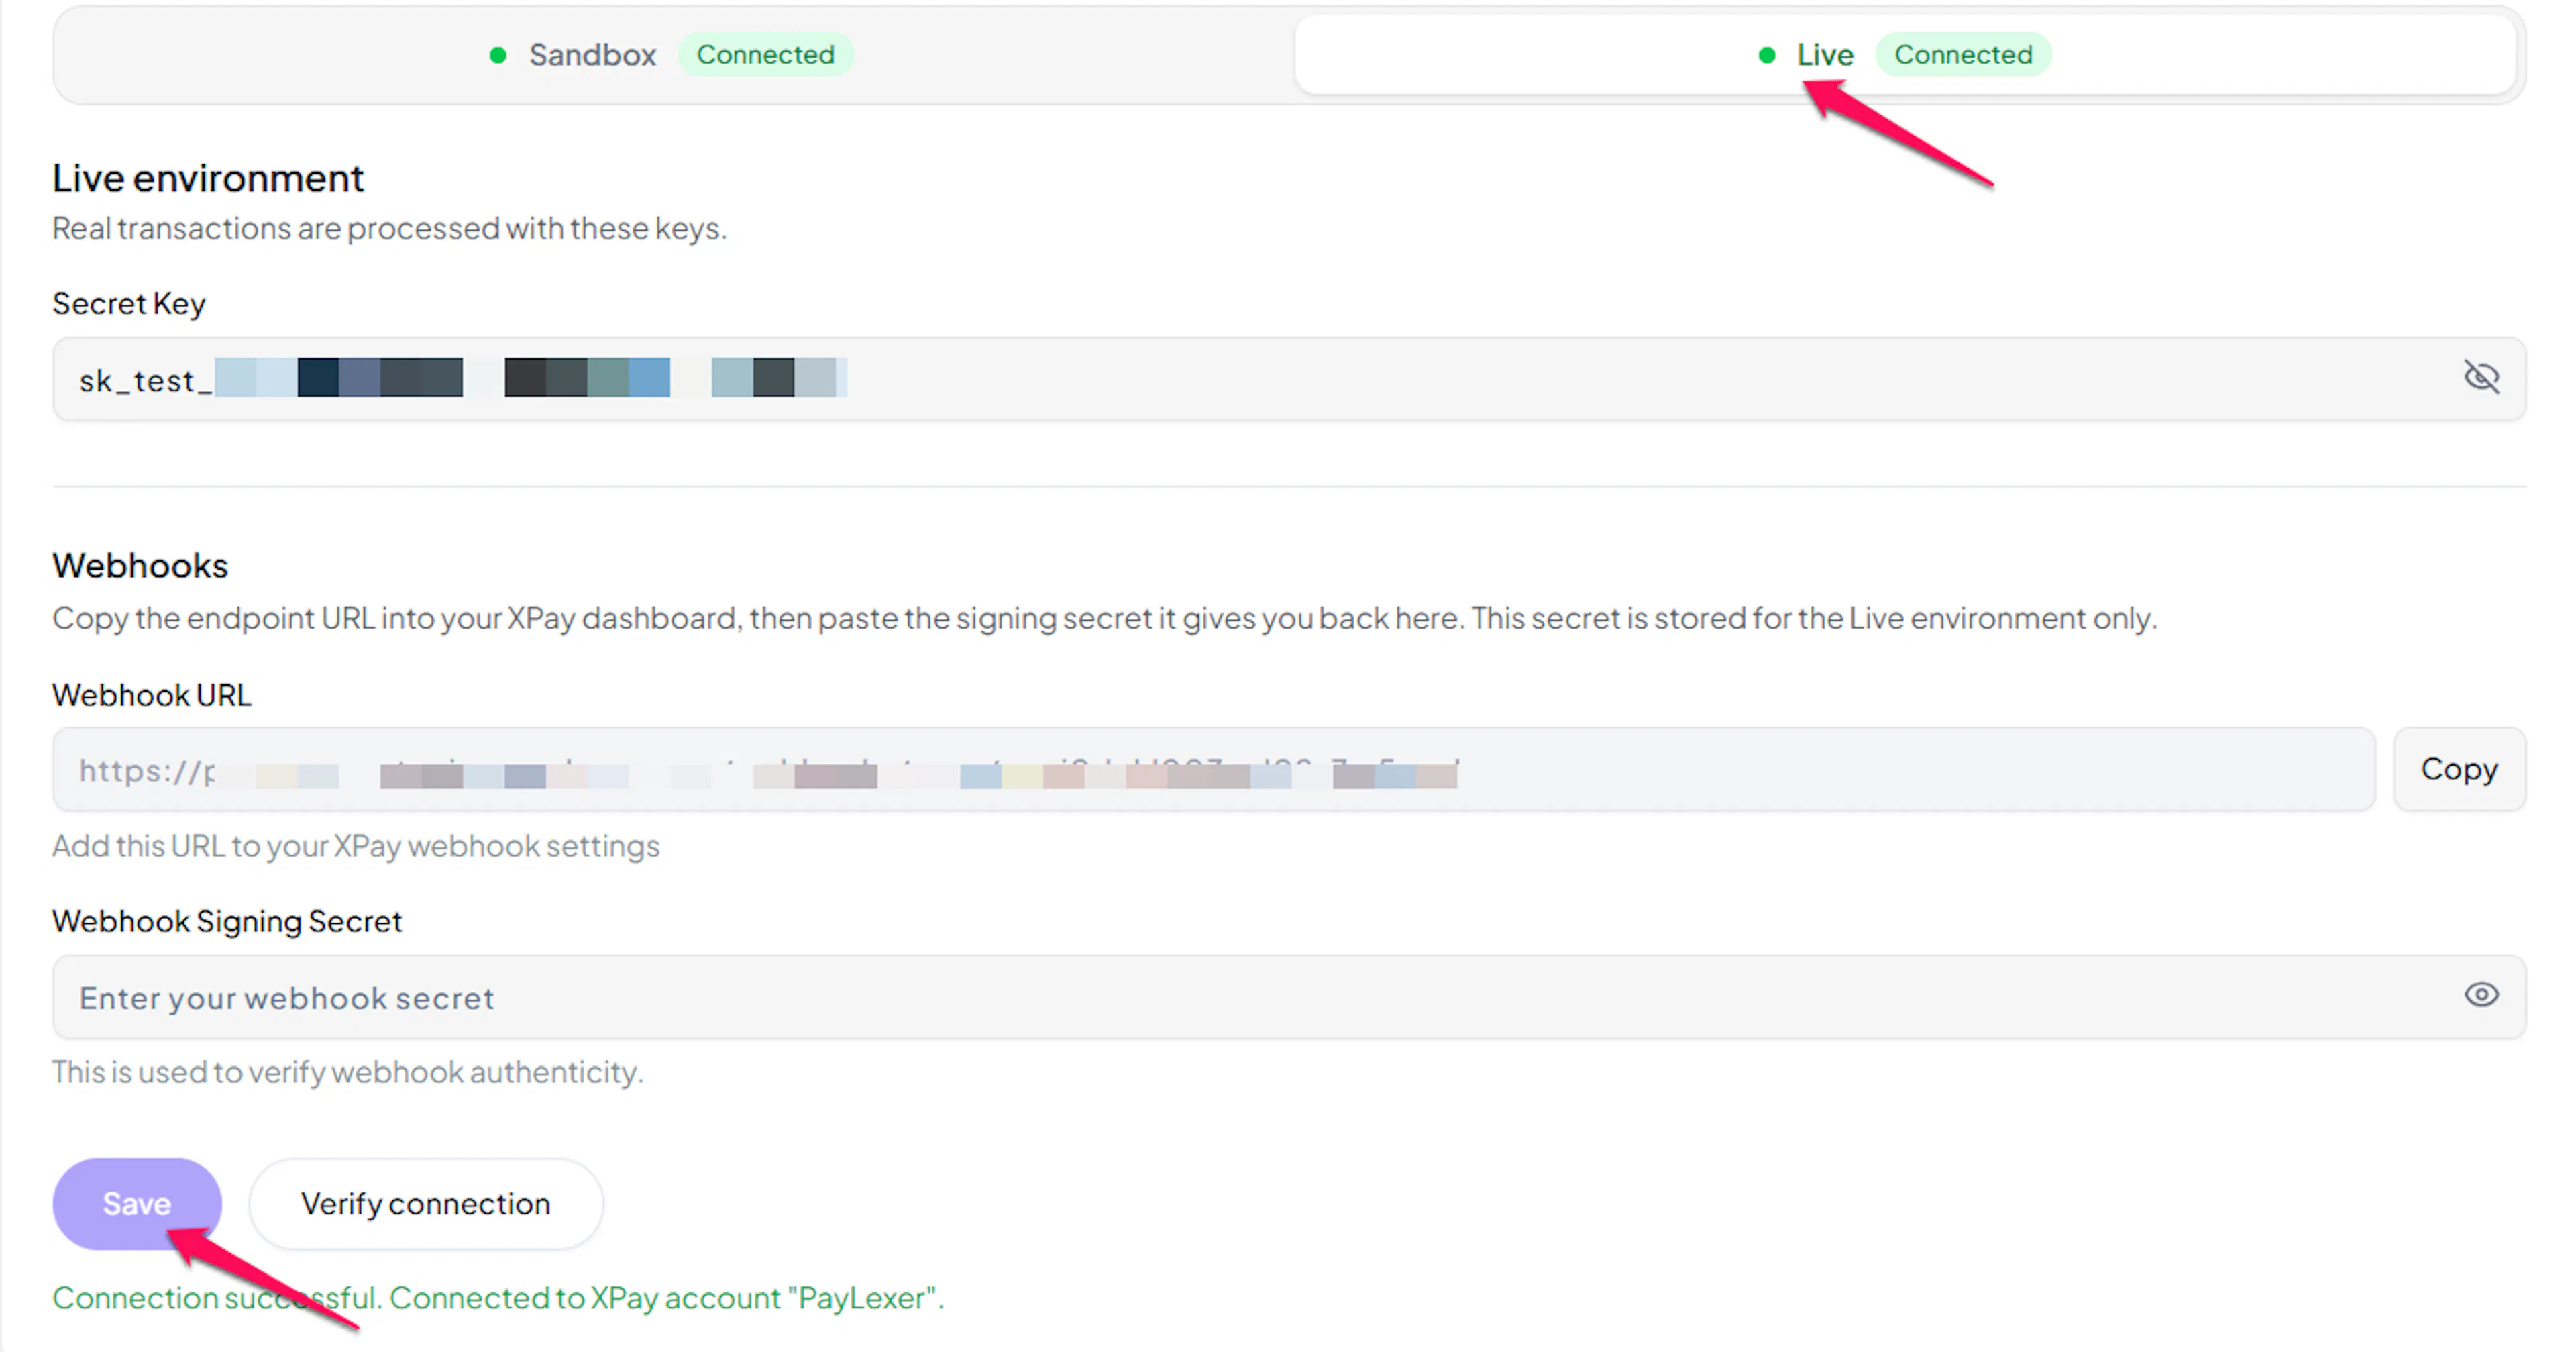
The check reads the key's own prefix, so a publishable key or a key saved under the wrong environment is caught immediately and named as such rather than failing later on a real payment.
Configuring Webhooks (Mandatory)
Webhooks enable real-time payment updates and significantly improve reliability.
Benefits of Webhooks:
- Instant payment status updates
- Automatic refund processing
Copy your PayLexer webhook URL
In PayLexer → Payment Gateways → XPay, copy the Webhook URL shown for your account.

Add the endpoint in XPay
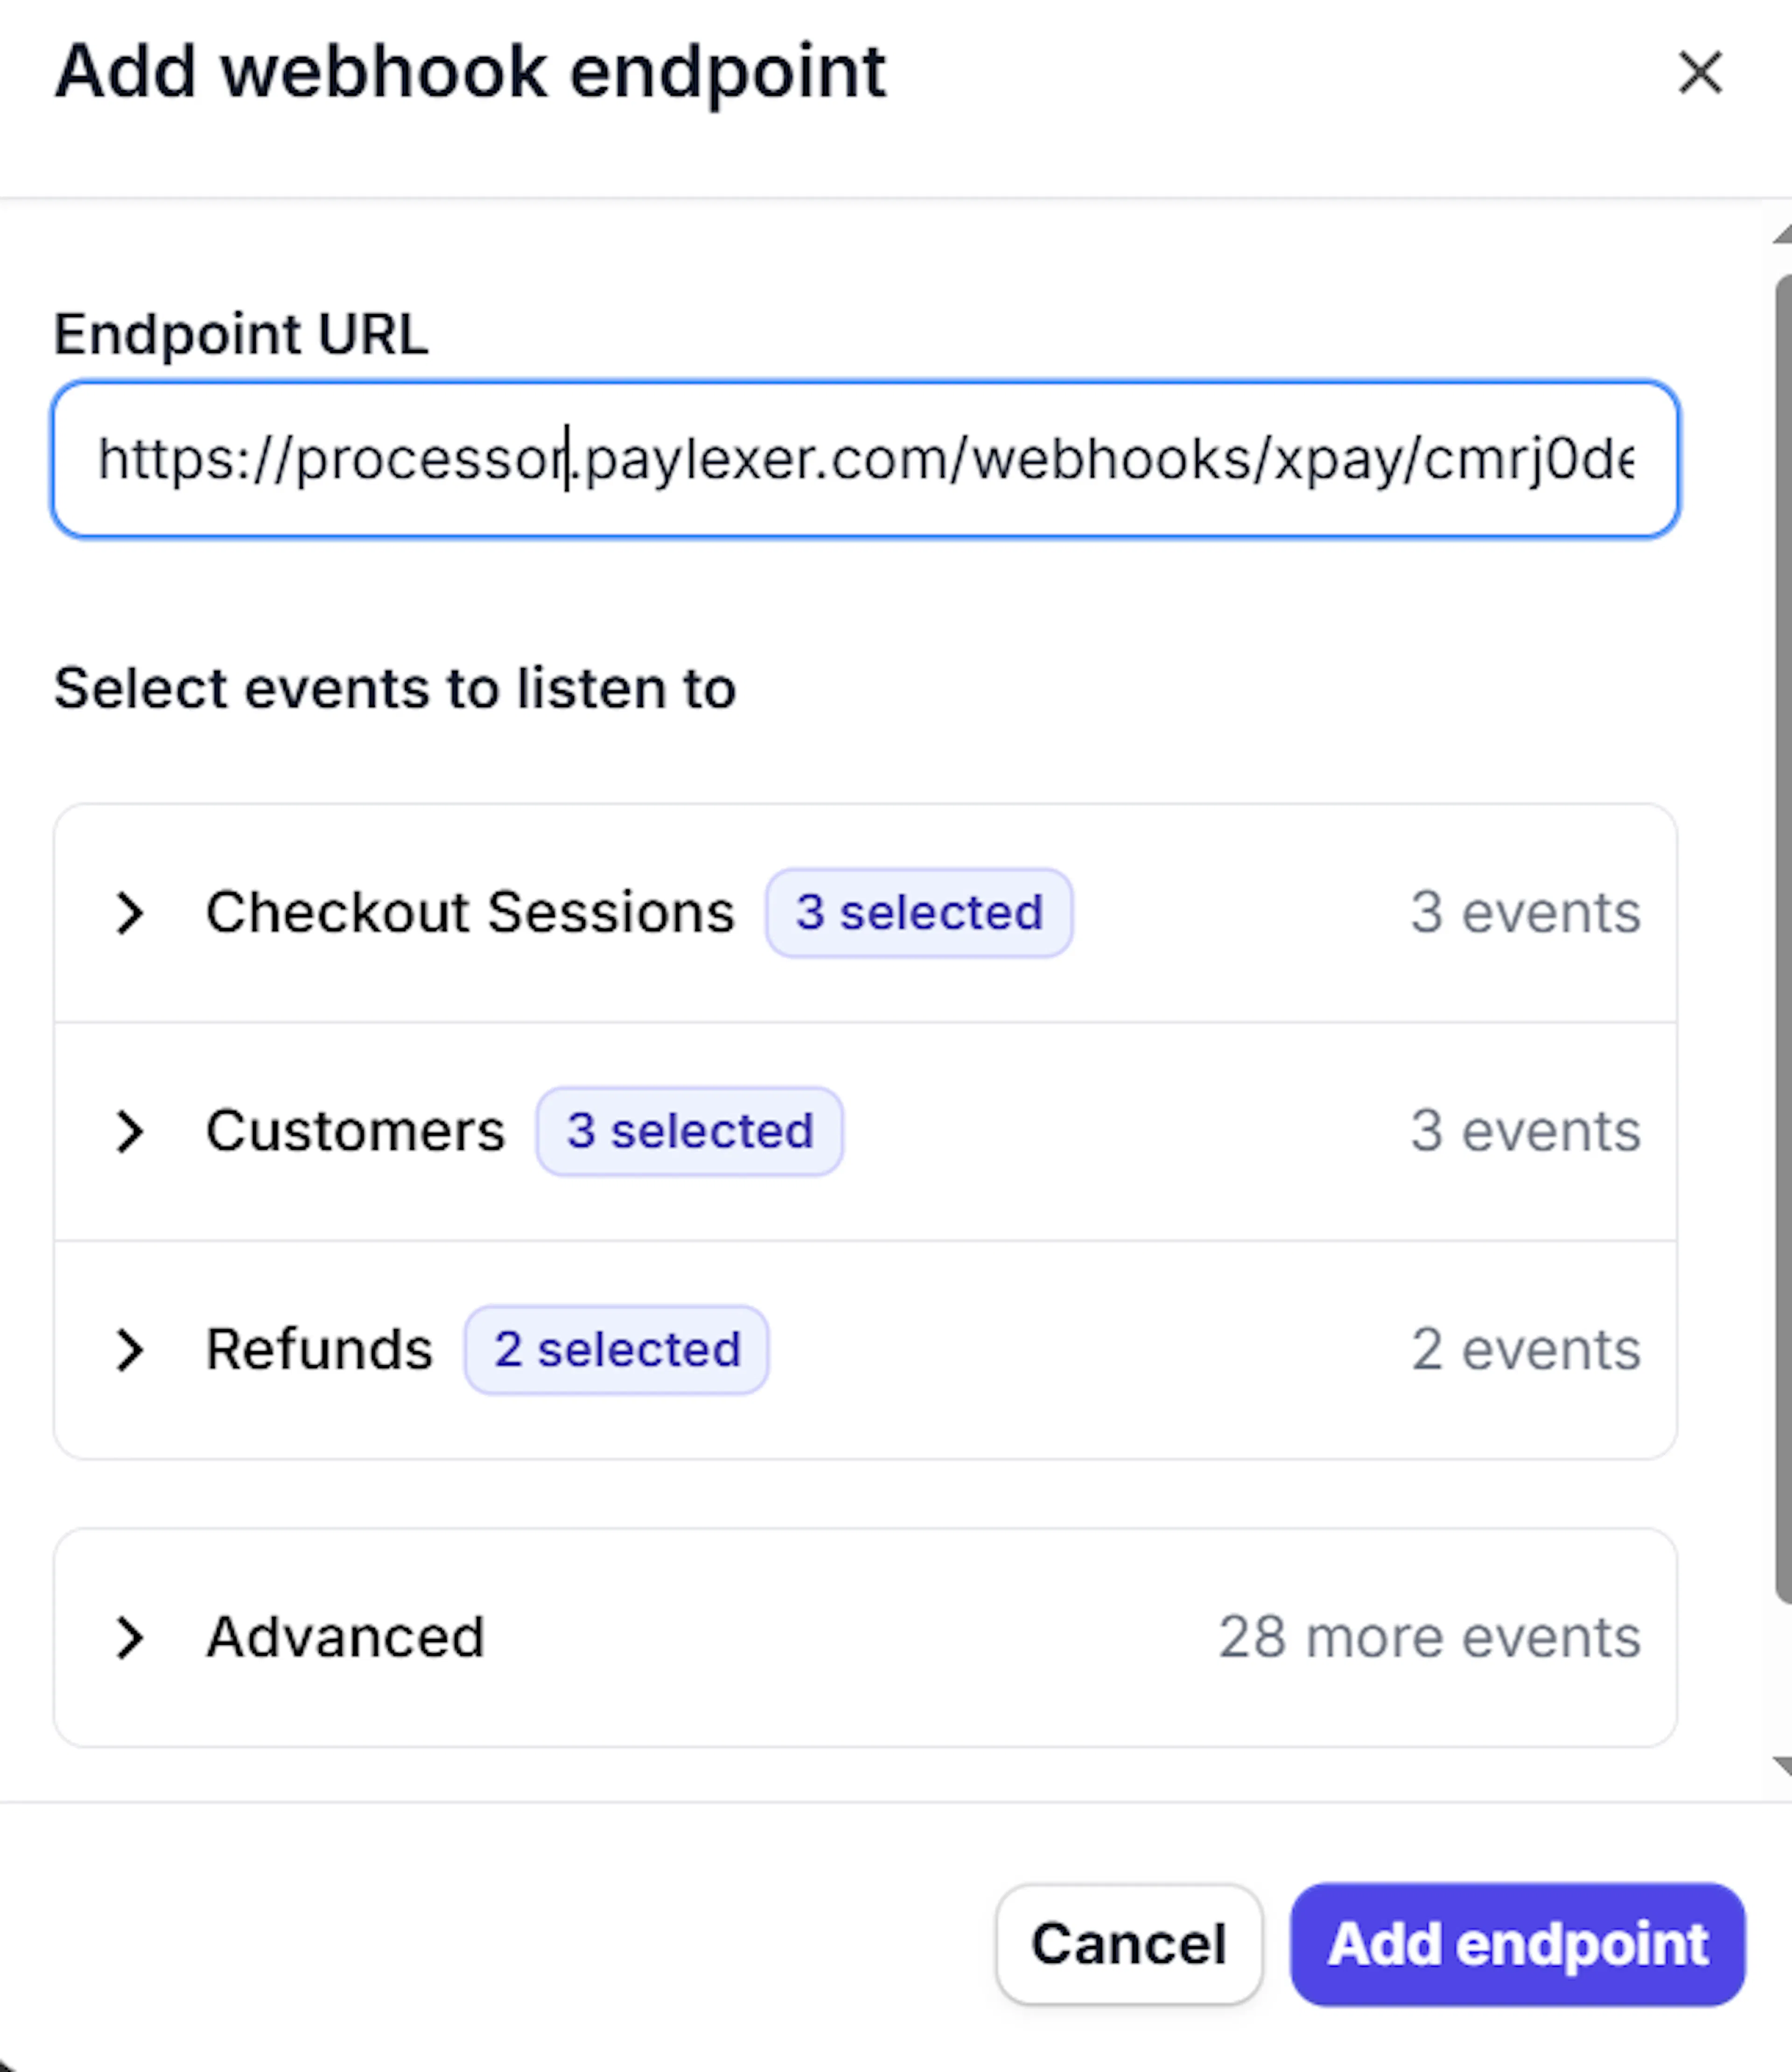
In the XPay dashboard, go to Developer Hub → Webhooks and click Add endpoint. Paste the PayLexer webhook URL into Endpoint URL.
Select the events PayLexer needs
Under Select events to listen to, choose these seven. Five are in the main list and two are under Advanced:
| Event | Where | Why PayLexer needs it |
|---|---|---|
| Checkout Session Completed | Checkout Sessions | Settles a card payment, or opens a Fawry payment as still unpaid |
| Checkout Session Async Payment Succeeded | Checkout Sessions | Completes a Fawry order once the cash is paid |
| Checkout Session Async Payment Failed | Checkout Sessions | Fails a Fawry order whose reference was never paid |
| Checkout Session Expired | Advanced → Checkout Sessions | Cancels an order the shopper abandoned |
| Refund Created | Refunds | Records a refund as pending |
| Refund Failed | Refunds | Marks a refund that did not go through |
| Charge Refunded | Advanced → Charges | Confirms the money left the payment |
Save the signing secret into PayLexer
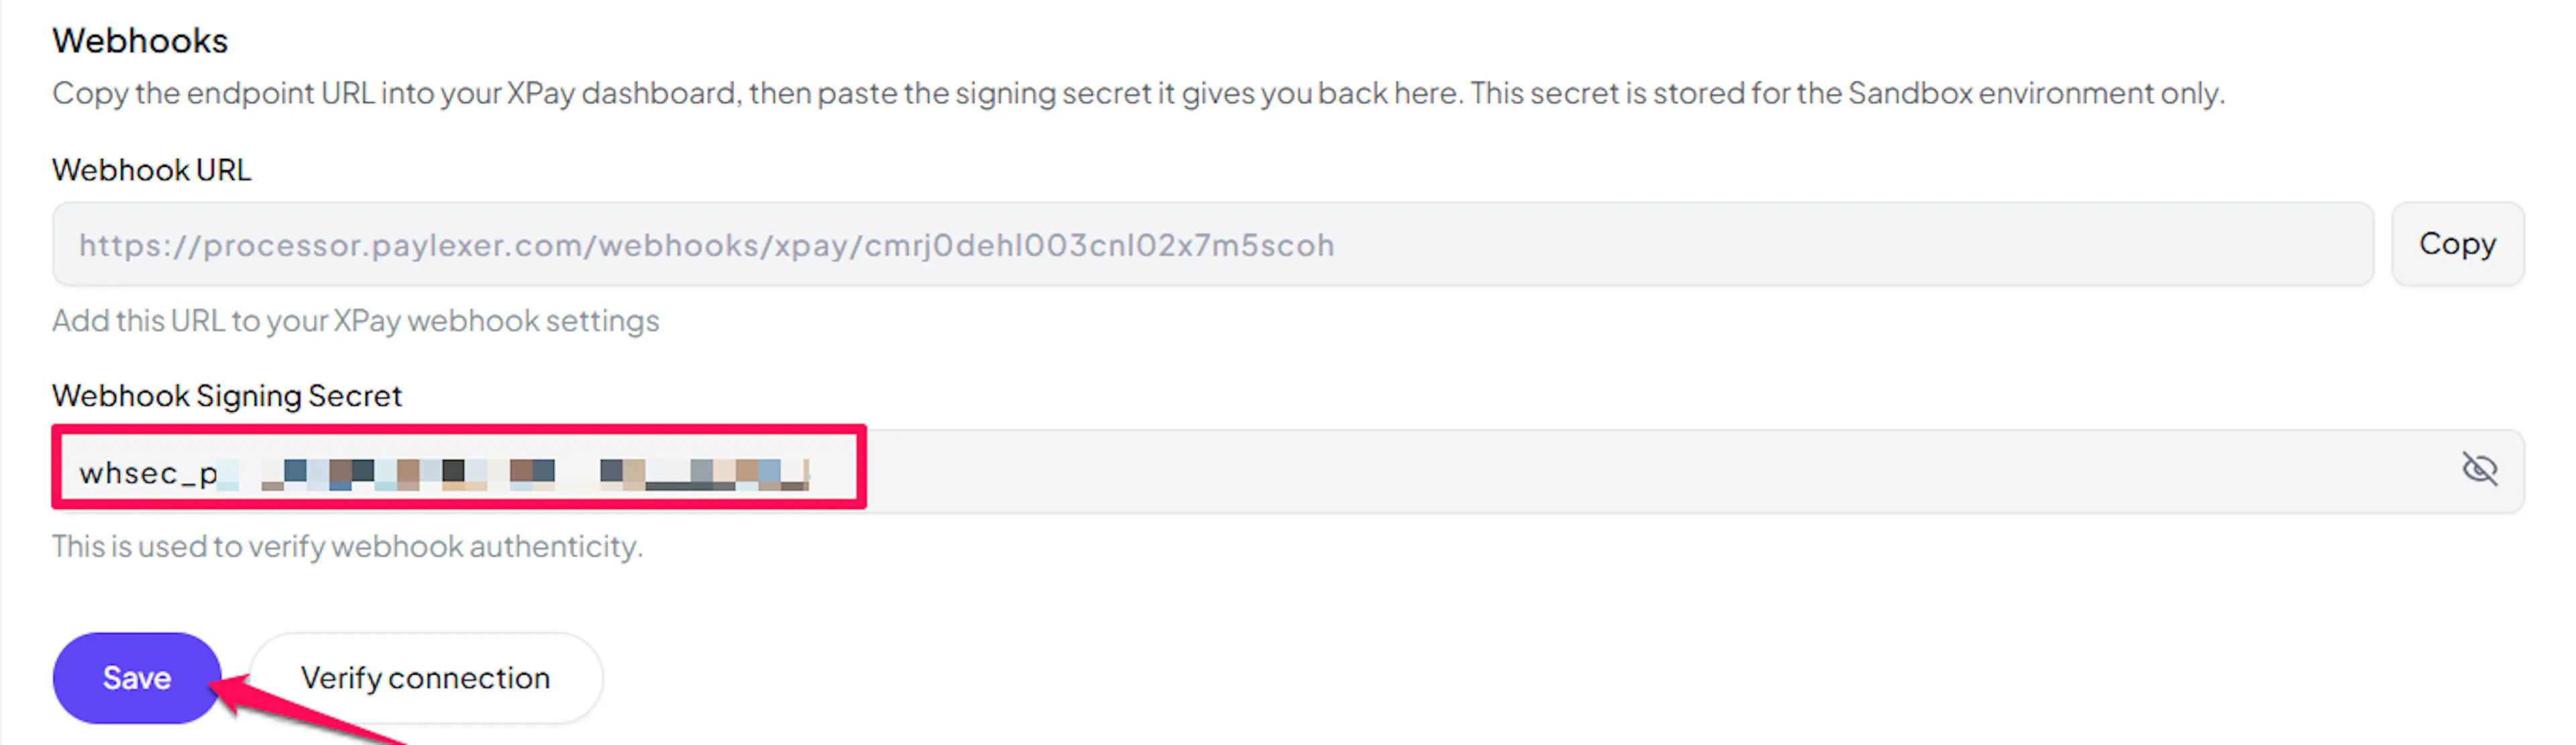
When you save the endpoint, XPay shows a Webhook signing secret starting whsec_. Copy it immediately - XPay will not show it again, and losing it means deleting the endpoint and creating a new one.
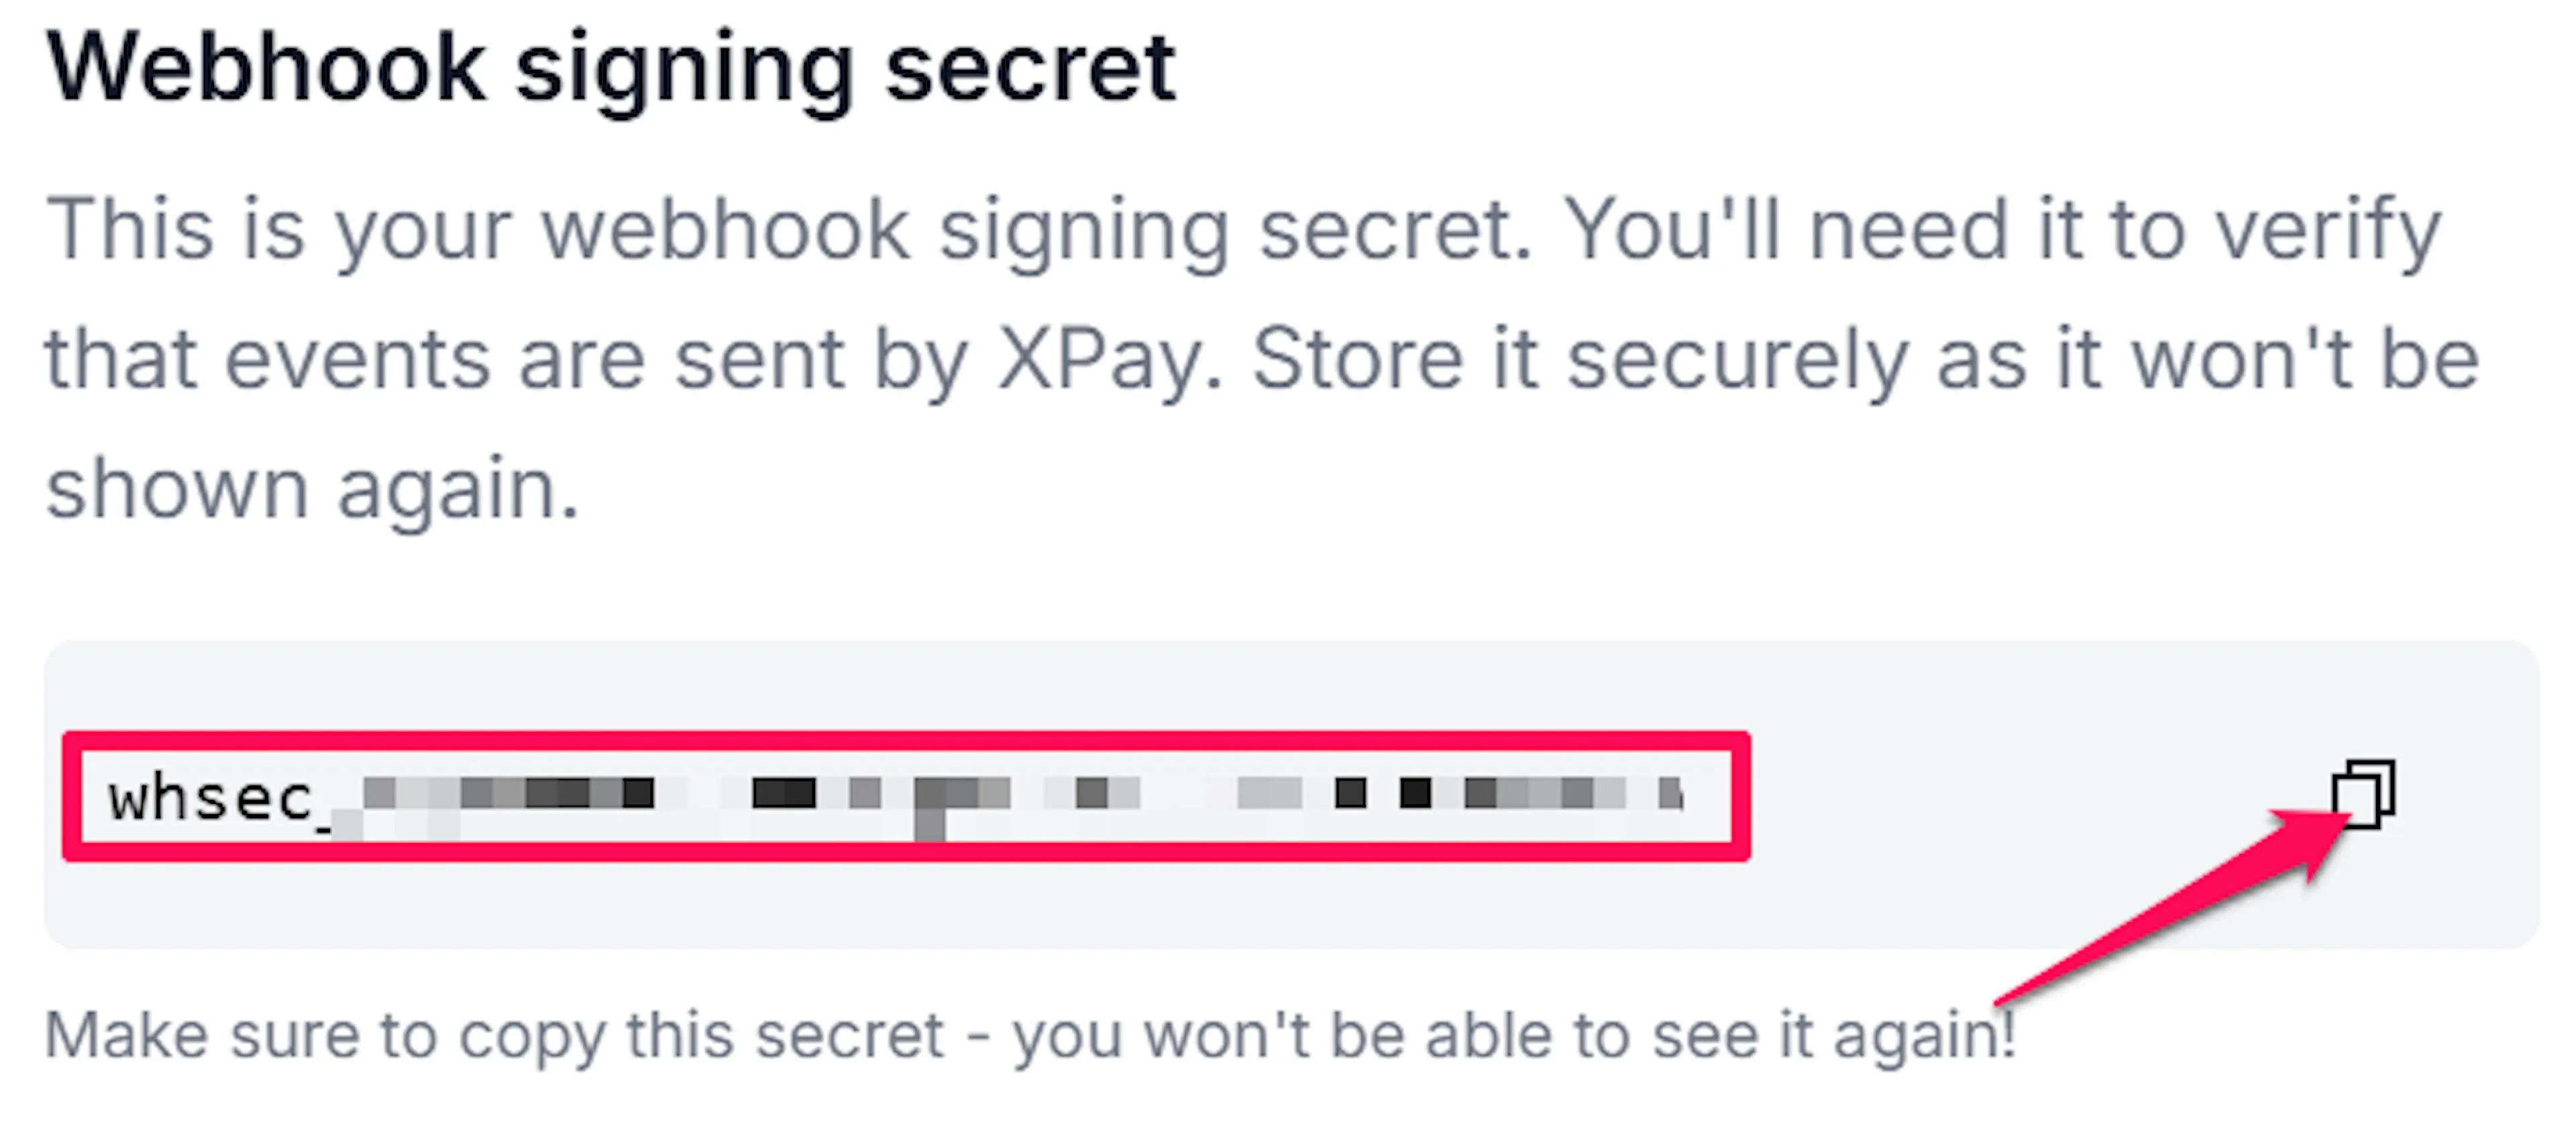
Back in PayLexer → Payment Gateways → XPay, paste it into the Webhook Signing Secret field in the Webhooks section and click Save.
Repeat in the other mode
Webhook endpoints belong to the mode you are in, so add the endpoint again after switching between** test and live,** and paste each signing secret into the matching PayLexer field.
Integrate XPay to Your Website
If you have already added and configured your site, you can enable XPay in your existing setup.
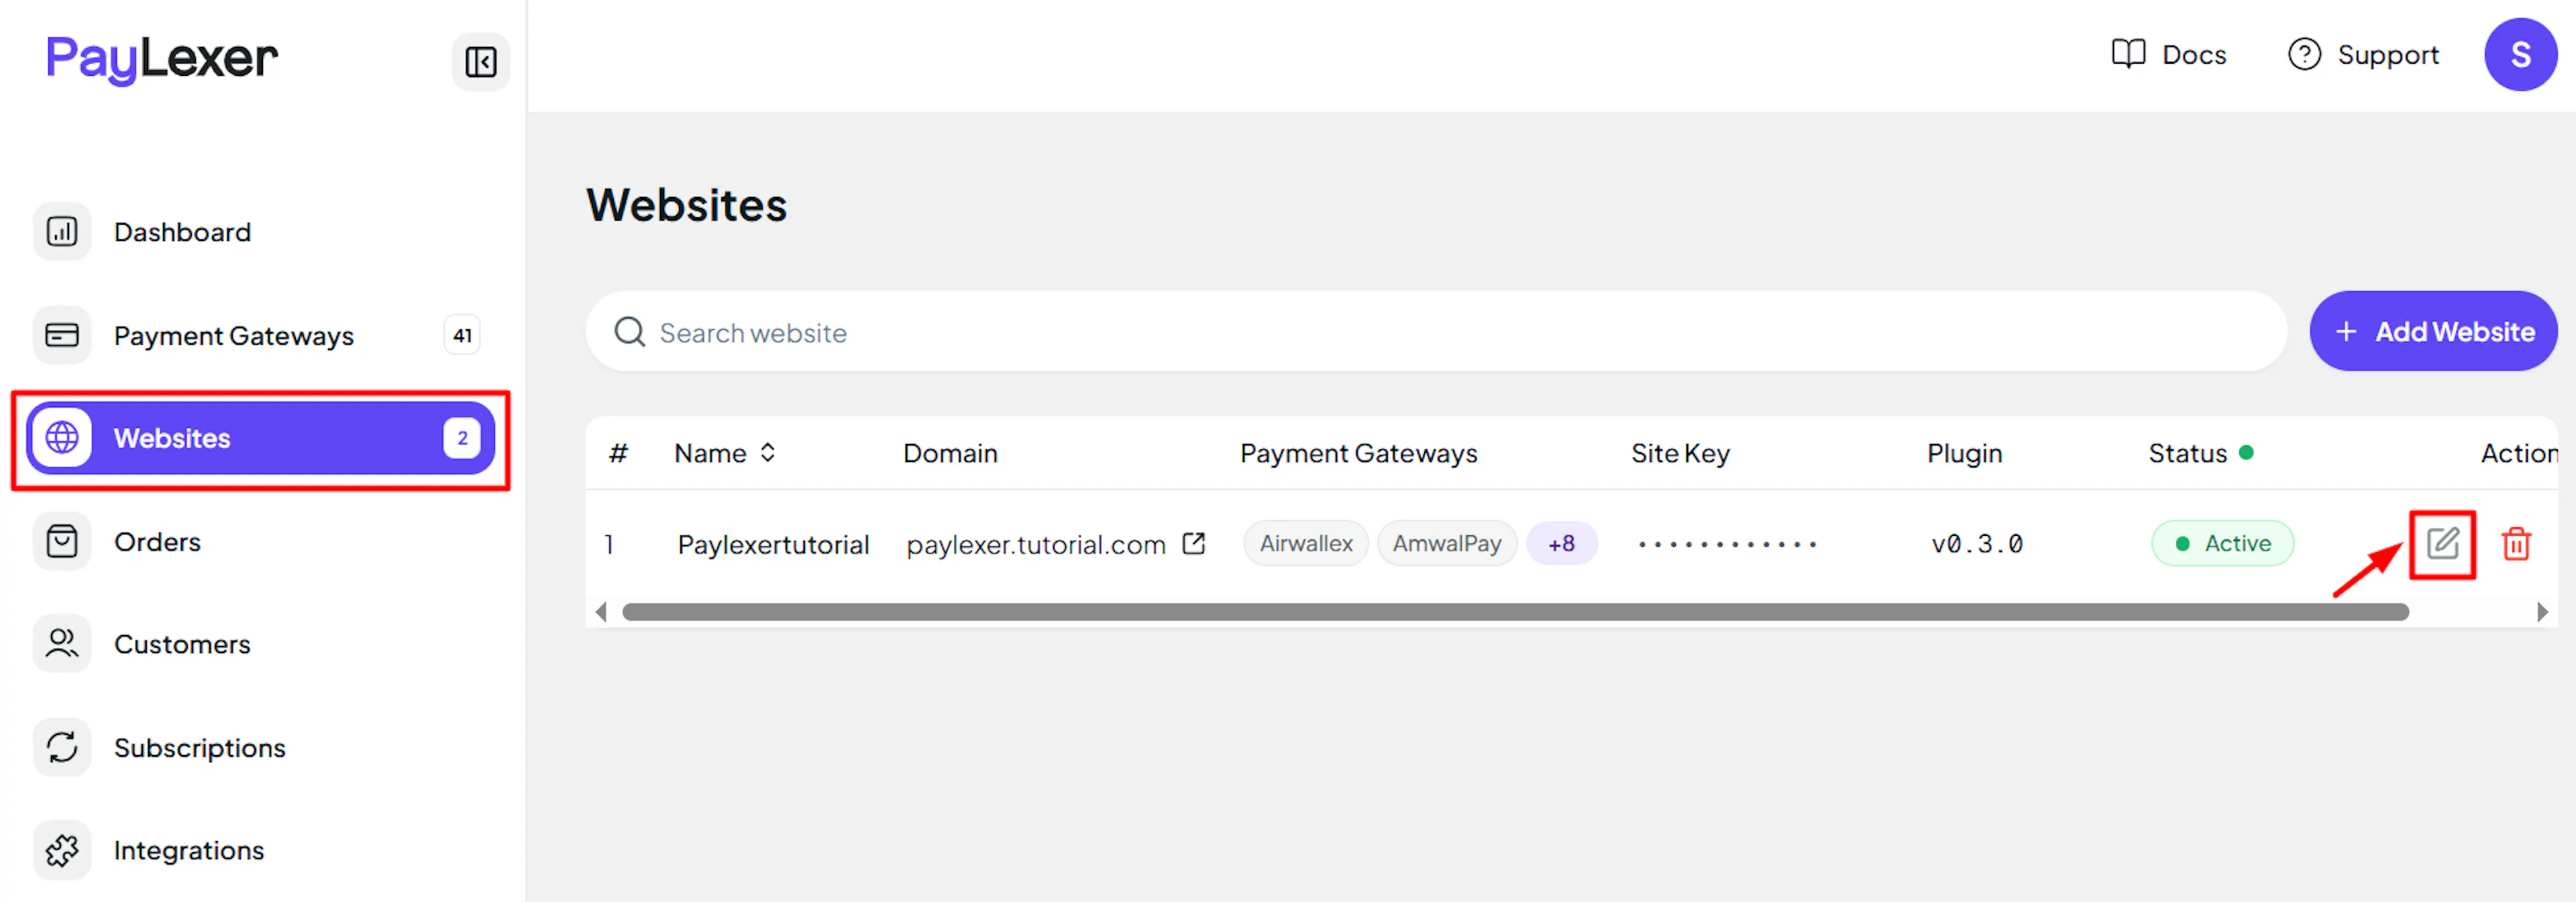
Go to Websites
Navigate to Websites in your PayLexer dashboard.
Edit your website
Click the Edit Icon of your added website.
Enable XPay
Click the checkbox to enable XPay for the website.
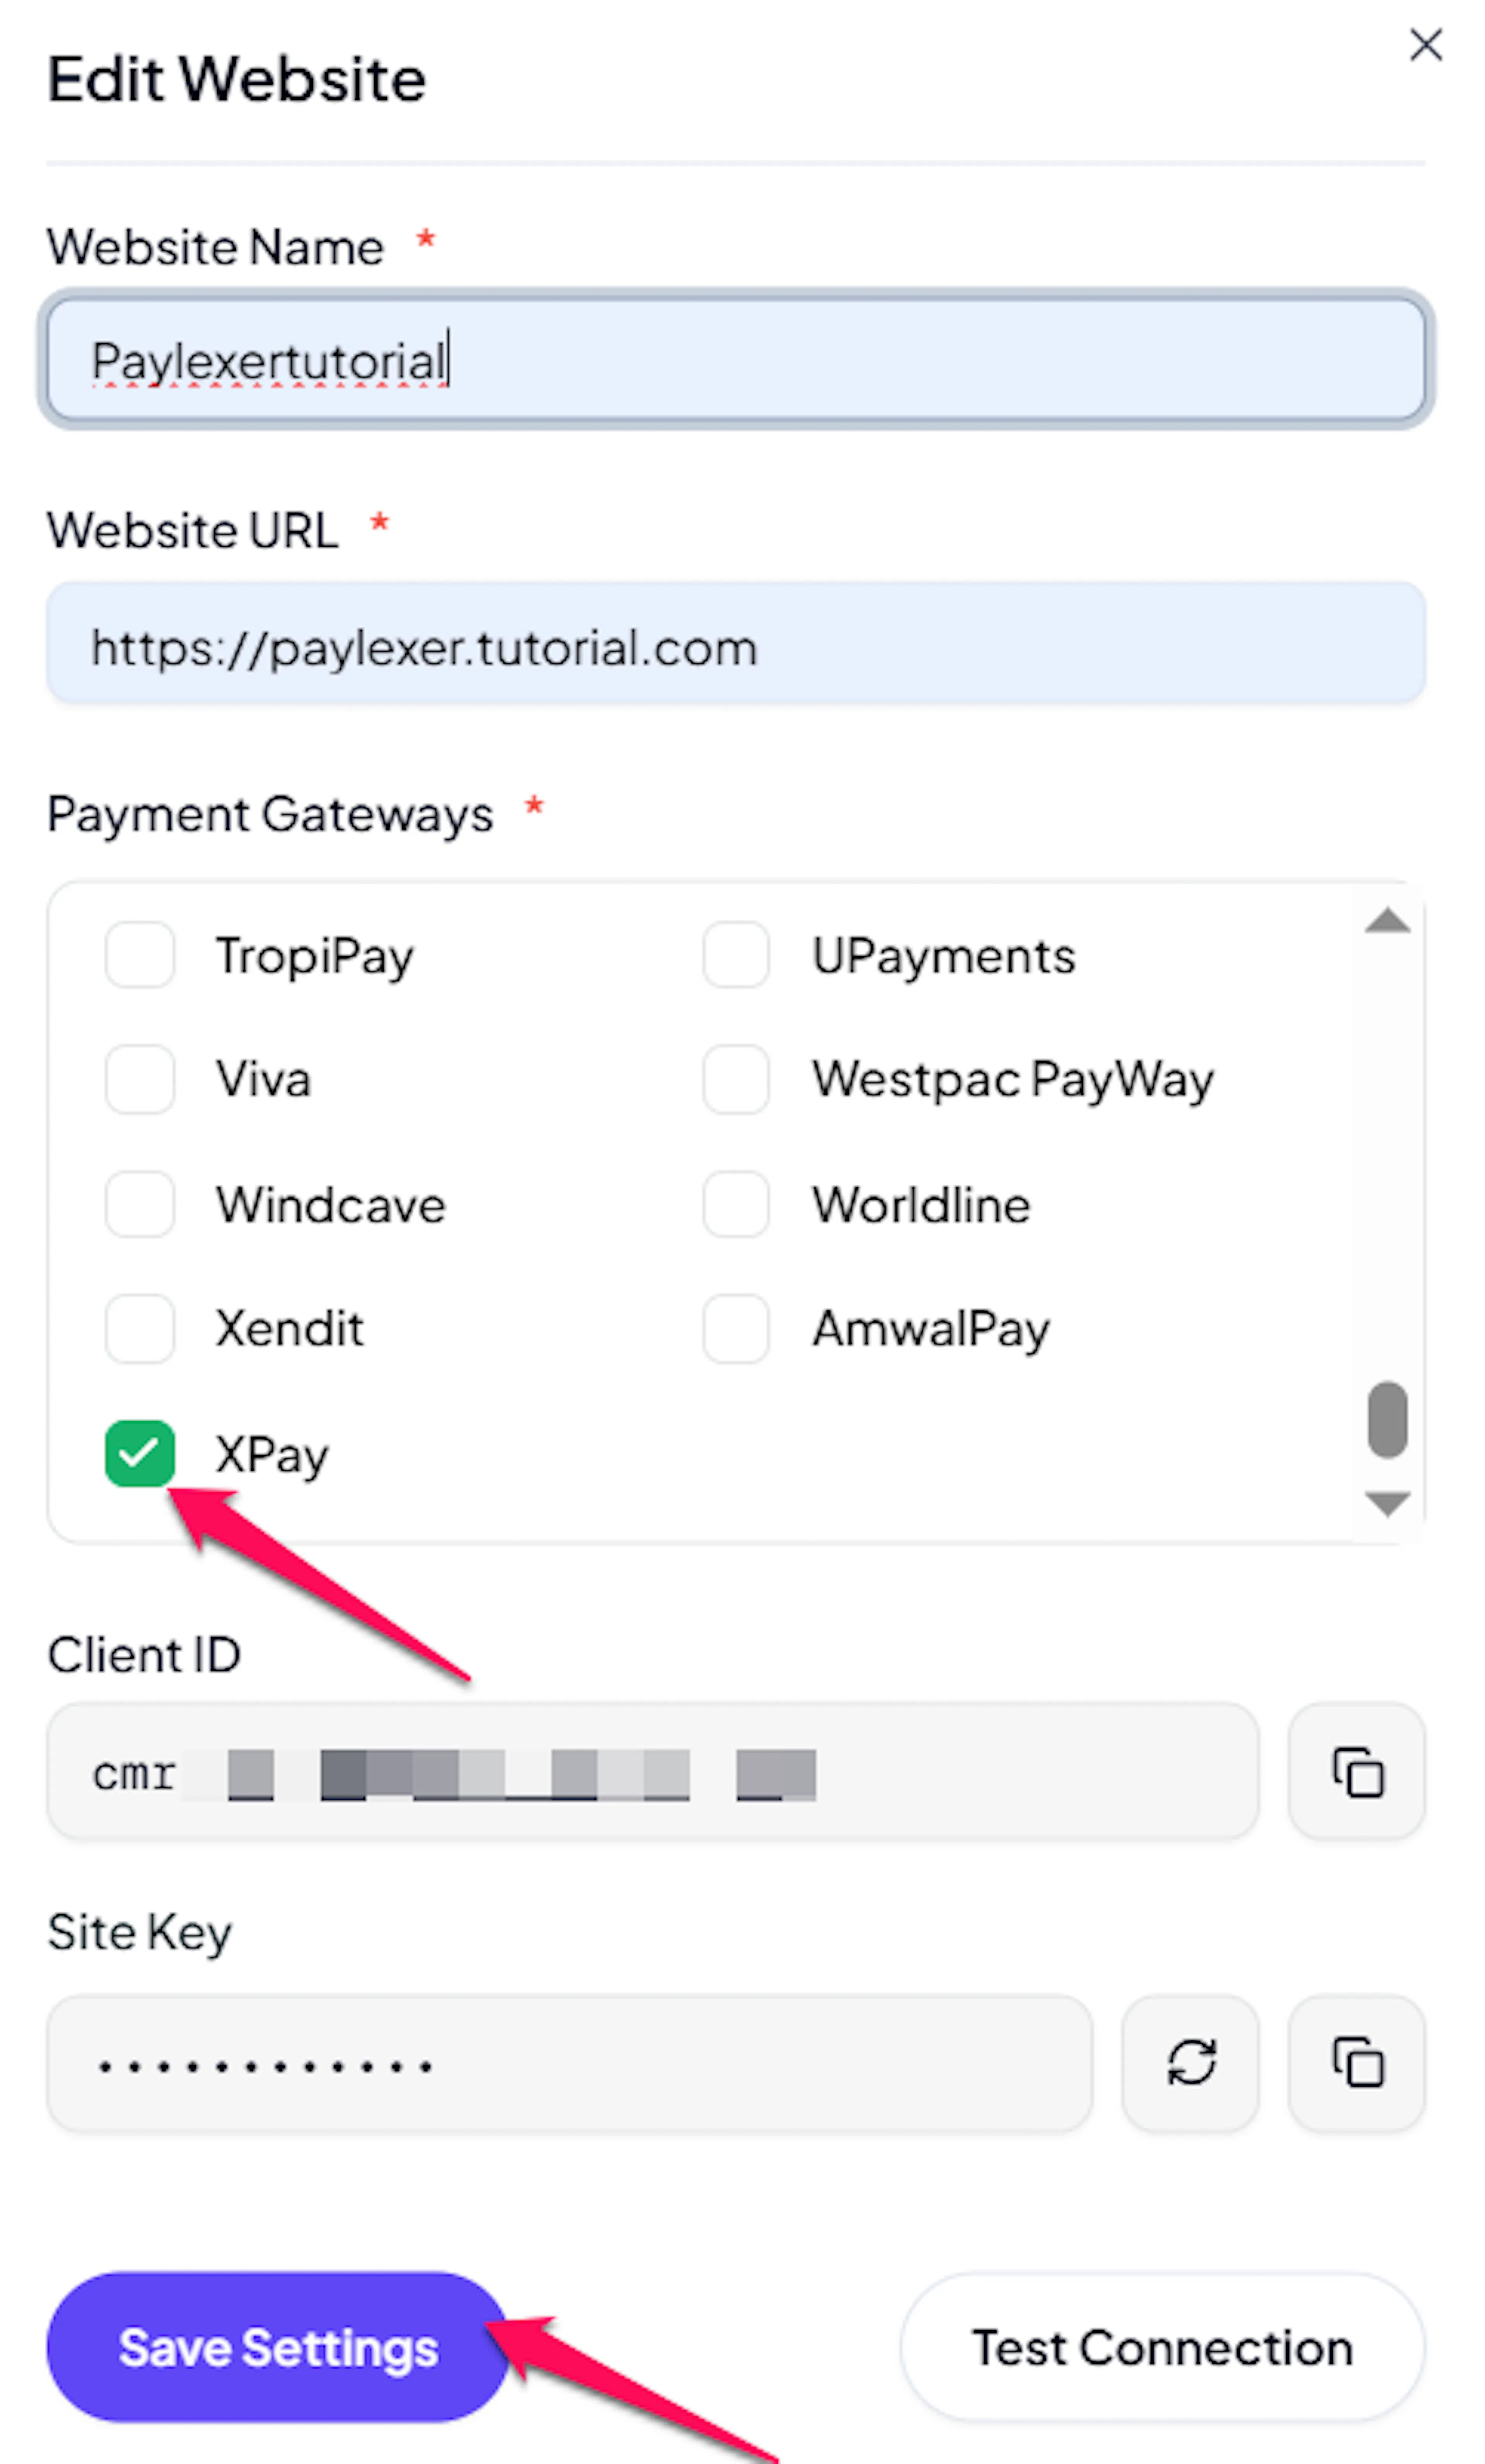
XPay is now active for this website. Run a test transaction before switching off Debug/Test mode.
If you haven't added a website yet, Continue to Add Your Website →
Troubleshooting
Best Practices
- Test in sandbox before enabling production. Every XPay account has test mode from the start, so run a full payment with Debug/Test mode ON and confirm the order updates before requesting live activation.
- Select all seven webhook events. Missing one does not break checkout visibly, but silently strands either Fawry orders or refunds.
- Copy the Webhook signing secret the moment XPay shows it. It is displayed once, and recovering it means deleting and recreating the endpoint.
- Consider a Restricted key instead of a full secret key, so the credential you store with PayLexer carries only the permissions it needs.
- Confirm your enabled currencies with XPay, and remember Fawry and ValU work only in Egyptian pounds.
- Price in your settlement currency where you can, since a partial refund is not possible on an order XPay had to convert.
- Tell your support team that ValU payments cannot be refunded, so they are not promised to a customer.
- Use a different gateway for any recurring billing, since XPay handles one-time payments only through PayLexer.
FAQs
Still Have Questions?
- XPay Support: XPay Support
- PayLexer Support: Contact Support