

Dodo Payments
Connect Dodo Payments to PayLexer to accept one-time payments and subscriptions across 85+ currencies through a hosted, merchant-of-record checkout page with signed webhooks.
Dodo Payments is a merchant-of-record payment platform backed by Andreessen Horowitz, Lightspeed, Visa, and Goldman Sachs, built for global sales without merchants having to manage tax compliance themselves. As merchant of record, Dodo Payments takes on legal responsibility for each transaction, including VAT, GST, and sales tax, and PayLexer connects to Dodo's hosted checkout page so shoppers pay in their own currency and card details never touch your site.
- Supported Regions (Merchant Accounts): 220+ countries and territories worldwide - view full list
- Supported Currencies: 85+ currencies including USD, EUR, GBP, AUD, CAD, JPY, INR, BRL, MXN, and ZAR - view full list
Supported Features
- Hosted checkout page for both one-time payments and recurring subscriptions
- Recurring subscription billing with support for free trial periods
- Broad multi-currency support, including zero-decimal currencies like JPY and KRW
- Full refunds, whether started from your store's order page or from the Dodo Payments Dashboard, with the result synced to your PayLexer order
- Partial refunds started from your store's order page, when your product's currency matches the currency Dodo Payments charged in
- Signed webhooks (Standard Webhooks / Svix, HMAC-SHA256) for real-time, server-to-server confirmation
- Actions taken directly in the Dodo dashboard (like a refund) are still matched back to the correct merchant and order
Sign-up fees are not supported for Dodo Payments subscriptions. If a product with a sign-up fee is in the cart, checkout is blocked with a message asking the shopper to choose a different payment method, so nobody is charged the wrong amount. Plan changes are also not supported after a subscription is created; to change the amount or interval, cancel and create a new subscription.
Your price is treated as the final, tax-inclusive amount. As merchant of record, Dodo Payments is responsible for VAT, GST, and sales tax, and PayLexer registers your price as tax inclusive. The shopper is charged exactly the price shown in your store, and any tax Dodo Payments owes is taken out of that amount rather than added on top. In tax-collecting regions this means your net per sale is lower than the sticker price. Price your products accordingly.
Dodo Payments may charge in a different currency than your product is priced in. A product priced in EUR can be presented and settled to the shopper in USD, so the Dodo Payments dashboard and your shopper's statement can show a converted amount (for example EUR 14.99 shown as USD 17.29) while PayLexer keeps showing your original price. This is expected. Your subscriptions, orders, and refund totals in PayLexer always stay in your product's currency.
Before You Start
Make sure you have:
- Dodo Payments Account – Don't have one? Sign up for Dodo Payments →
- PayLexer Account – Required to configure the integration. Create your account →
- A website where you want to integrate
Looking for a different payment processor? View all supported gateways →
Configuring Dodo Payments
You need an API Key and Publishable Key from Dodo Payments for this integration.
Getting API Credentials
Open the Dodo Payments Dashboard
Log in to your Dodo Payments Dashboard.
Switch to the environment you are configuring
You manage both environments from the same dashboard (app.dodopayments.com), but Test Mode and Live Mode each have their own API Key, Publishable Key, and webhook. Use the Test/Live toggle in the dashboard to switch to the correct environment before generating or copying any credentials below.
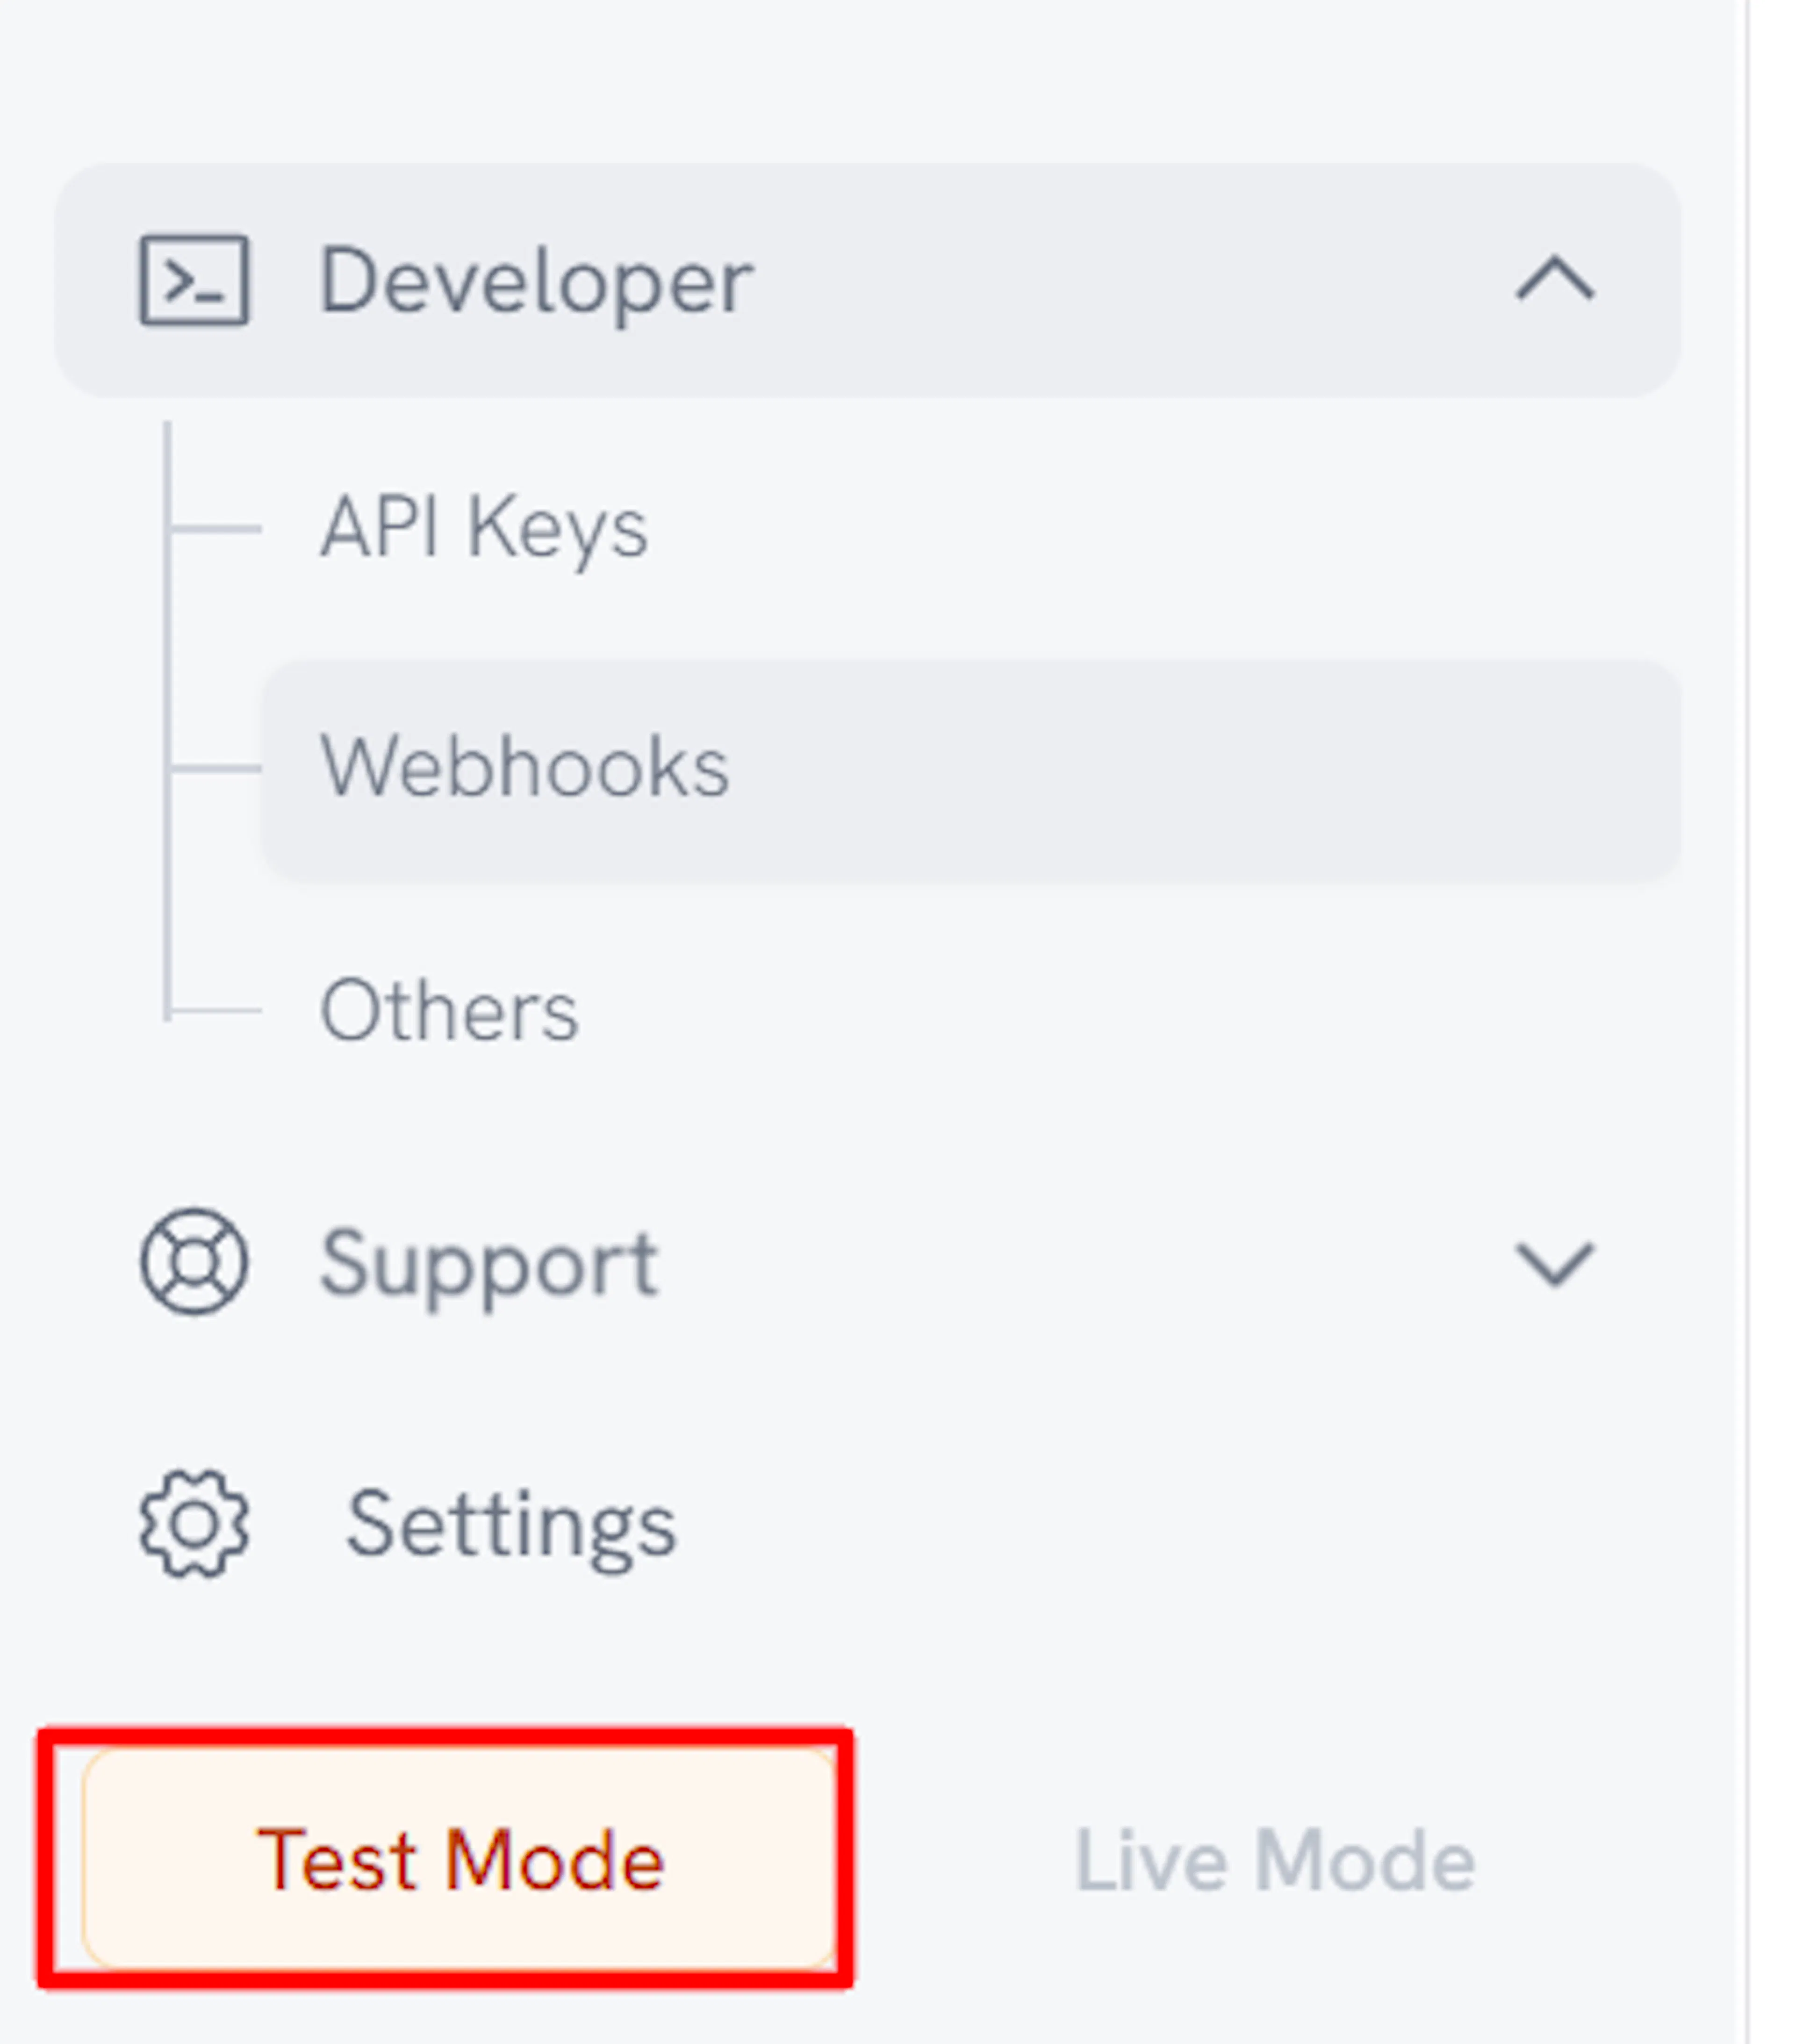
Credentials generated in one environment do not work in the other. Confirm you're in the right environment before copying keys, or you'll end up pasting a Test key into the Live fields (or vice versa) in PayLexer.
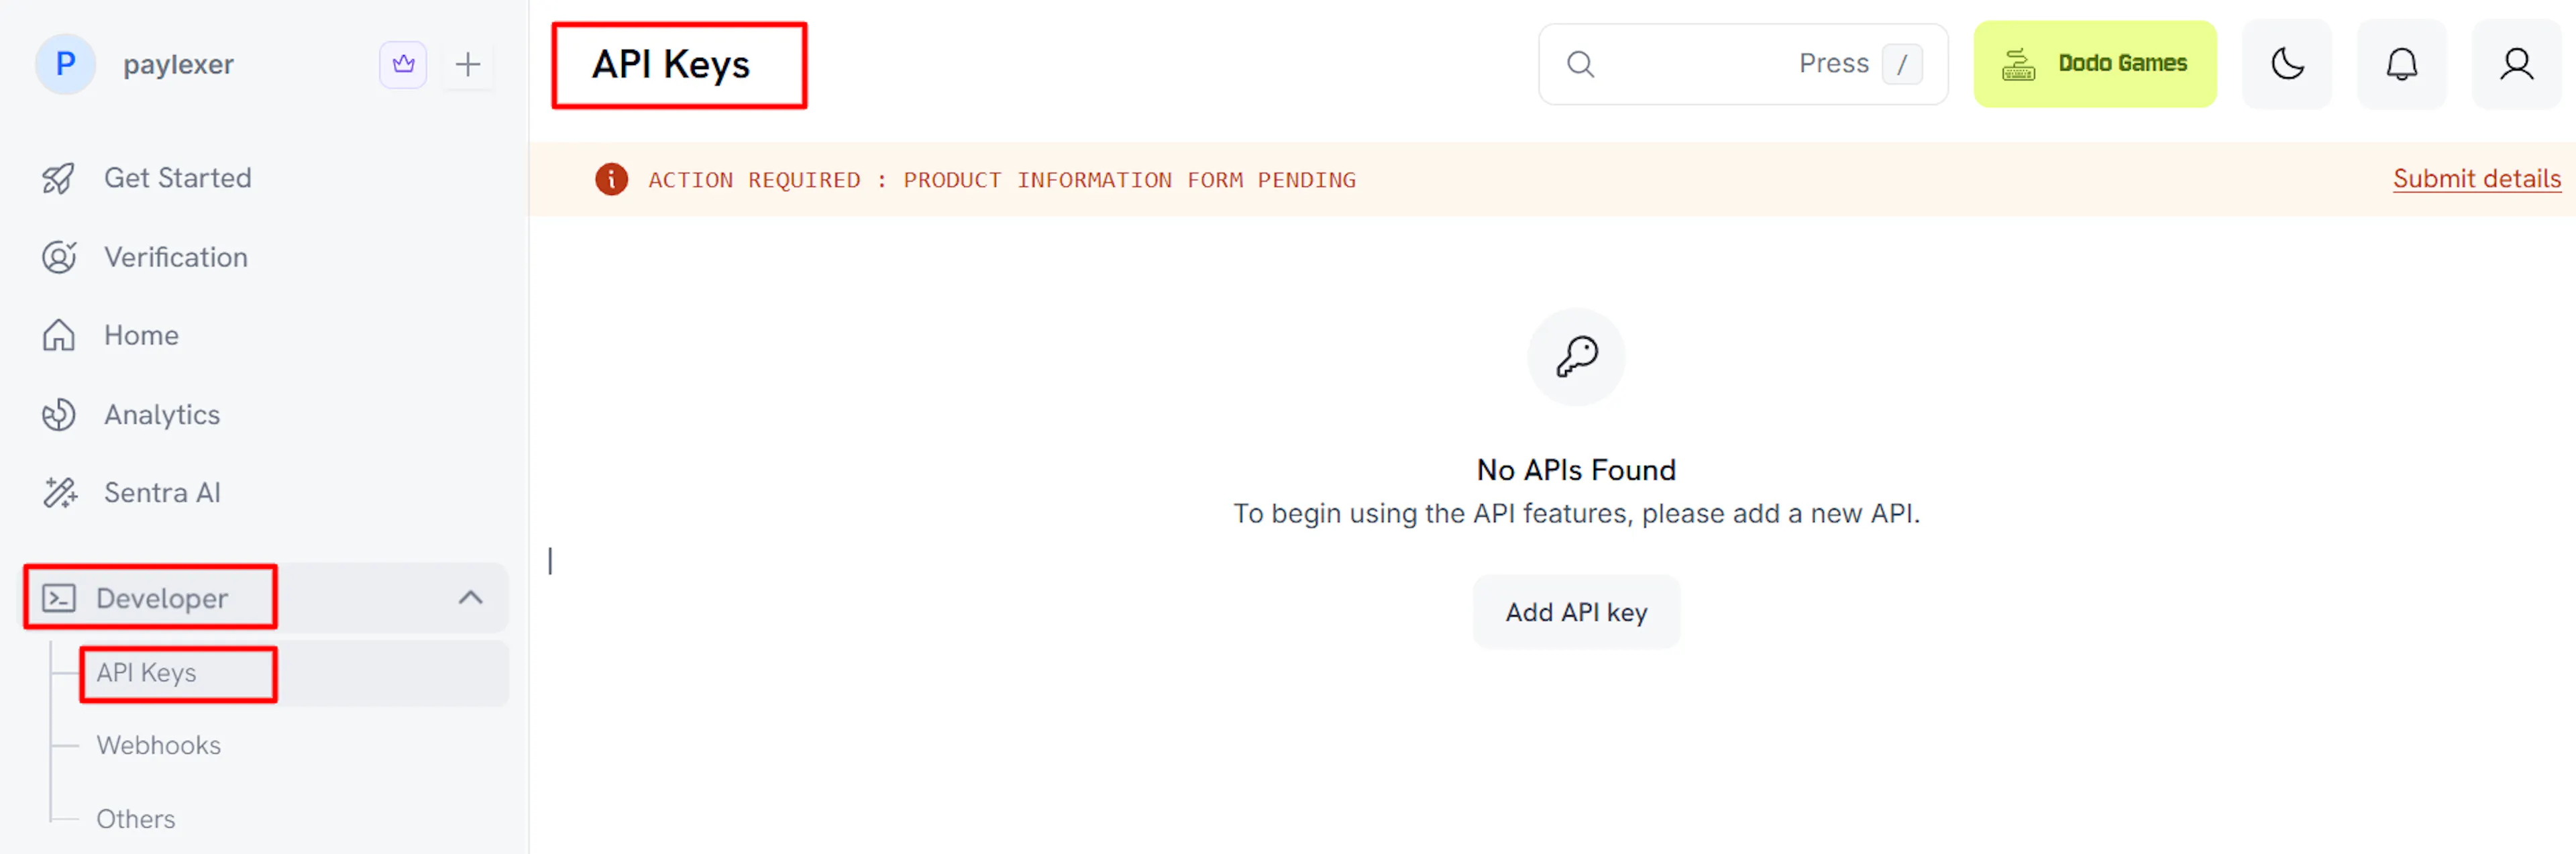
Copy or create your API Key
Navigate to Developer -> API Keys. Copy an existing API Key, or click Create API Key if you don't have one yet for this environment.
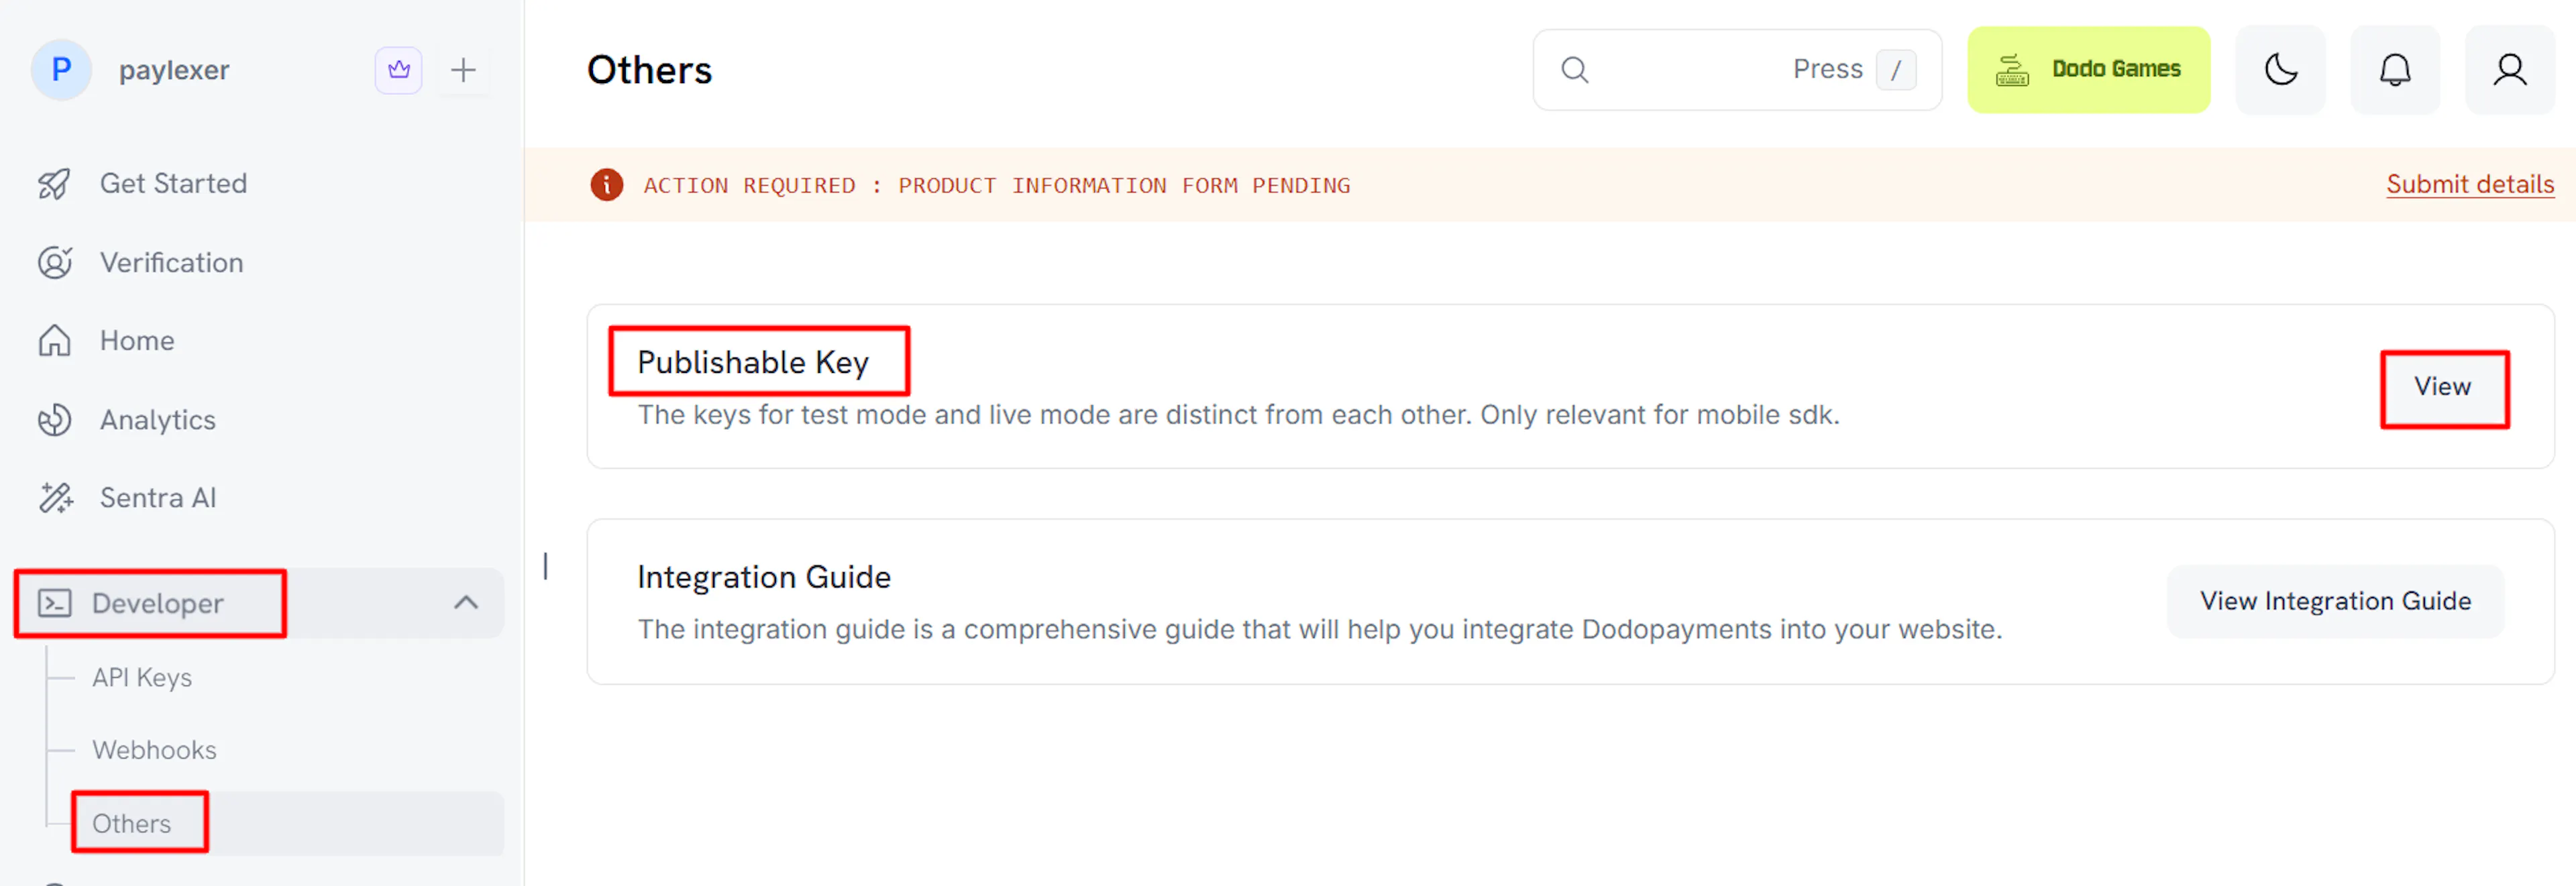
Copy your Publishable Key
Navigate to Developer -> Others -> Publishable Key, click View, then copy the key shown.
Adding Credentials to PayLexer
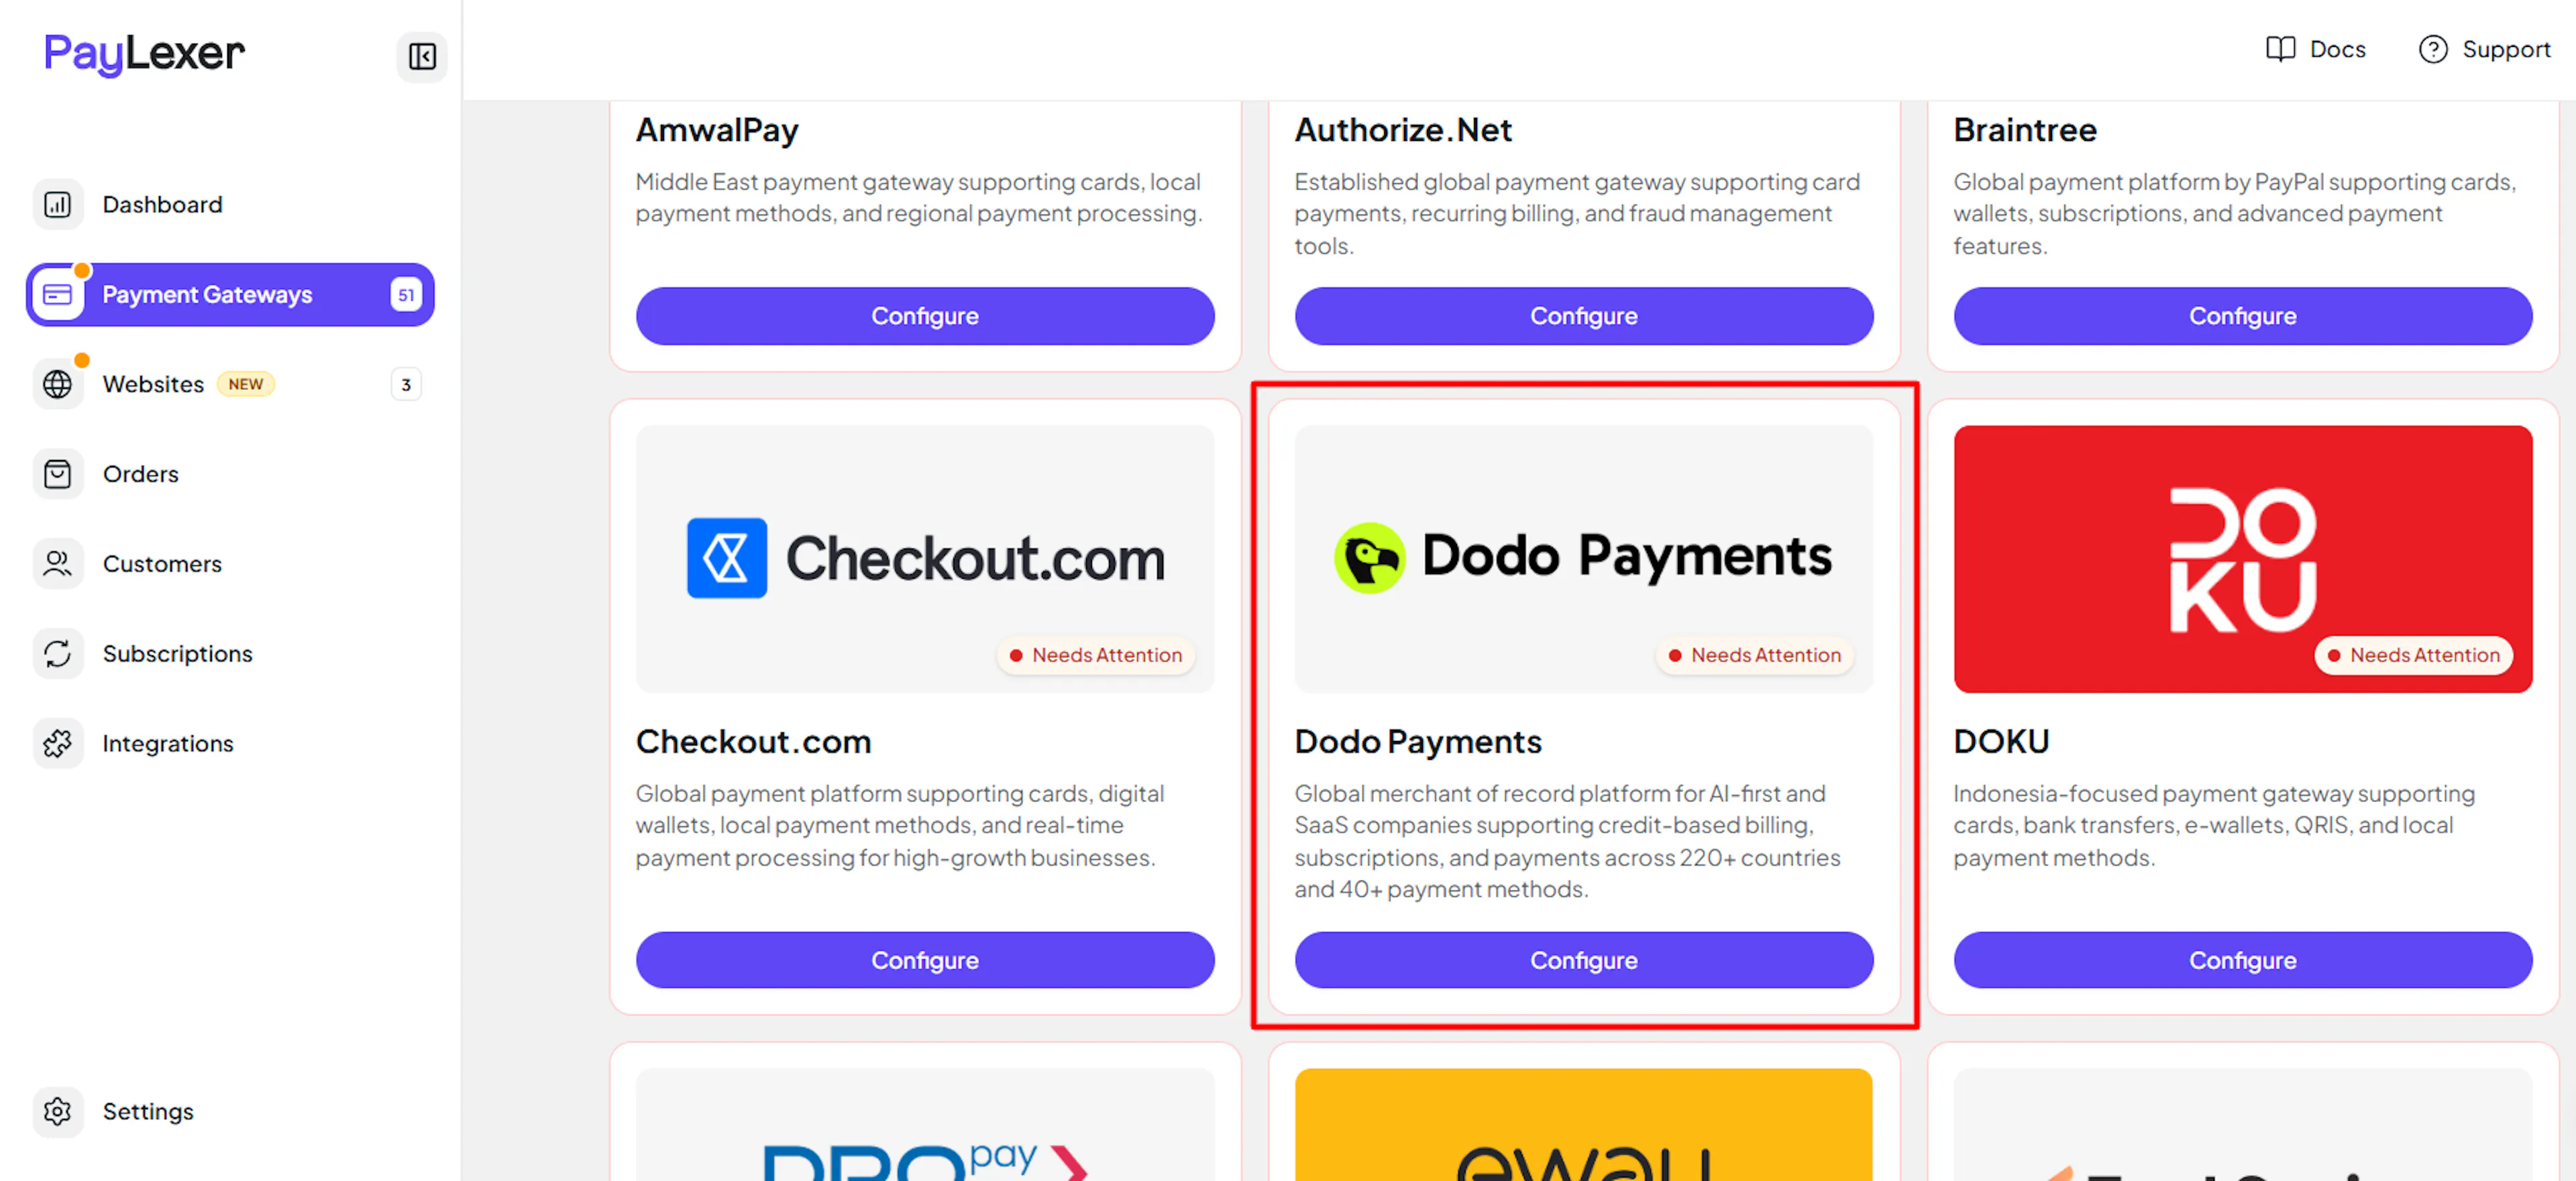
Open PayLexer Dashboard
Log in to your PayLexer dashboard and navigate to Payment Gateways -> Dodo Payments.
Enter your credentials
Paste the API Key and Publishable Key you copied from Dodo Payments.
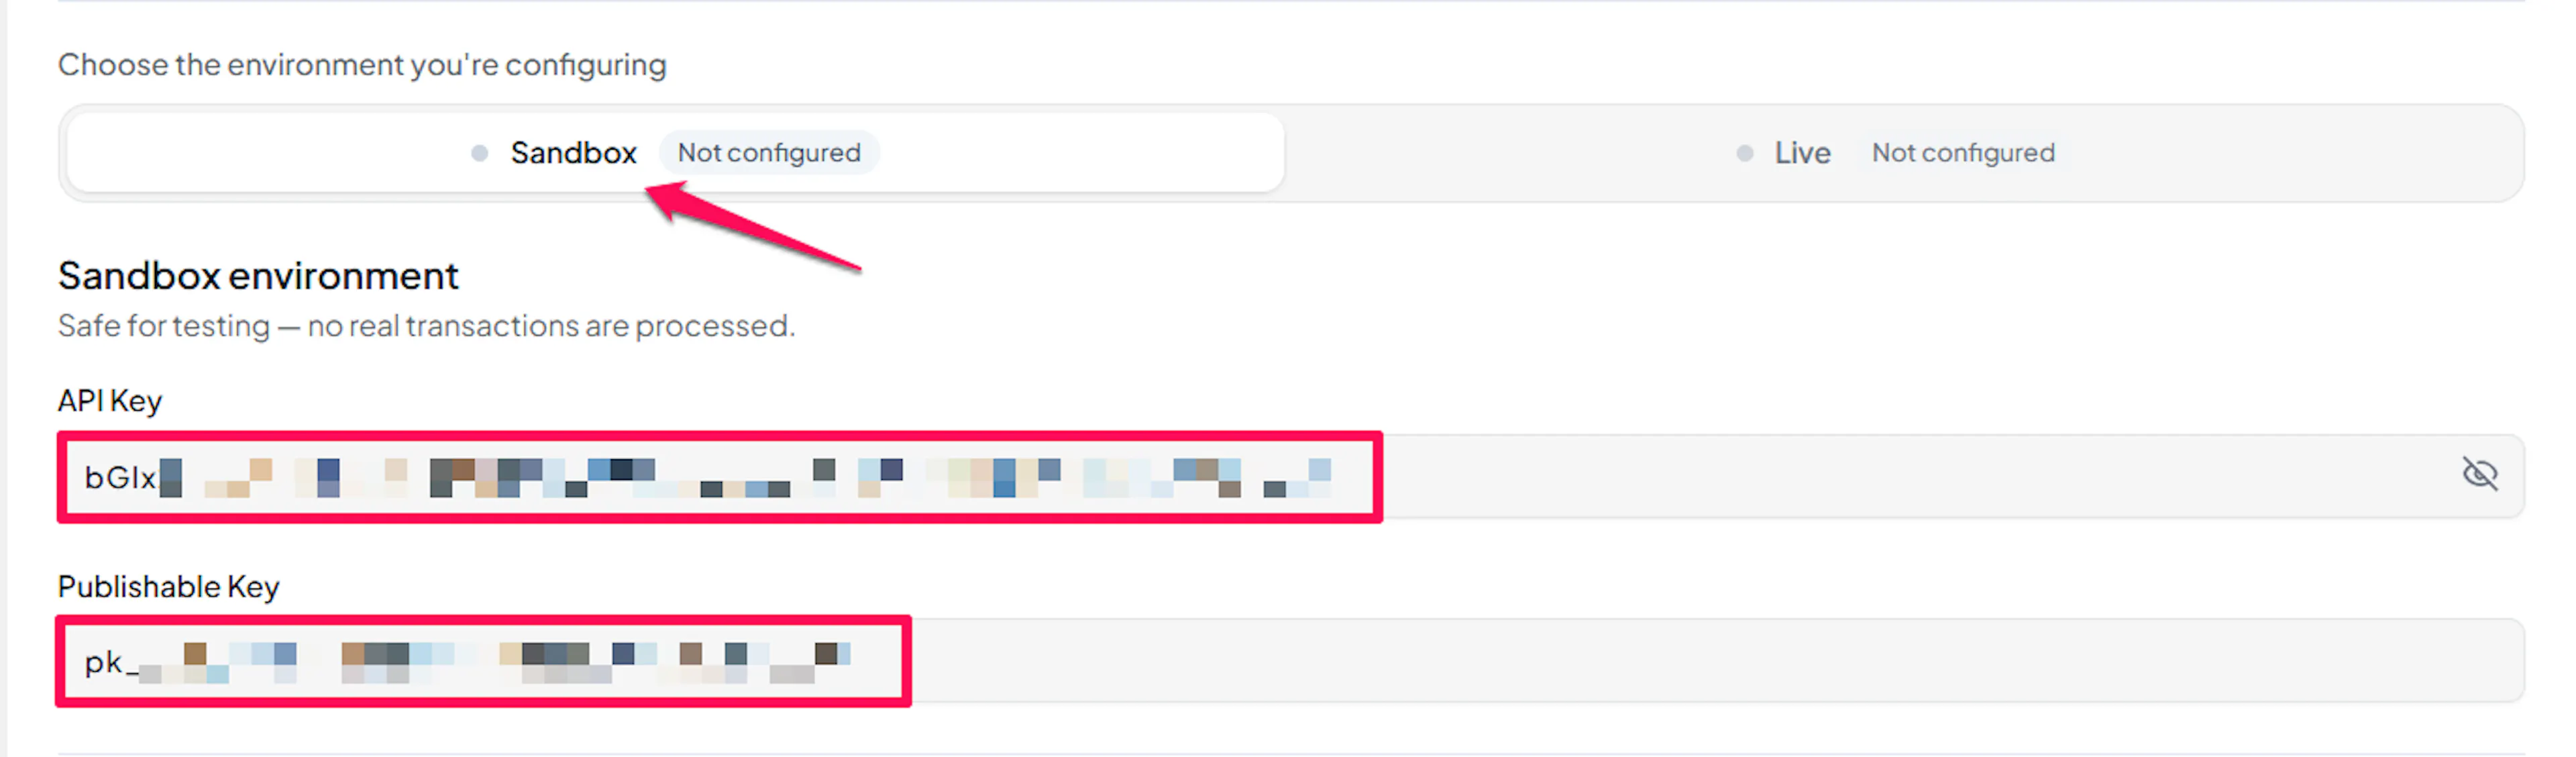
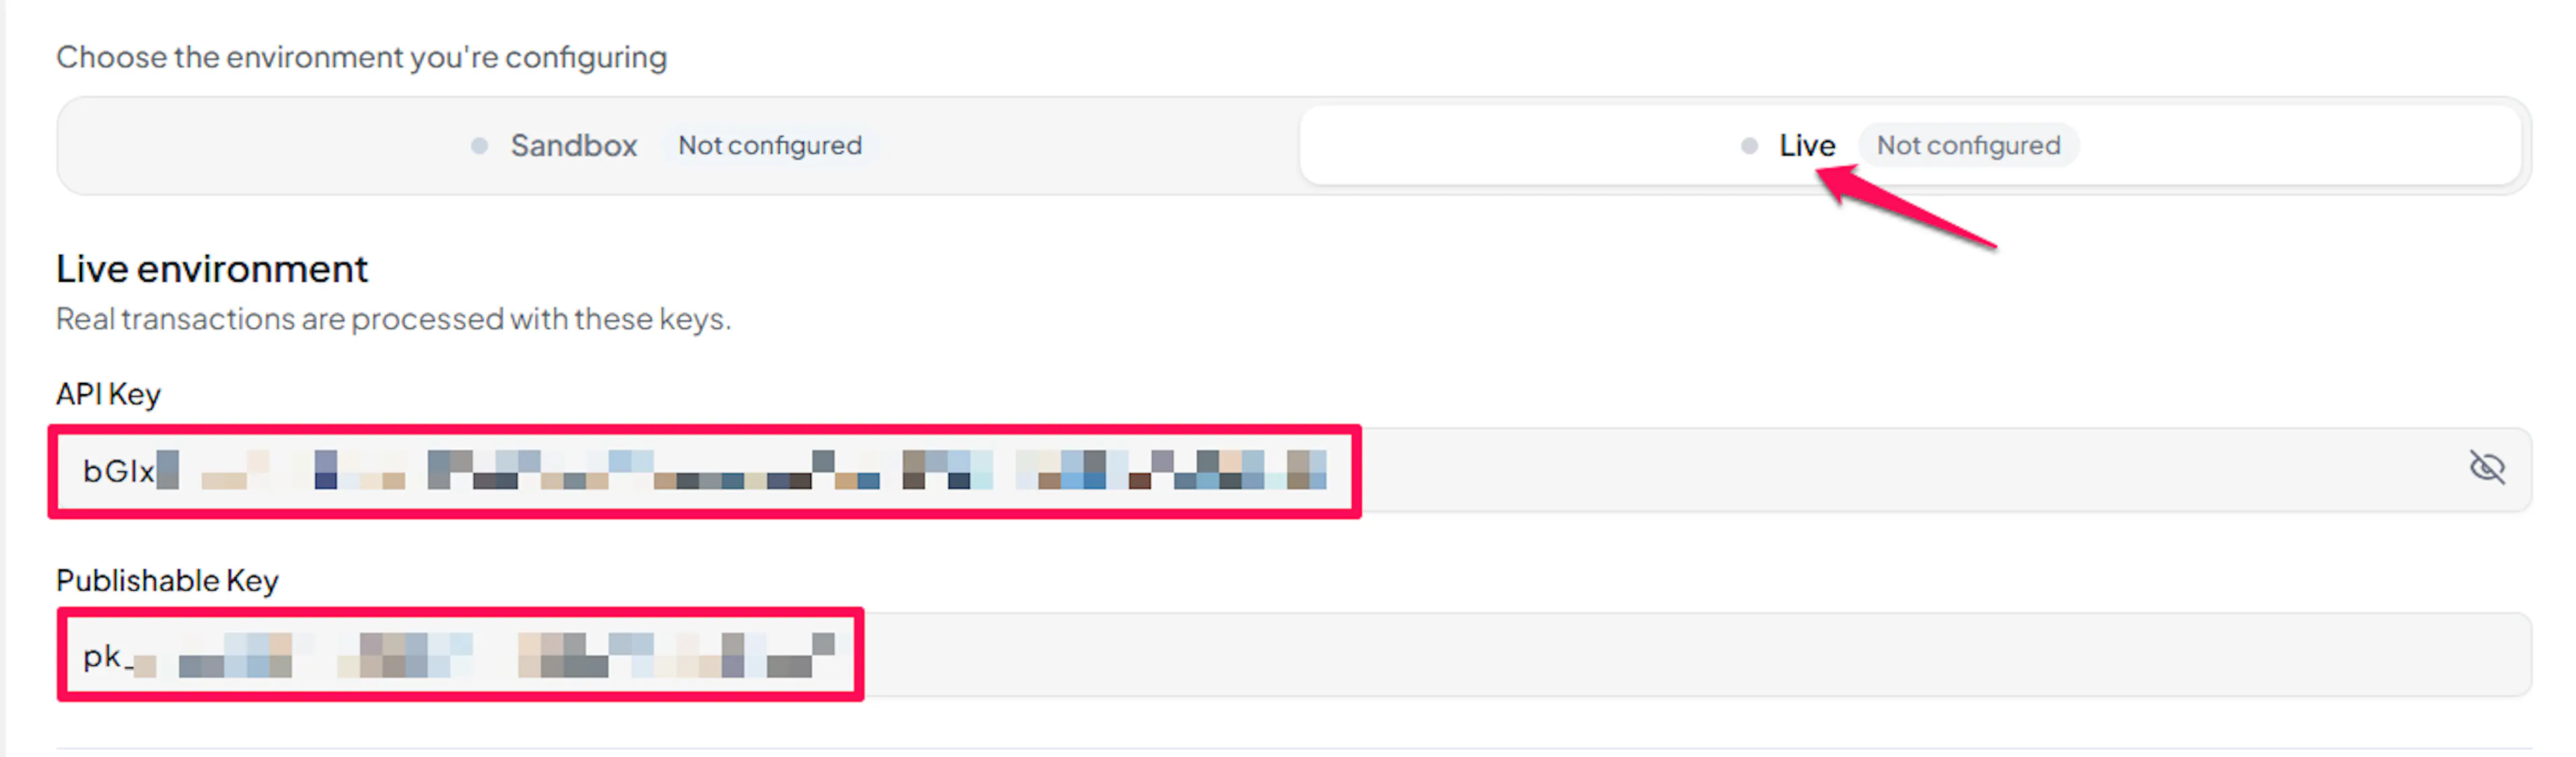
Understanding Live/Production and Sandbox Settings:
| Environment | Purpose |
|---|---|
| Live / Production (Mandatory) | Used for real transactions. Cannot be empty, even when testing. |
| Test / Sandbox (Optional) | Used for testing only. No real money is processed. |
How PayLexer selects credentials:
- Debug/Test mode ON → Test credentials are used
- Debug/Test mode OFF → Live credentials are used
Test and save
Click Save to save your configuration and verify your credentials. Click Verify Connection to test the connection.
Configuring Webhooks (Mandatory)
Webhooks enable real-time payment updates and significantly improve reliability.
Benefits of Webhooks:
- Instant payment status updates
- Automatic refund processing
- Subscription renewal, pause, and cancellation updates
Dodo Payments signs each webhook using the Standard Webhooks specification (via Svix), and PayLexer verifies the webhook-signature header against your Webhook Secret before trusting any event.
Copy your PayLexer webhook URL
In PayLexer -> Payment Gateways -> Dodo Payments, copy the Webhook URL shown for your account.

Create the webhook in Dodo Payments
In the Dodo Payments Dashboard, go to Developer -> Webhooks -> Add Webhook and set the PayLexer webhook URL as the endpoint URL.
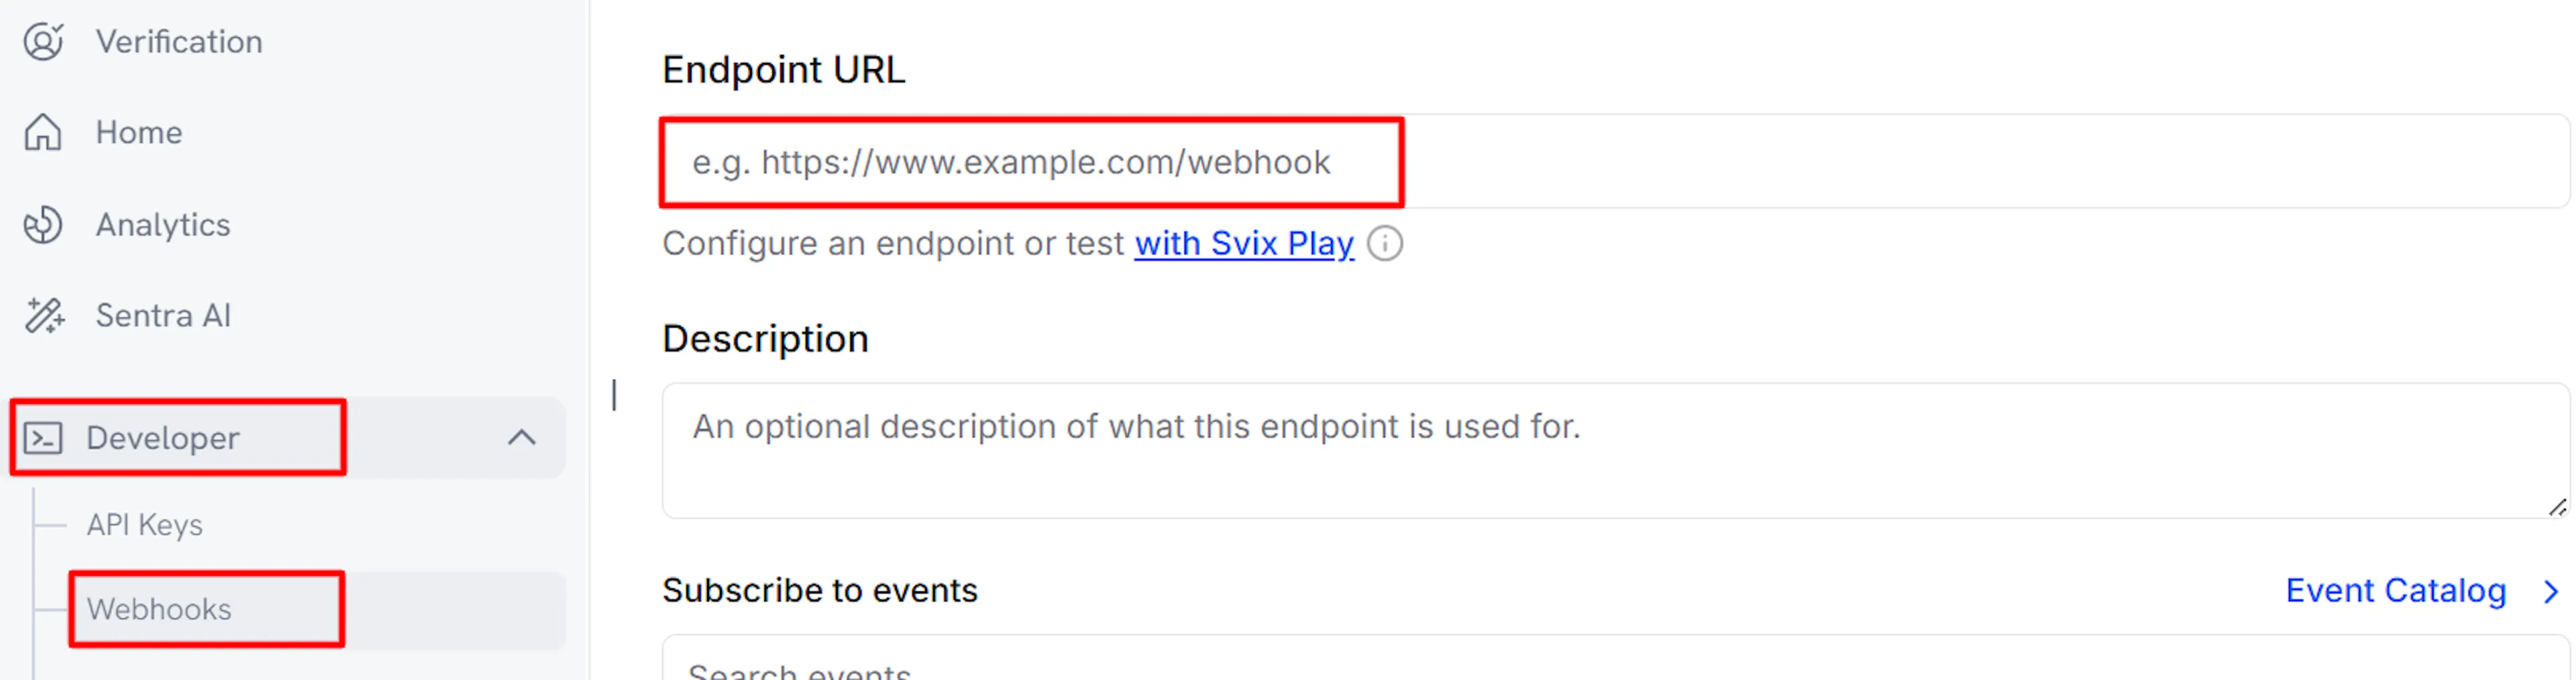
Test Mode and Live Mode each need their own webhook. Repeat this step in both environments, and paste each environment's own webhook secret into the matching Test or Live field in PayLexer.
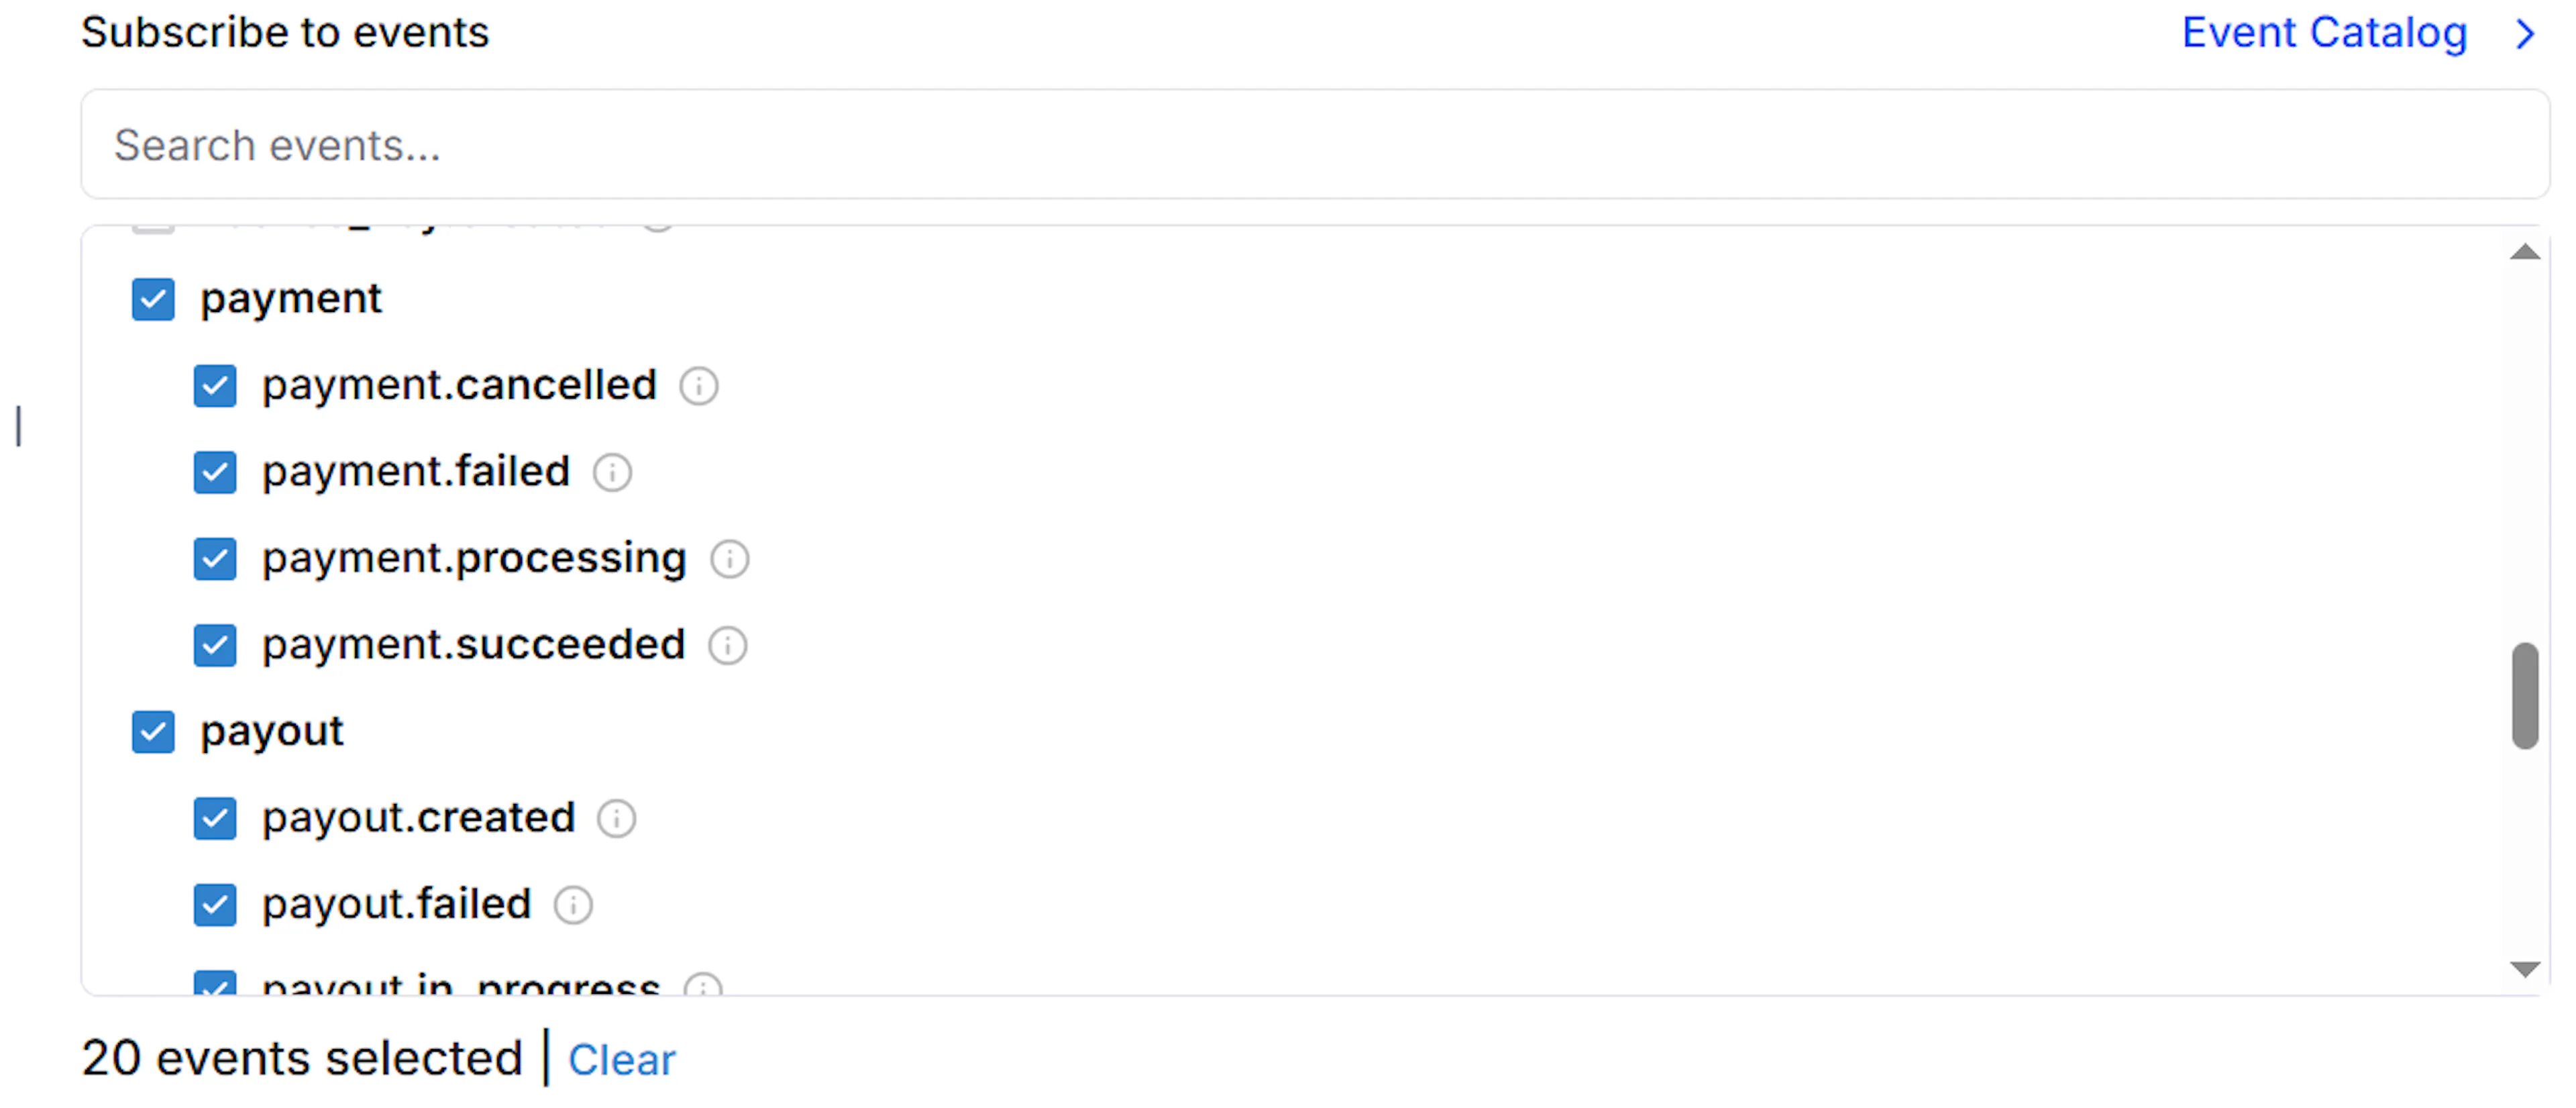
Select payment and subscription events
Subscribe to the payment events (Payment Succeeded, Payment Failed, Payment Cancelled), refund events (Refund Succeeded, Refund Failed), and subscription events (Subscription Active, Subscription Renewed, Subscription Cancelled), then save the webhook.
Add the Webhook Secret to PayLexer
Copy the webhook secret key shown for the webhook in Dodo Payments, then paste it into the Webhook Secret field in PayLexer and click Save Configuration.
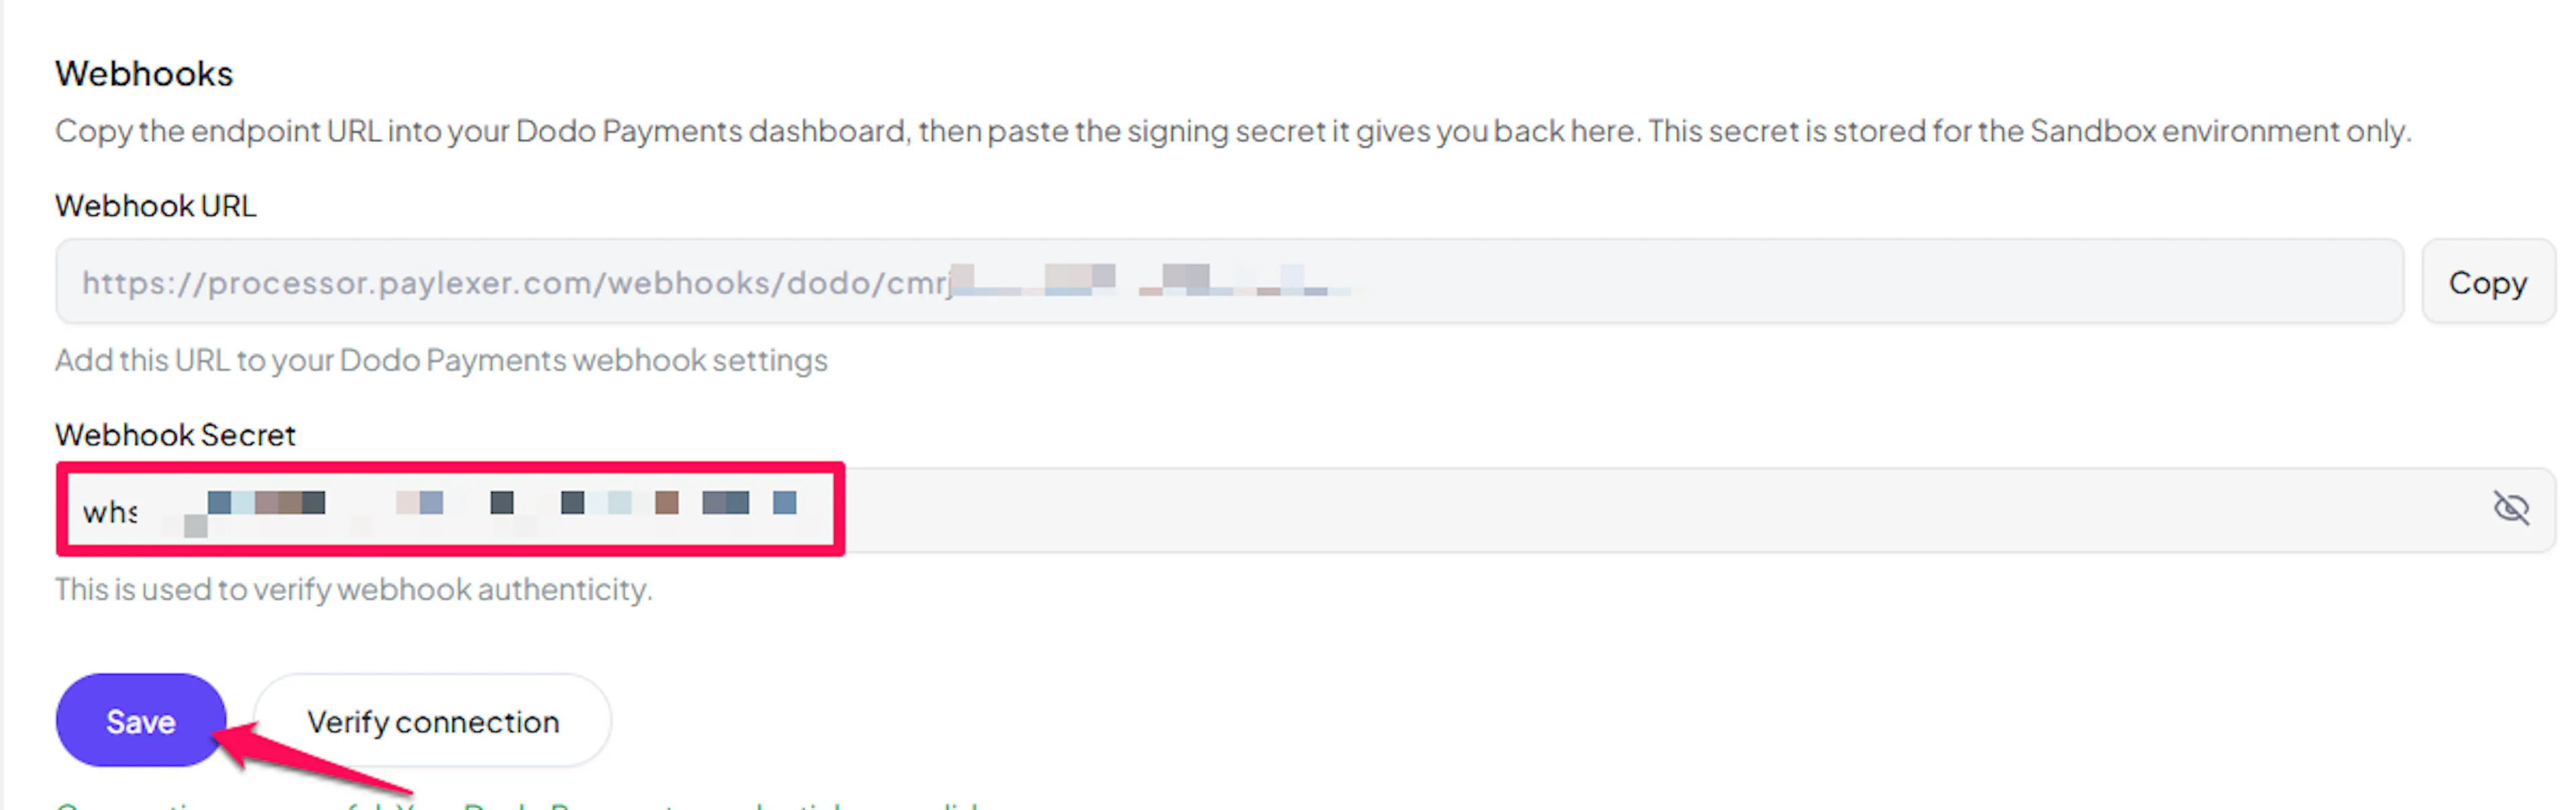
The Webhook Secret starts with whsec_. Paste it exactly as shown, including the prefix. PayLexer decodes it internally to verify each webhook's signature.
Integrate Dodo Payments to Your Website
If you have already added and configured your site, you can enable Dodo Payments in your existing setup.
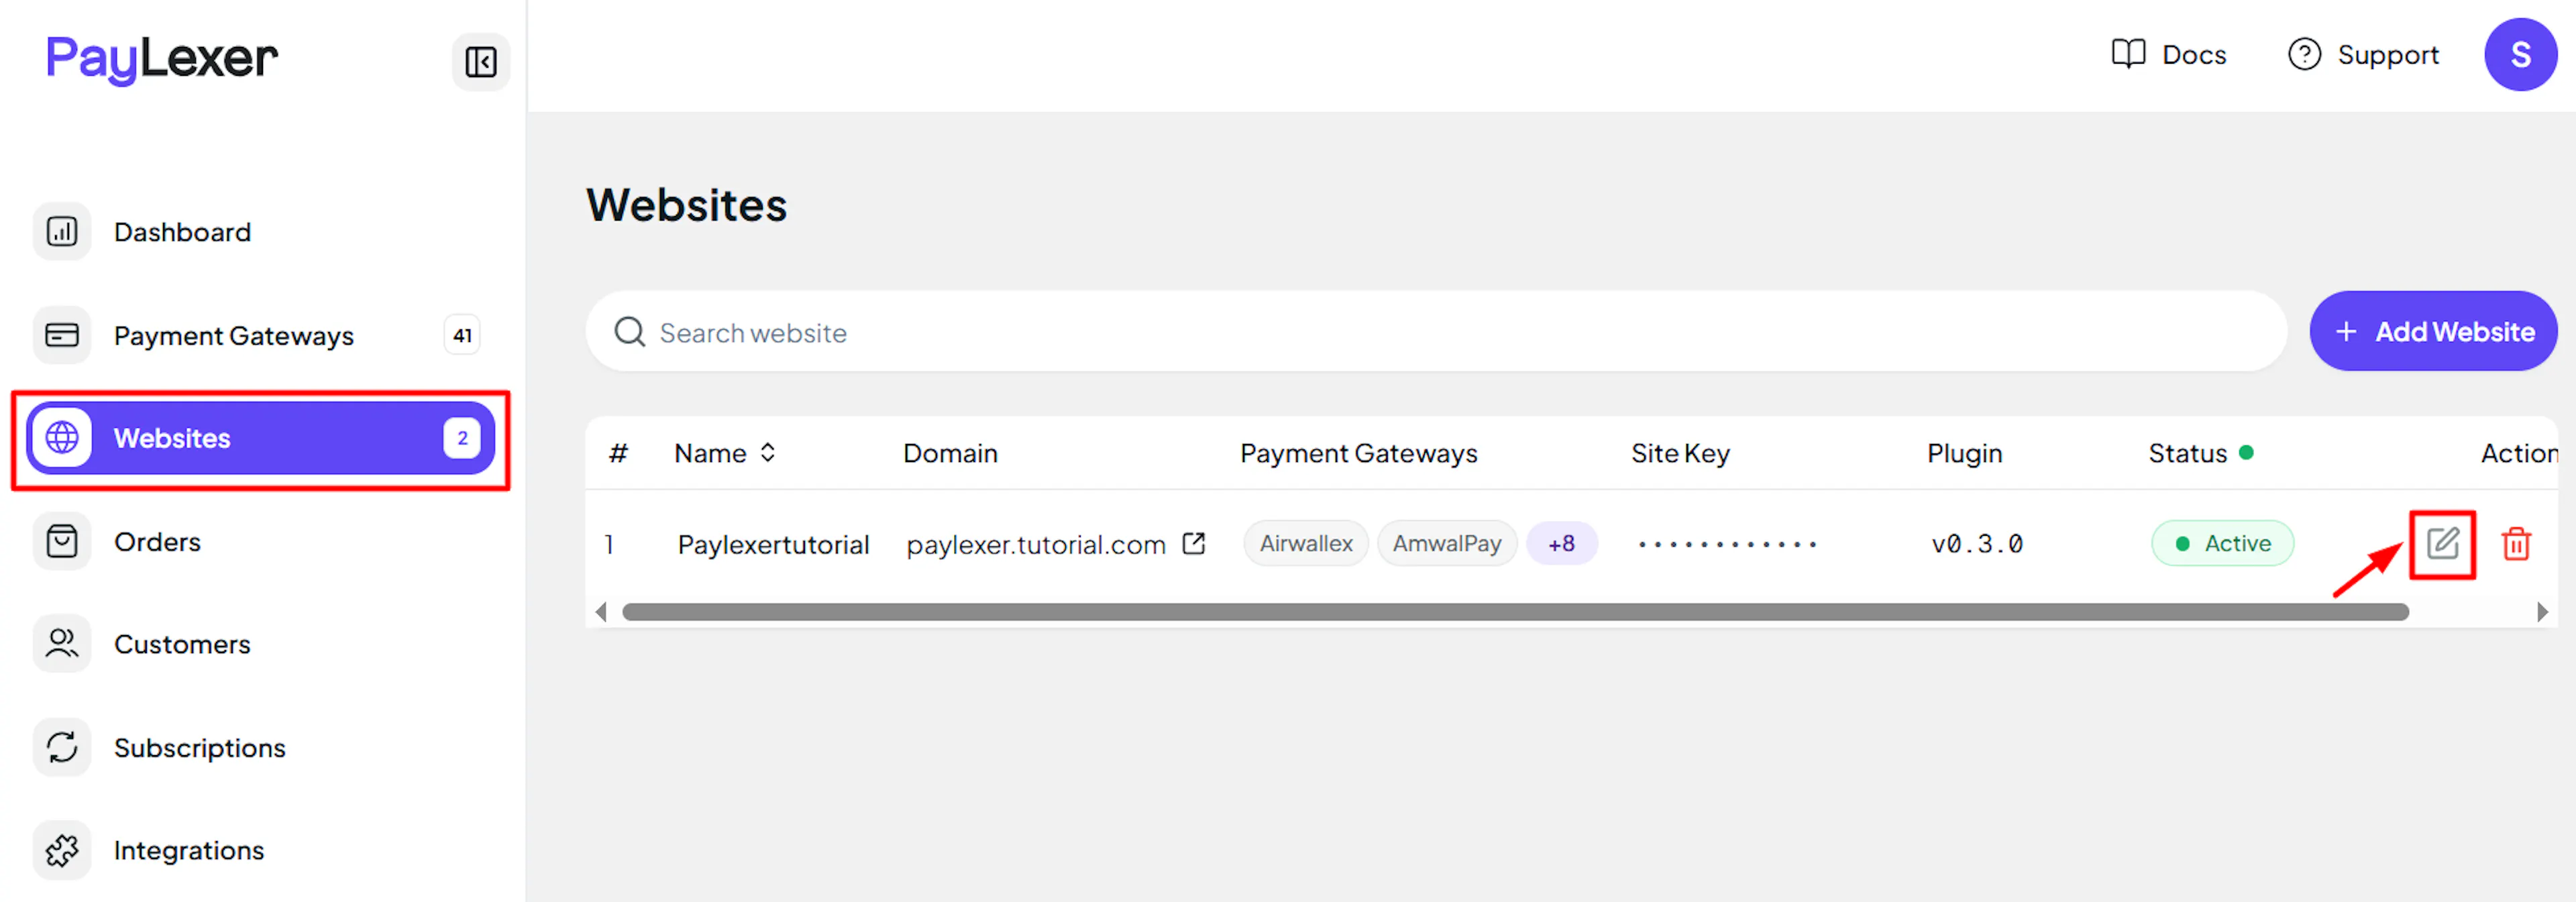
Go to Websites
Navigate to Websites in your PayLexer dashboard.
Edit your website
Click the Edit Icon of your added website.
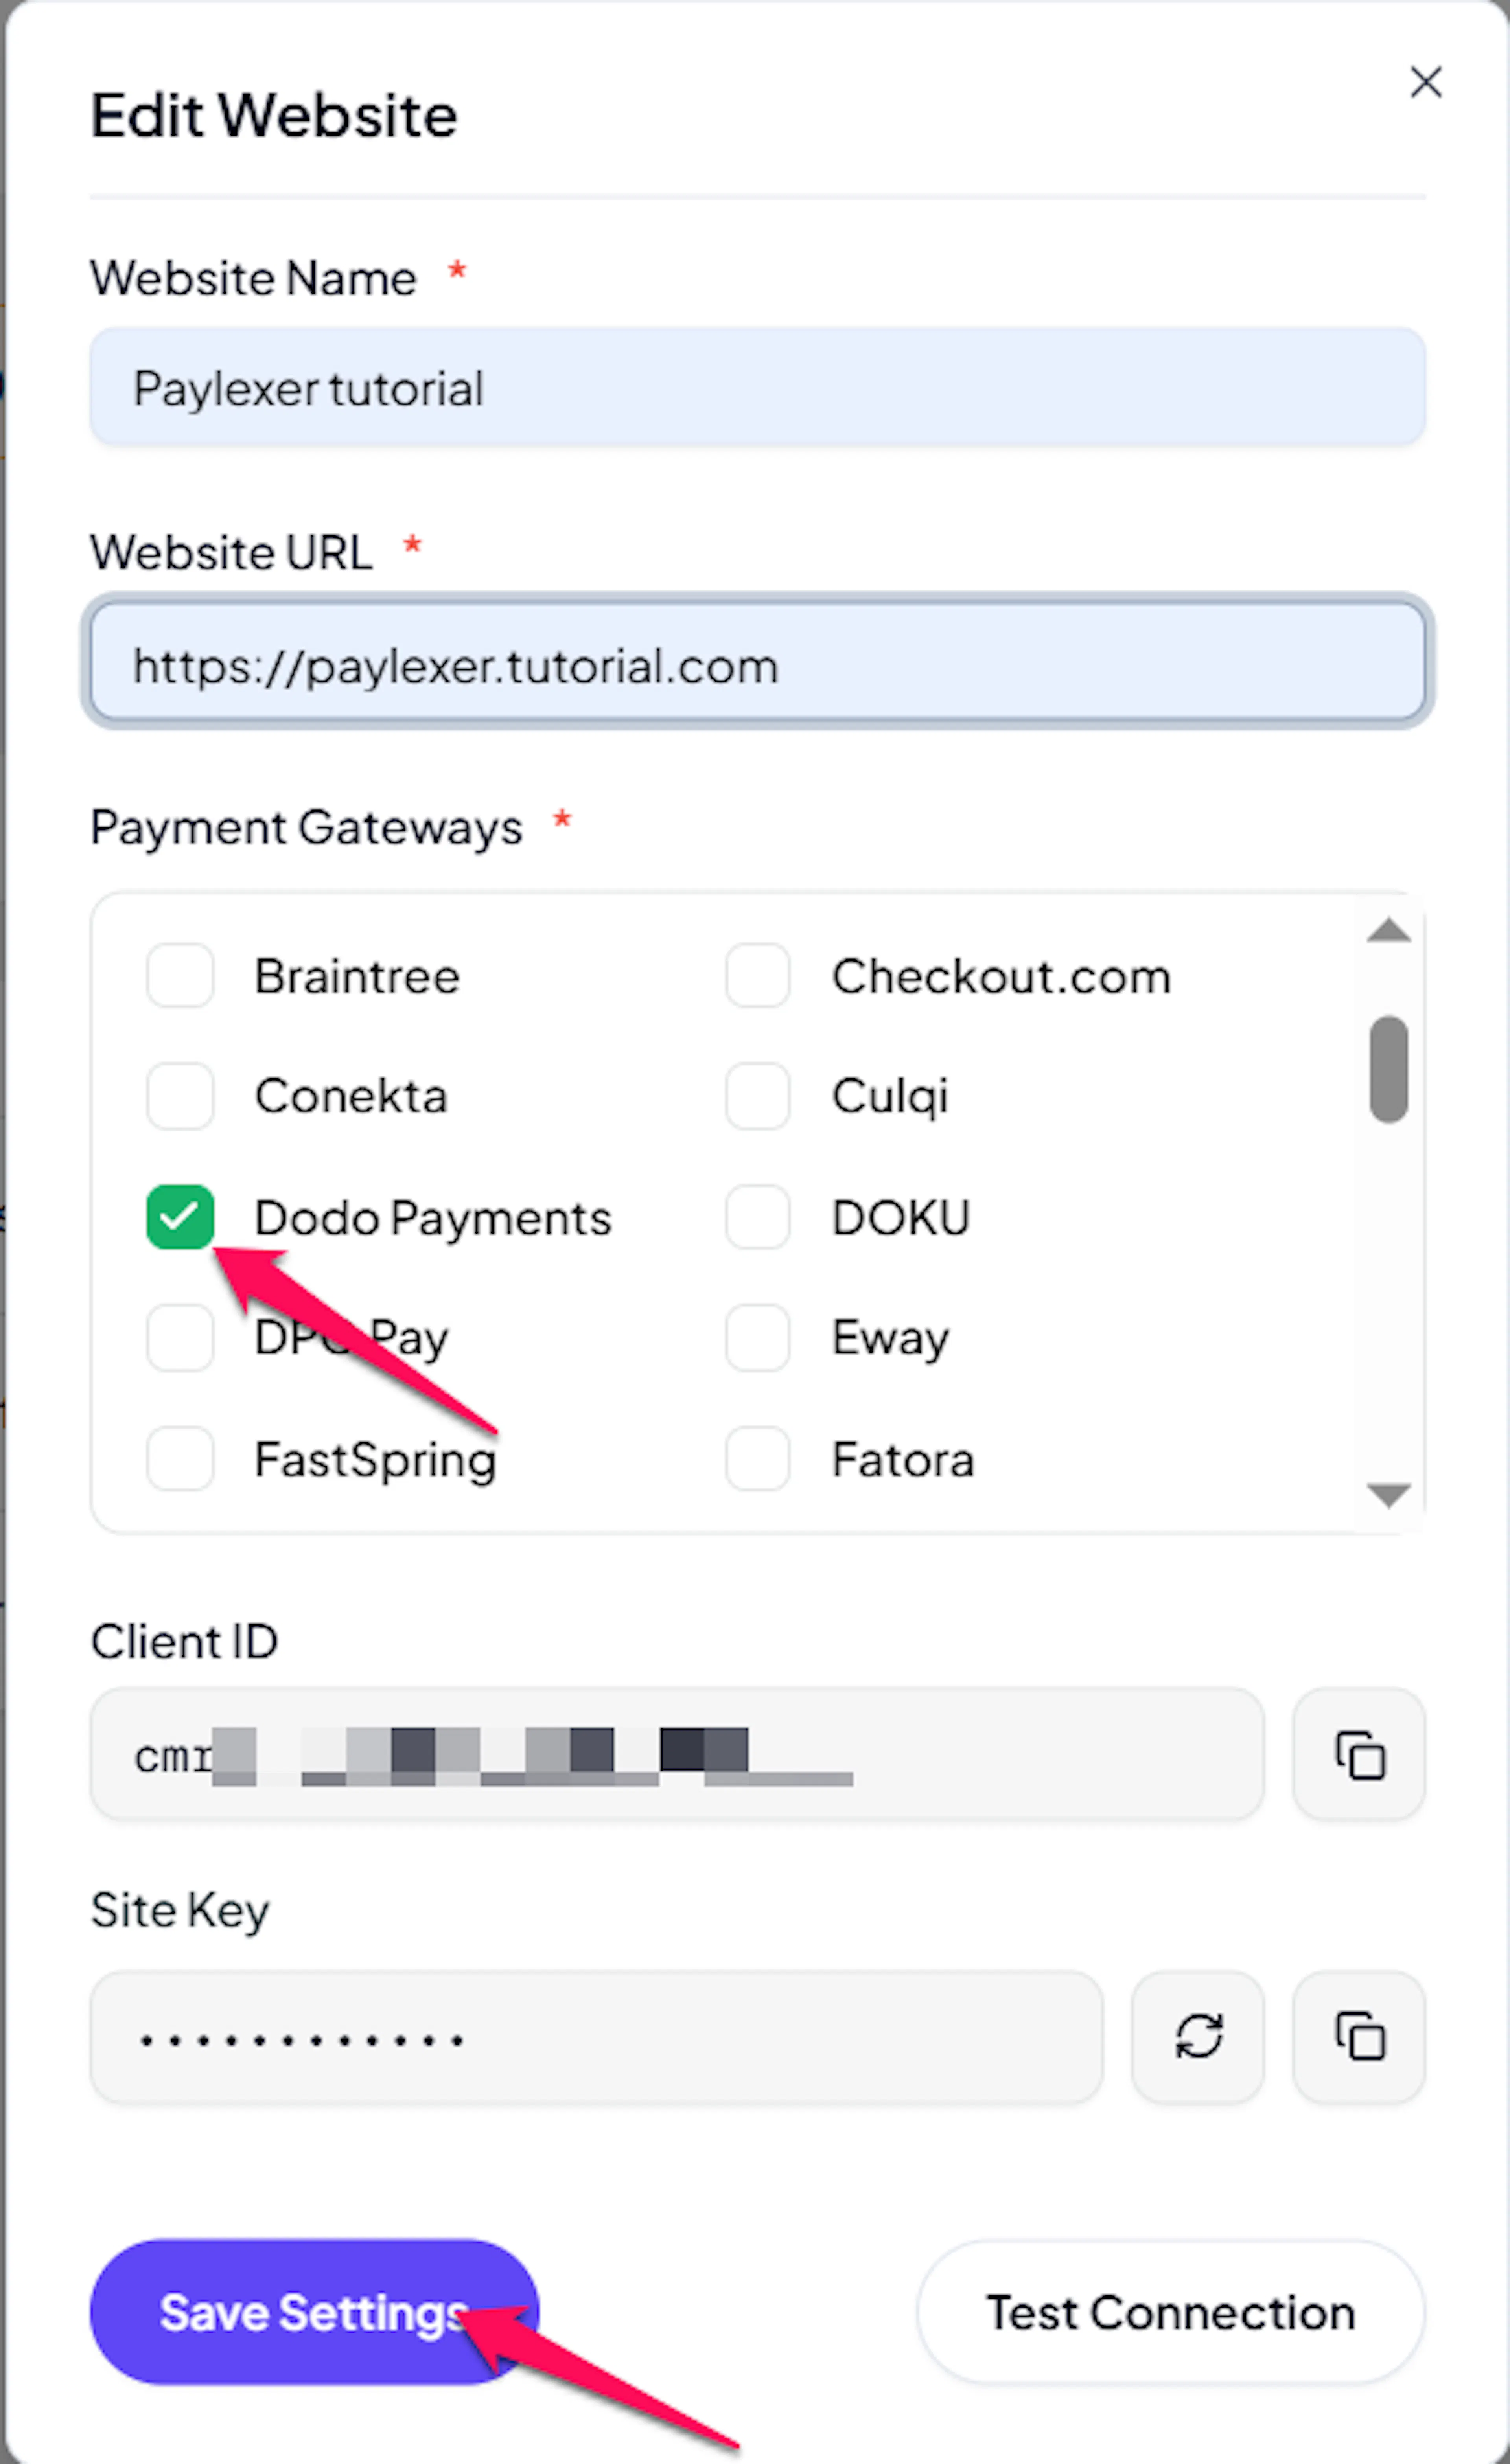
Enable Dodo Payments
Click the checkbox to enable Dodo Payments for the website.
If you haven't added a website yet, Continue to Add Your Website →
Troubleshooting
Best Practices
- Test in sandbox before enabling production. Use Test Mode credentials and complete a full payment and subscription flow before switching to live.
- Configure webhooks so payment, refund, and subscription updates sync in real time.
- Keep your API Key and Webhook Secret confidential, and rotate them if you suspect exposure.
- Decide on your subscription's amount and billing interval upfront, since plan changes aren't supported after creation.
- Don't rely on a sign-up fee for Dodo Payments subscriptions; checkout is blocked when one is in the cart, so use a separate product or a higher recurring amount instead.
- Set your prices as the final amount you want the shopper to pay, since Dodo Payments treats them as tax inclusive and takes any tax it owes out of that amount.
- Keep a product's currency stable once subscriptions exist against it, so refund and renewal amounts stay comparable.
FAQs
Still Have Questions?
- Dodo Payments Support: Dodo Payments Support
- PayLexer Support: Contact Support