

Montonio
Connect Montonio to PayLexer to accept card, Apple Pay, and Google Pay payments in EUR and PLN across the Baltics, Nordics, and Poland.
Montonio is an Estonian payments and checkout provider headquartered in Tallinn, founded in 2018. It powers payments and shipping for over 5,000 online stores across the Baltics and Poland, and offers merchants a single hosted checkout for card payments, bank payments, and buy now pay later.
- Supported Regions (Merchant Accounts): Estonia, Latvia, Lithuania, Finland, Poland, and Germany
- Supported Currencies: EUR and PLN - view full list
This gateway appears in checkout only when the selected currency is EUR or PLN.
Supported Features
- Card payments through Montonio's hosted checkout page
- Apple Pay and Google Pay, offered automatically on supported devices
- Full refunds from the PayLexer dashboard
- Partial refunds, including several against the same order
- Automatic payment notifications, with no webhook setup required
- Separate sandbox and live environments for safe testing
Montonio also offers bank payments, BLIK, MobilePay, and buy now pay later. PayLexer currently sends every Montonio order as a card payment, because Montonio requires one payment method to be chosen before the order is created and card payments are the only method that can be refunded from your dashboard without extra activation.
Before You Start
Make sure you have:
- Montonio Account – Don't have one? Sign up for Montonio →
- PayLexer Account – Required to configure the integration. Create your account →
- A website where you want to integrate
Looking for a different payment processor? View all supported gateways →
Configuring Montonio
You need an Access Key and a Secret Key from Montonio for this integration.
Getting API Credentials
Montonio issues a completely separate Access Key and Secret Key for sandbox and for live. The two are not interchangeable, so collect whichever pair matches the environment you are setting up.
Log in to the Partner System
Sign in to the Montonio Partner System.
Open your store's API Keys page
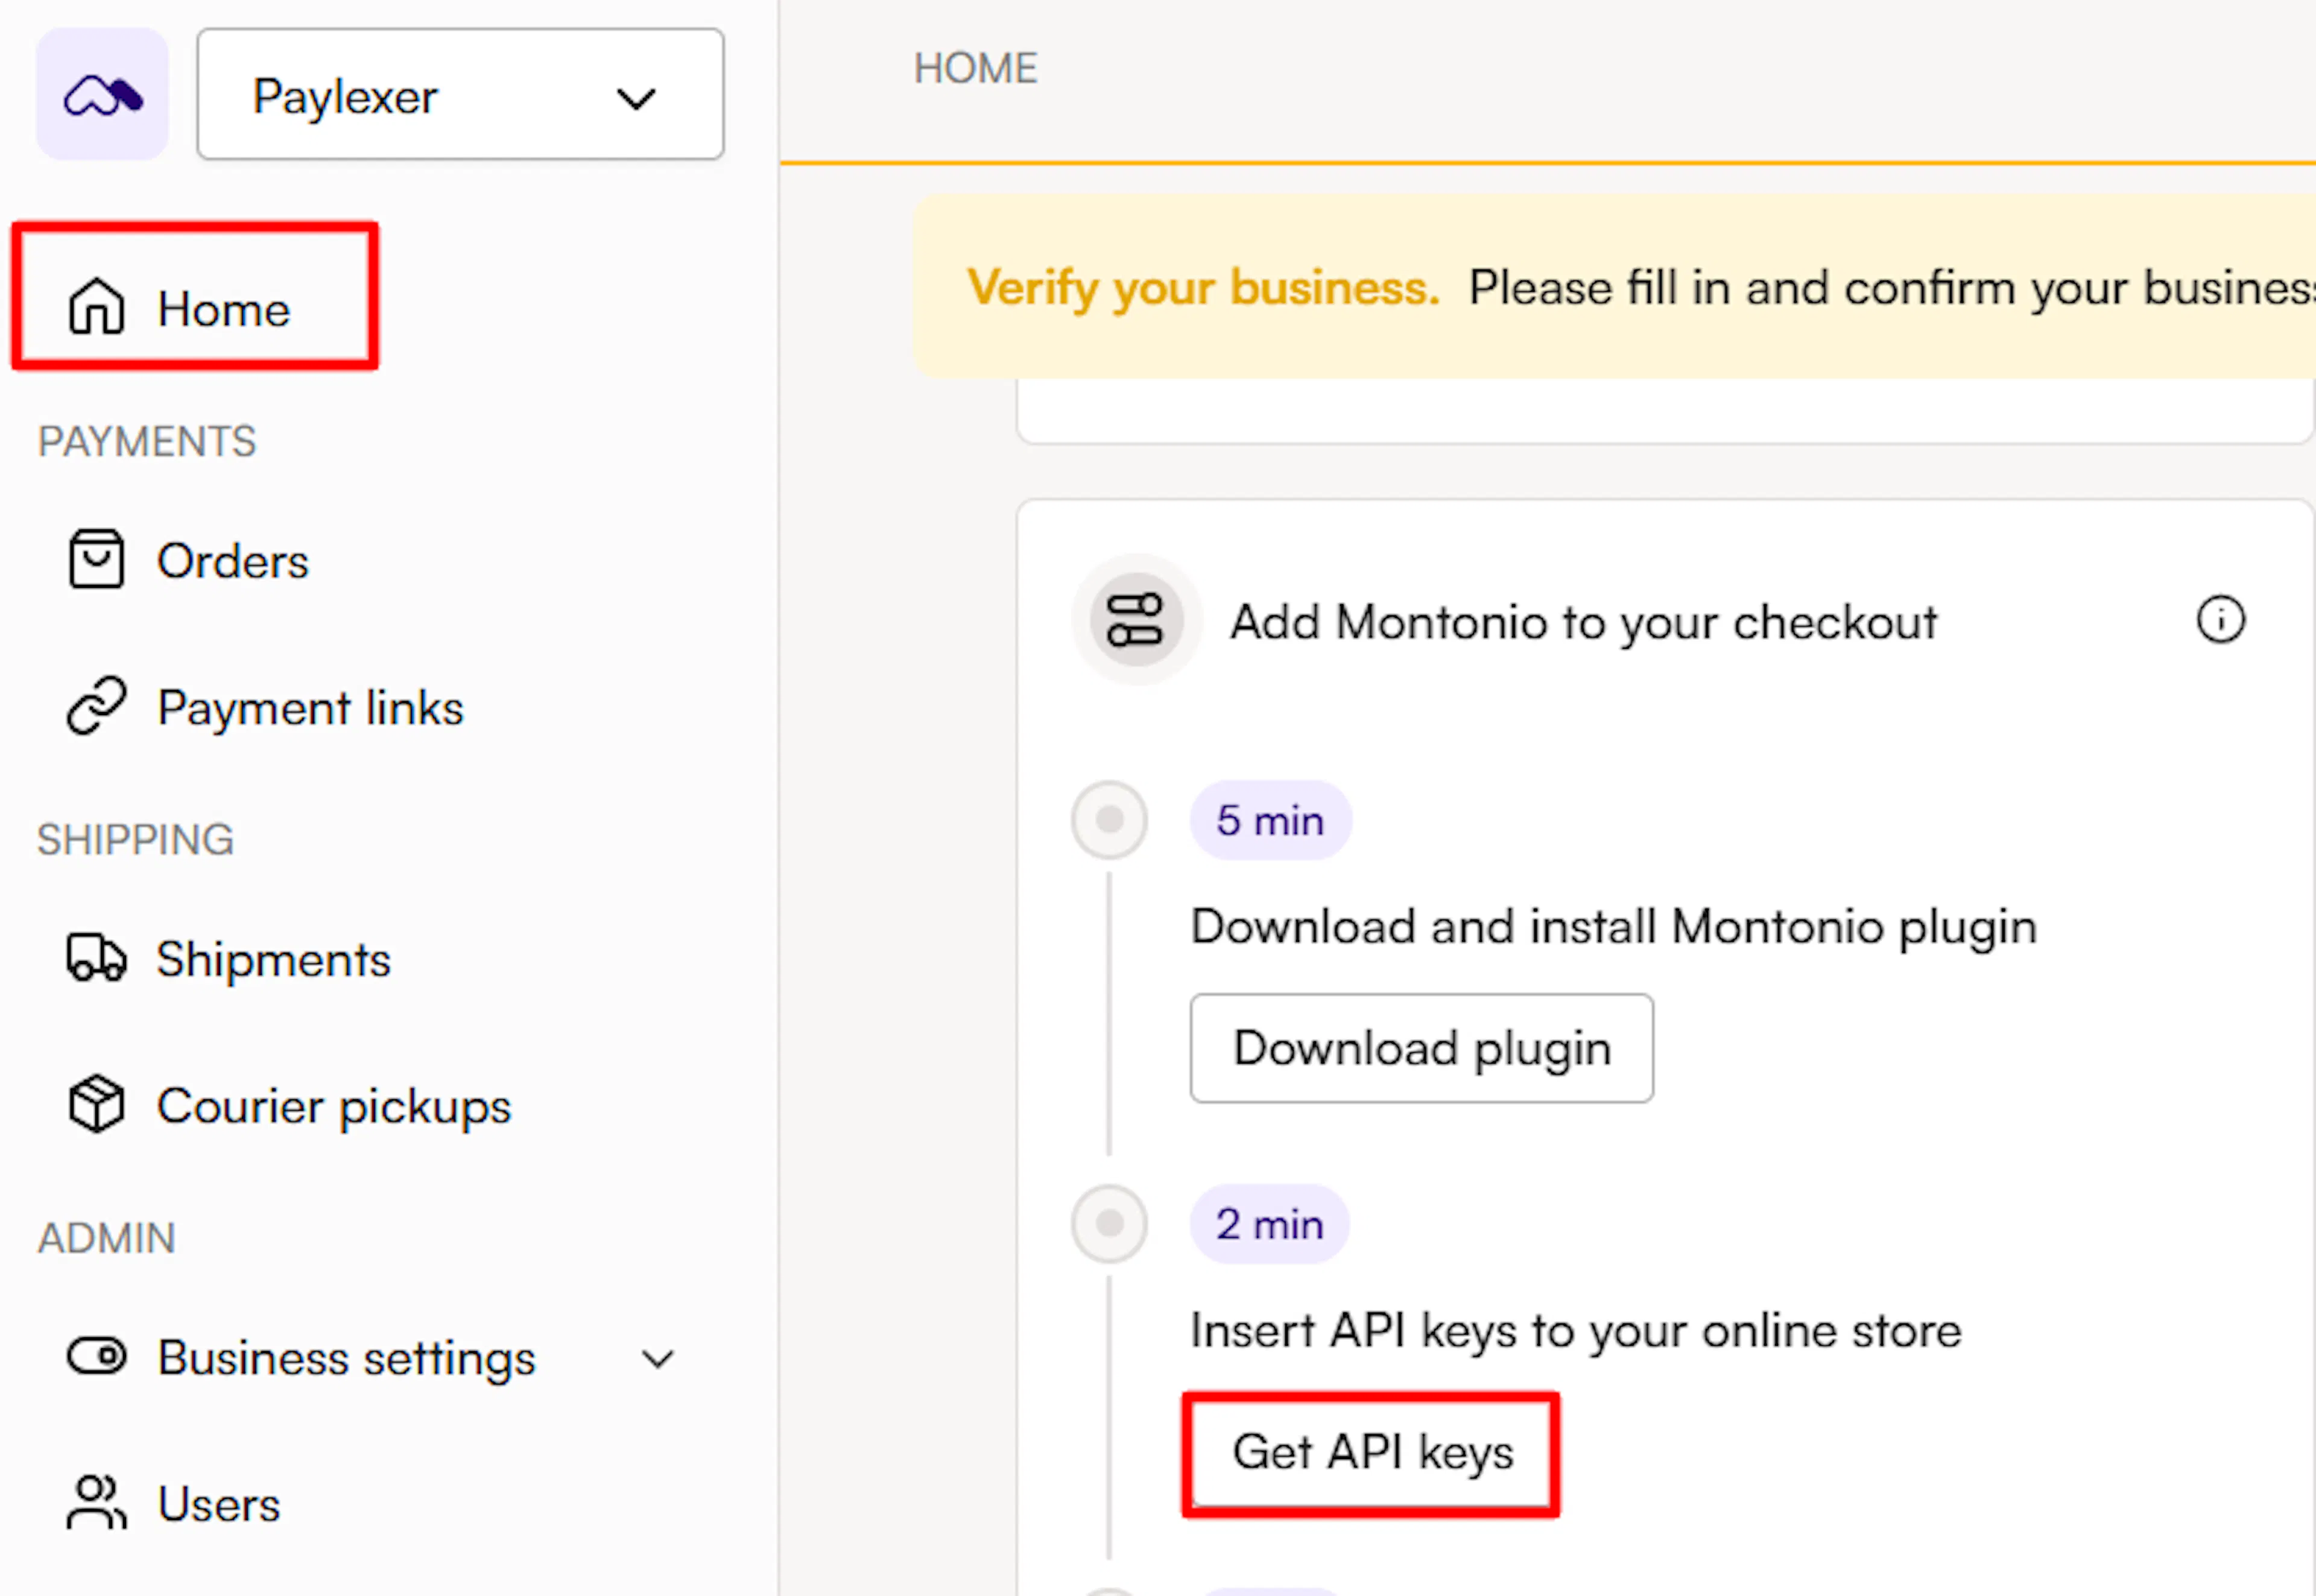
Go to Home in the left-hand menu, select your store from the dropdown if you have more than one, then click Get API Keys.
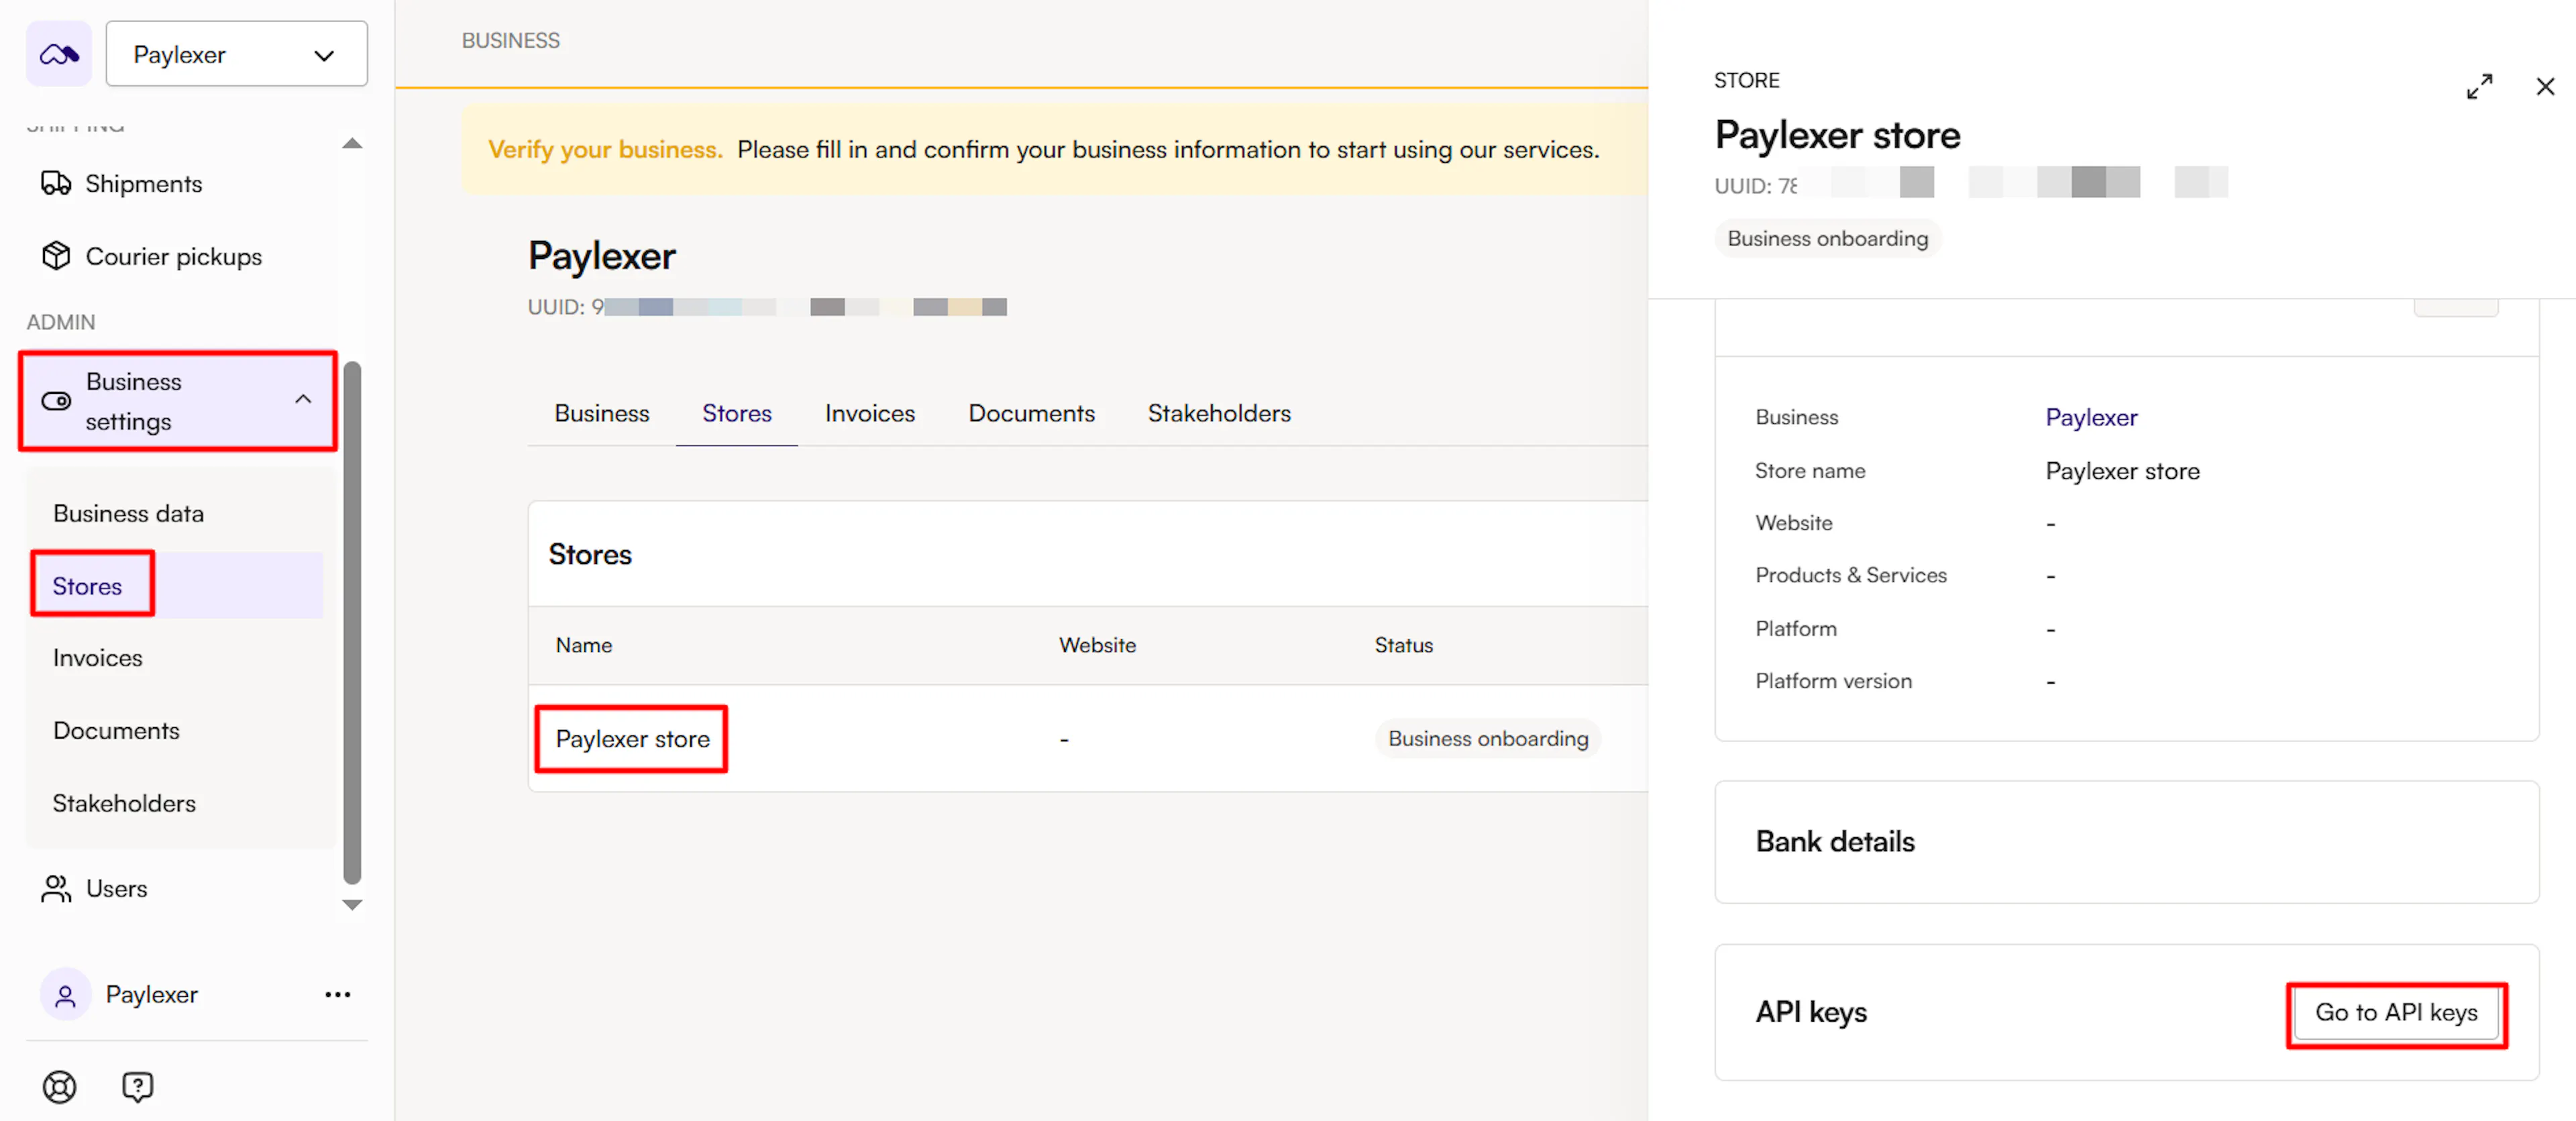
For a new store on an already active account, go to Business settings → Stores, click your store name, then click Go to API Keys.
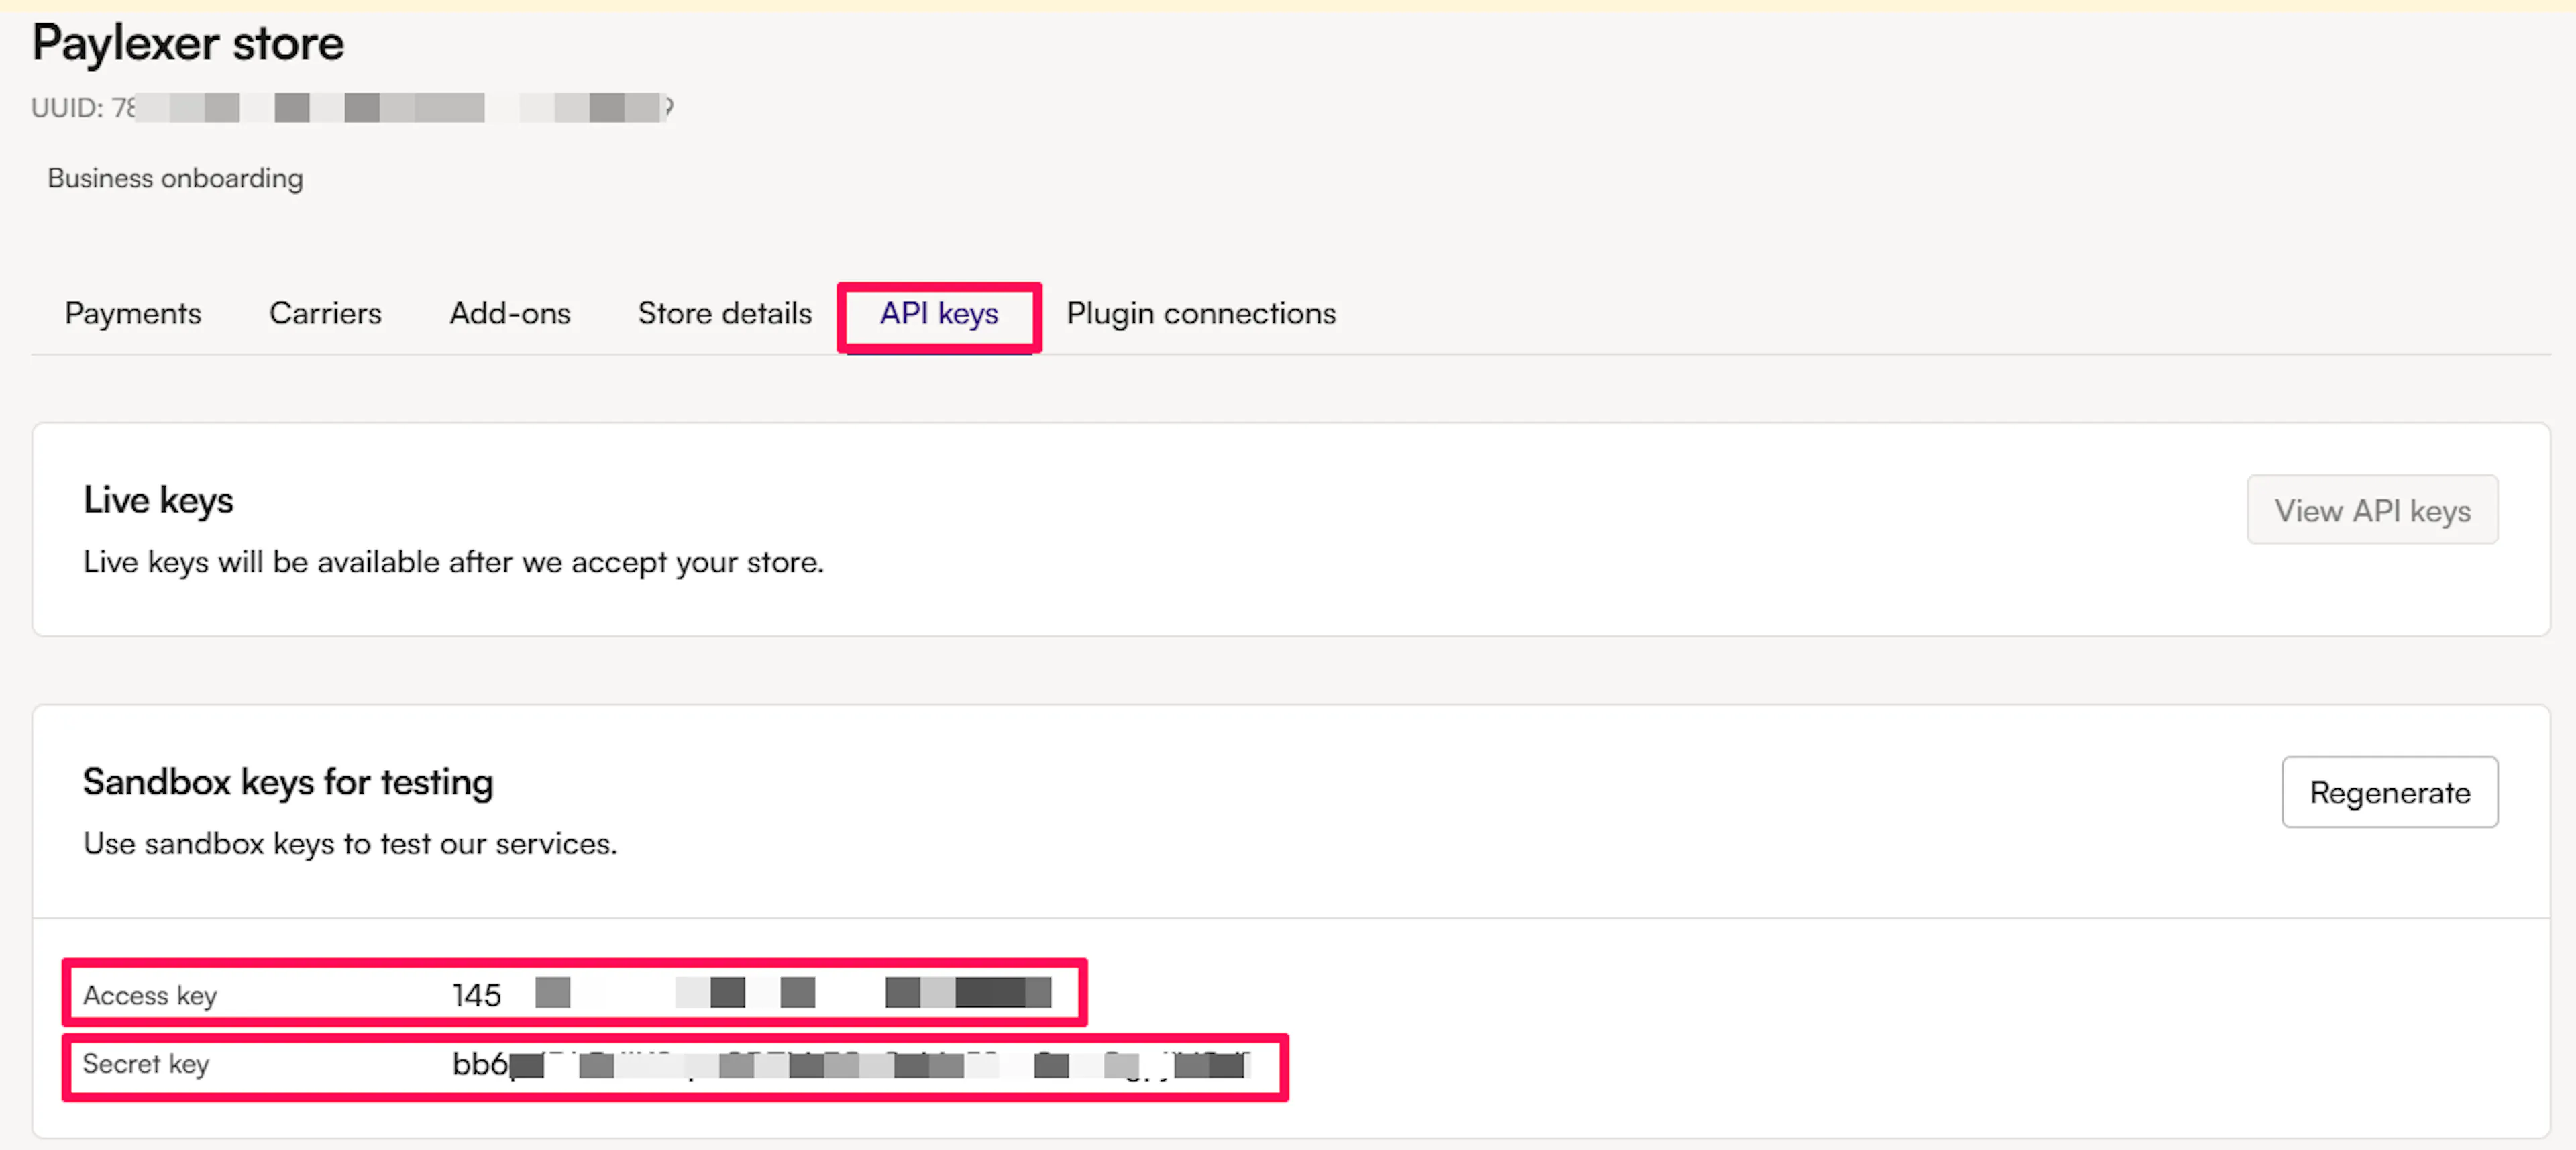
Copy the Access Key and Secret Key
Copy both values for the environment you are configuring. Sandbox keys are available immediately. Live keys appear on the same page once your account and store are activated by Montonio.
Your Secret Key both authorizes payments and verifies the notifications Montonio sends back to PayLexer. Treat it like a password and never share it or place it in client-side code.
Adding Credentials to PayLexer
Open PayLexer Dashboard
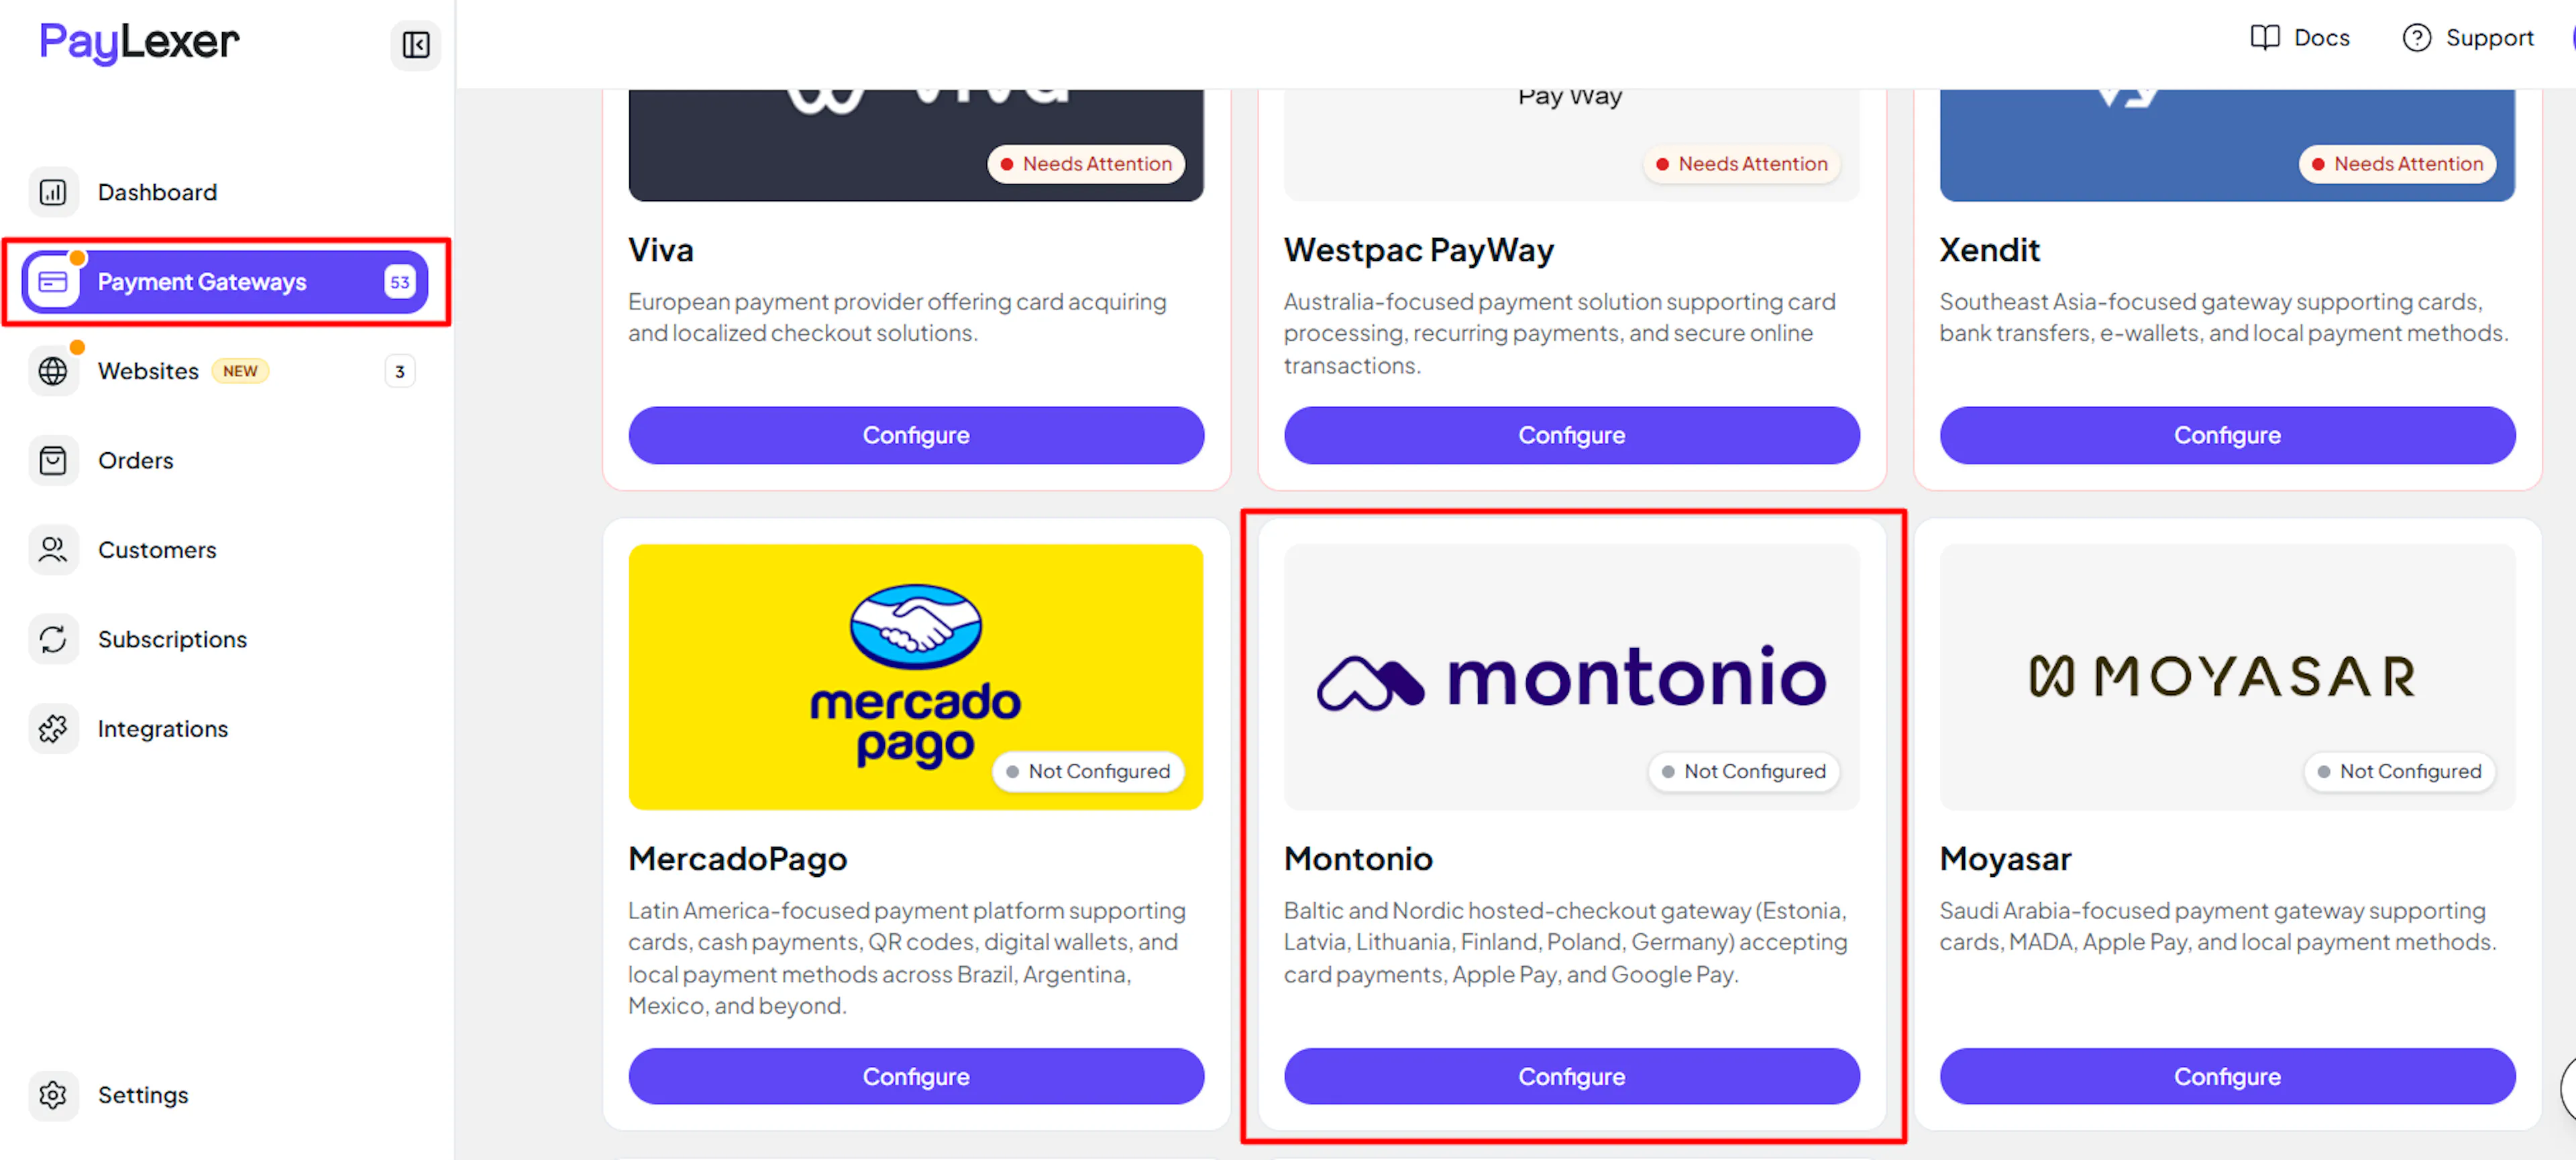
Log in to your PayLexer dashboard and navigate to Payment Gateways → Montonio.
Enter your credentials
Paste the Access Key and Secret Key you copied from Montonio.
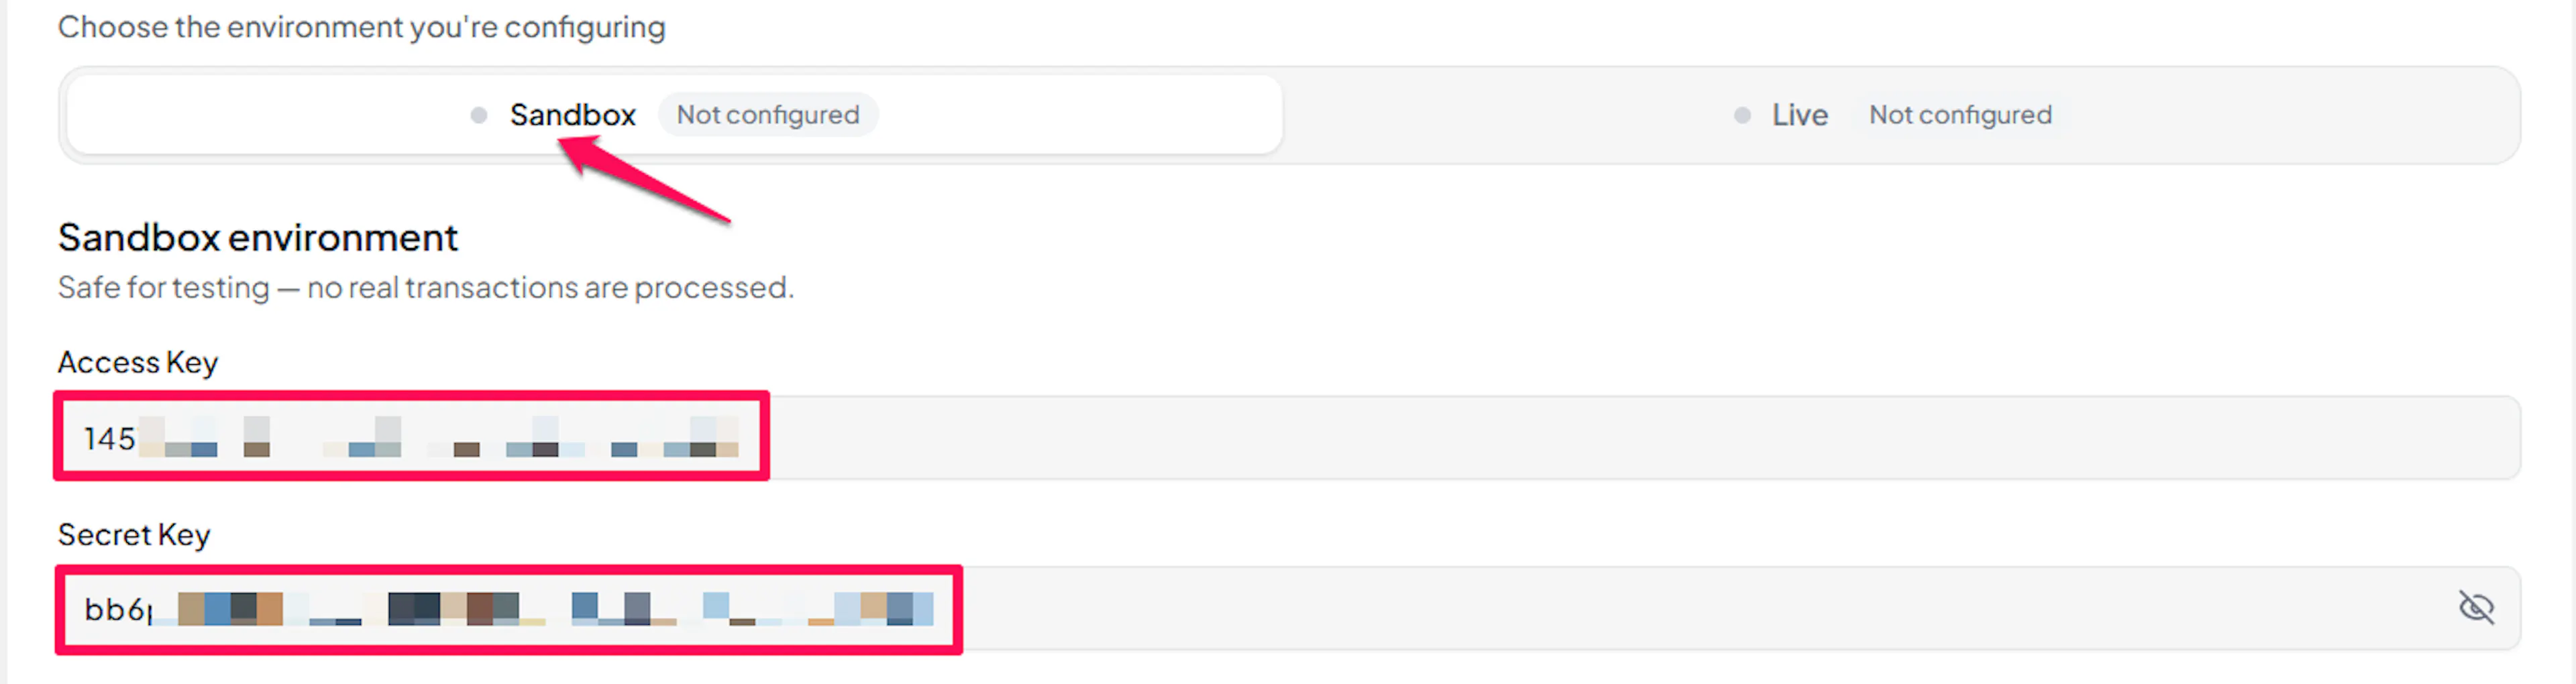
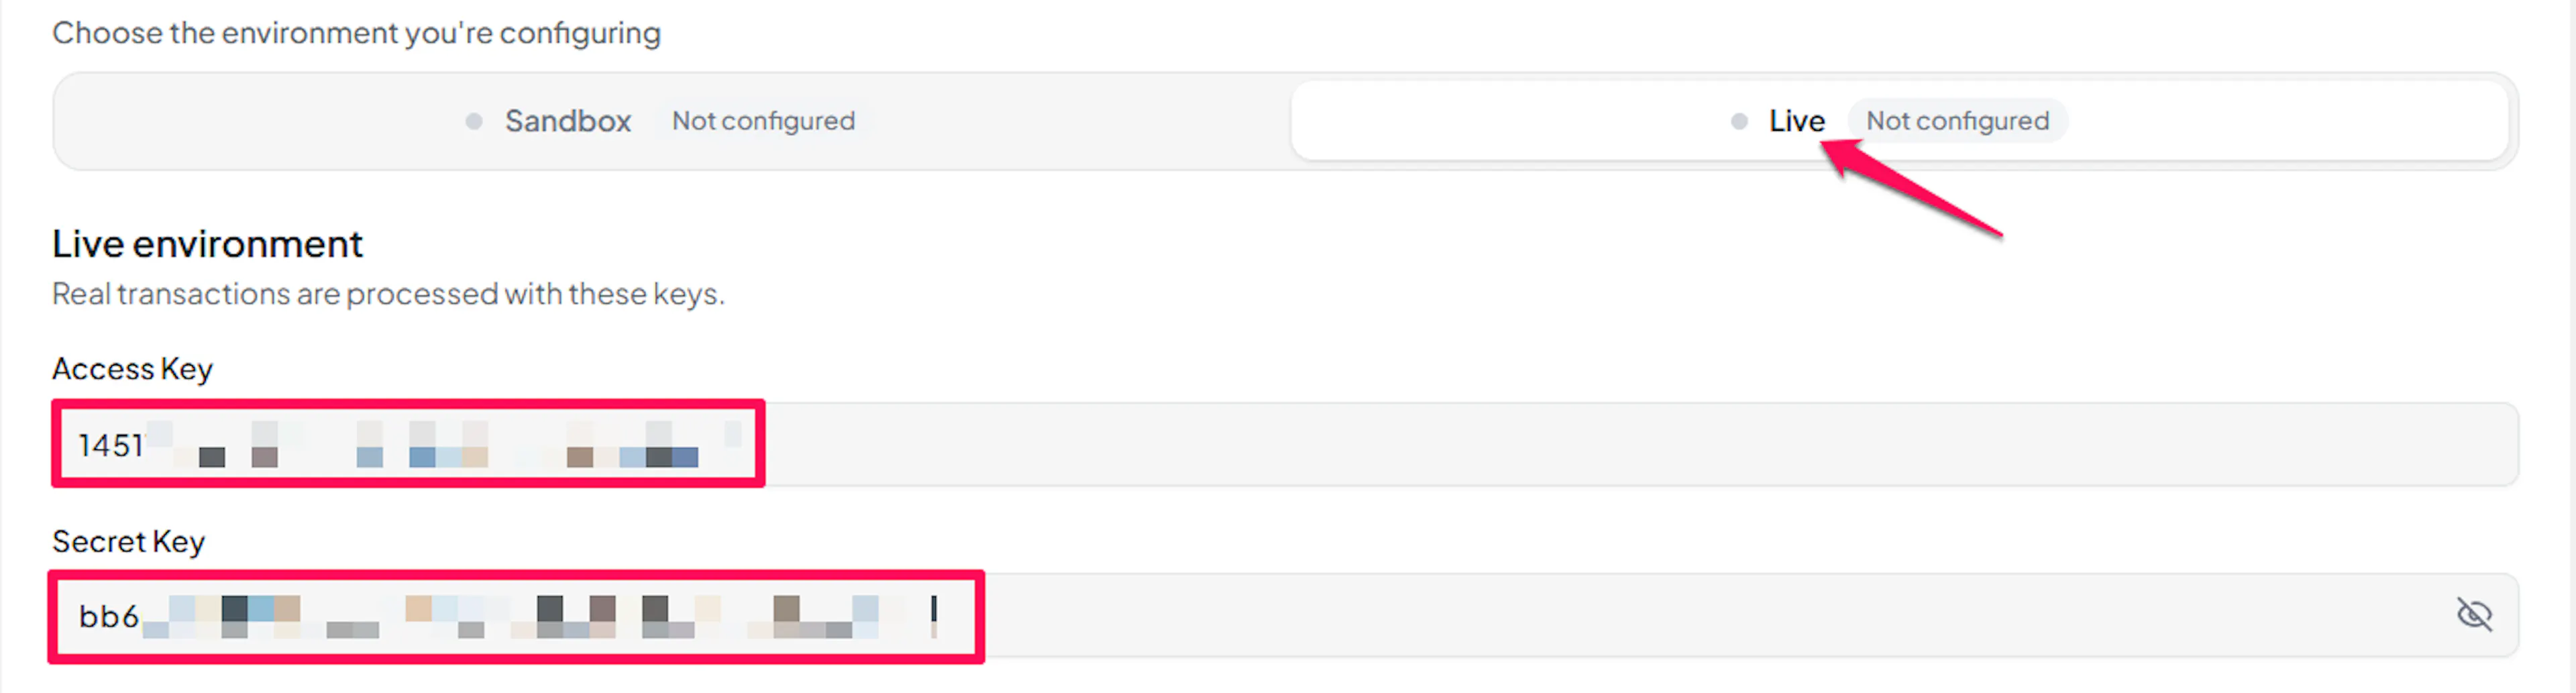
Understanding Live/Production and Sandbox Settings:
| Environment | Purpose |
|---|---|
| Live / Production (Mandatory) | Used for real transactions. Cannot be empty, even when testing. |
| Test / Sandbox (Optional) | Used for testing only. No real money is processed. |
How PayLexer selects credentials:
- Debug/Test mode ON → Test credentials are used
- Debug/Test mode OFF → Live credentials are used
Test and save
Click Save to save your configuration and verify your credentials. Click Verify Connection to test the connection.
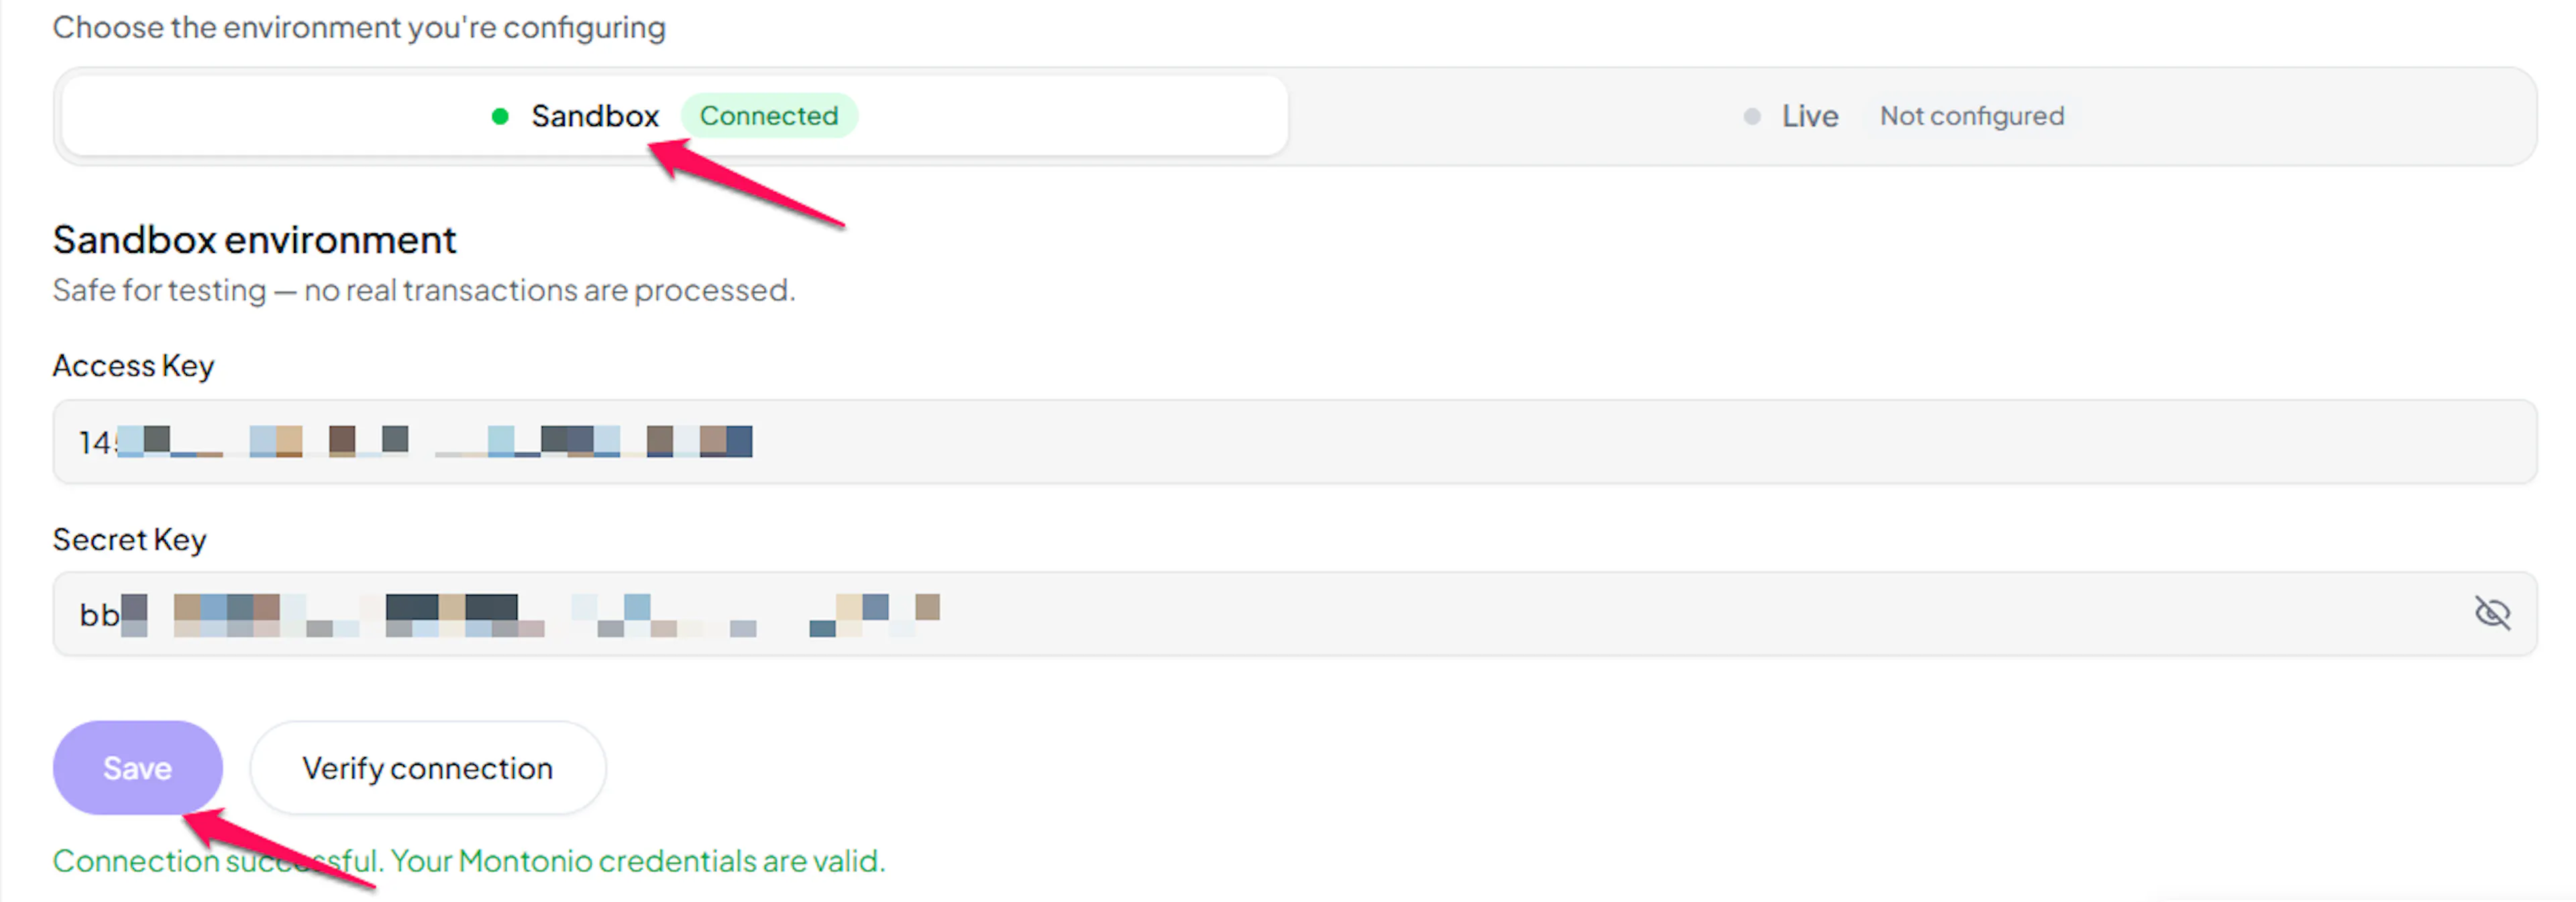
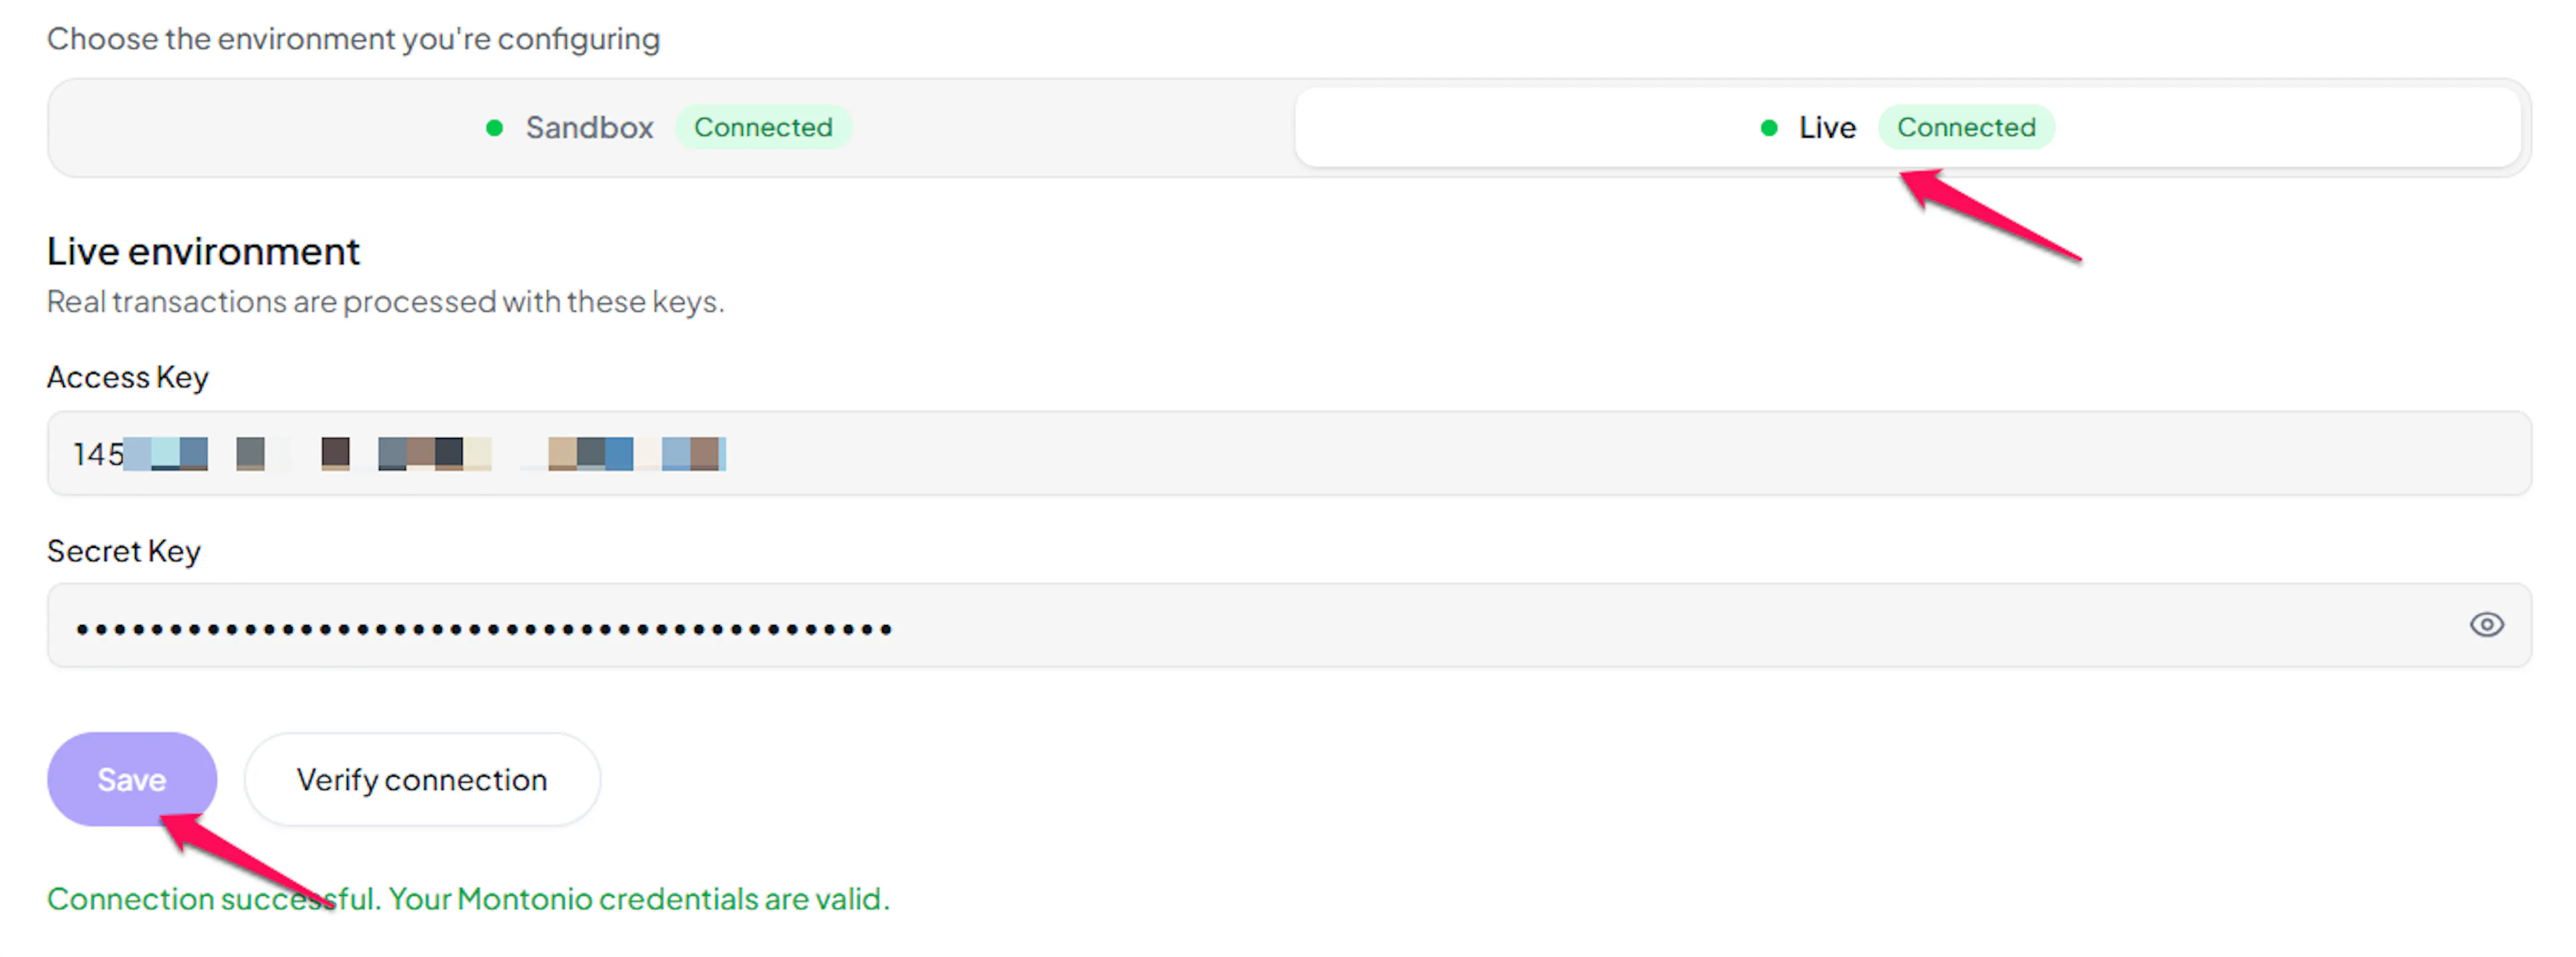
Montonio has no dedicated credential-check endpoint, so Test Connection verifies your keys by looking up an order that does not exist. Nothing is created and nothing is charged. Montonio answering "not found" is what proves your keys were accepted.
Webhooks (Automatic)
PayLexer registers a notification address with Montonio every time it creates an order, so there is nothing to copy, paste, or configure in the Partner System, for either your sandbox store or your live store.
Benefits of Webhooks:
- Instant payment status updates
- Automatic order reconciliation
- Accurate failure and cancellation records
How PayLexer handles the notification:
- Every notification Montonio sends is cryptographically signed with your Secret Key, and PayLexer rejects any notification whose signature does not verify
- Because the signature covers the order reference, status, and amount together, a verified notification is trusted without a second lookup
- Montonio retries an undelivered notification for up to 48 hours, so a brief outage on your side does not lose a payment
- Refund outcomes arrive the same way, so a refund that Montonio later completes or rejects is reflected in PayLexer automatically
Returning from Montonio's checkout page is never treated as proof of payment on its own. If a shopper abandons or cancels at the payment page, PayLexer returns them to your checkout rather than your thank-you page, and the order stays unpaid until Montonio confirms it.
Integrate Montonio to Your Website
If you have already added and configured your site, you can enable Montonio in your existing setup.
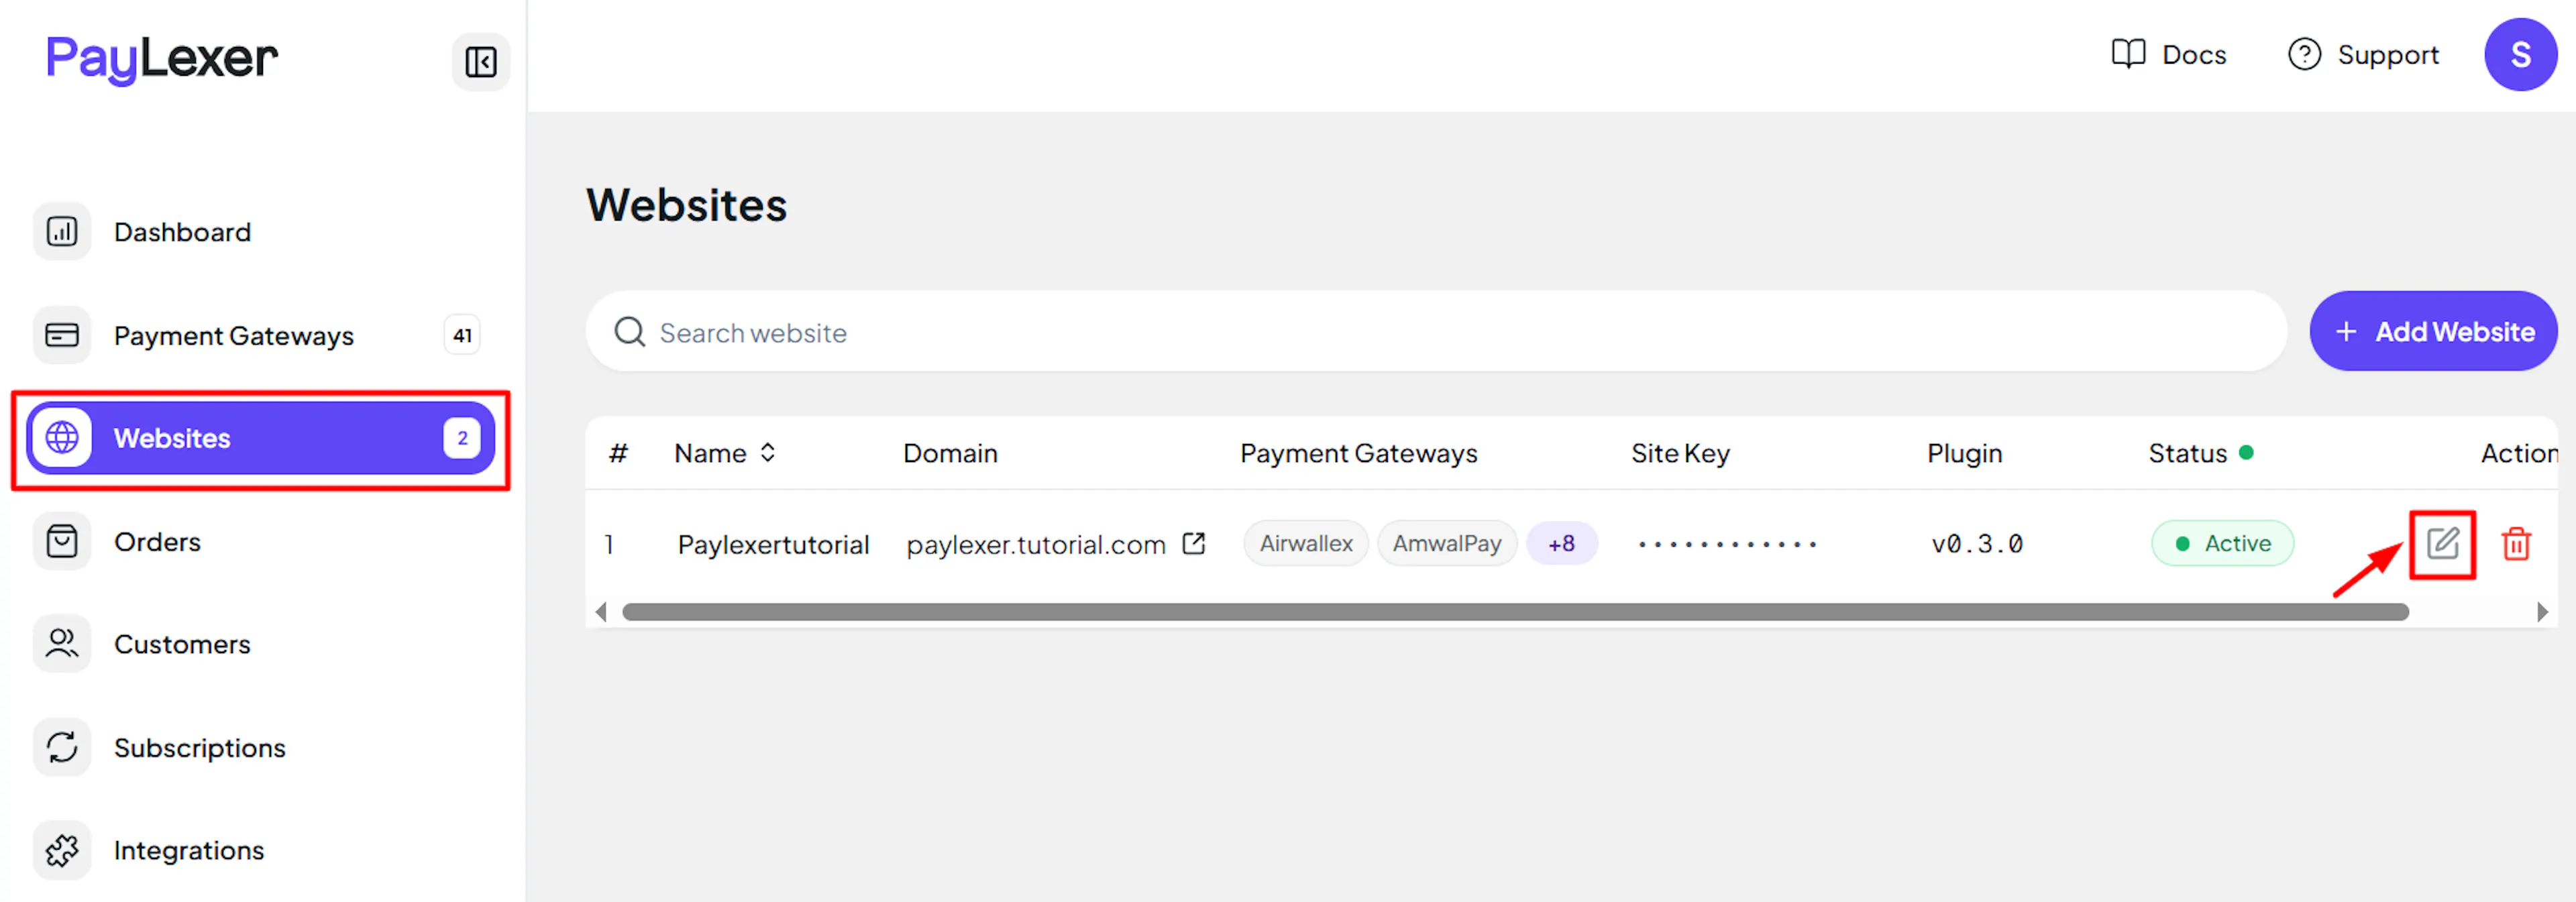
Go to Websites
Navigate to Websites in your PayLexer dashboard.
Edit your website
Click the Edit Icon of your added website.
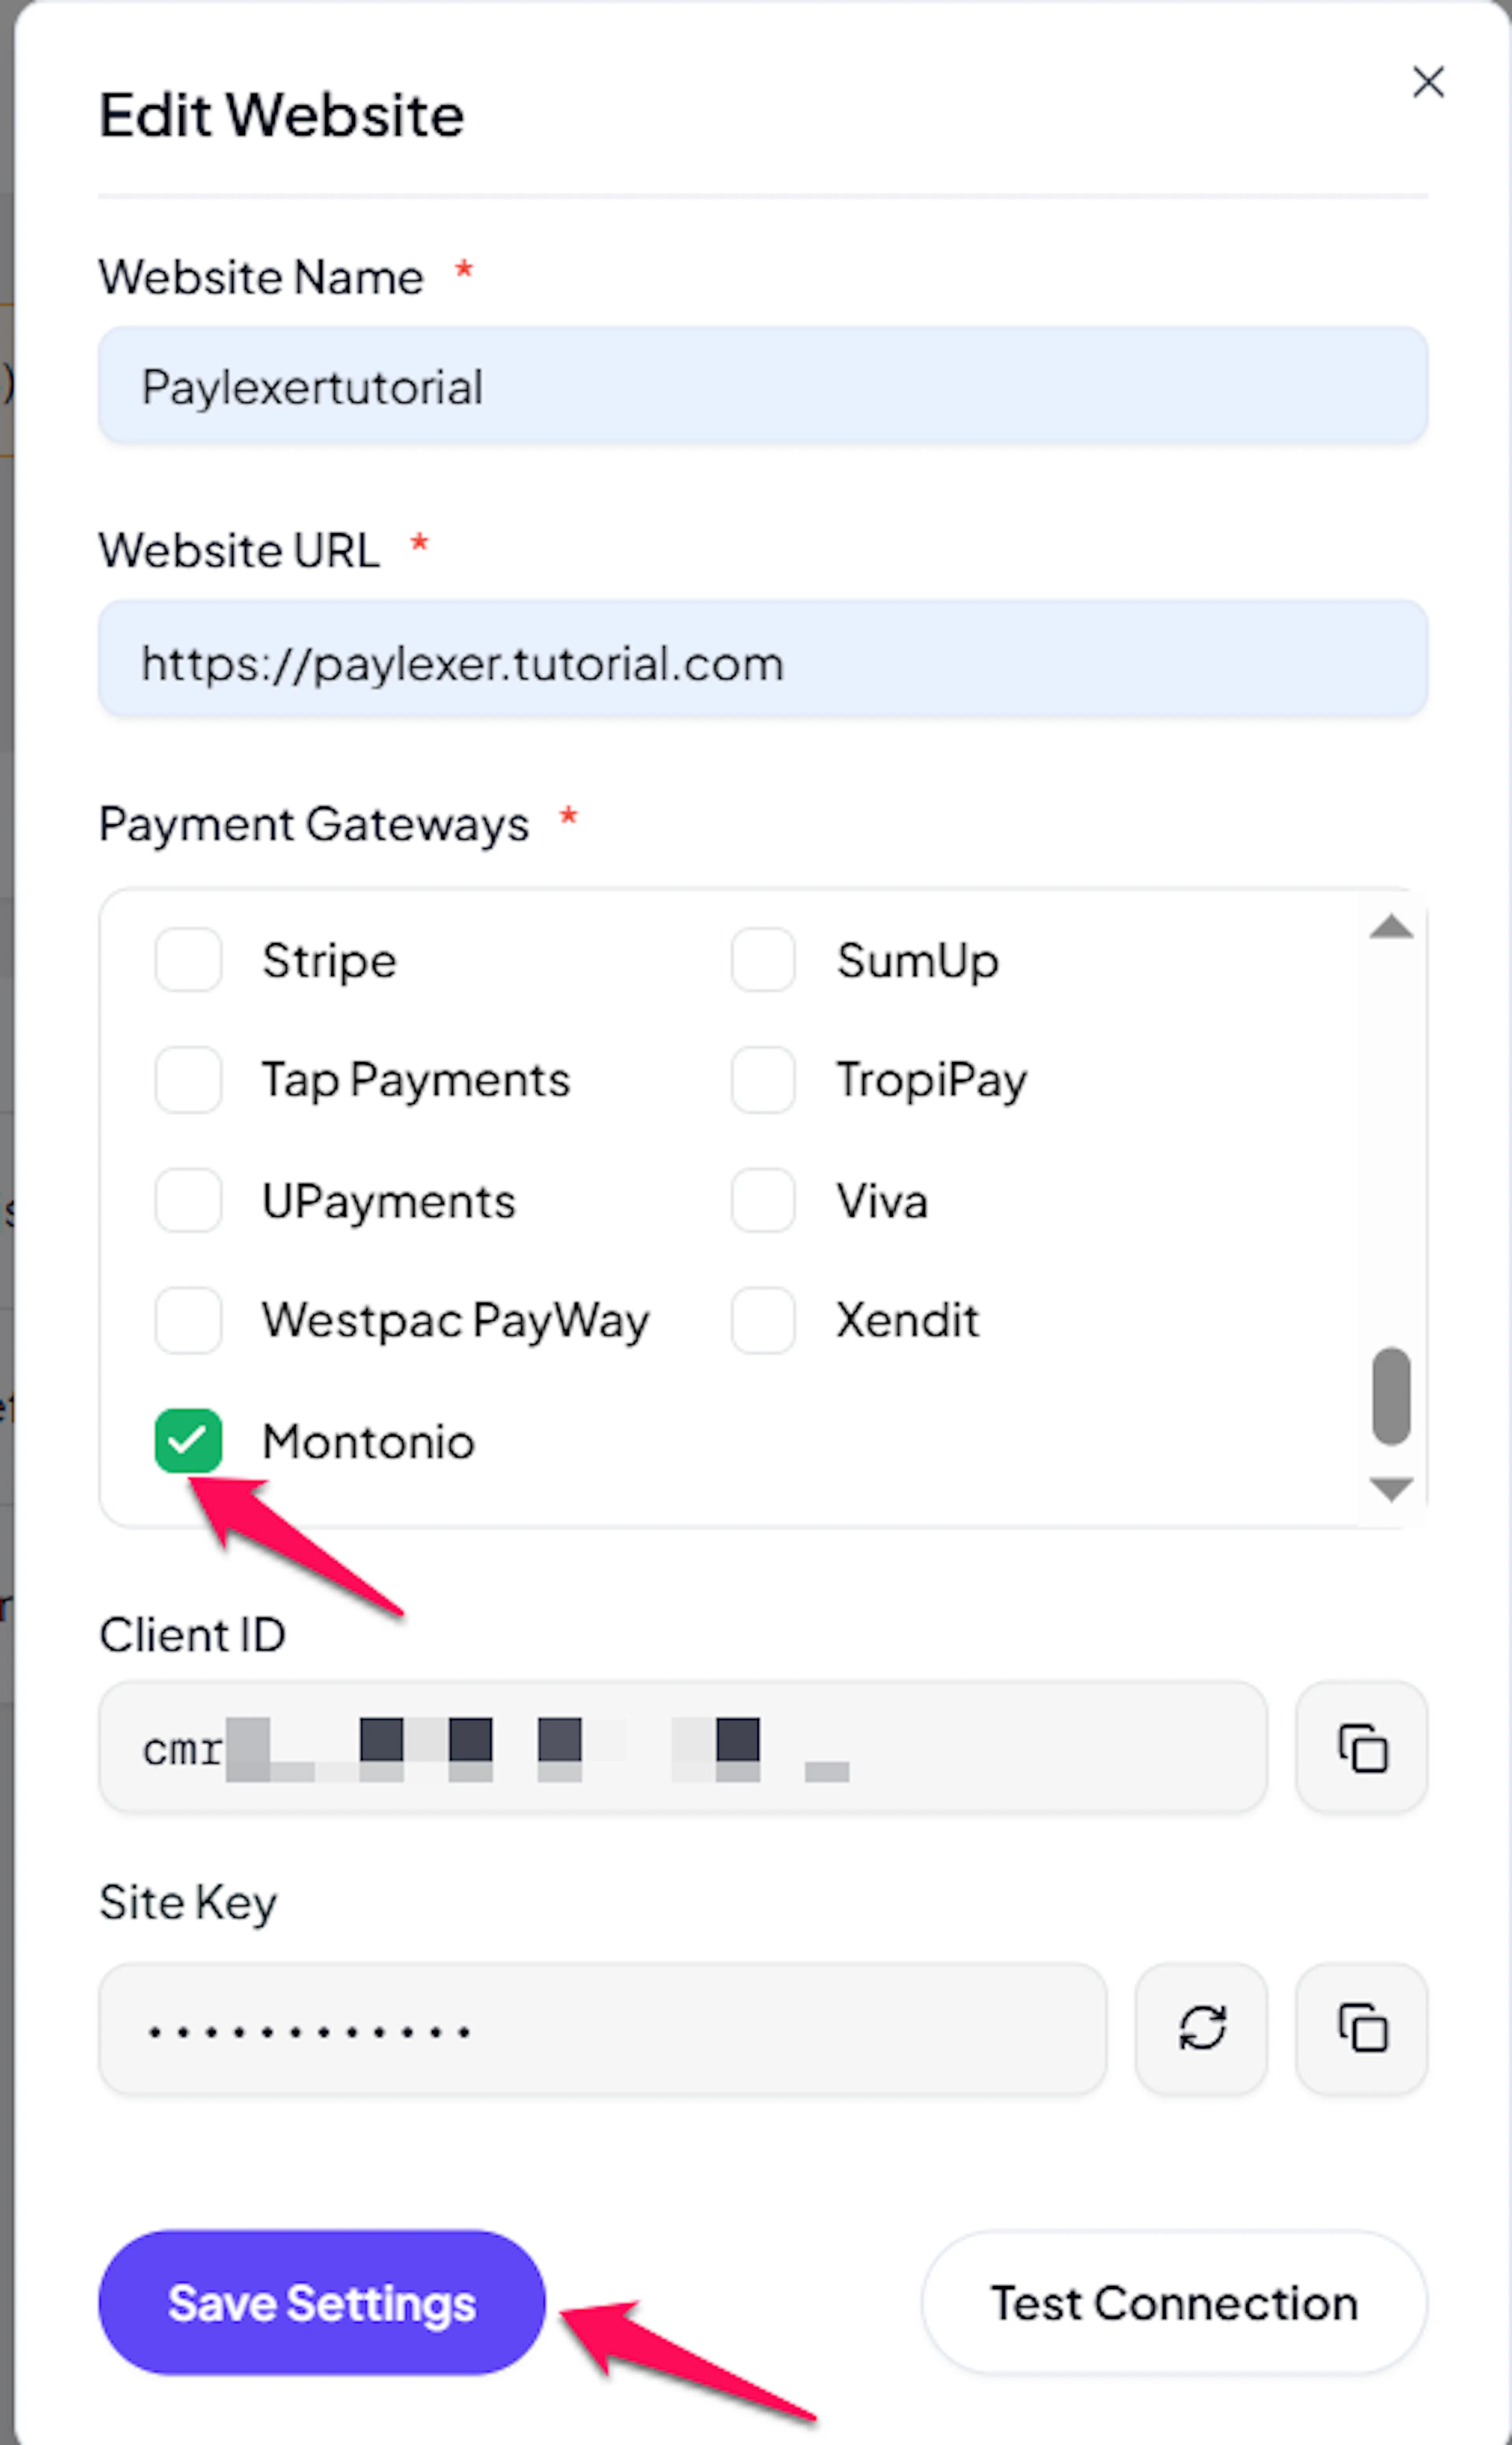
Enable Montonio
Click the checkbox to enable Montonio for the website.
If you haven't added a website yet, Continue to Add Your Website →
Troubleshooting
Best Practices
- Test in sandbox before enabling production, using your sandbox Access Key and Secret Key
- Switch Test mode on in the Partner System while testing so your sandbox orders are visible there
- Keep your Secret Key server-side only, and rotate it in the Partner System if you suspect it has been exposed
- Price your Montonio products in EUR or PLN so the gateway is offered at checkout
- Allow one to two business days after your first live payments before relying on refunds, so your settlement balance has time to build
- Reconcile PayLexer Dashboard → Orders against the Partner System regularly
FAQs
Still Have Questions?
- Montonio Support: Montonio Support
- PayLexer Support: Contact Support