

Moneris
Connect Moneris to PayLexer to accept card payments and issue refunds in Canadian and US dollars.
Moneris is one of Canada's largest payment processors, headquartered in Toronto and jointly founded by two of Canada's major banks. It processes card payments for hundreds of thousands of merchants across Canada and the United States of America, supporting online checkout, in-store POS, and omnichannel commerce. PayLexer connects to the Moneris Unified API so you can accept card payments directly on your website and issue refunds without leaving your PayLexer dashboard.
- Supported Regions (Merchant Accounts): Canada and United States of America
- Supported Currencies: CAD and USD
This gateway appears in checkout only when the selected currency is CAD or USD.
Supported Features
- Accept credit and debit card payments through a secure card form
- Process payments in Canadian dollars (CAD) and US dollars (USD)
- Issue full refunds on completed payments
- Issue partial refunds for a portion of the original amount
- Separate Test (sandbox) and Live (production) credentials
Moneris on PayLexer supports one-time card payments and refunds. Recurring subscriptions and hosted redirect checkout are not supported for this gateway.
Before You Start
Make sure you have:
- Moneris Account – Don't have one? Sign up for Moneris →
- PayLexer Account – Required to configure the integration. Create your account →
- A website where you want to integrate
Looking for a different payment processor? View all supported gateways →
Configuring Moneris
You need a Merchant ID (Store ID), OAuth Client ID, and OAuth Client Secret from Moneris for this integration.
Getting API Credentials
Log in to the Moneris Developer Portal
Sign in to the Moneris Developer Portal using your Moneris account.
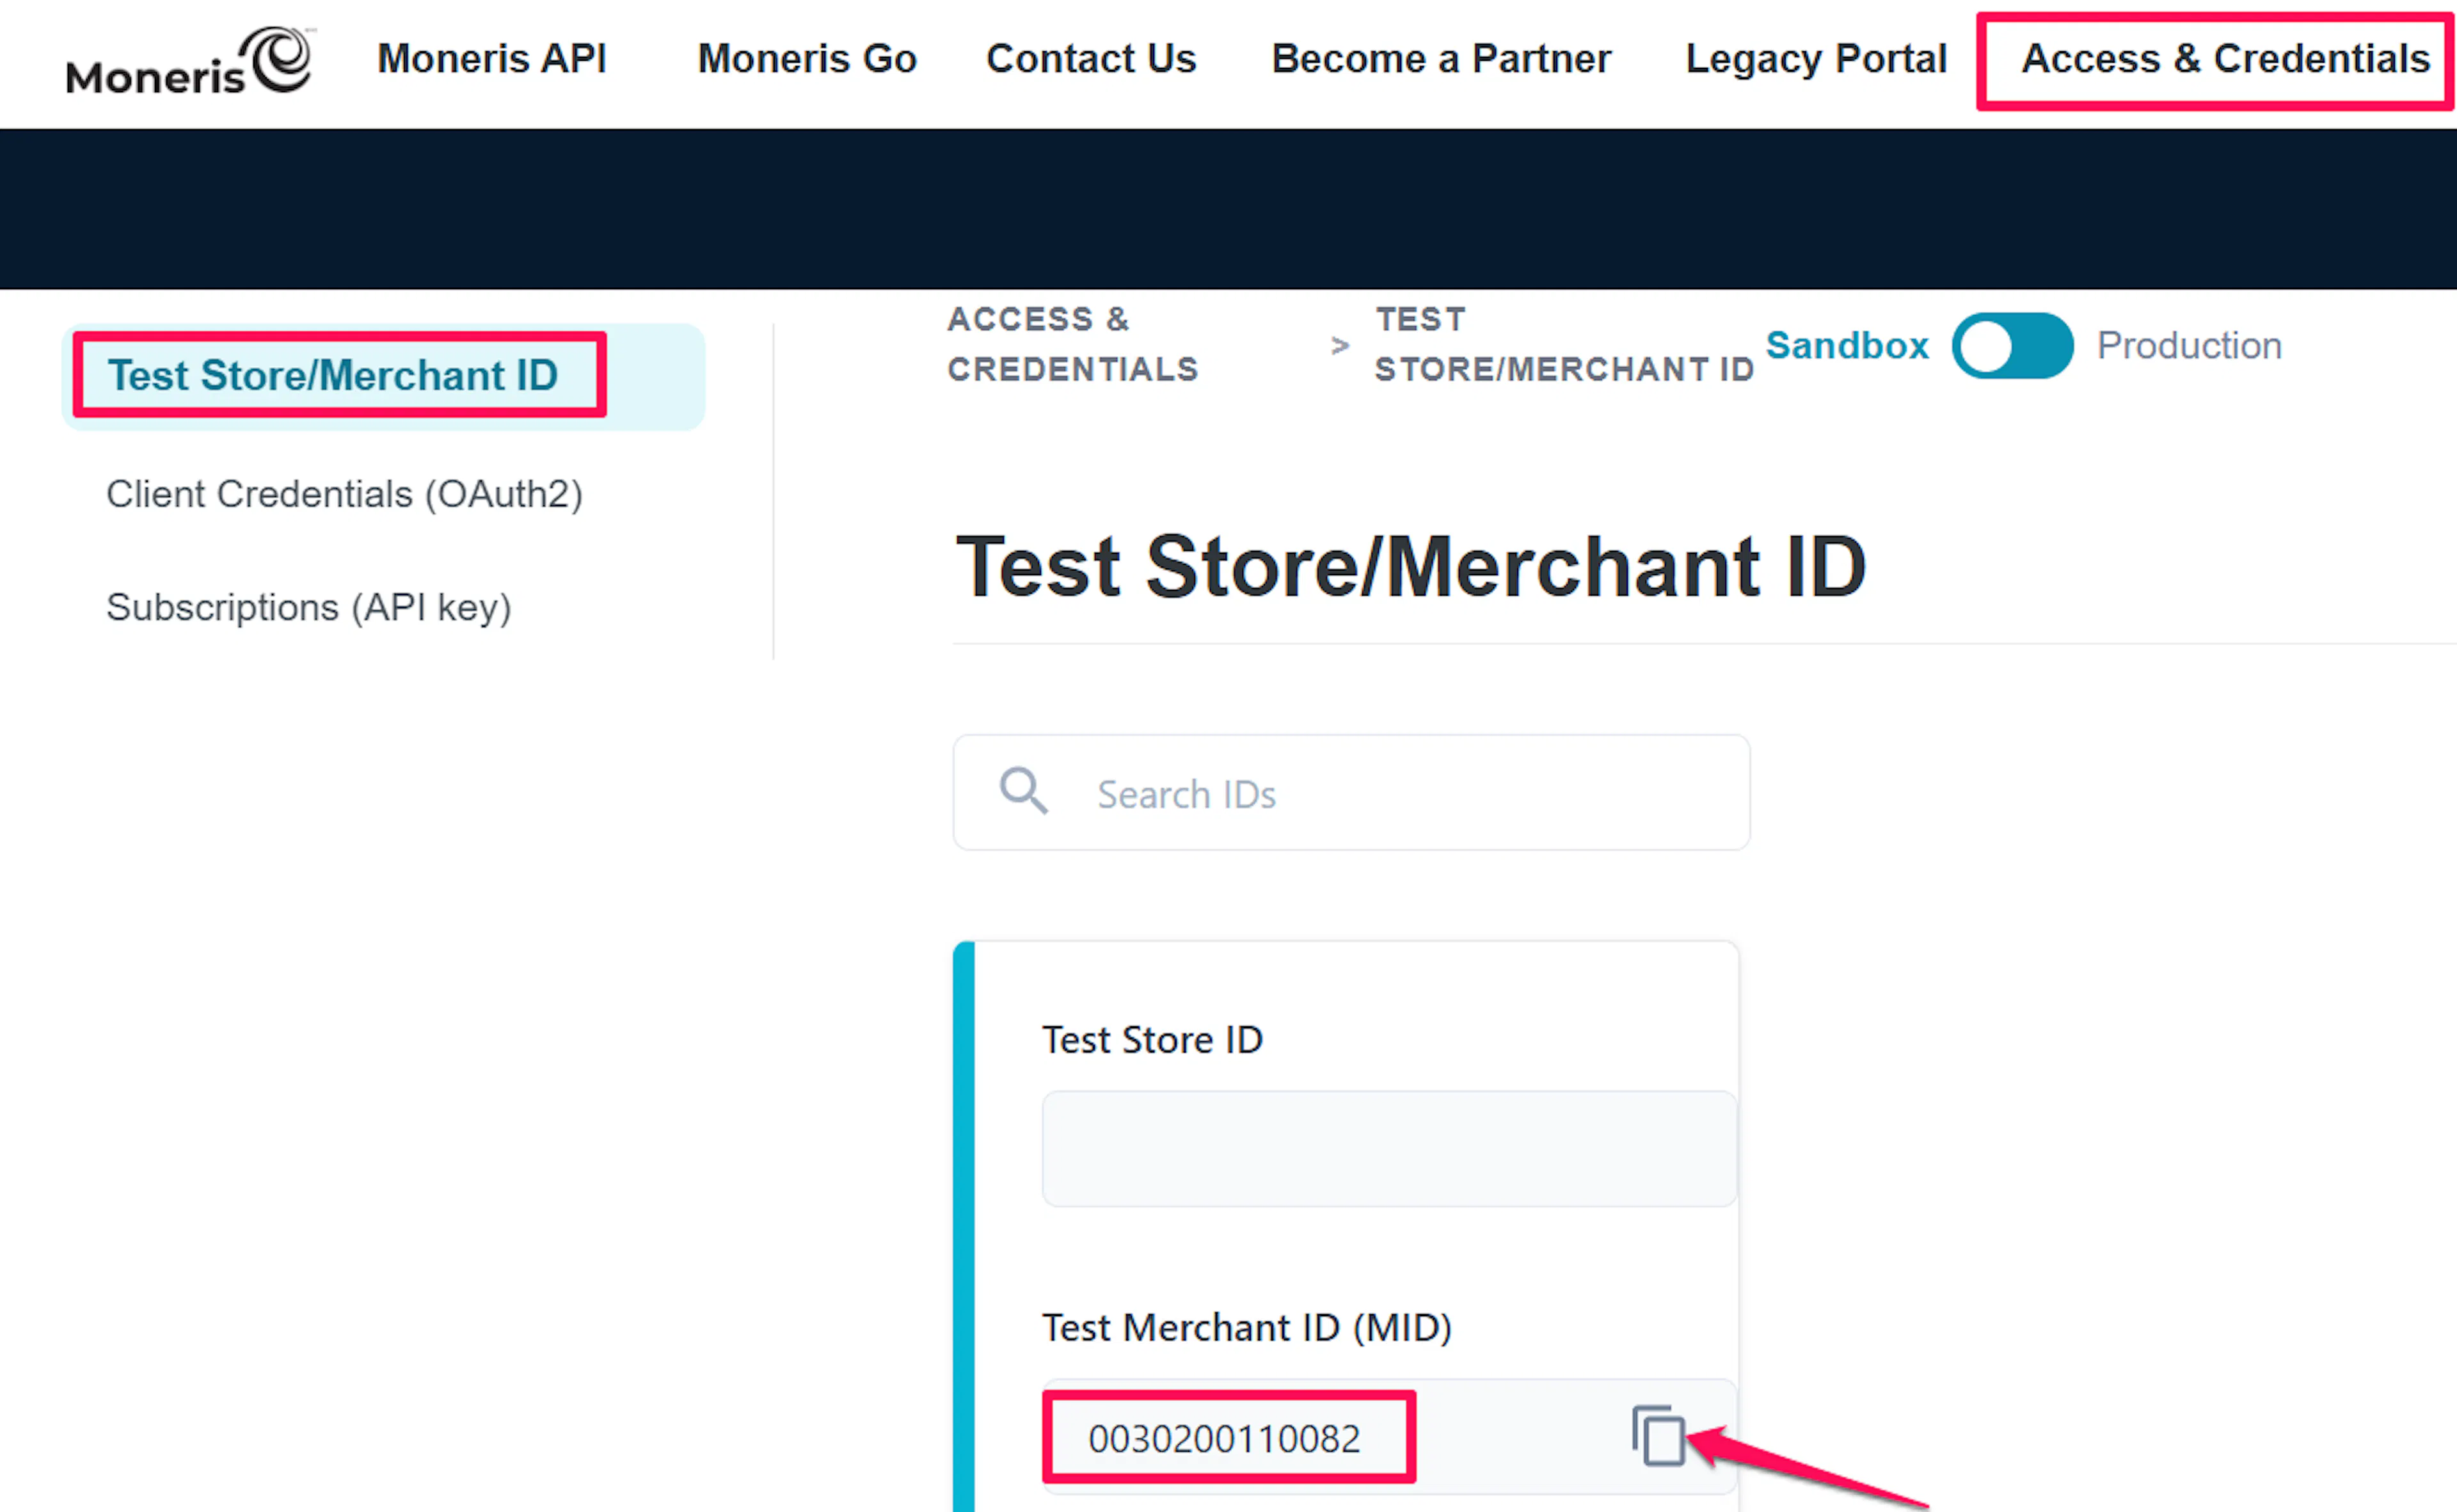
Locate your Merchant ID (Store ID)
Open the Access and Credentials section of your portal. Copy your Merchant ID - the 13-character identifier assigned to your store.
Create a new application
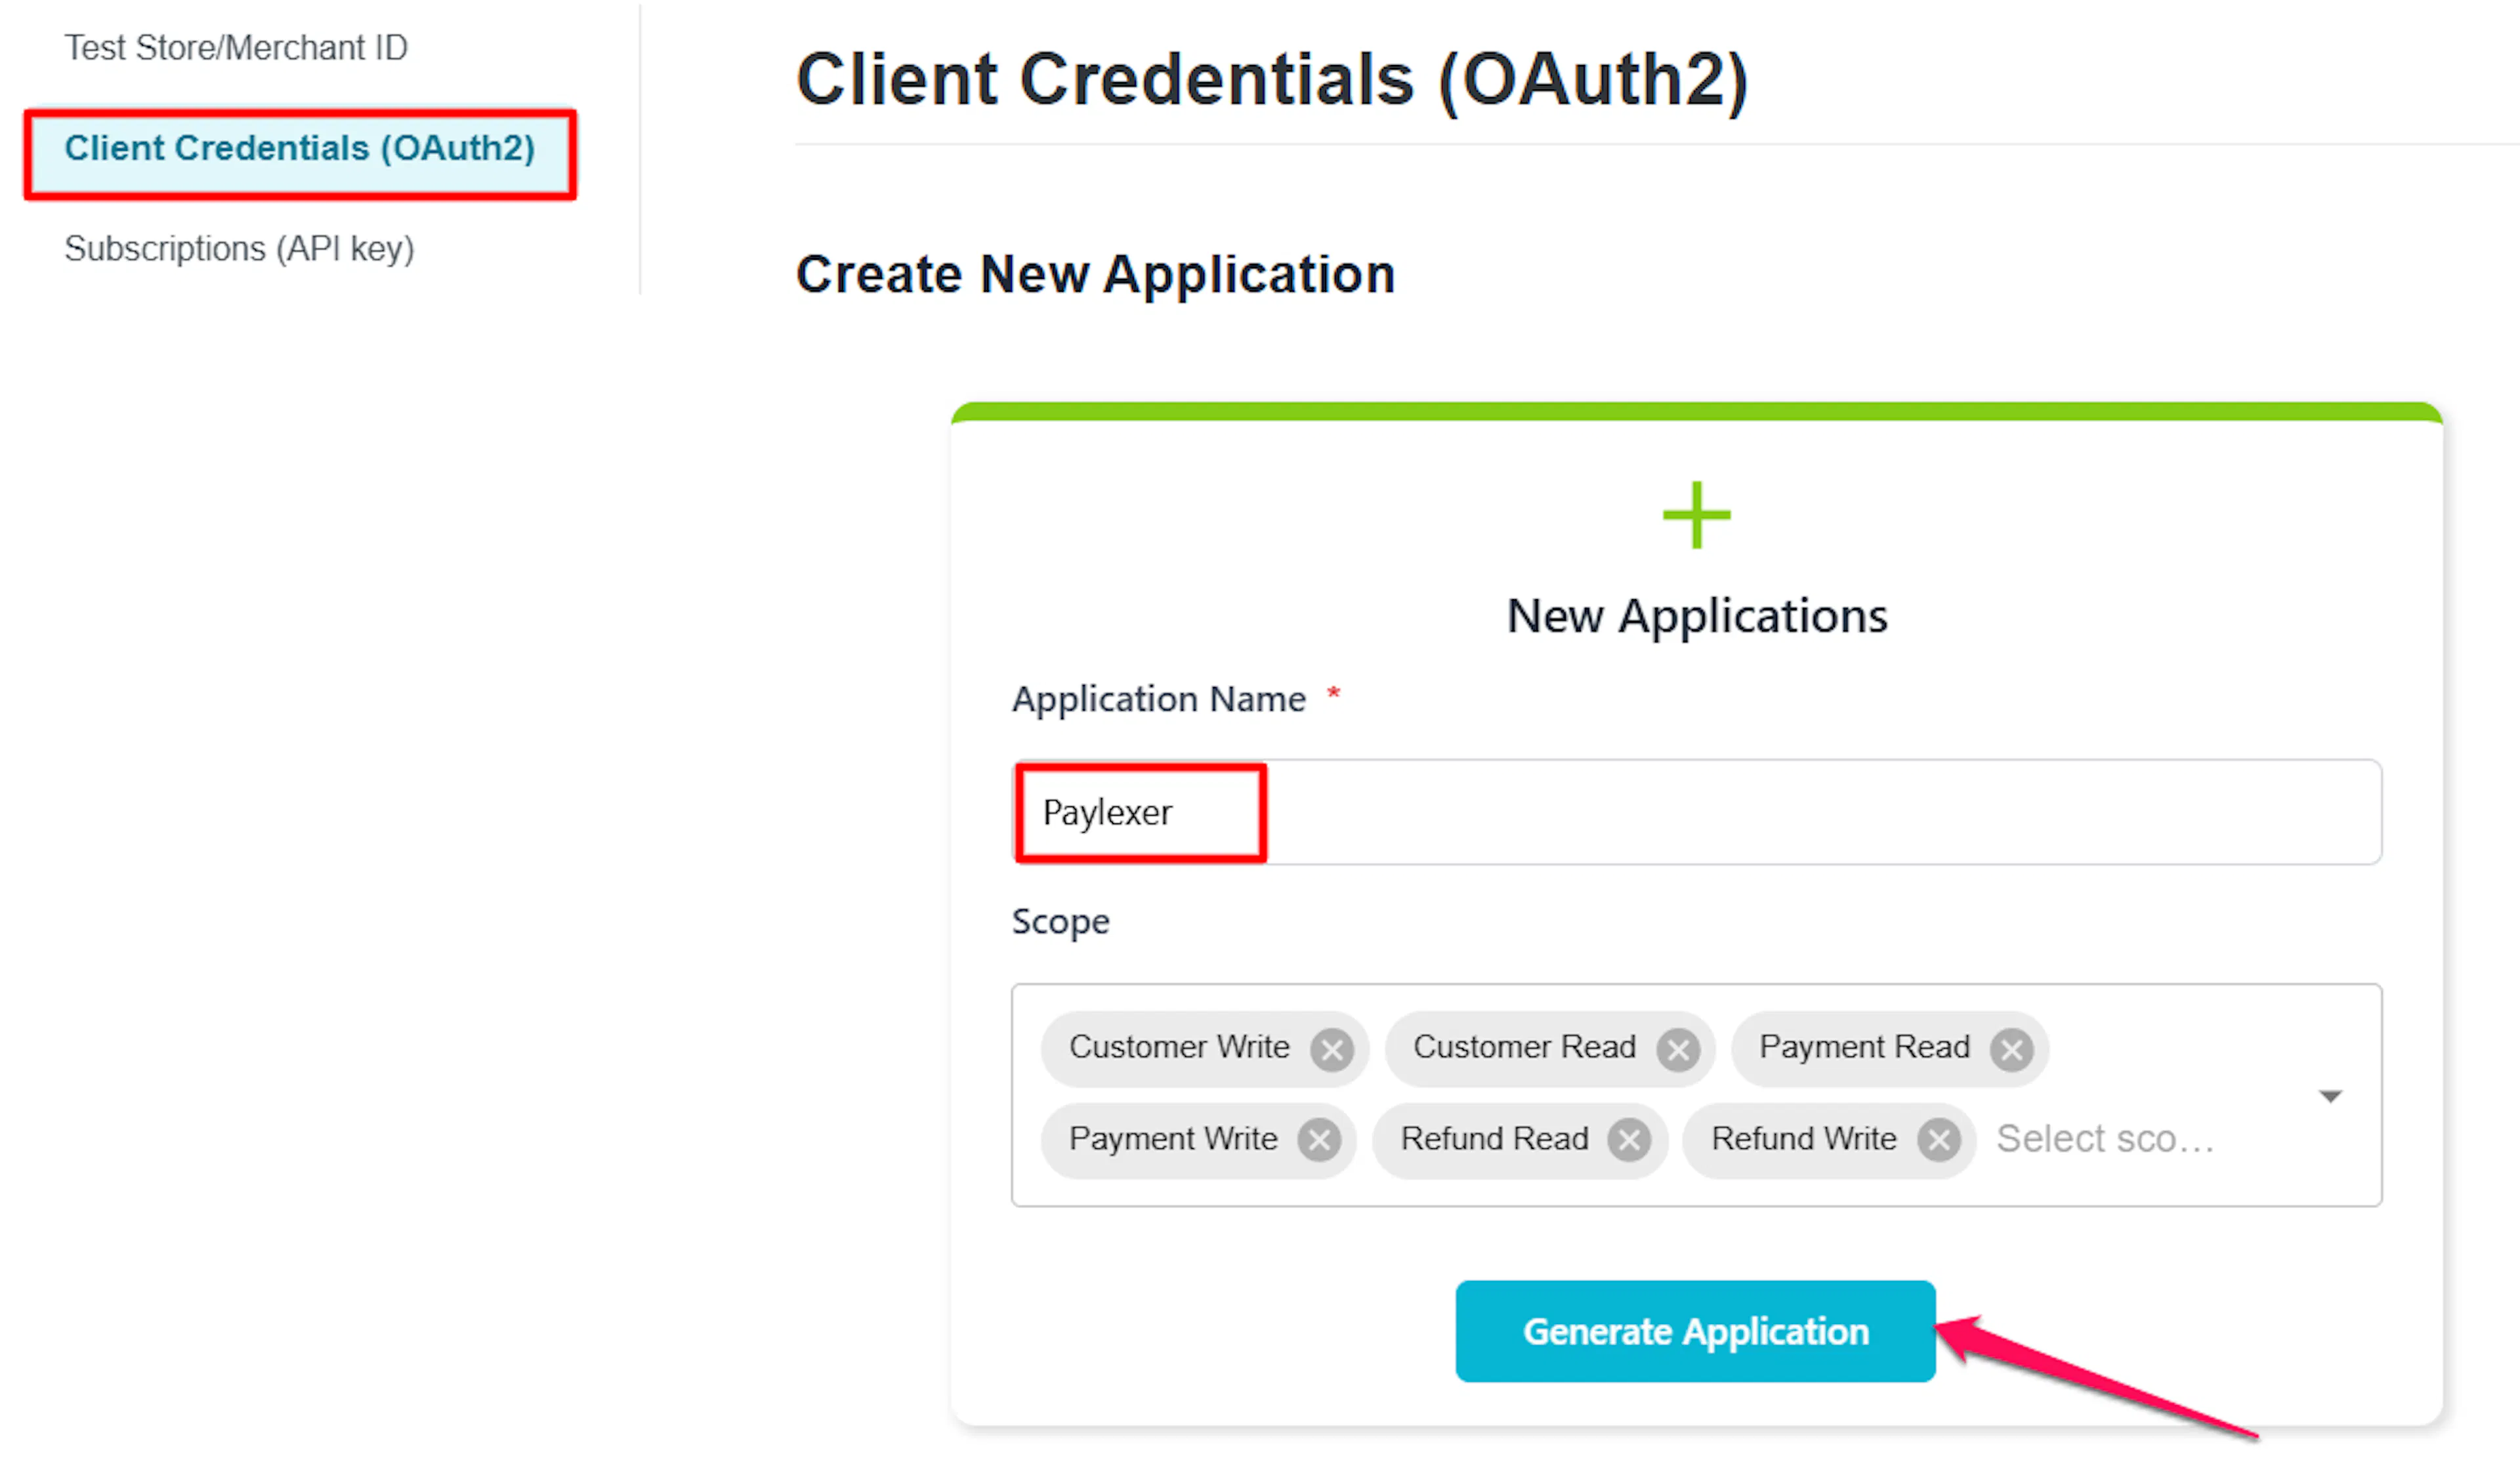
Go to Client Credentials (OAuth2) section, Create New Application.
Enter an Application Name, select the required scopes, and click Generate Application. Moneris then generates the application and provides the Client ID.
Copy your OAuth Client ID and Client Secret
In the Manage Clients section, copy your Client ID and Client Secret. PayLexer uses these to request an OAuth2 access token from Moneris on each charge.
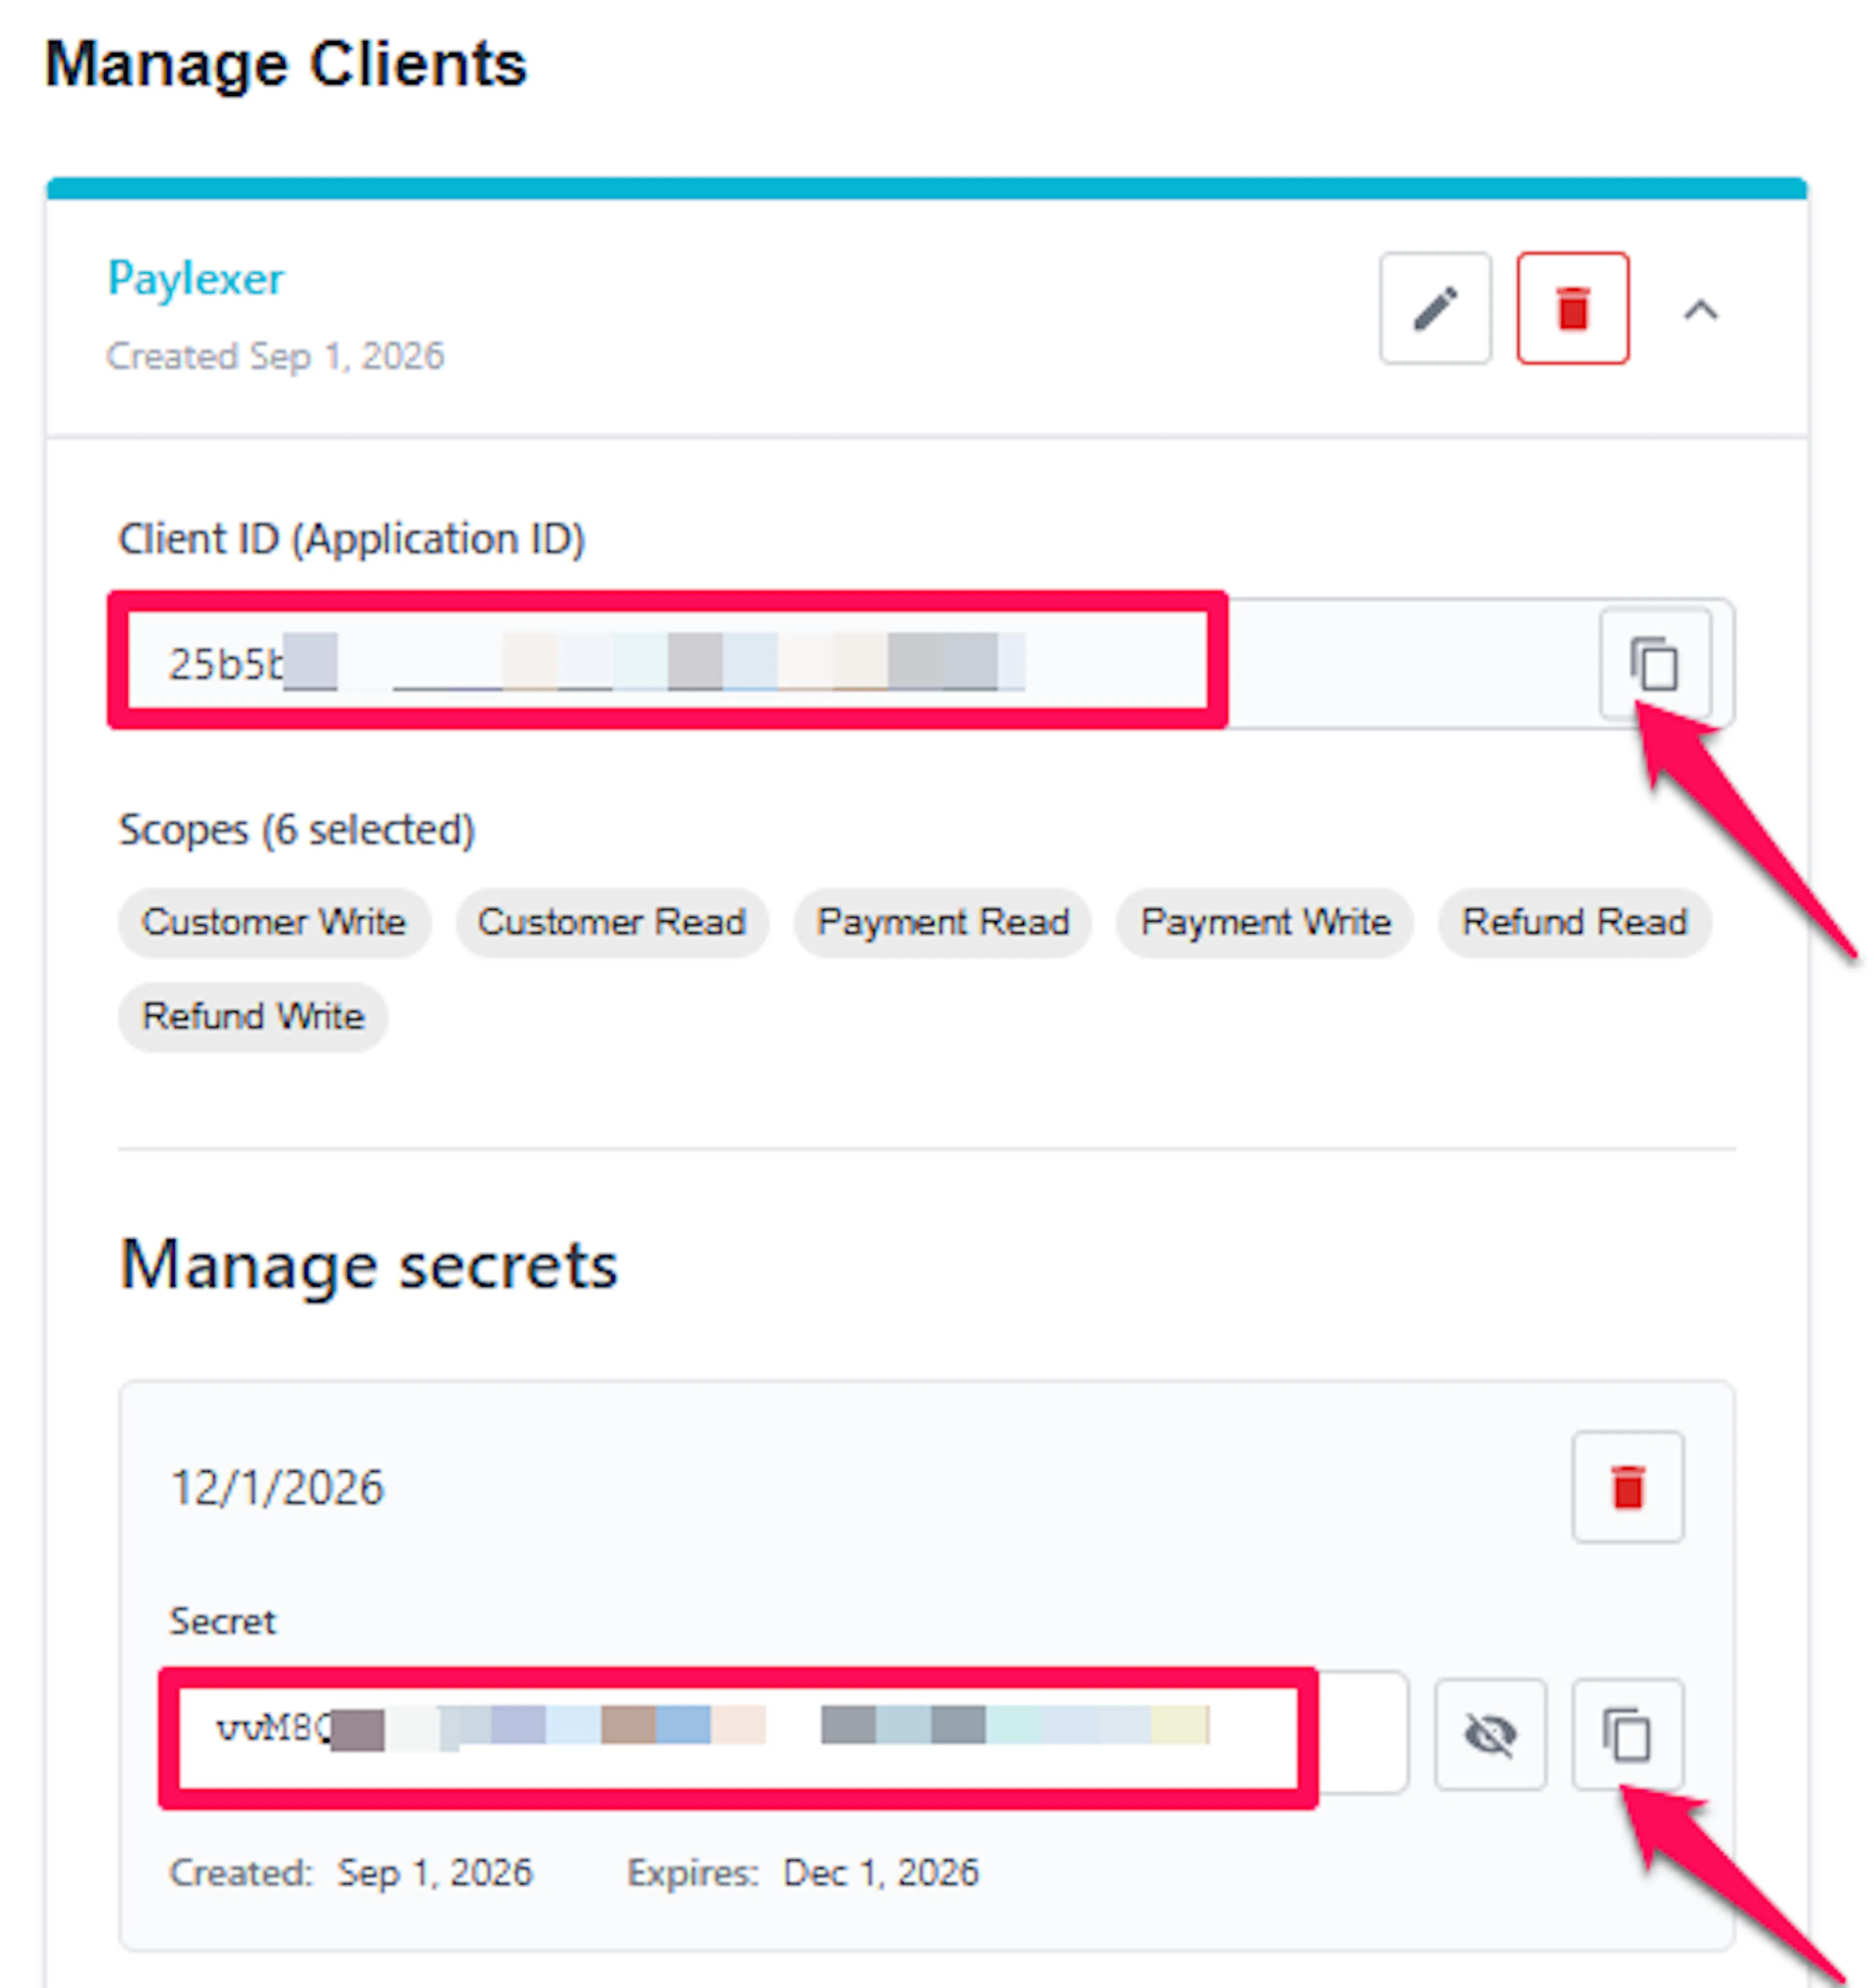
Your Client Secret is shown only once when it is generated. Store it securely. If you lose it, generate a new secret in the Moneris portal.
Adding Credentials to PayLexer
Open PayLexer Dashboard
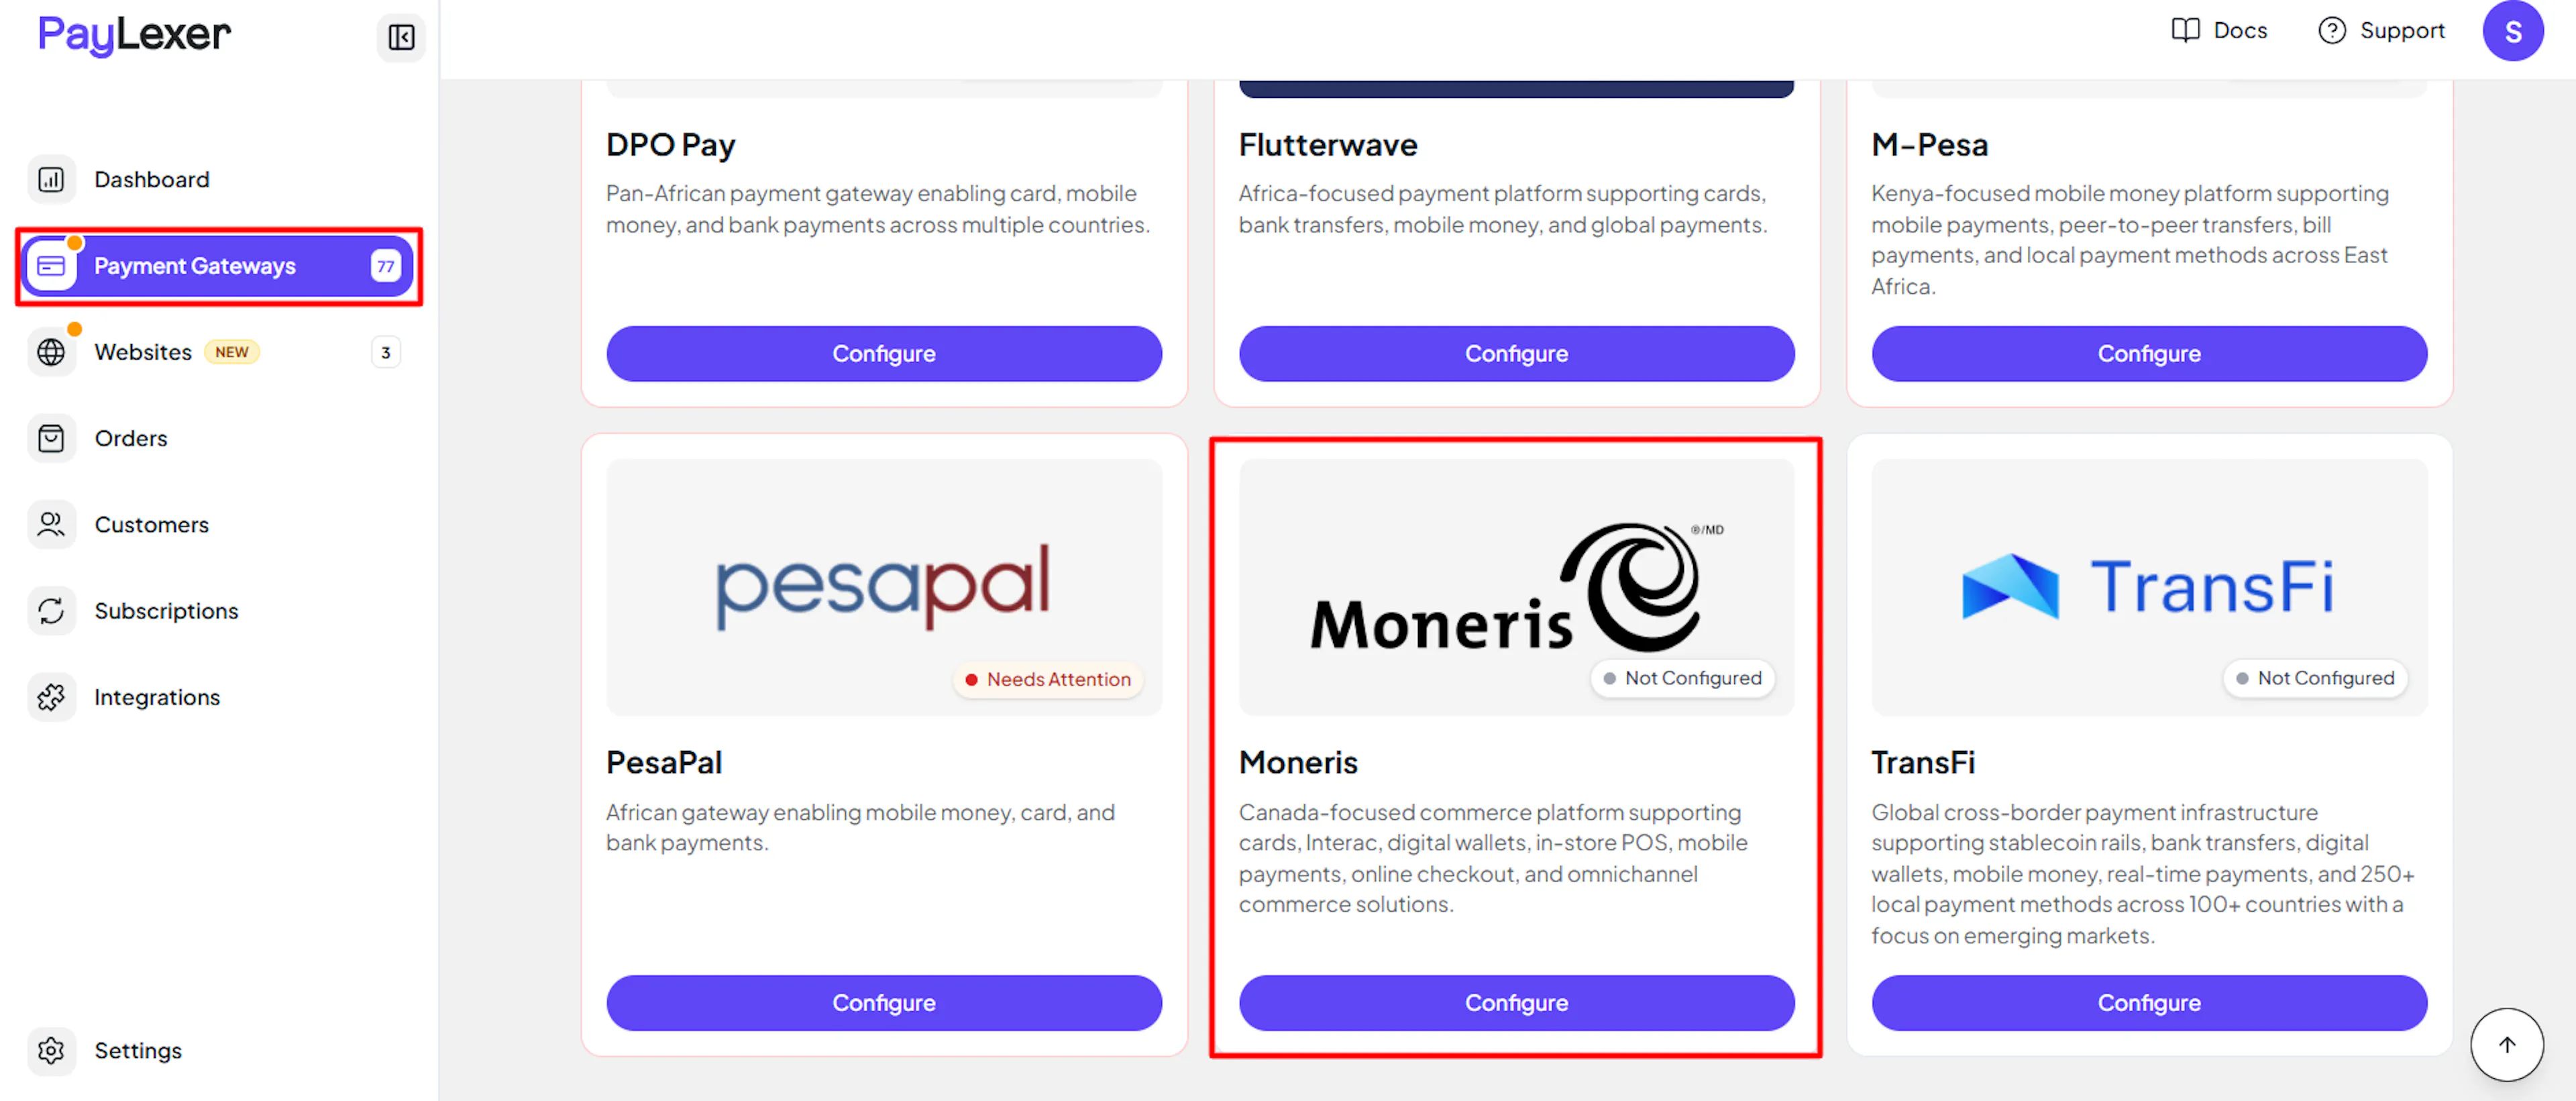
Log in to your PayLexer dashboard and navigate to Payment Gateways → Moneris.
Enter your credentials
Paste the Merchant ID (Store ID), OAuth Client ID, and OAuth Client Secret you copied from Moneris into the corresponding fields.
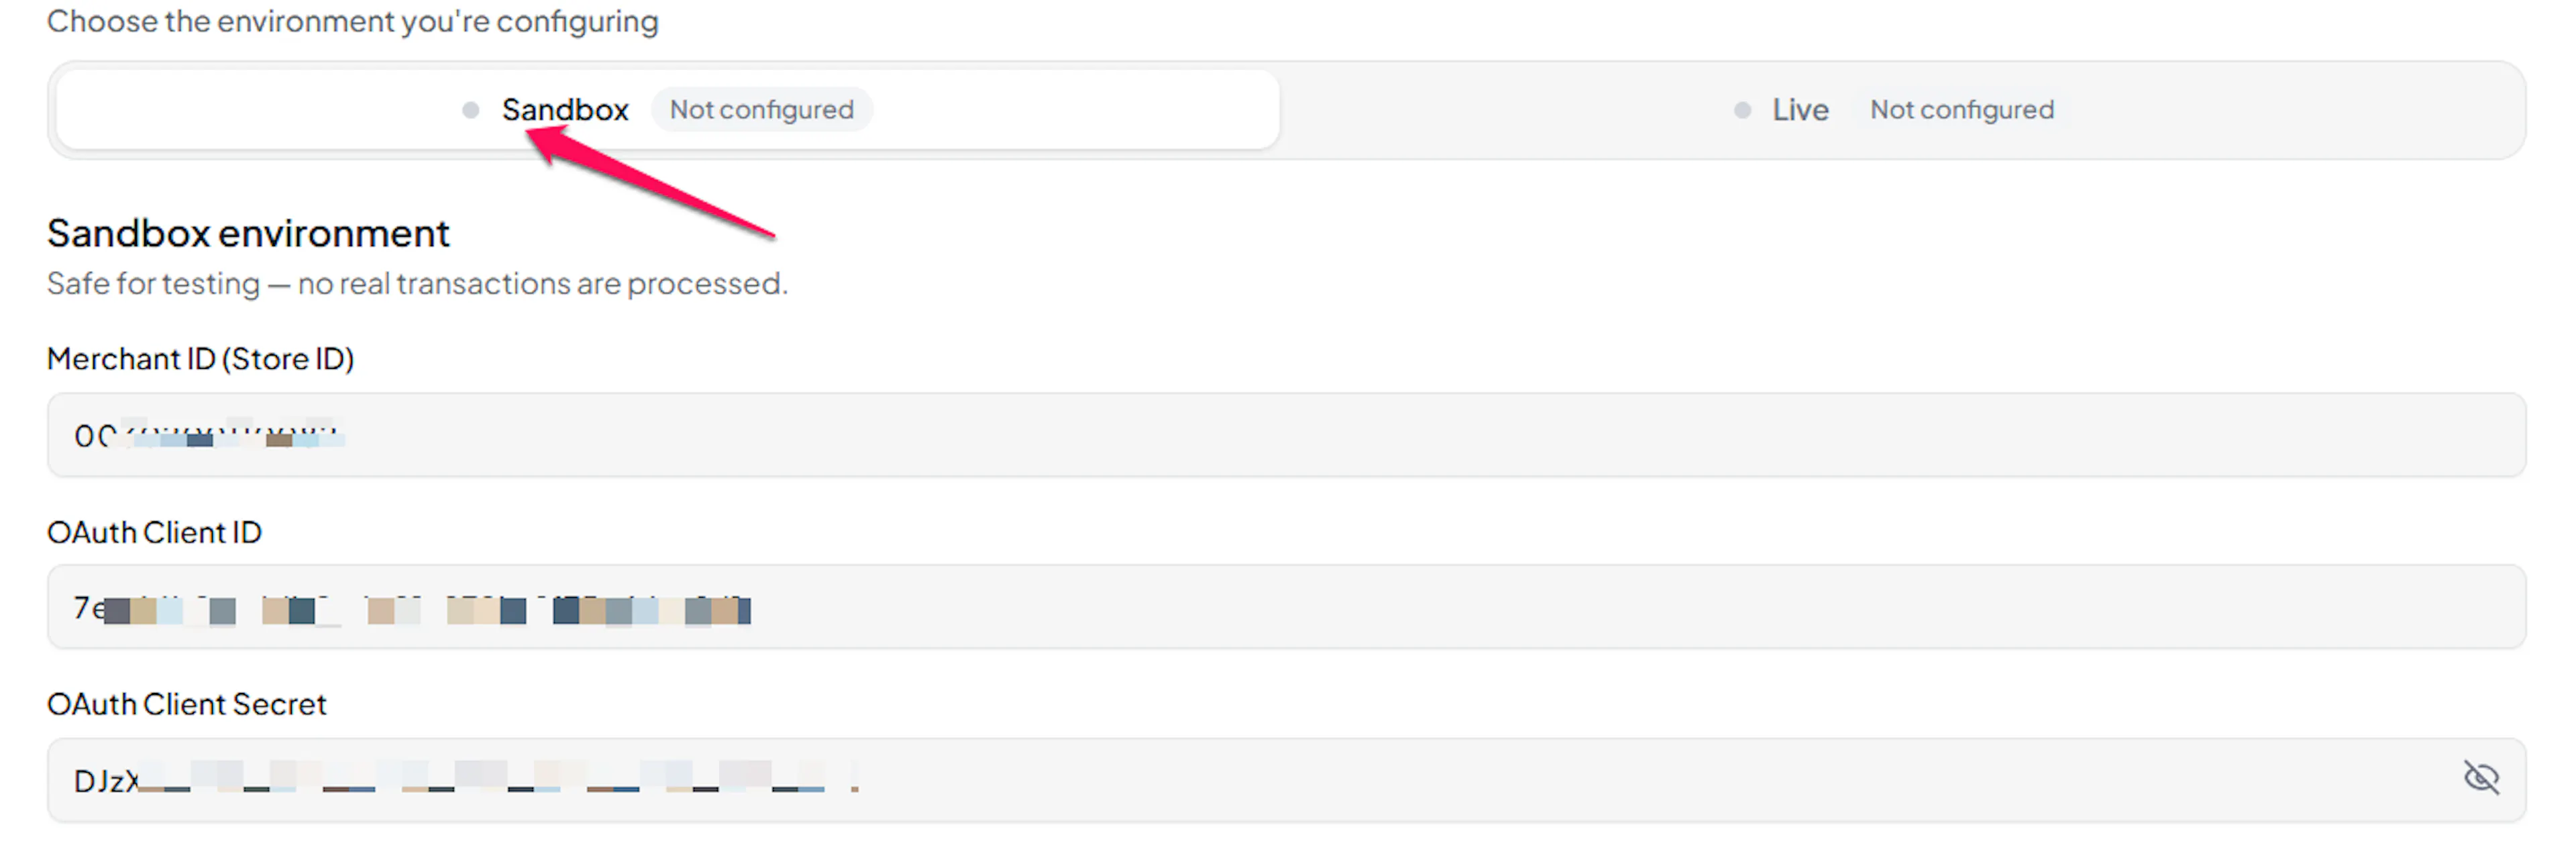
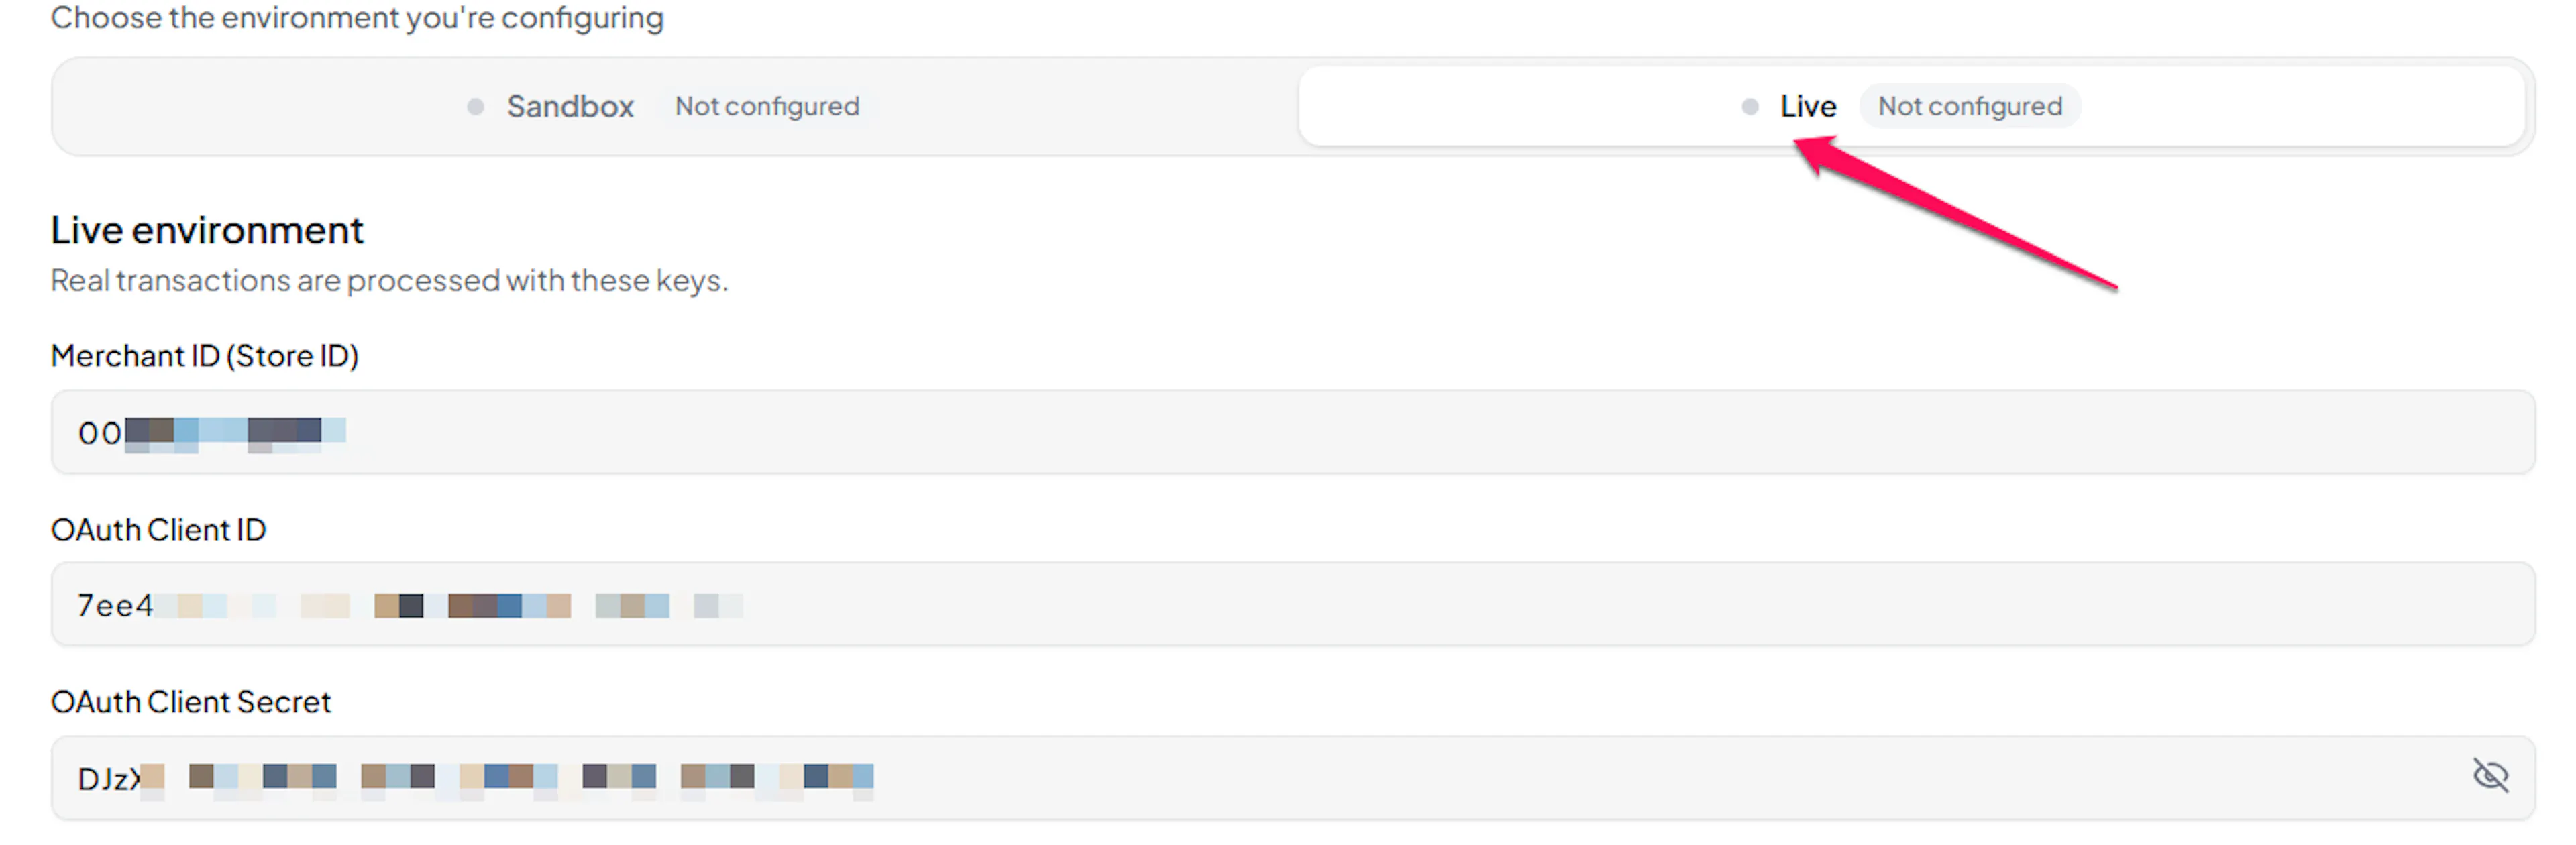
Understanding Live/Production and Sandbox Settings:
| Environment | Purpose |
|---|---|
| Live / Production (Mandatory) | Used for real transactions. Cannot be empty, even when testing. |
| Test / Sandbox (Optional) | Used for testing only. No real money is processed. |
How PayLexer selects credentials:
- Debug/Test mode ON → Test credentials are used
- Debug/Test mode OFF → Live credentials are used
Test and save
Click Save to save your configuration and verify your credentials. Click Verify Connection to test the connection.
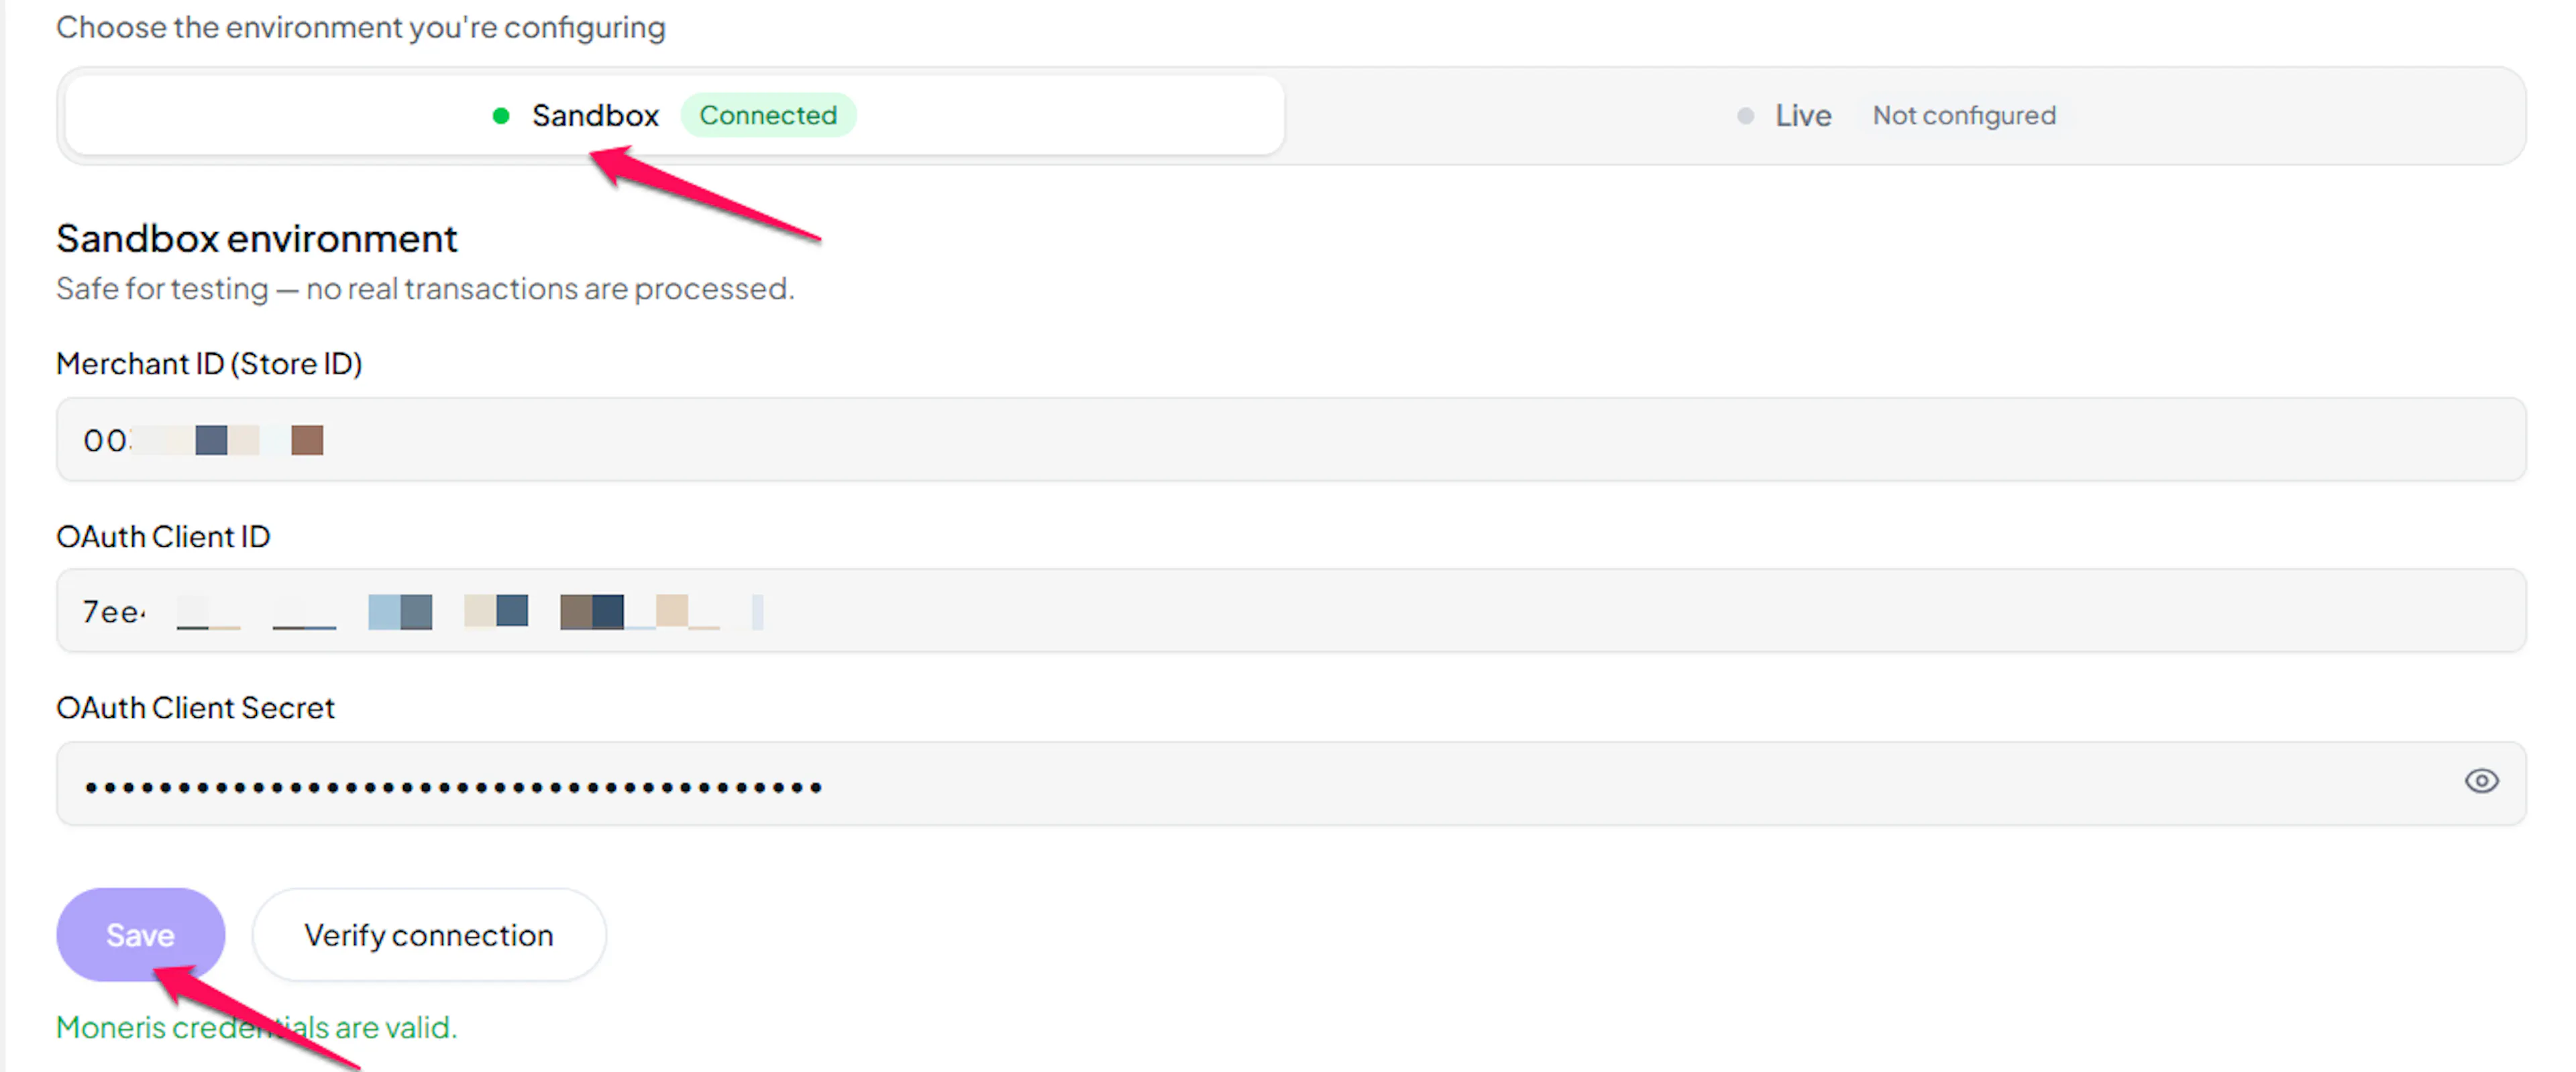
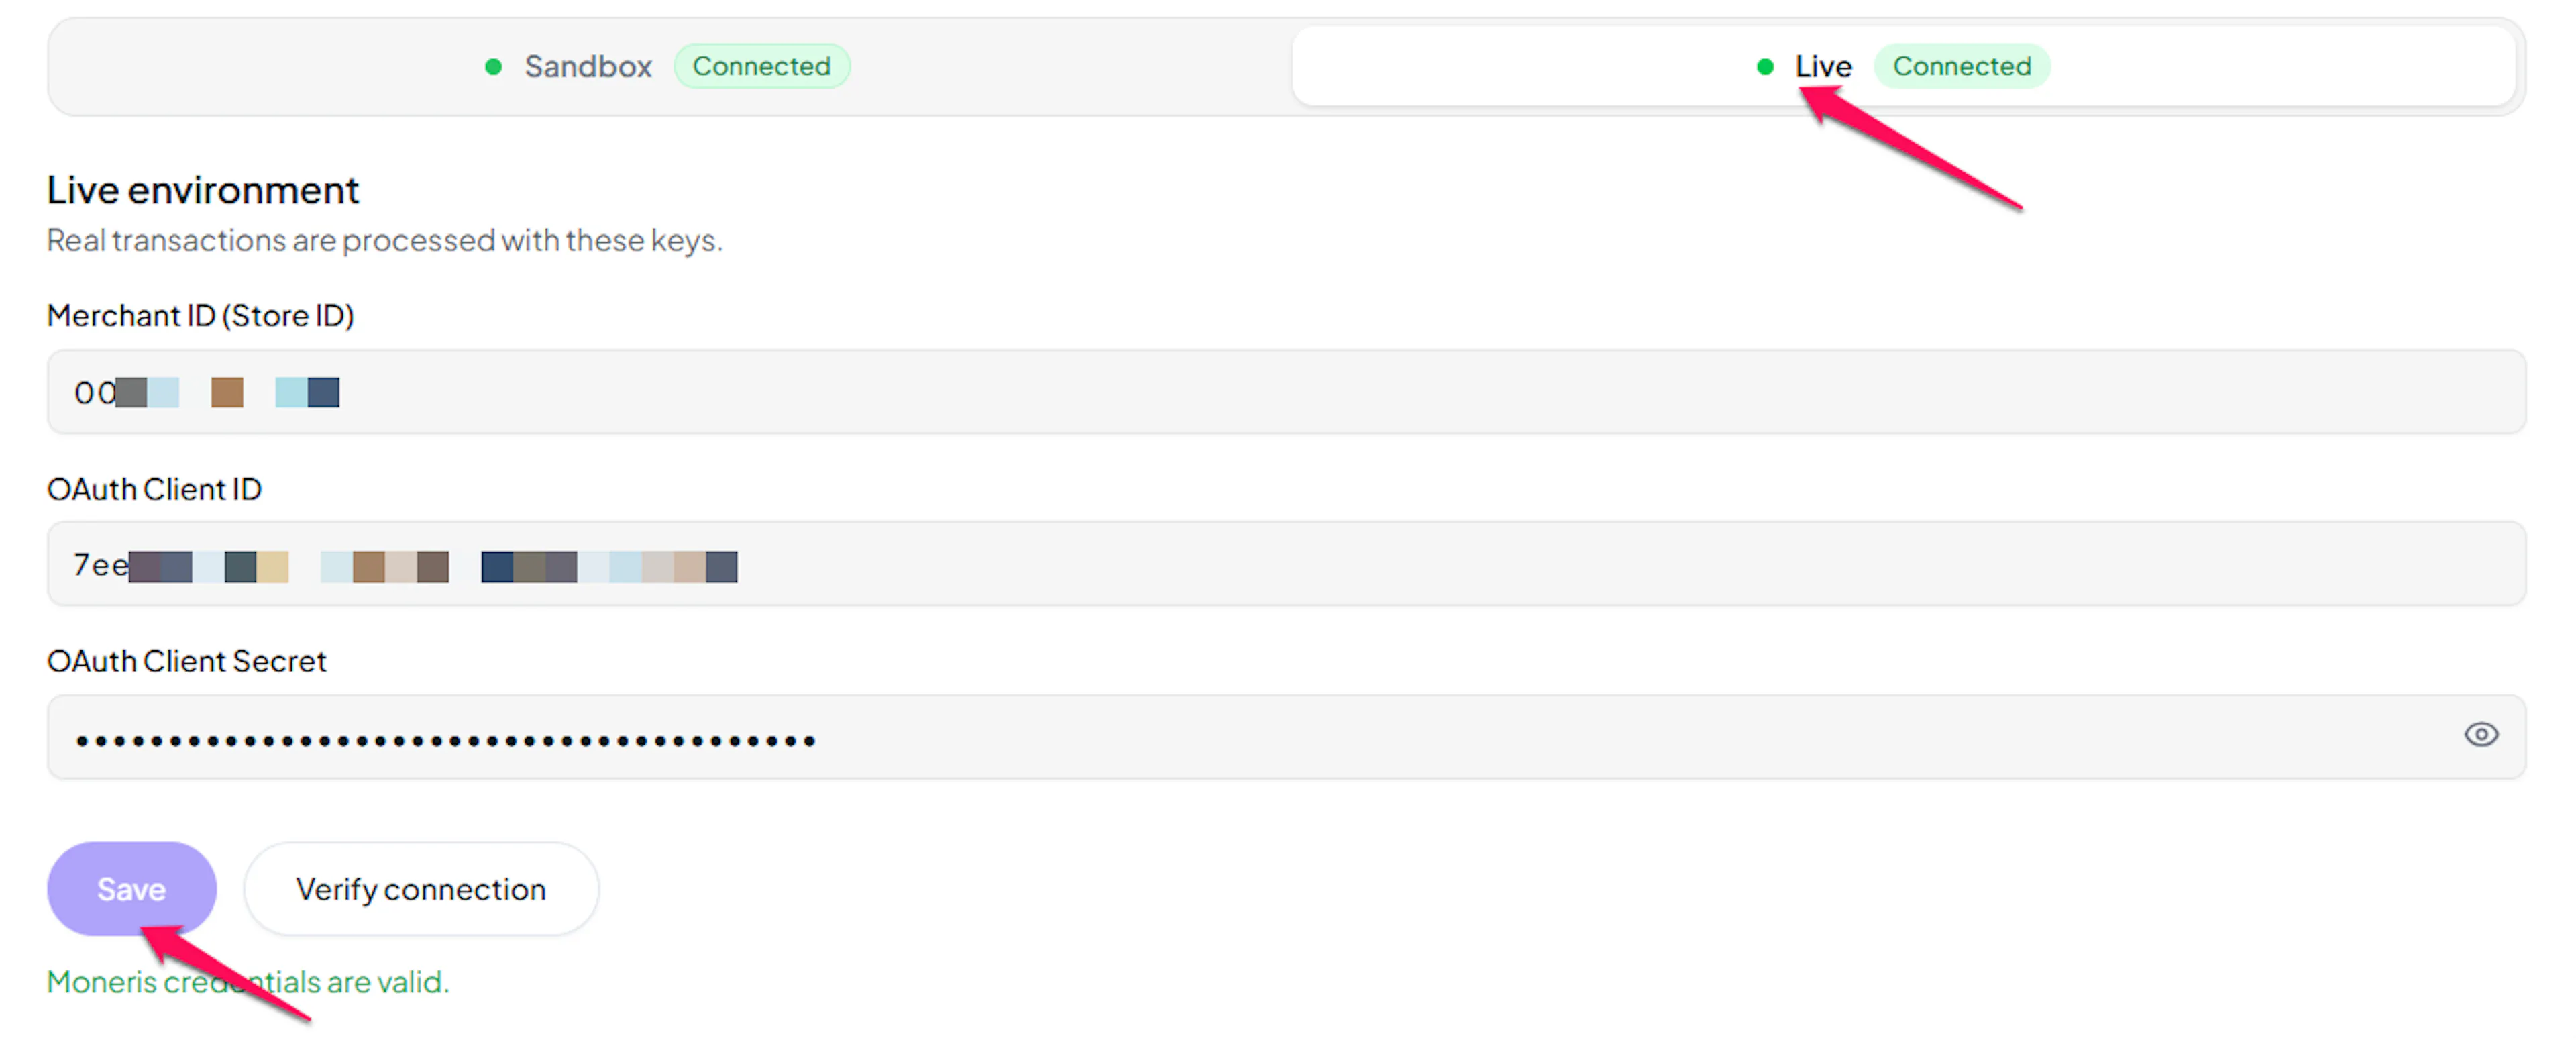
Webhooks (Not Used for This Integration)
Moneris' webhook events cover subscription and recurring billing only. Since PayLexer's Moneris integration handles one-time card payments and refunds, there is no Moneris webhook event that applies here.
- Payment updates are confirmed by PayLexer polling Moneris directly
- Real-time push notifications exist for subscription billing on Moneris, not for the one-time payments this integration uses
- Payment status updates occur through standard API polling
This means payment confirmations may take slightly longer to appear than on gateways whose webhooks do cover one-time payments.
Integrate Moneris to Your Website
If you have already added and configured your site, you can enable Moneris in your existing setup.
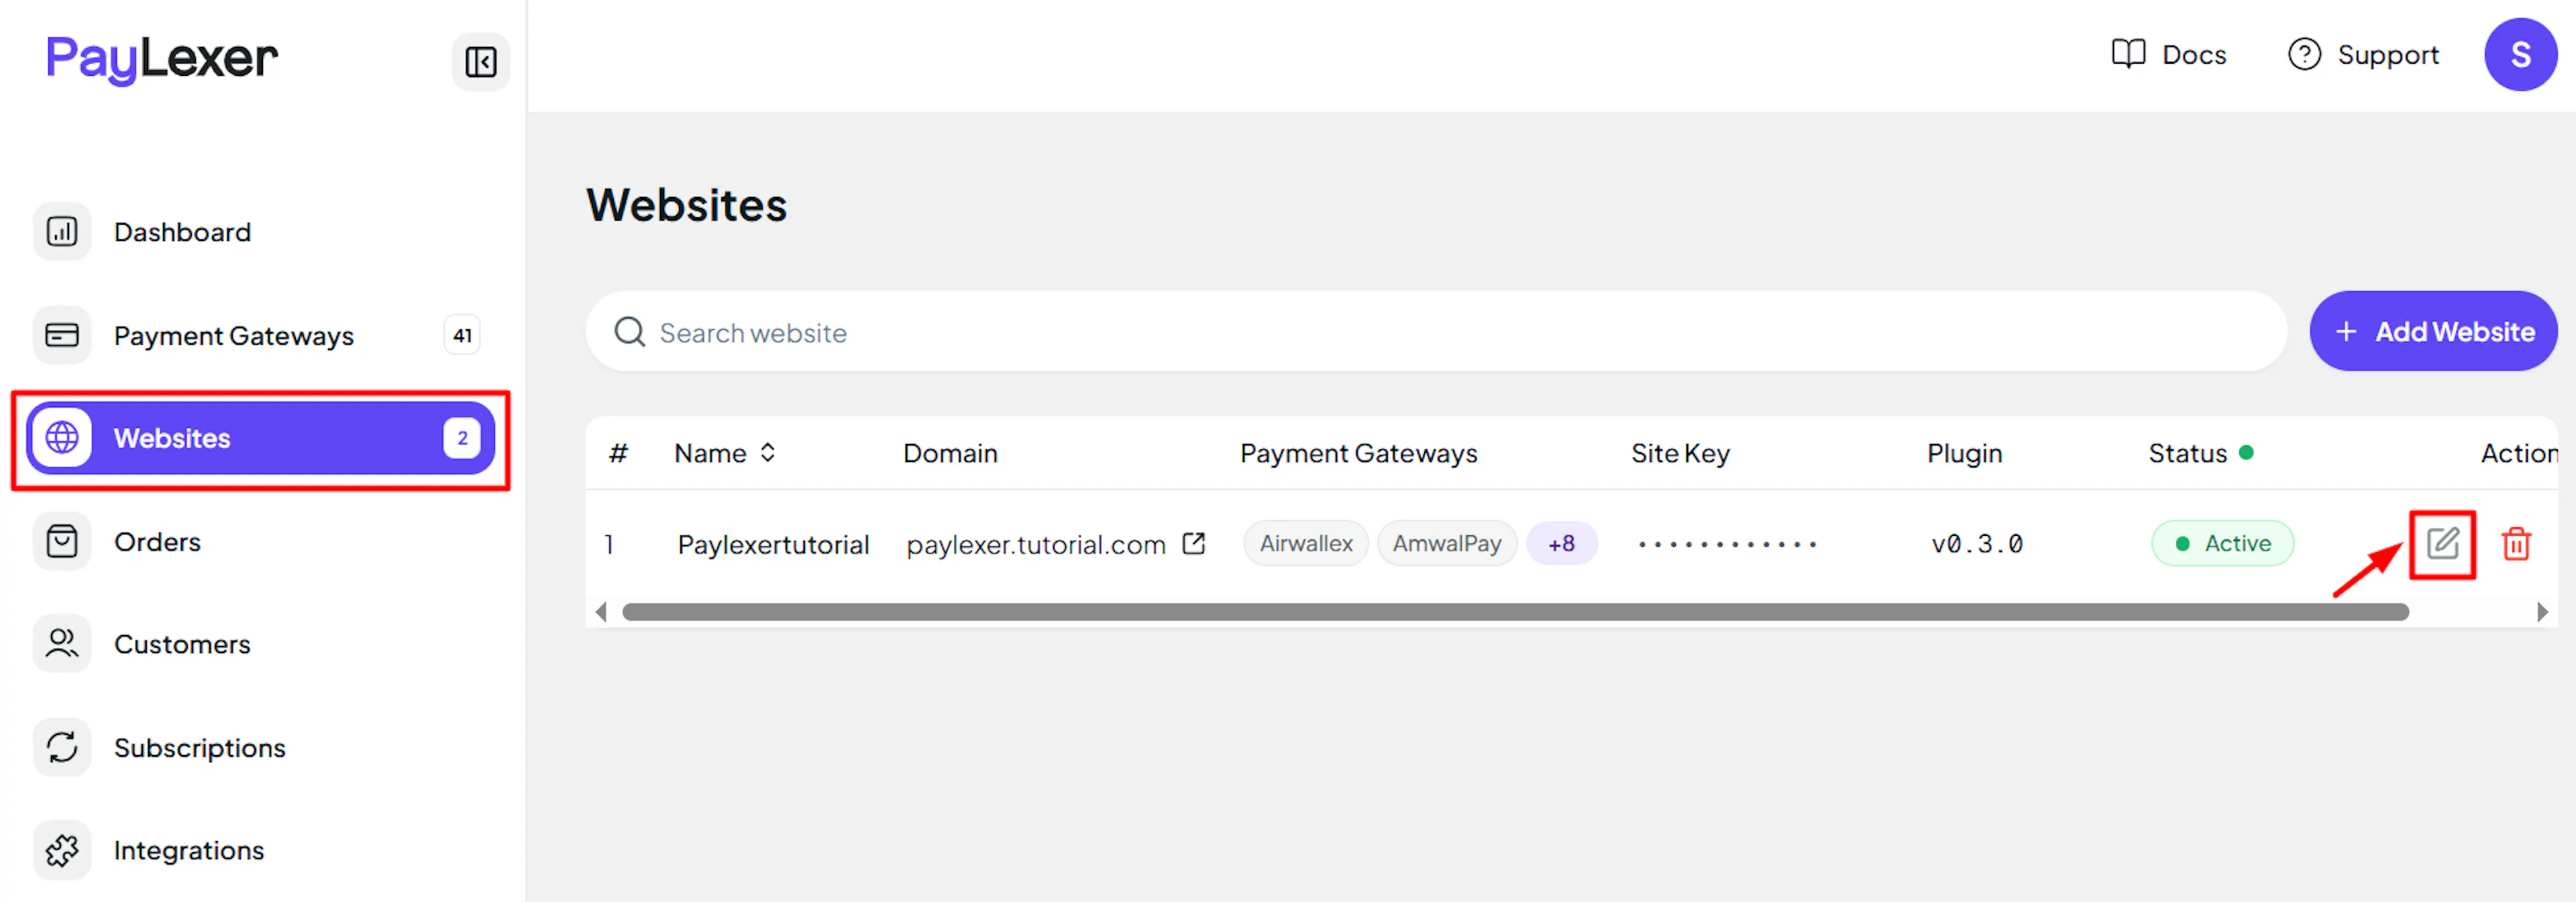
Go to Websites
Navigate to Websites in your PayLexer dashboard.
Edit your website
Click the Edit Icon of your added website.
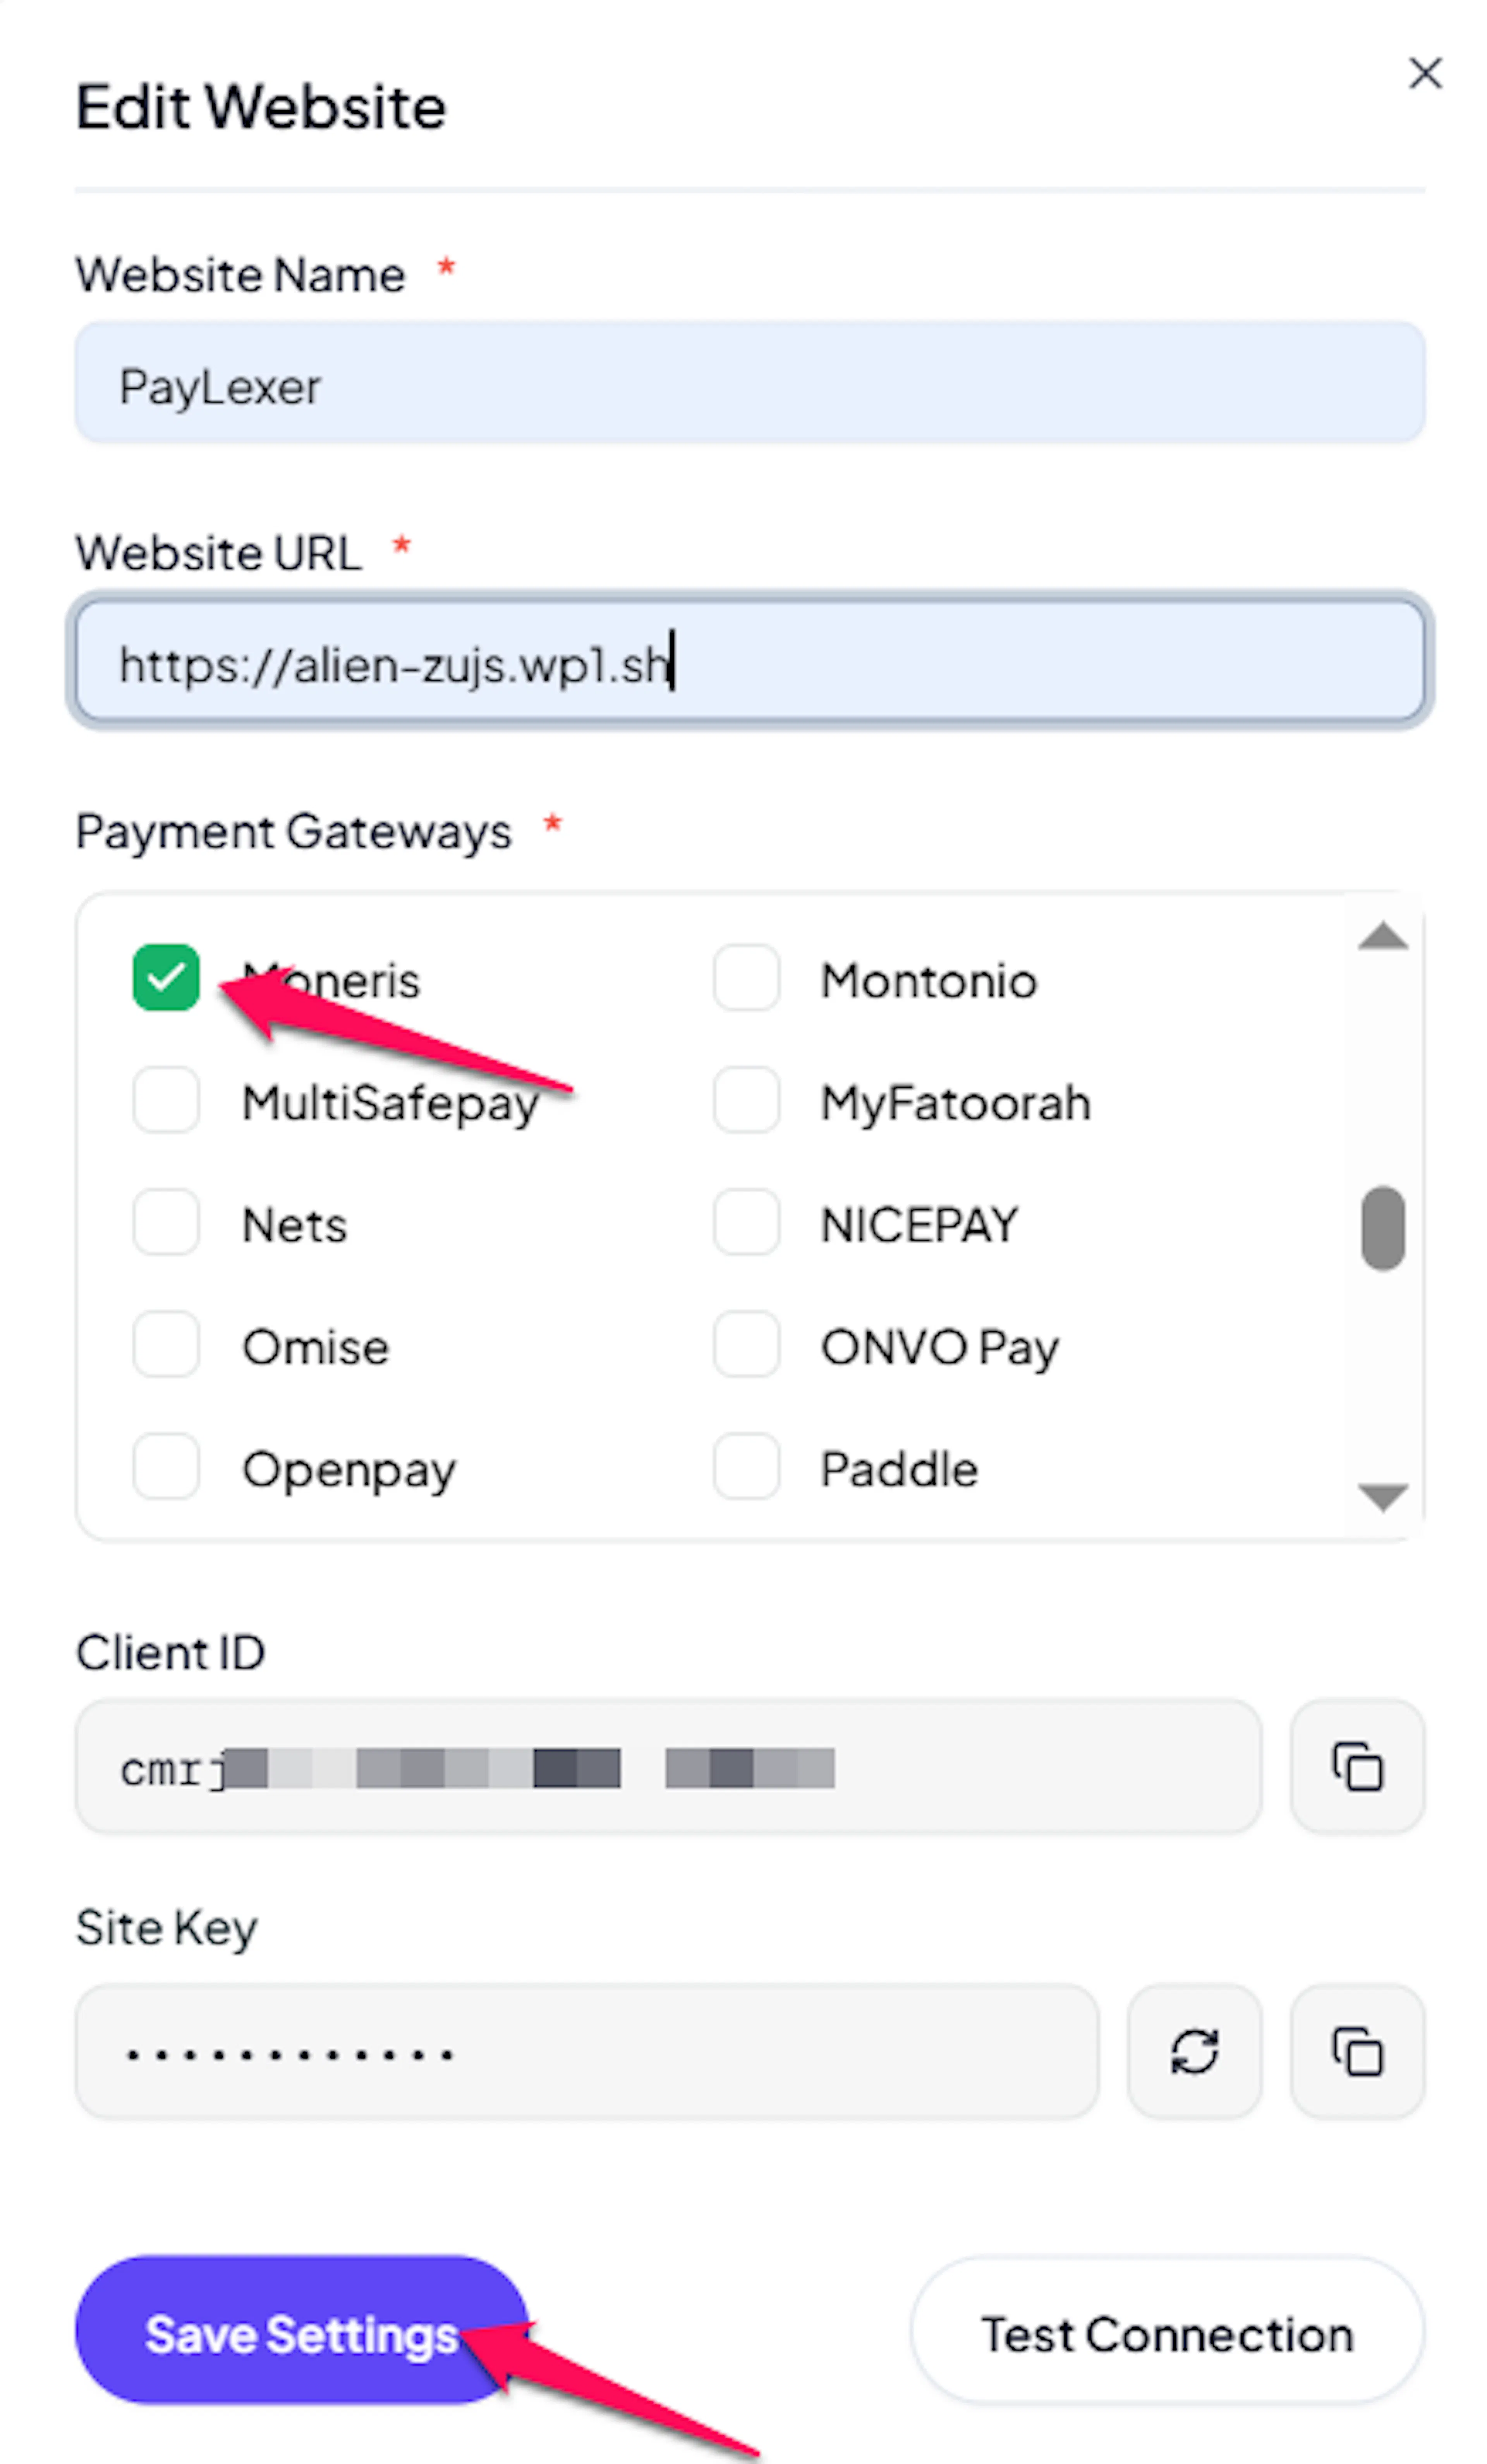
Enable Moneris
Click the checkbox to enable Moneris for the website.
If you haven't added a website yet, Continue to Add Your Website →
Troubleshooting
Best Practices
- Test in sandbox before enabling production so you can validate card payments and refunds without moving real money.
- Keep your OAuth Client Secret stored securely and rotate it if you suspect it was exposed.
- Enter both Test and Live credentials so you can switch safely between testing and production.
- Confirm your Moneris merchant account settles in the same currency (CAD or USD) that your website charges.
- Reconcile PayLexer orders against your Moneris portal regularly, since payment status relies on polling rather than webhooks.
FAQs
Still Have Questions?
- Moneris Support: Moneris Help Center
- PayLexer Support: Contact Support