

FastSpring
Connect FastSpring to PayLexer to sell digital products globally through a popup checkout with built-in tax compliance, subscription billing, and HMAC-signed webhooks.
FastSpring is a global Merchant of Record (MoR) platform for digital products and SaaS businesses. It handles payment collection, sales tax and VAT, PCI compliance, and payouts. With PayLexer, customers pay through FastSpring's secure popup checkout using cards, PayPal, or local payment methods. After payment, the popup closes and your confirmation page appears with no redirect or page reload.
- Supported Regions (Merchant Accounts): Global - view details
- Supported Currencies: USD, EUR, GBP, AUD, CAD, NZD, SGD, HKD - view full list
Supported Features
- Popup checkout - shopper pays inside a FastSpring window without leaving your site or being redirected
- FastSpring acts as Merchant of Record: handles sales tax, VAT, PCI compliance, and local payment methods globally
- Recurring subscriptions billed automatically by FastSpring on each due date
- Free trial periods on subscriptions
- Full and partial refunds processed from PayLexer
- HMAC-signed webhooks for real-time payment, subscription, and refund updates
Before You Start
Make sure you have:
- FastSpring Account - Don't have one? Sign up for FastSpring →
- PayLexer Account - Required to configure the integration. Create your account →
- A website where you want to integrate
Live mode requires FastSpring account activation. A new FastSpring store works immediately in test mode, but accepting real payments requires FastSpring to review your tax forms and website. That activation is your responsibility directly with FastSpring - PayLexer cannot expedite it.
Looking for a different payment processor? View all supported gateways →
Configuring FastSpring
You need a Store ID, API Username, API Password, Popup Checkout Path, and Webhook HMAC Secret from FastSpring for this integration. You also need a popup checkout in your FastSpring store - you can use an existing one or create a new one.
Getting API Credentials
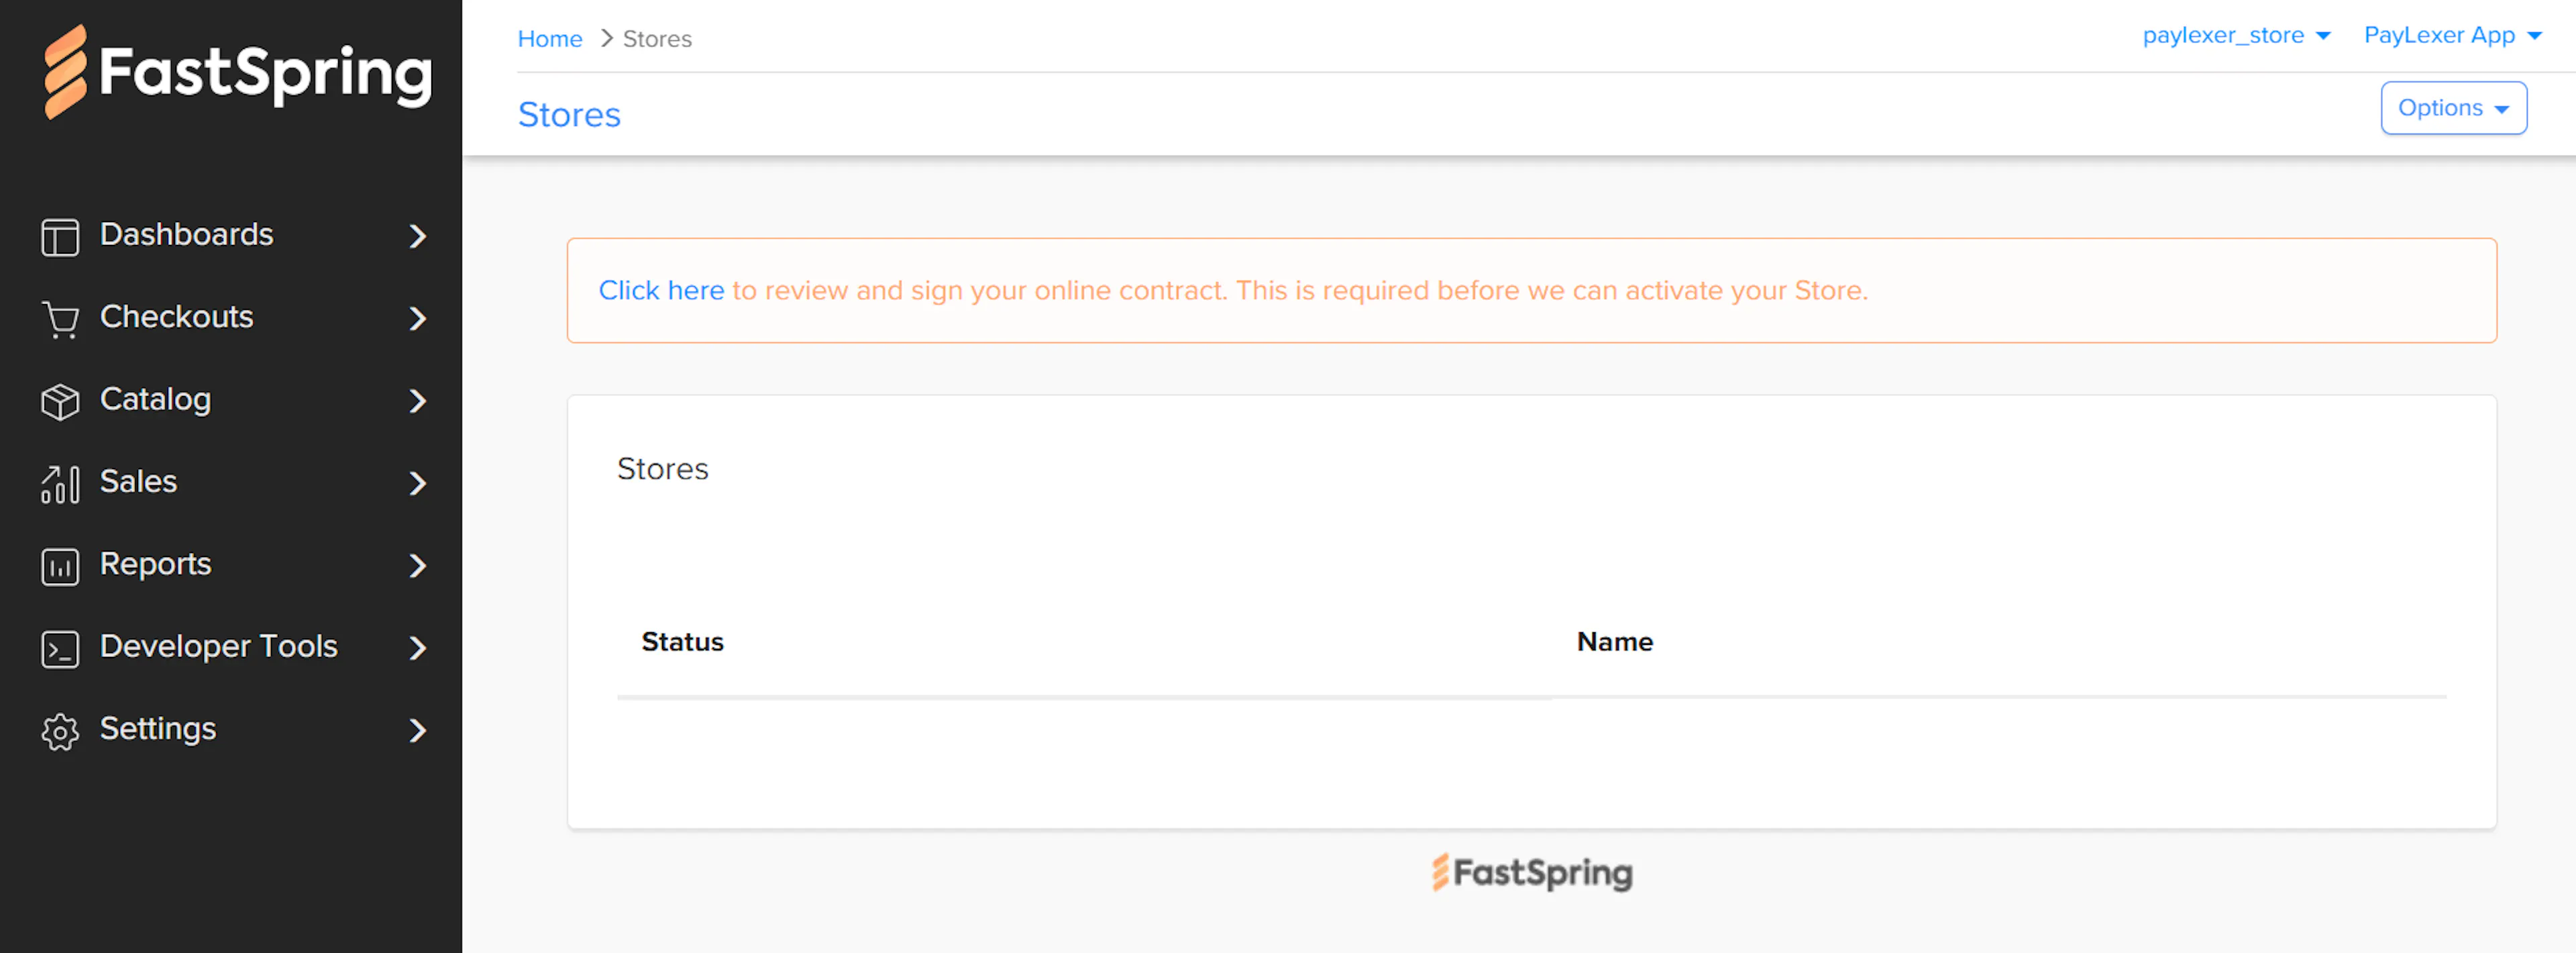
Open the FastSpring Dashboard
Log in to your FastSpring Dashboard.
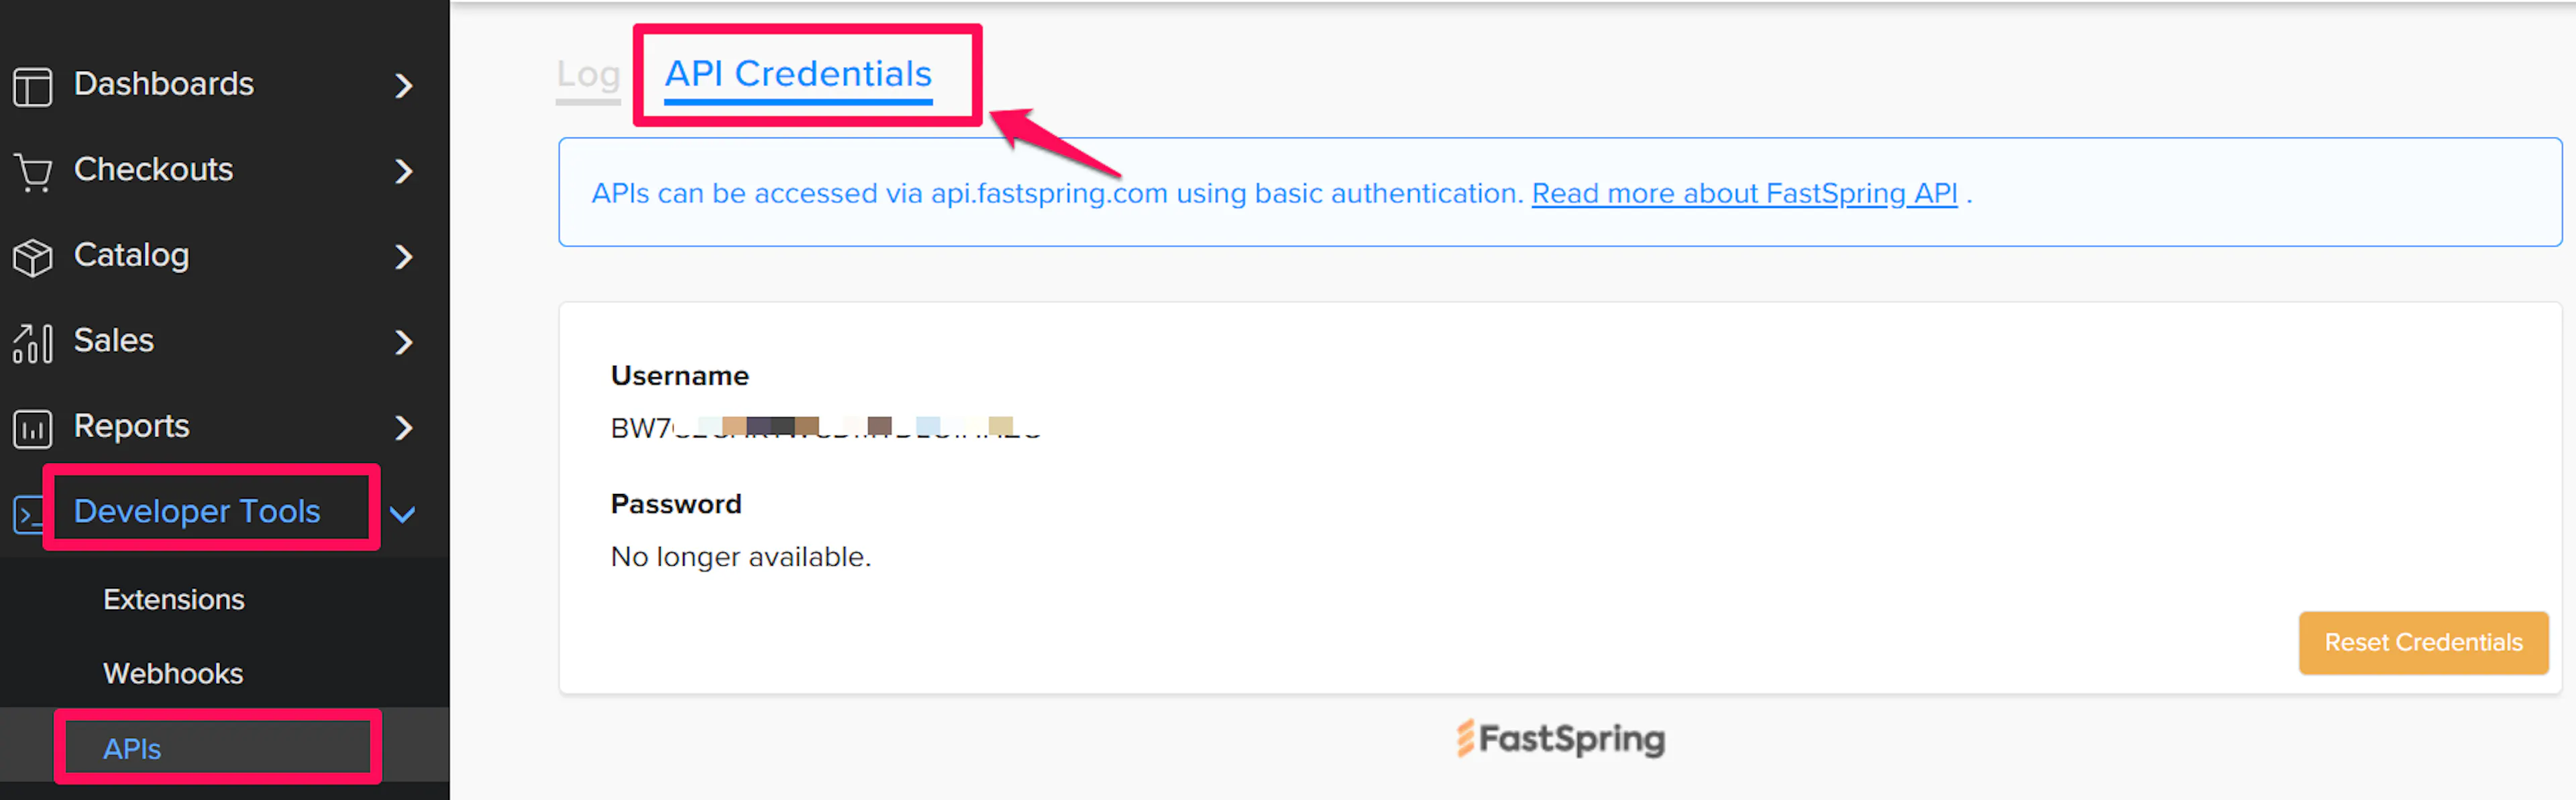
Go to API Credentials
Navigate to Developer Tools → APIs and open the API Credentials tab.
Copy your API Username and API Password
On the API Credentials page, copy your API Username and API Password.
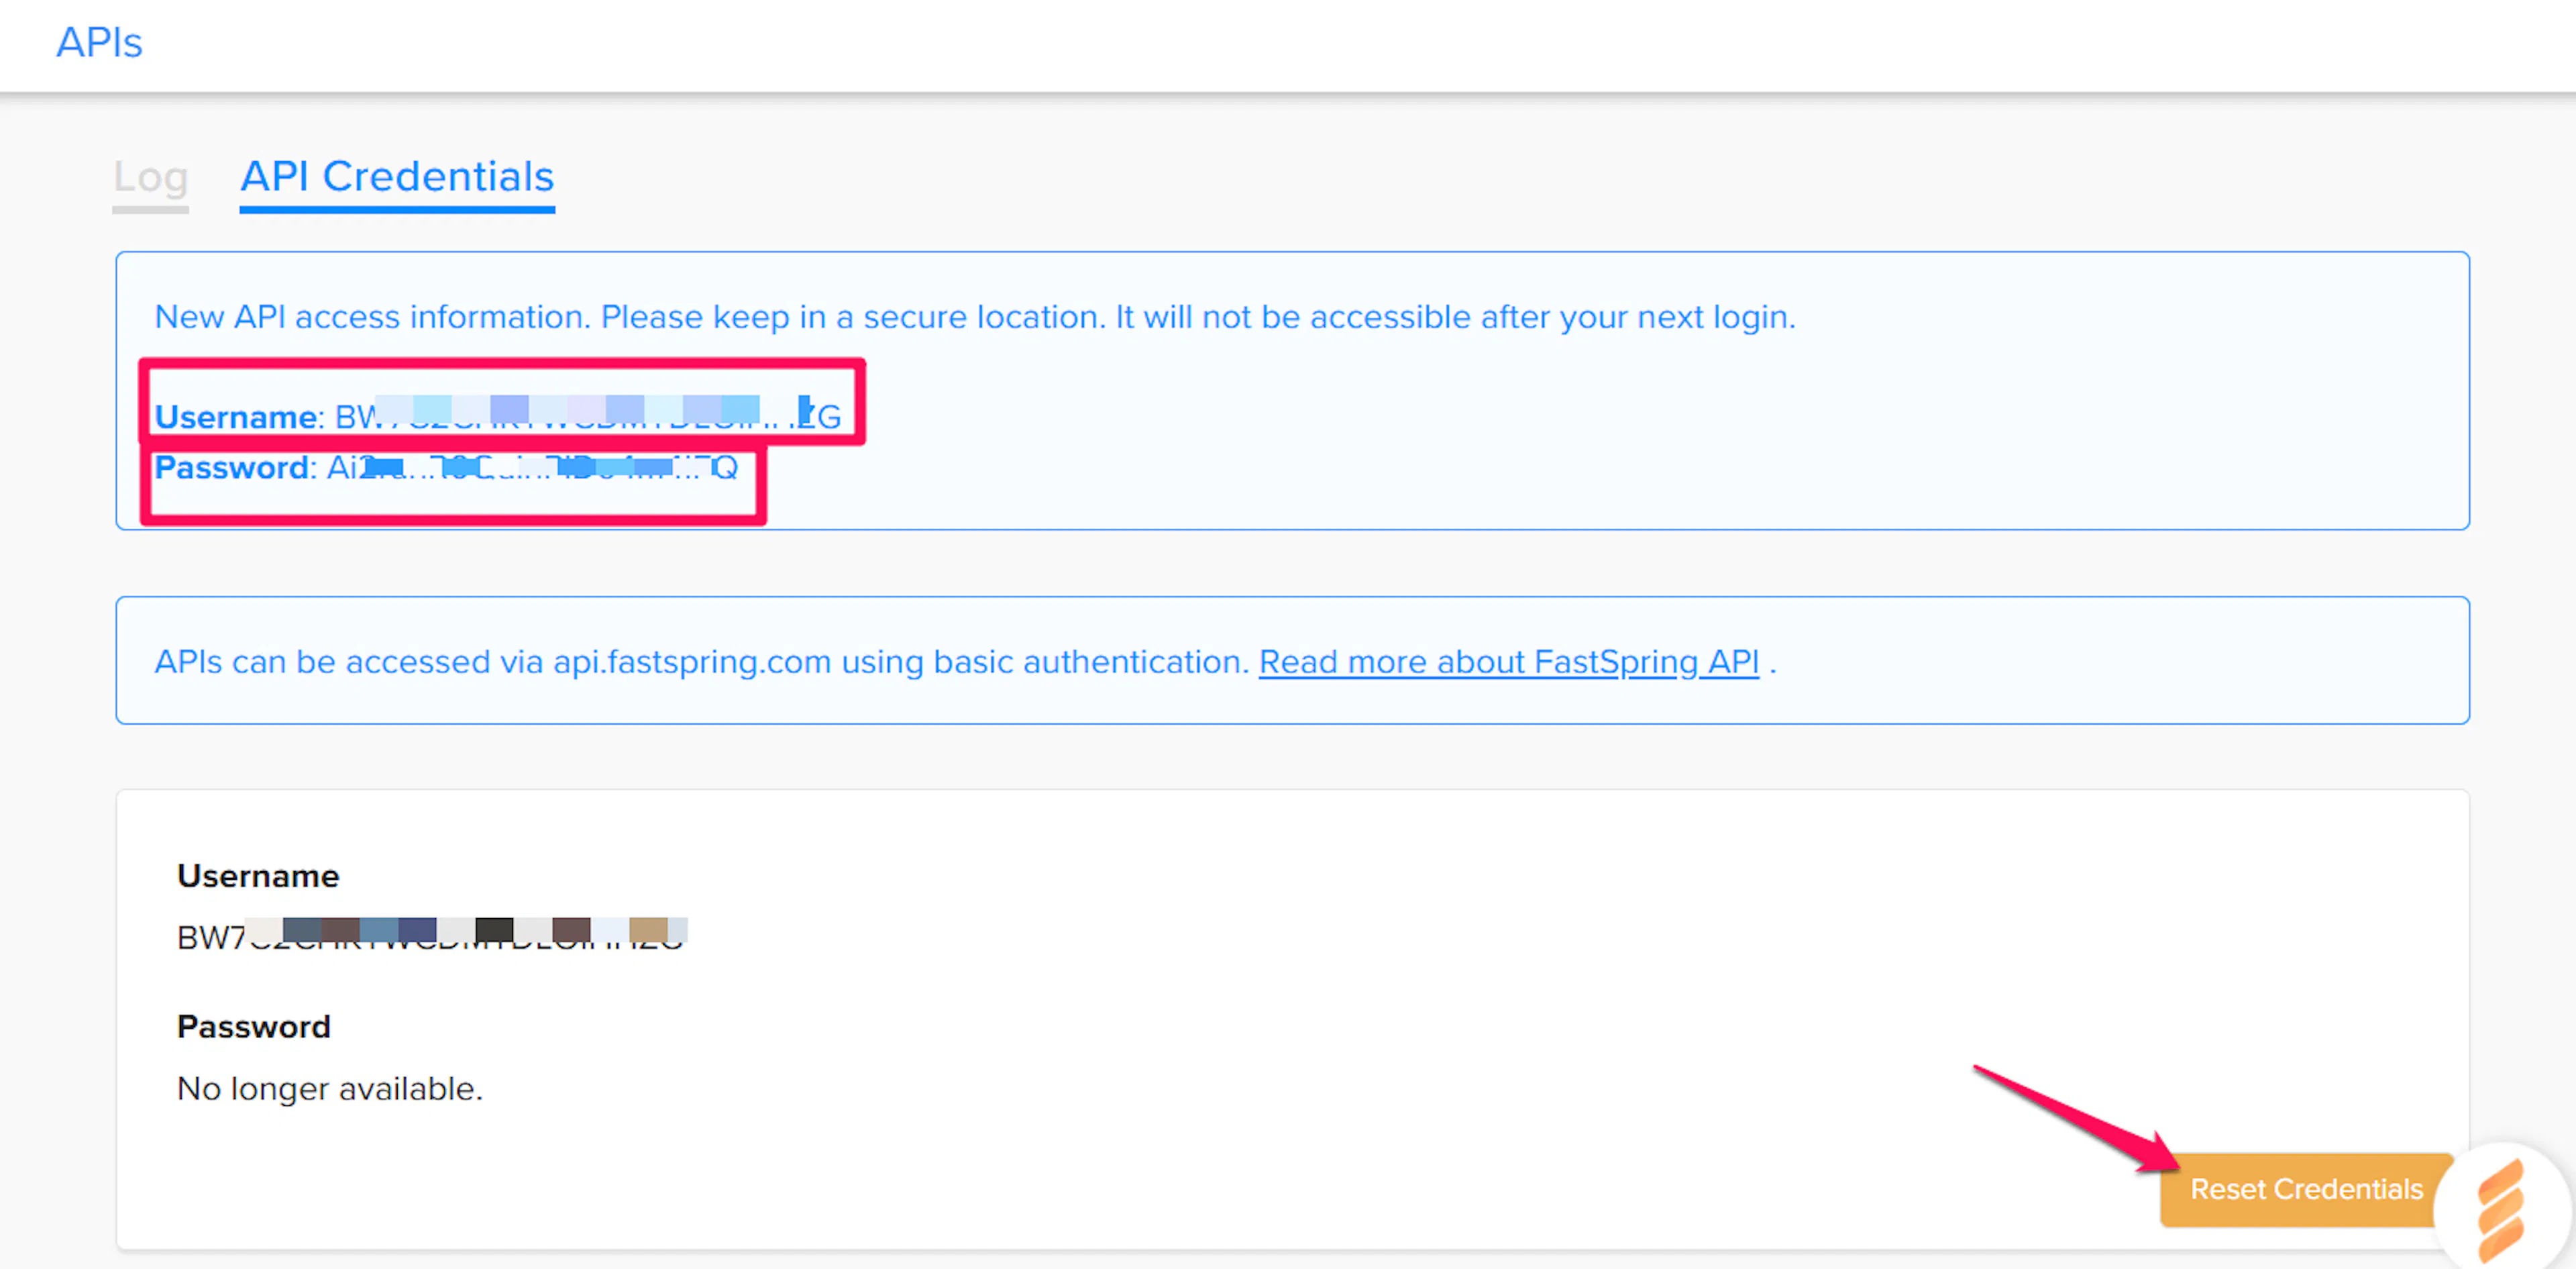
Copy your API Password and store it securely. It is shown only once when generated - if you lose it, you must generate a new one.
FastSpring uses one set of API credentials per store. Enter the same Store ID, API Username, and API Password in both the Live and Test credential fields in PayLexer.
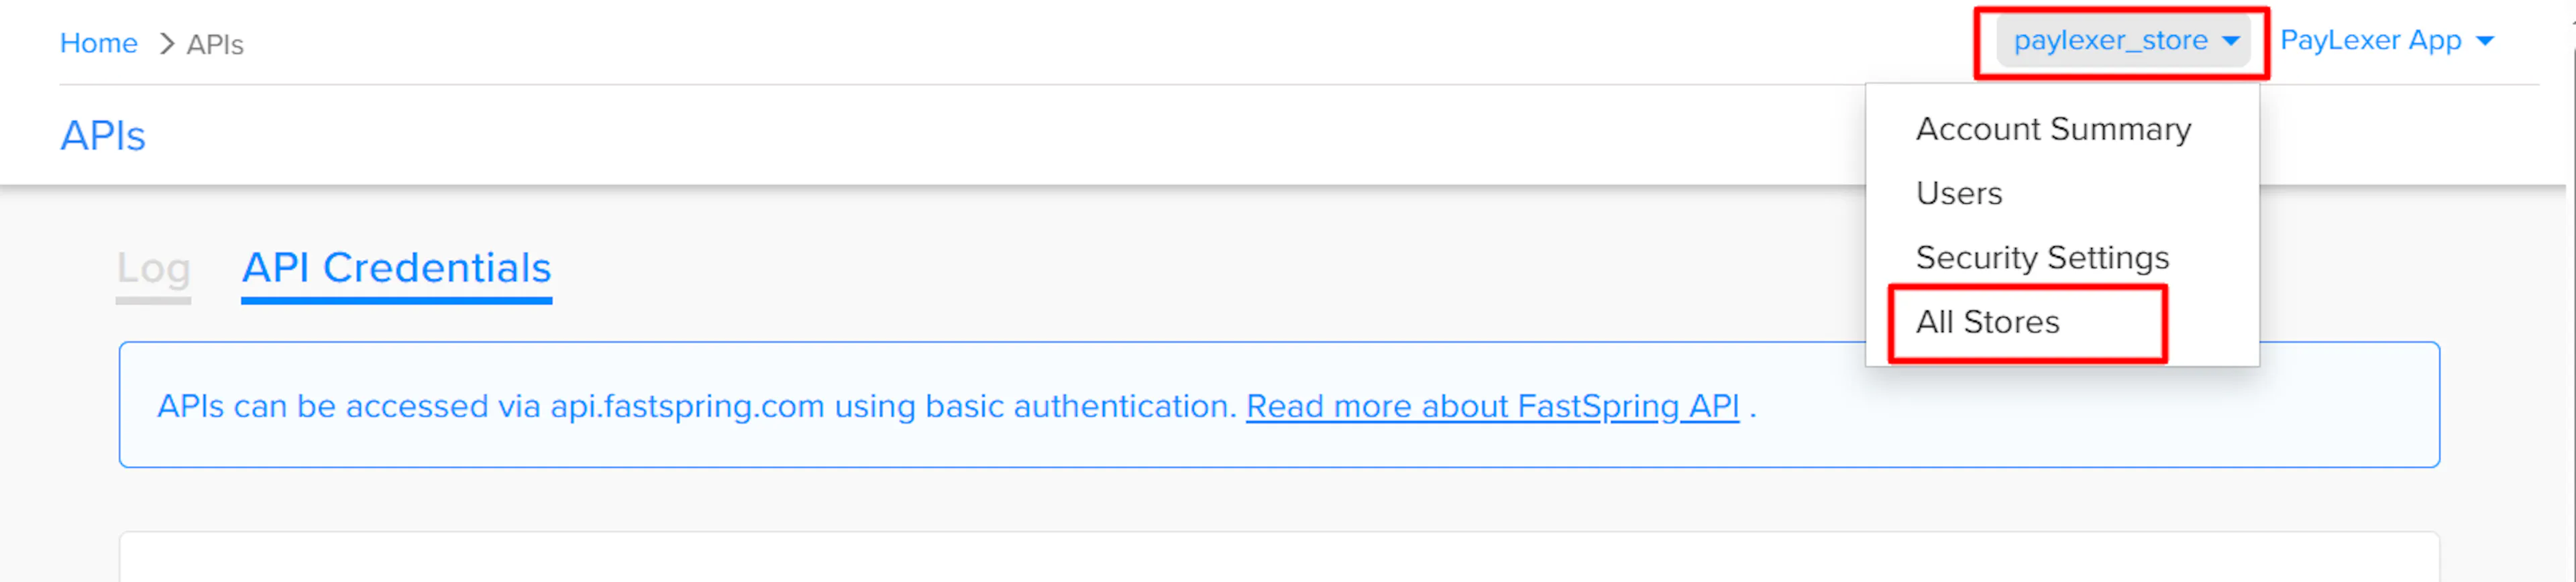
Find your Store ID
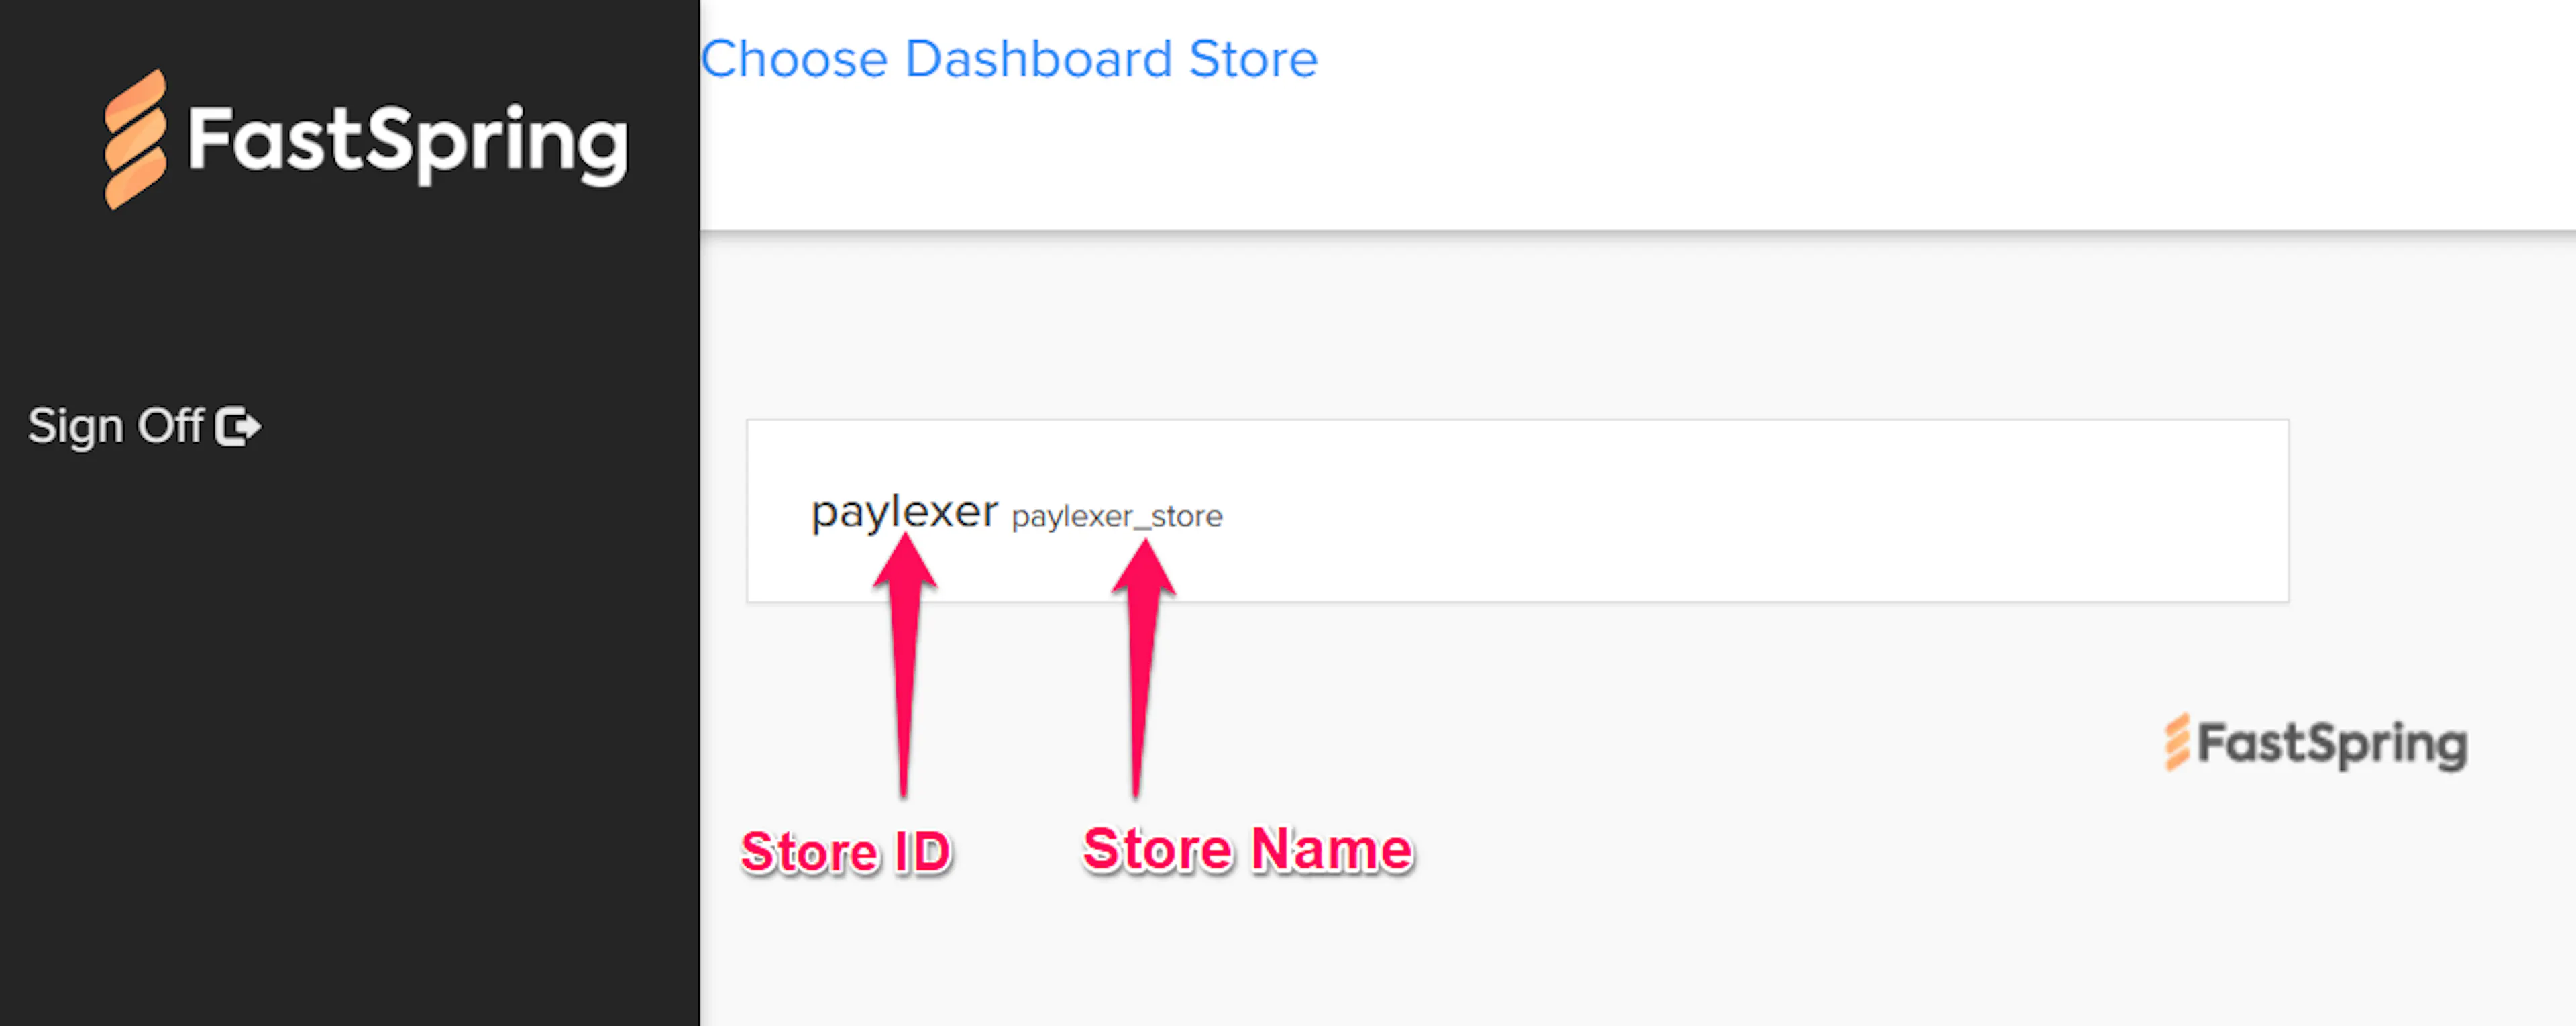
Open the store switcher in the top navigation and select All Stores. On the store chooser page, your store is listed with its Store ID on the left (e.g. paylexer) and the store name on the right. Copy the Store ID - this is the value to enter in PayLexer.
Selecting a Popup Checkout
PayLexer opens FastSpring's payment popup using a popup checkout from your FastSpring store. You can use an existing one or create a new one.
Go to Popup Checkouts
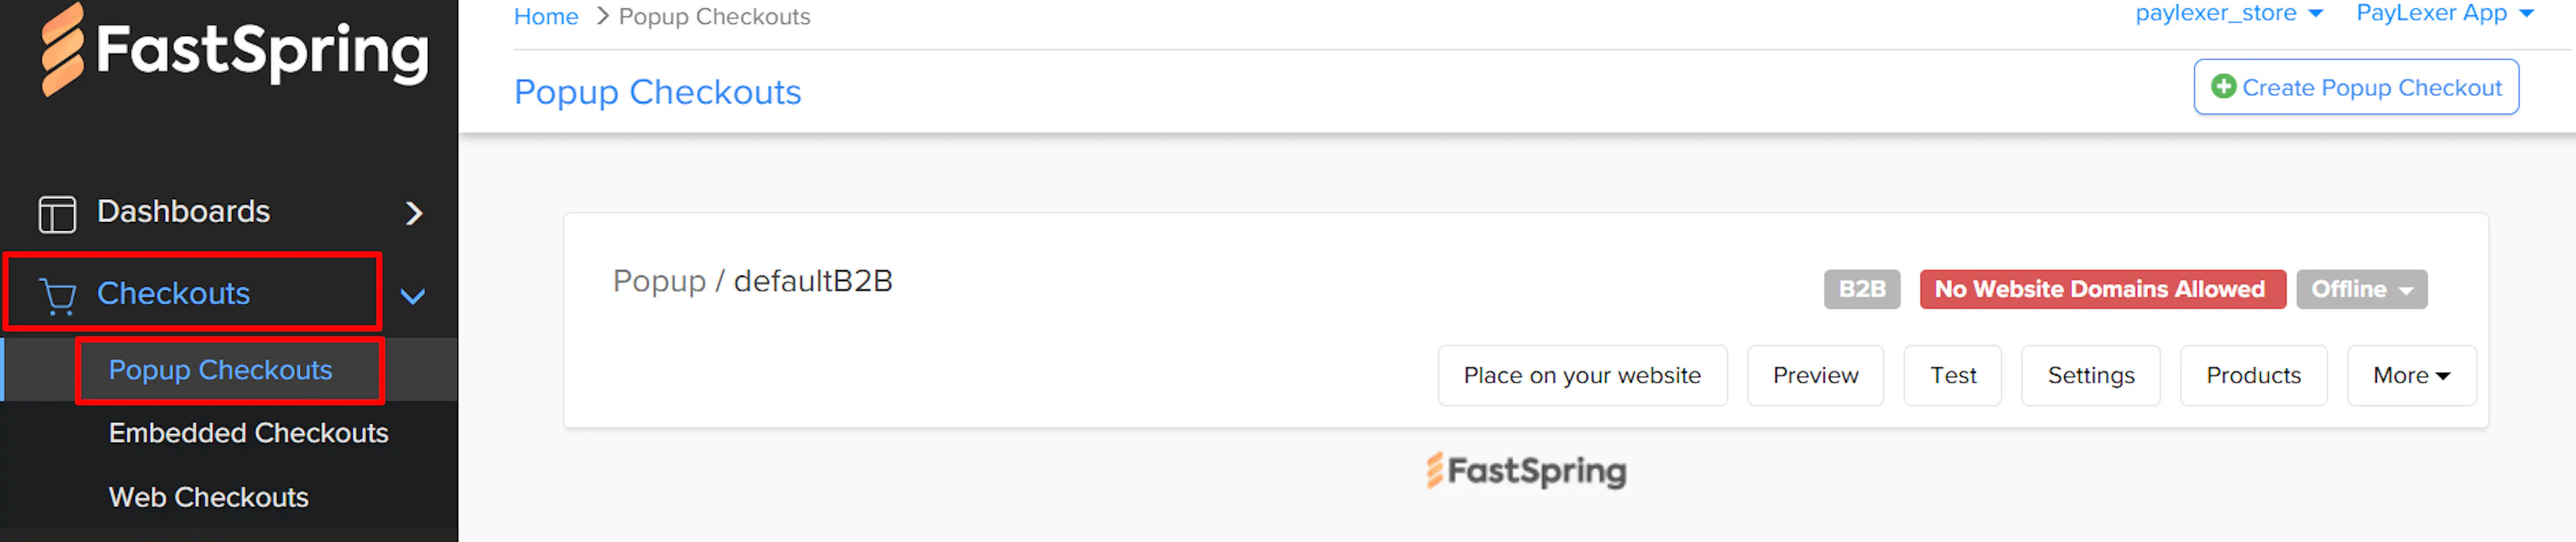
In your FastSpring Dashboard, navigate to Checkouts → Popup Checkouts.
Use an existing checkout or create a new one
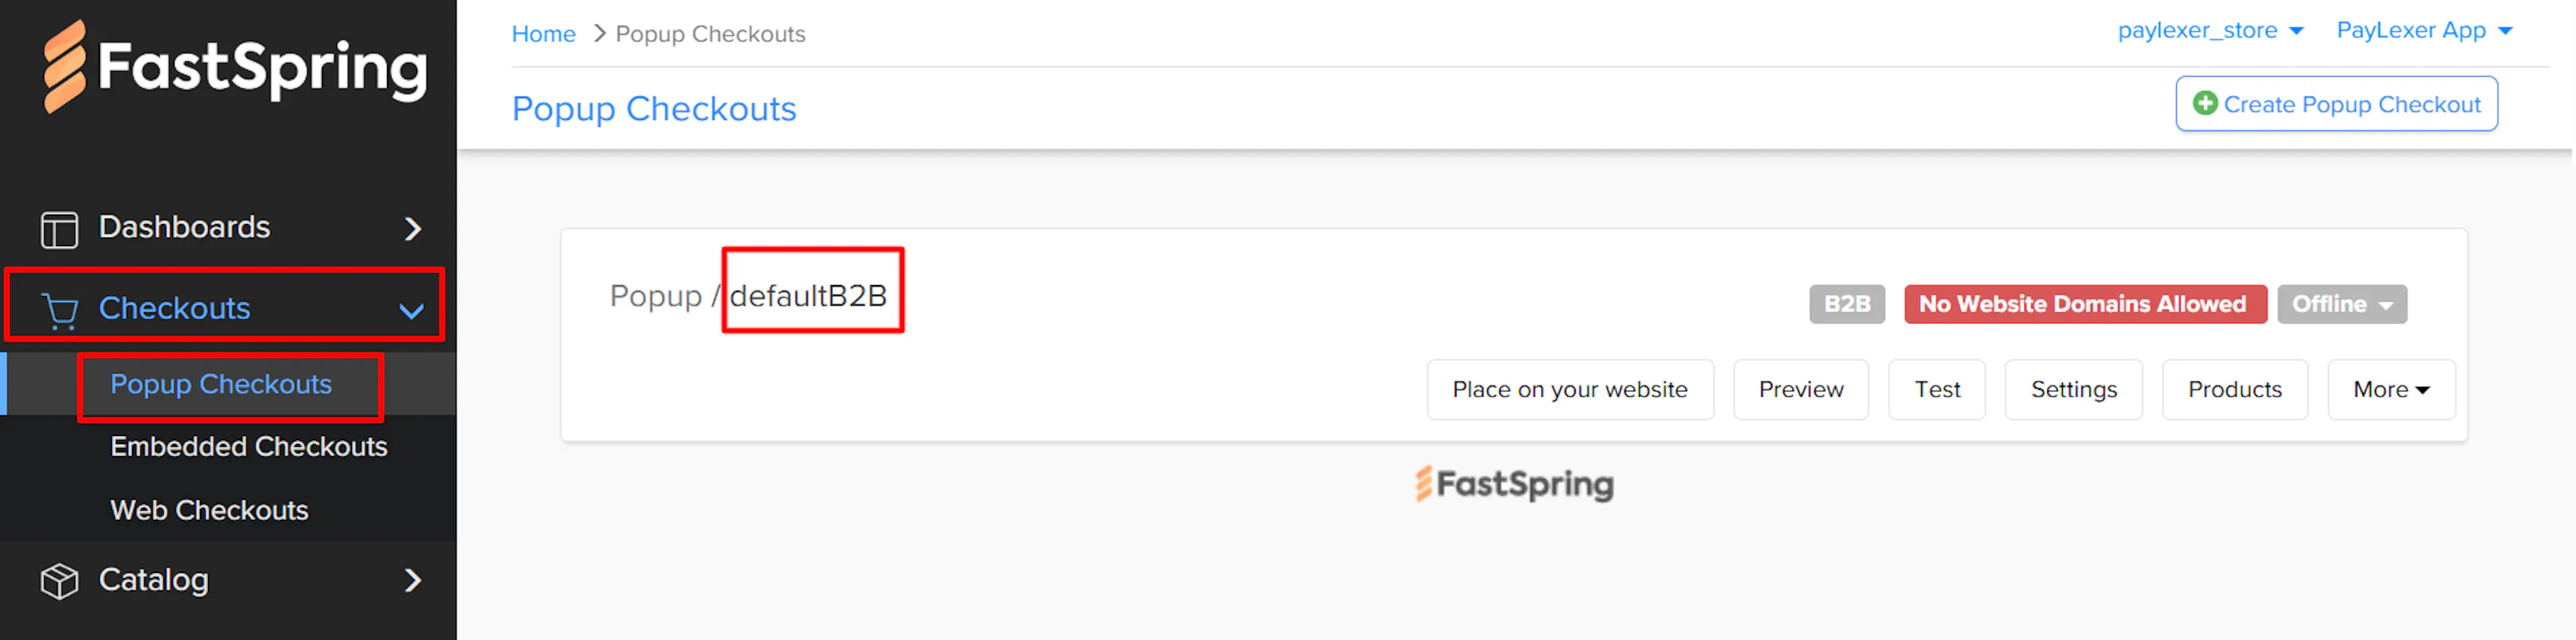
If you already have a popup checkout listed, you can use it. Note its name - for example, if the checkout is listed as Popup / defaultB2B, you will enter defaultB2B in PayLexer (PayLexer automatically adds the popup- prefix).
If you need a new popup checkout, click Create Popup Checkout and give it any name you like.
Adding Credentials to PayLexer
Open PayLexer Dashboard
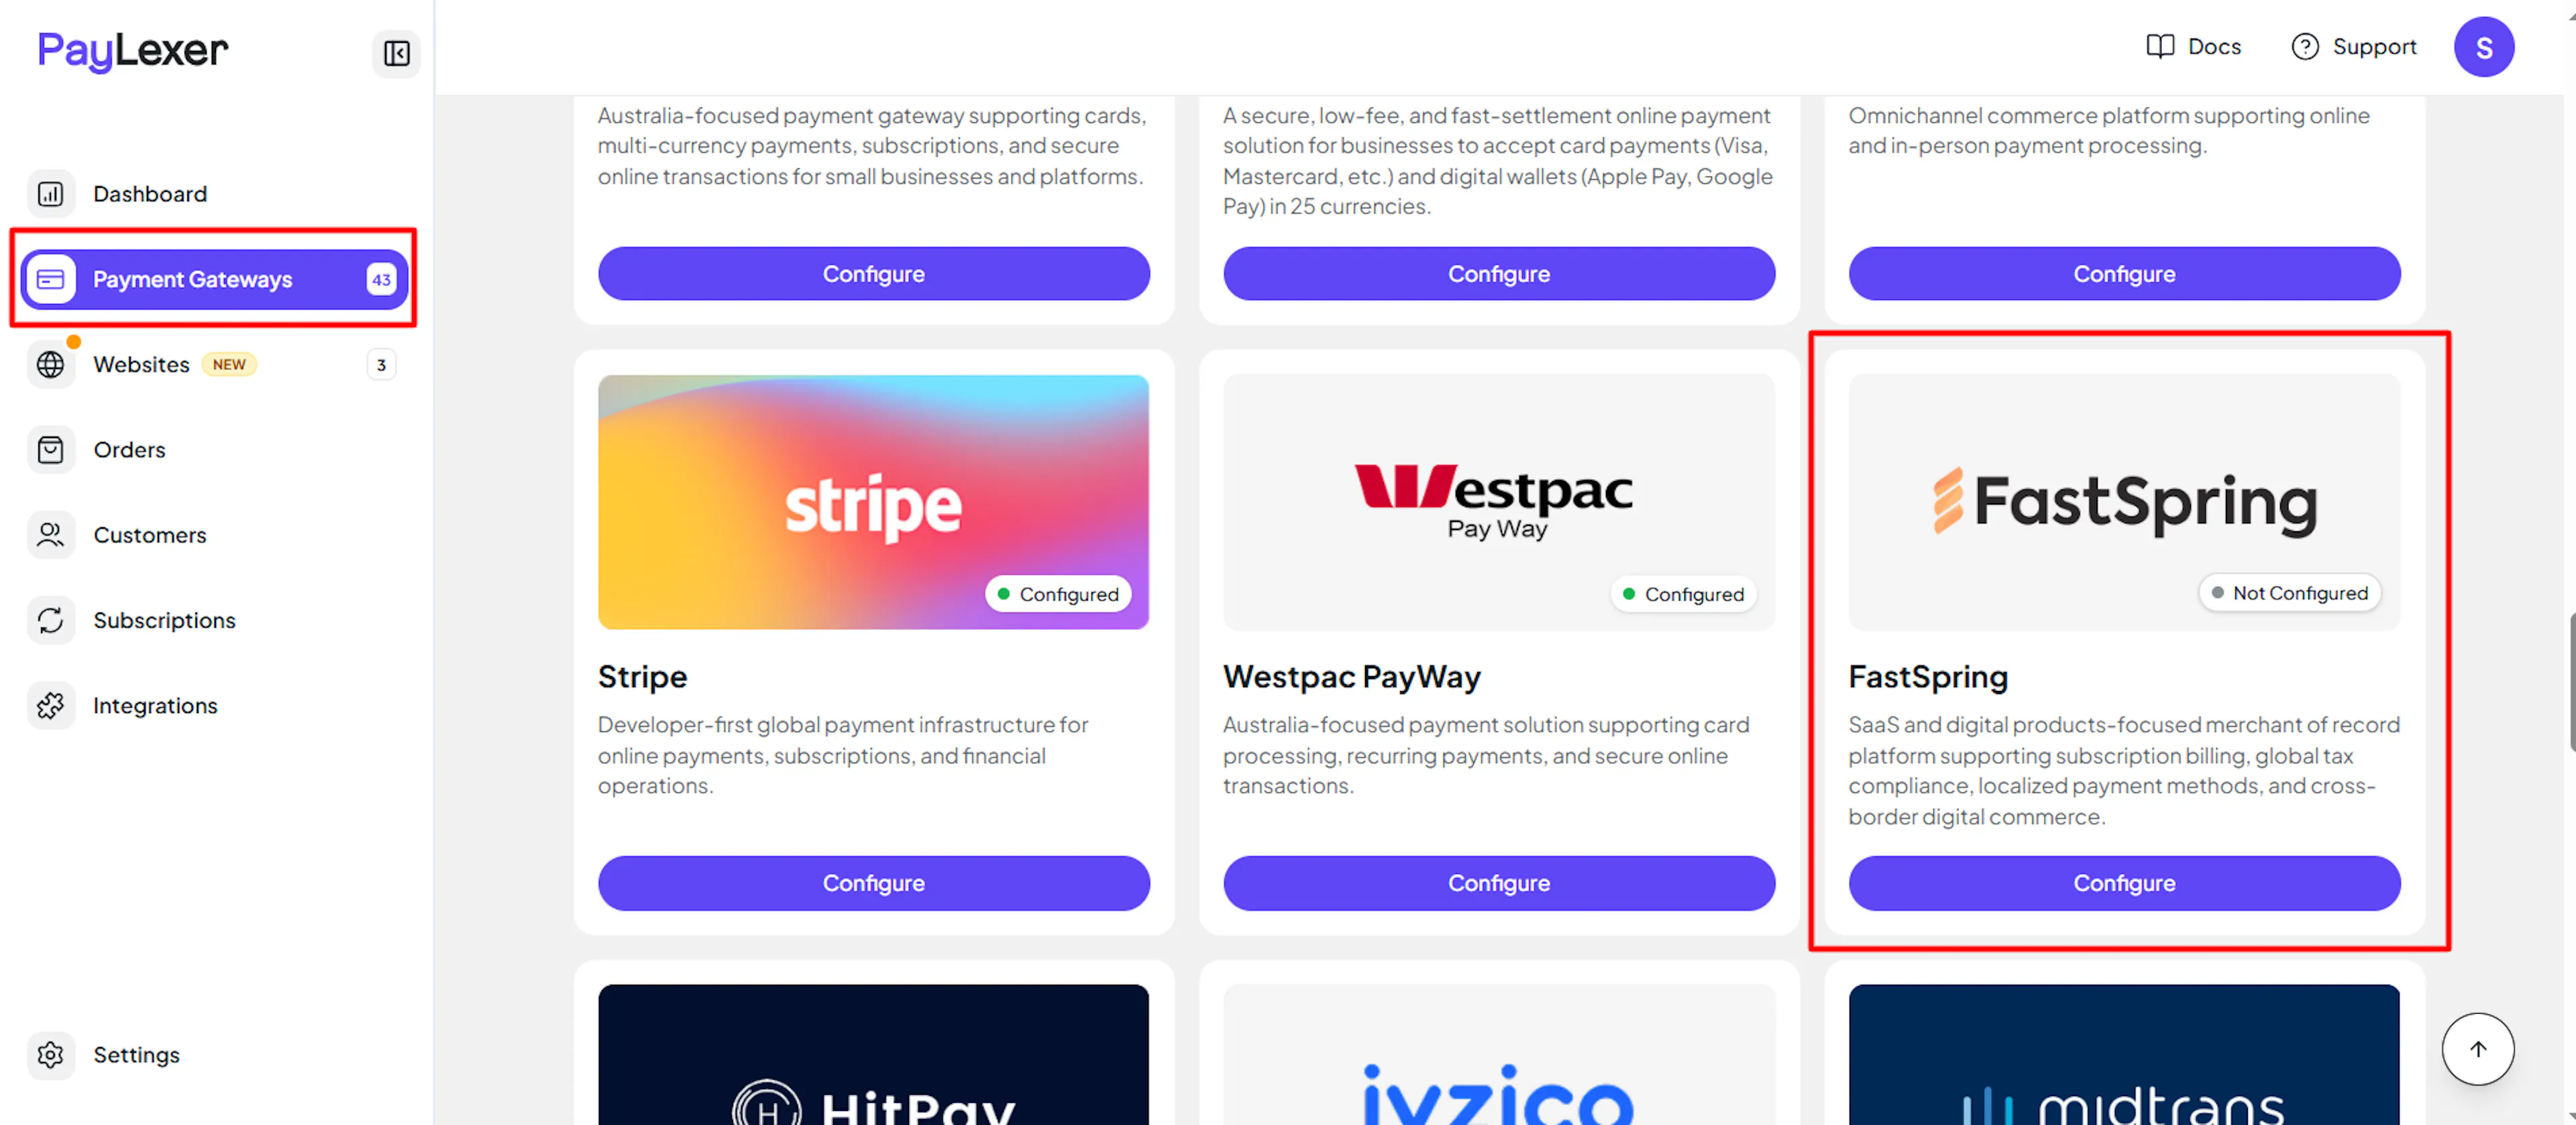
Log in to your PayLexer dashboard and navigate to Payment Gateways → FastSpring.
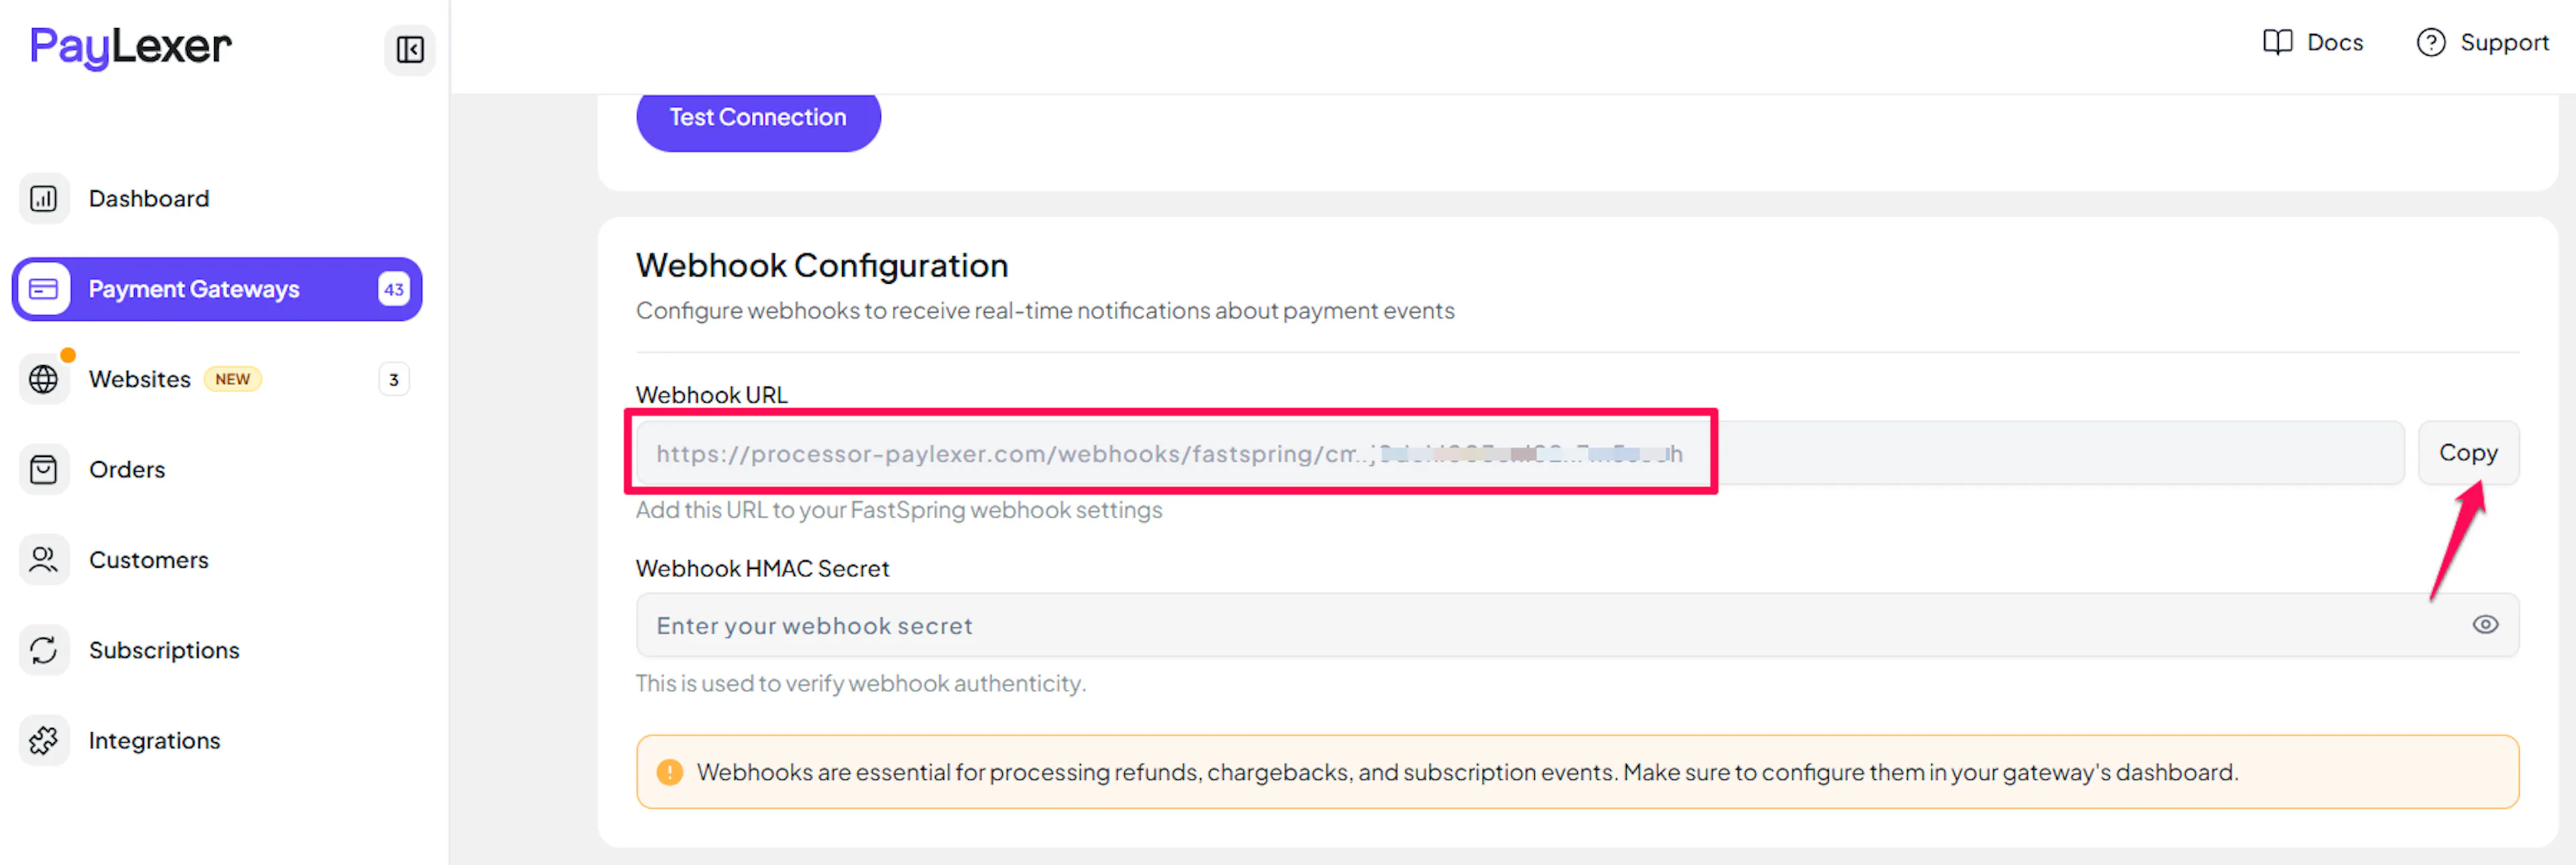
Copy the Webhook URL
Copy the Webhook URL shown on the FastSpring configuration page. You will need it when registering your webhook in FastSpring in the next section.
Enter your credentials
Enter your credentials in both the Live and Test fields. Because FastSpring uses one credential set per store, enter the same values in both:
- Store ID - your FastSpring store subdomain
- API Username - from FastSpring's API Credentials page
- API Password - from FastSpring's API Credentials page
- Popup Checkout Path - the name of your popup checkout, without the
popup-prefix (e.g. if your checkout ispopup-defaultB2B, enterdefaultB2B)
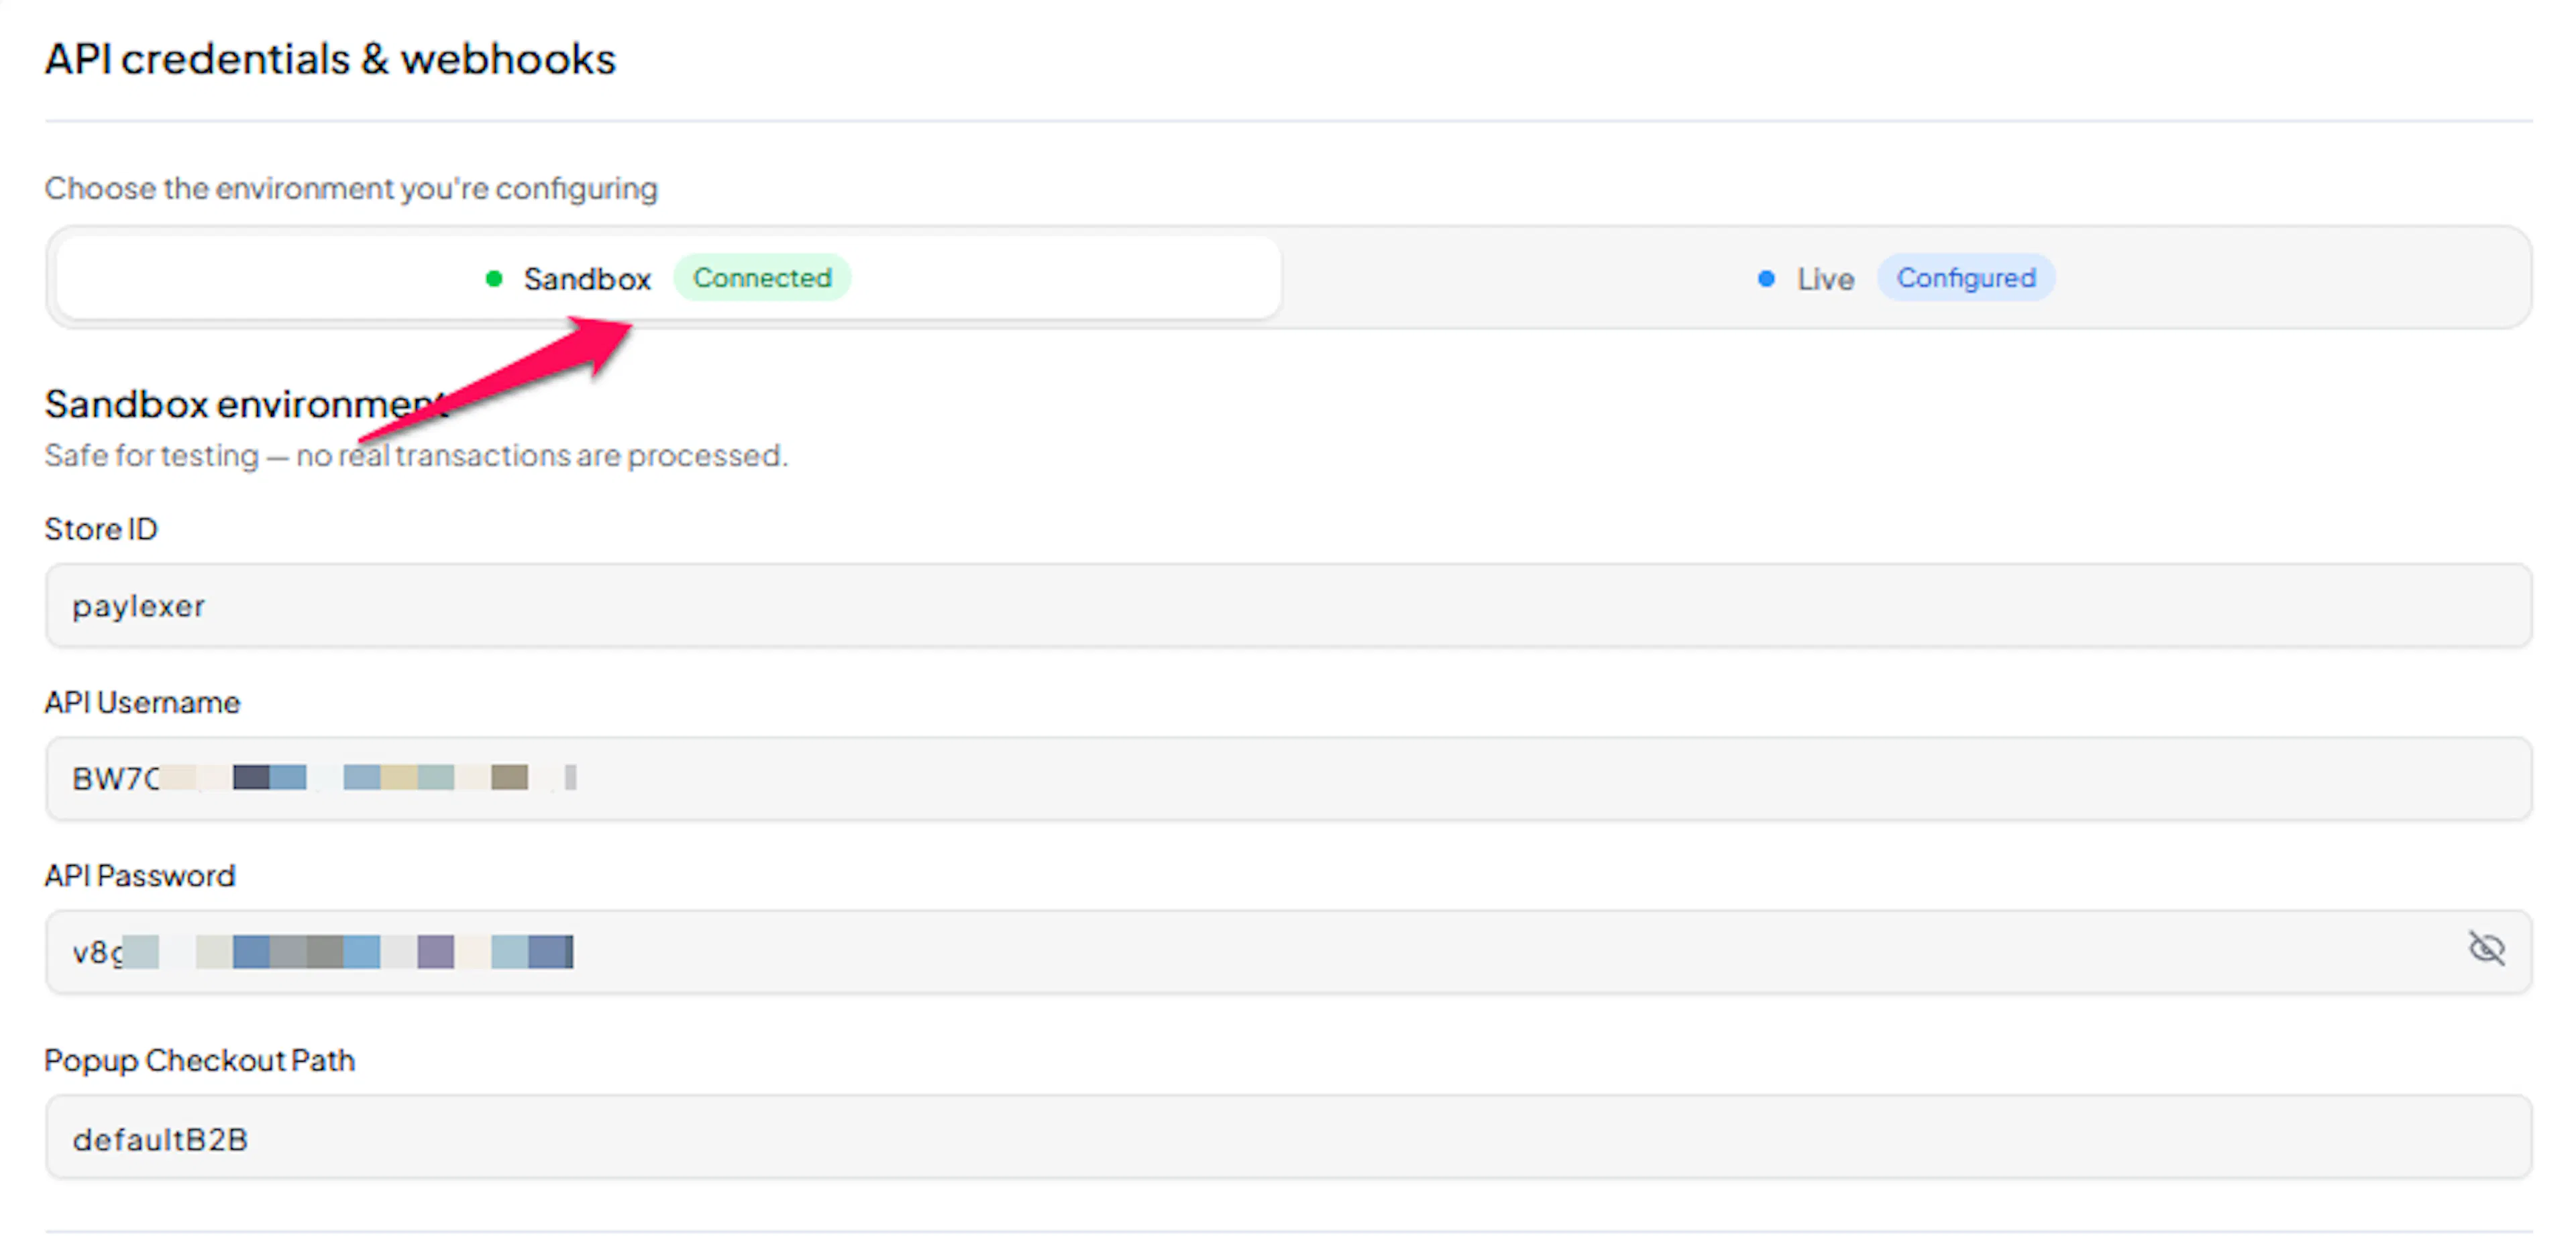
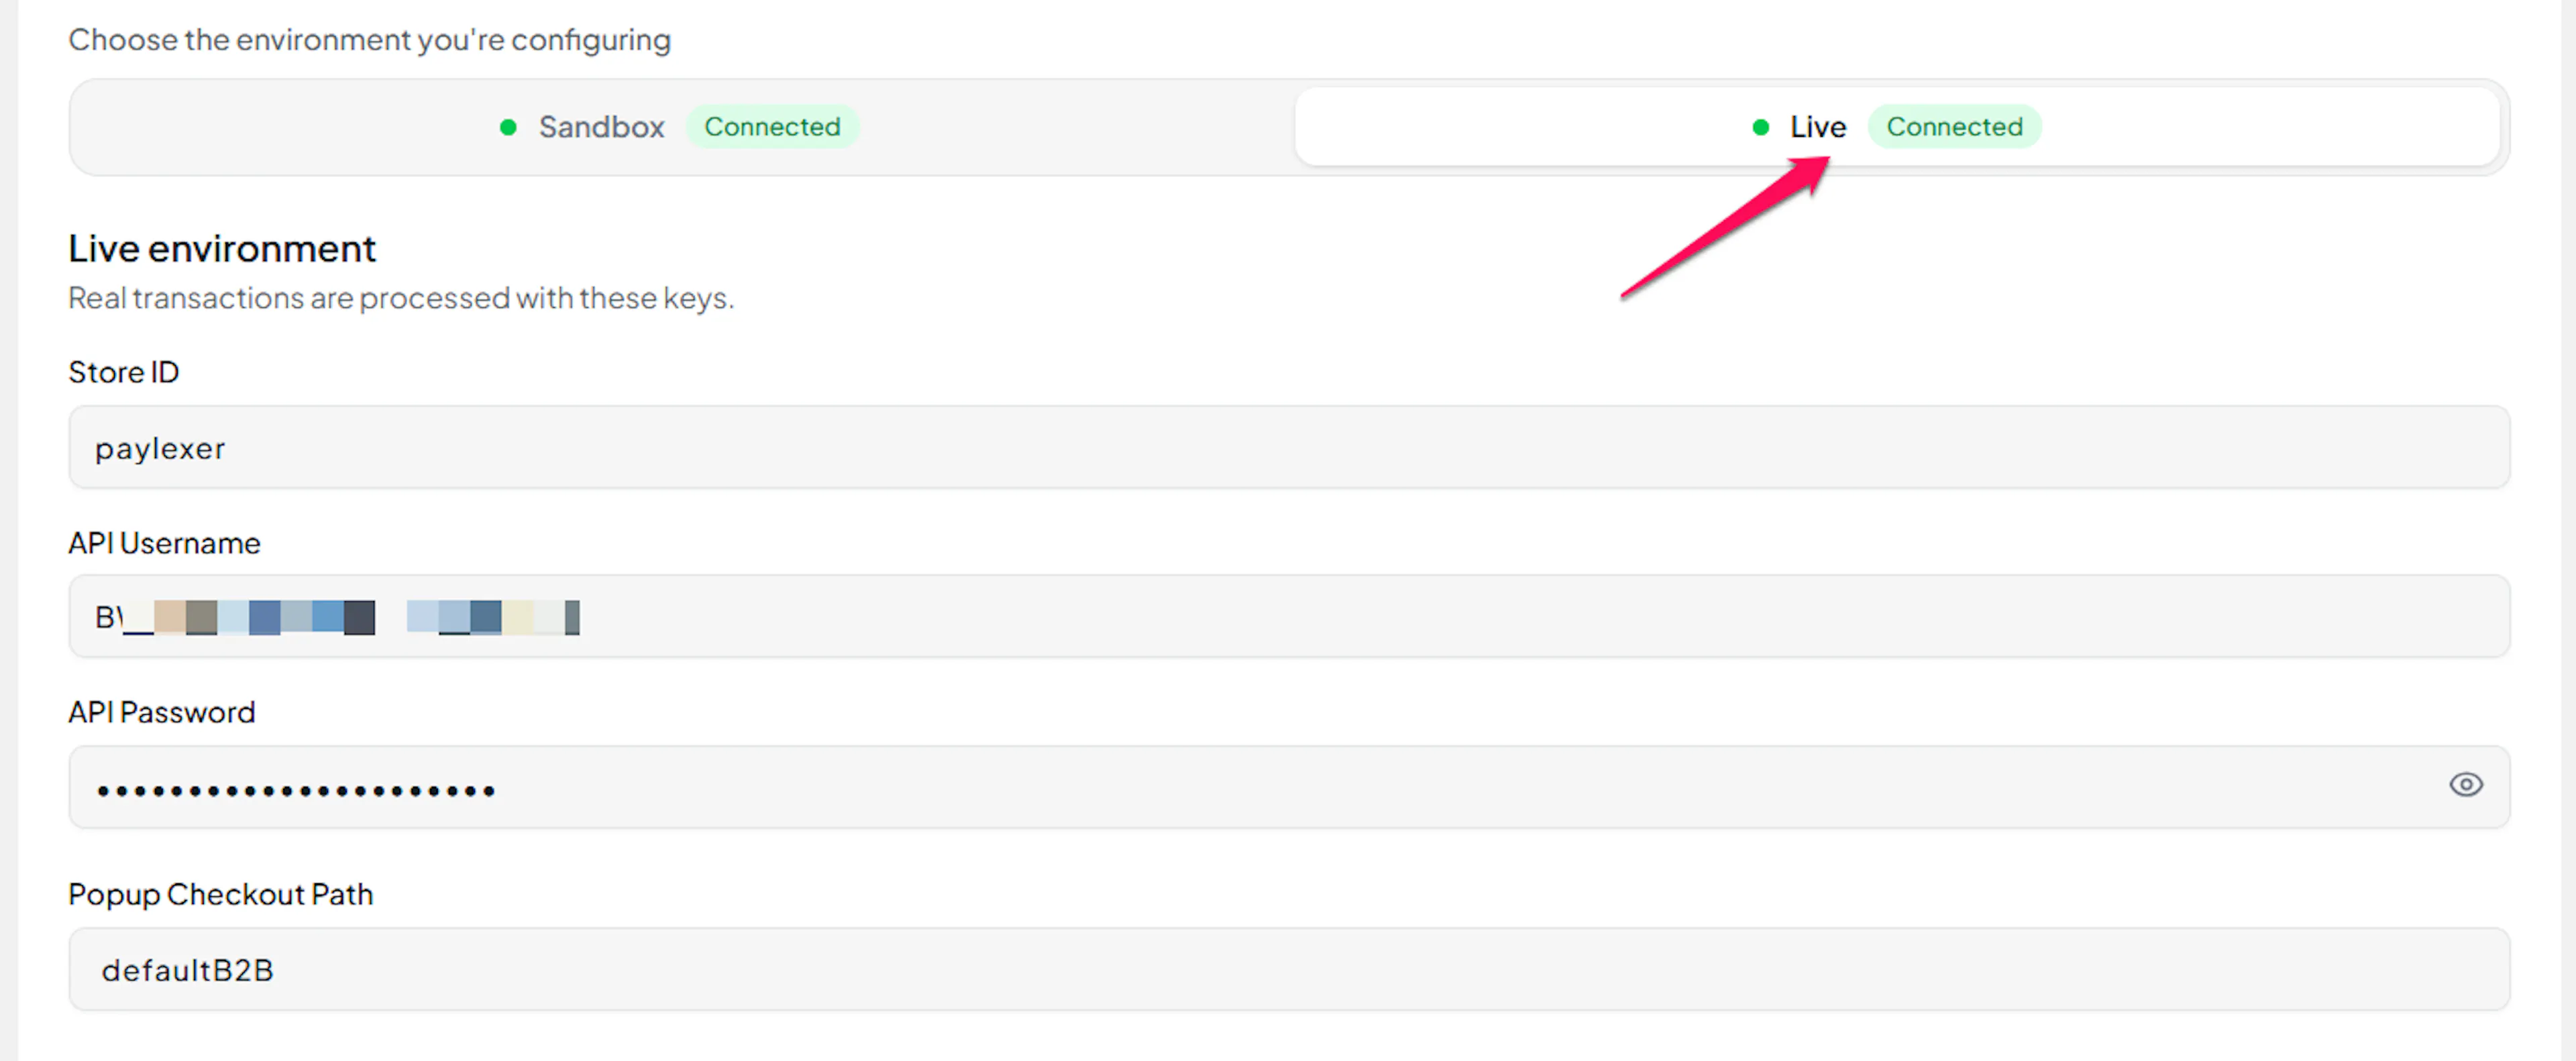
Understanding Live/Production and Sandbox Settings:
| Environment | Purpose |
|---|---|
| Live / Production (Mandatory) | Used for real transactions. Cannot be empty, even when testing. |
| Test / Sandbox (Optional) | Used for testing only. No real money is processed. |
How PayLexer selects credentials:
- Debug/Test mode ON → Test credentials are used
- Debug/Test mode OFF → Live credentials are used
Test and save
Click Test Connection to verify your credentials. PayLexer will validate your API credentials and confirm that the popup checkout at the path you entered exists in your store. If the popup checkout path is incorrect or missing, you will see an actionable error with instructions.
Once the test passes, click Save Configuration.
During the credential test, PayLexer automatically creates a shared catalog product in your FastSpring store. You do not need to create or configure any products yourself - PayLexer manages this on your behalf.
Configuring Webhooks (Mandatory)
Webhooks enable real-time updates for payments, subscriptions, and refunds. Without them, order and subscription statuses may not update automatically.
Benefits of Webhooks:
- Instant payment and subscription status updates
- Automatic subscription lifecycle tracking (activations, renewals, cancellations, pauses)
- Refund confirmation notifications (including refunds initiated by FastSpring for fraud prevention)
FastSpring signs each webhook with an HMAC-SHA256 digest in the X-FS-Signature header. PayLexer verifies this signature using the secret phrase you define before processing any notification.
Open Webhooks in FastSpring
In your FastSpring Dashboard, navigate to Developer Tools → Webhooks and open the Configuration tab.
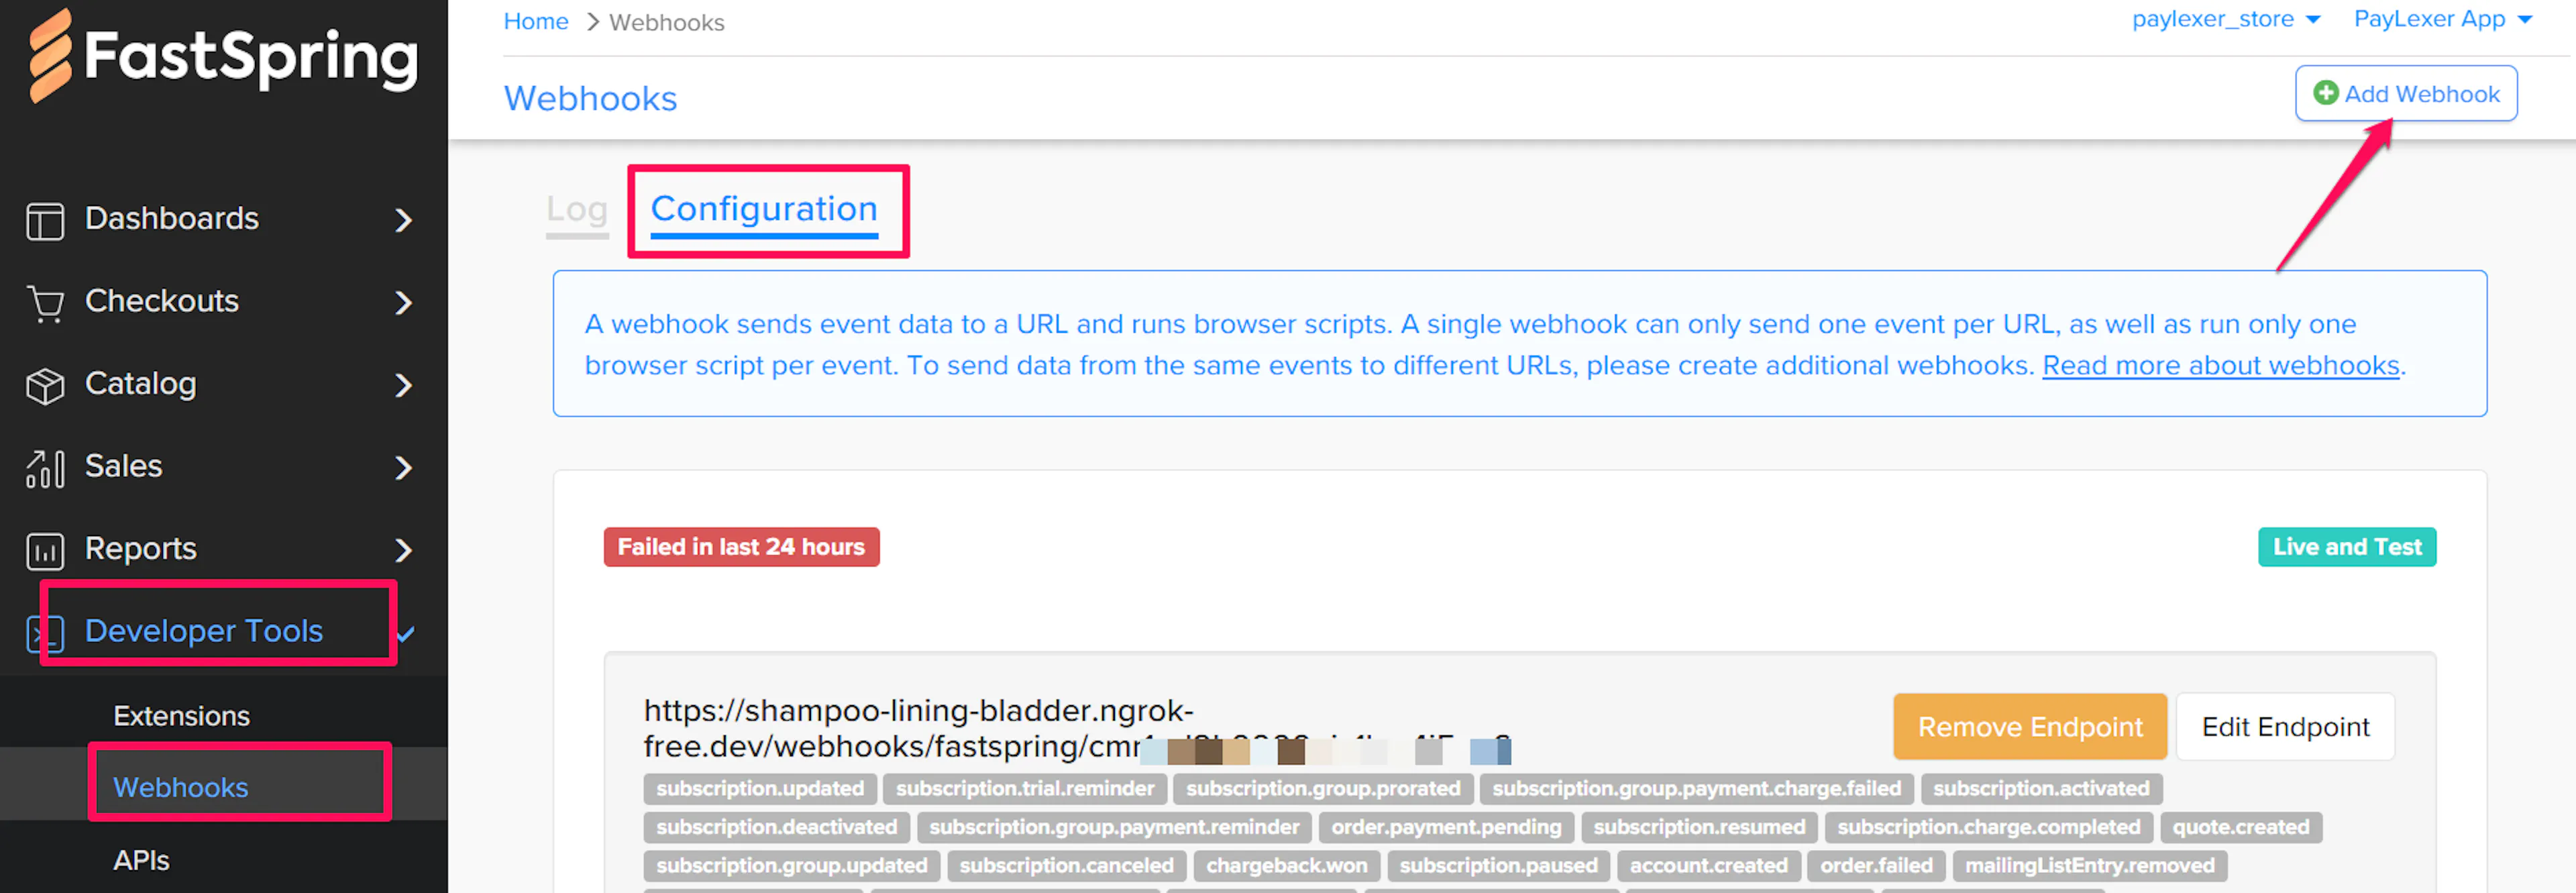
Add a webhook
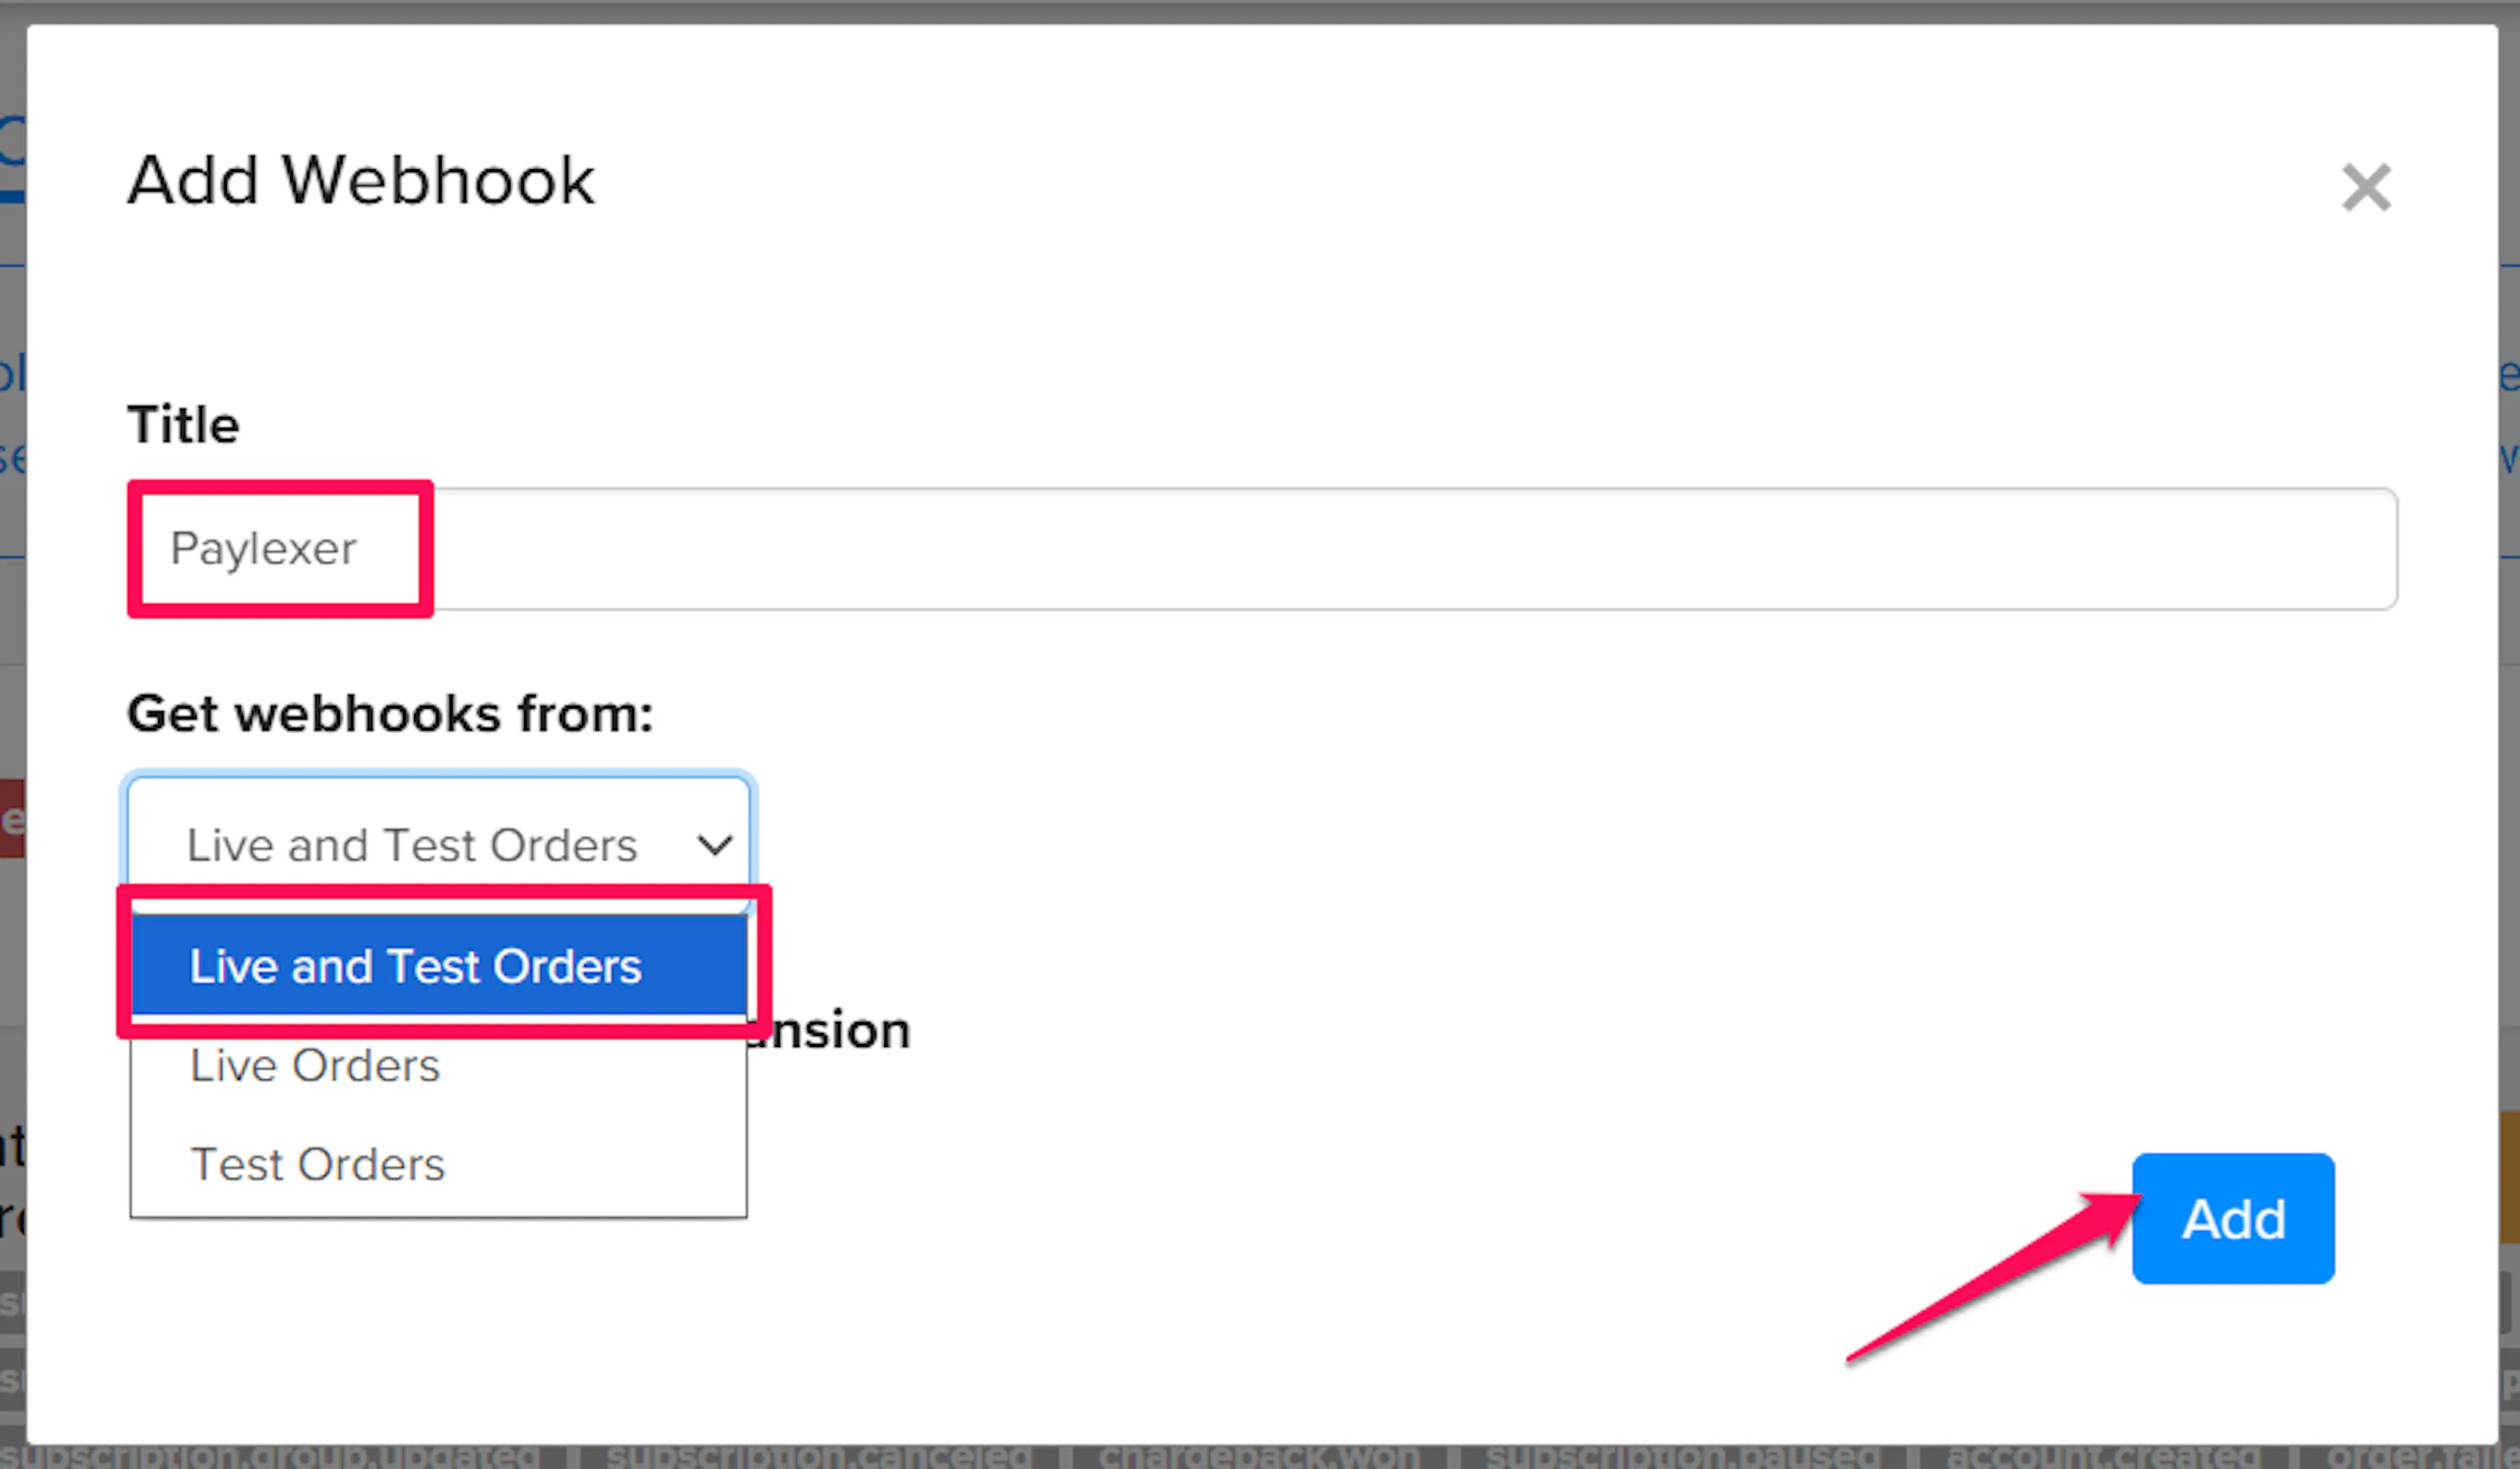
Click Add Webhook. In the dialog, enter a title for the webhook (e.g. "PayLexer"), select Live and Test Orders so the webhook fires for both environments, and click to add it.
Add the webhook URL endpoint
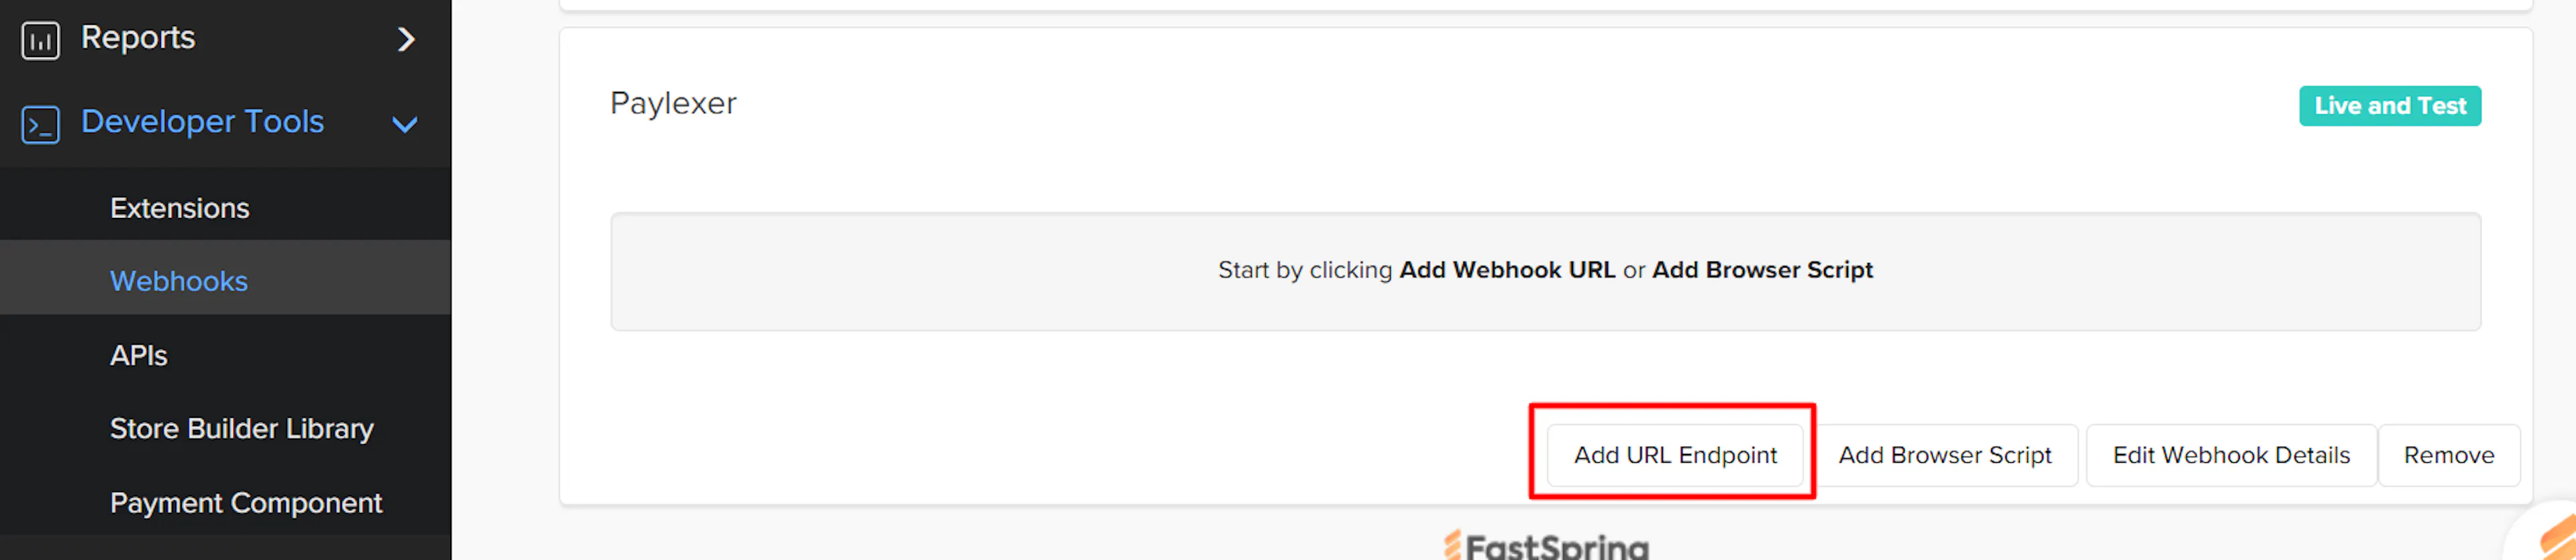
After the webhook is created, click Add URL Endpoint next to it. In the endpoint dialog:
- URL - paste the PayLexer Webhook URL you copied earlier
- HMAC SHA256 Secret - enter a secret phrase of your choice (e.g. a long random password). This is the shared secret PayLexer will use to verify the signature on every notification.
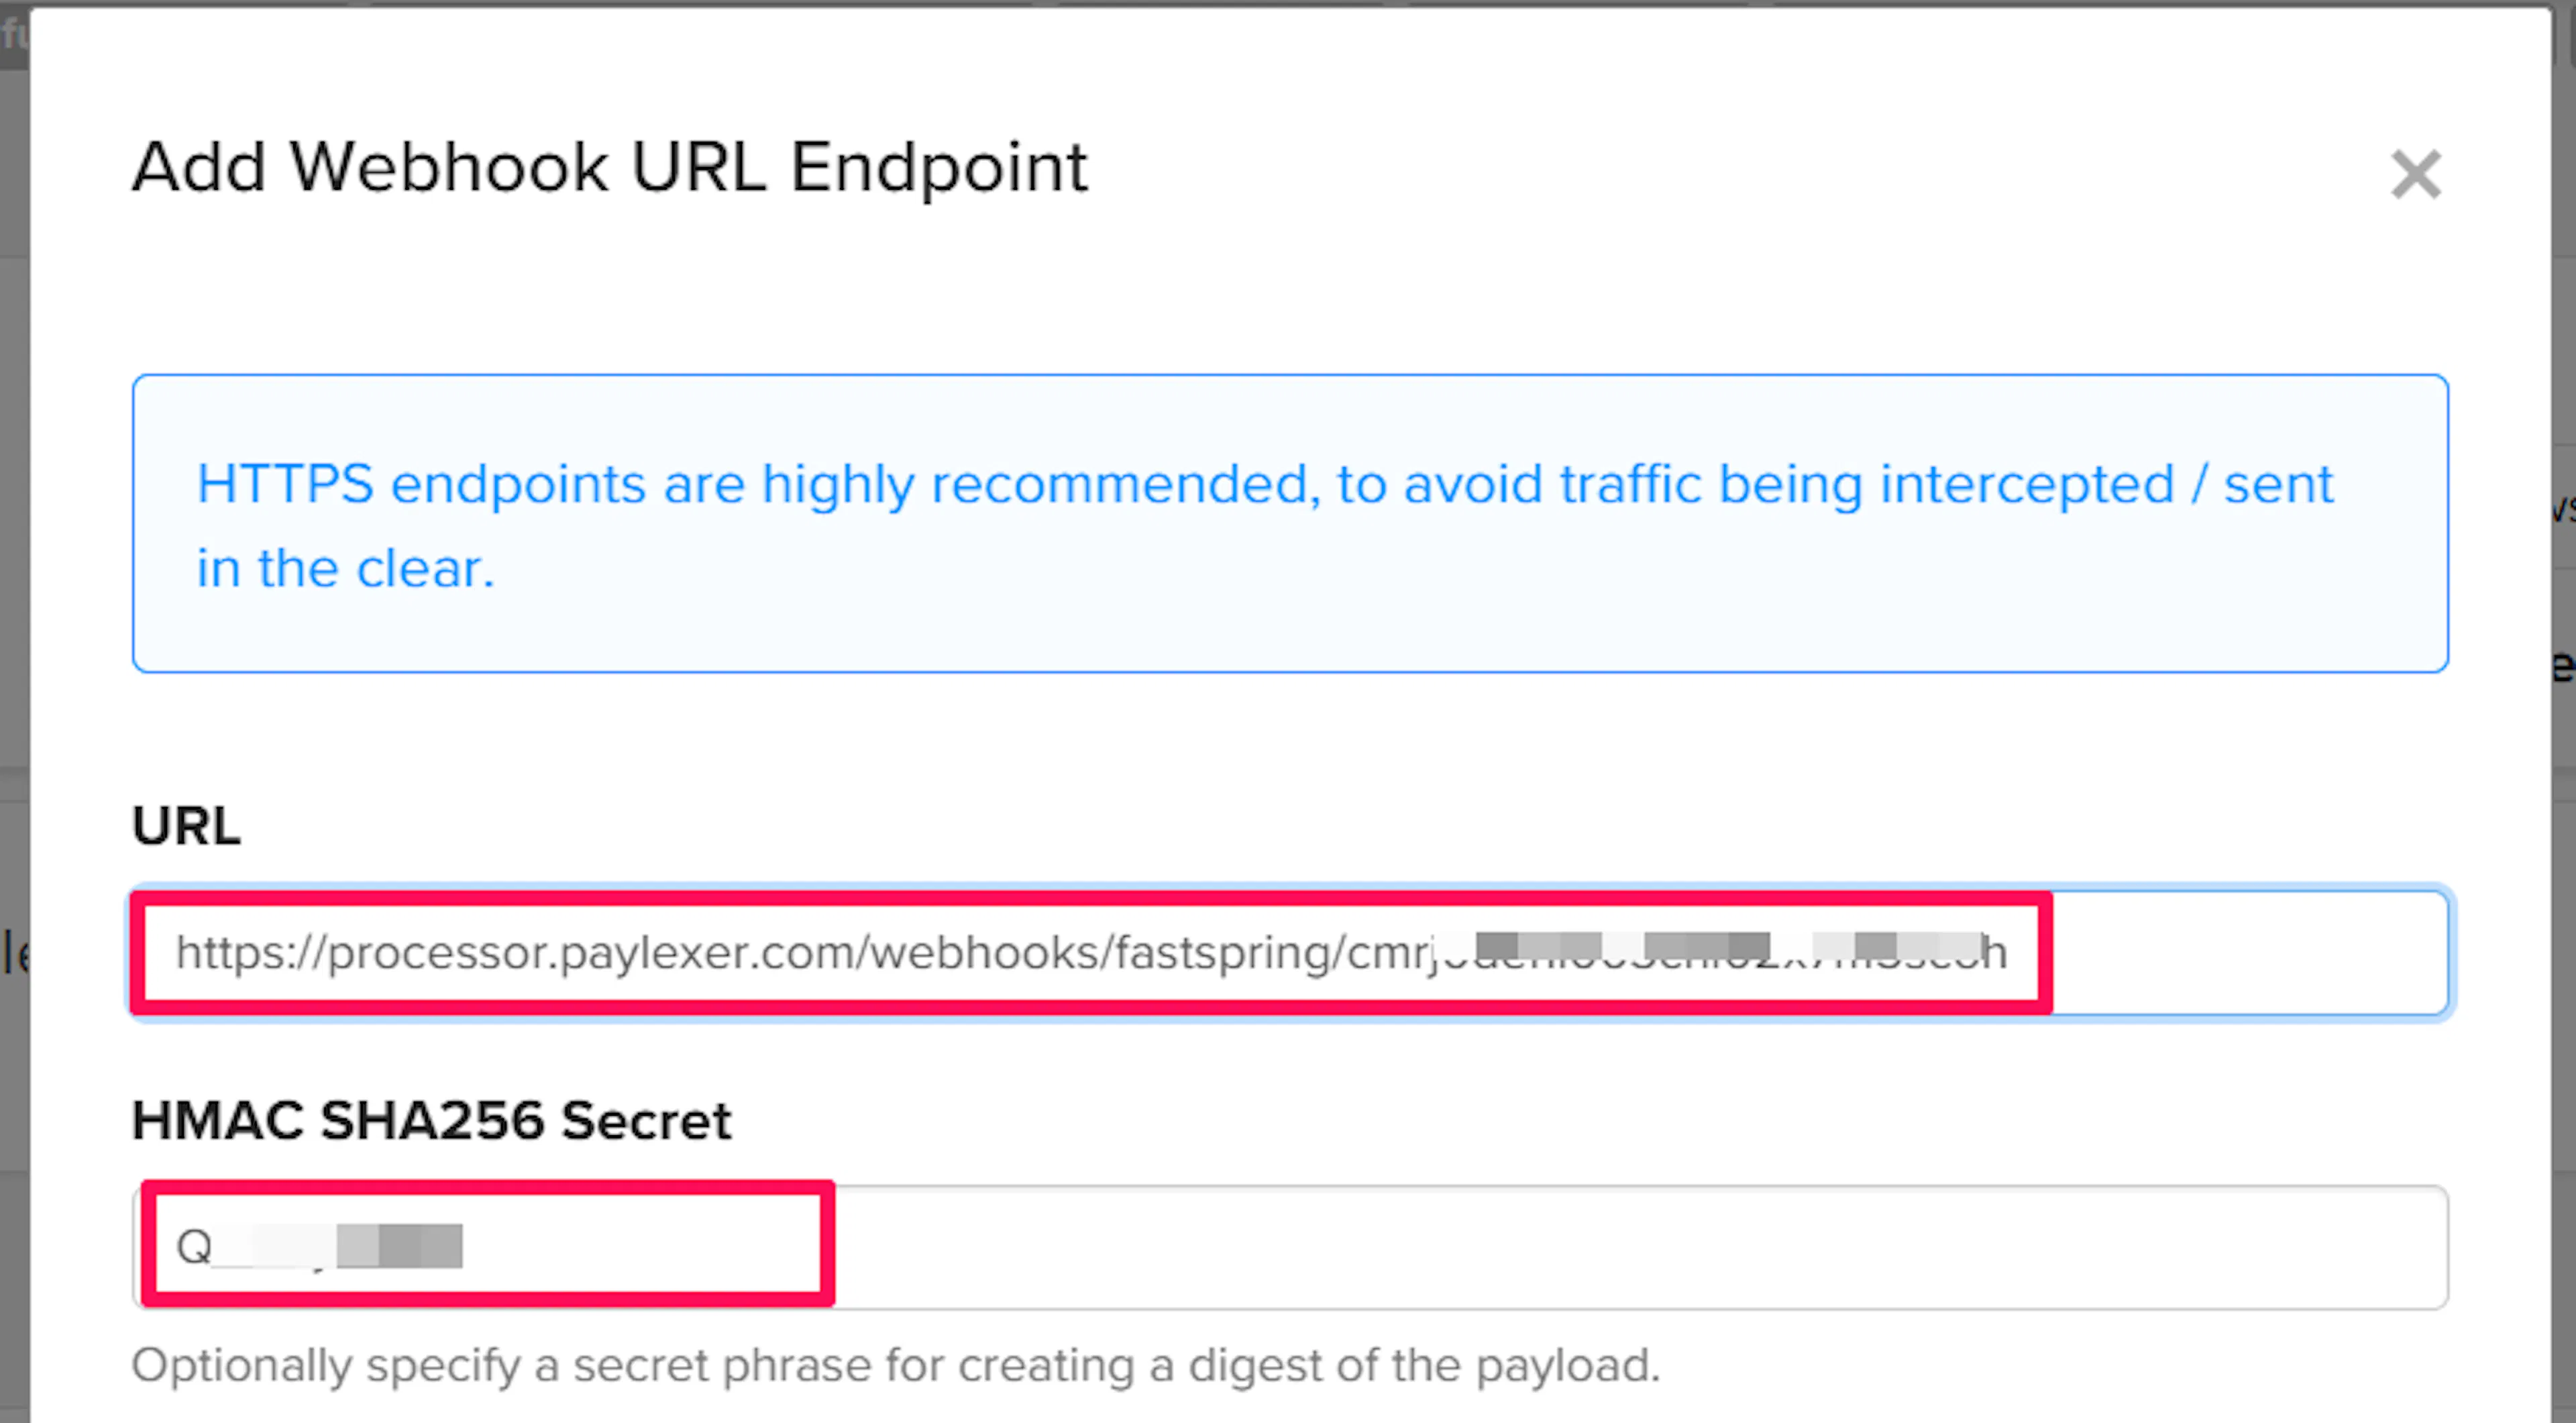
Copy your HMAC SHA256 Secret now. You will paste it into PayLexer in a moment. Use a strong, random value and keep it confidential.
Select webhook events
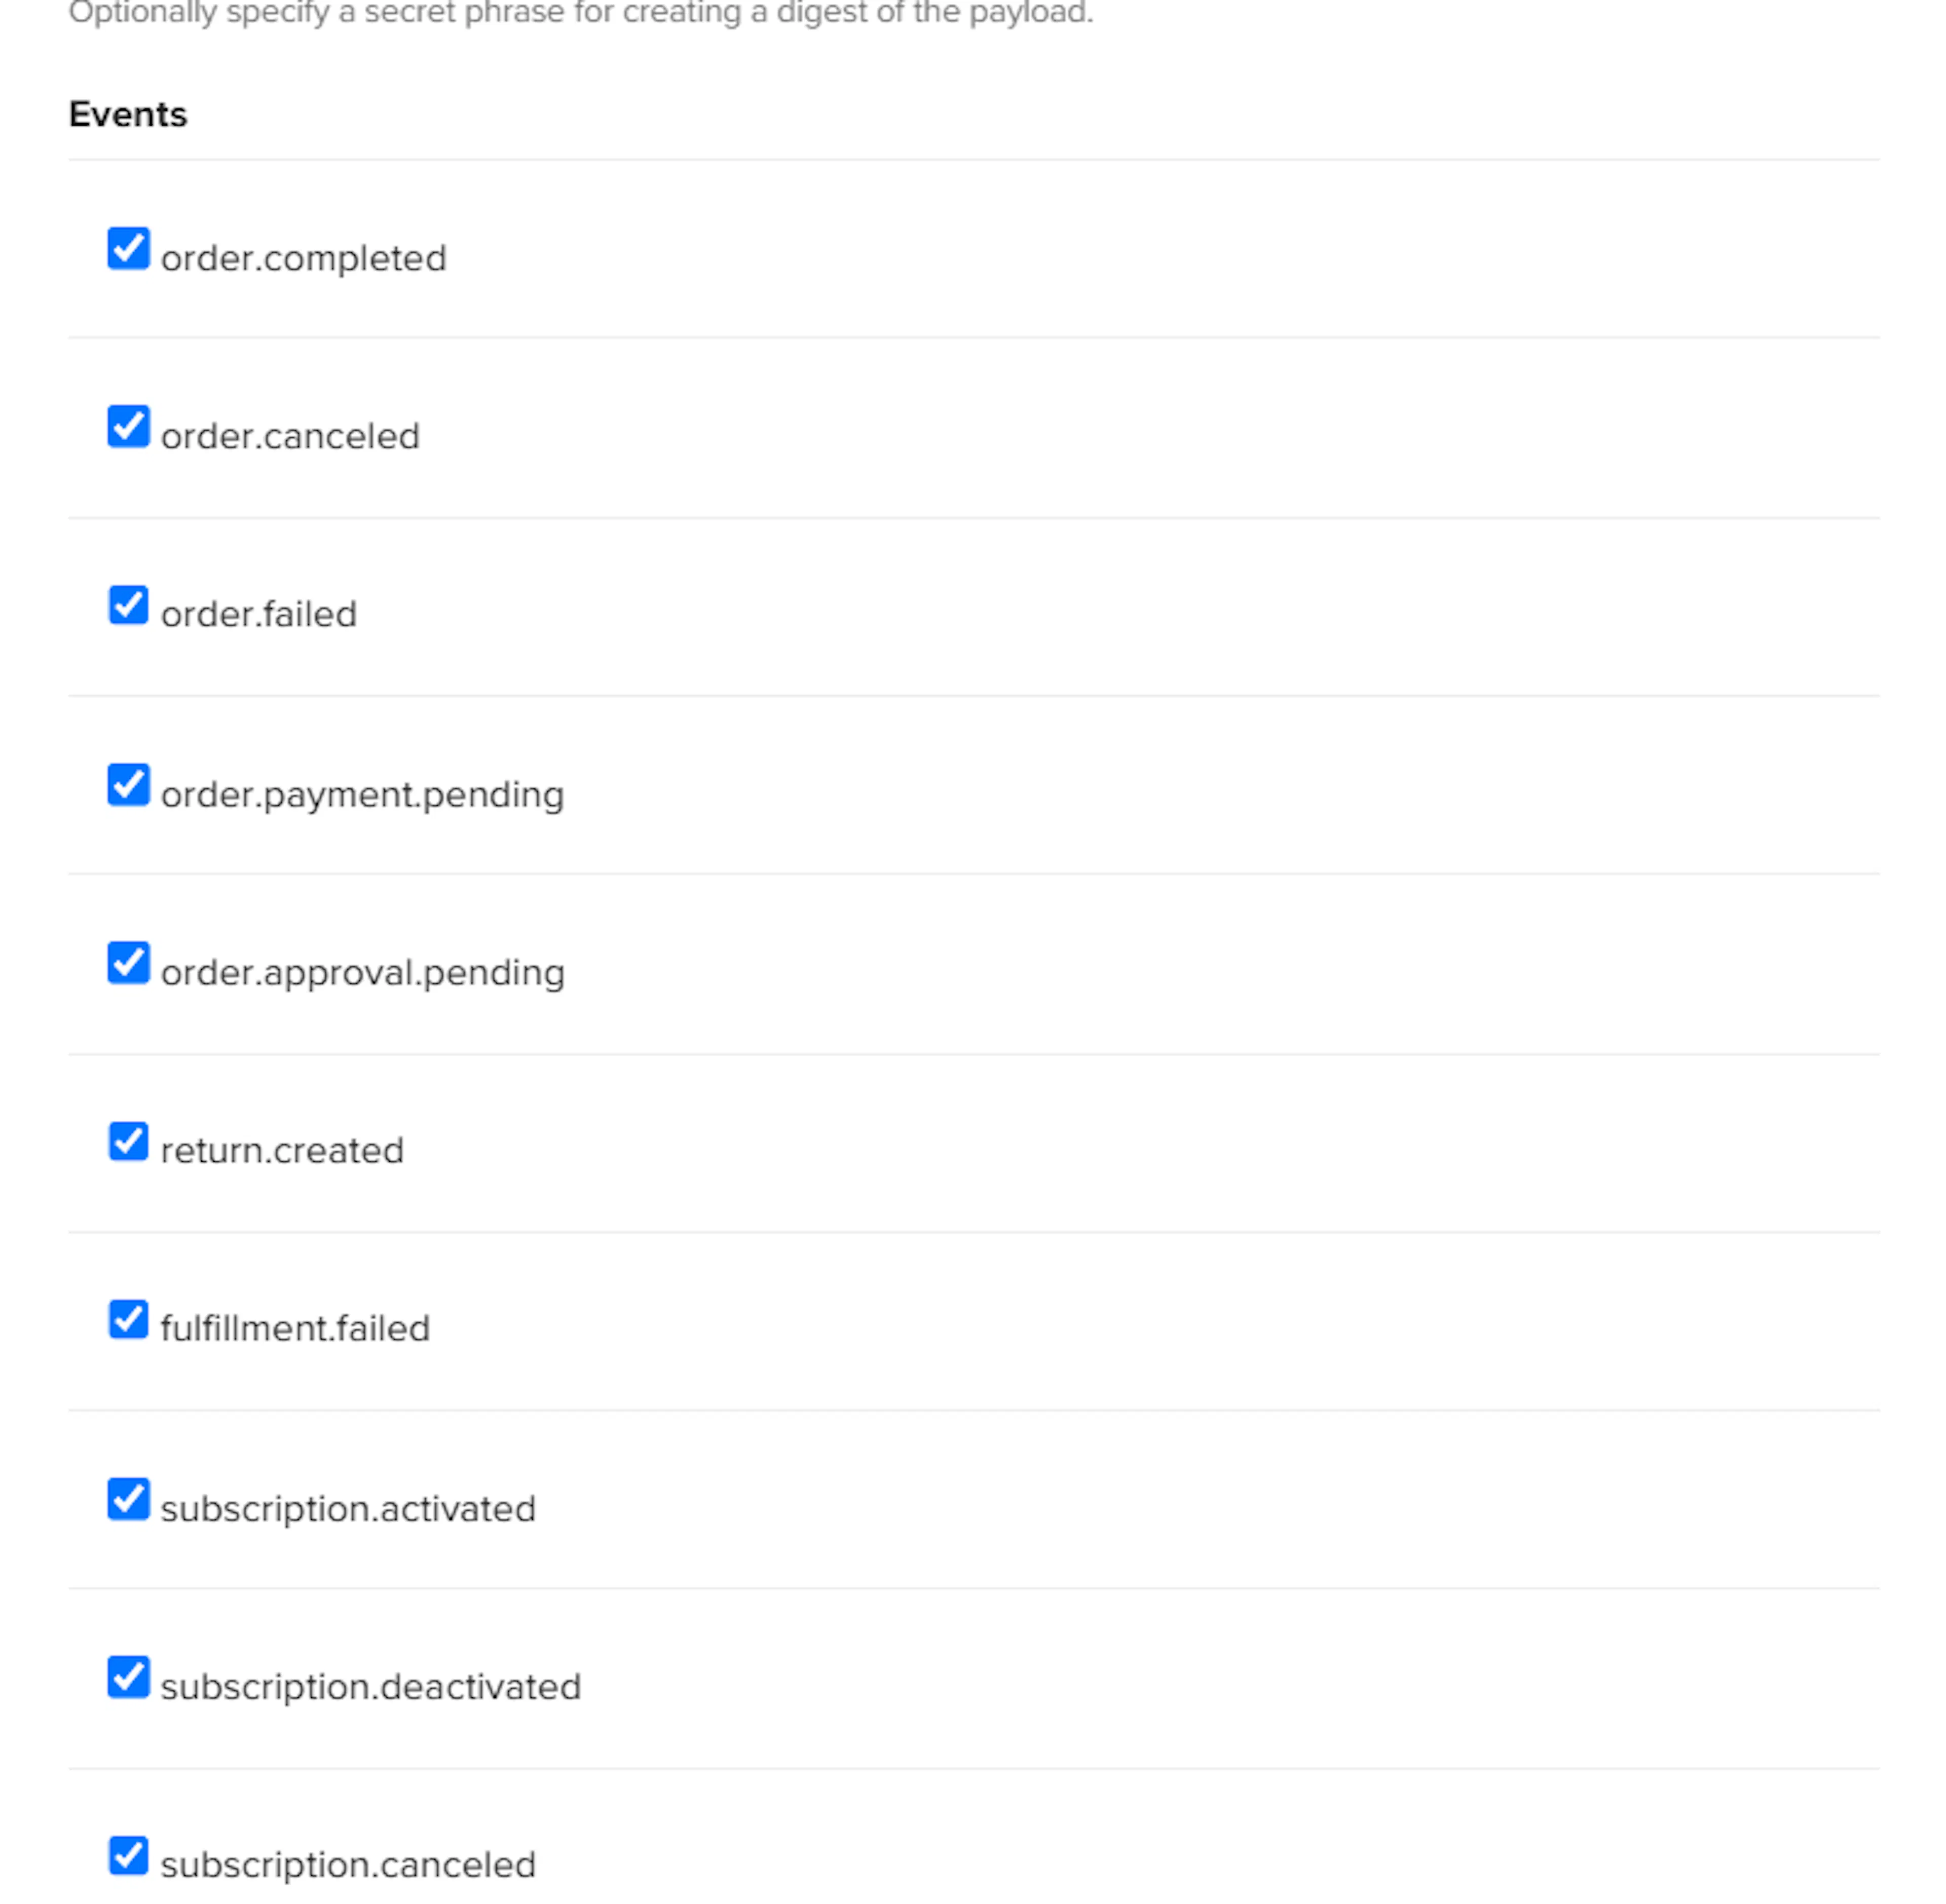
In the events list, select events relating to order, return and subscription so PayLexer receives all relevant payment, refund, and subscription notifications and save the endpoint.
Add the HMAC secret to PayLexer
Return to Payment Gateways → FastSpring in your PayLexer dashboard. Paste the HMAC SHA256 Secret you defined into the Webhook HMAC Secret field and click Save Configuration.
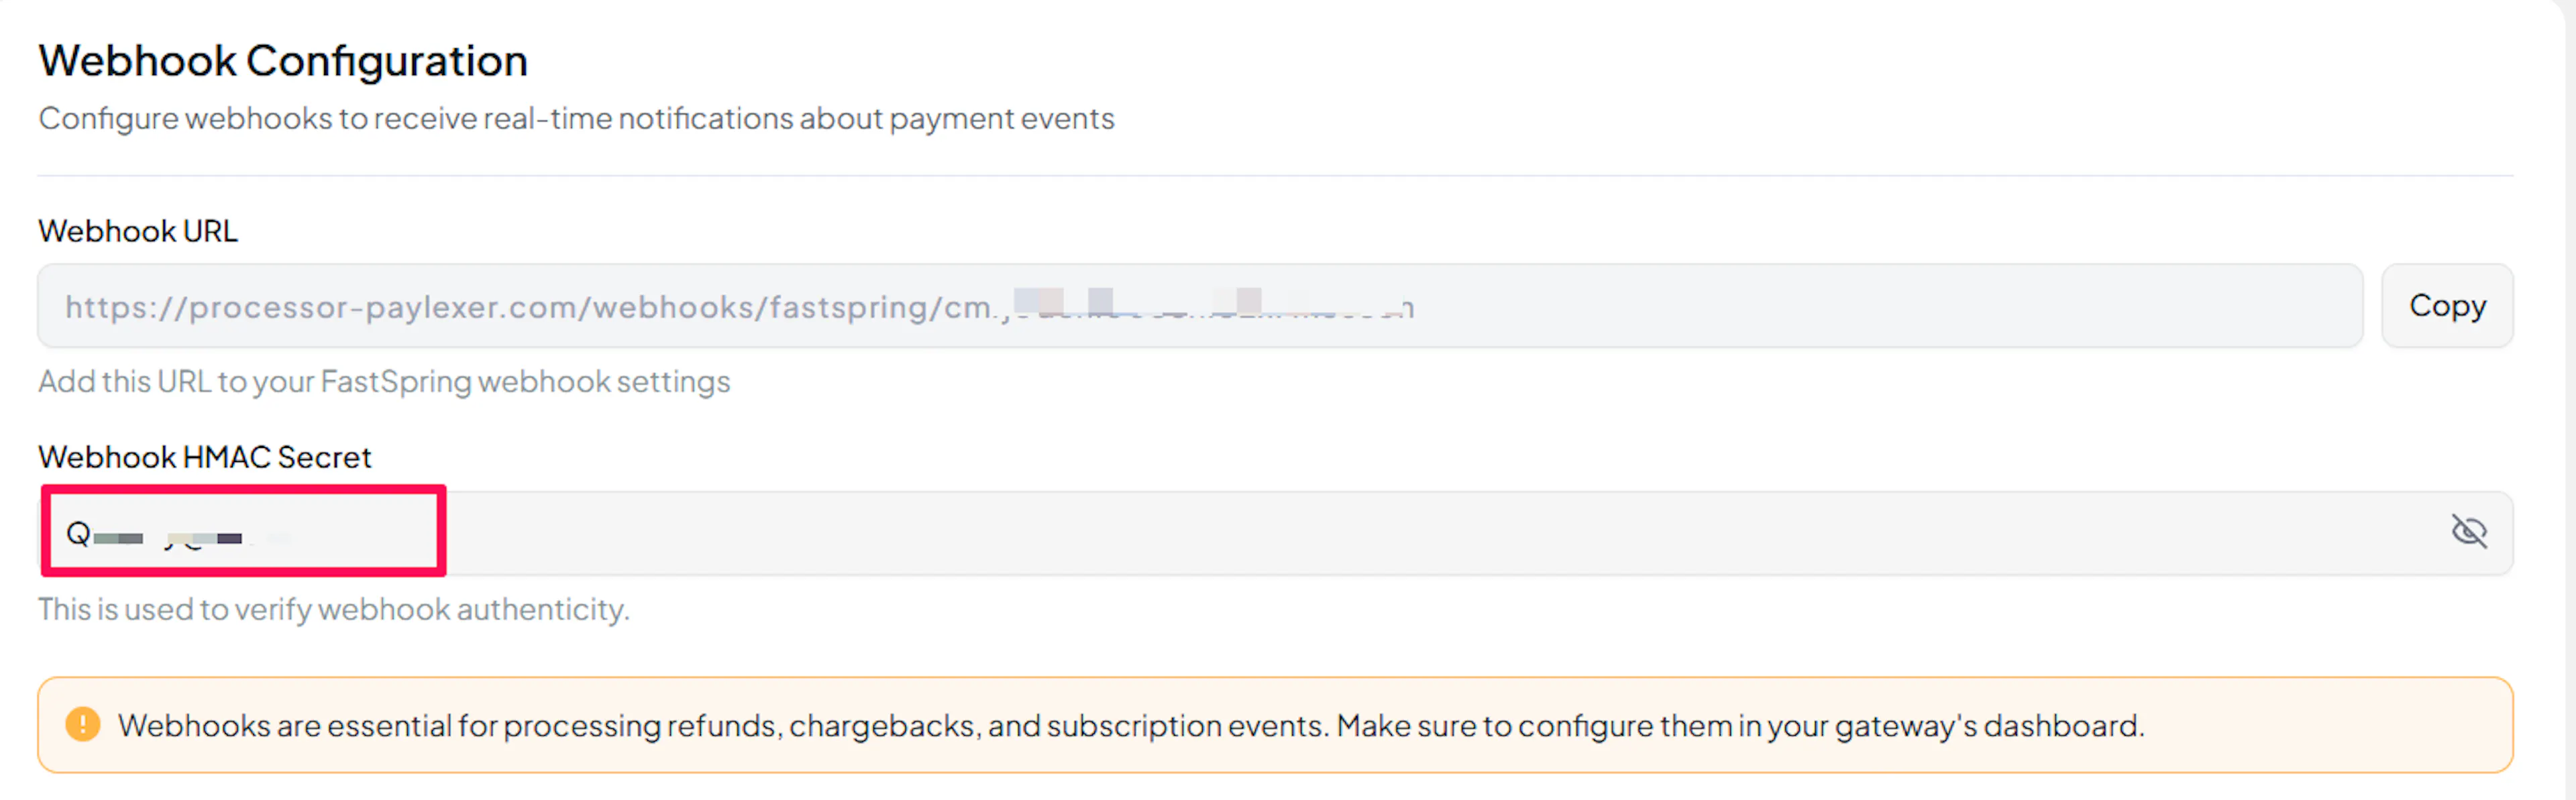
PayLexer will now verify every FastSpring notification using HMAC-SHA256 before updating any order or subscription.
Integrate FastSpring to Your Website
If you have already added and configured your site, you can enable FastSpring in your existing setup.
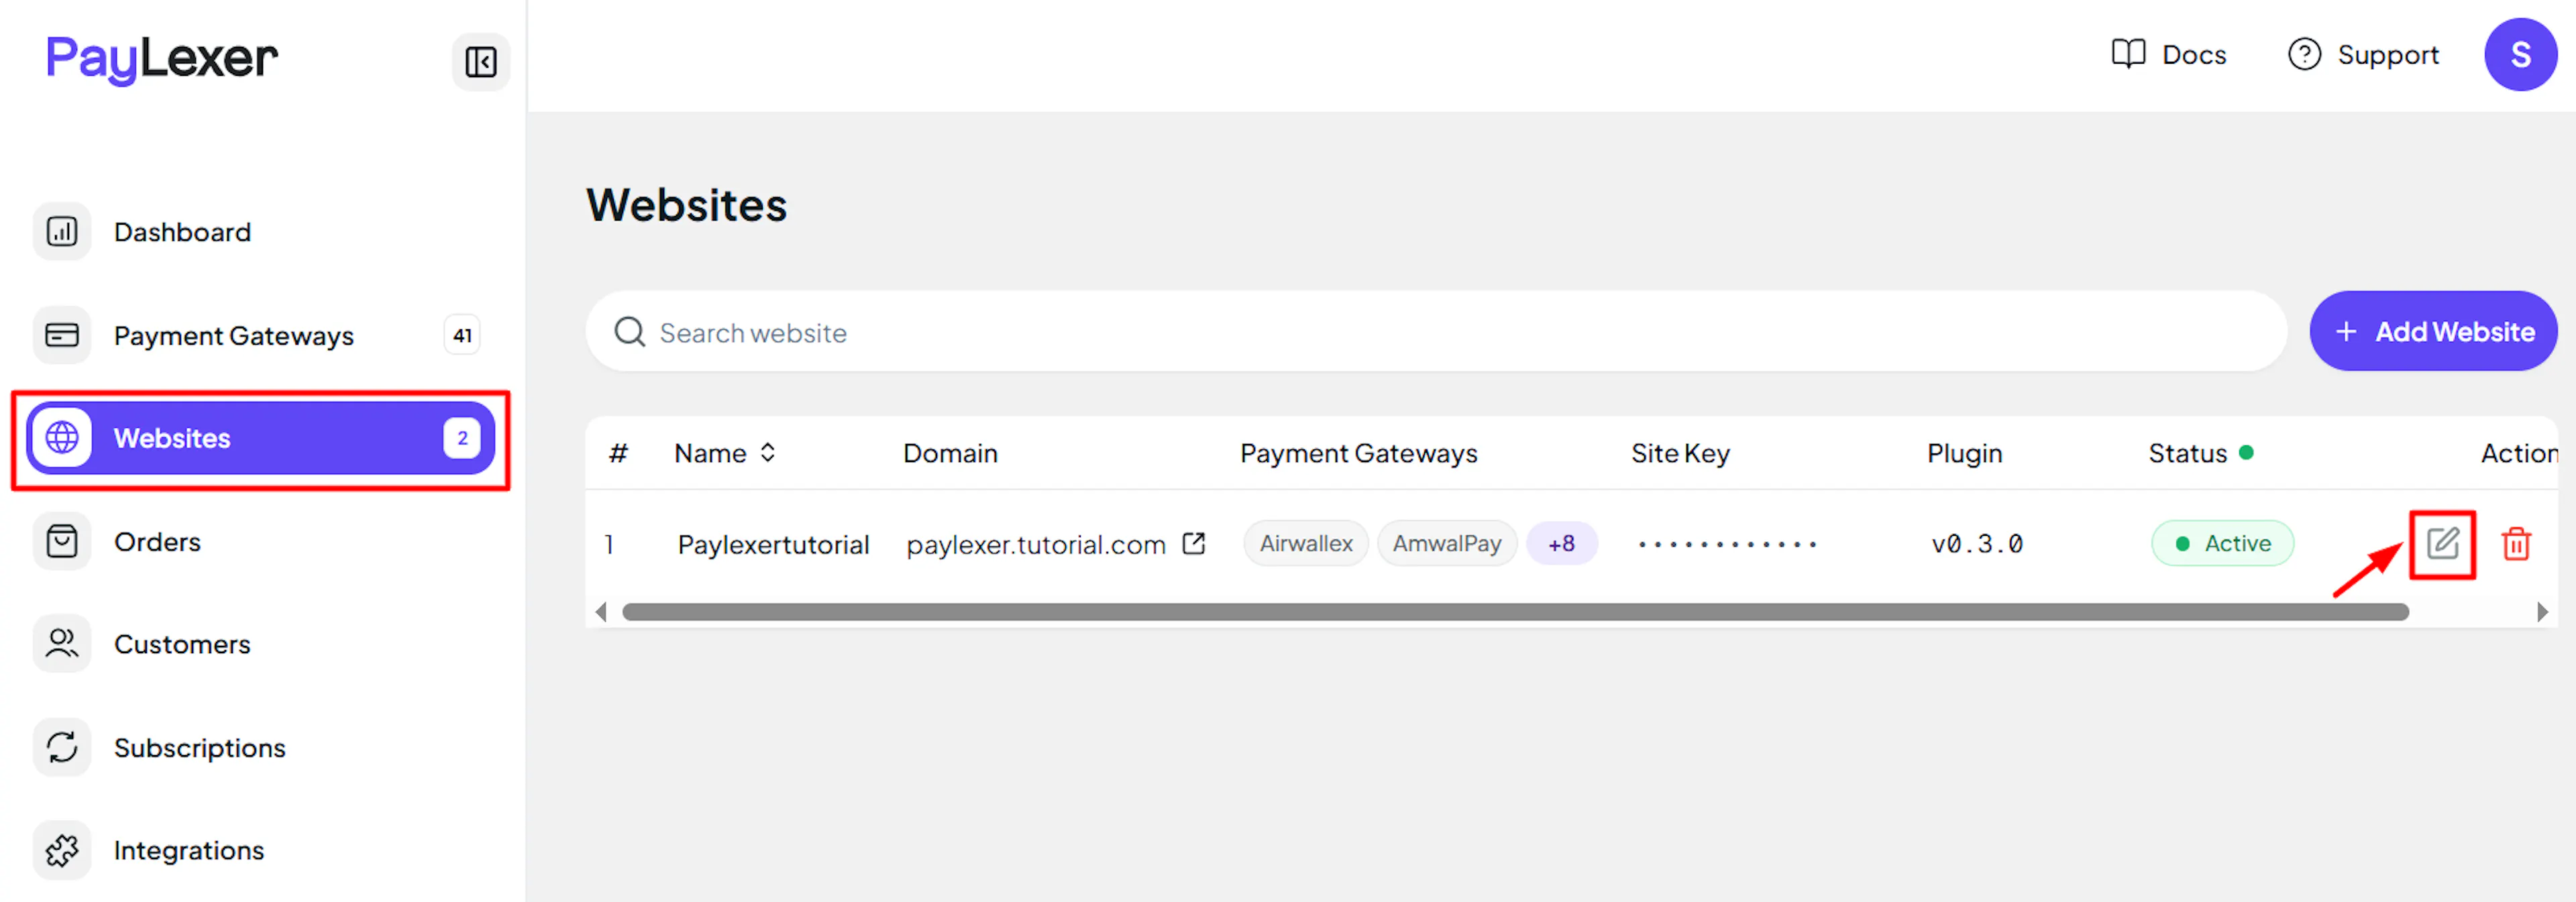
Go to Websites
Navigate to Websites in your PayLexer dashboard.
Edit your website
Click the Edit Icon of your added website.
Enable FastSpring
Click the checkbox to enable FastSpring for the website.
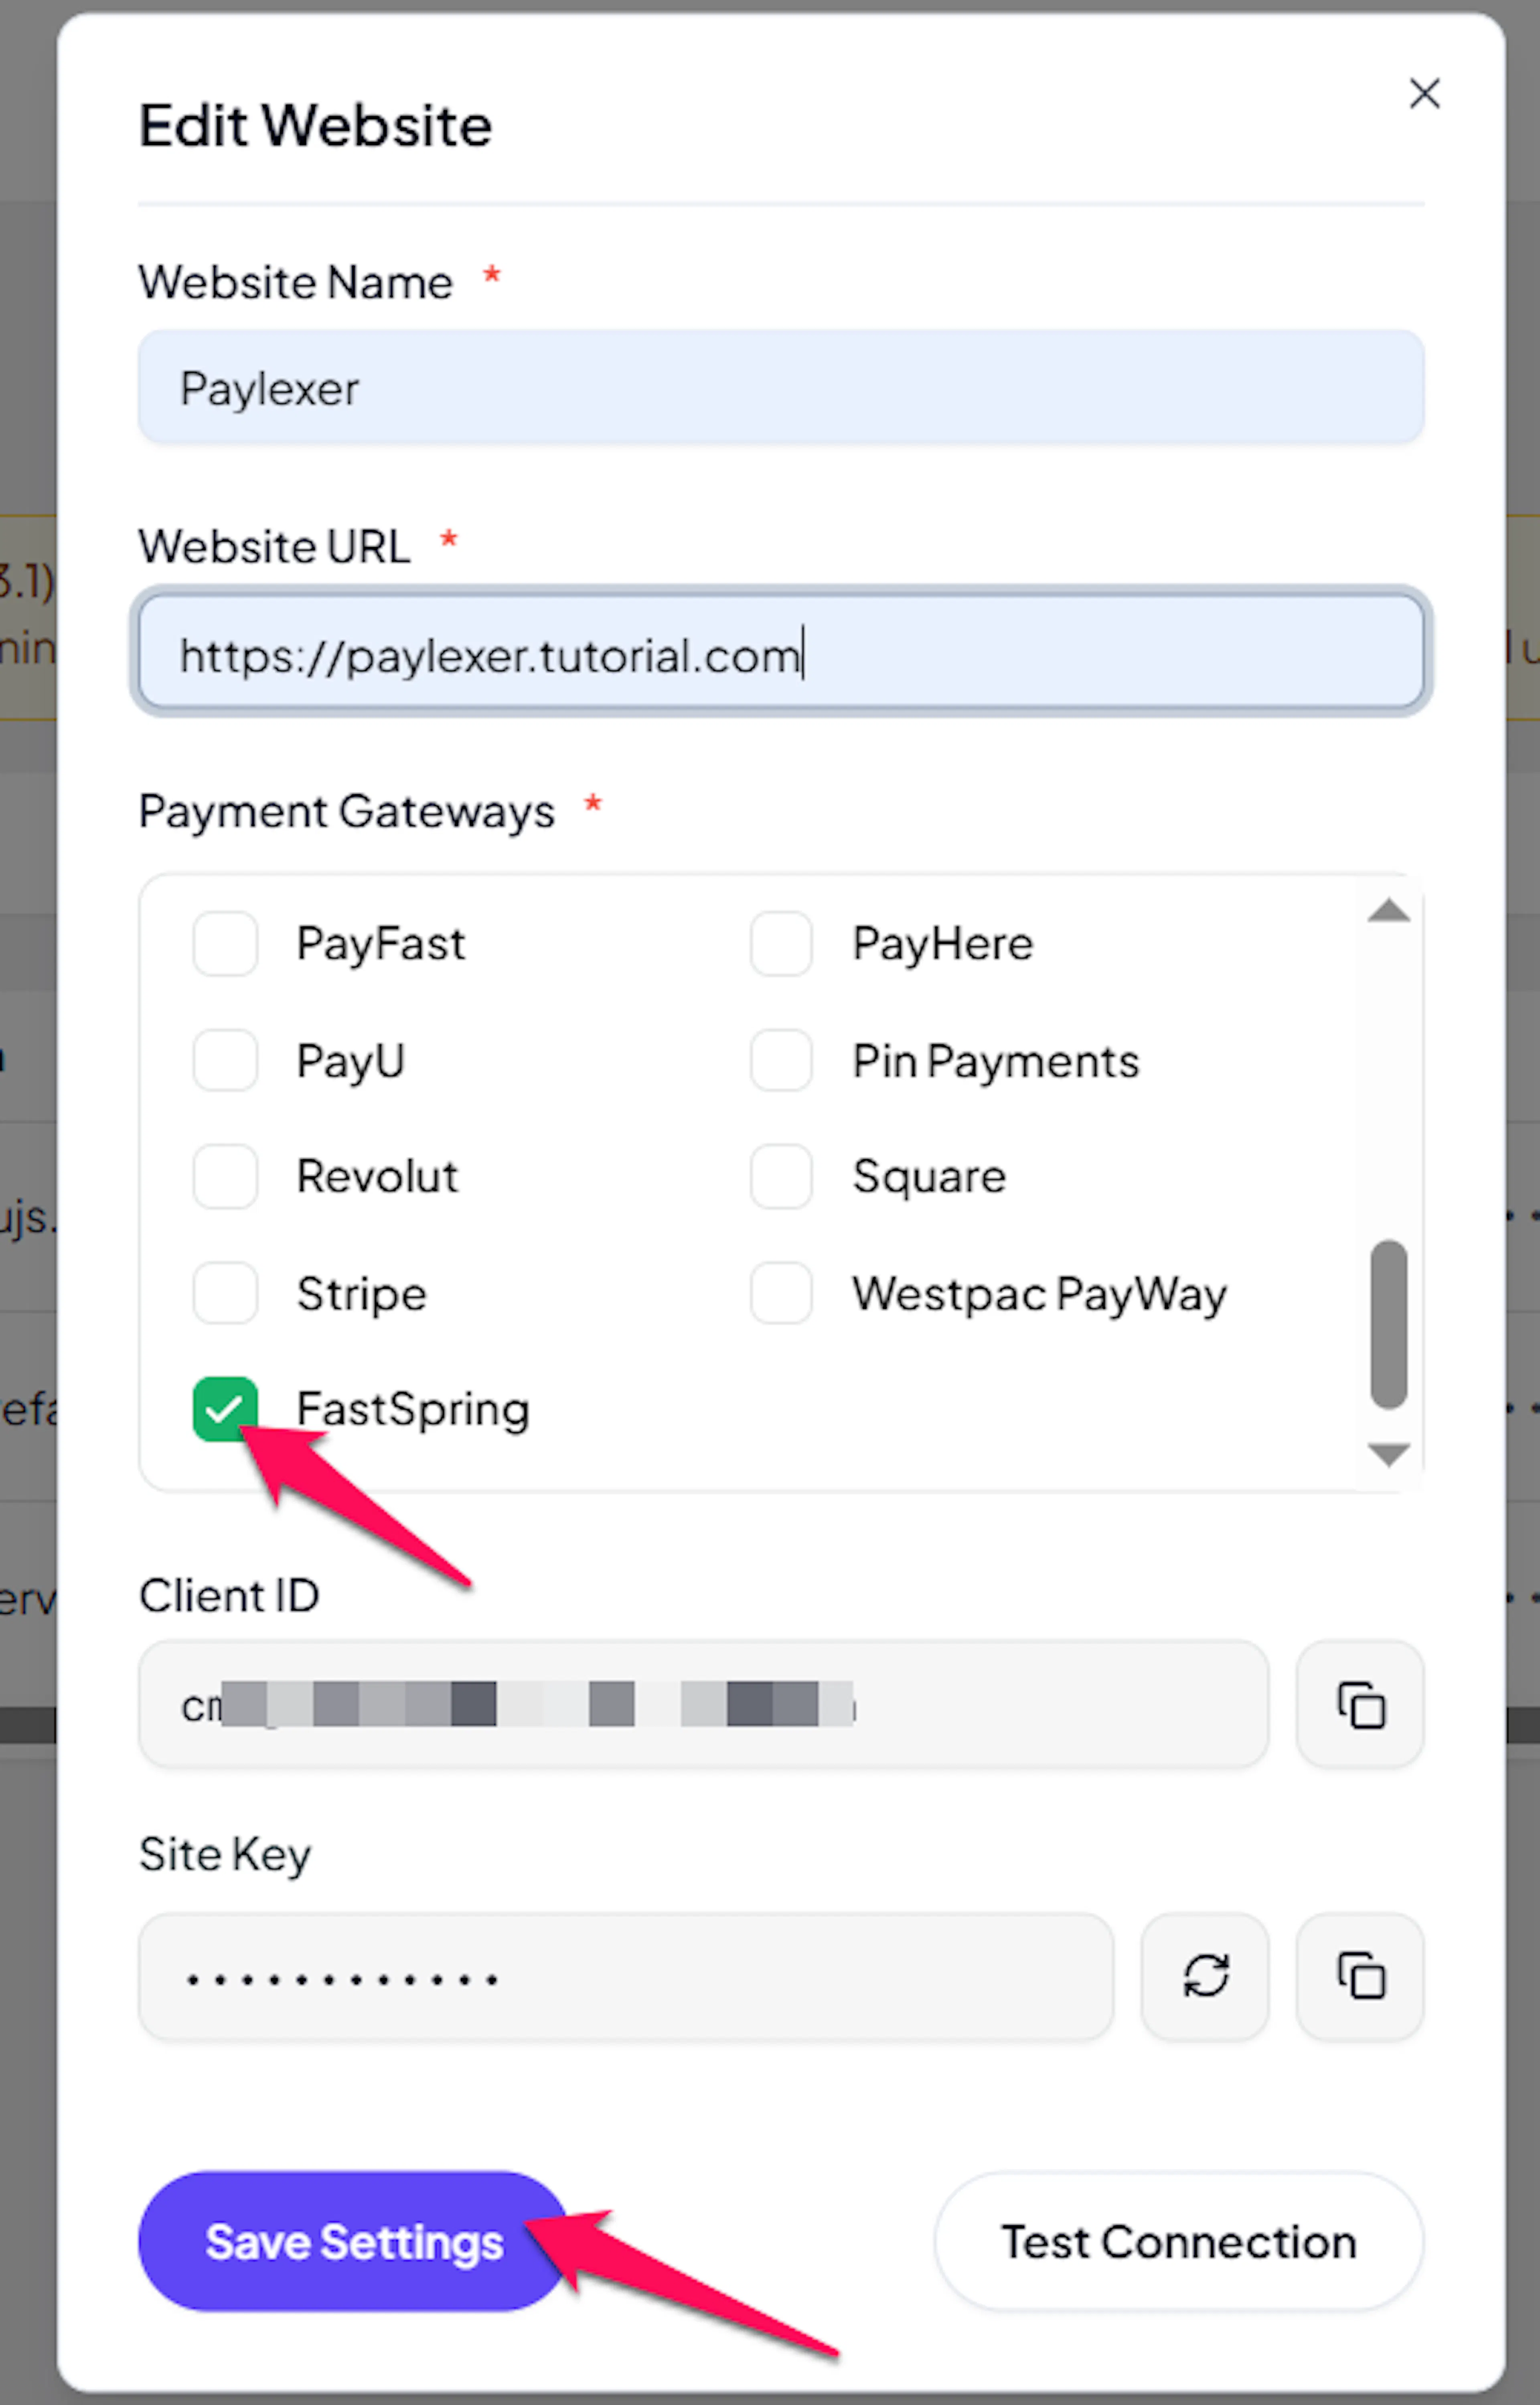
FastSpring is now active for this website. Complete a test purchase in test mode before switching to live.
If you haven't added a website yet, Continue to Add Your Website →
Troubleshooting
Best Practices
- Complete a test purchase in test mode before enabling live. Use FastSpring's test payment methods to verify the full popup checkout flow, webhook delivery, and order confirmation.
- Configure all recommended webhook events so payment, subscription, and refund updates sync reliably. Missing events can leave orders in an incorrect state.
- Keep your HMAC SHA256 Secret confidential and store it securely. If it is compromised, update it in both FastSpring and PayLexer immediately.
- Restrict your FastSpring store's supported currencies to match your site's currency. FastSpring localizes the checkout currency based on the buyer's country - if the store would select a different currency, PayLexer refuses to open the checkout rather than show the shopper a wrong price.
- For subscriptions with a free trial, FastSpring collects the payment method upfront and defers the first charge until the trial ends. Verify this flow with a test subscription before going live.
- Plan for FastSpring's account activation process. Accepting live payments requires FastSpring to verify your tax information and review your website - start this process early and check the status directly with FastSpring.
FAQs
Still Have Questions?
- FastSpring Support: FastSpring Support
- PayLexer Support: Contact Support
For API references and webhook integration details, see the FastSpring developer documentation.