

TransFi
Connect TransFi to PayLexer to accept cards, local bank rails, mobile wallets, and stablecoins in 36 currencies from a single merchant account.
TransFi is a global cross-border payment provider that accepts ordinary money and cryptocurrency through the same checkout. It gives a merchant 250+ local payment methods across 63 countries from one account, so a shopper can pay by card in Australia, by PIX in Brazil, from a mobile wallet in the Philippines, or in stablecoins such as USDC and USDT, and the merchant still sees one payment in their own currency.
- Supported Regions (Merchant Accounts): 63 countries across Latin America, Southeast Asia, Africa, the Middle East, Europe, and North America - view full list
- Supported Currencies: AUD, BRL, EUR, PHP, SGD, USD, and ZAR - view full list
PayLexer offers TransFi at checkout only for the currencies TransFi can collect. An order in any other currency is rejected before the shopper is sent anywhere. XOF is deliberately excluded because TransFi supports it for payouts only.
Supported Features
- Hosted payment page where the shopper chooses card, local bank rail, mobile wallet, or stablecoin
- Payments in 36 currencies across 63 countries from a single merchant account
- Automatic payer record creation, reused for every later order by the same shopper
- Signed webhook notifications that complete an order even when the shopper never returns to your store
- Optional control over which payment rail your orders use
- Per-rail amount limits checked before the shopper is sent to pay
- Separate sandbox and live credentials for safe testing
TransFi refunds cannot be processed through PayLexer. TransFi does not provide a refund API, so refunds must be handled by TransFi’s support team through their admin dashboard after receiving a customer request and proof of payment. PayLexer will refuse refund attempts rather than showing them as successful.
TransFi cannot be used for subscriptions. Its API has no recurring-billing, plan, mandate, or saved-instrument capability, so there is nothing to charge a second time. Sell subscription products through a gateway that supports them.
Before You Start
Make sure you have:
- TransFi Account – Don't have one? Sign up for TransFi →
- PayLexer Account – Required to configure the integration. Create your account →
- A website where you want to integrate
Looking for a different payment processor? View all supported gateways →
Configuring TransFi
You need an API Username, an API Password, and a Merchant ID (MID) from TransFi for this integration.
Getting API Credentials
TransFi issues a separate username, password, and Merchant ID for sandbox and for live. The two sets are not interchangeable, so collect whichever set matches the environment you are setting up.
Create or open your TransFi account
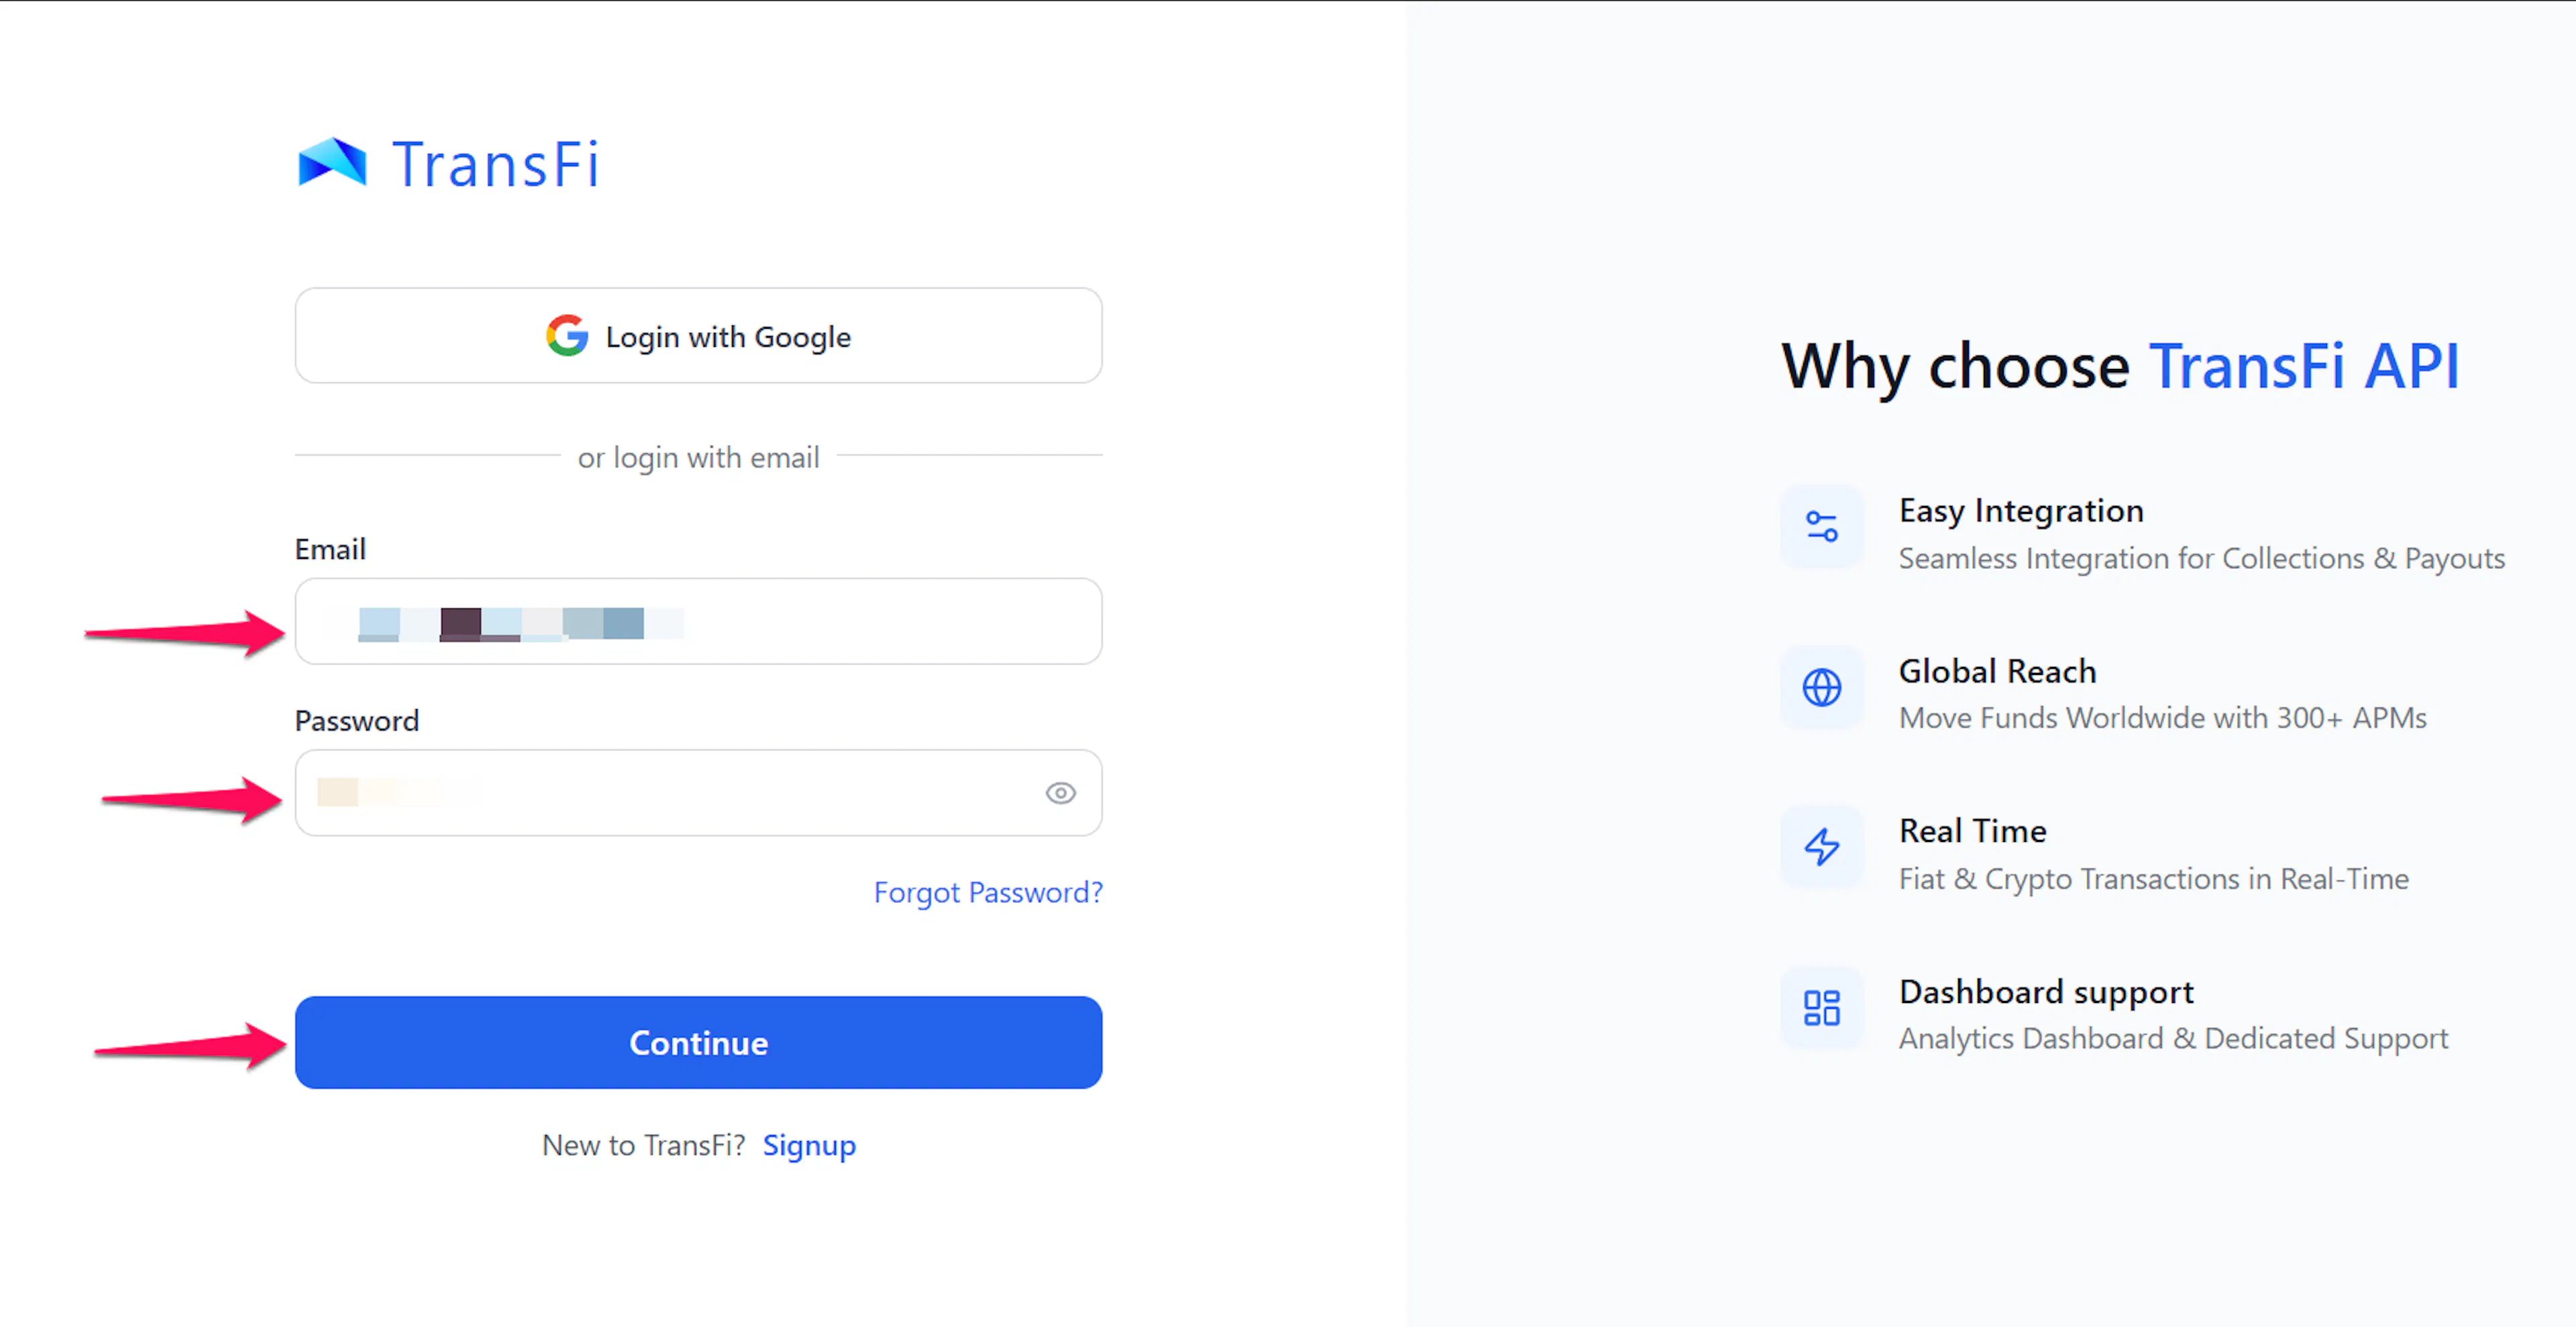
Sign in to the TransFi dashboard. Registration is self-service and requires your company details, email verification, password, and authenticator-app MFA. Business verification is only required when you’re ready to accept live payments.
Copy your API username and password
Go to Settings → API Credentials. Copy the API username, then click Regenerate to produce the API password.
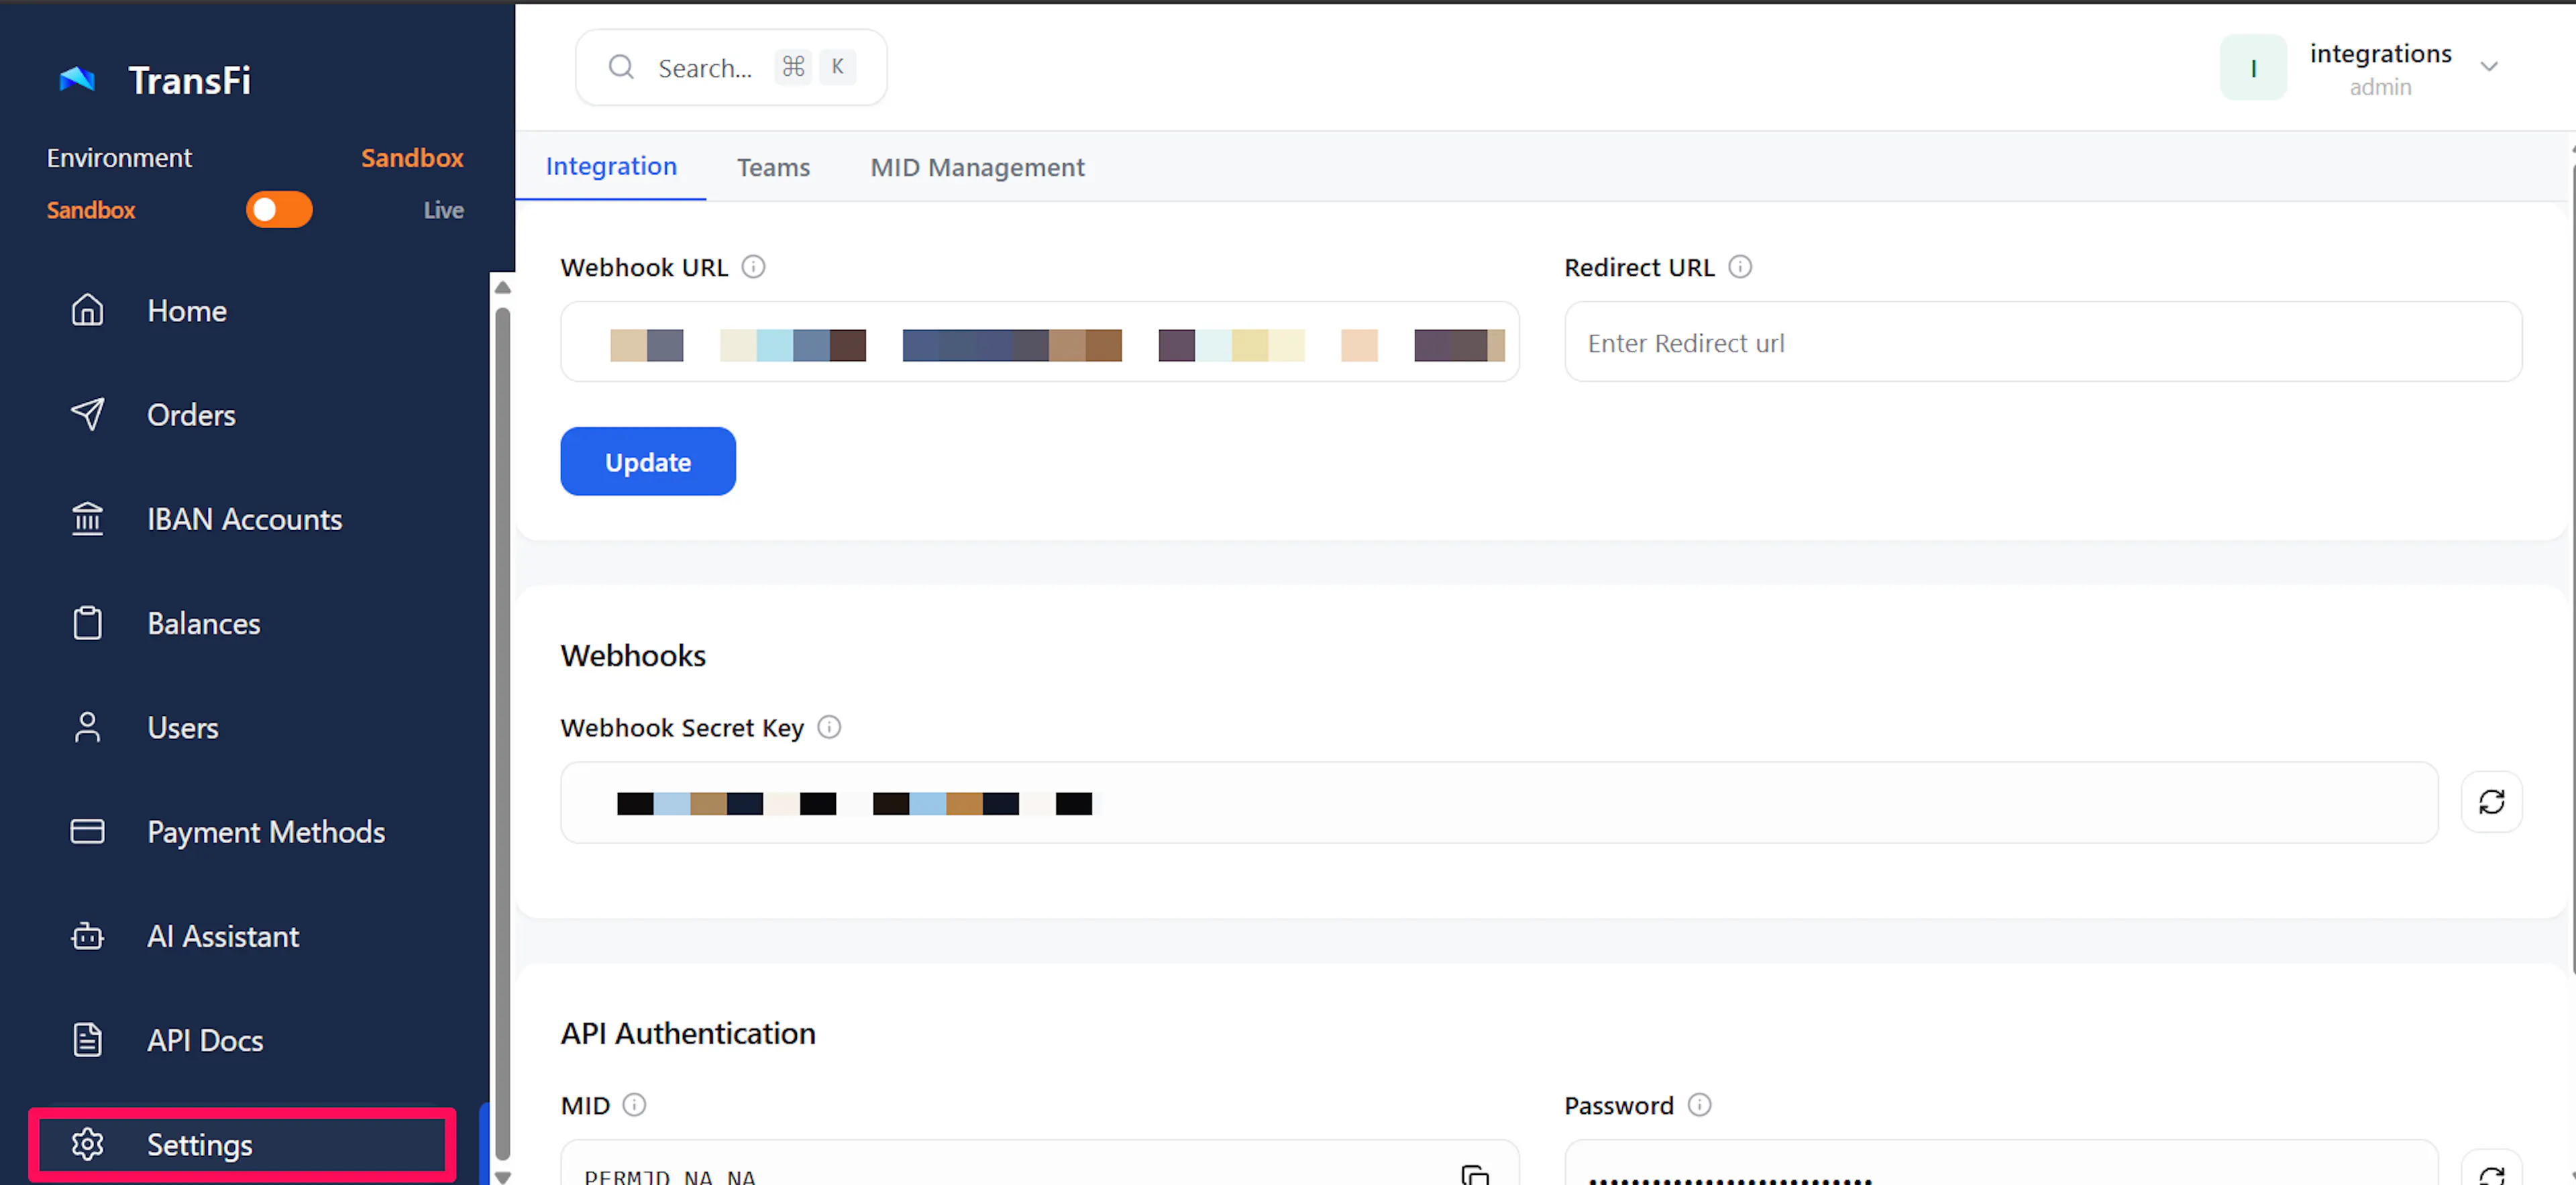
The API password is shown once, at the moment you generate it. Copy it straight into PayLexer. If you lose it you must regenerate, which invalidates the previous password and breaks any integration still using it.
Copy your Merchant ID (MID)
Copy the Merchant ID for the account. TransFi requires it on every single API call, separately from your username and password.

Valid credentials with an incorrect or missing Merchant ID will authenticate successfully but fail on every request. PayLexer shows a specific error identifying the Merchant ID, making it clear that the credentials themselves are correct.
Adding Credentials to PayLexer
Open PayLexer Dashboard
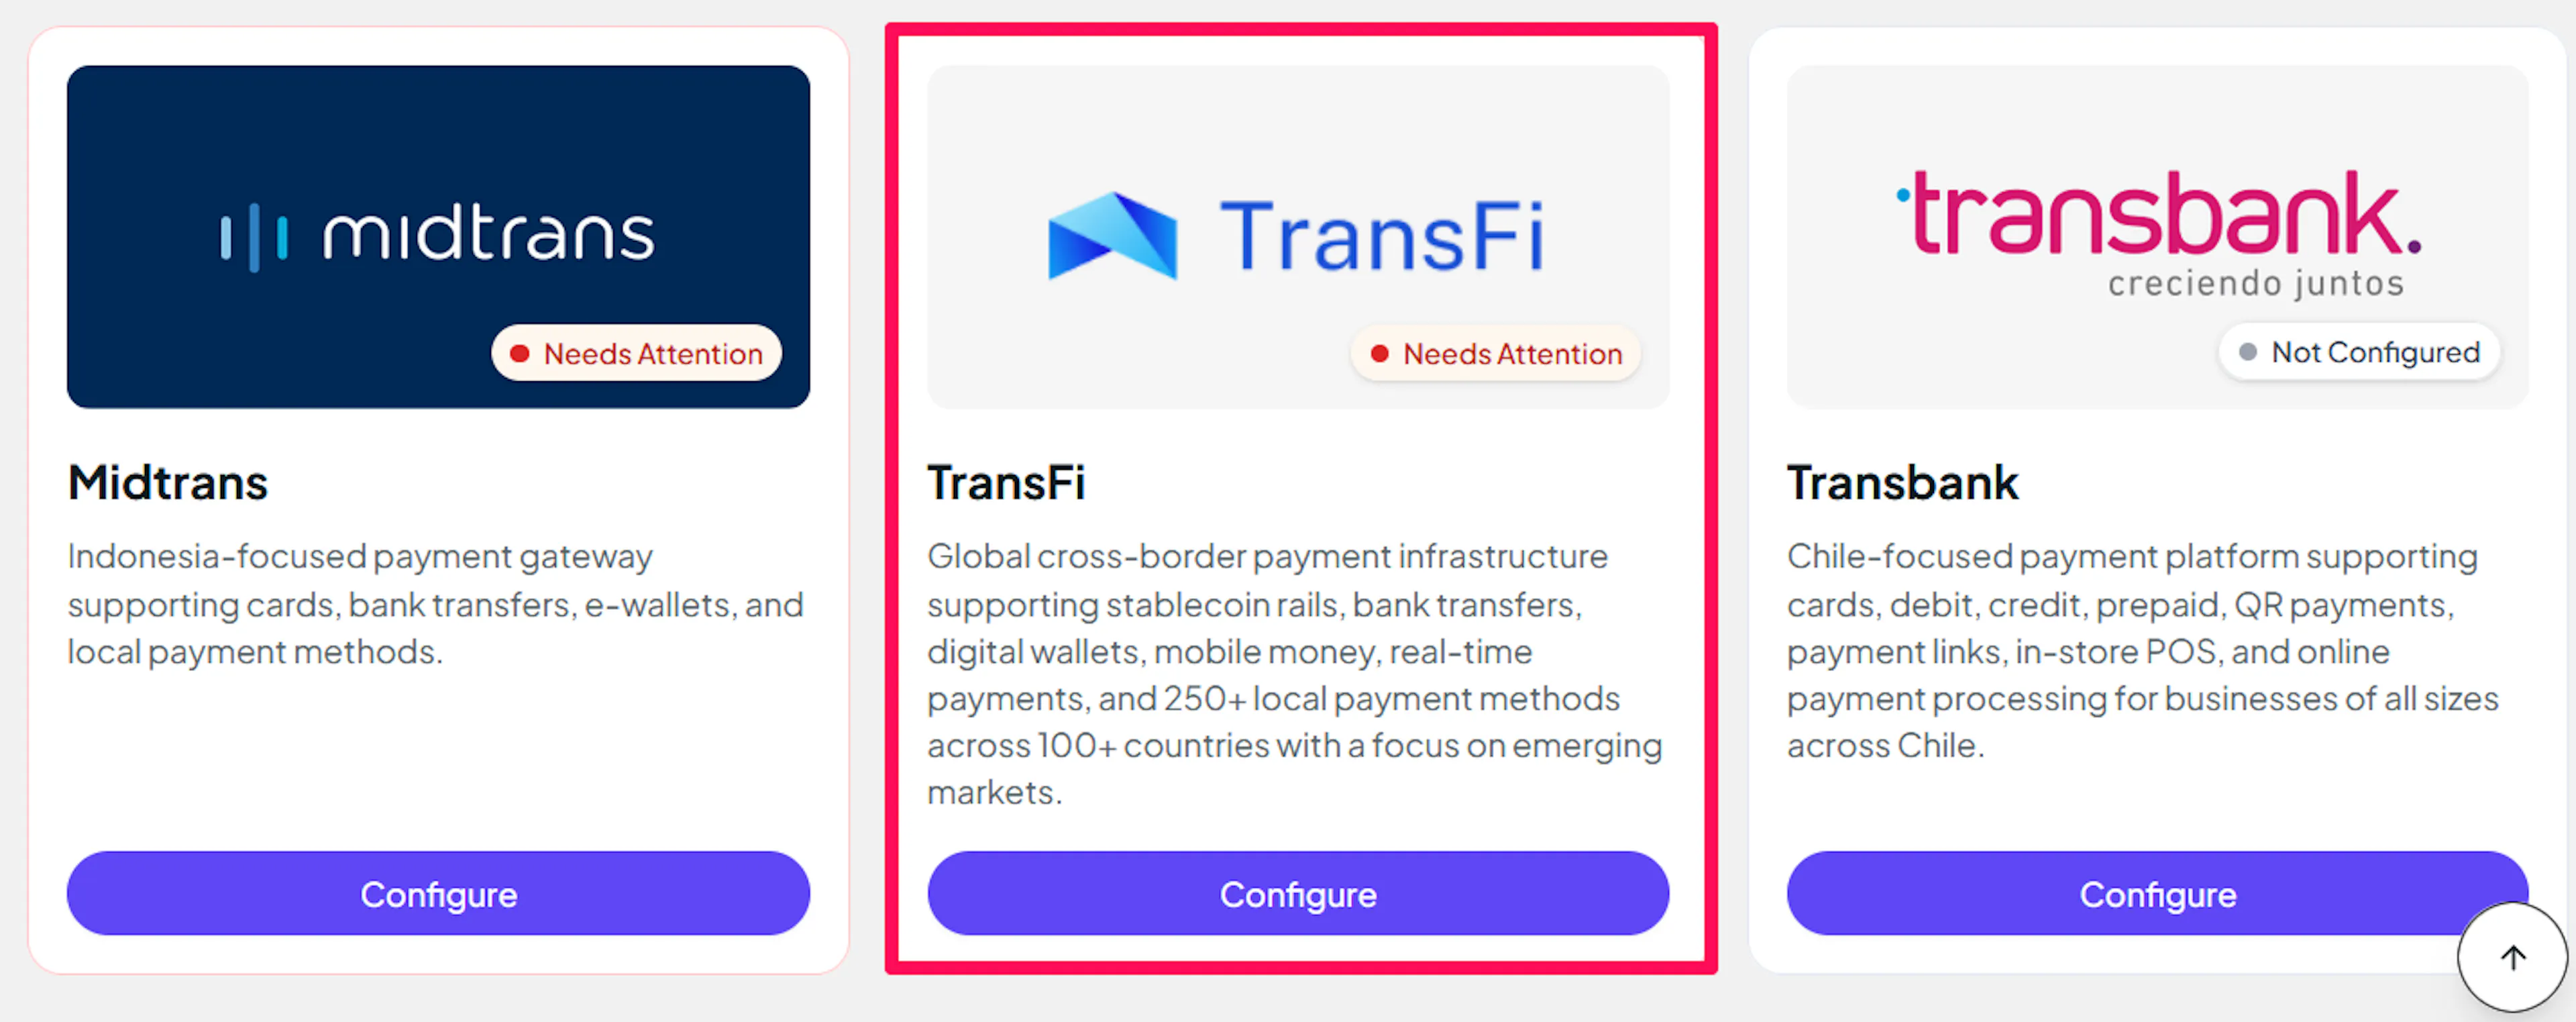
Log in to your PayLexer dashboard and navigate to Payment Gateways → TransFi.
Enter your credentials
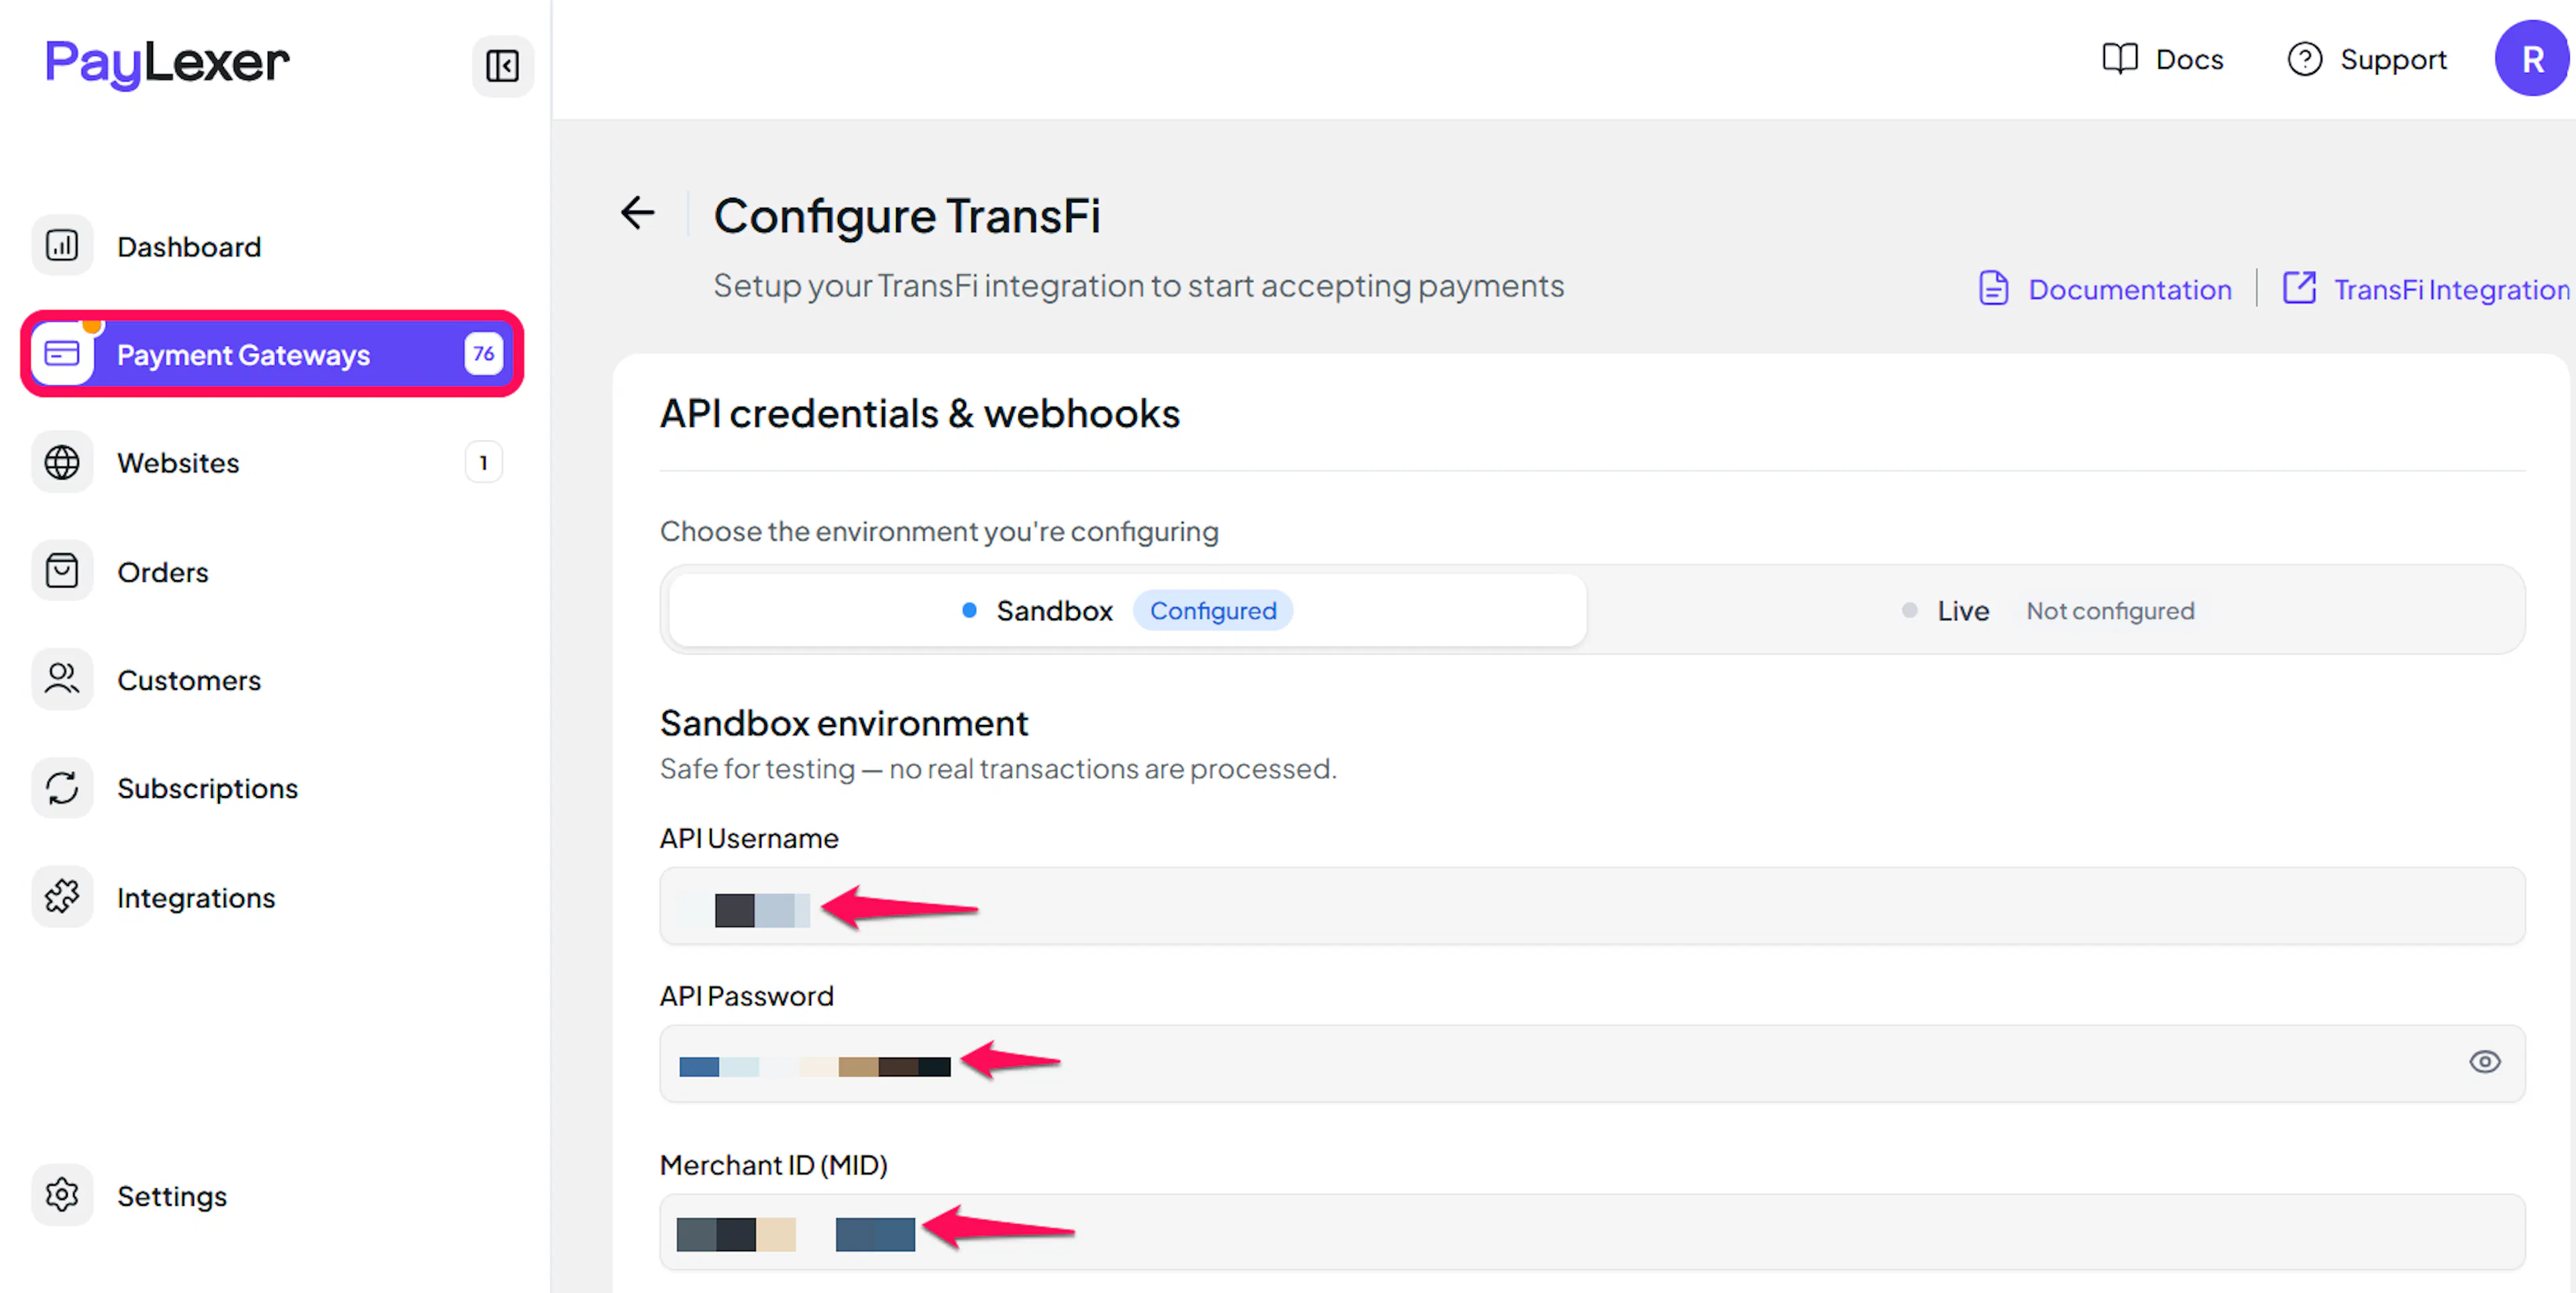
Paste the API Username, API Password, and Merchant ID (MID) you copied from TransFi into the corresponding fields. The sandbox fields are labelled Sandbox API Username, Sandbox API Password, and Sandbox Merchant ID (MID).
Understanding Live/Production and Sandbox Settings:
| Environment | Purpose |
|---|---|
| Live / Production (Mandatory) | Used for real transactions. Cannot be empty, even when testing. |
| Test / Sandbox (Optional) | Used for testing only. No real money is processed. |
How PayLexer selects credentials:
- Debug/Test mode ON → Test credentials are used
- Debug/Test mode OFF → Live credentials are used
Test and save
Click Save to save your configuration and verify your credentials. Click Verify Connection to test the connection.
How the Payment Method Is Chosen
You do not configure this. TransFi requires every order to name a payment type, and the rails your account has enabled differ by currency, so PayLexer reads the rails your account actually has for the order currency and picks one.
The order it prefers is card, then bank transfer, then local wallet:
- Card first because it settles immediately and is what most shoppers expect.
- Bank transfer next. It can take hours to settle, but it works for anyone paying in that currency.
- Local wallet last. TransFi’s payment-method list doesn’t specify which country each wallet belongs to, so shoppers may see wallets they cannot use. A slower payment method the shopper can access is better than a faster one they cannot.
When your account has only one rail for a currency, there is nothing to choose.
PayLexer sends the payment type to TransFi, and TransFi's payment page then shows your shopper the enabled methods of that type. A shopper on a bank transfer order therefore still sees every bank rail your account offers for that currency.
Configuring Webhooks (Mandatory)
Webhooks enable real-time payment updates and significantly improve reliability.
Benefits of Webhooks:
- Instant payment status updates
- Orders completed even when the shopper closes their browser
- Accurate failure, expiry, and compliance-hold records
TransFi holds one webhook address per account rather than accepting one per payment, so you paste the URL into your TransFi dashboard once.
Copy your PayLexer webhook URL
In your PayLexer dashboard, go to Payment Gateways → TransFi and copy the generated Webhook URL.
Paste it into TransFi
In your TransFi dashboard, go to Settings → Integration and paste the URL as your webhook endpoint.
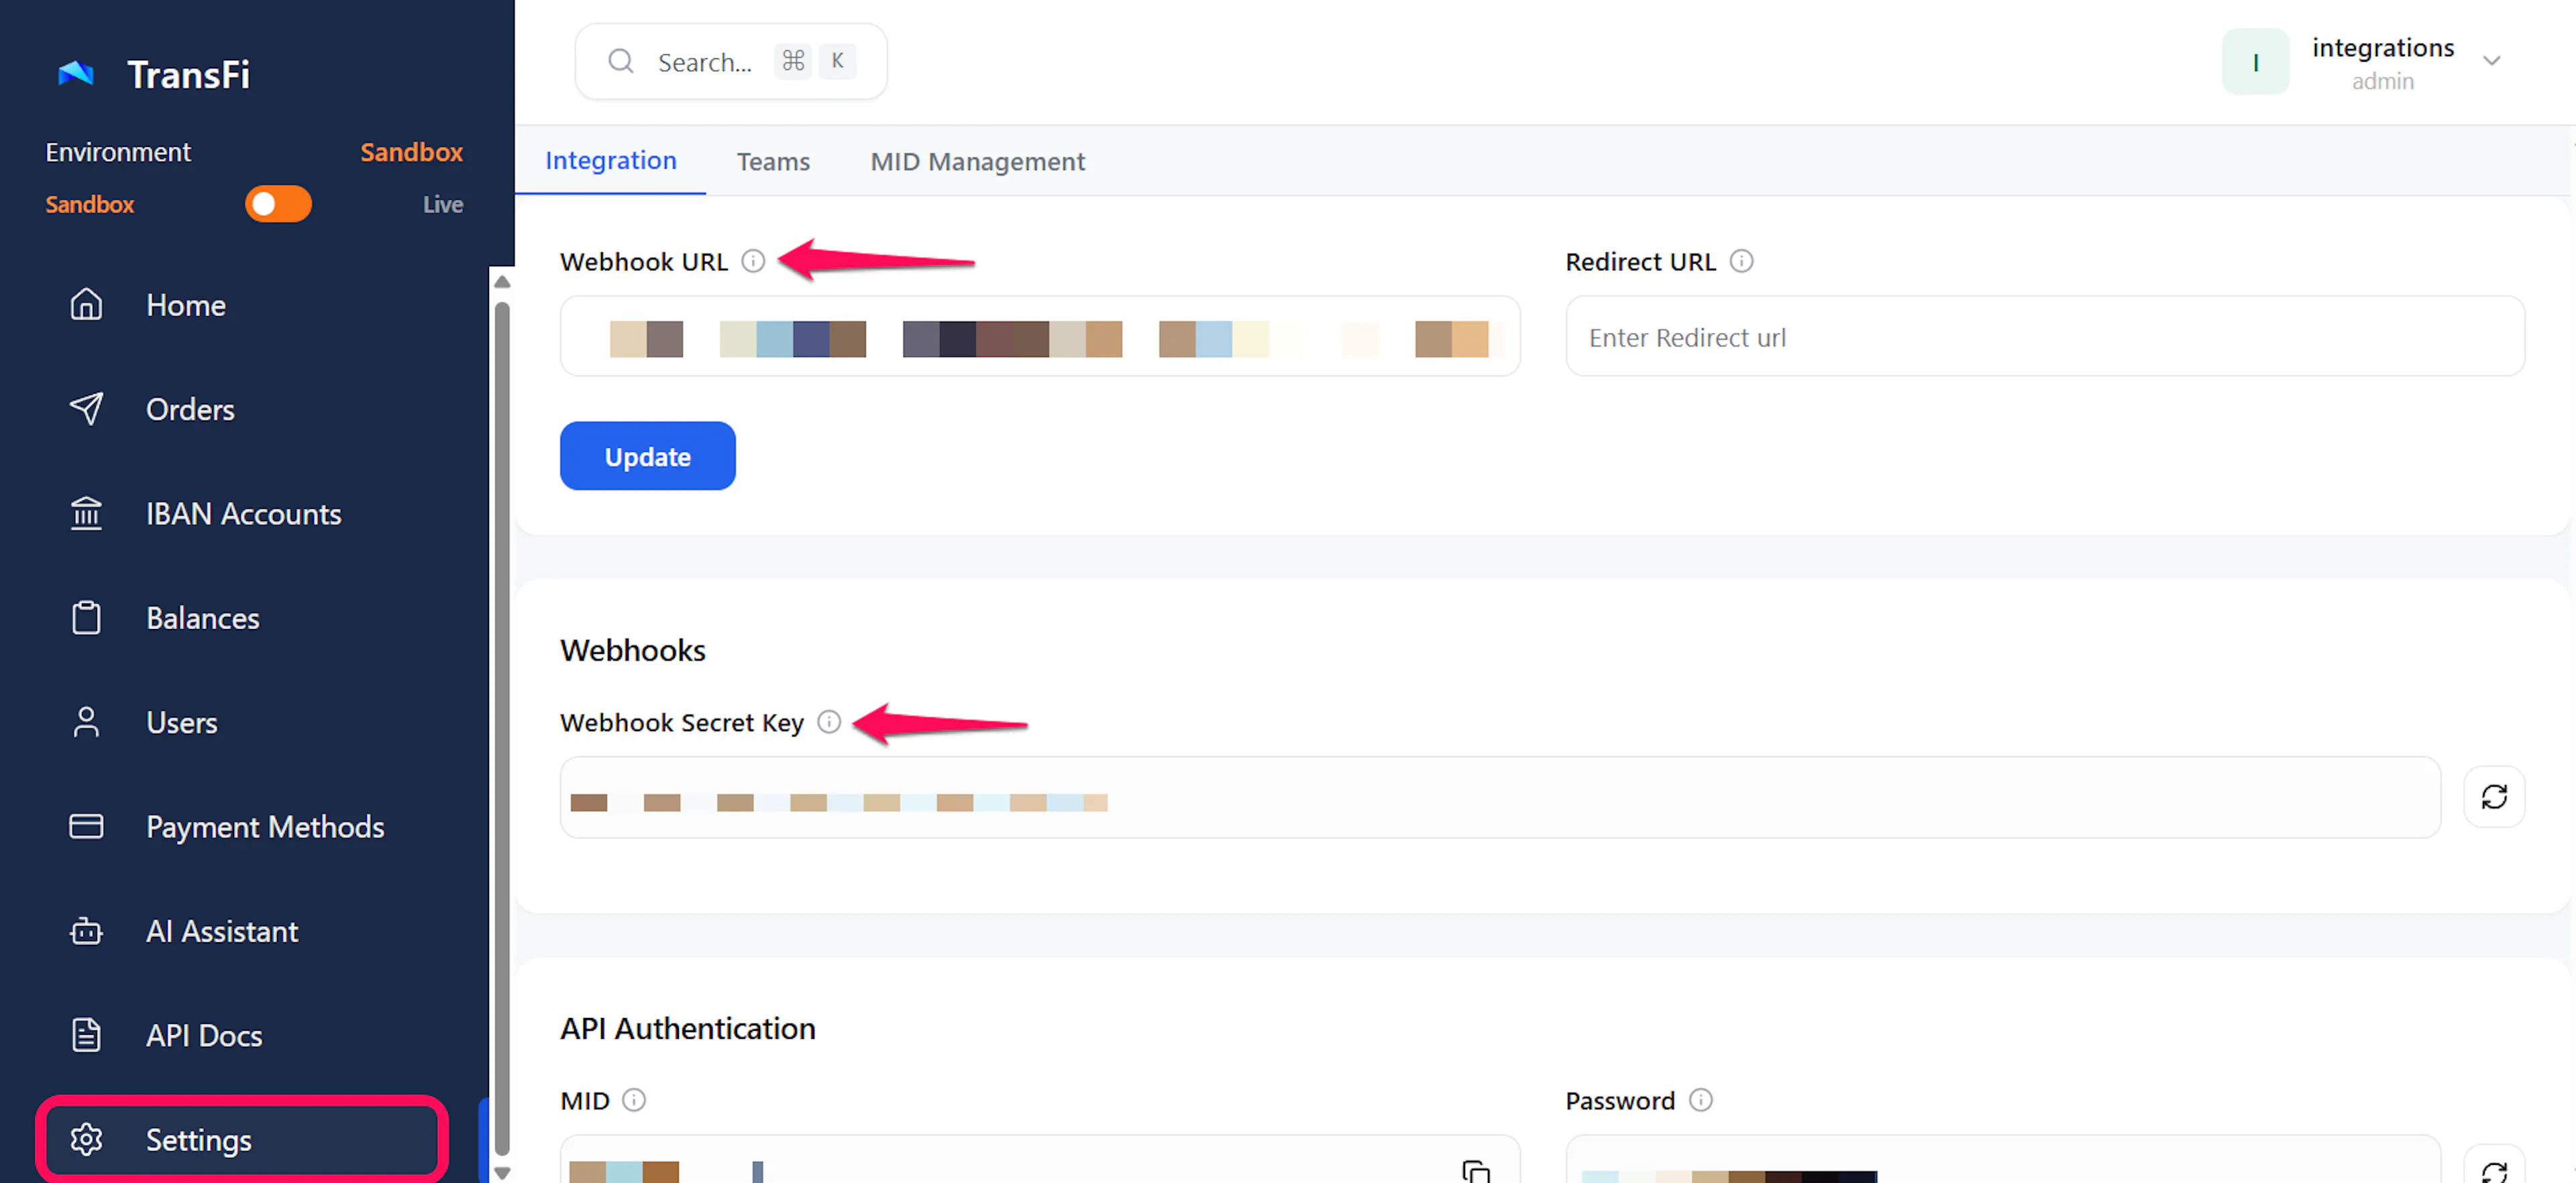
Copy the webhook secret back to PayLexer
TransFi gives you a signing secret on the same page, with a button to regenerate it. Copy it into the Webhook Secret field in PayLexer for the environment you are configuring, then click Save.
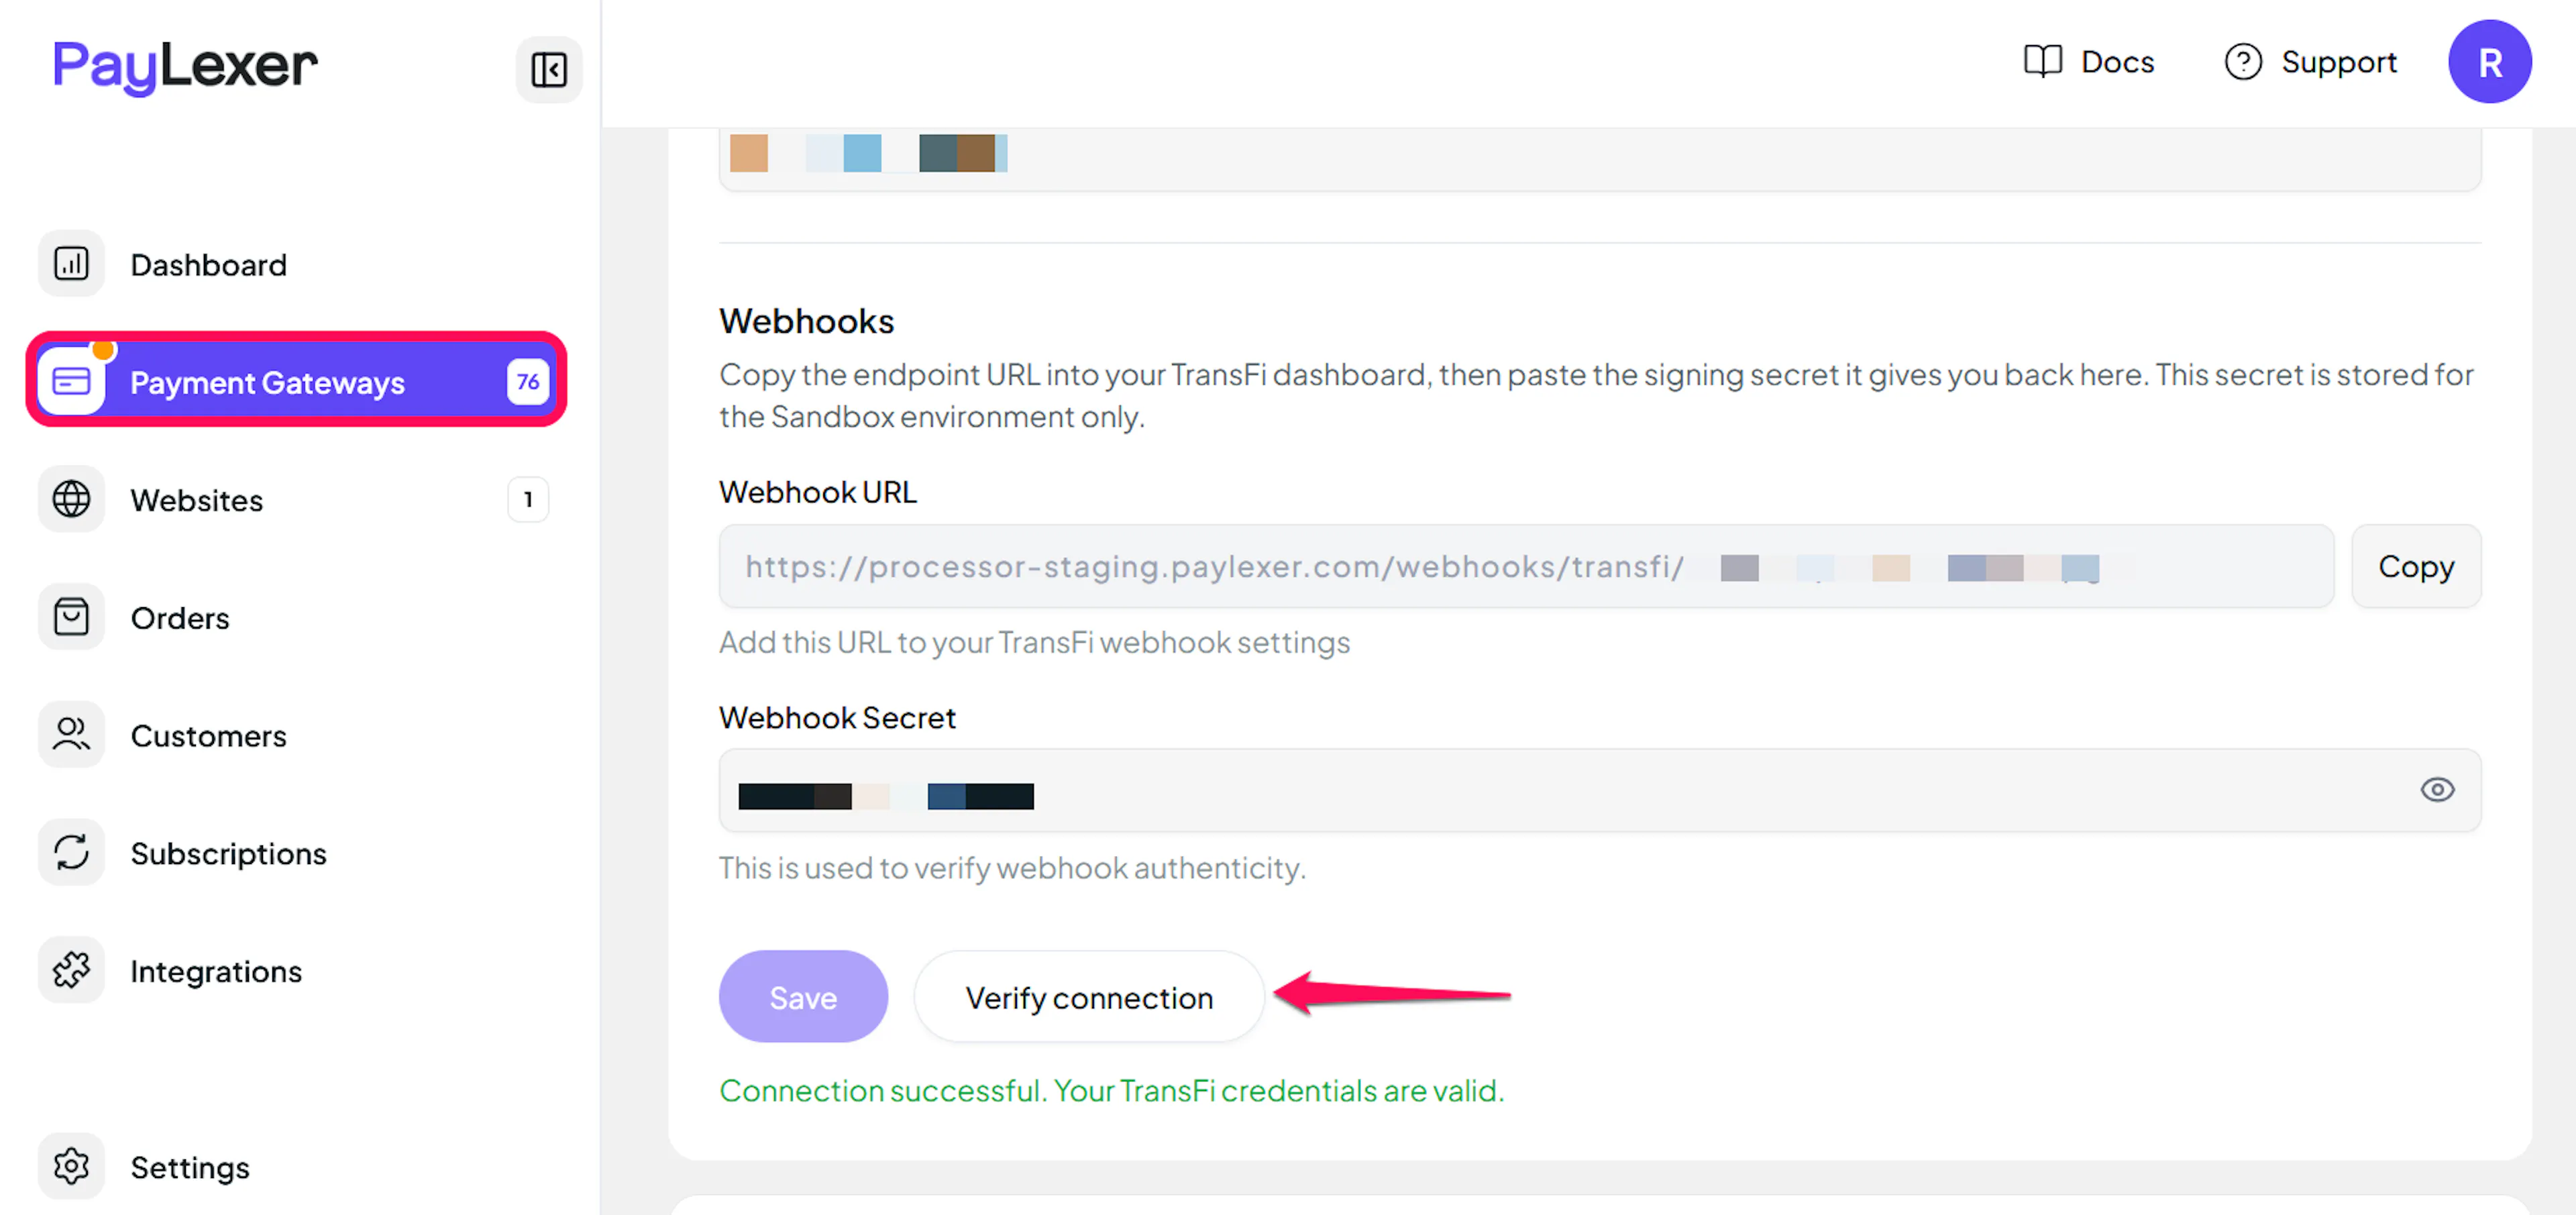
The secret is stored per environment. A sandbox secret pasted into the live field, or the reverse, makes PayLexer reject every notification as unsigned, and orders stay pending with no visible error at TransFi's end.
Until both the webhook URL and secret are configured, orders are completed only when the shopper returns to your store. If a shopper pays by bank transfer and closes their browser, the order remains unpaid. That’s why webhook setup is mandatory, not optional.
Returning from TransFi’s payment page is not proof of payment. TransFi sends shoppers back as soon as they submit, which can be well before a bank transfer arrives. PayLexer therefore confirms the payment status with TransFi first. If the payment is still processing or under compliance review, the shopper is returned to checkout and the order remains open until the funds settle.
Integrate TransFi to Your Website
If you have already added and configured your site, you can enable TransFi in your existing setup.
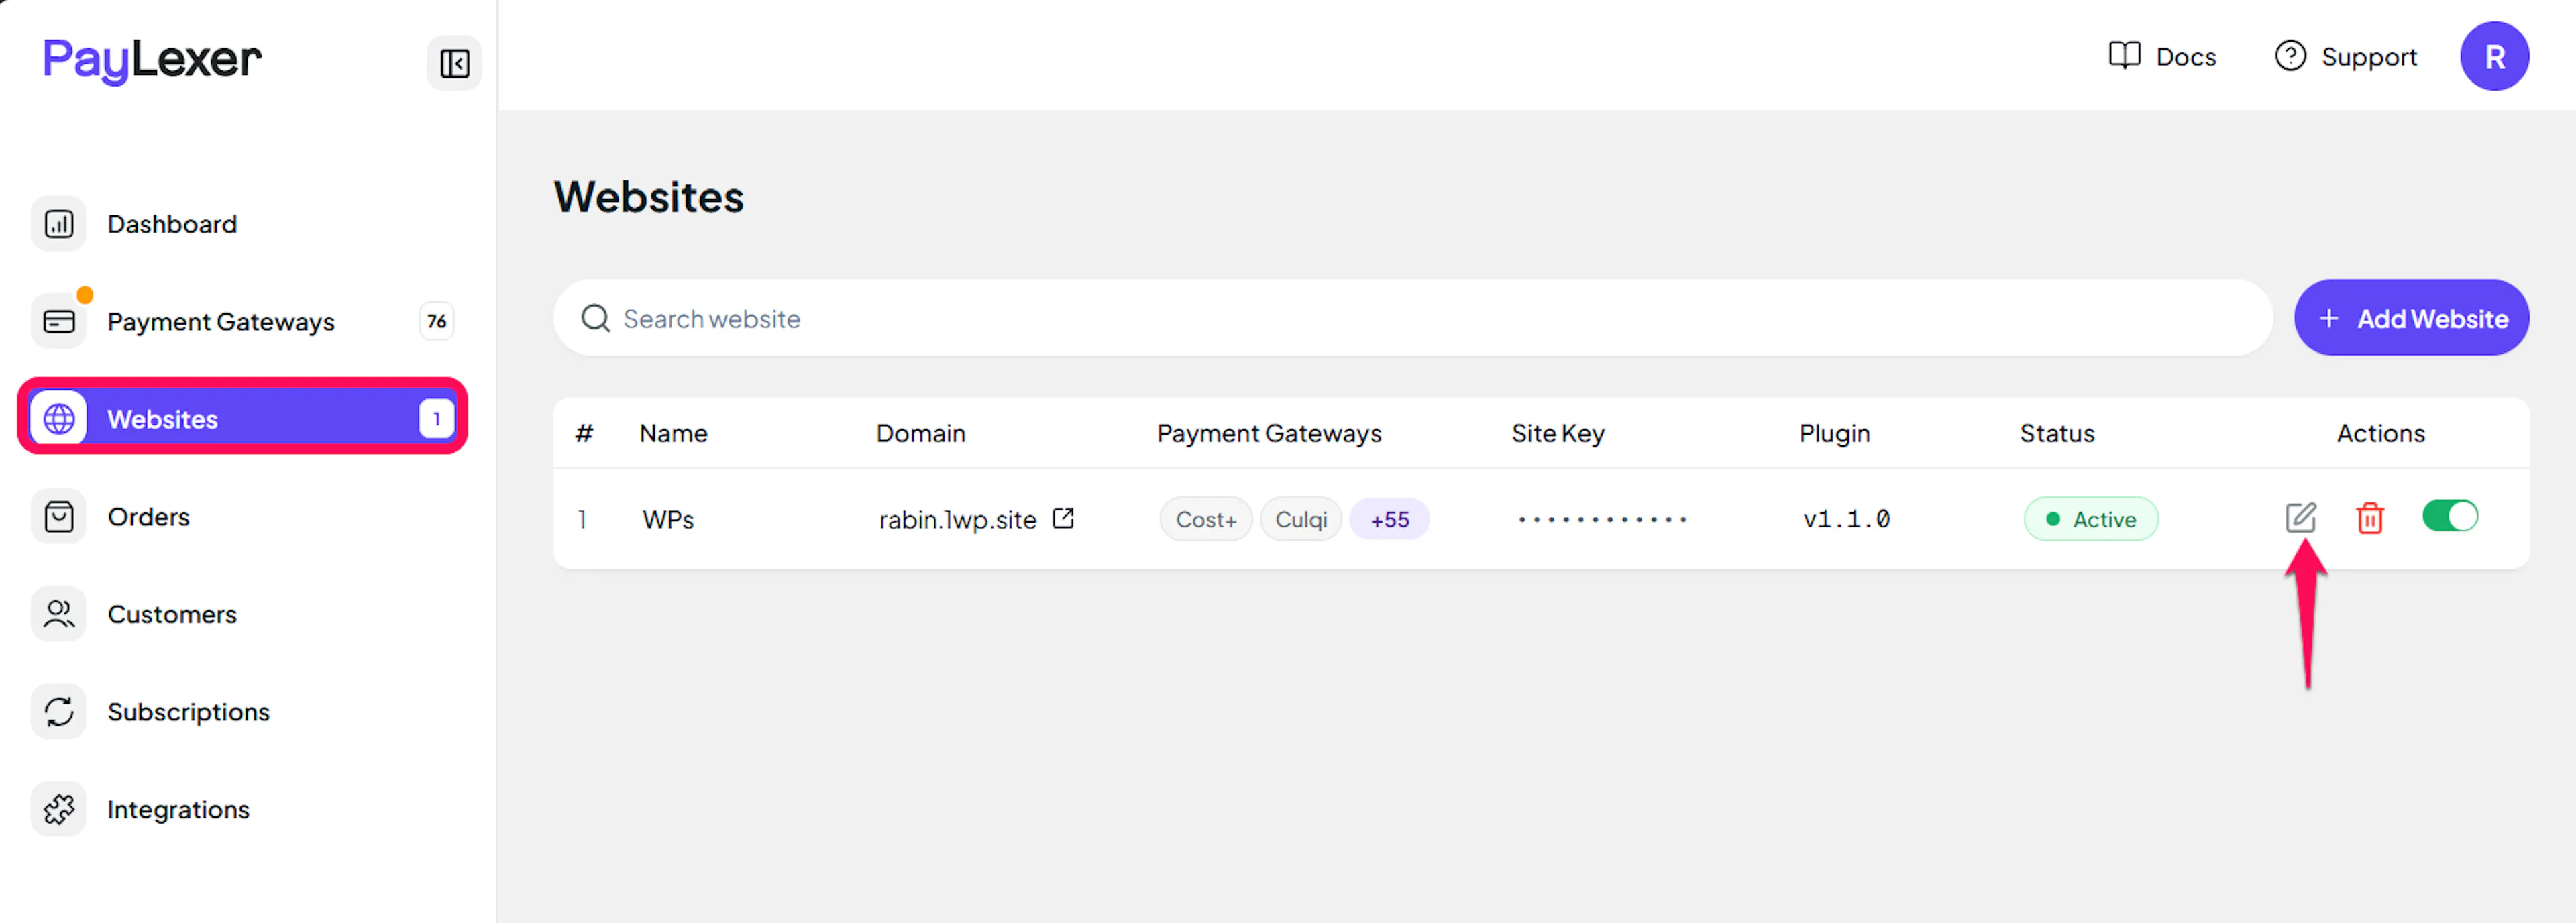
Go to Websites
Navigate to Websites in your PayLexer dashboard.
Edit your website
Click the Edit Icon of your added website.
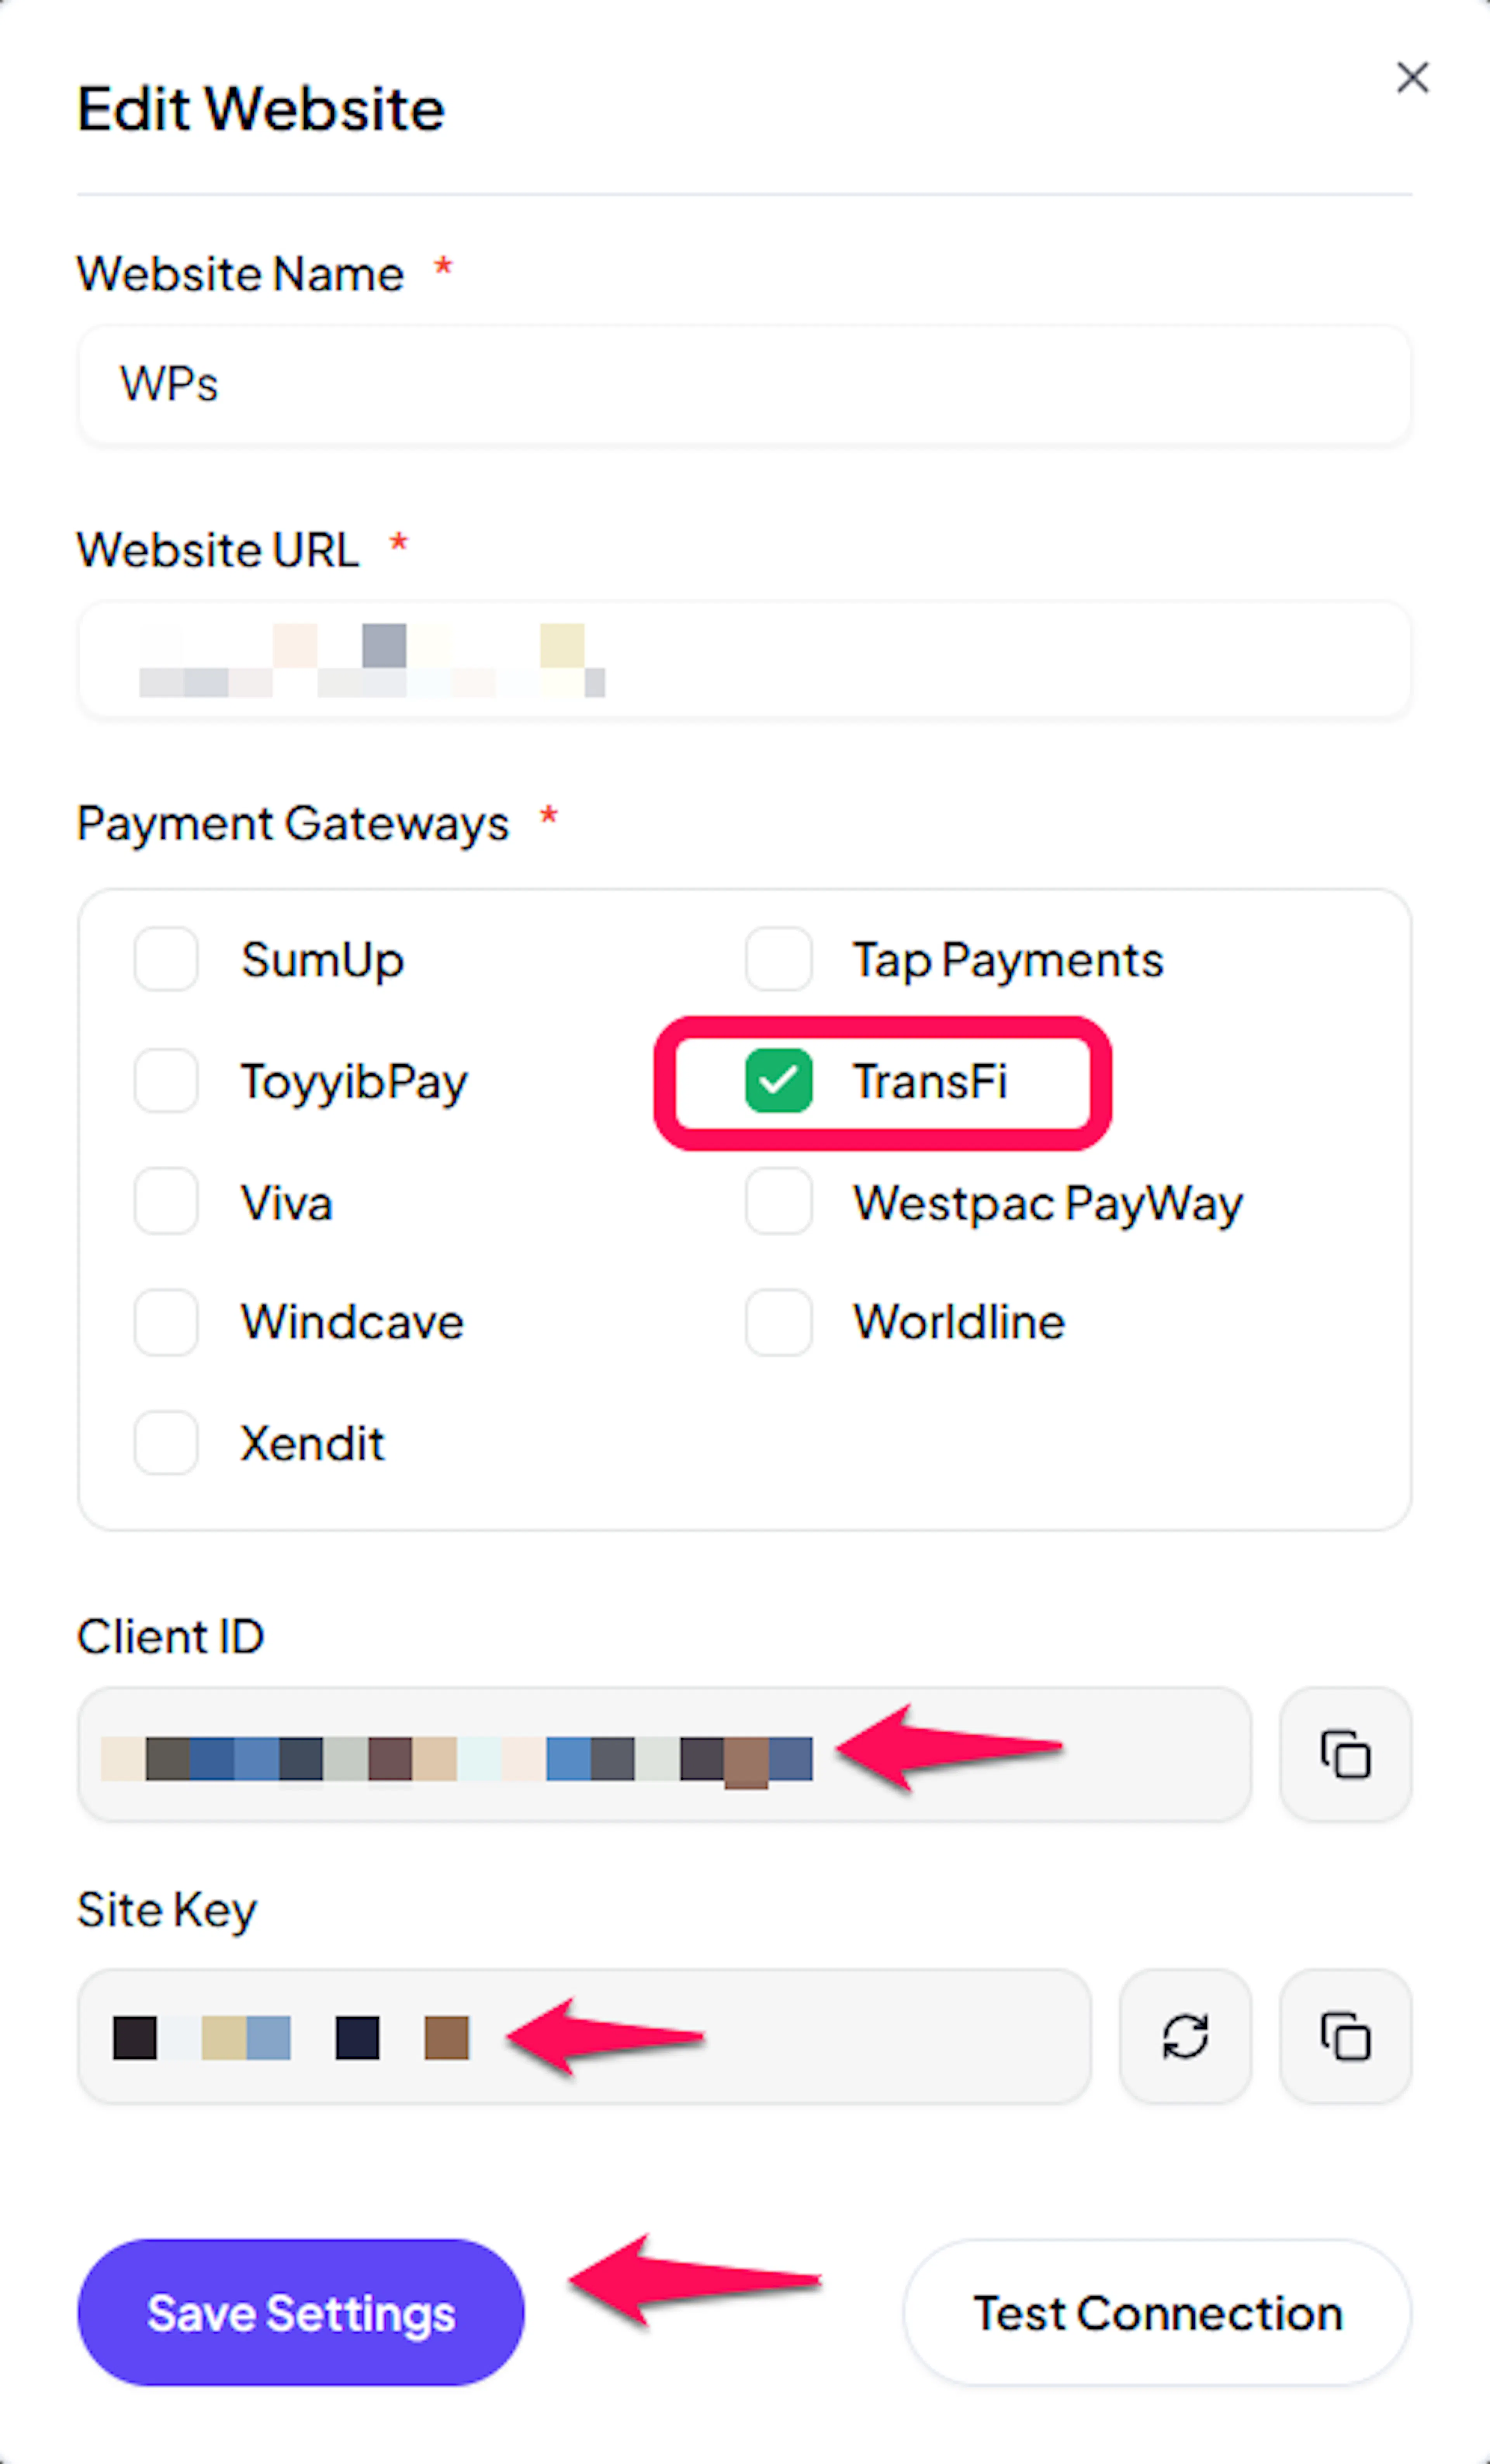
Enable TransFi
Click the checkbox to enable TransFi for the website.
If you haven't added a website yet, Continue to Add Your Website →
What TransFi Requires at Checkout
TransFi requires a verified email or phone number and a complete payer record before issuing a payment URL. Incomplete details are rejected. This is the single most common reason a TransFi checkout fails before the shopper ever sees a payment page, so it is worth getting right before you go live.
Make billing phone and billing address required fields at your checkout. If either is missing, the order fails at creation with a message naming the field.
The fields TransFi validates
| Field | What "valid" means |
|---|---|
| Country | Must be a country TransFi serves - see TransFi's supported countries. This is the shopper's billing country, not where your business is. An unsupported country is refused outright and no configuration on your side can change it |
| Street address | Must be a real street that TransFi can resolve for the city and postcode given. This is the one that catches people out - see the callout below |
| City | The real city for that street and postcode |
| Postal code | A real postcode for that city. Supplying one is what makes TransFi look the street up |
| Phone | Must be a valid phone number for the billing country. Use the international format (e.g., +61) or ensure the billing country is set, as TransFi needs the country dialing code when the number has no prefix. |
| State / province | TransFi does not currently check this, but keep it correct anyway. It appears on your own records and other gateways do check it |
A worked example - Australia
These five values are consistent with each other, which is the part that matters:
Street address : 200 Bourke Street
City           : Melbourne
State          : VIC
Postal code    : 3000
Country        : AU
Phone          : +61 491 570 006
Change the country and every other field has to change with it. You cannot keep an Australian address and only swap the other fields.
The postcode triggers a street lookup. When provided, TransFi checks whether the street matches the postcode and refuses addresses it cannot find. Placeholder or mismatched address data is the usual cause. The street, city, and postcode must all describe the same real location.
Payer verification
TransFi verifies the payer’s email or phone as part of its compliance checks. New payer records start as unverified, so TransFi may ask the shopper to confirm a code before completing payment.
This does not prevent order creation. The shopper can still reach the payment page. It only affects payment completion, so:
- Collect a valid email and phone number the shopper can access.
- Returning shoppers are matched by email, so previously verified shoppers do not need to verify again.
- Some currencies may require additional identity verification. For example, Mexican SPEI payments may require a CURP or RFC number in the exact required format.
Both checks belong to TransFi, not PayLexer, and both happen on TransFi's own payment page after the redirect. PayLexer cannot pre-fill or skip them.
Troubleshooting
Best Practices
- Test in sandbox before enabling production, using your sandbox username, password, and Merchant ID
- Set up the webhook URL and secret before your first live payment, not after. Without them, orders complete only when the shopper returns
- Make phone number and billing address required at checkout, because TransFi requires both on every payer record
- Confirm which rails your account has enabled for each currency you sell in before going live, so you are not surprised by a payment method your shoppers cannot use
- Agree a refund process with TransFi support before you launch, since refunds cannot be issued from PayLexer
- Reconcile PayLexer Dashboard → Orders against your TransFi dashboard regularly
FAQs
Still Have Questions?
- TransFi Help Center: TransFi Help Center
- PayLexer Support: Contact Support