

How to Integrate PayLexer with Tutor LMS
Connect PayLexer to Tutor LMS to sell courses and subscription plans with any payment gateway, using the PayLexer for Tutor LMS add-on.
Connect PayLexer to Tutor LMS to accept course payments and subscription renewals across multiple payment gateways.
Overview
Tutor LMS is a WordPress plugin for creating, selling and managing online courses. PayLexer for Tutor LMS is PayLexer's own add-on for it. It adds every gateway you connect in PayLexer, such as Stripe, PayPal and more, to Tutor LMS's native eCommerce checkout, each as its own payment method.
Tutor LMS needs two PayLexer plugins: the PayLexer plugin, which connects your site to PayLexer, and the PayLexer for Tutor LMS add-on, which brings your gateways into Tutor LMS. The add-on never sees or stores gateway credentials.
Supported Features
- One-time payments - Students pay for a course in a single transaction on the gateway's secure hosted page.
- Subscriptions (Tutor LMS Pro) - Bill Tutor LMS Pro subscription plans as PayLexer subscriptions, renewals included, with trials, enrollment fees and billing-cycle limits.
- Automatic enrollment - Students are enrolled as soon as the payment is confirmed.
- Refunds from Tutor LMS - Refund full or partial amounts from the Tutor LMS order. Refunds made in the gateway's own dashboard or the PayLexer dashboard, full or partial, are mirrored back to the order.
- One payment method per gateway - Each gateway you enable in PayLexer gets its own card, name, logo and on/off switch in Tutor LMS.
- Multiple payment gateways and websites - Connect and manage several gateways and websites from one PayLexer account.
- Test and Live mode per gateway - Test payments safely without real charges before going live.
Before You Start
Make sure you have the following before starting:
- Admin access to your WordPress site.
- Tutor LMS installed & active, with its native eCommerce turned on. Download Tutor LMS →
- Tutor LMS Pro, only if you want to sell subscription plans.
- The email address you want to use for PayLexer. If you don't have a PayLexer account yet, one is created for you while you connect.
- A payment gateway account, such as Stripe or PayPal. If you're new to PayLexer, you configure it after connecting your website. Choose and configure a gateway →
Setup Journey
If you haven't configured PayLexer yet, follow these steps in order before continuing:
Getting Started
Complete the PayLexer setup. Setup guide →
Connect Your Website
Install the PayLexer plugin and select Connect Account. Connect your site →
Configure Payment Gateway
Choose and configure your gateway. Gateway docs →
Platform Integration
You're here! Continue below.
Test Transactions
Verify everything works. Test guide →
Integration Steps
You no longer add your website in PayLexer first or copy a Client ID and Site Key. The Connect Account button in the PayLexer plugin creates or signs in to your PayLexer account and adds your website automatically.
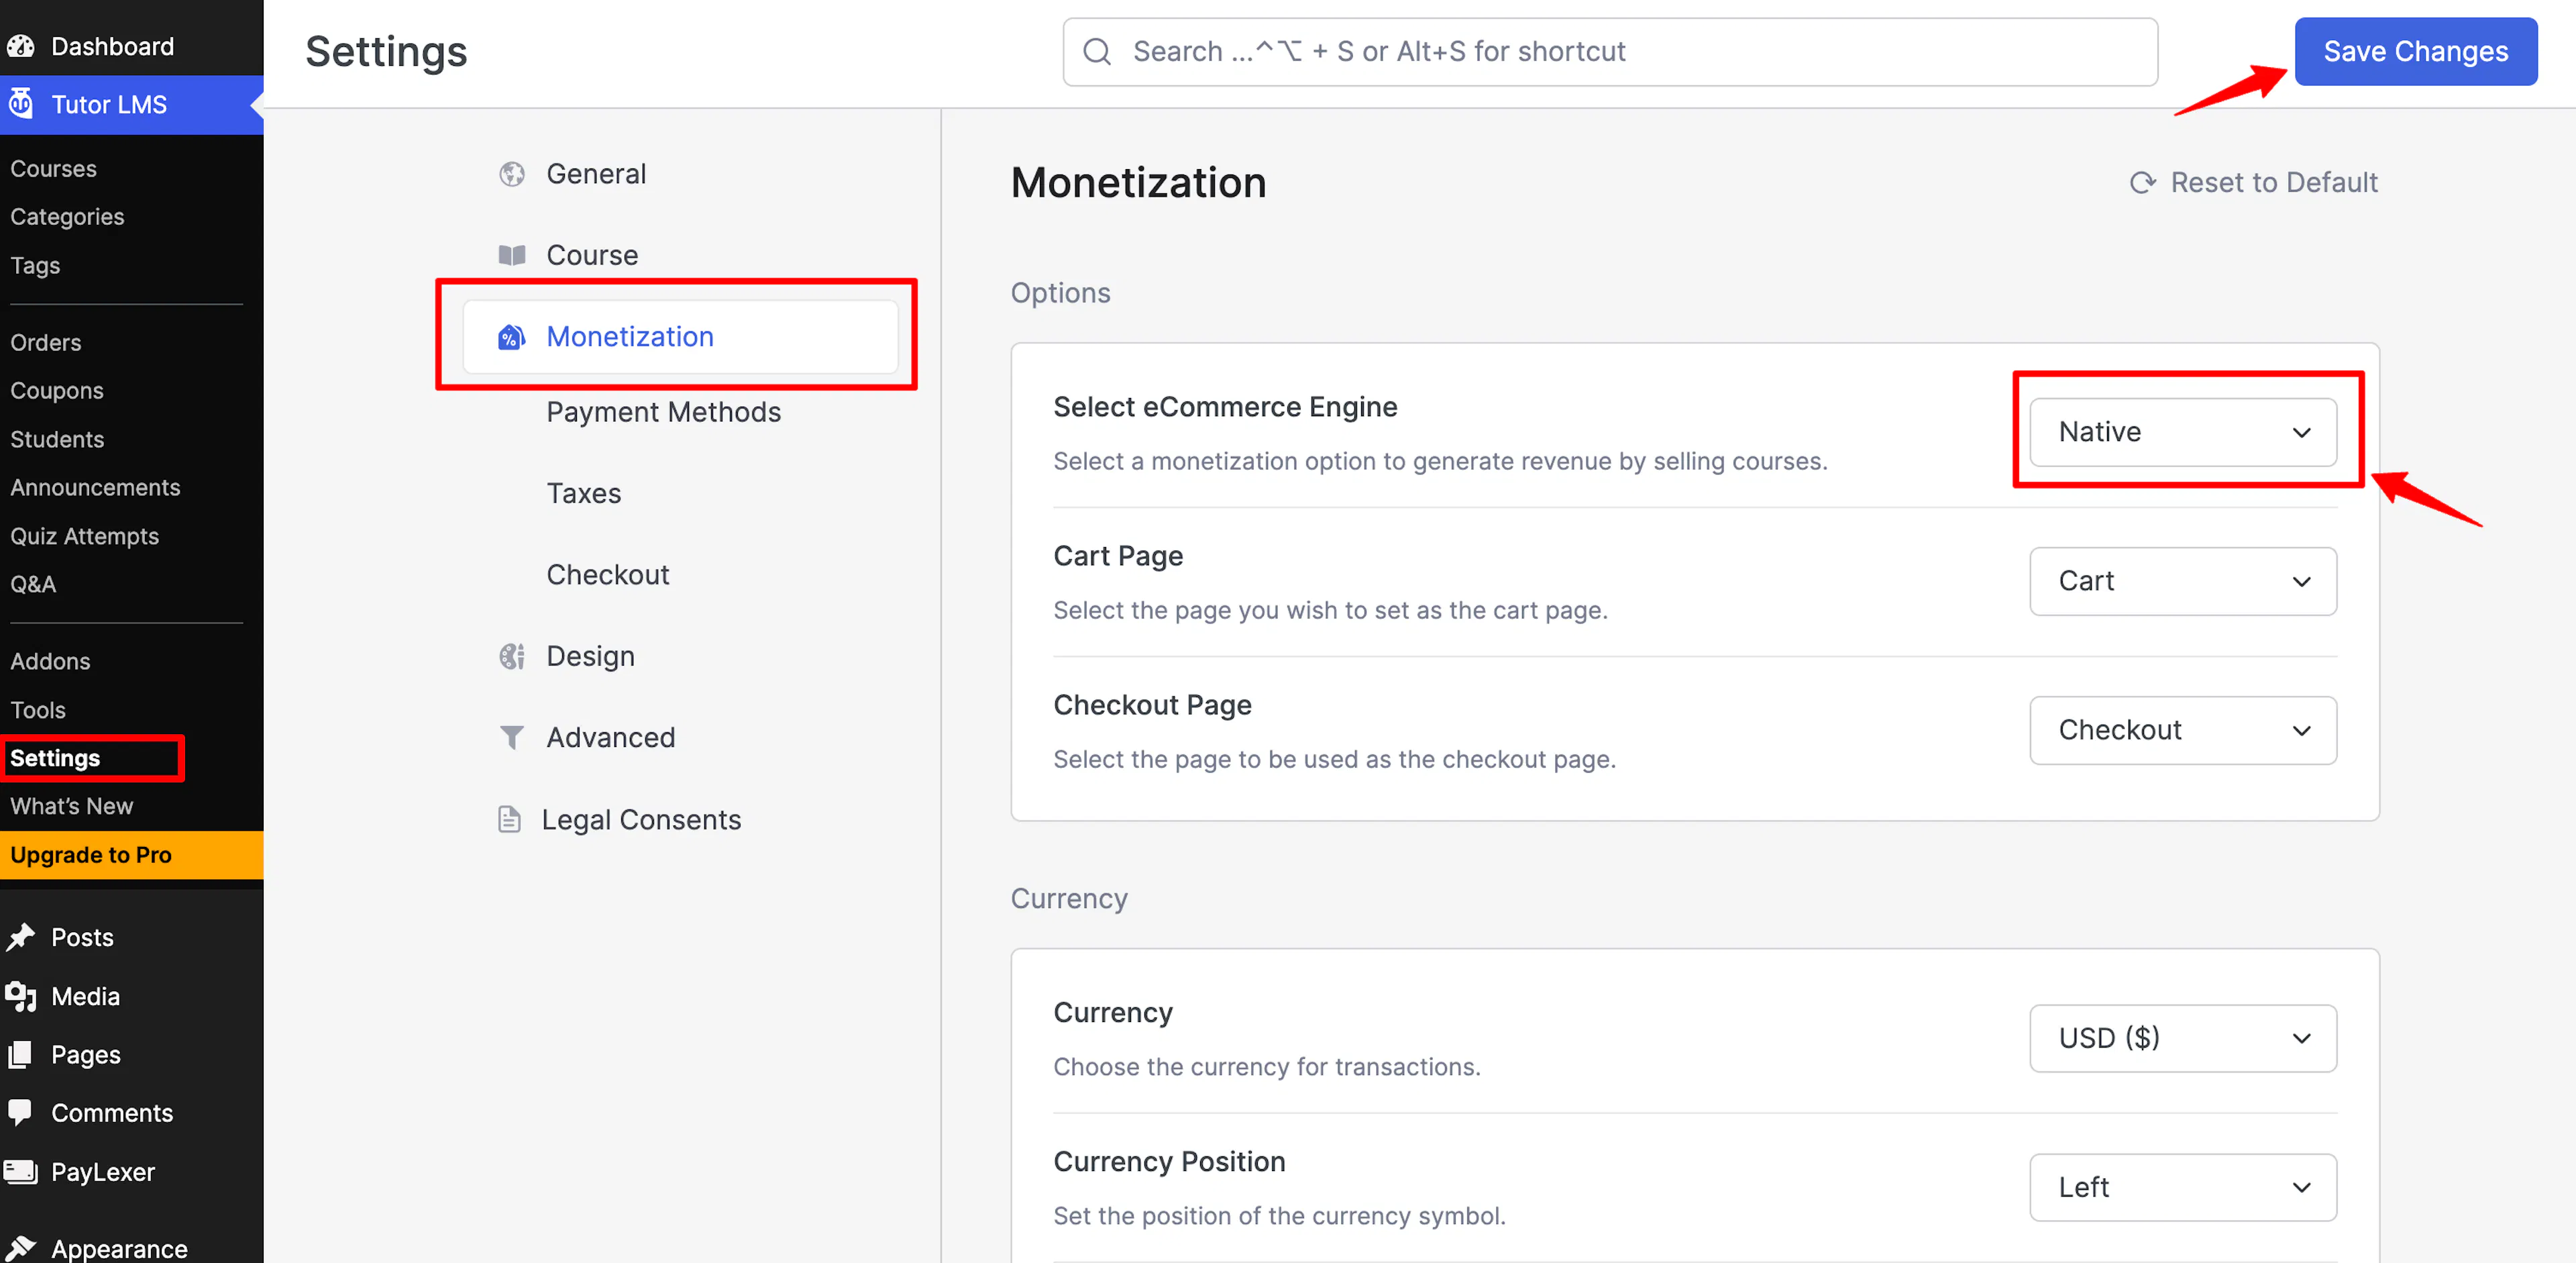
Turn On Tutor LMS eCommerce
- Go to Tutor LMS → Settings → Monetization.
- Select Native as the eCommerce engine.
- Click Save Changes.
Install the PayLexer WordPress Plugin
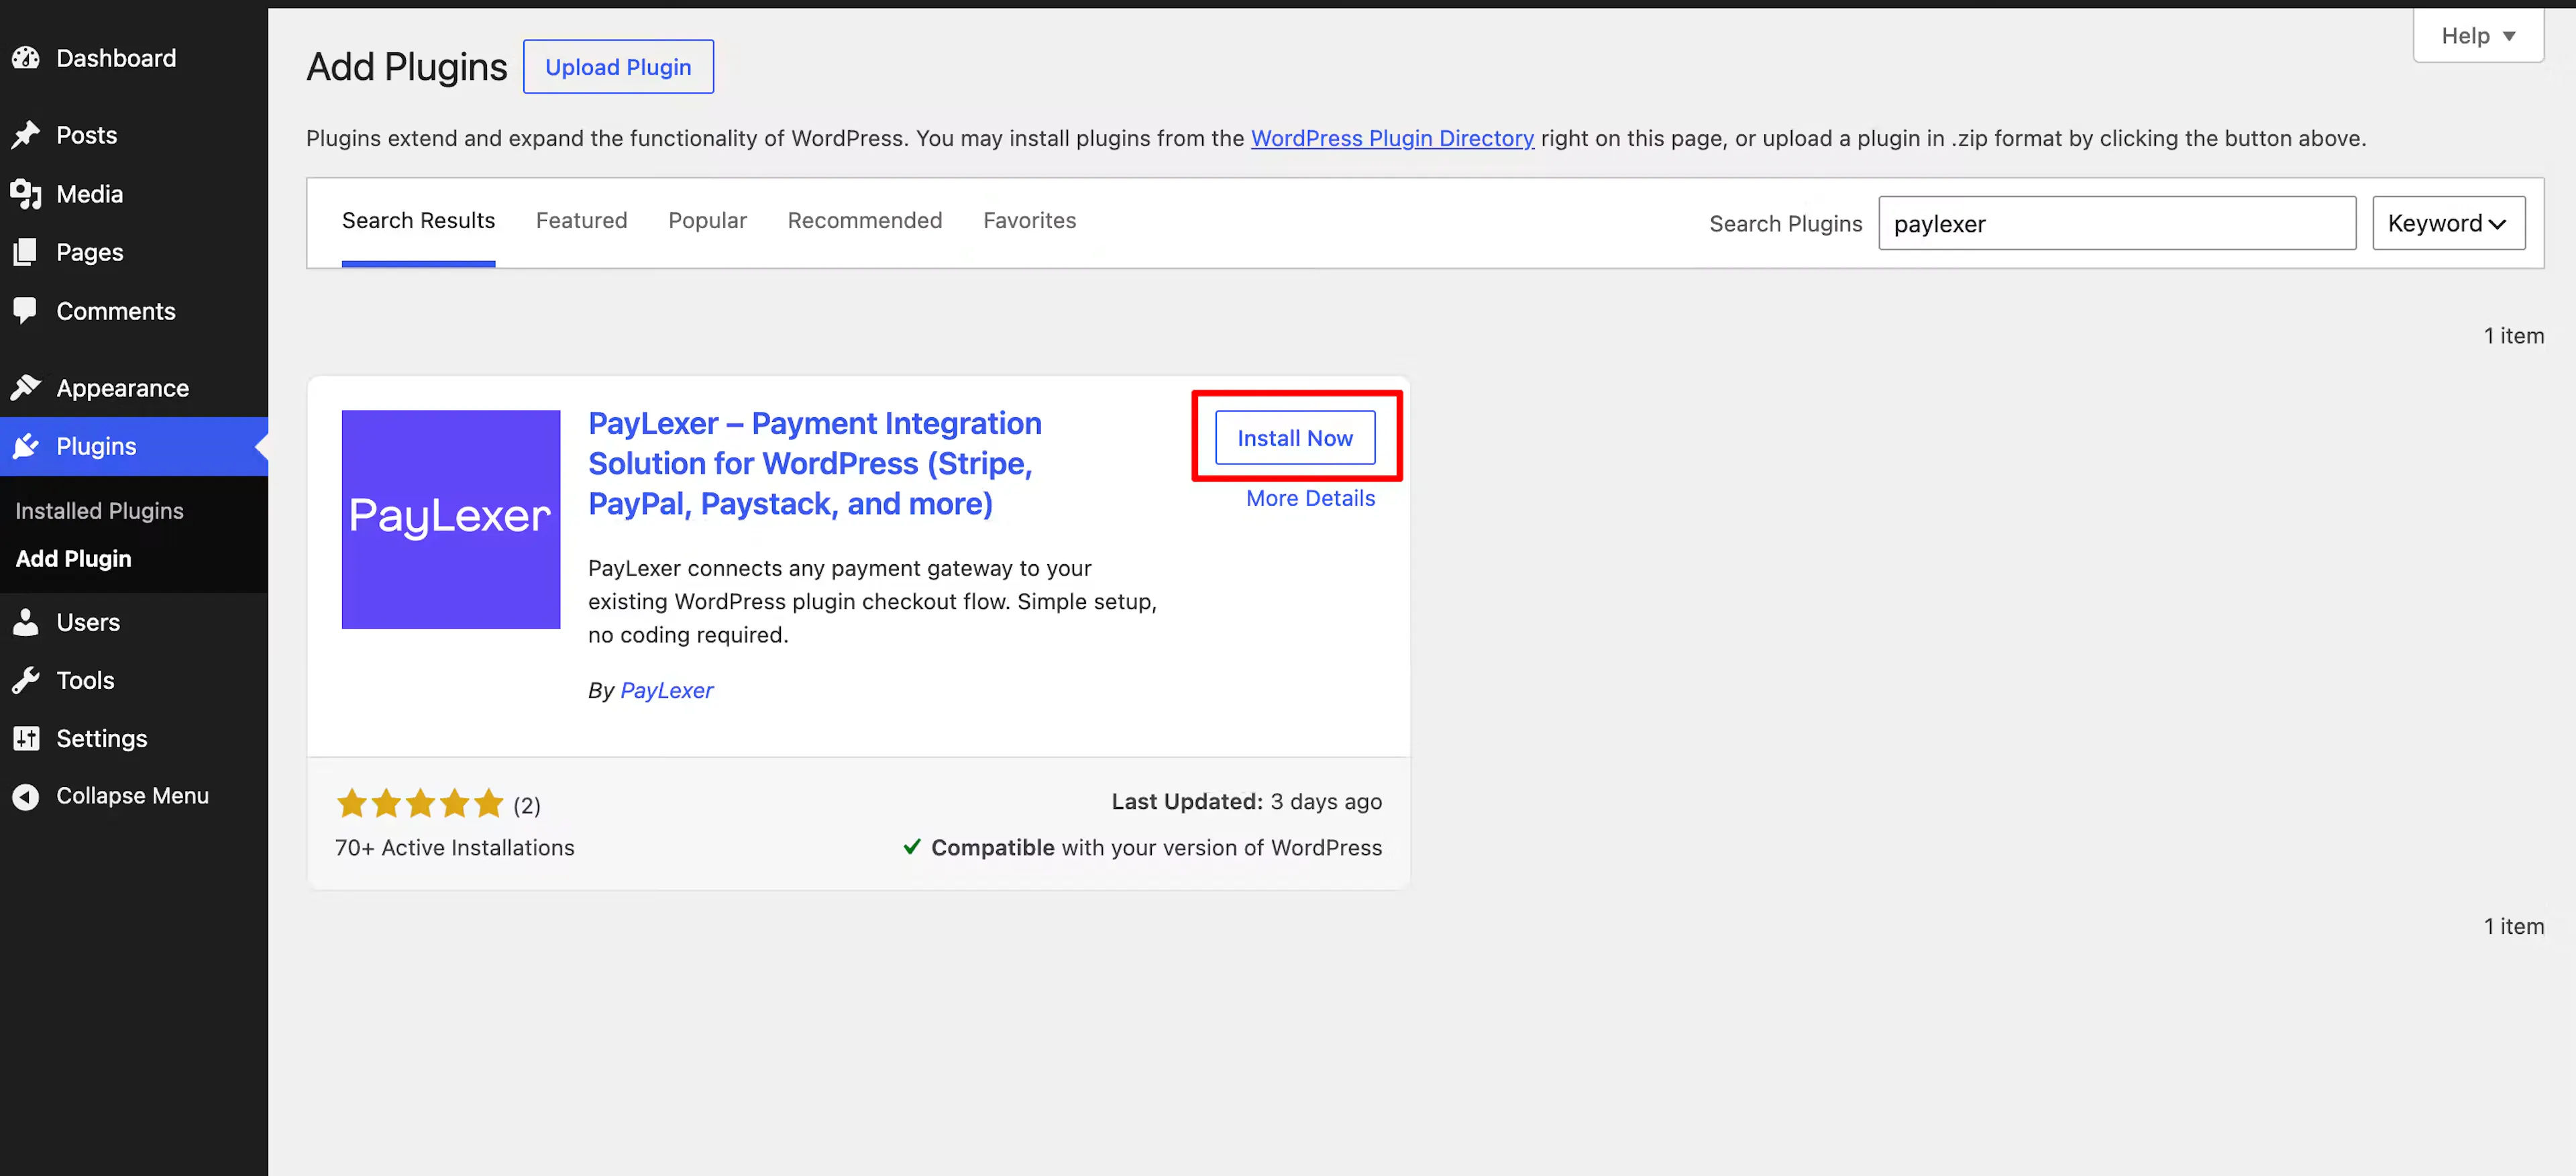
- Go to WordPress Admin → Plugins → Add New Plugin.
- Search for PayLexer, then click Install Now.
- Click Activate to enable the plugin on your site.
Connect Your PayLexer Account
- In the WordPress sidebar, go to PayLexer. The General page opens with the Connect to PayLexer card.
- Click Connect Account and enter your email address. What happens next depends on your account:
- New to PayLexer: your account is created and your website is connected.
- Existing account: enter your password to sign in and connect.
- Already signed in on this browser: you skip the password and go to the authorization page. Check the account and website, then click Connect Account and Authorize.
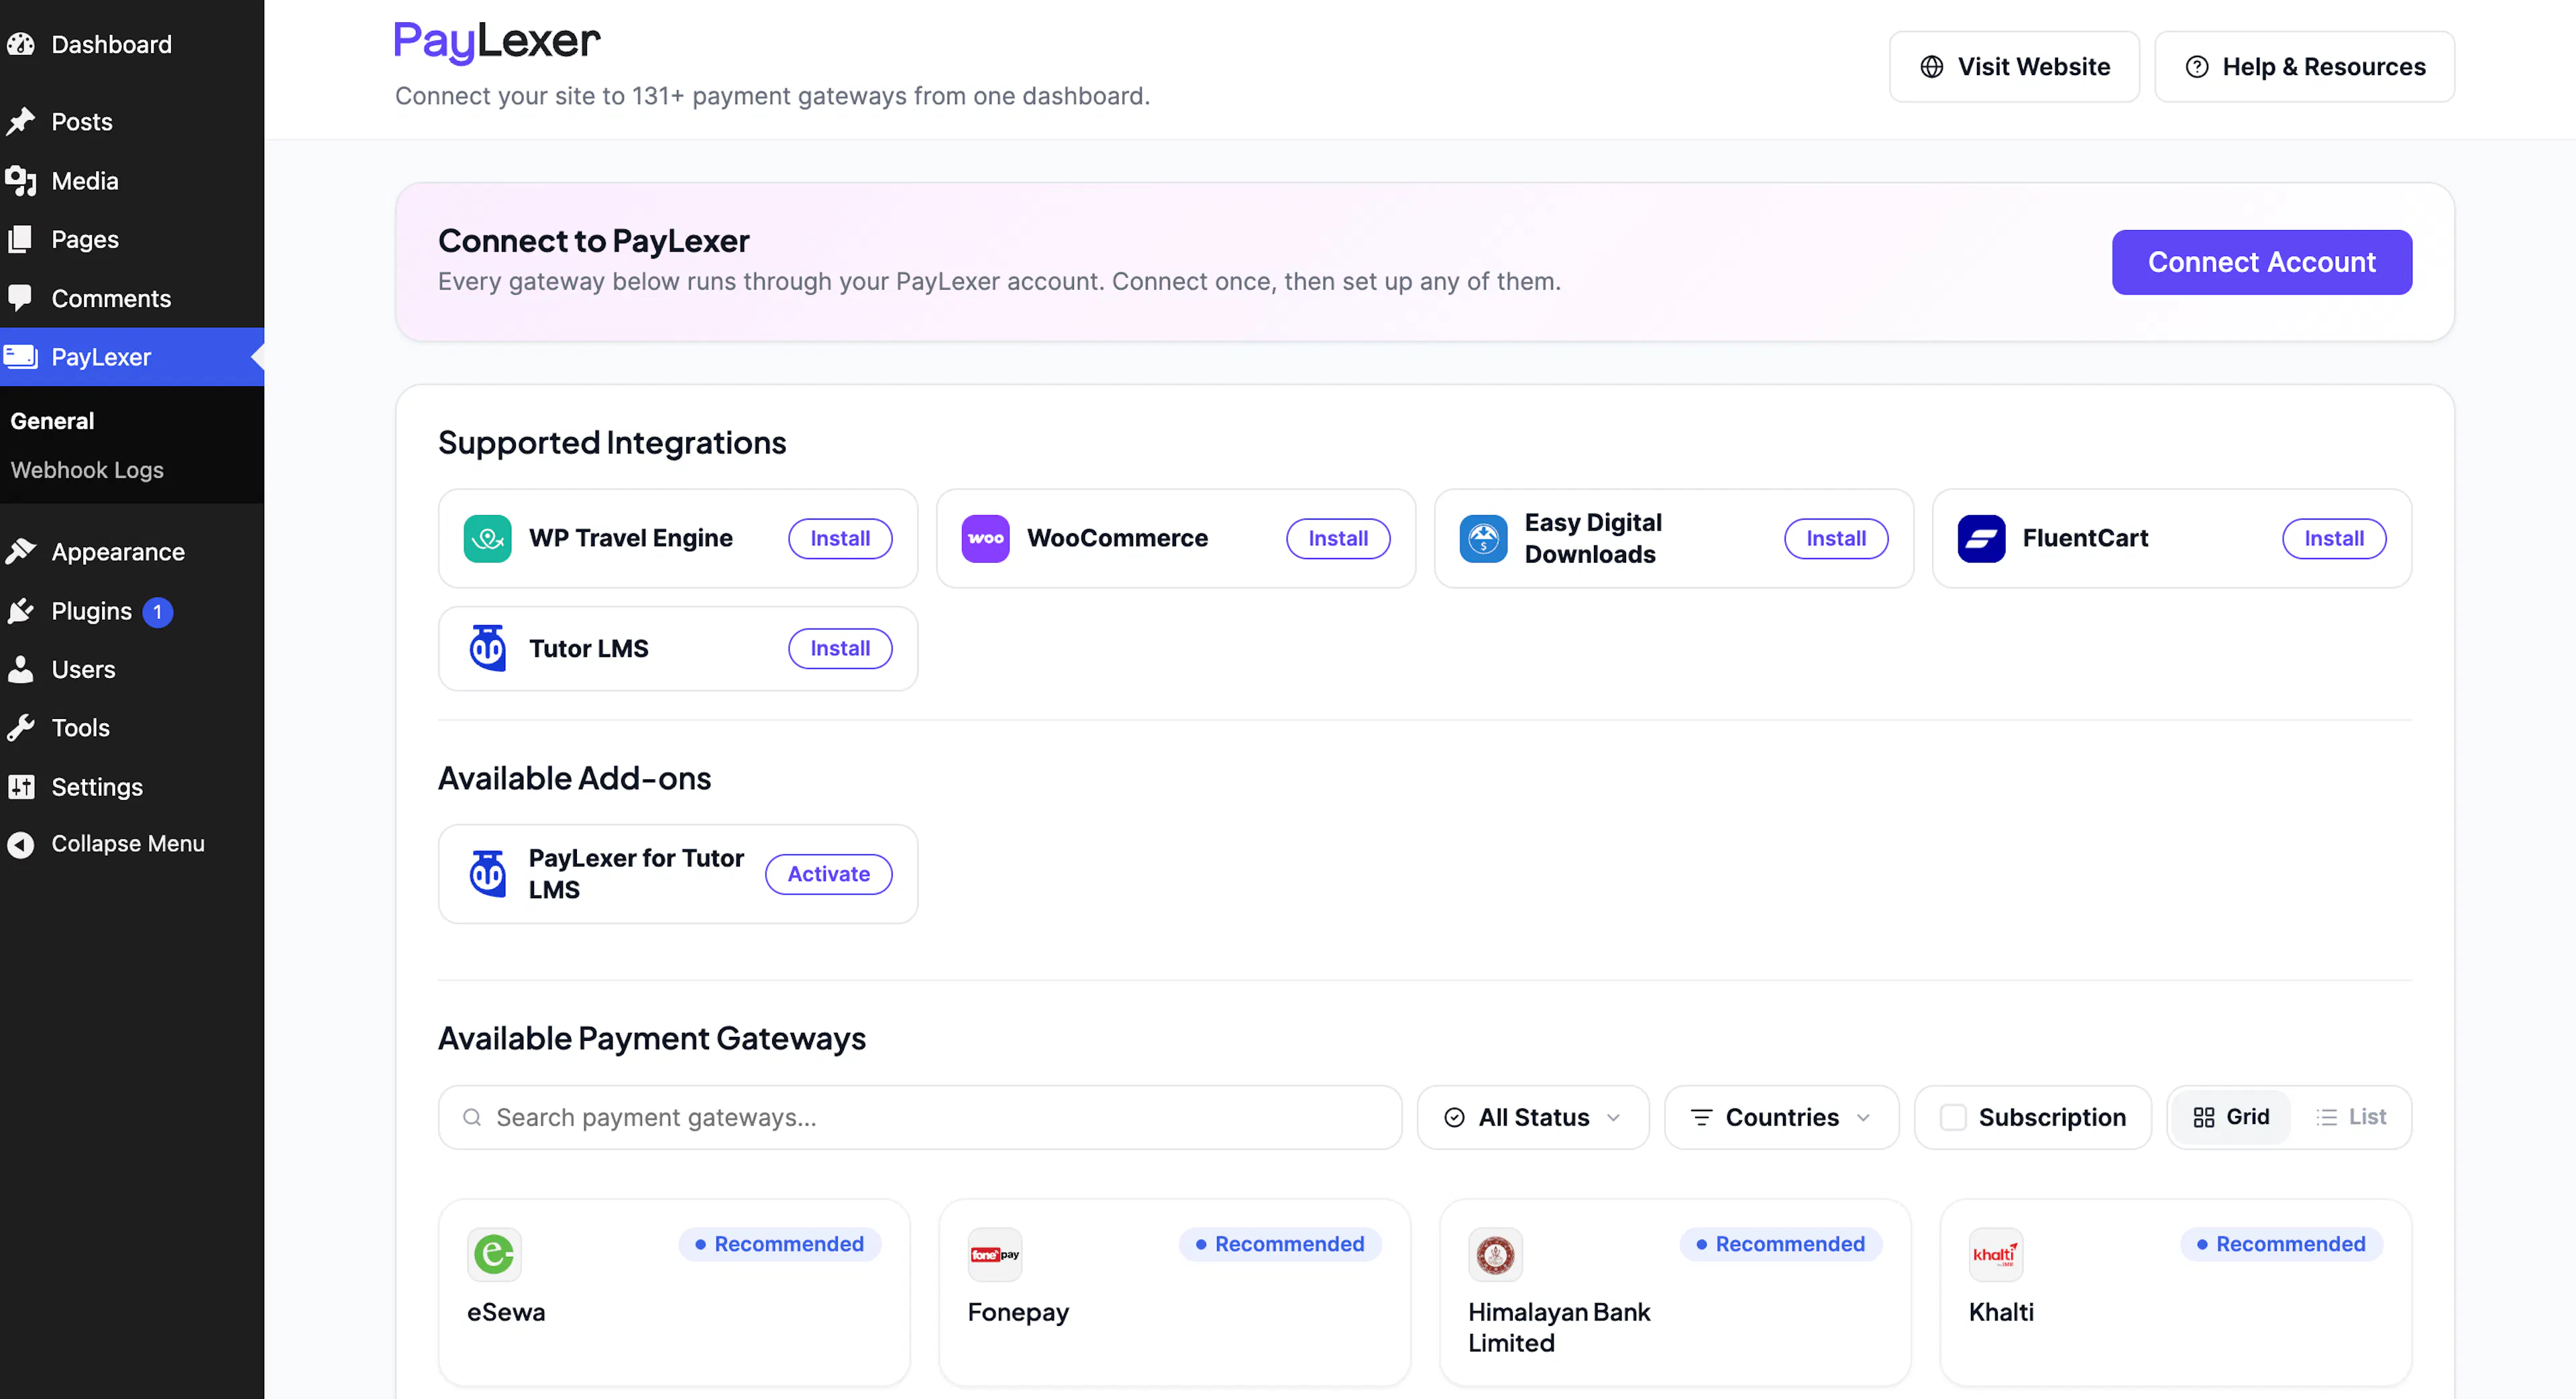
You only connect once. Every gateway you configure in PayLexer runs through this connection.
Prefer to start from PayLexer? Add your website from Websites → Add Website, then finish with Connect Account in the plugin. See both ways to connect →
Install the PayLexer for Tutor LMS Add-on
- On the PayLexer General page, find PayLexer for Tutor LMS under Available Add-ons.
- Click Install, then click Activate.
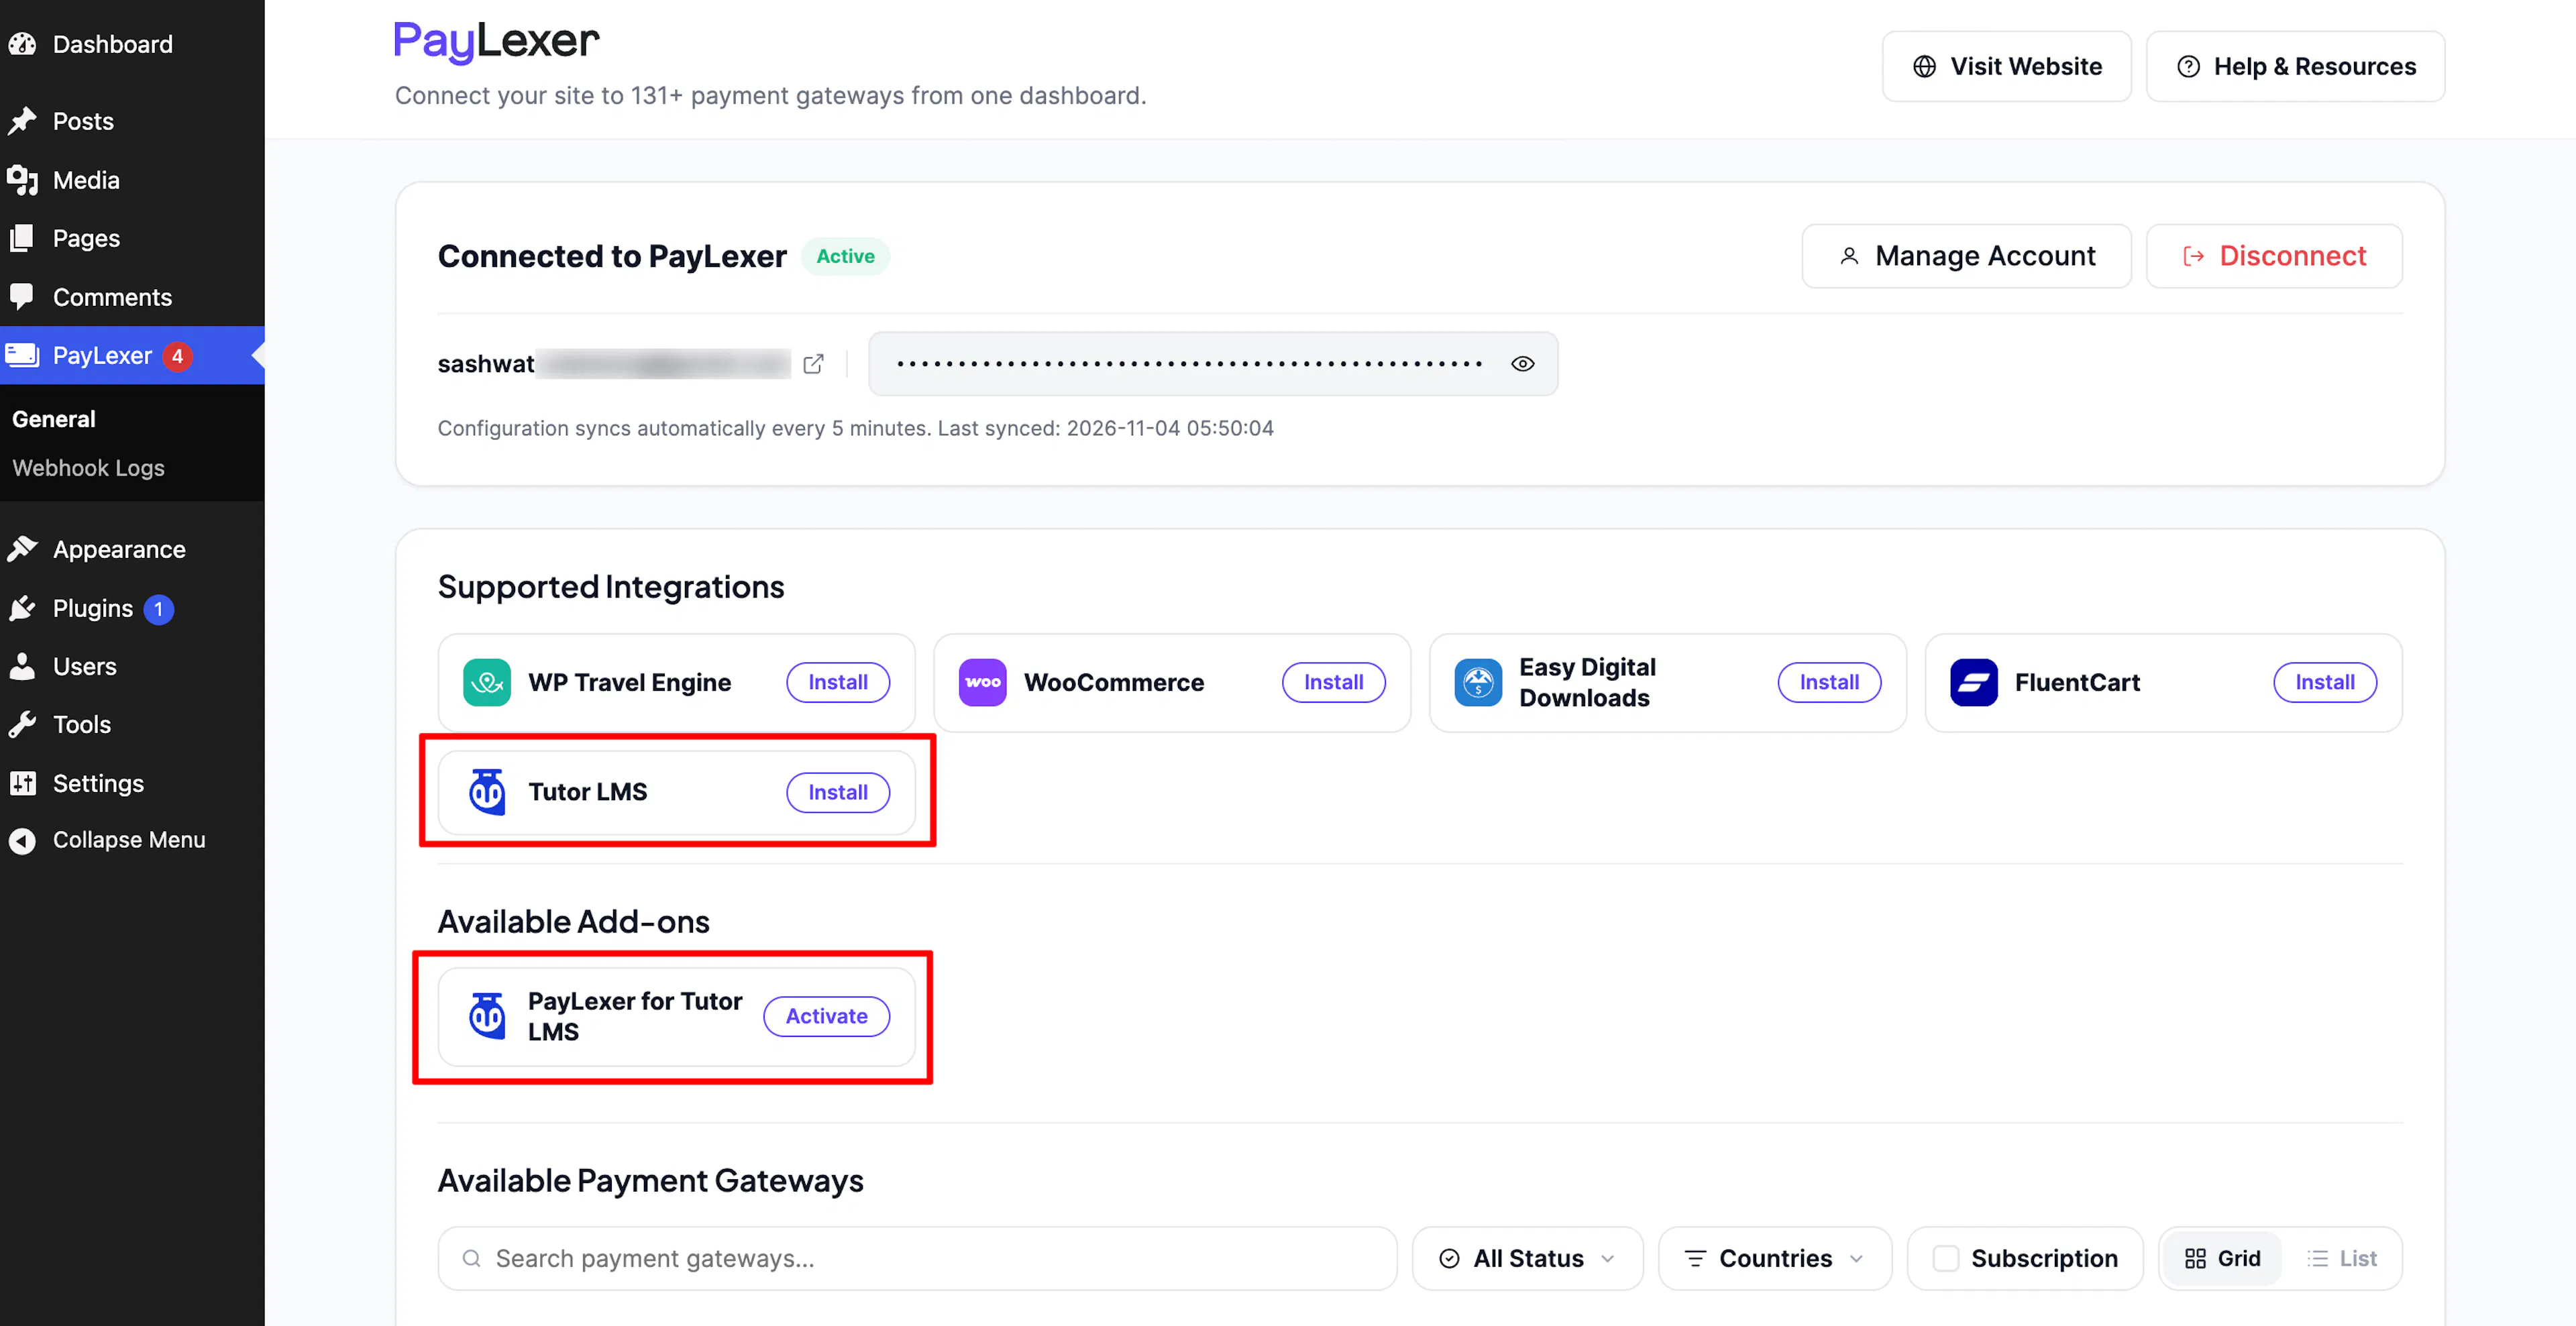
You can also install it from Plugins → Add New Plugin by searching for PayLexer for Tutor LMS.
Check the Connection
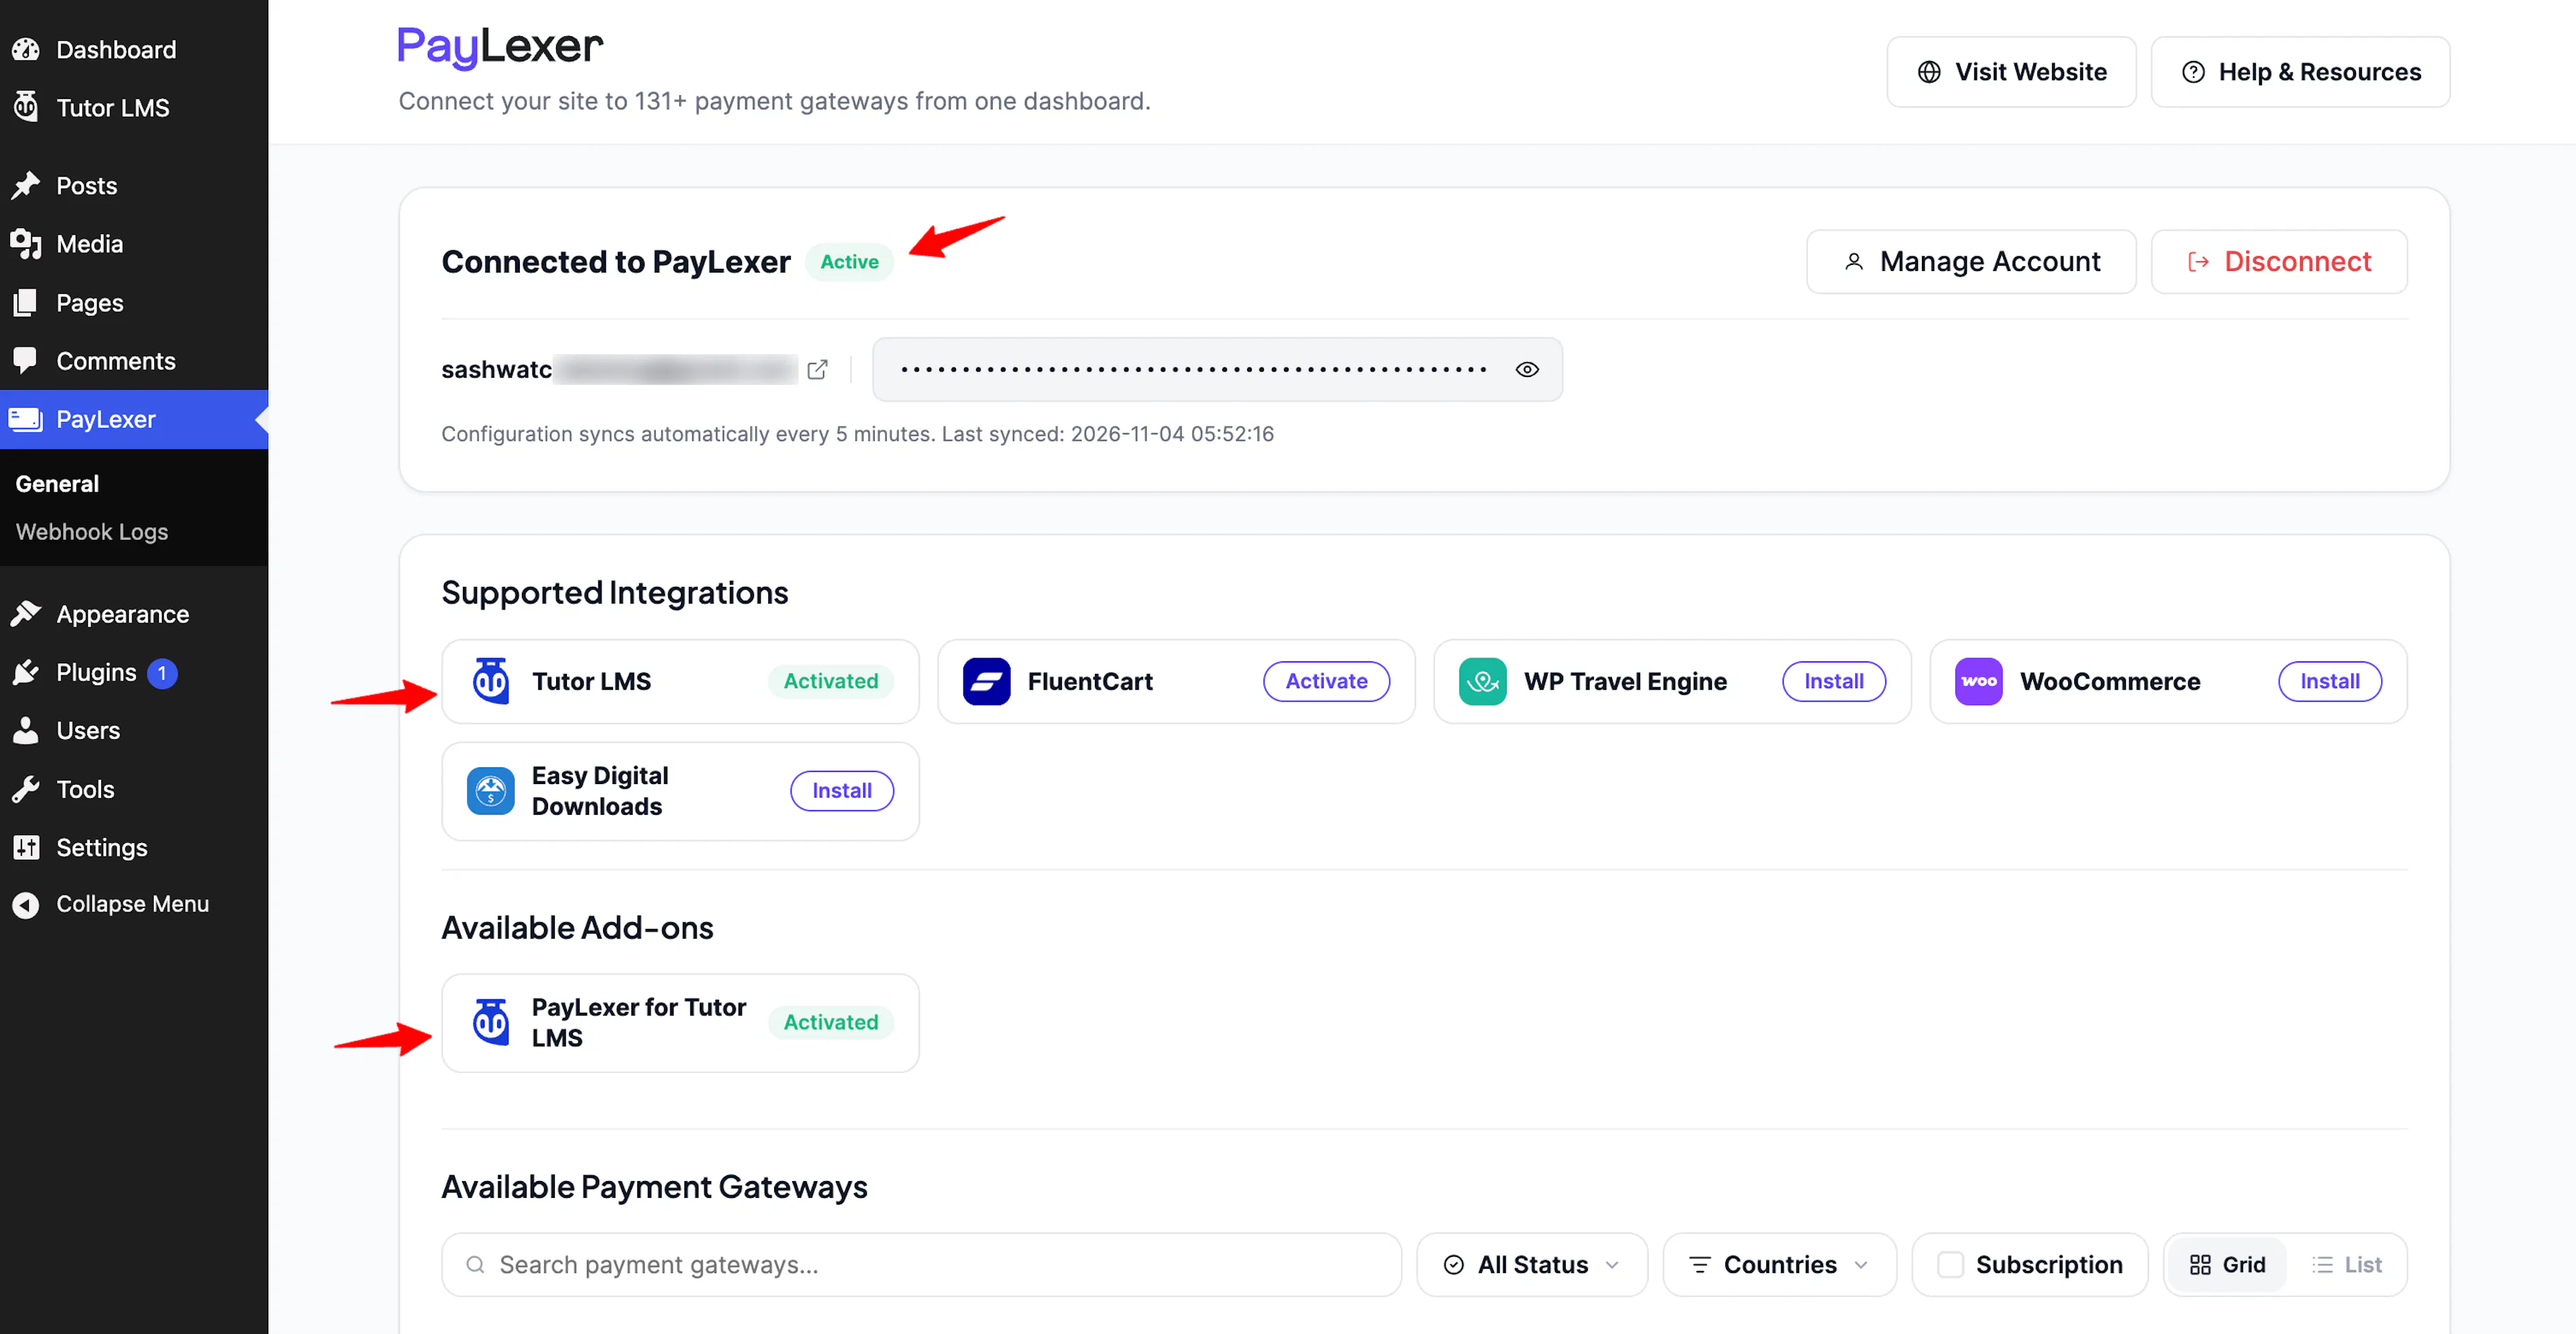
- In WordPress, the card on the PayLexer General page changes to Connected to PayLexer with the status Active, and shows the email of your PayLexer account.
- On the same page, Tutor LMS shows as Activated under Supported Integrations, and PayLexer for Tutor LMS shows as Activated under Available Add-ons.
- In the PayLexer dashboard, go to Websites. Your website appears in the table with the status Connected.
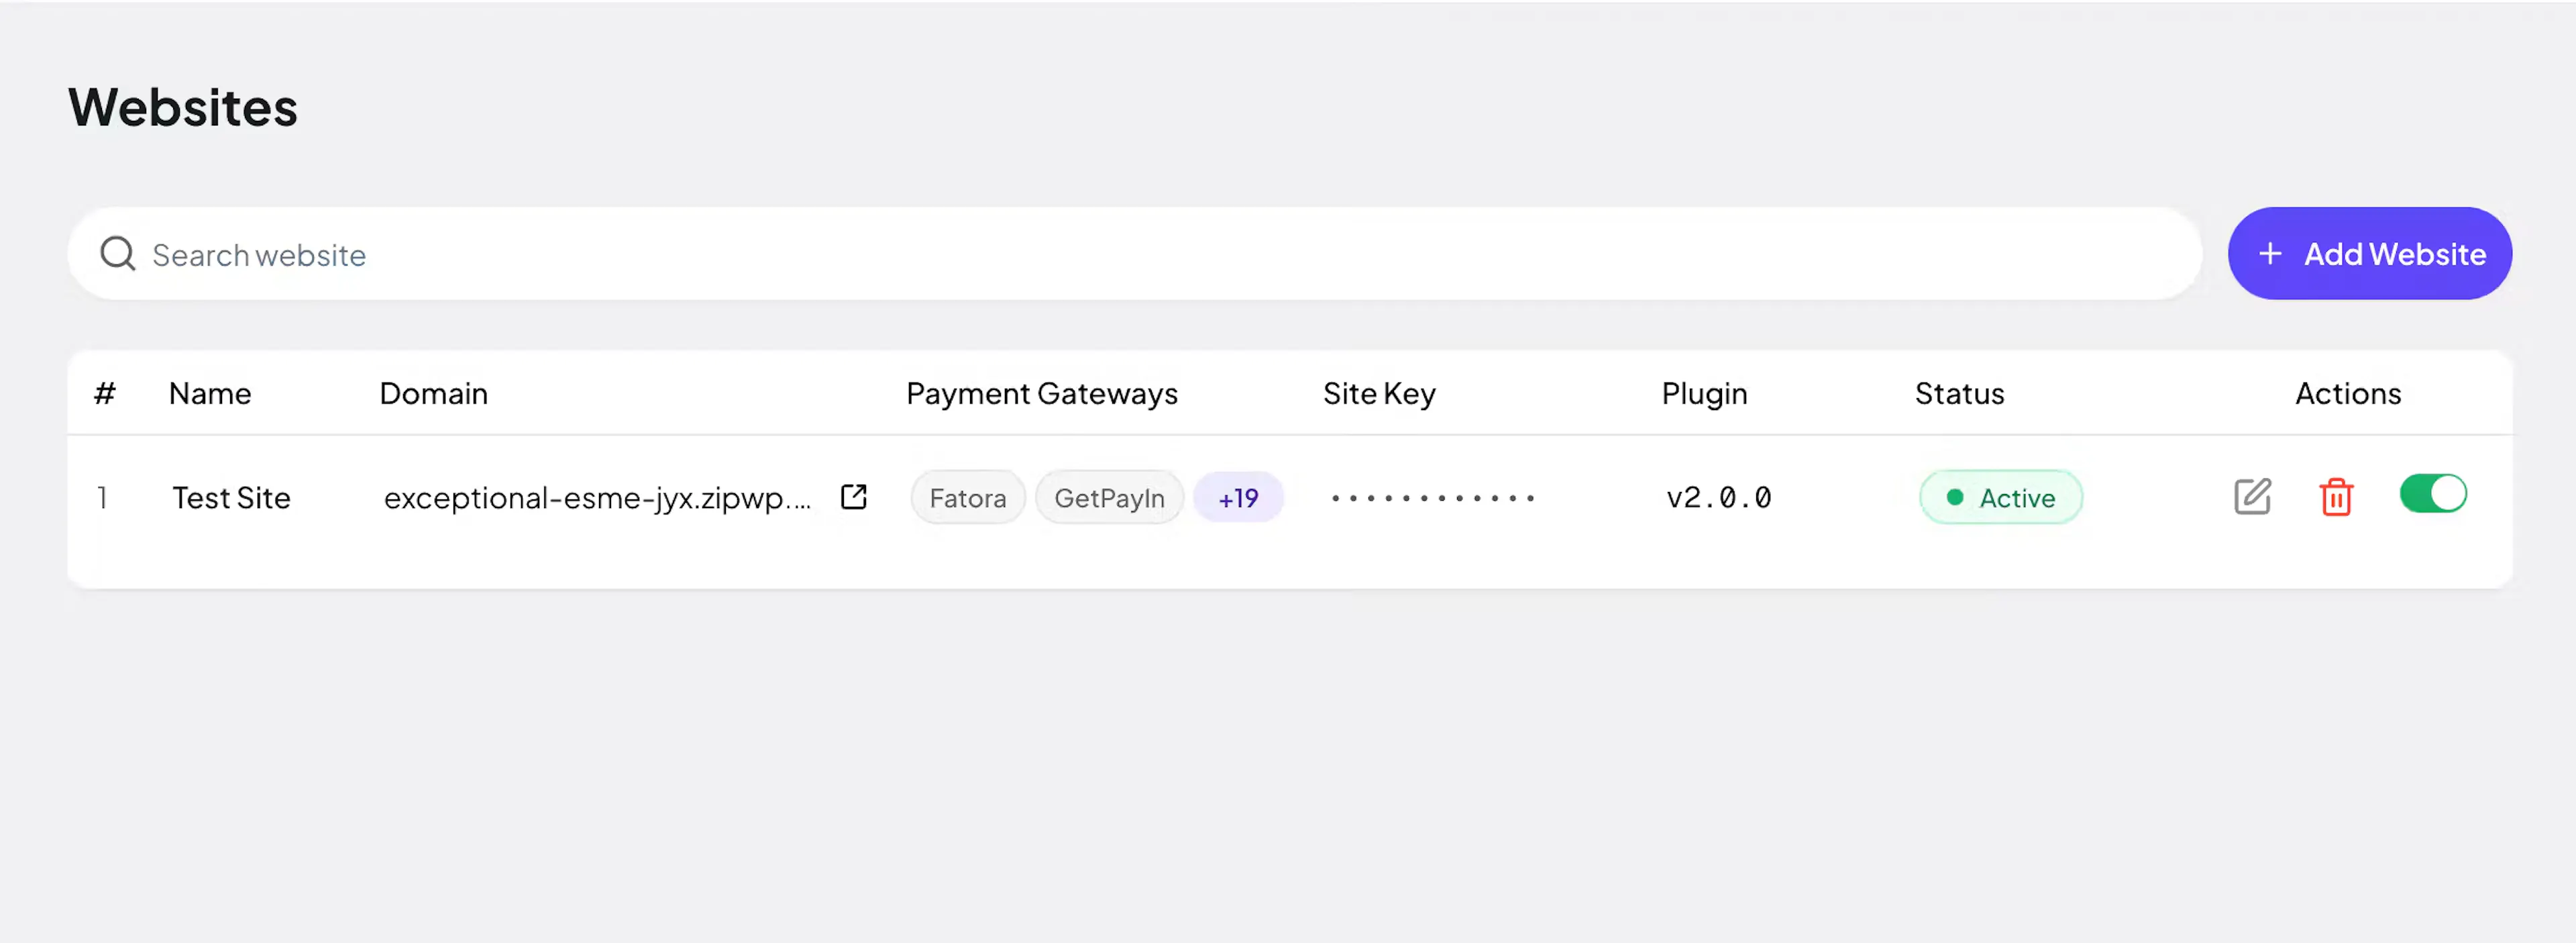
On failure: Click Connect Account again and check the email and password you entered. Your website must show as Connected before payments can be processed.
Enable PayLexer Gateways in Tutor LMS
- Go to Tutor LMS → Settings → Payment Methods. Each PayLexer gateway has its own card with a via PayLexer badge.
- Switch on the gateways you want to offer at checkout.
- Click Save Changes.
[IMAGE: Tutor LMS Payment Methods settings showing PayLexer gateway cards with the via PayLexer badge]
PayLexer now handles payment processing for your Tutor LMS courses.
Selling Subscriptions
With Tutor LMS Pro, you can sell subscription plans through PayLexer. The gateway bills every renewal, PayLexer reports it, and the add-on records the renewal order in Tutor LMS so the student stays enrolled.
- Gateways that can bill subscriptions show Tutor's Supports Subscriptions badge in Tutor LMS → Settings → Payment Methods, and only those are offered at checkout for subscription plans.
- Free trials, enrollment fees and billing-cycle limits from the plan are passed to the gateway. If the chosen gateway can't run a trial or charge a fee, the student sees a message at checkout and can choose another payment method.
- Cancelling a subscription in Tutor LMS also cancels it at the gateway, so no further renewals are charged. The student keeps access until the paid period ends.
- Pauses, resumes, failed renewals and cancellations made at the gateway or in PayLexer update the Tutor LMS subscription automatically.
Hourly plans and plans with a discounted first payment can't be billed through PayLexer. Students choosing them are asked to pick another payment method.
Customize Gateway Settings
Once a payment gateway is enabled, its card in Tutor LMS shows the gateway's name and logo at checkout. Each card has one setting:
- Environment - Choose Test to use the gateway's sandbox with your Test credentials, or Live to process real payments with your Live credentials. New cards start on Test.
Go to Tutor LMS → Settings → Payment Methods, open the card for the gateway you want to update, change the Environment, then click Save Changes.
[IMAGE: Tutor LMS Payment Methods settings showing a PayLexer gateway card with the Environment field]
Test Mode
PayLexer supports full testing without real charges through each gateway's Environment setting in Tutor LMS.
How Test Mode Works
- Go to Tutor LMS → Settings → Payment Methods.
- Open the PayLexer gateway card and set Environment to Test.
- Click Save Changes.
When Environment is Test:
- PayLexer uses your Test credentials from the Payment Gateway Configuration page.
- Tutor LMS orders are created normally.
- Payments are processed in test mode.
When Environment is Live, PayLexer uses your Live credentials instead.
Payment Flow Overview
A new PayLexer order is created for every payment attempt, including each subscription renewal.
Next Steps: Test Transactions
After enabling gateways, check the full payment flow before going live.
- Basic testing: Set each gateway's Environment to Test above and enroll in a course without real charges.
- Advanced testing (subscriptions, refunds, multi-gateway): Follow the dedicated guide. Test Transactions & Platform Integration →
Troubleshooting
Best Practices
- Always test with Test credentials before switching to Live.
- Enable webhooks for better reliability and real-time payment event syncing.
- Run one small real payment after going live to confirm everything works end to end.
Final Checklist
Before going live, confirm all of the following:
- The Connected to PayLexer card shows Active in WordPress
- Your website shows as Connected in the PayLexer Websites table
- Tutor LMS shows as Activated under Supported Integrations
- PayLexer for Tutor LMS shows as Activated under Available Add-ons
- At least one gateway is added to your website
- At least one PayLexer gateway is switched on in Tutor LMS
- Payment gateway tested successfully with Environment set to Test
- Live credentials added (not just test)
- Environment set to Live on every PayLexer gateway card in Tutor LMS
FAQs
Still Have Questions?
Check the FAQs above first. If your question isn't covered there, choose the option that fits:
PayLexer Support
Site won't connect, gateways not showing in Tutor LMS, or payments not syncing? Open a ticket with the PayLexer team.
Tutor LMS Support
Questions about courses, enrollment, subscription plans or Tutor LMS settings? Contact the Tutor LMS team.
For settings and advanced configuration, see the Tutor LMS documentation.